- 动态与公告
- 产品简介
- 购买指南
- 新手指引
- Demo 体验
- 视频通话(含 UI)
- 多人会议(含 UI)
- 组件介绍 (TUIRoomKit)
- 开通服务 (TUIRoomKit)
- 跑通 Demo(TUIRoomKit)
- 快速接入 (TUIRoomKit)
- 界面定制 (TUIRoomKit)
- 虚拟背景(TUIRoomKit)
- 会议控制 (TUIRoomKit)
- 云端录制 (TUIRoomKit)
- AI 降噪 (TUIRoomKit)
- 会中聊天 (TUIRoomKit)
- 机器人推流 (TUIRoomKit)
- 更多特性 (TUIRoomKit)
- 客户端 API (TUIRoomKit)
- 服务端 API (TUIRoomKit)
- 常见问题 (TUIRoomKit)
- 错误码 (TUIRoomKit)
- SDK更新日志(TUIRoomKit)
- 在线直播(含 UI)
- 语音聊天室(含 UI)
- 无 UI 集成
- 高级功能
- 服务端 API
- 控制台指南
- 解决方案
- 常见问题
- 旧版文档
- 协议与策略
- TRTC 政策
- 词汇表
操作步骤
步骤1: 集成消息推送插件
flutter pub addtencent_cloud_chat_push
步骤2: 厂商配置
集成消息推送插件之前,需要先向 Apple 申请 APNs 推送证书,然后上传推送证书到 Tencent RTC 控制台 。
操作步骤
步骤1:申请 APNs 证书
开启 App 远程推送
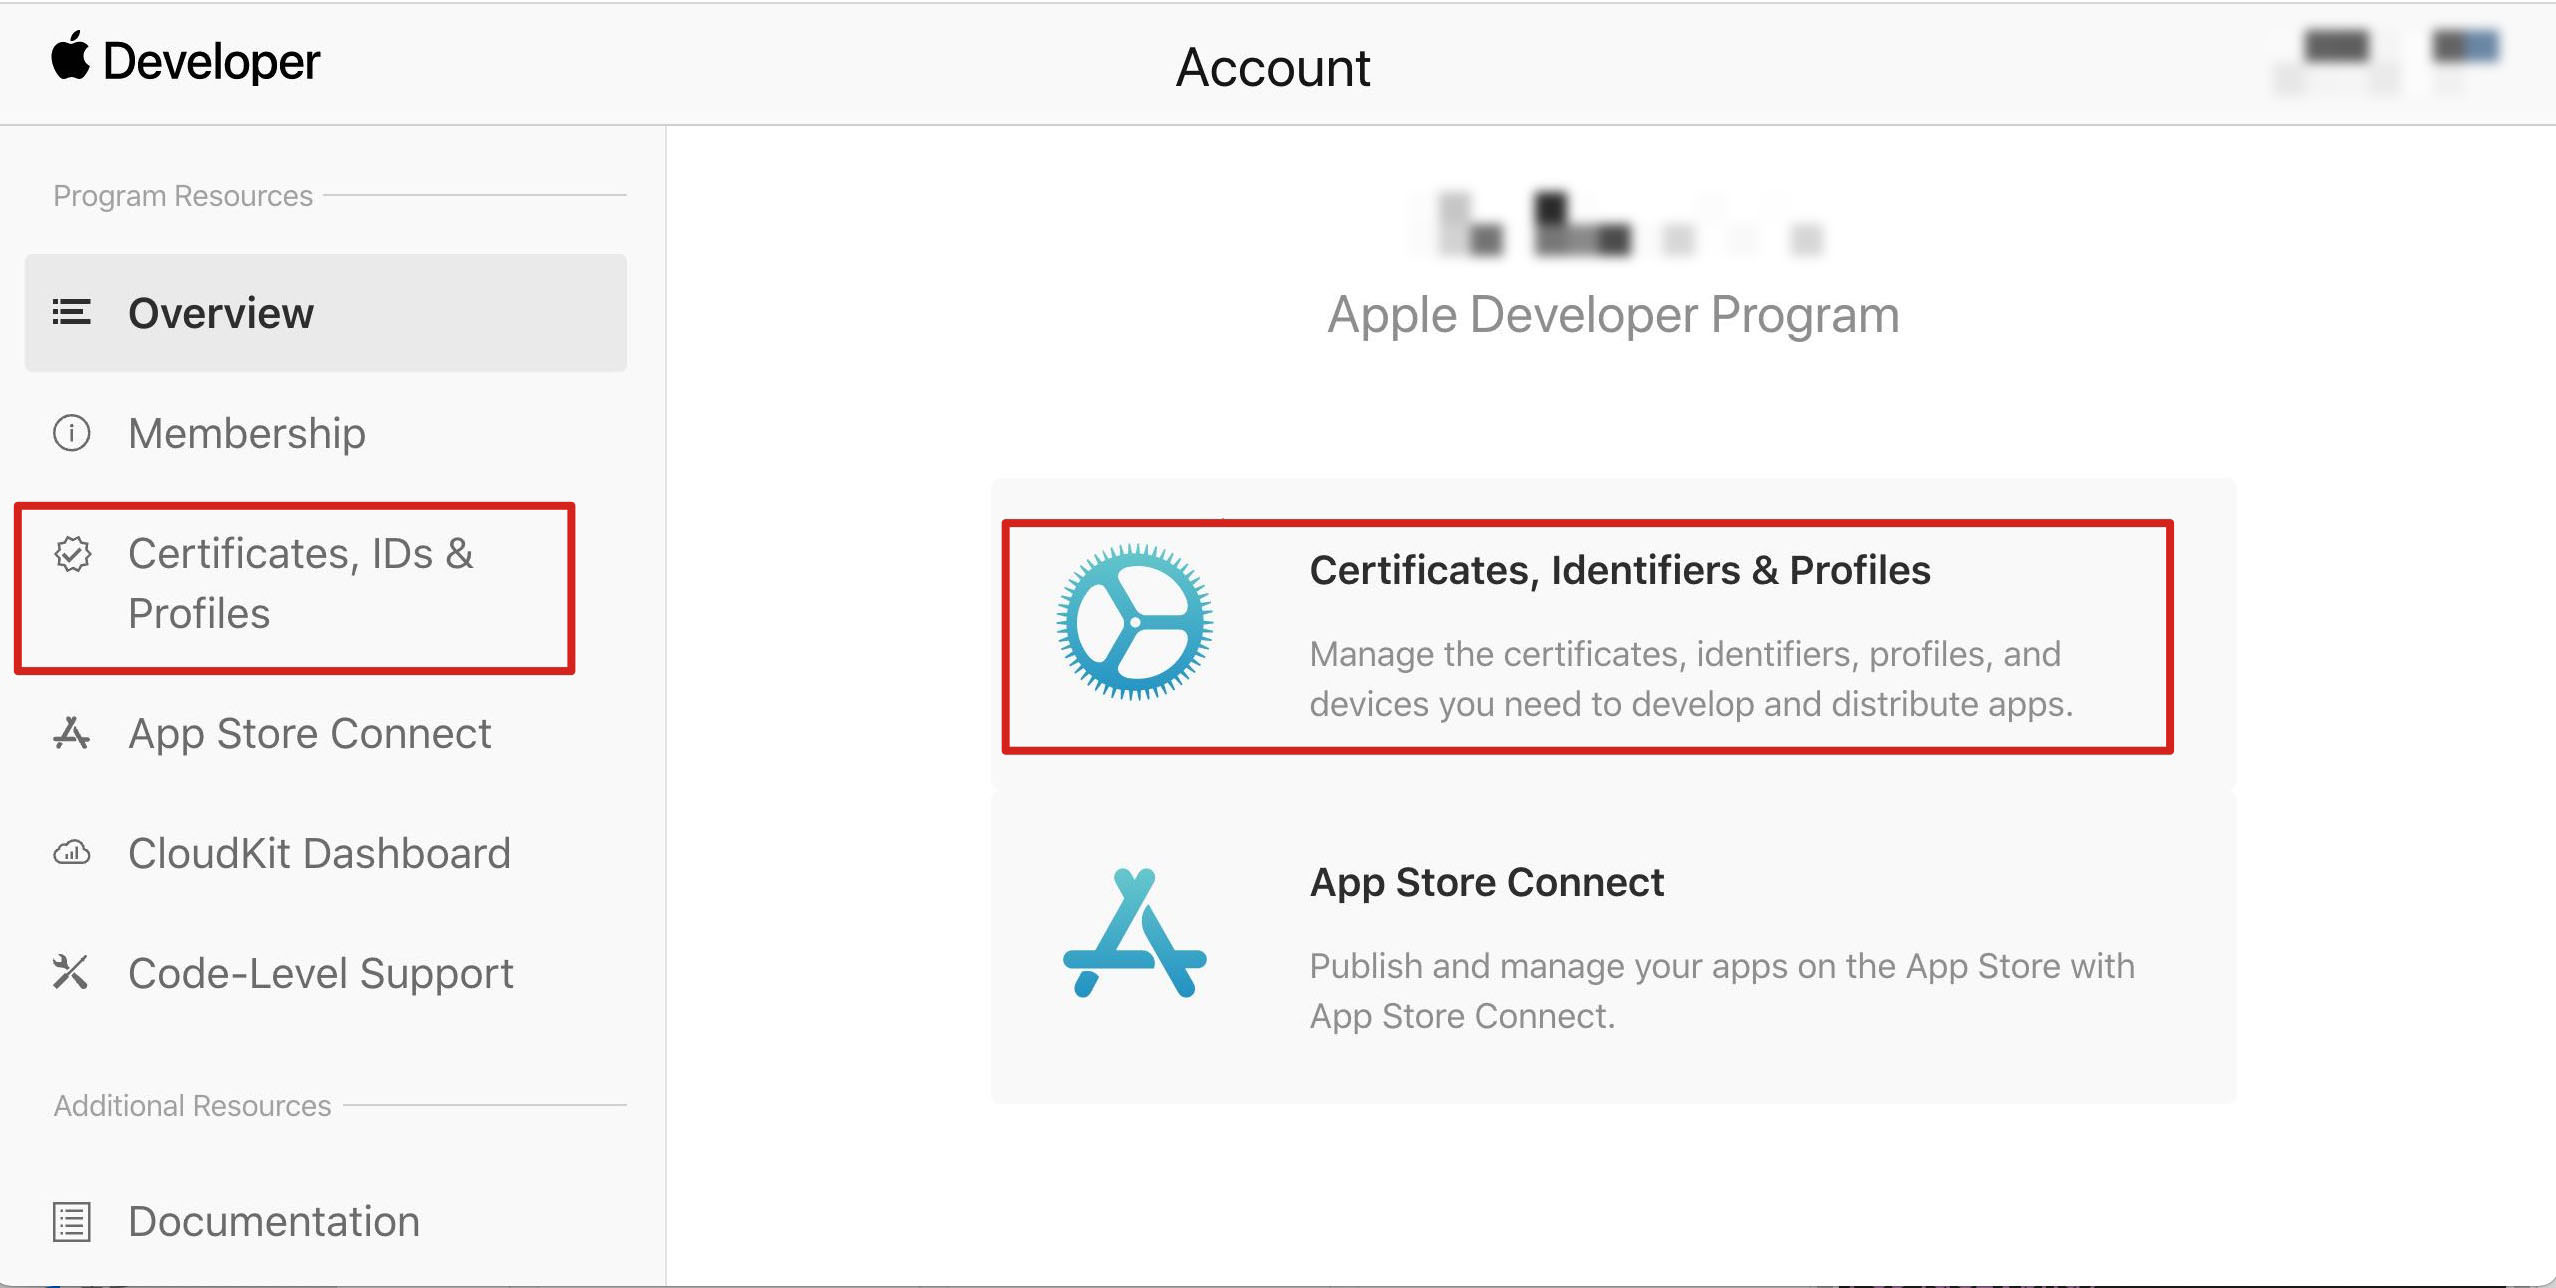
1. 登录 苹果开发者中心 网站,单击 Certificates,Identifiers & Profiles 或者侧栏的 Certificates,IDs & Profiles,进入 Certificates, IDS & Profiles 页面。

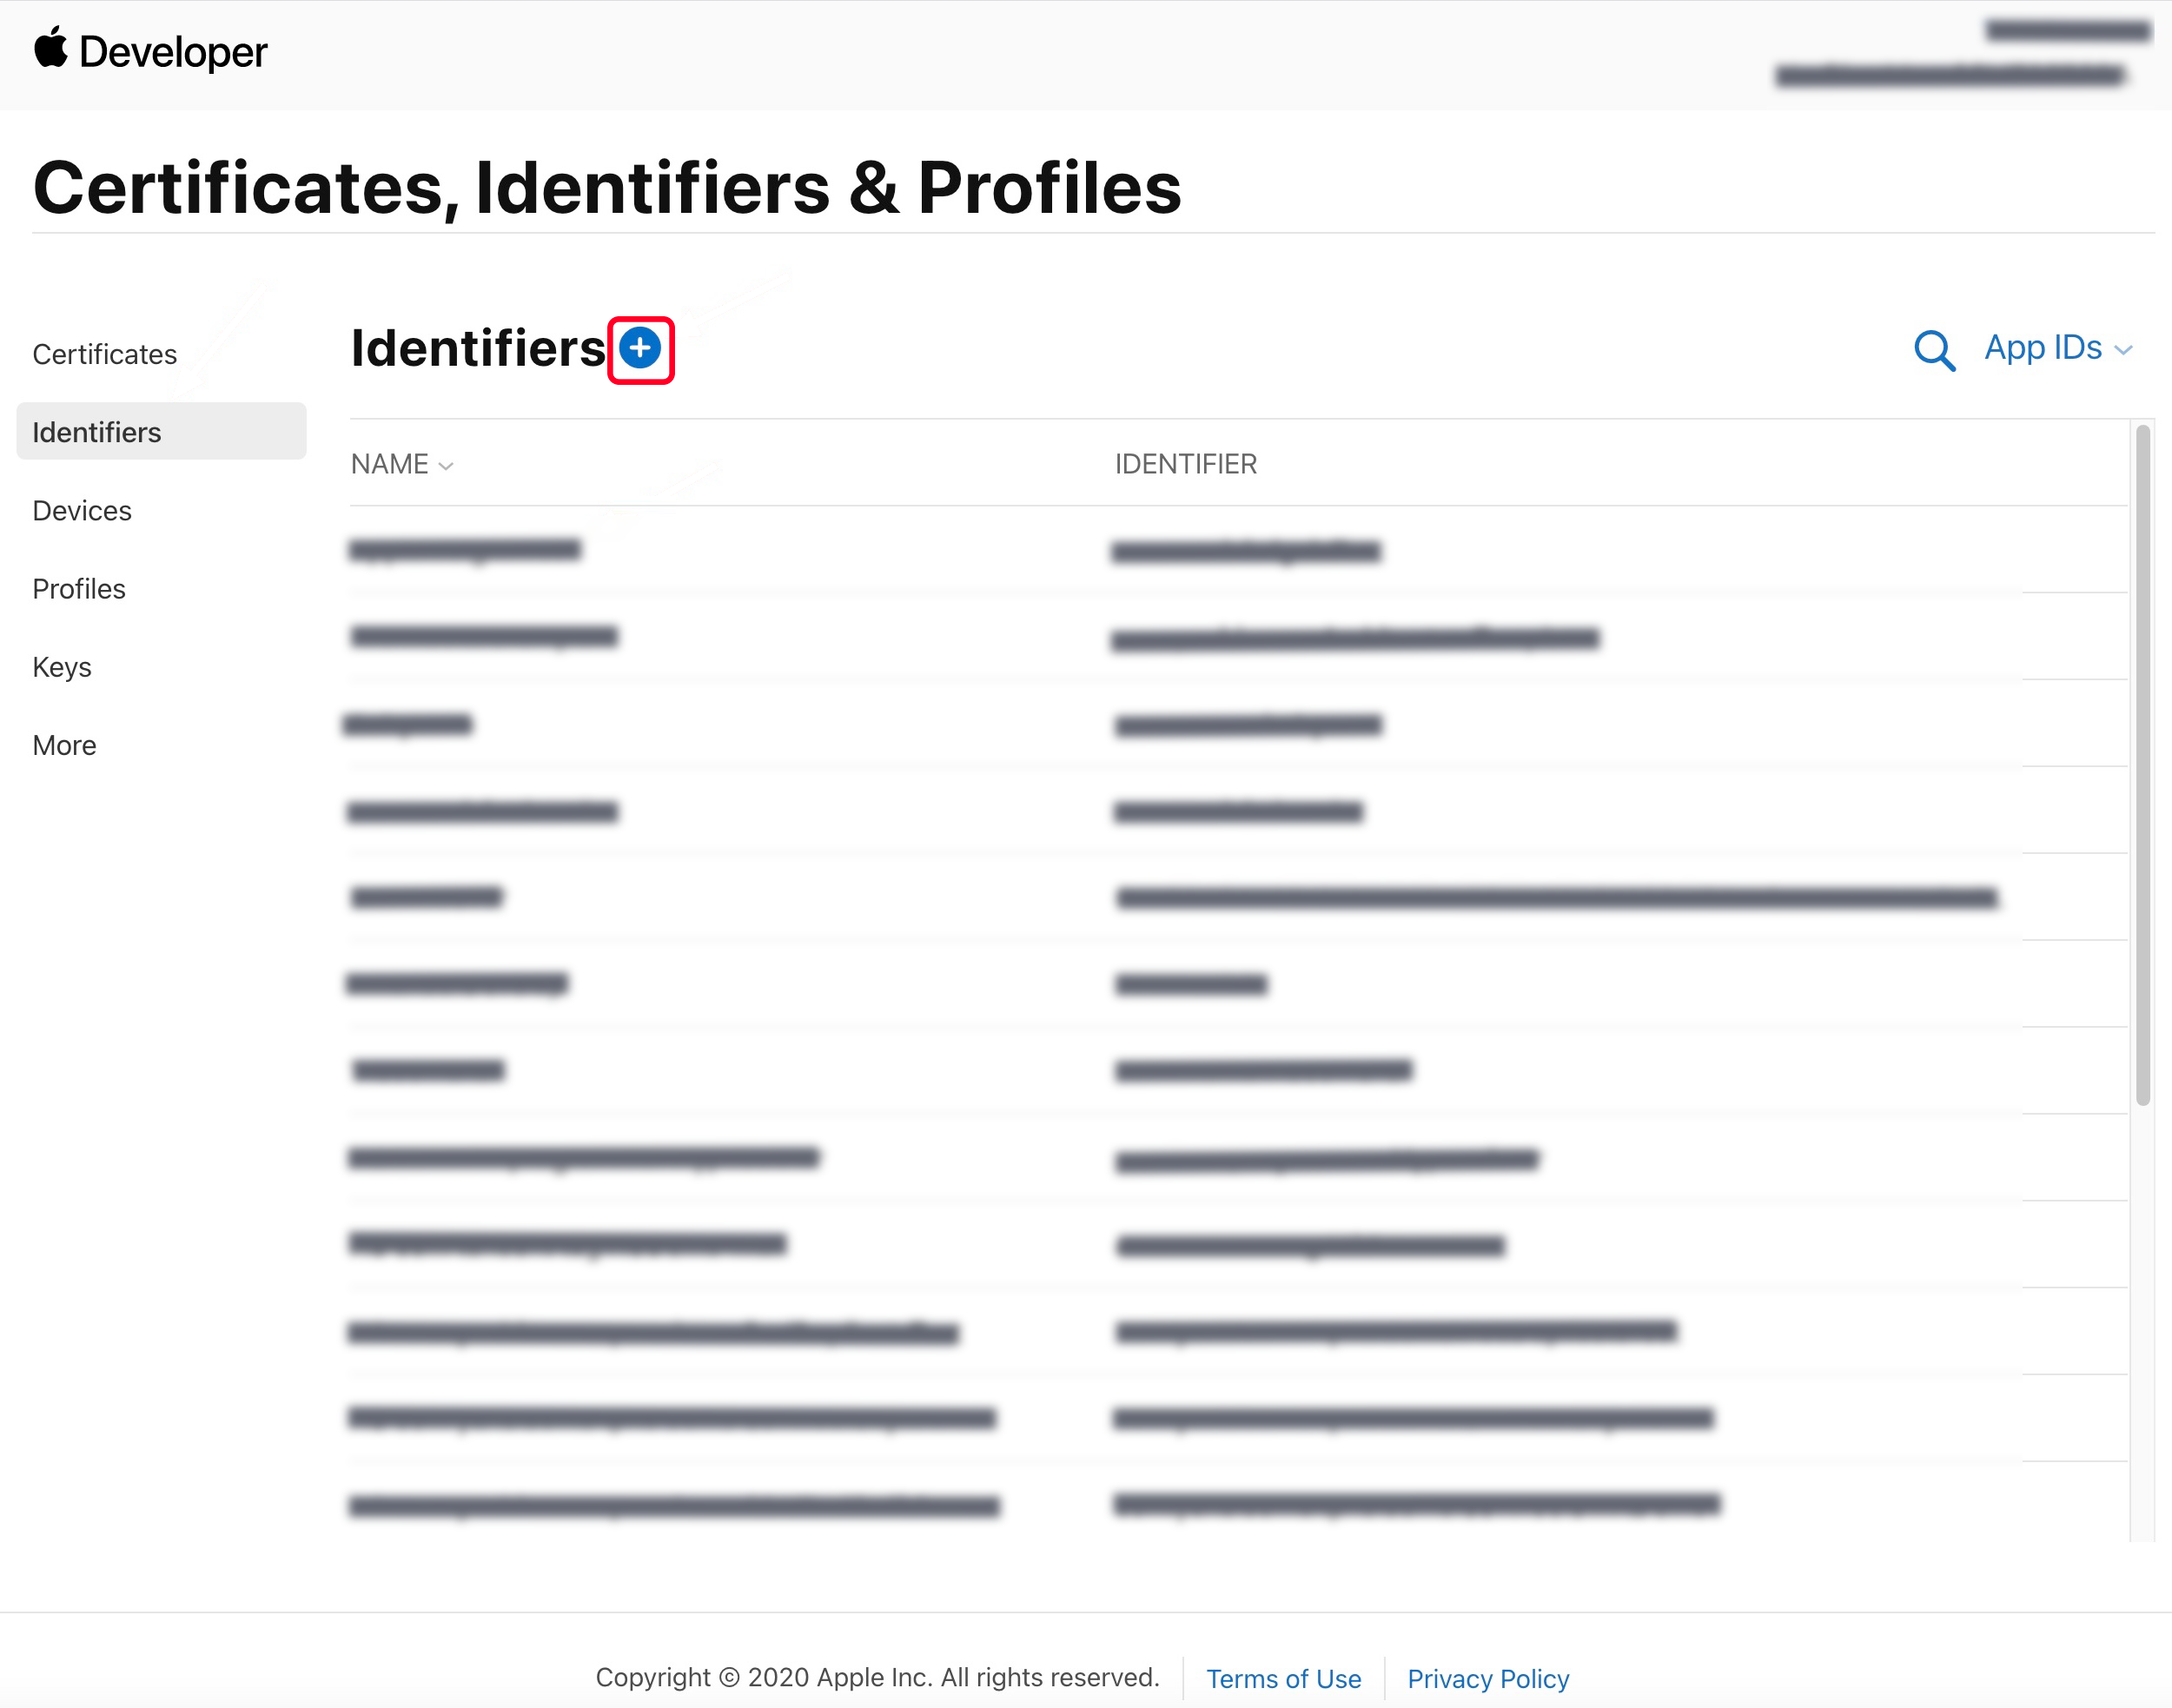
2. 单击 Identifiers 右侧的 +。

3. 您可以参见如下步骤新建一个 AppID,或者在您原有的 AppID 上增加
Push Notification 的 Service。说明
您 App 的
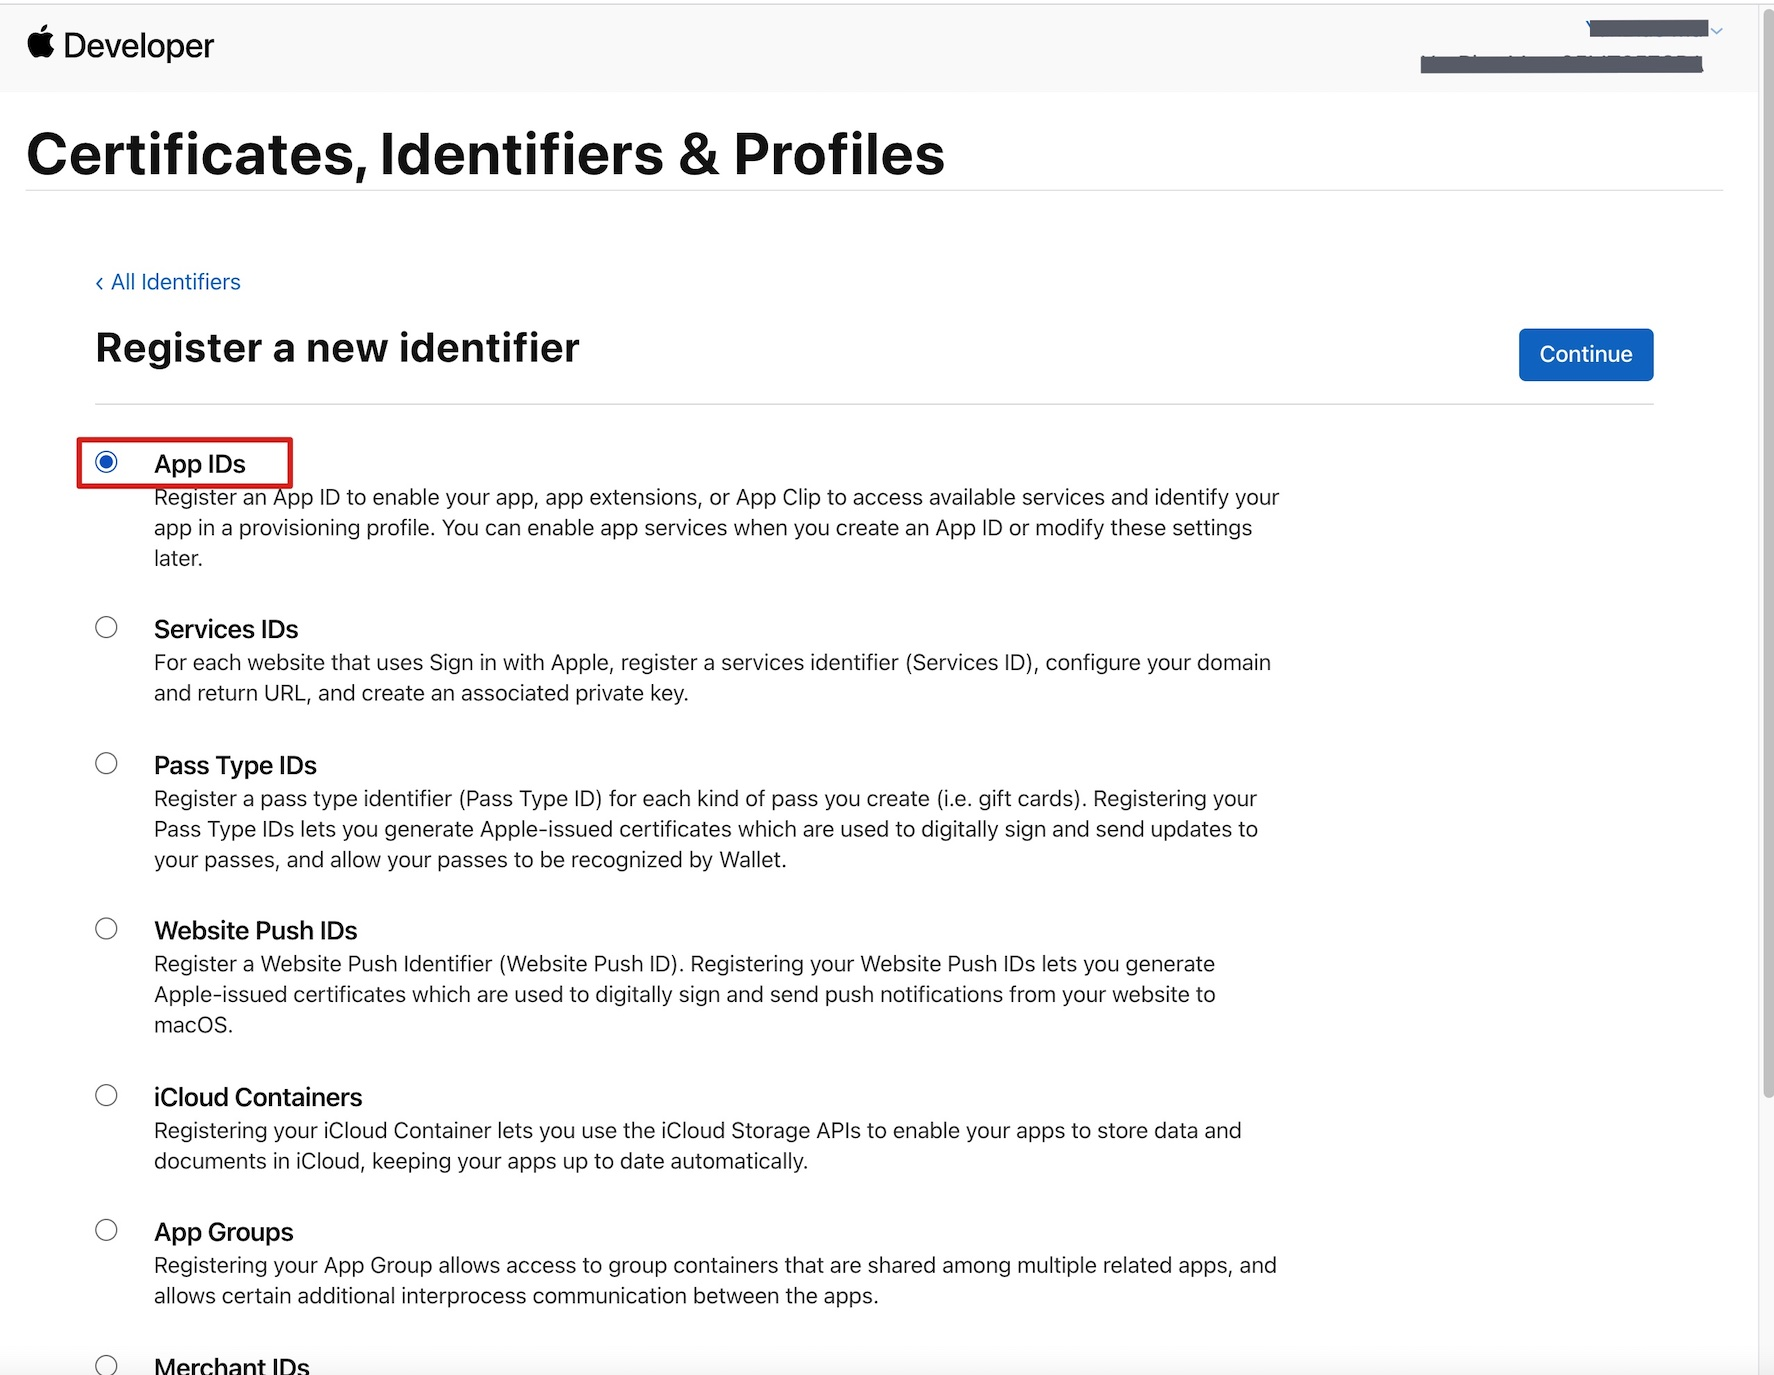
Bundle ID 不能使用通配符 *,否则将无法使用远程推送服务。4. 勾选 App IDs,单击 Continue 进行下一步。

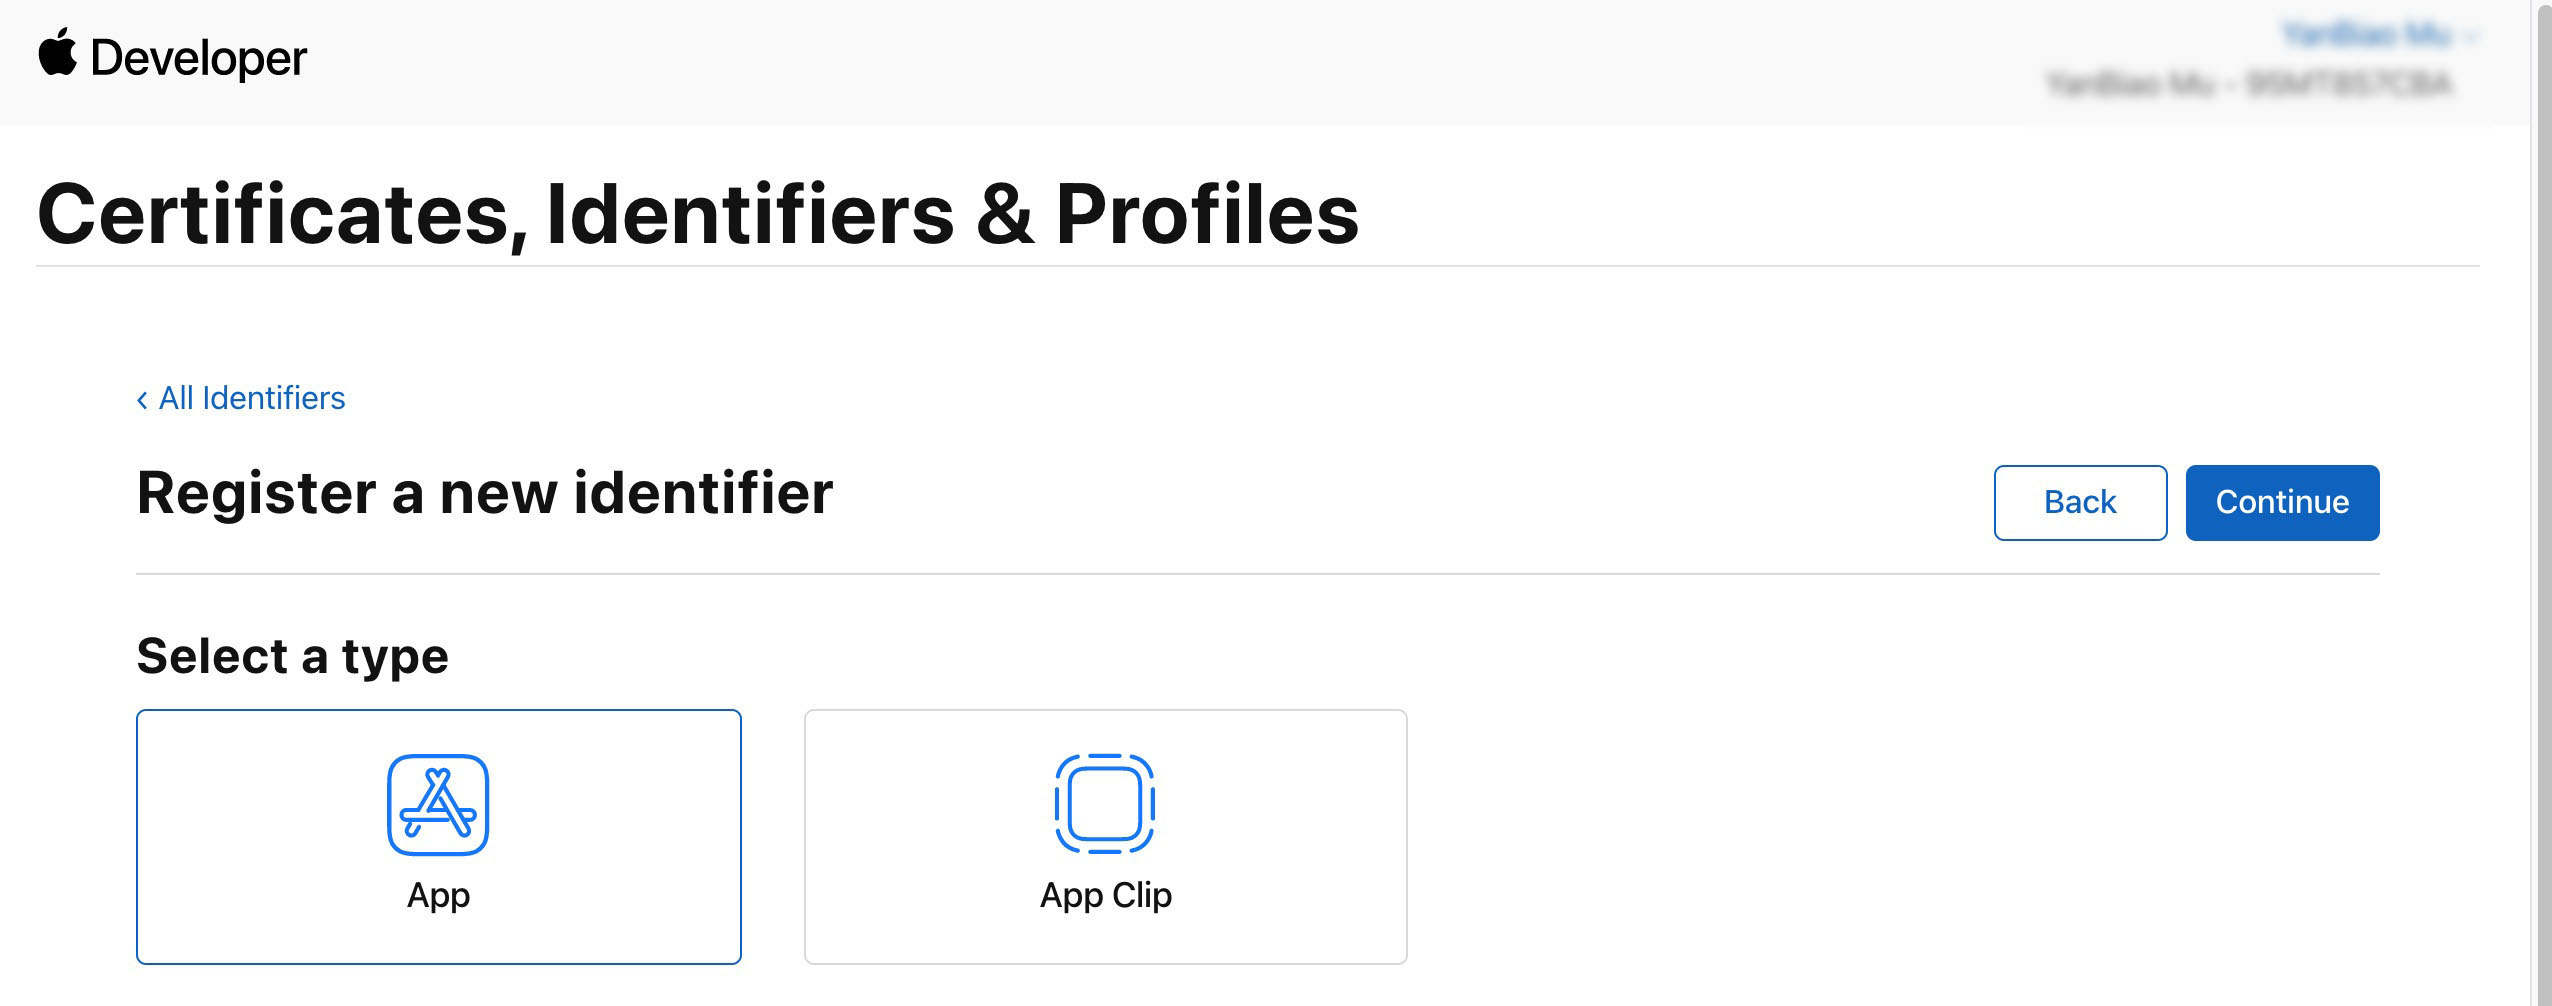
5. 选择 App,单击 Continue 进行下一步。

6. 配置
Bundle ID 等其他信息,单击 Continue 进行下一步。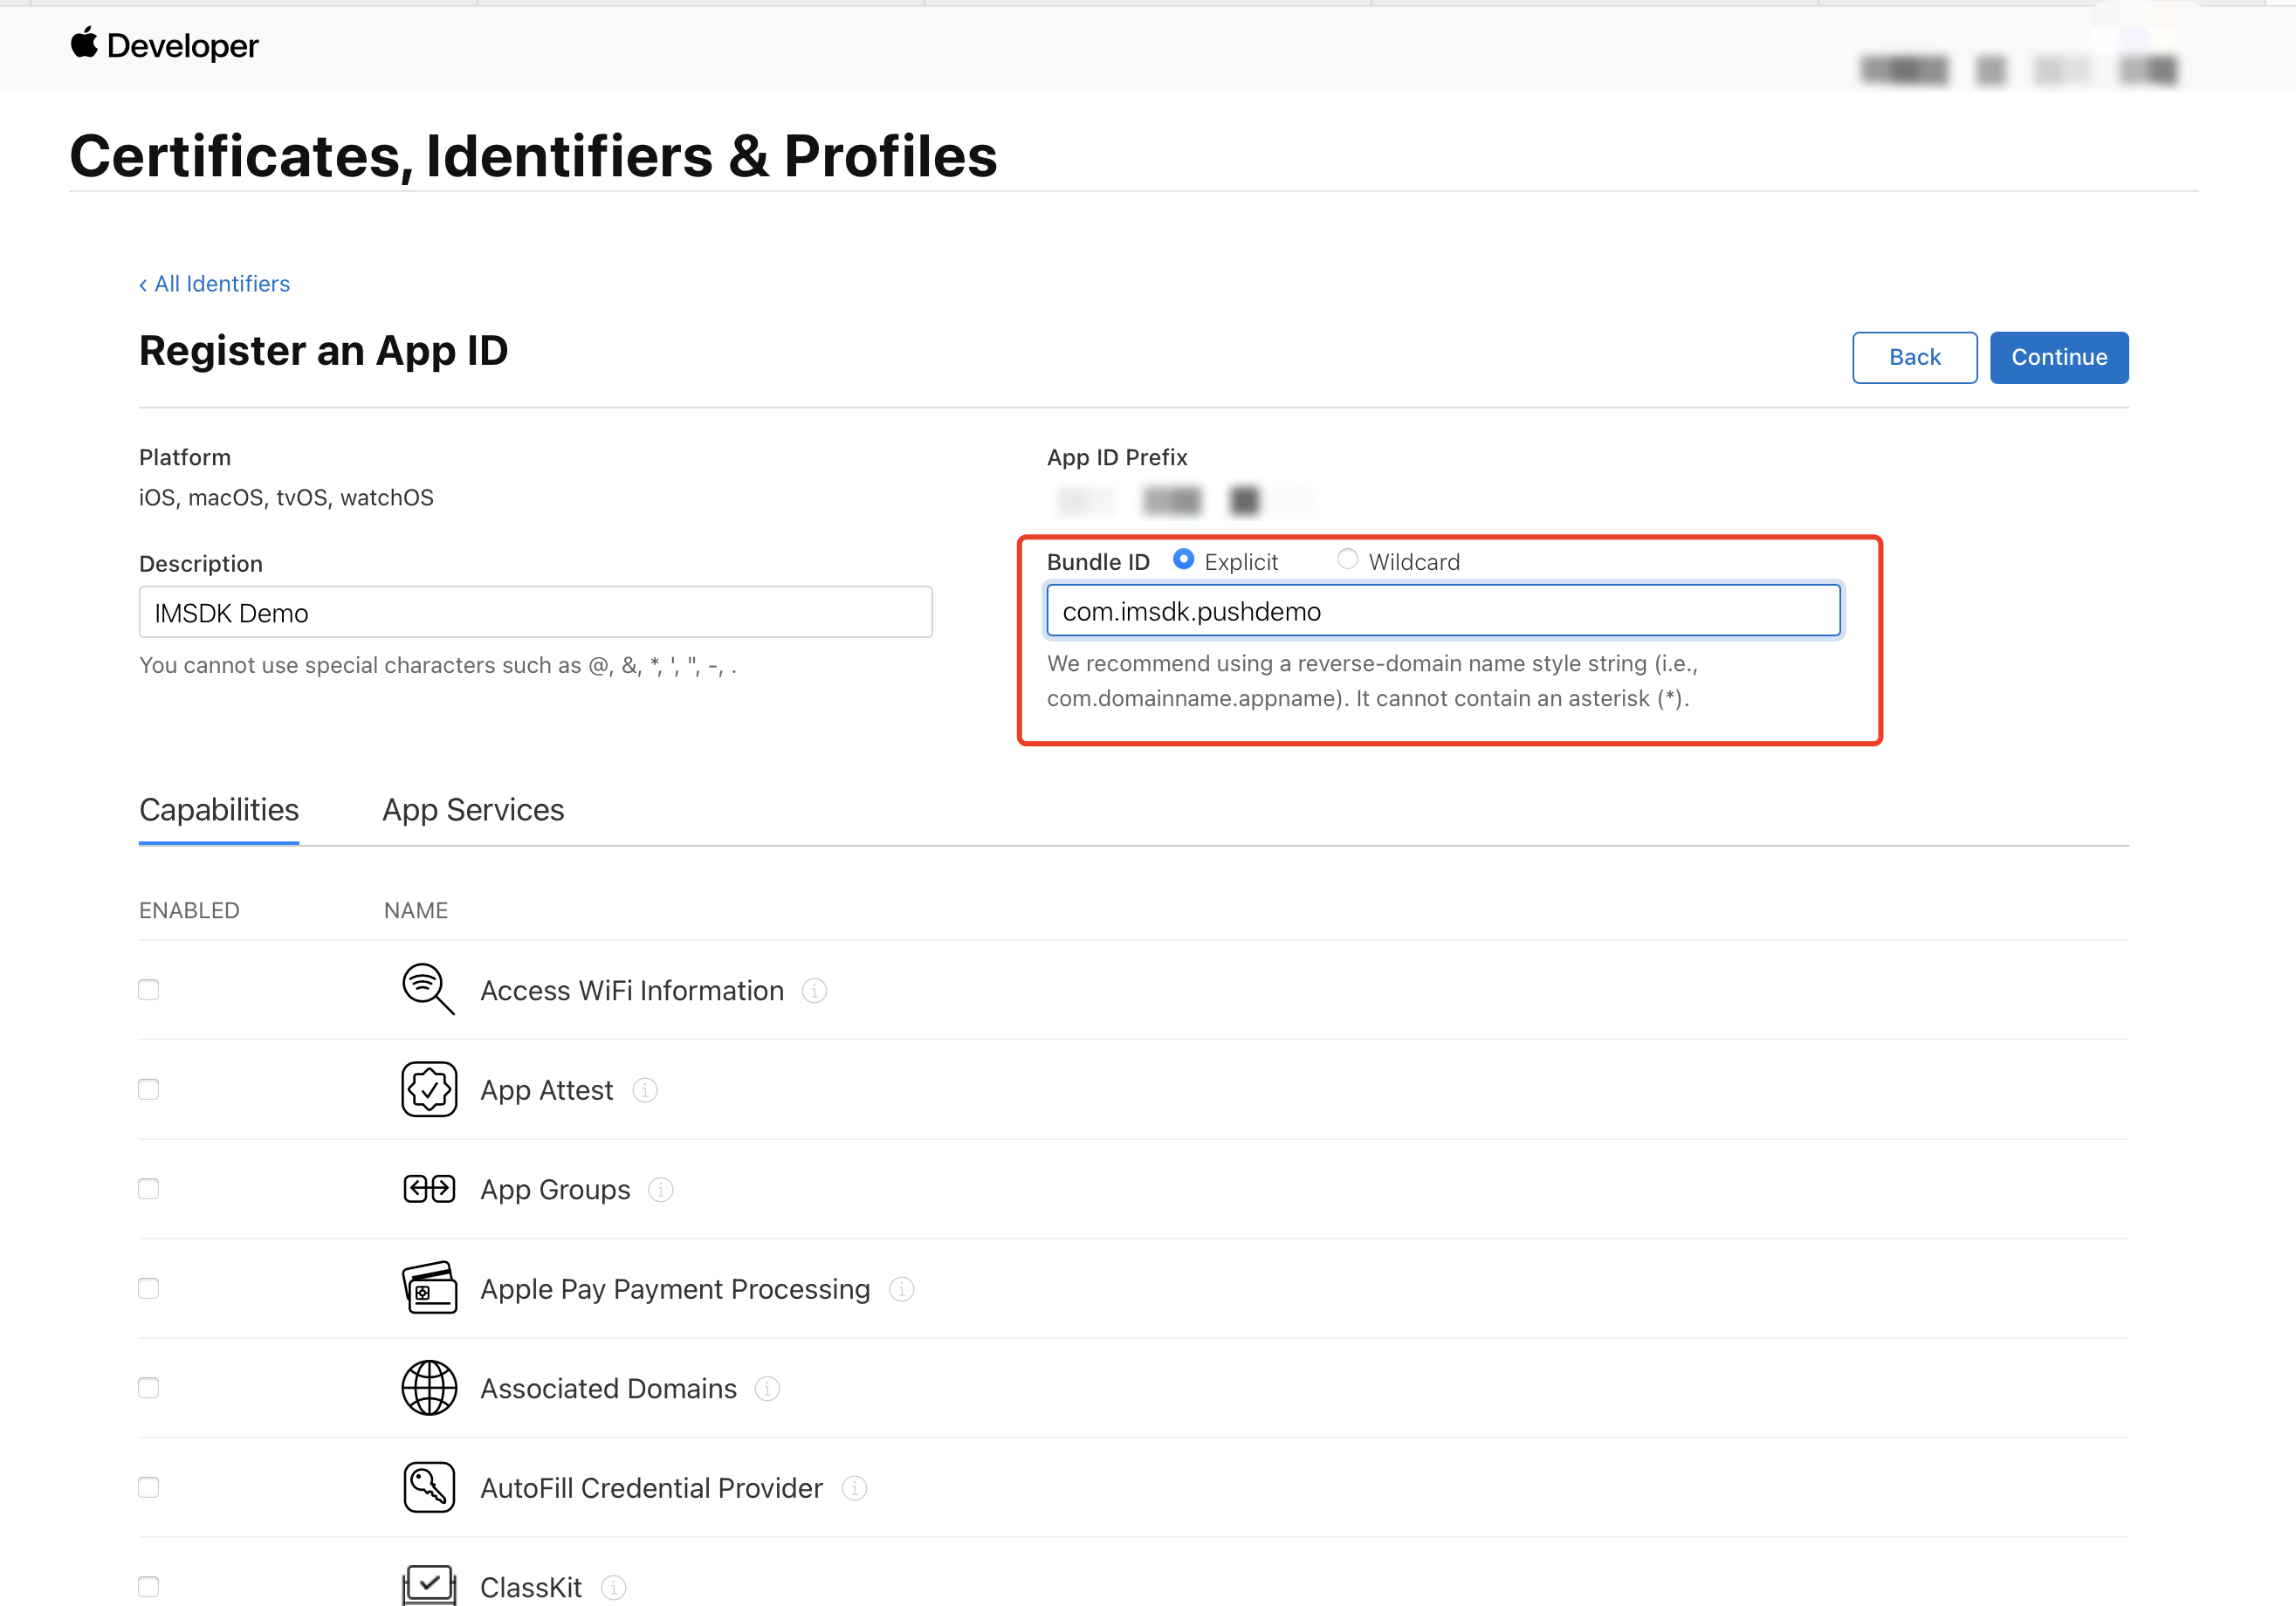

7. 勾选 Push Notifications,开启远程推送服务。
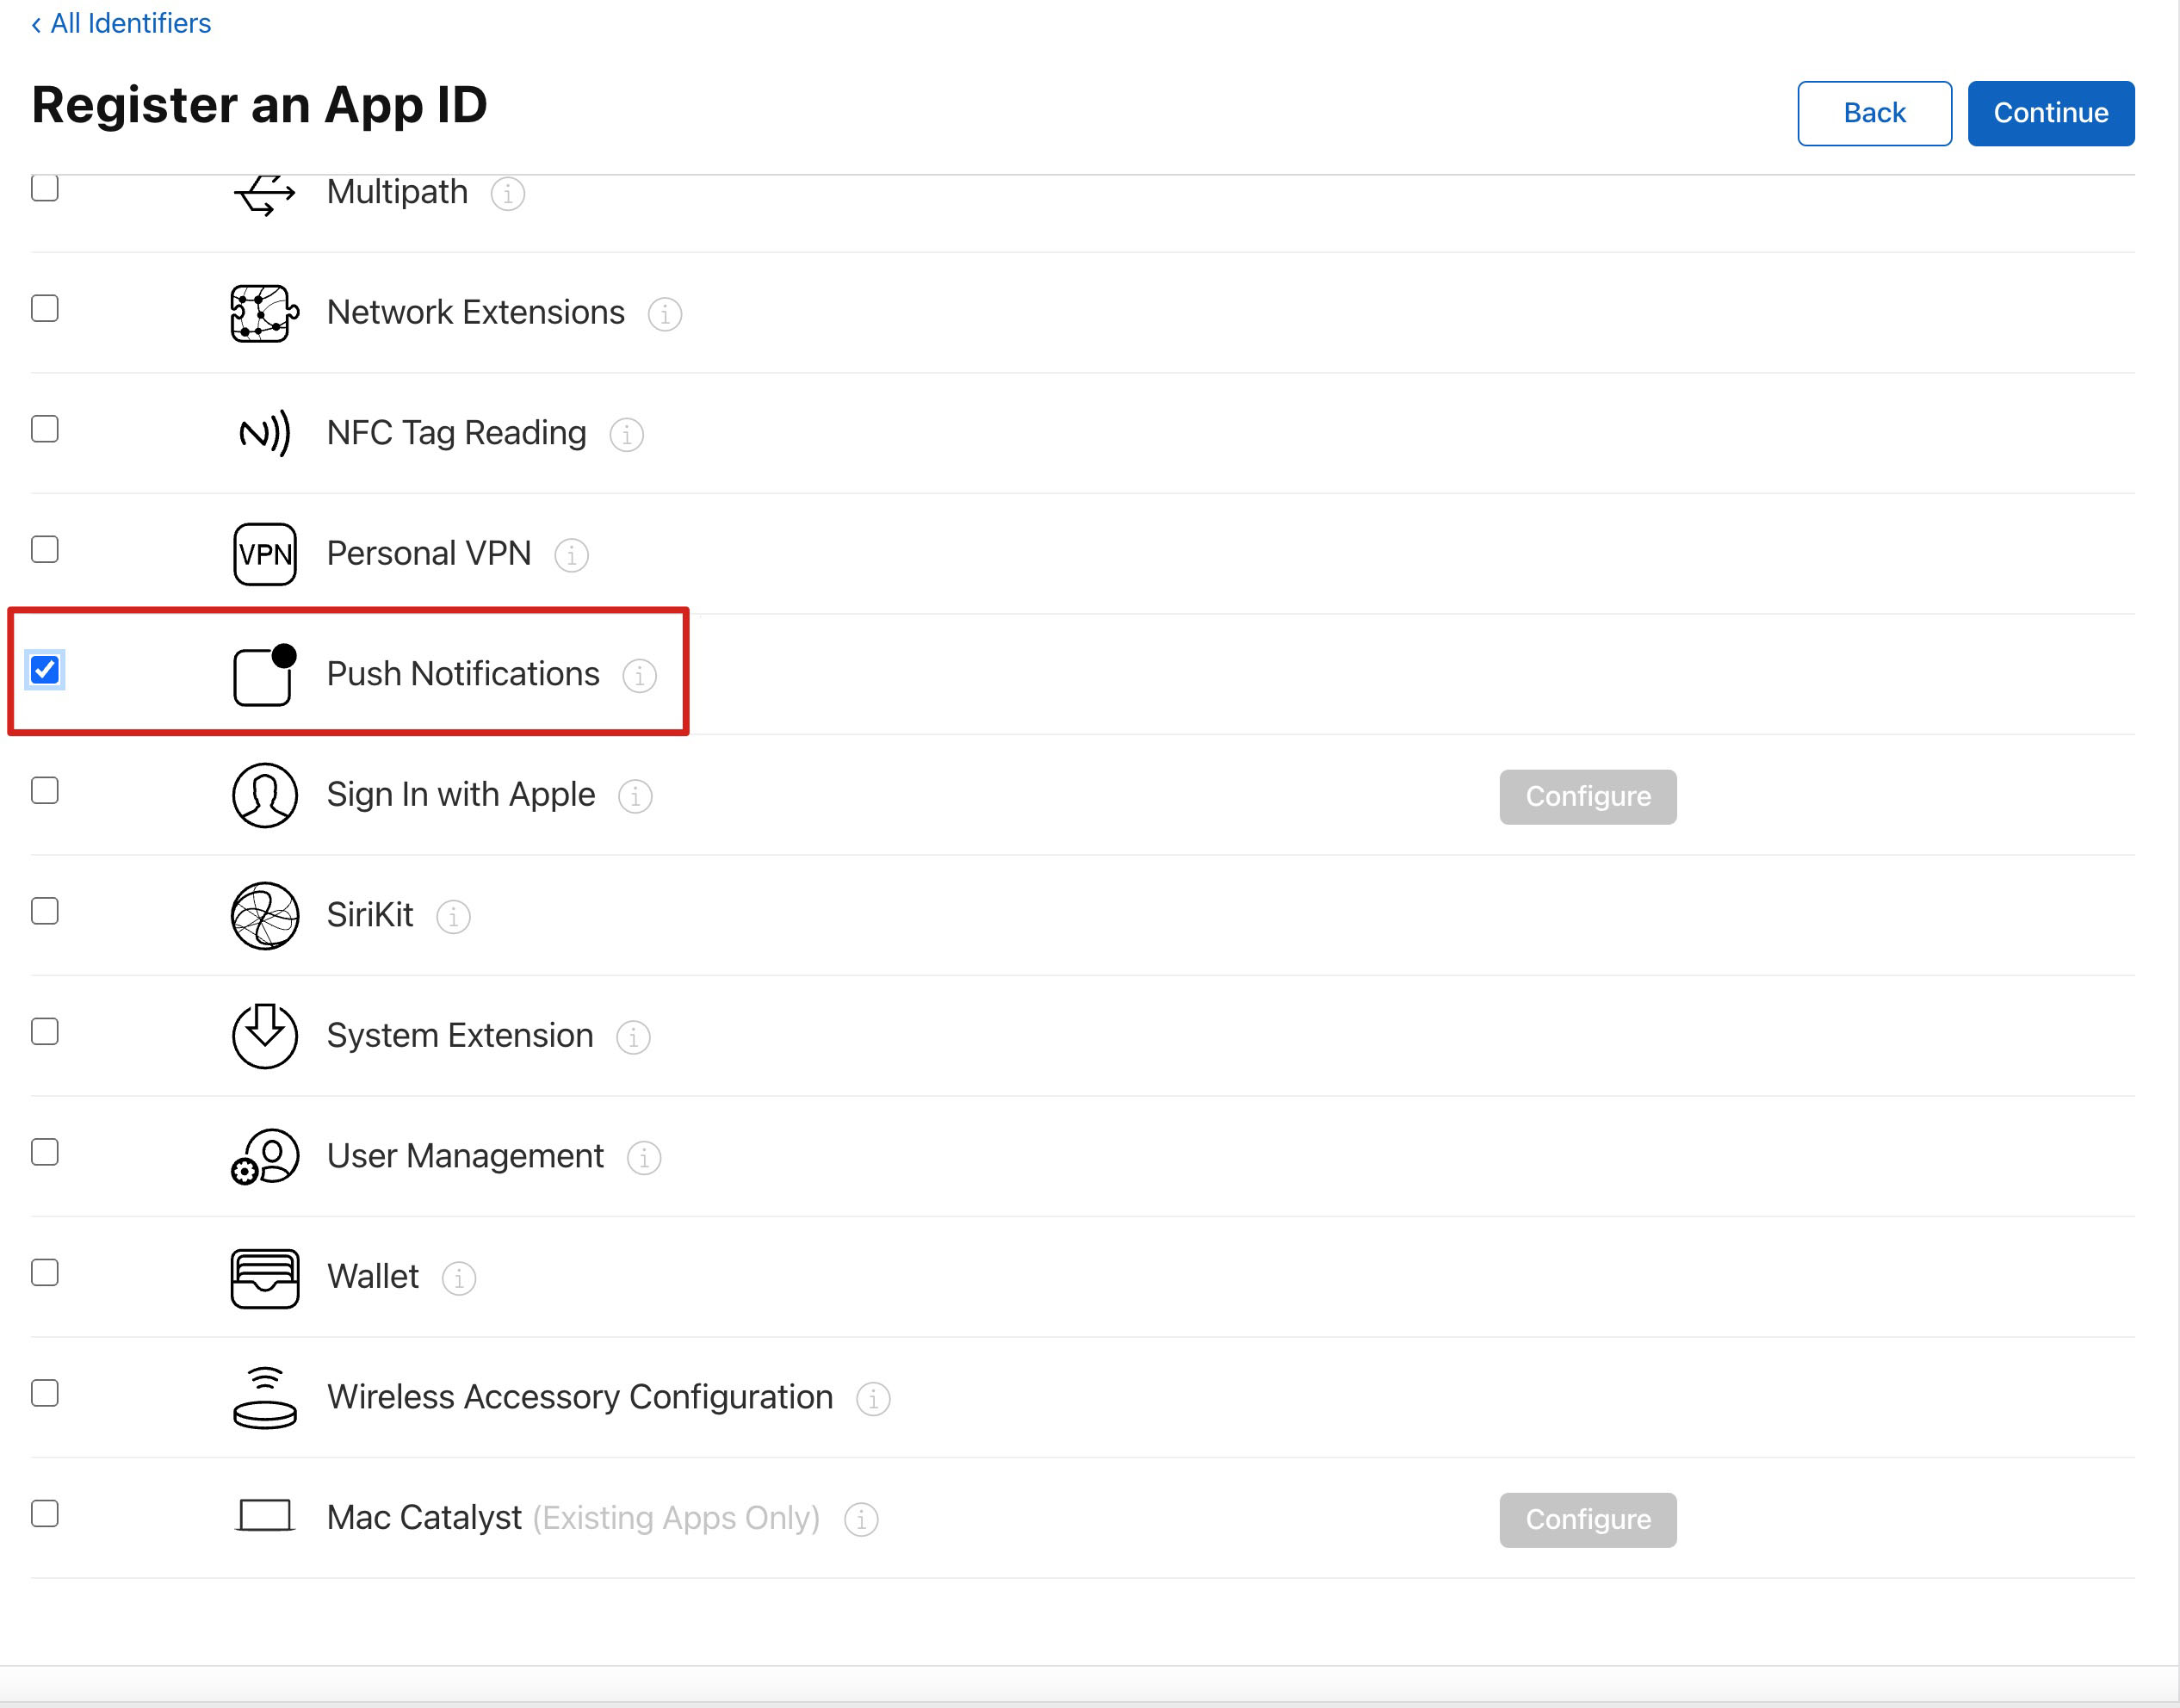

生成证书
1. 选中您的 AppID,选择 Configure。
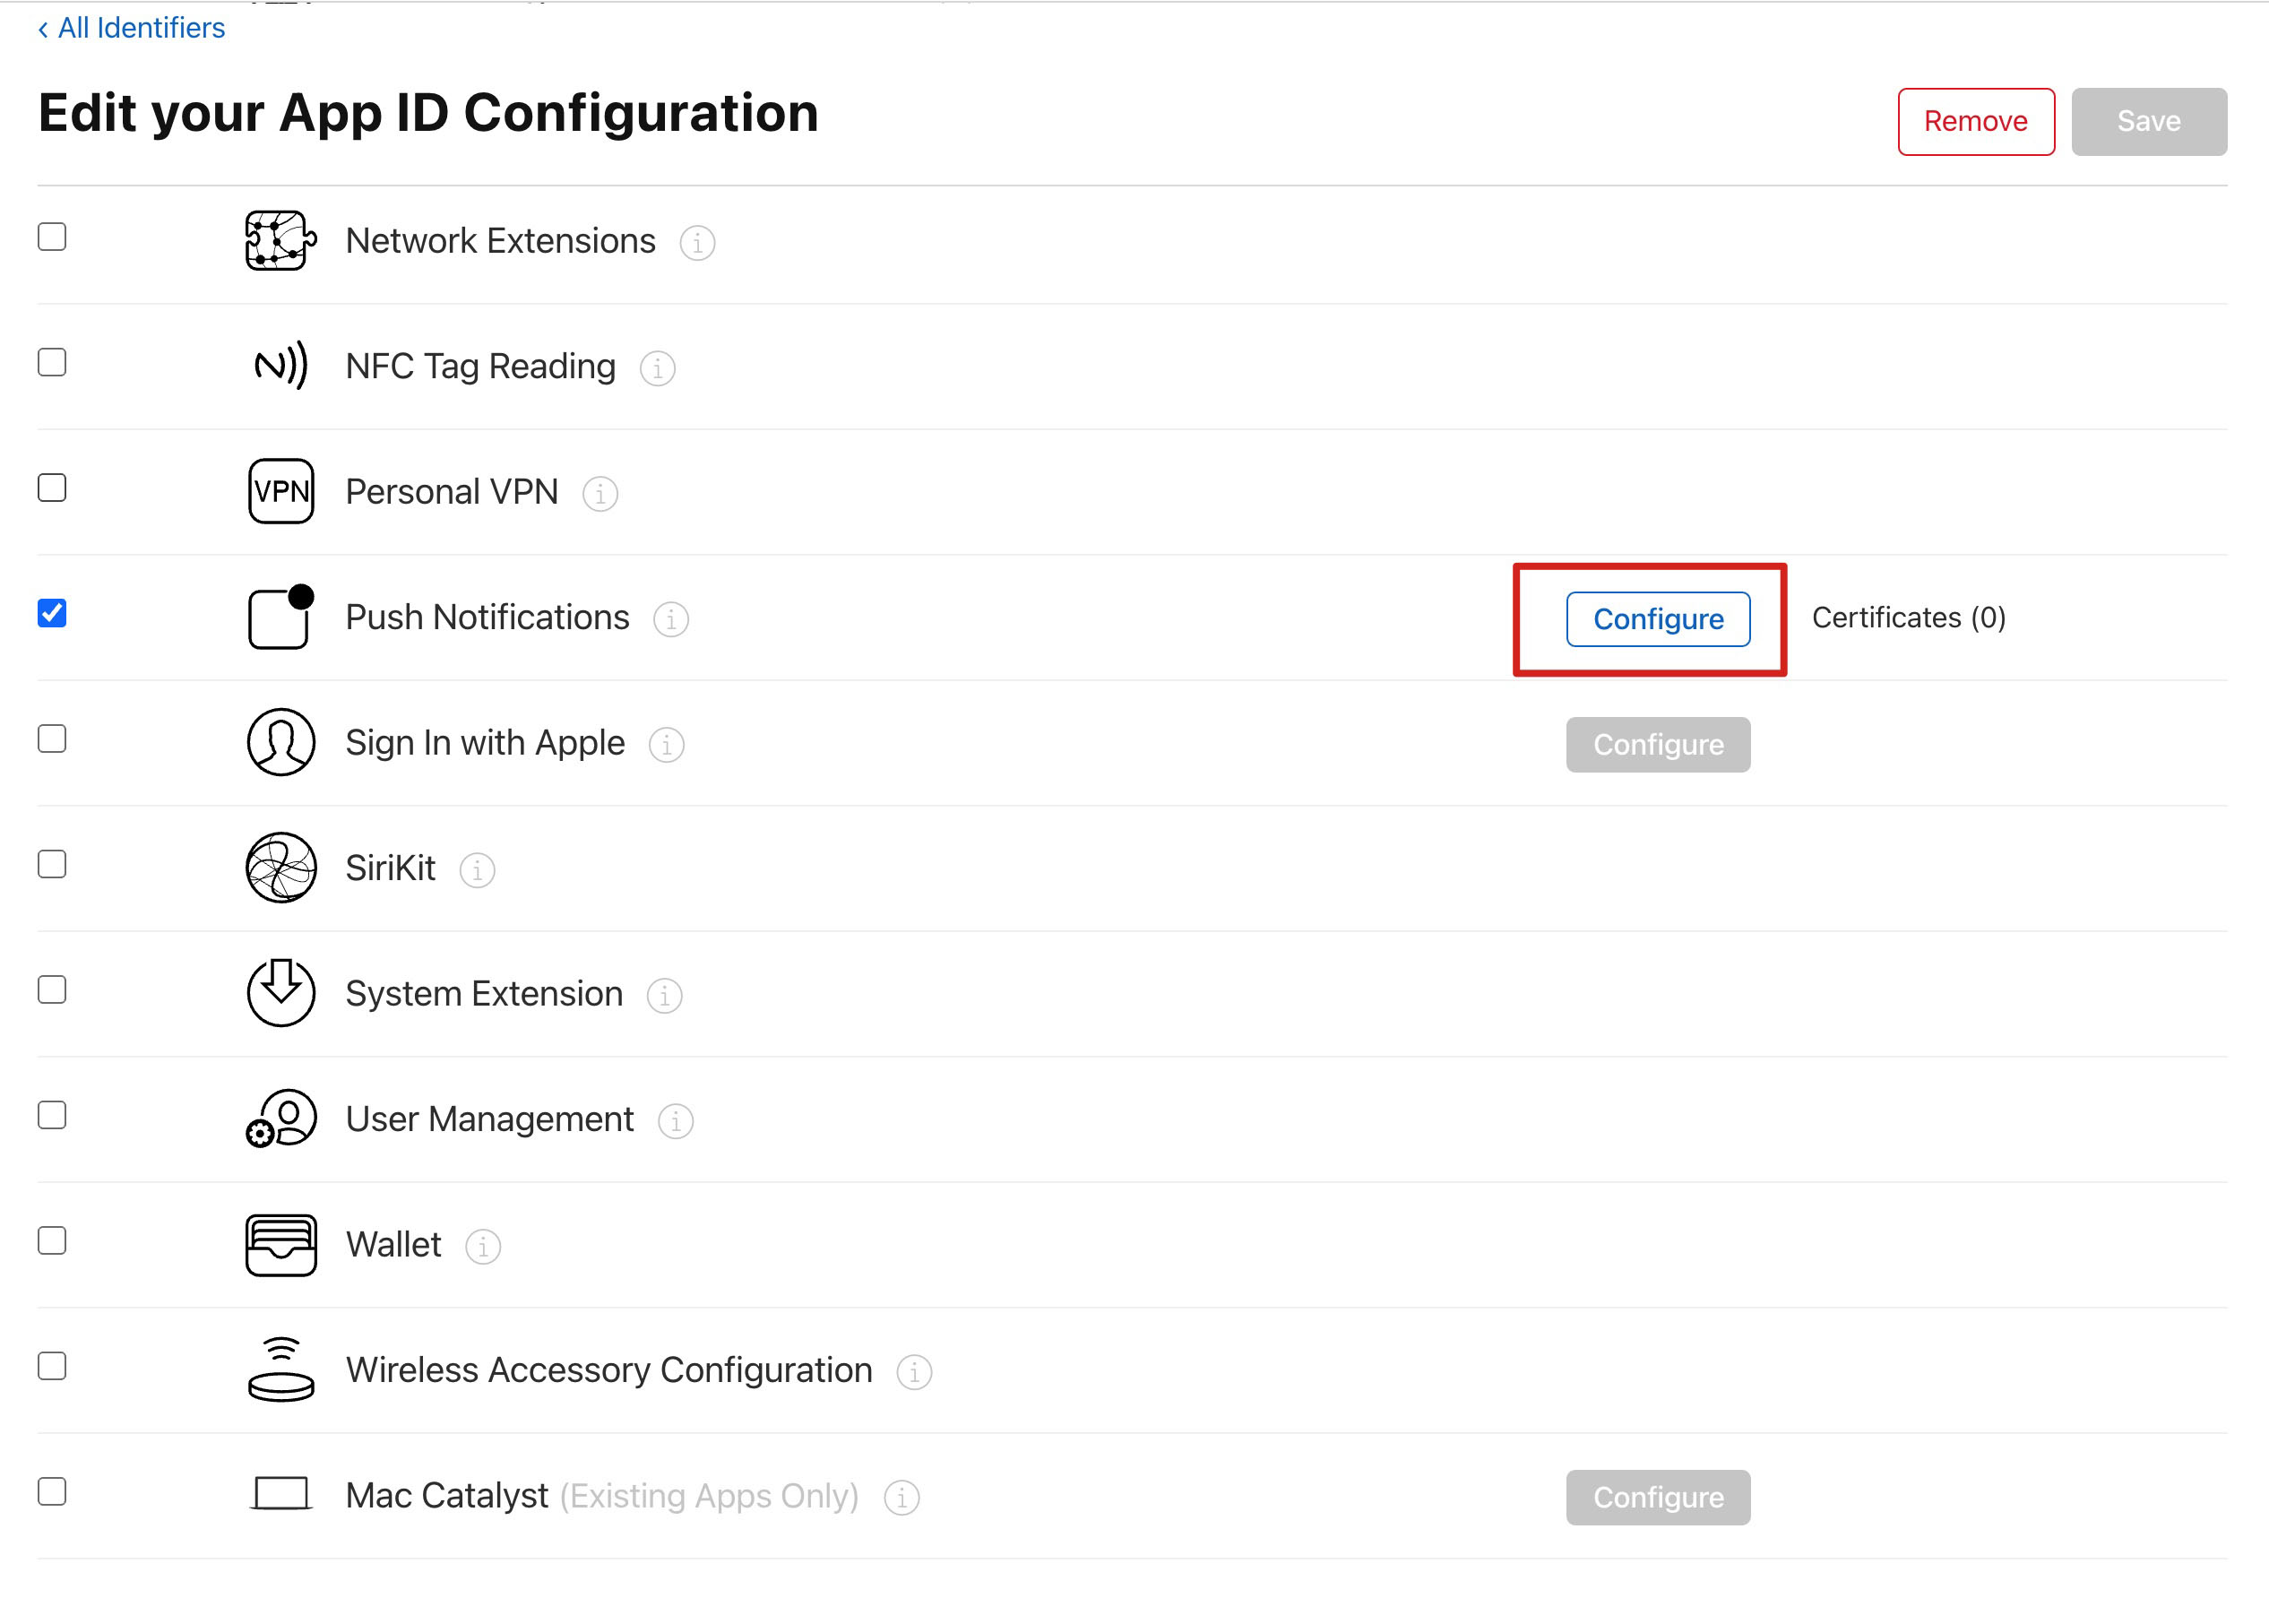

2. 可以看到在 Apple Push Notification service SSL Certificates 窗口中有两个
SSL Certificate,分别用于开发环境(Development)和生产环境(Production)的远程推送证书,如下图所示: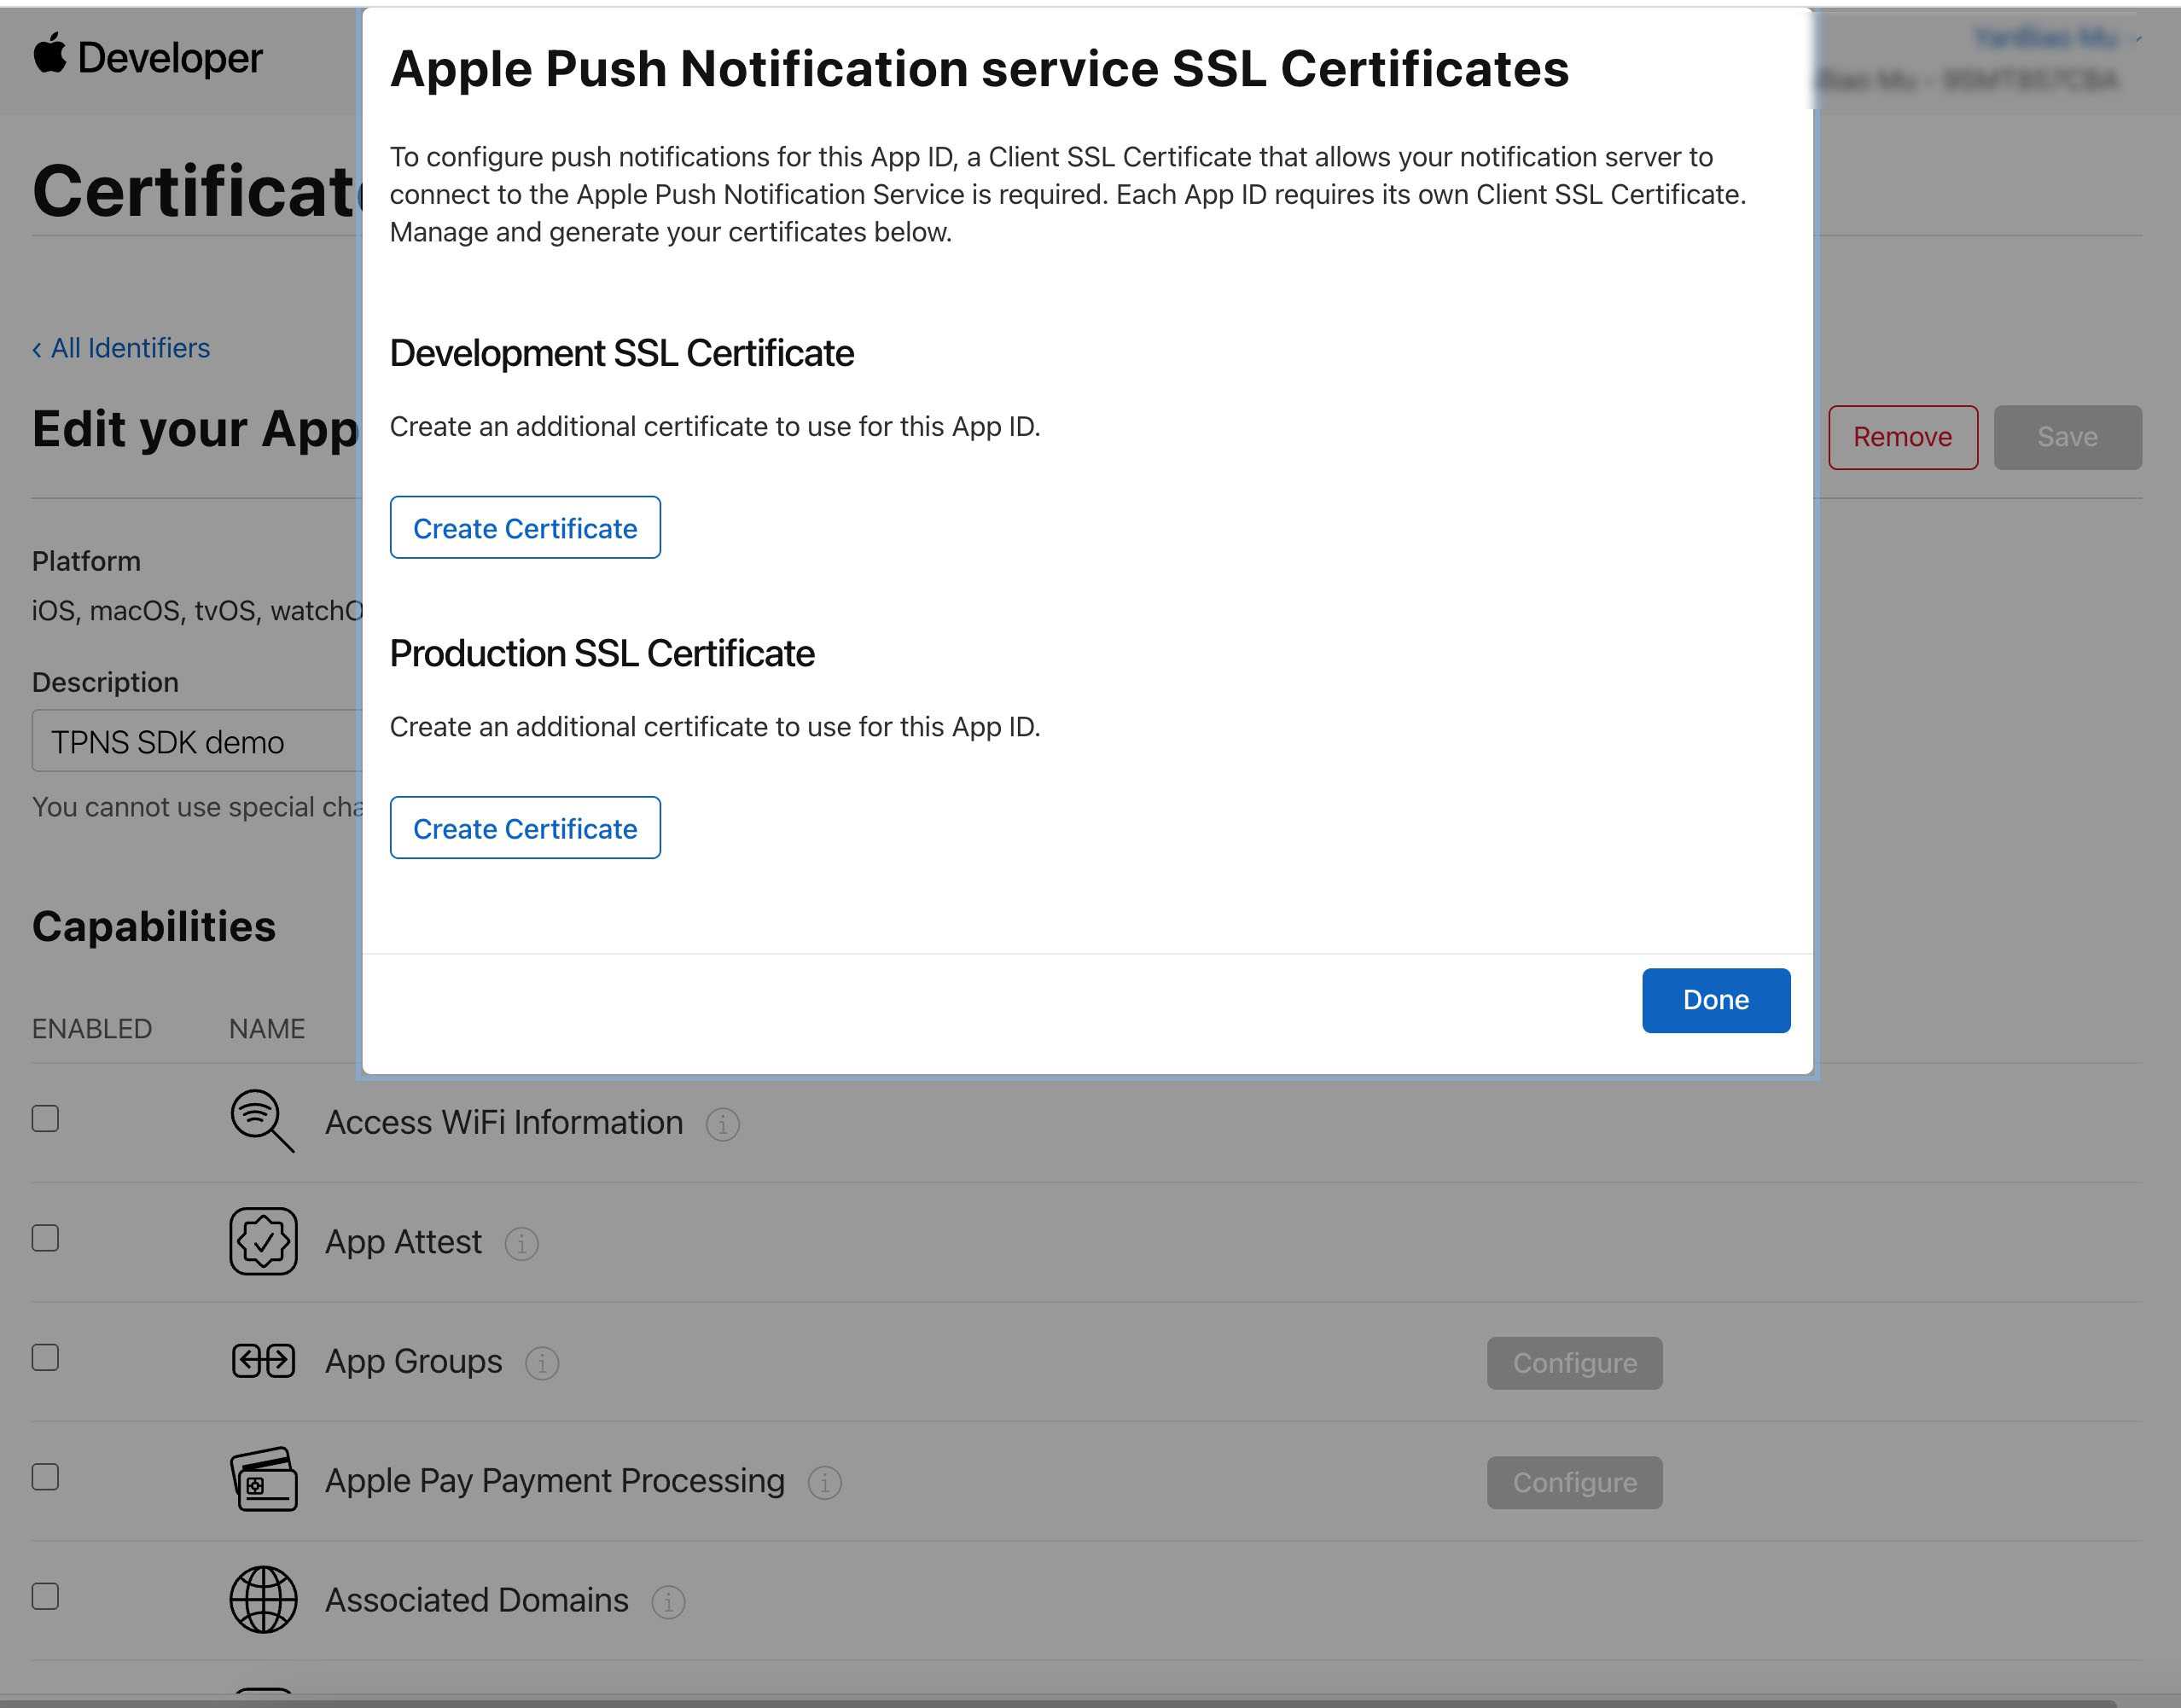

3.
我
们先选择开发环境(Development)的 Create Certificate,系统将提示我们需要一个 Certificate Signing Request(CSR)。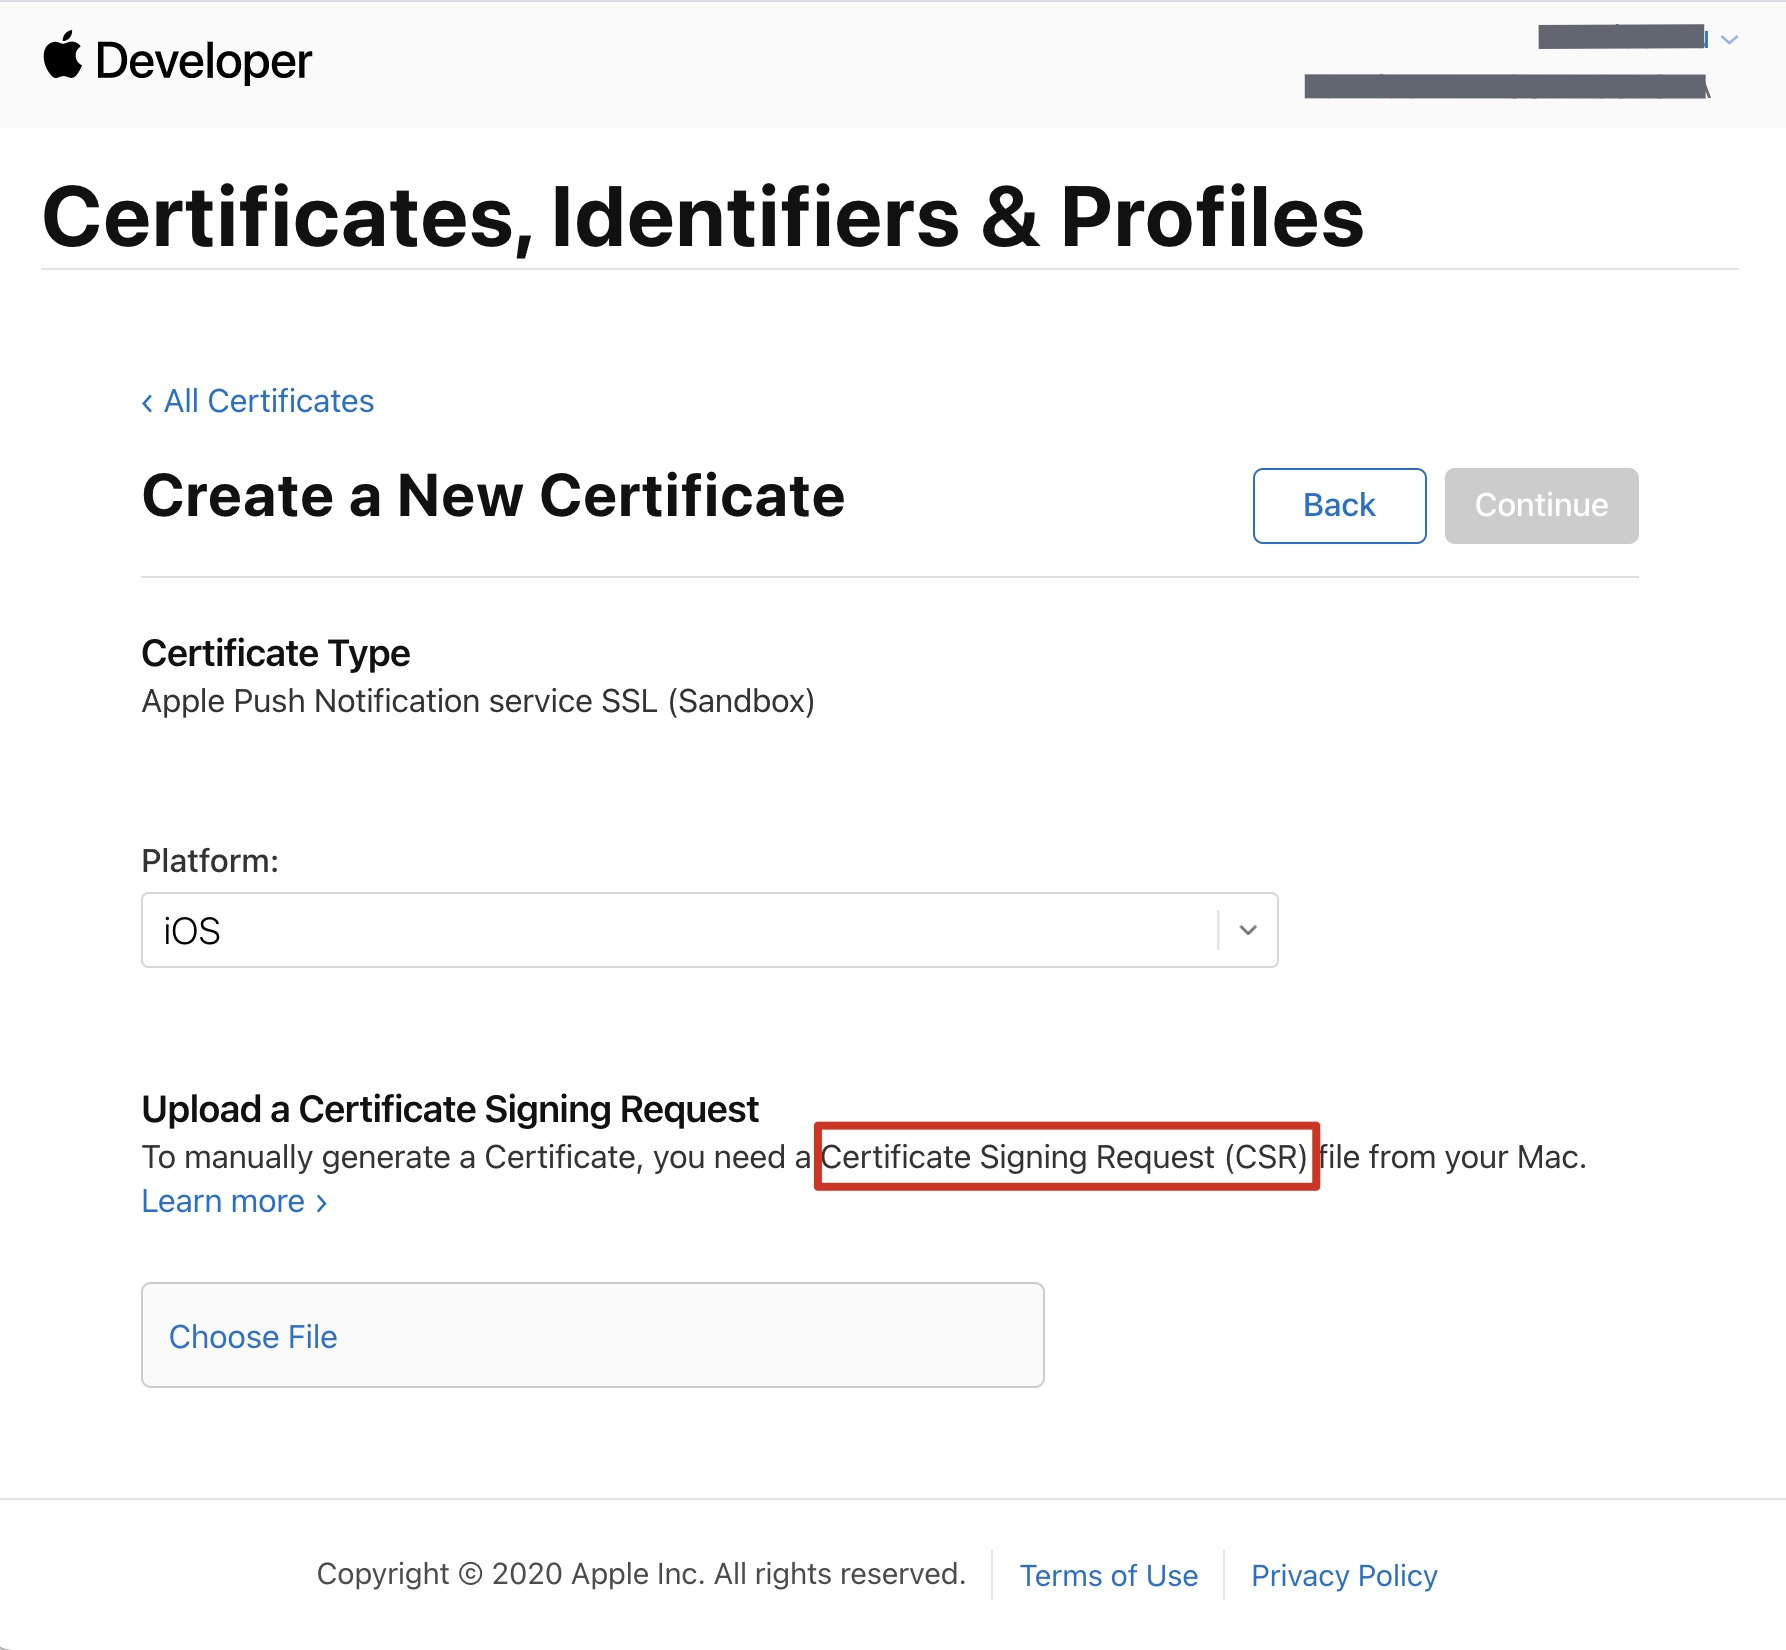

4. 在 Mac 上打开钥匙串访问工具(Keychain Access),在菜单中选择钥匙串访问 > 证书助理 > 从证书颁发机构请求证书(
Keychain Access - Certificate Assistant - Request a Certificate From a Certificate Authority)。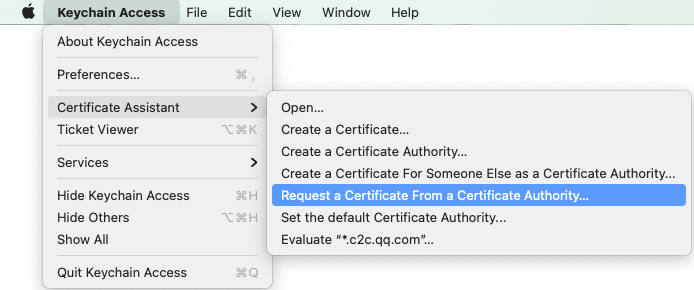

5. 输入用户电子邮件地址(您的邮箱)、常用名称(您的名称或公司名),选择存储到磁盘,单击继续,系统将生成一个
*.certSigningRequest 文件。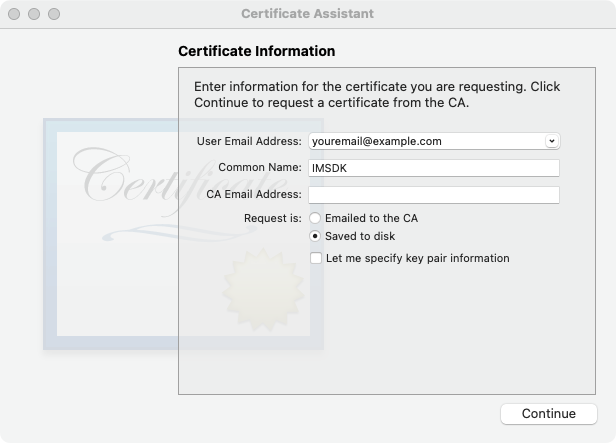

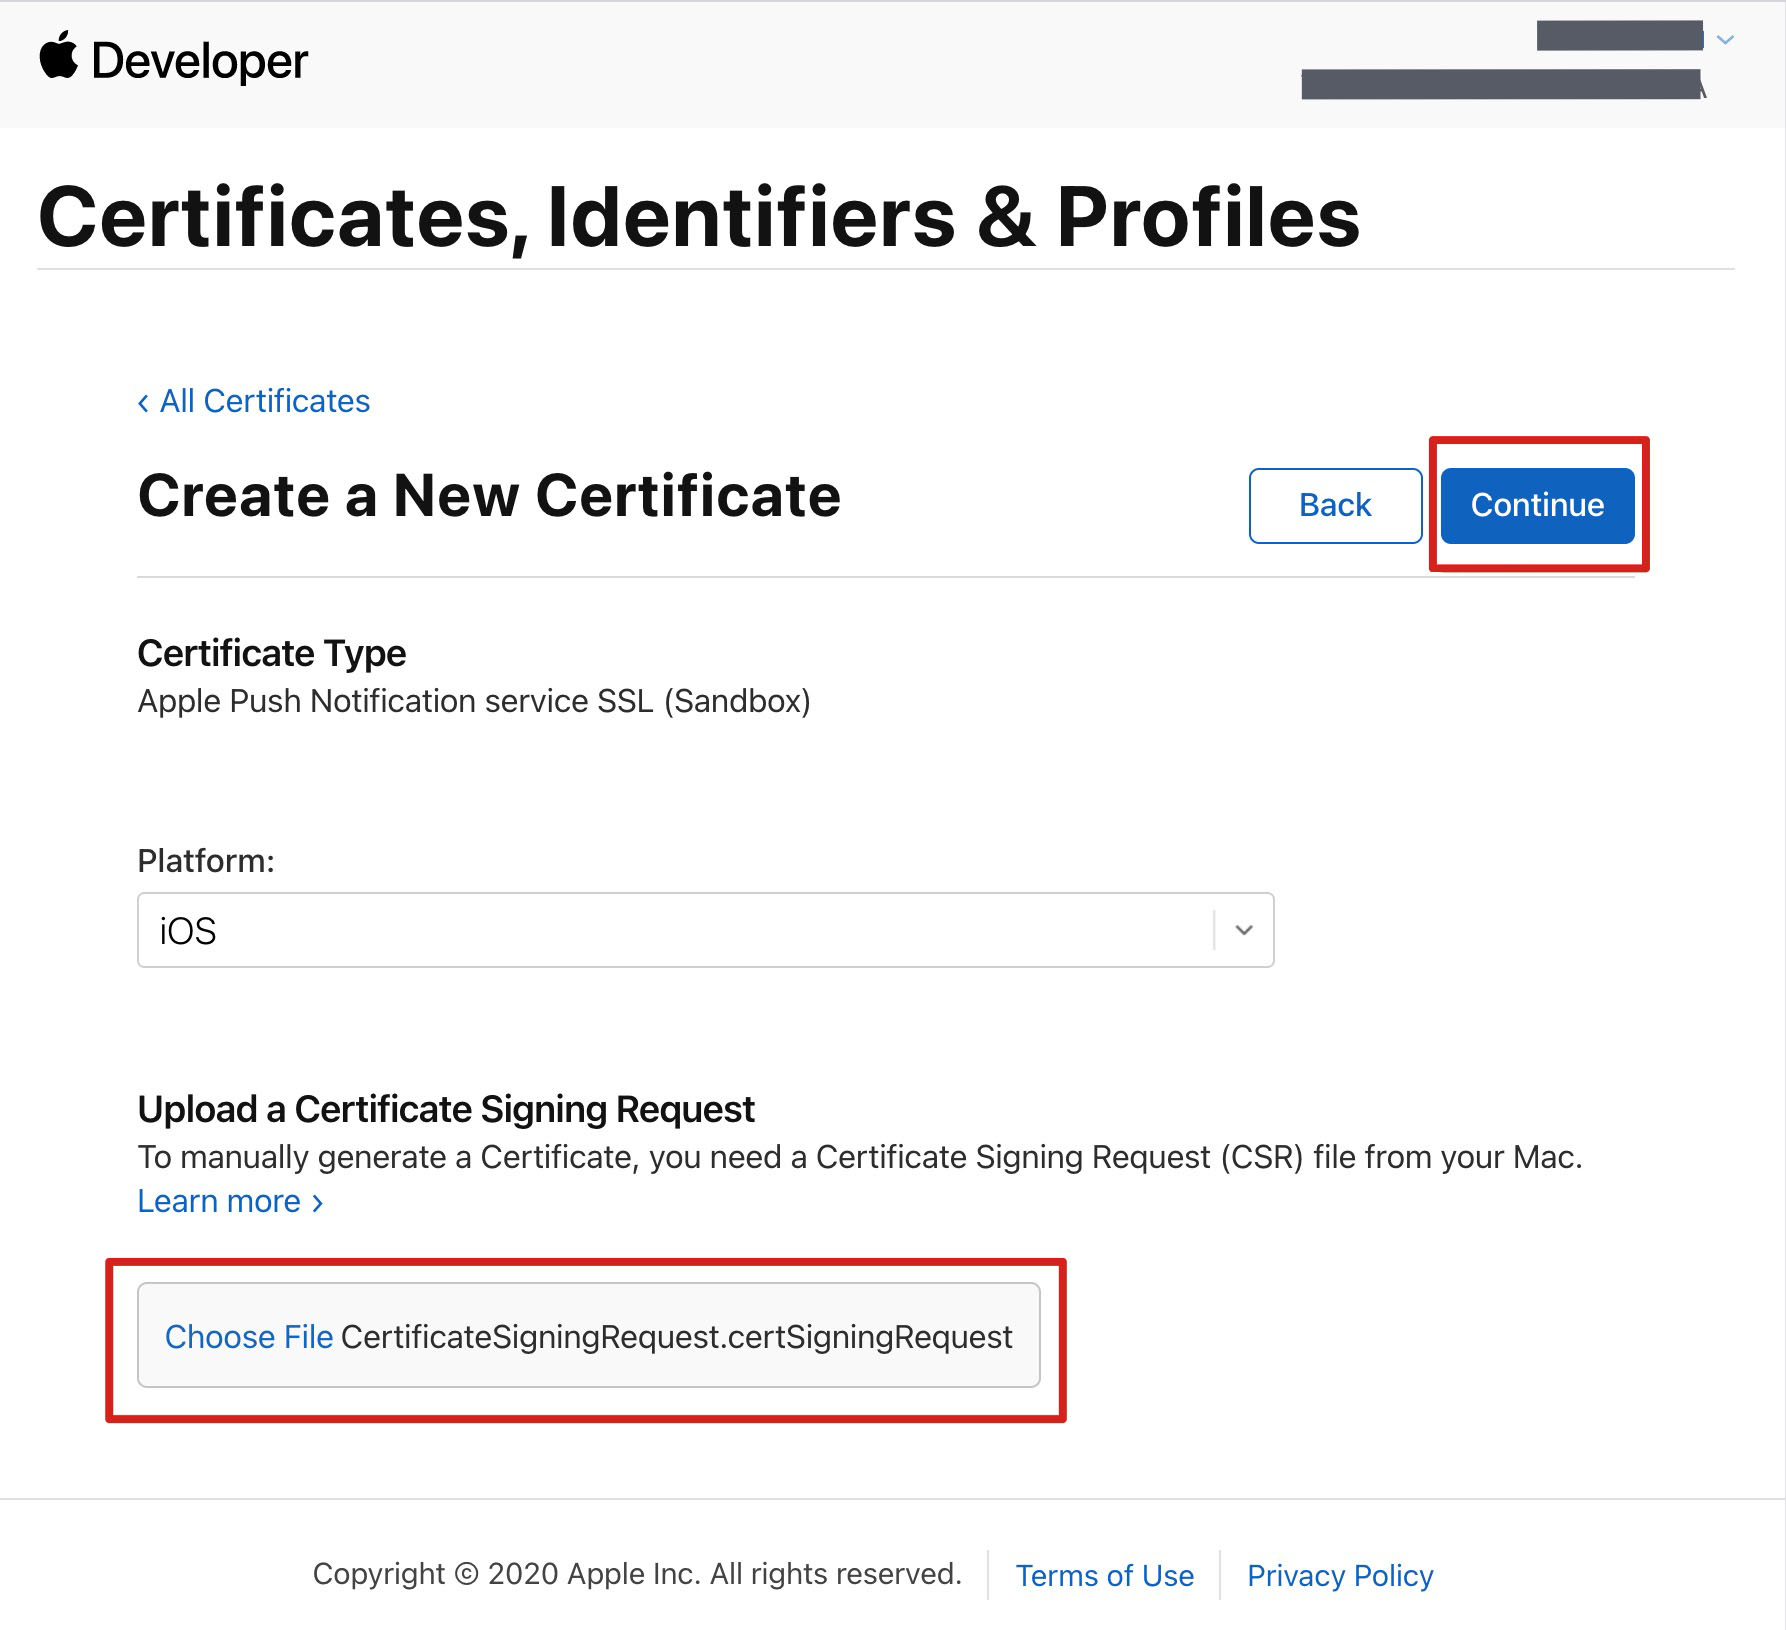
6. 返回上述 步骤3 中 Apple Developer 网站刚才的页面,单击 Choose File 上传生成的
*.certSigningRequest 文件。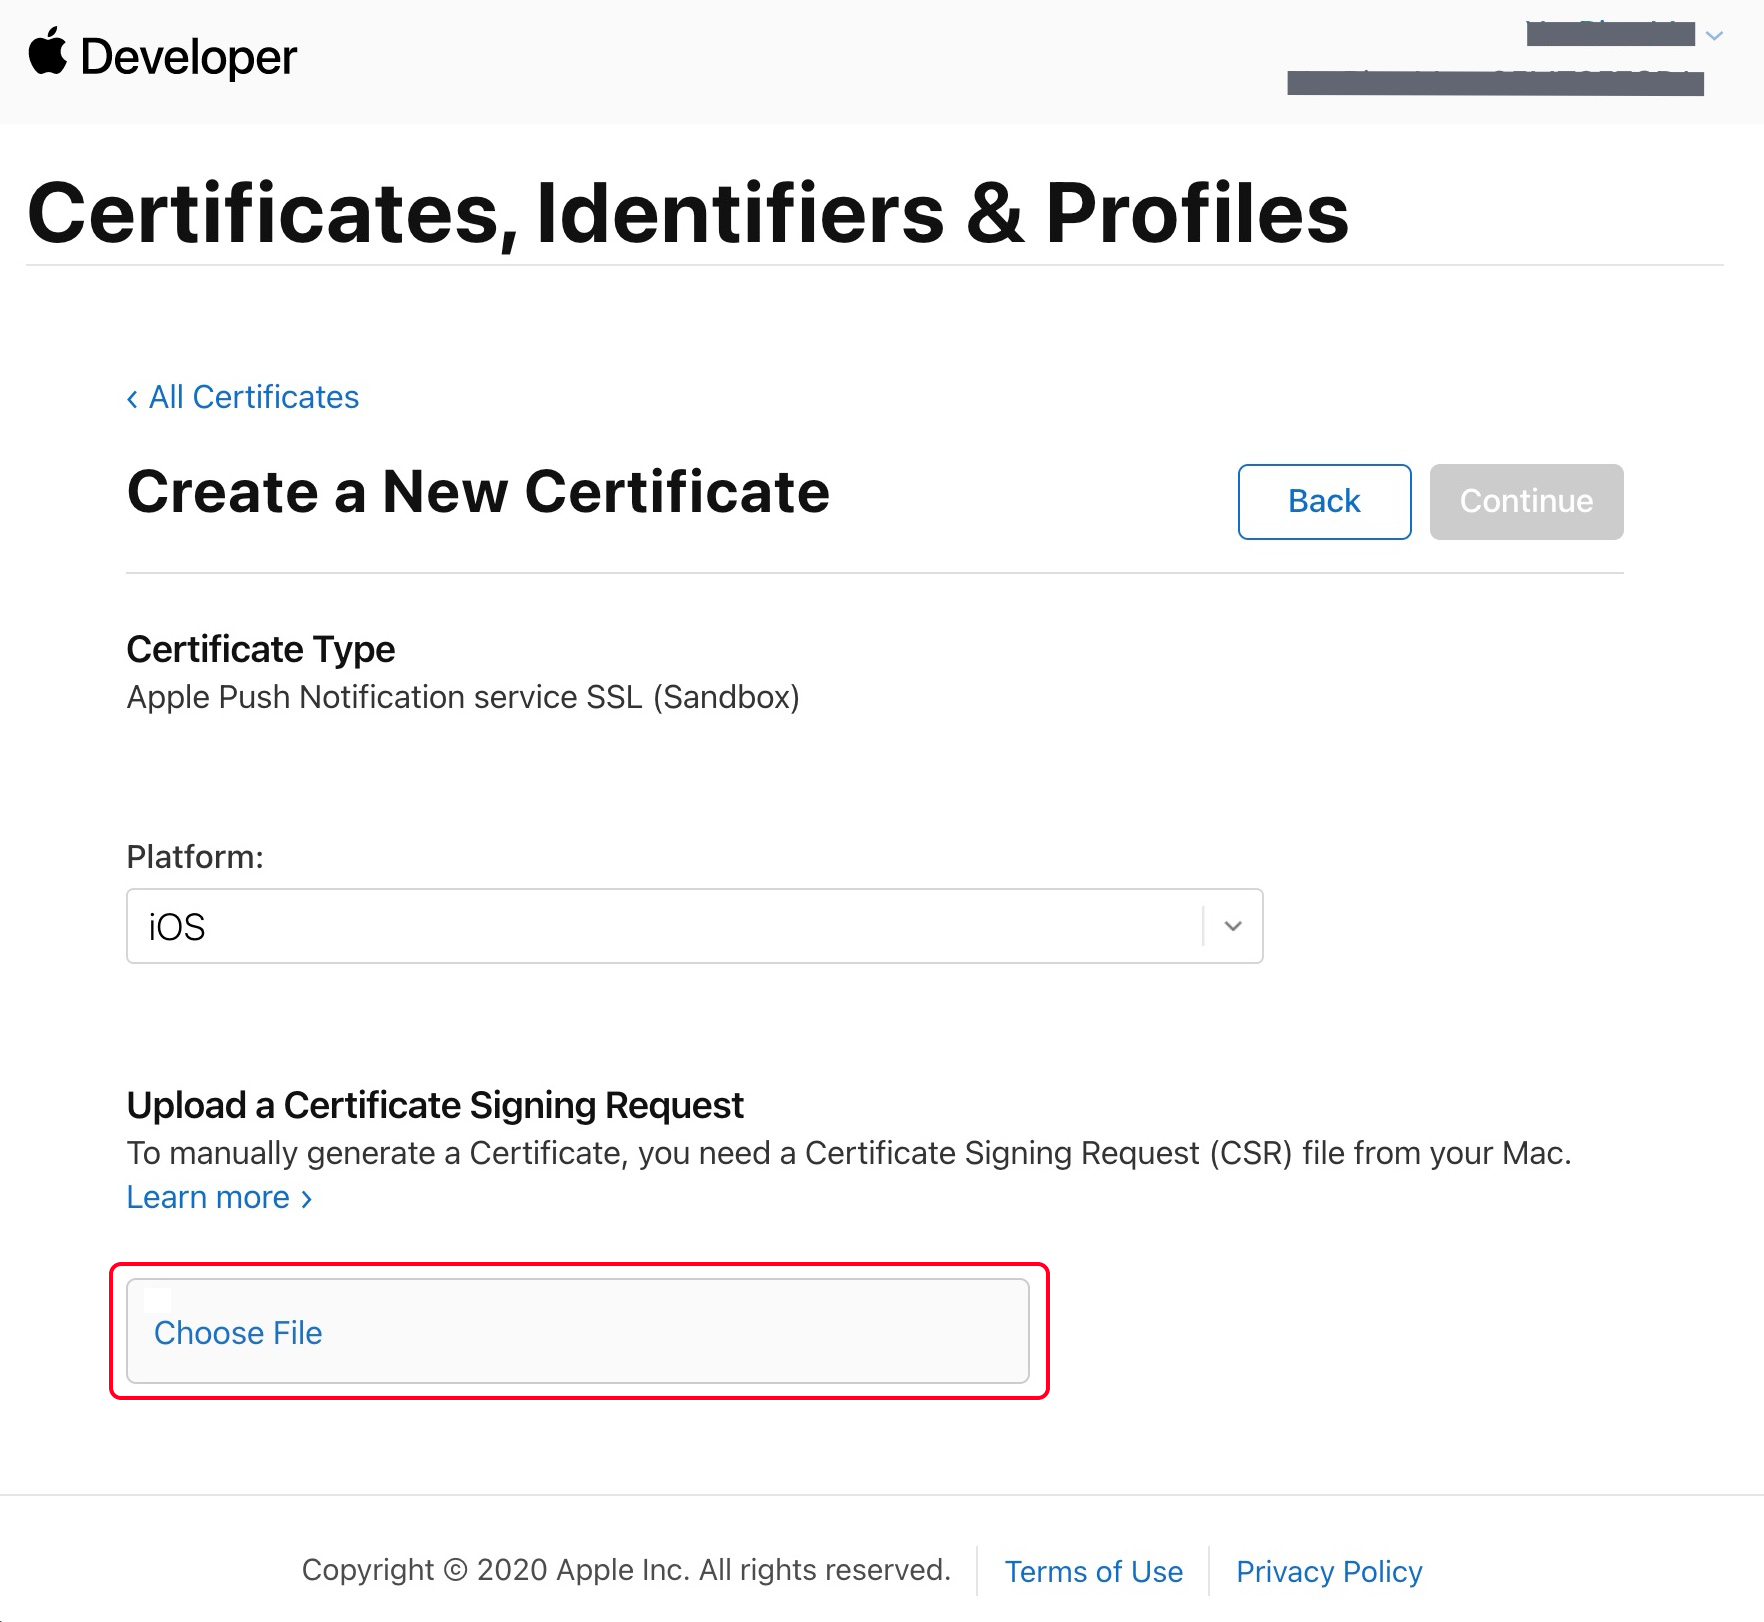

7. 单击 Continue,即可生成推送证书。

8. 单击 Download 下载开发环境的
Development SSL Certificate 到本地。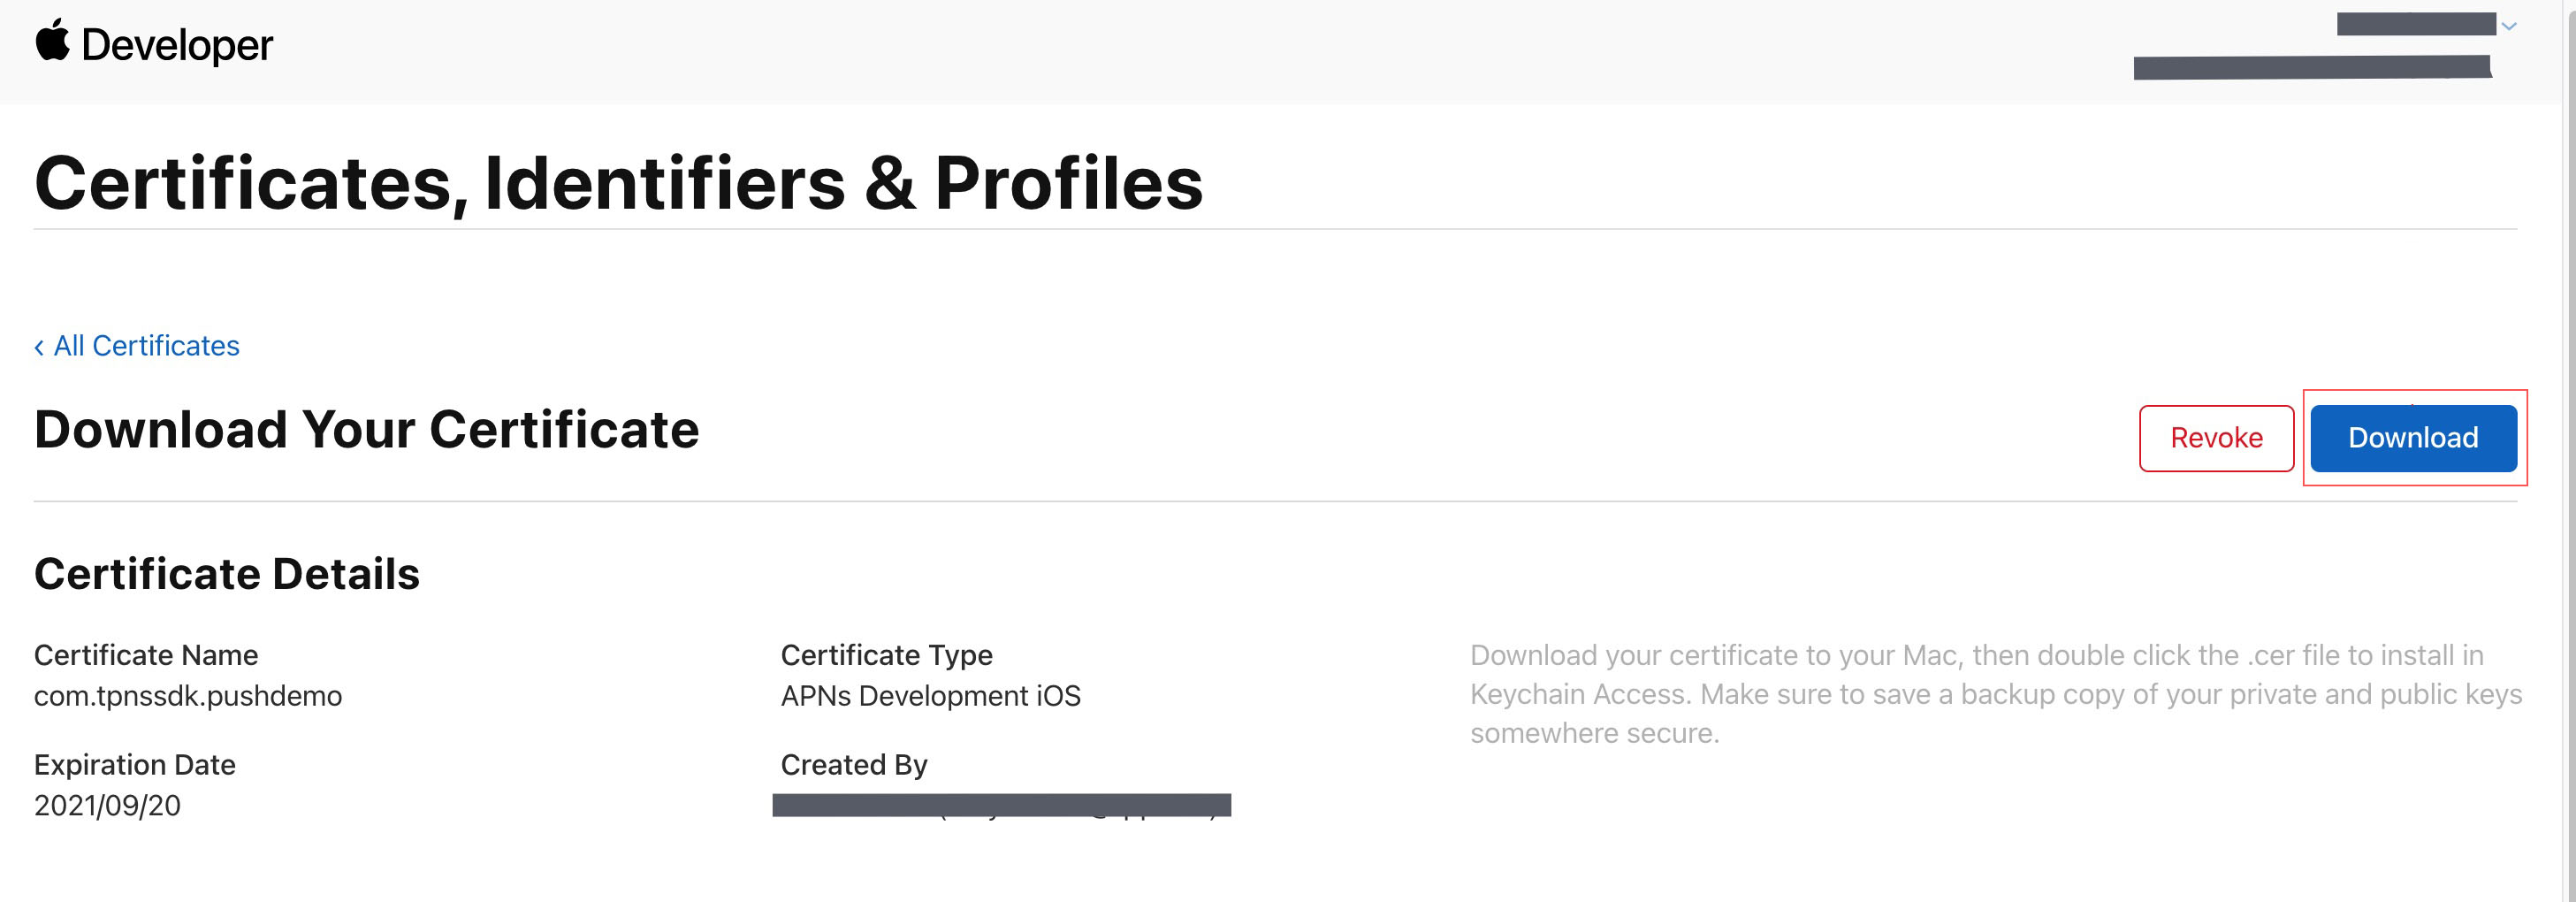

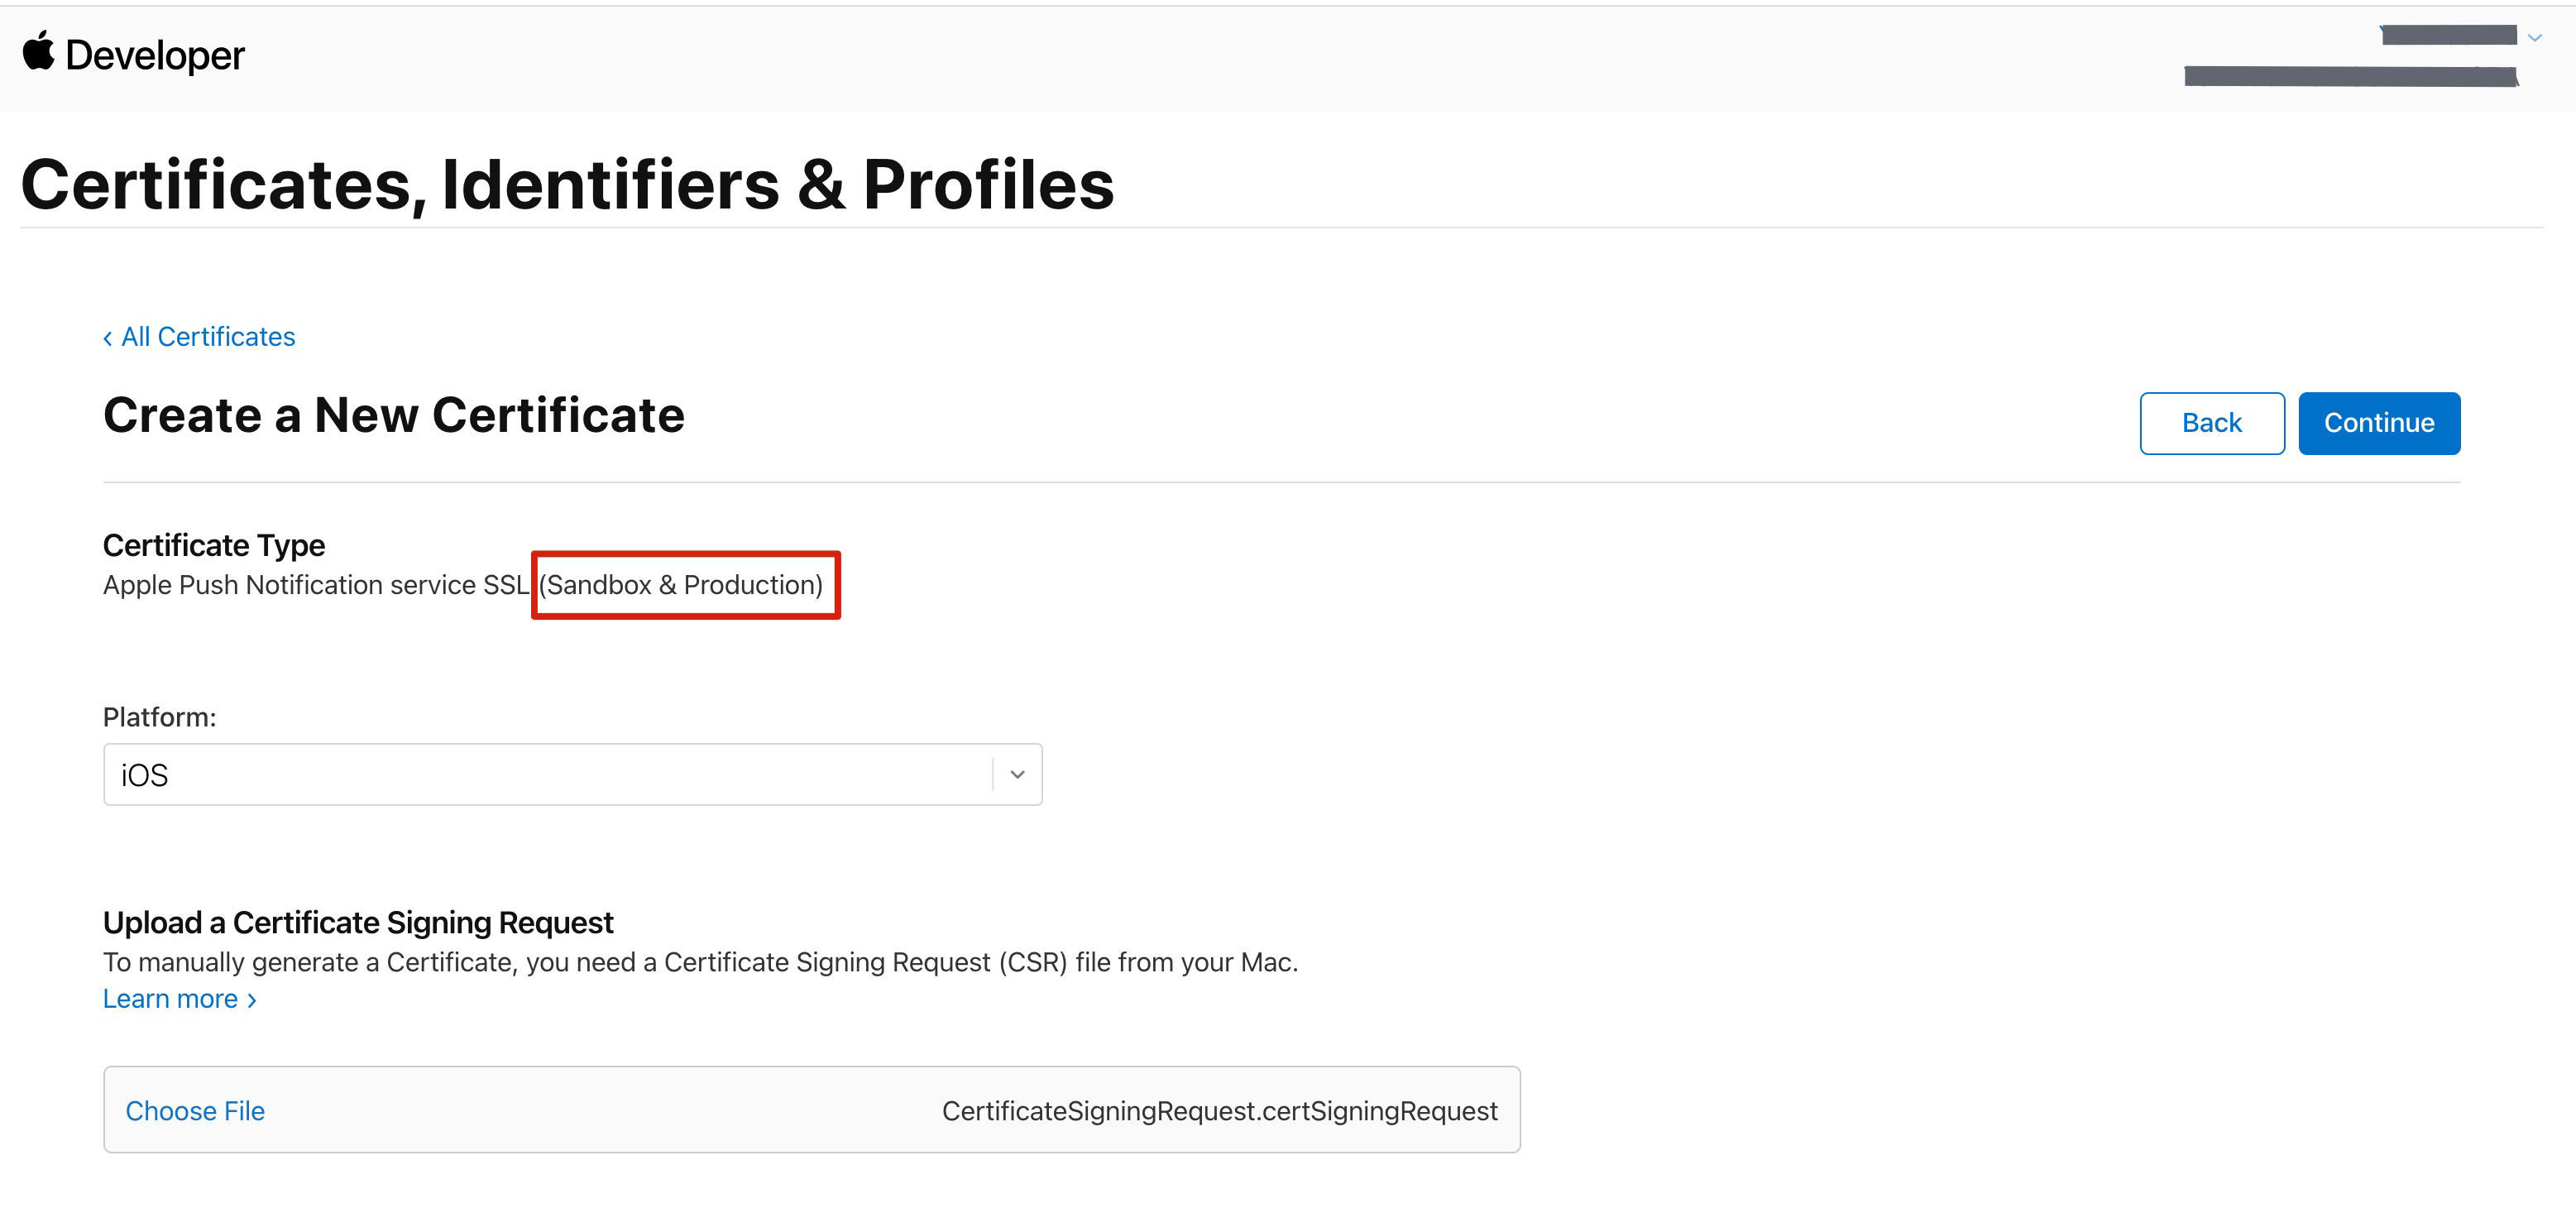
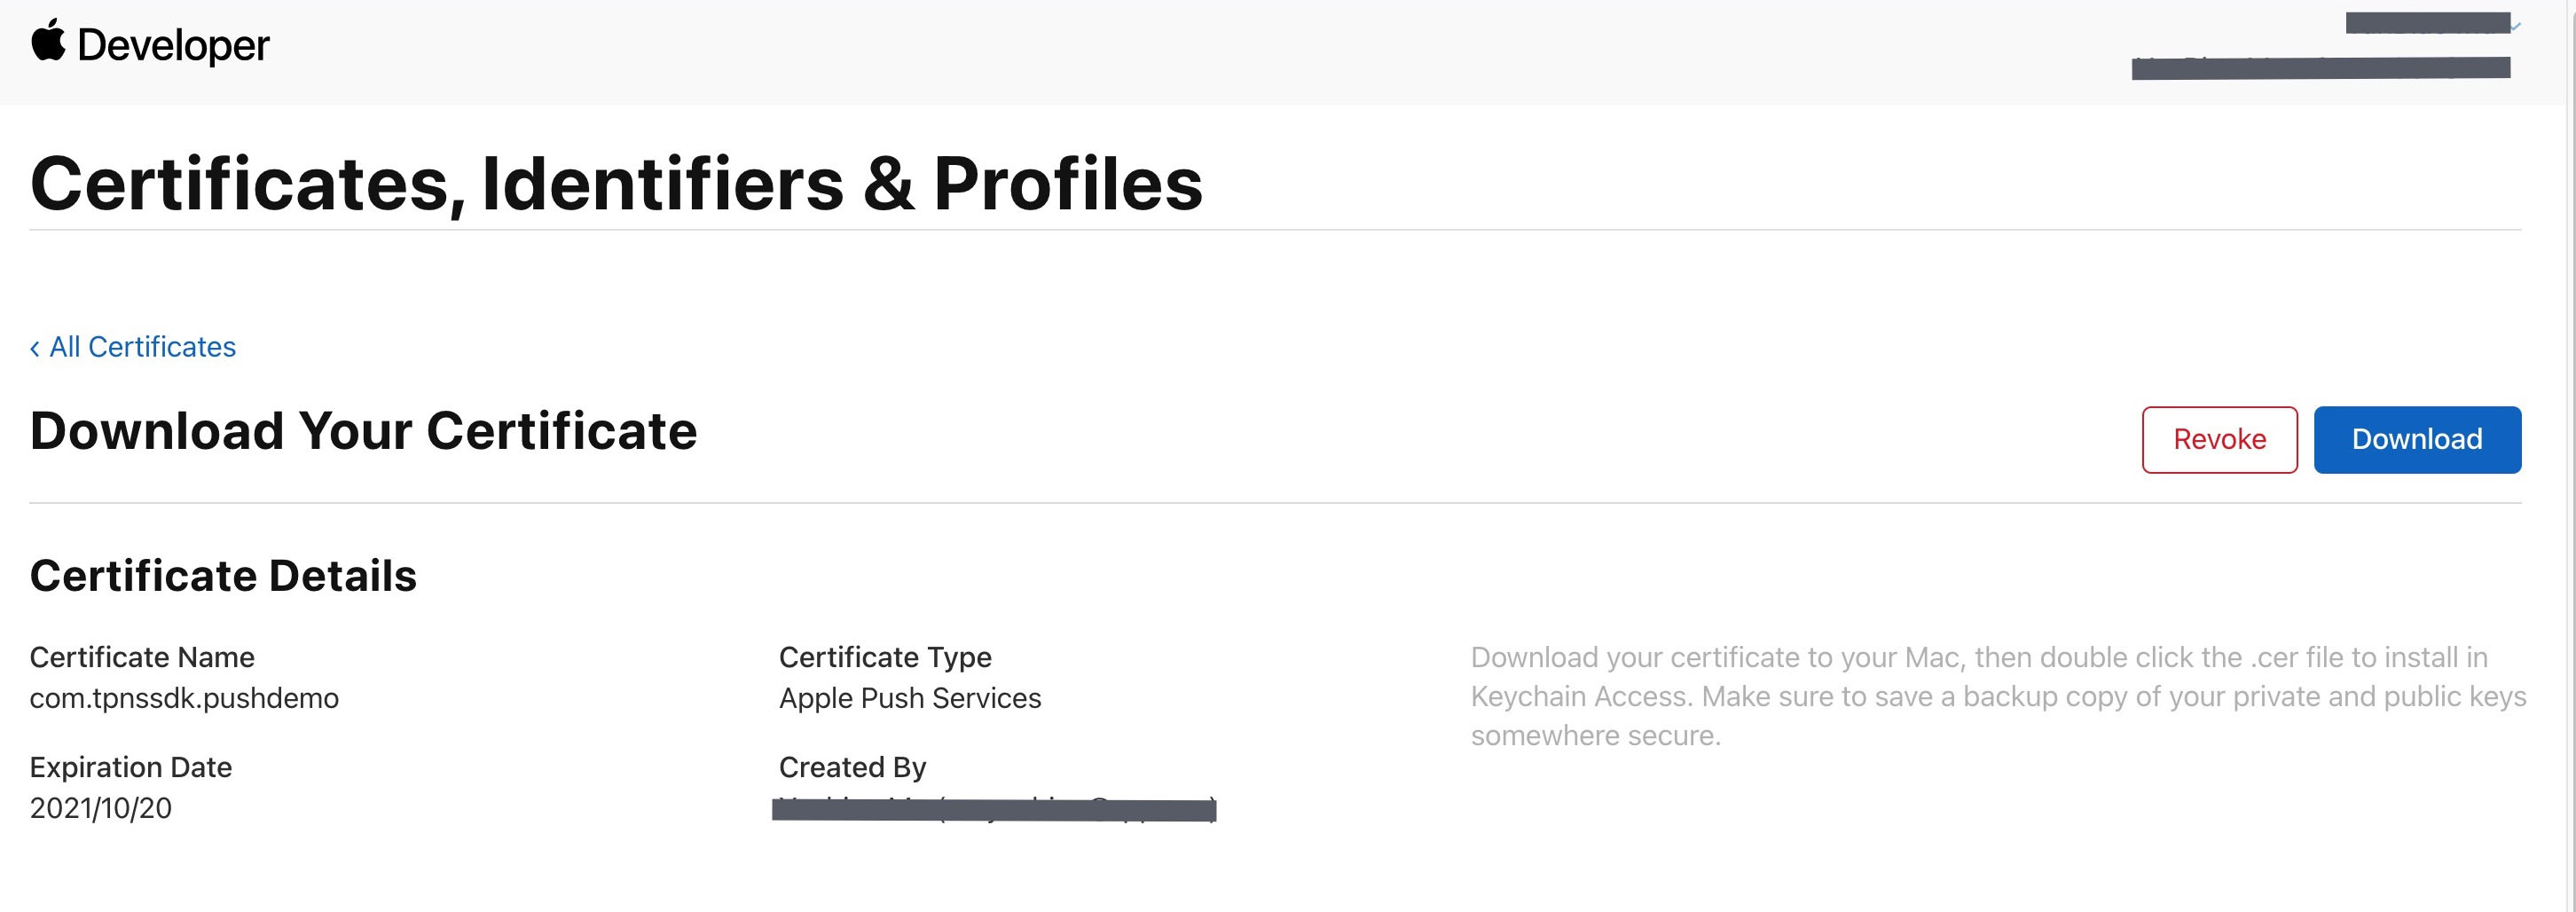
9. 再次按照上述步骤1 - 8,将生产环境的
Production SSL Certificate 下载到本地。说明
生产环境的证书实际是开发(Sandbox)+生产(Production)的合并证书,可以同时作为开发环境和生产环境的证书使用。


10. 双击打开下载的开发环境和生产环境的
SSL Certificate,系统会将其导入钥匙串中。11. 打开钥匙串应用,在登录 > 我的证书,右键分别导出刚创建的开发环境(
Apple Development IOS Push Service)和生产环境(Apple Push Services)的 P12 文件。注意
保存
P12文件时,请务必要为其设置密码。步骤2:上传证书到控制台
1. 登录 Tencent RTC 控制台。
2. 单击目标应用卡片,选择左侧的 Chat 标签,点击 Push ,点击 Access settings。
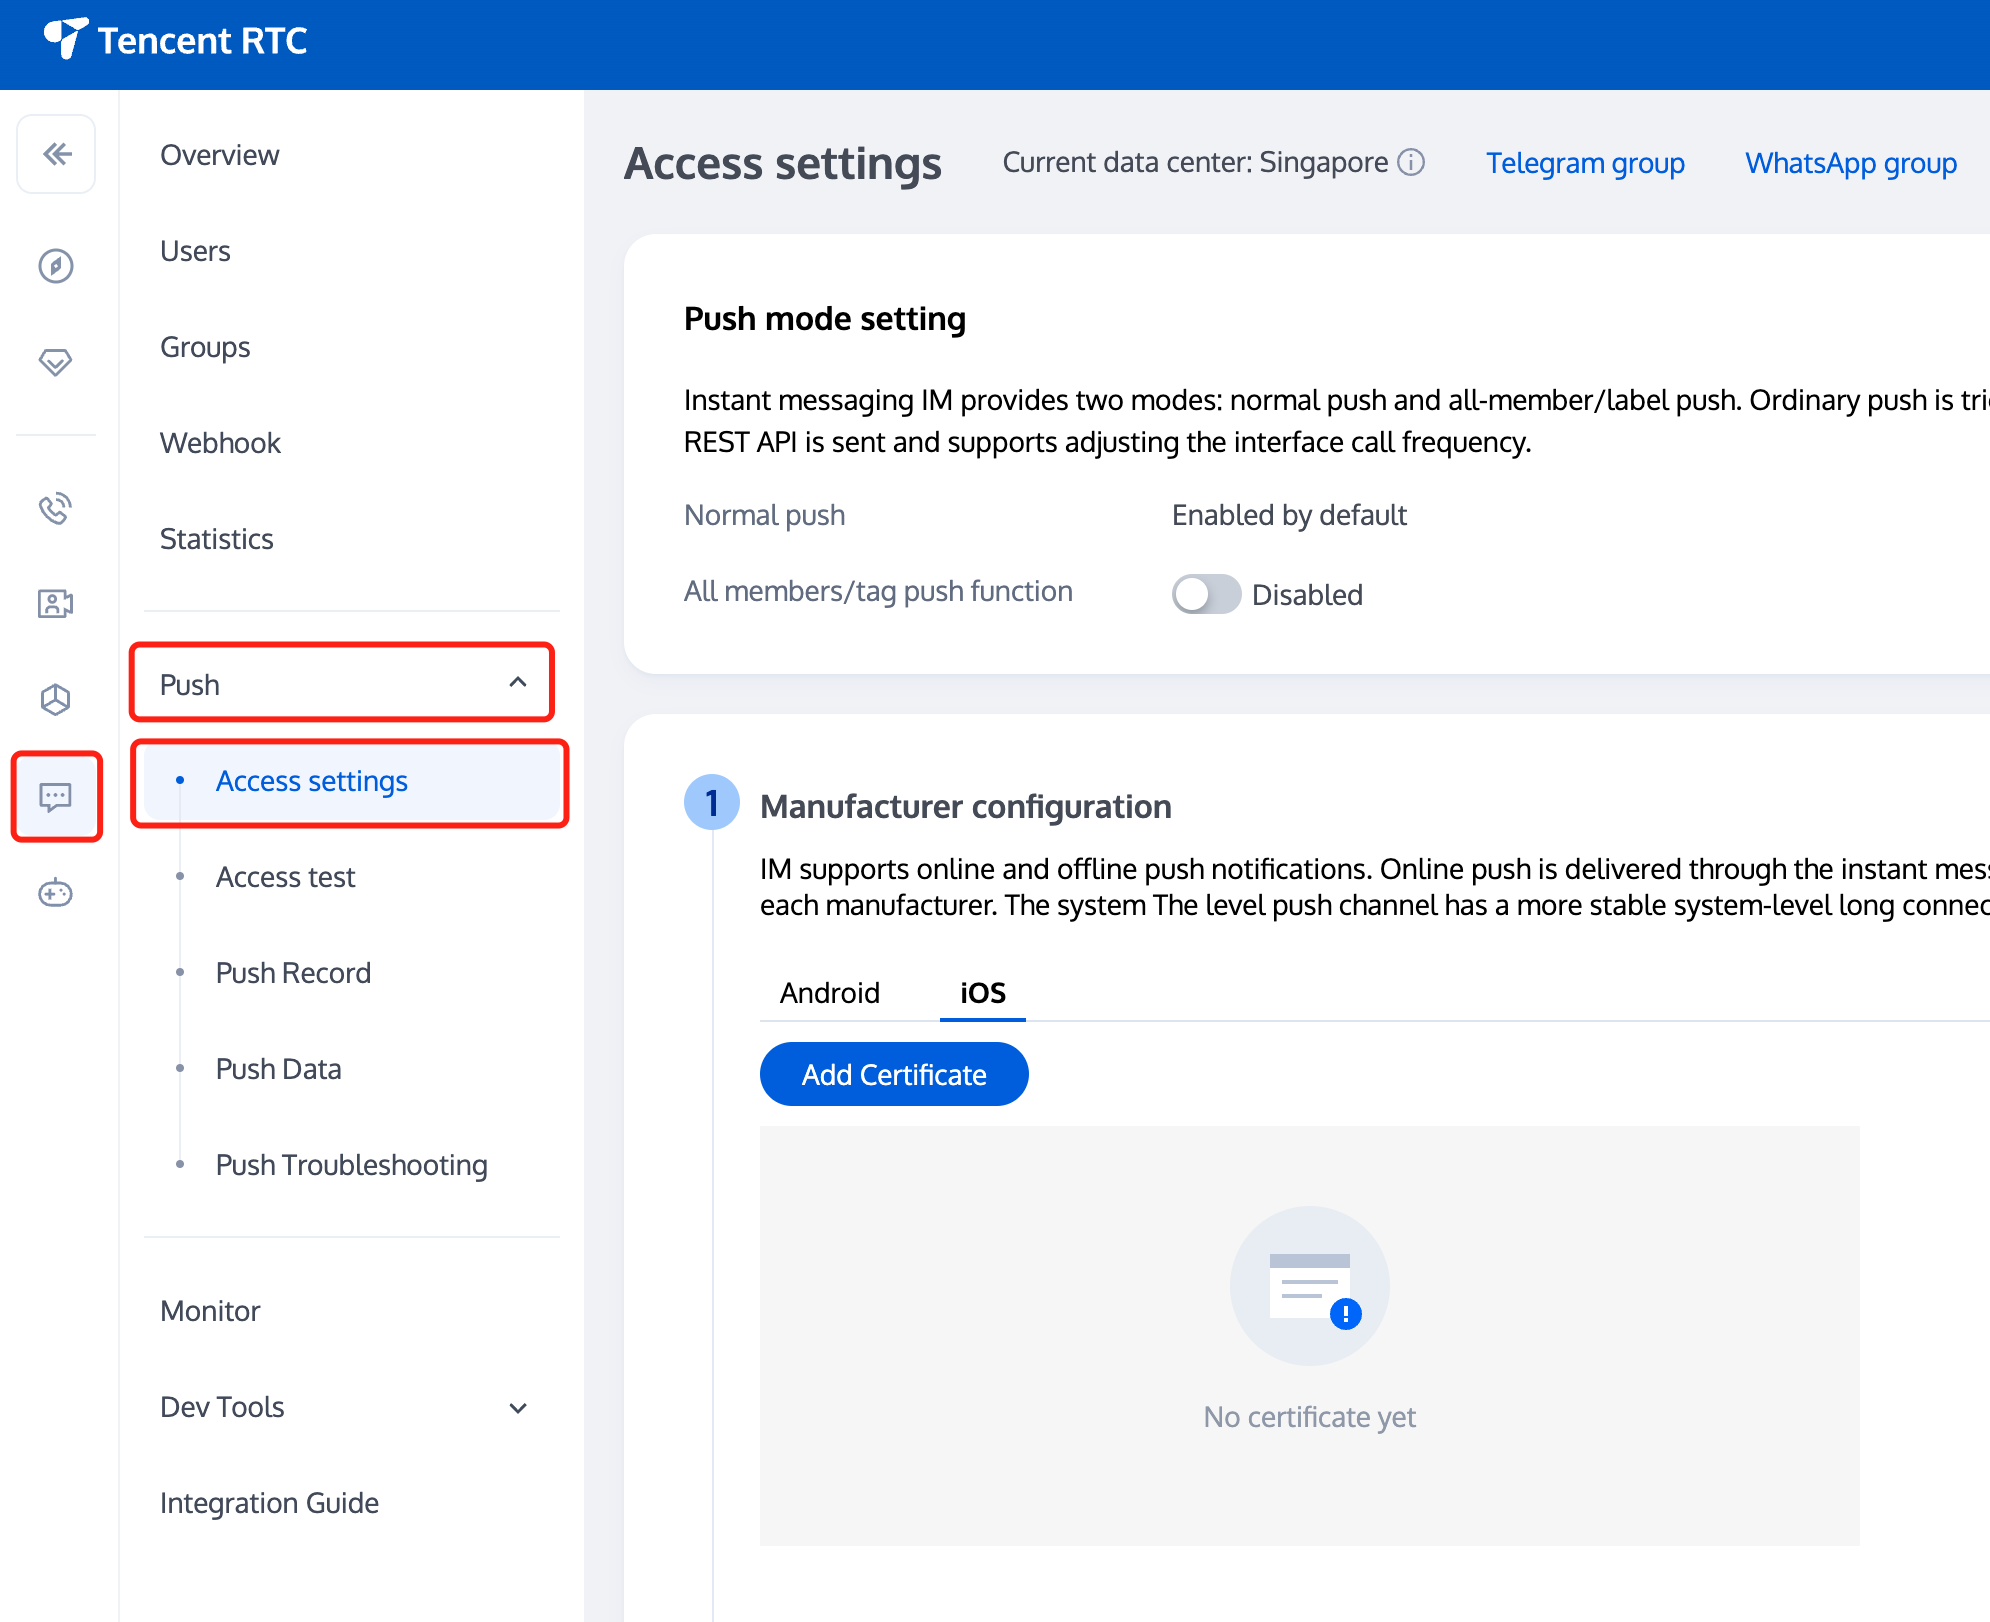

3. 单击 iOS 原生离线推送设置右侧的添加证书。
4. 选择证书类型,上传 iOS 证书(p12),设置证书密码,单击确认。
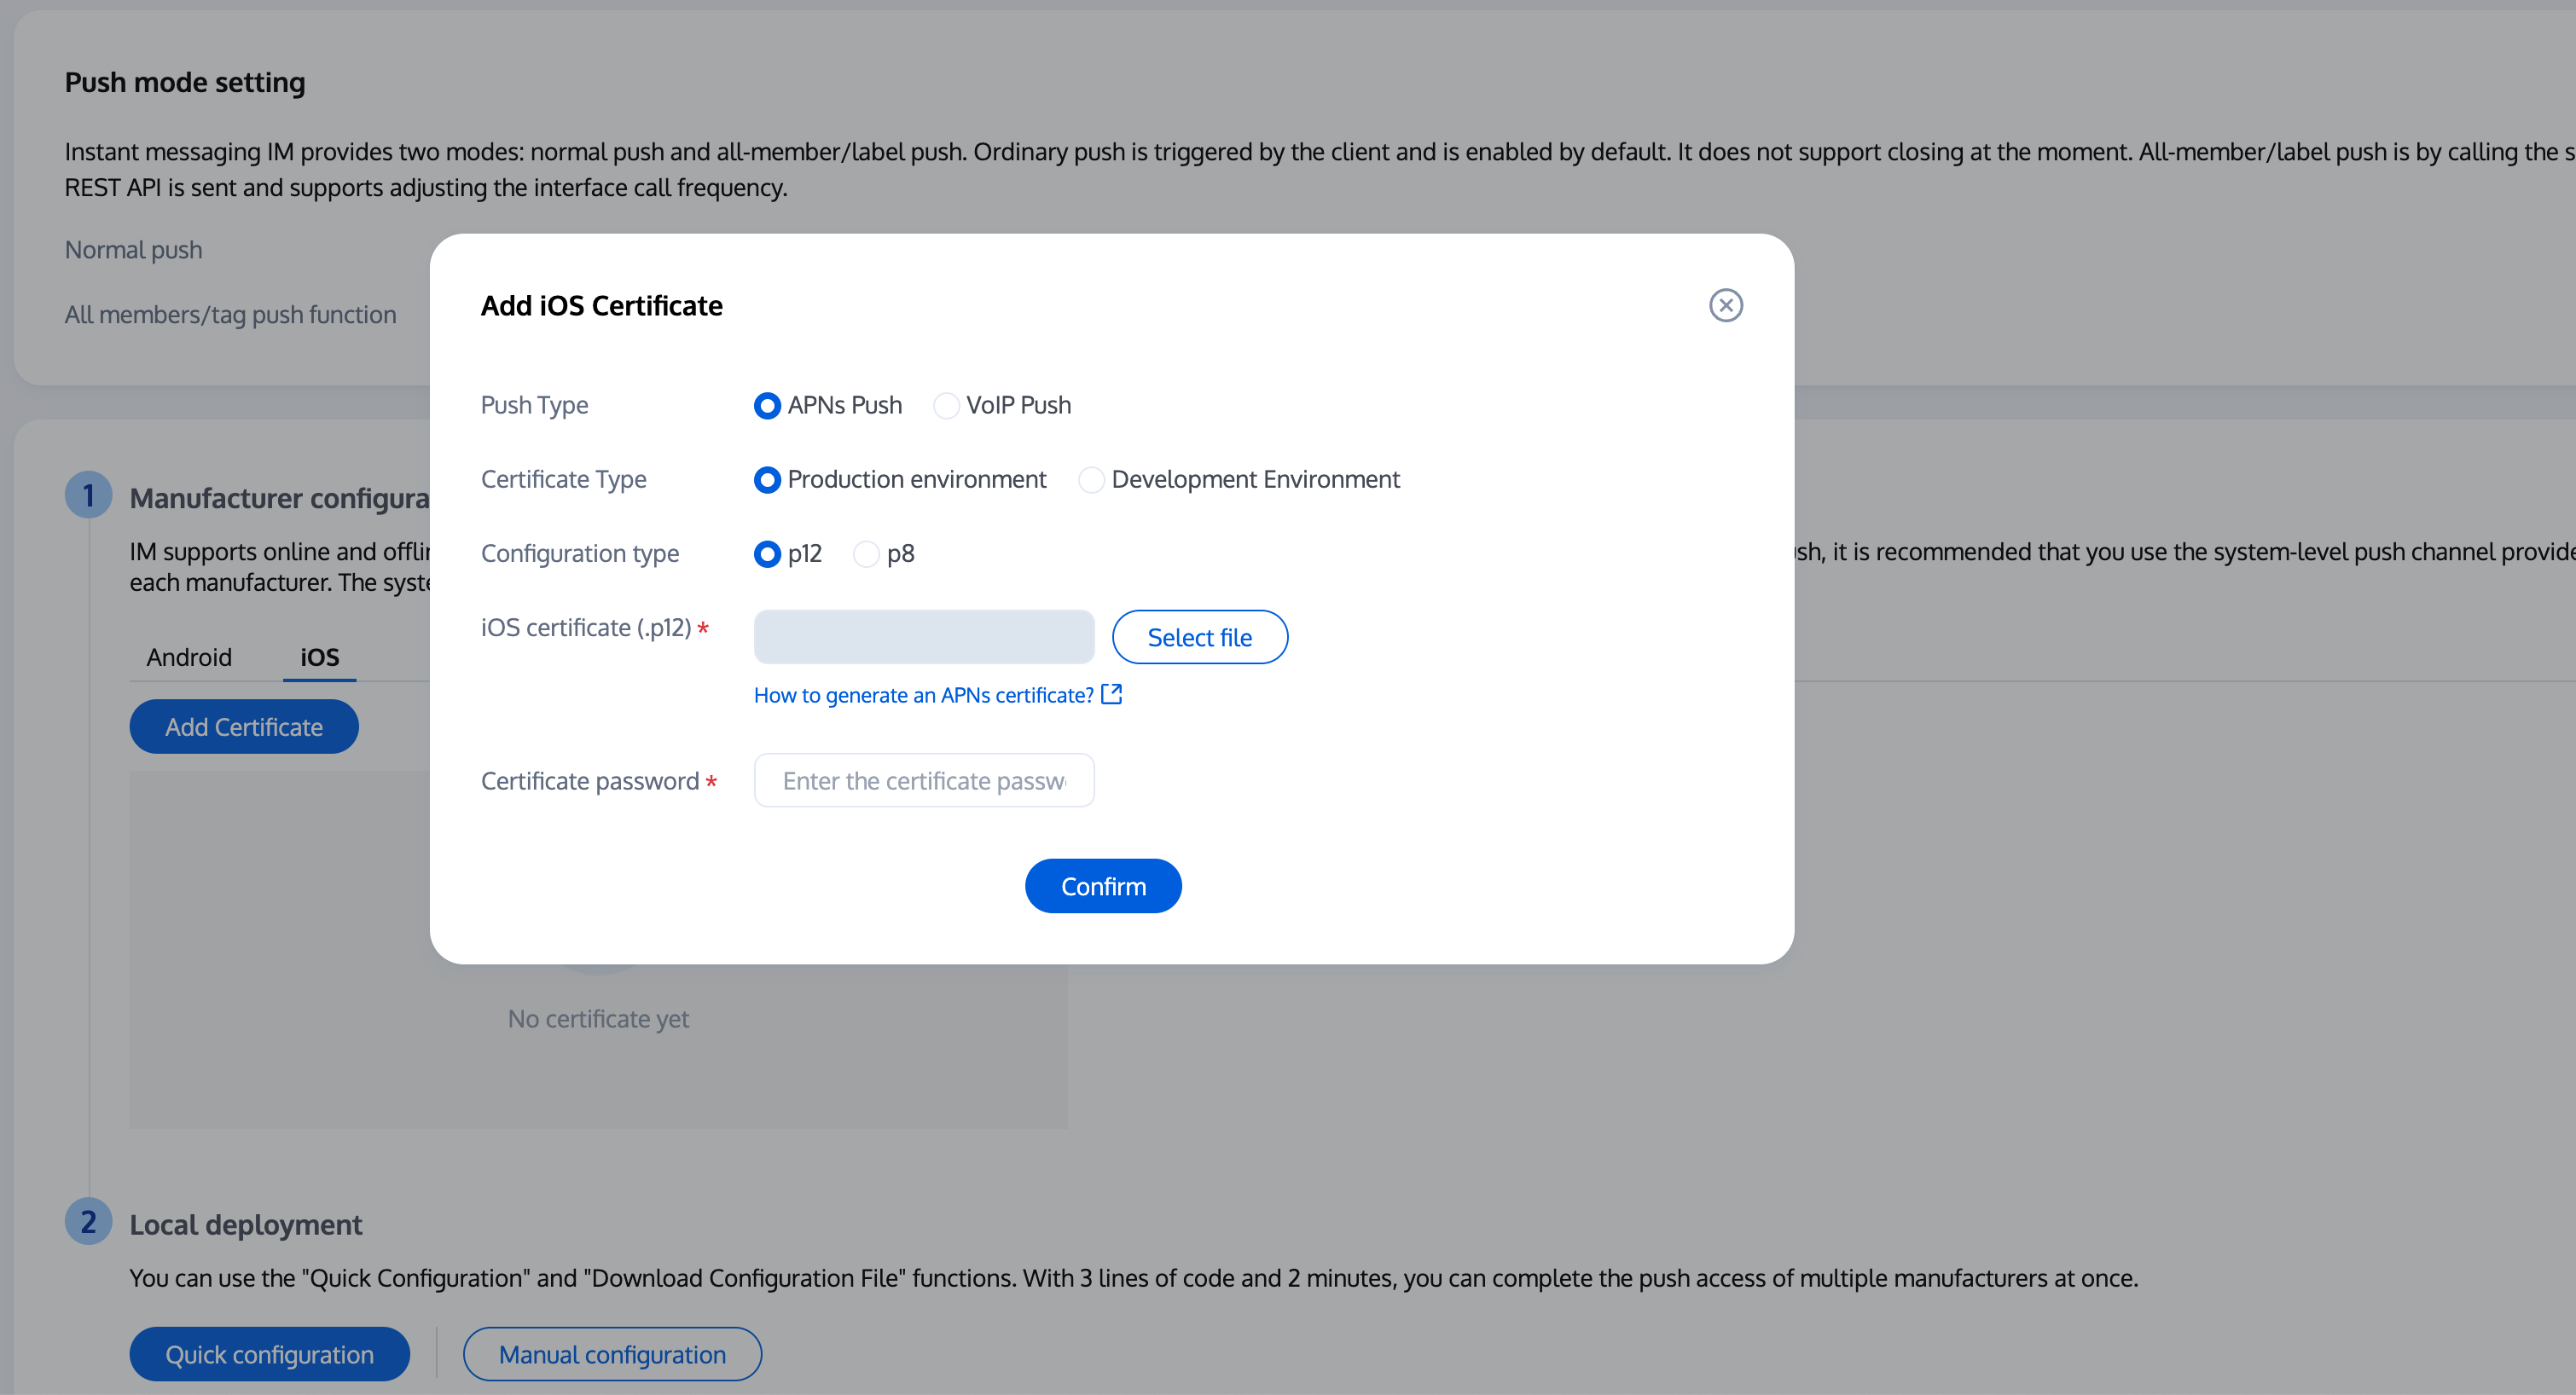

注意
上传证书名最好使用全英文(尤其不能使用括号等特殊字符)。
上传证书需要设置密码,无密码收不到推送。
发布 App Store 的证书需要设置为生产环境,否则无法收到推送。
上传的 p12 证书必须是自己申请的真实有效的证书。
操作步骤
步骤1:注册应用到厂商推送平台
离线推送需要将您自己的应用注册到各个厂商的推送平台,得到 AppID 和 AppKey 等参数,来实现离线推送功能。
步骤2:TRTC 控制台配置
登录腾讯云 Tencent RTC 控制台 ,在Chat > Push > Access settings功能栏添加各个厂商推送证书,并将您在步骤一中获取的各厂商的 AppId、AppKey、AppSecret 等参数配置给添加的推送证书。
注意:
关于点击后续动作选项:
如需使用本插件提供的点击跳转能力, 请保持默认值不变, 即通常是 `打开应用内指定页面` 并带有默认配置.
如需使用上报统计功能, 也请保持此项默认值不变,
厂商推送平台 | IM 控制台配置 |
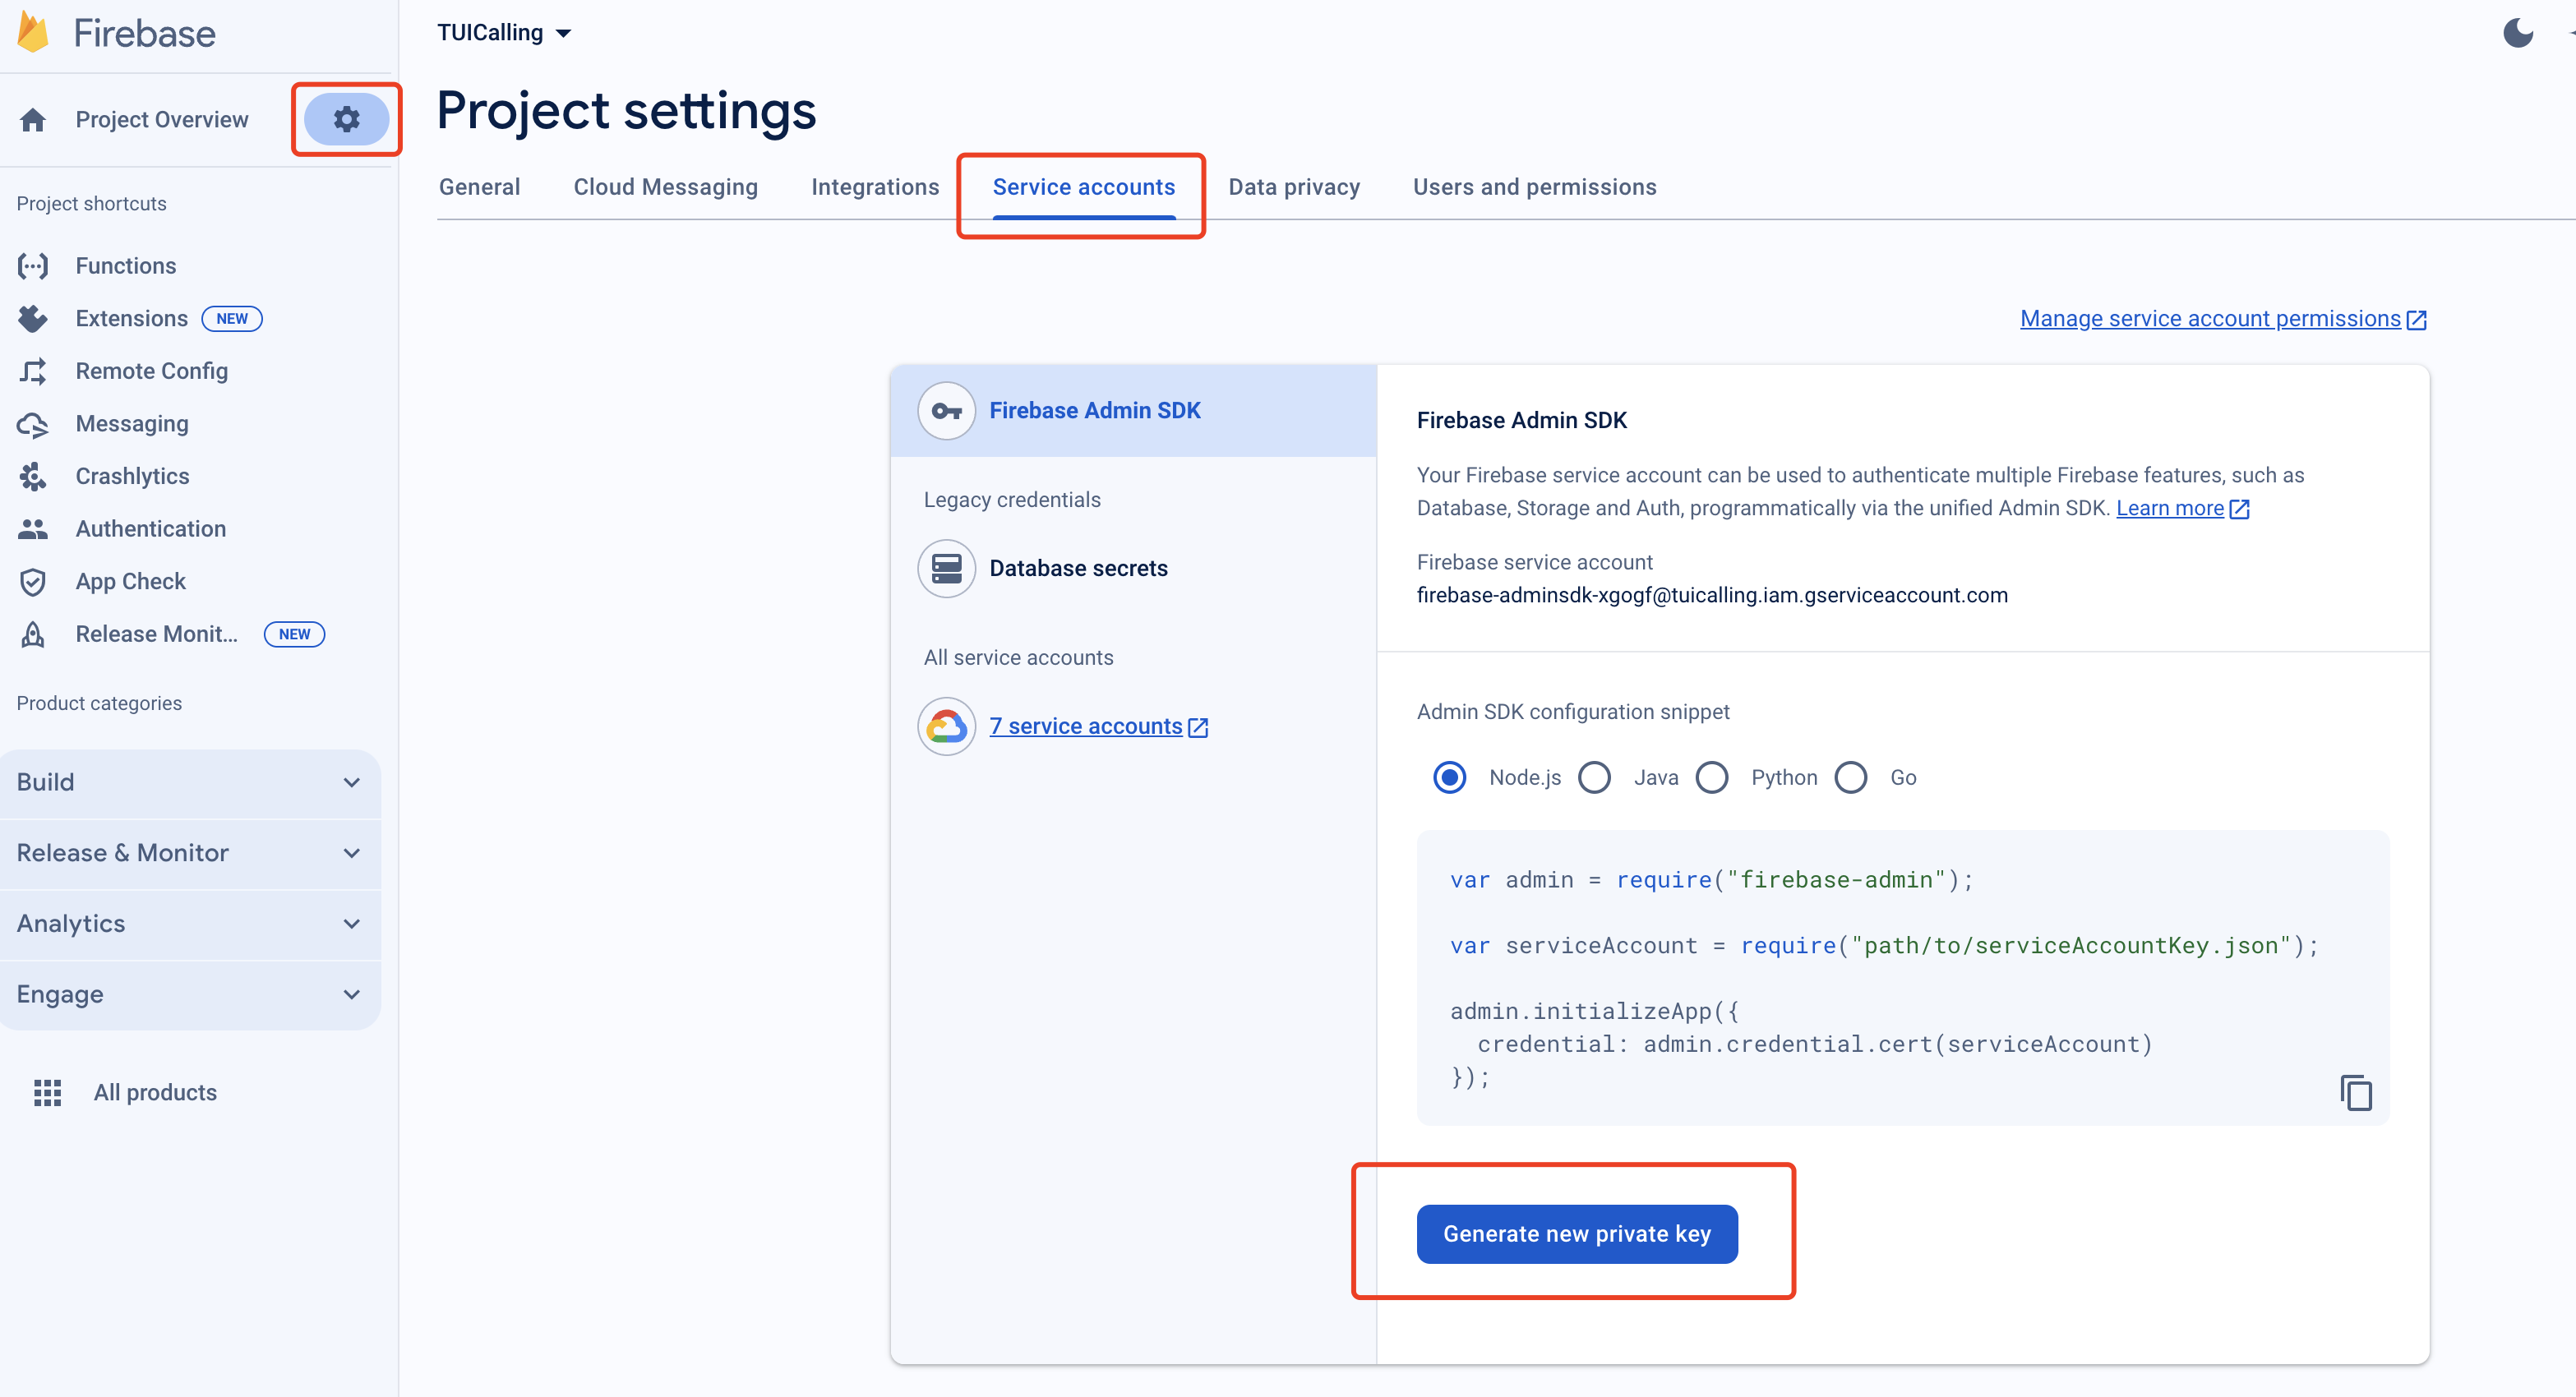 | 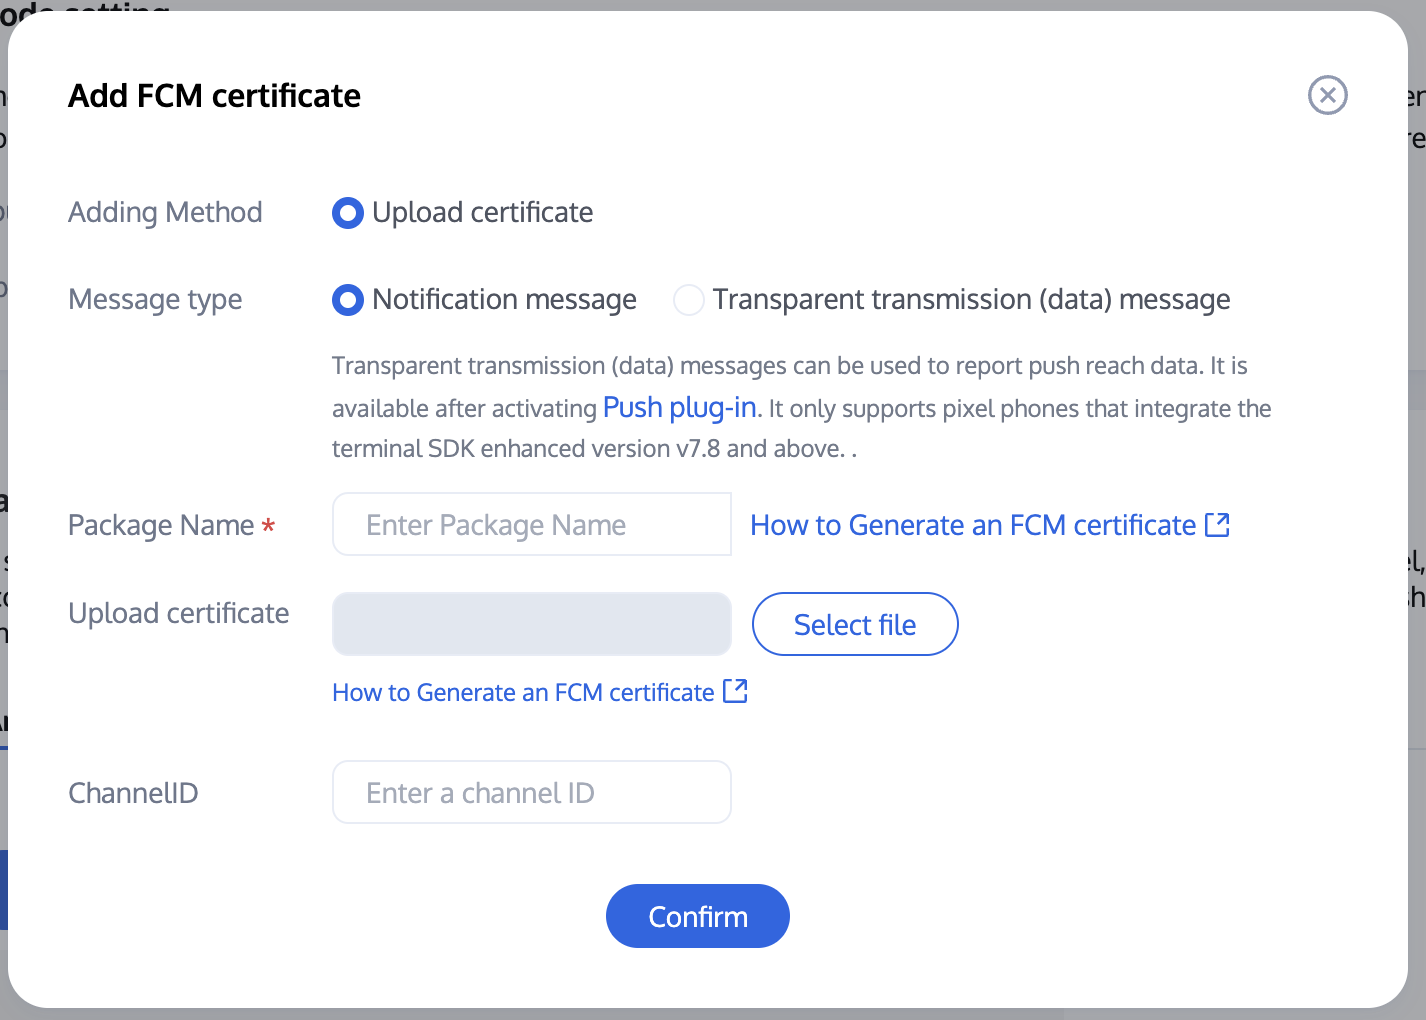 |
步骤3: 推送参数配置
请将您在厂商配置步骤中, 获取到的 iOS APNs 推送证书, 上传至 IM 控制台。
IM 控制台会为您分配一个证书 ID,见下图:
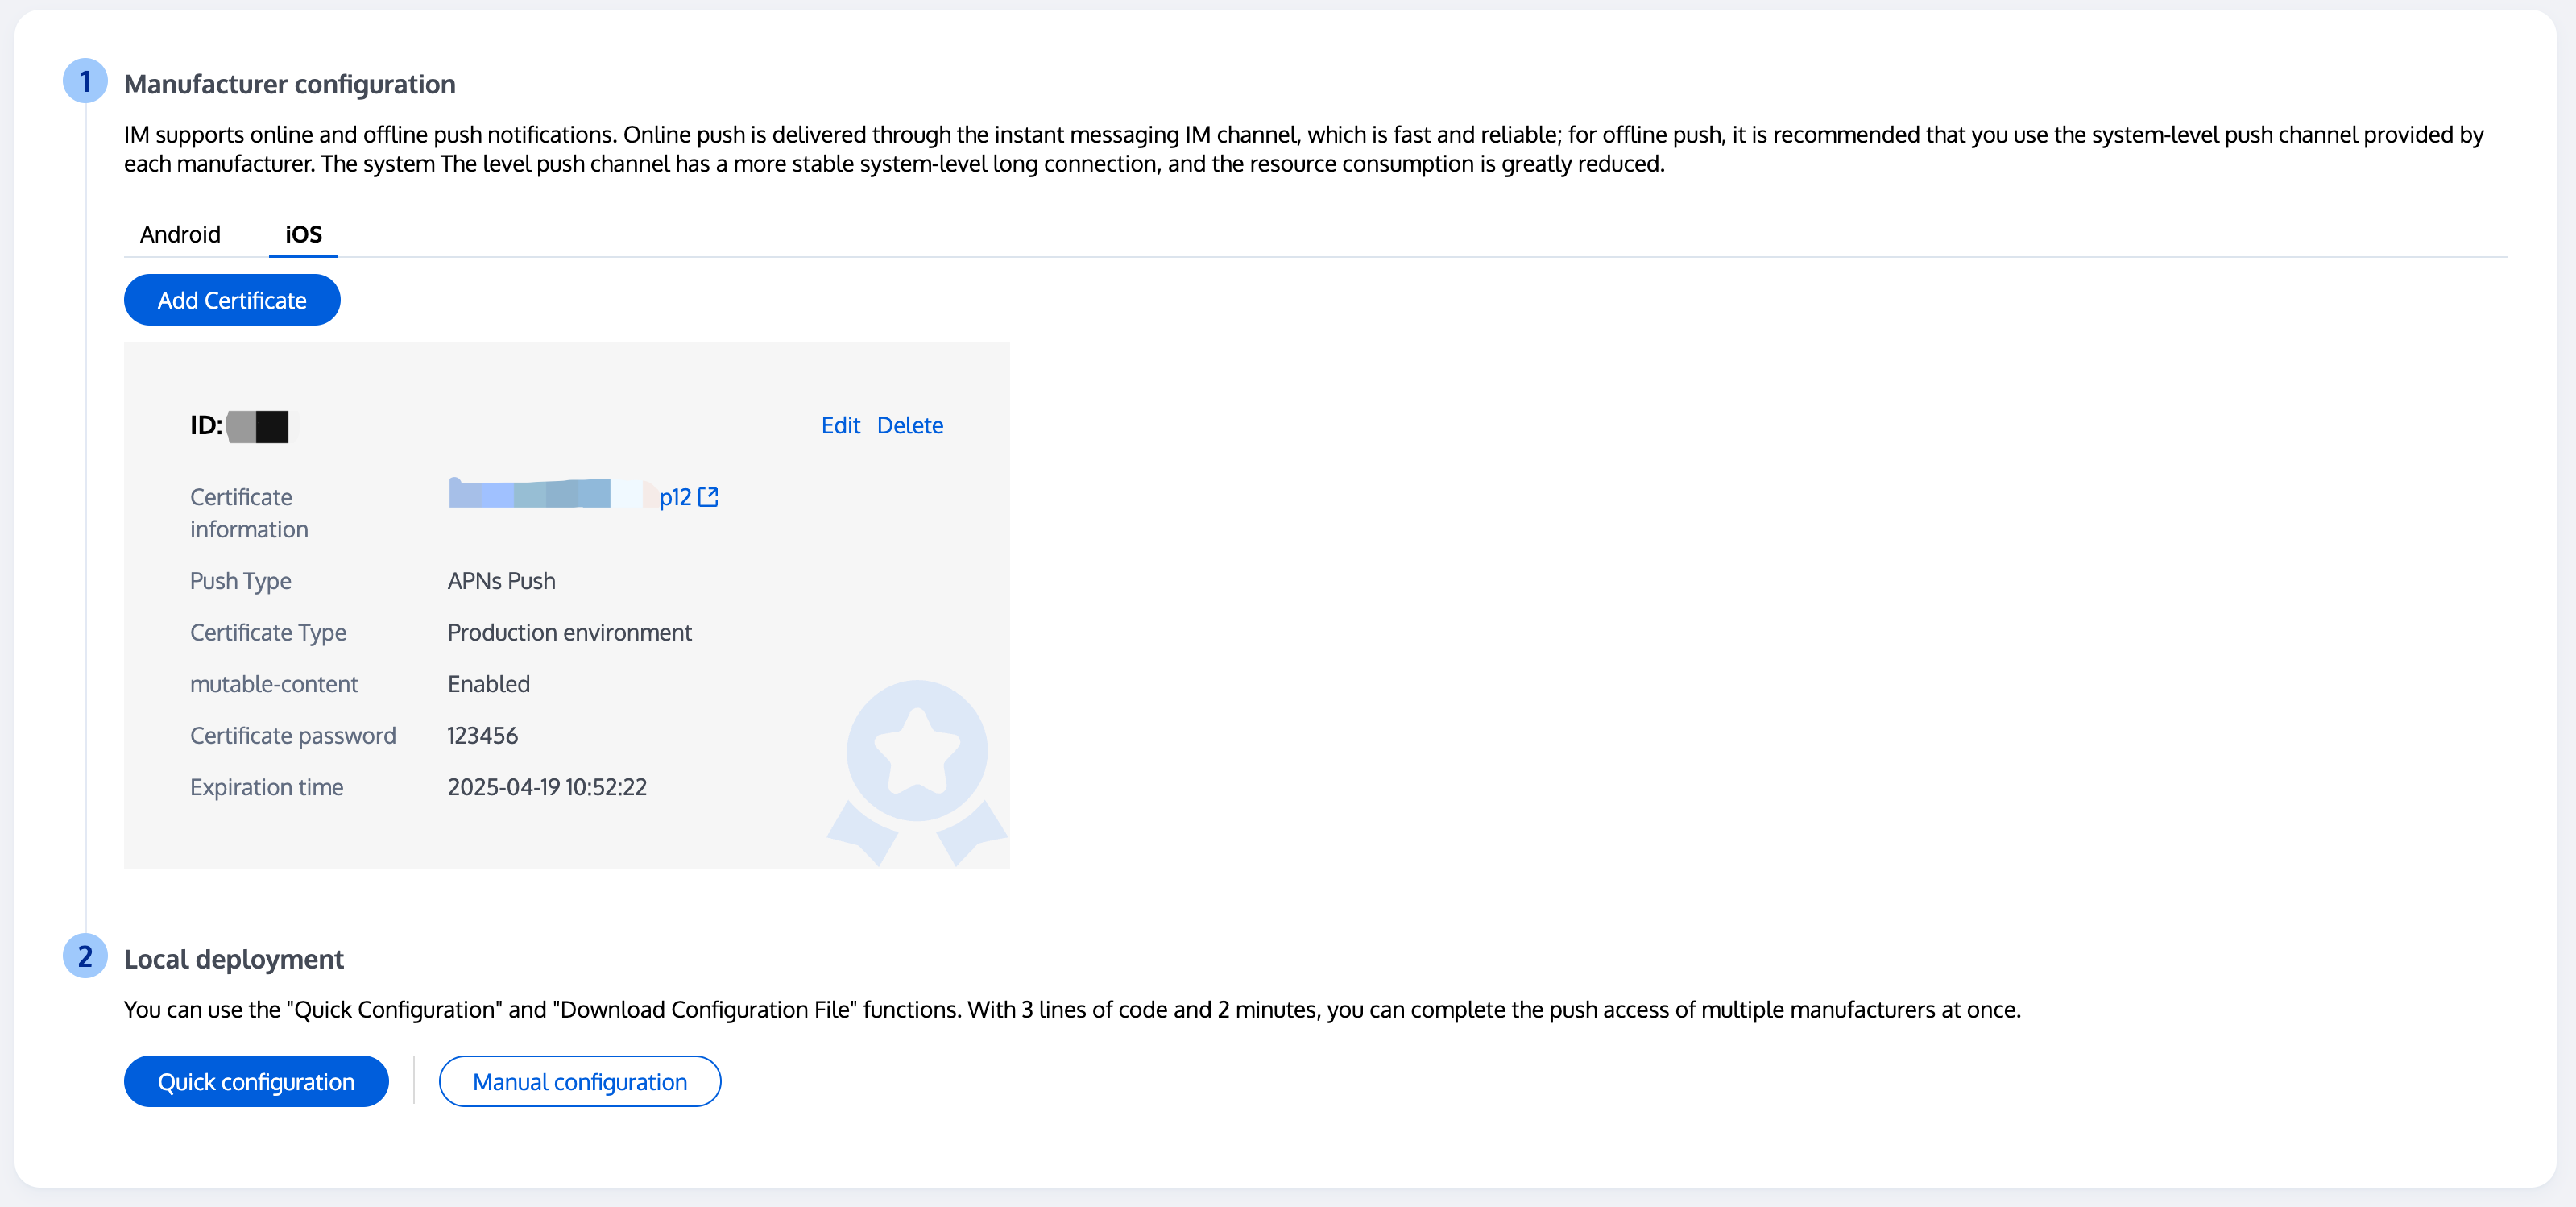

在您应用的启动后尽可能早的位置, 调用
TencentCloudChatPush().setApnsCertificateID 方法, 将此证书 ID 传入。TencentCloudChatPush().setApnsCertificateID(apnsCertificateID: Certificate ID);
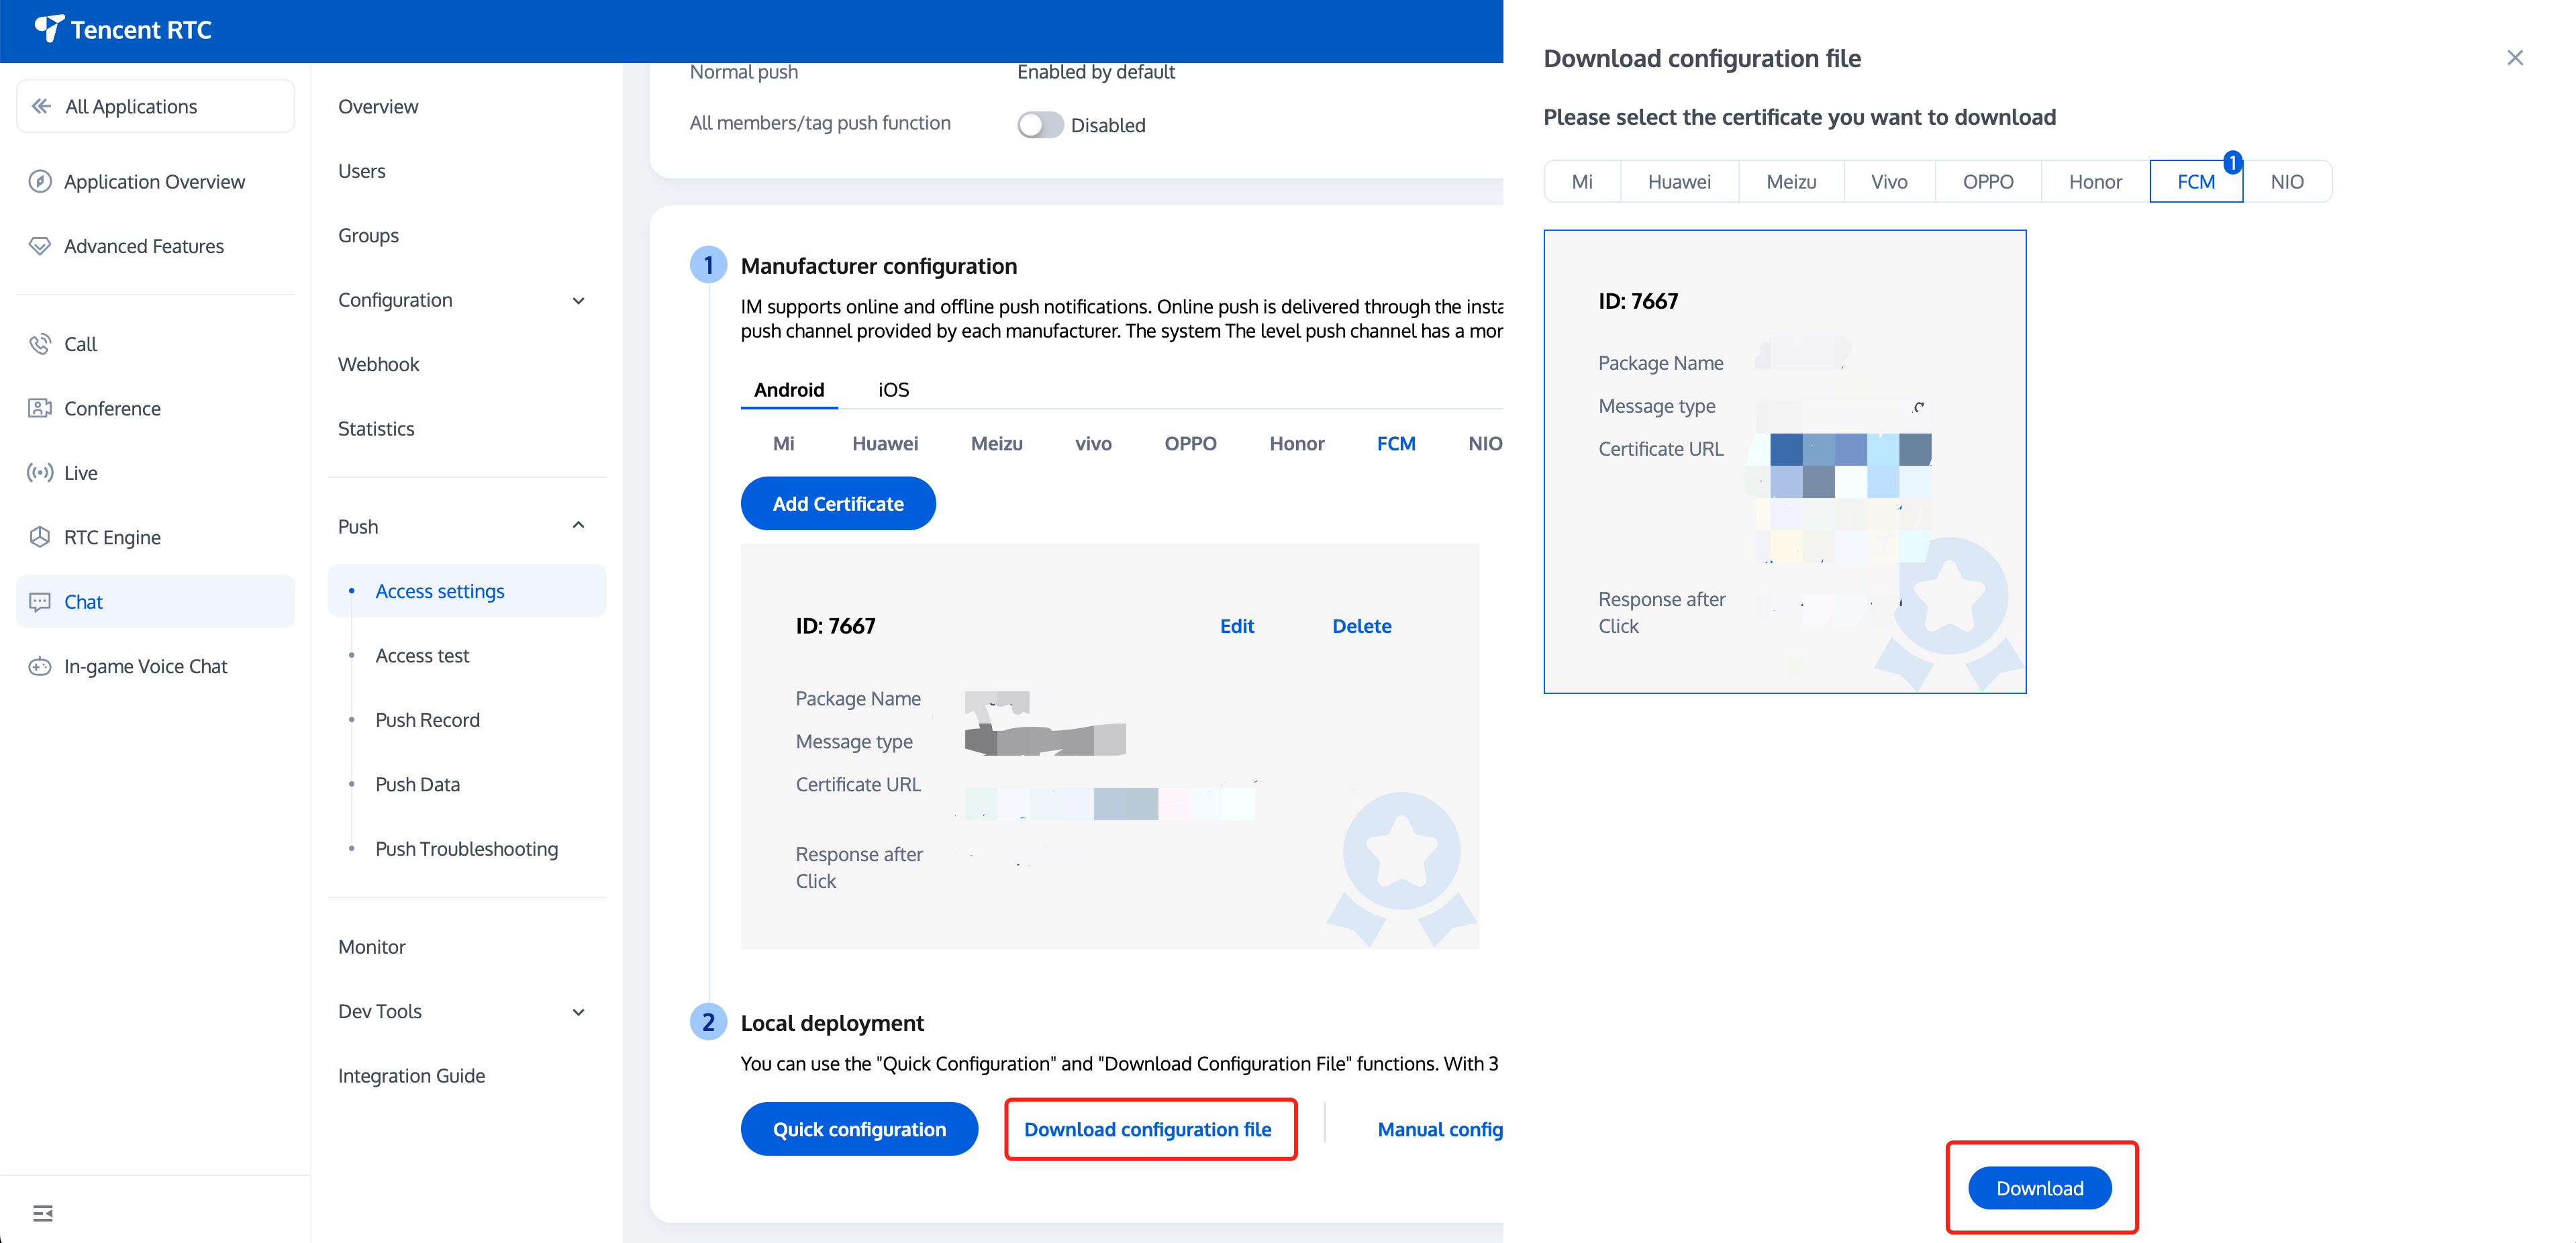
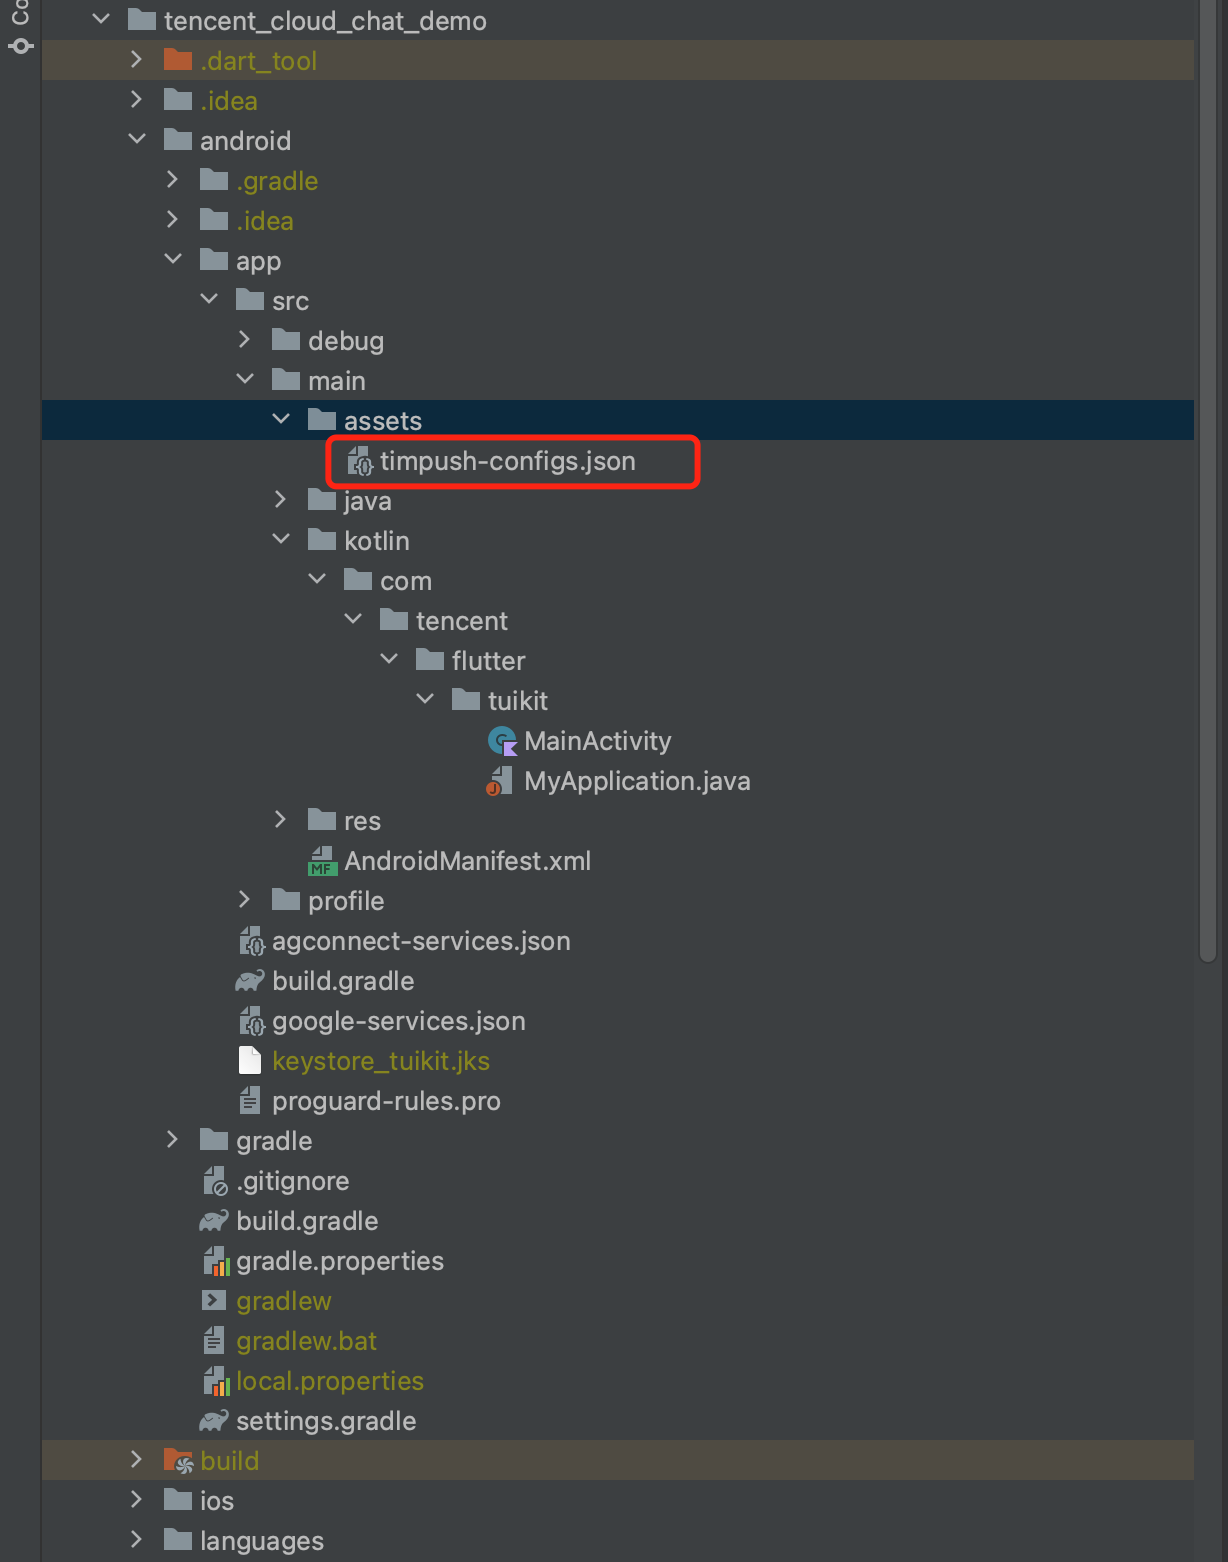
完成控制台厂商推送信息填写后,下载并添加配置文件到工程。将下载的 timpush-configs.json 文件添加到项目的
android/app/src/main/assets 目录下, 如果该目录不存在, 请手动创建.1.选择下载配置文件 timpush-configs.json | 2.添加到工程 |
 |  |
步骤4: 客户端代码配置
本步骤,需编写若干原生代码,例如:Swift, Java, XML 等。
请不要担心, 直接根据说明, 复制我们提供的代码到指定文件即可。
您可使用 Xcode 编辑,也可直接在 Visual Studio Code 或 Android Studio 中编辑。
打开
ios/Runner/AppDelegate.swift 文件,将下列圈出的代码粘贴进入,效果如图所示. 代码附在图片后。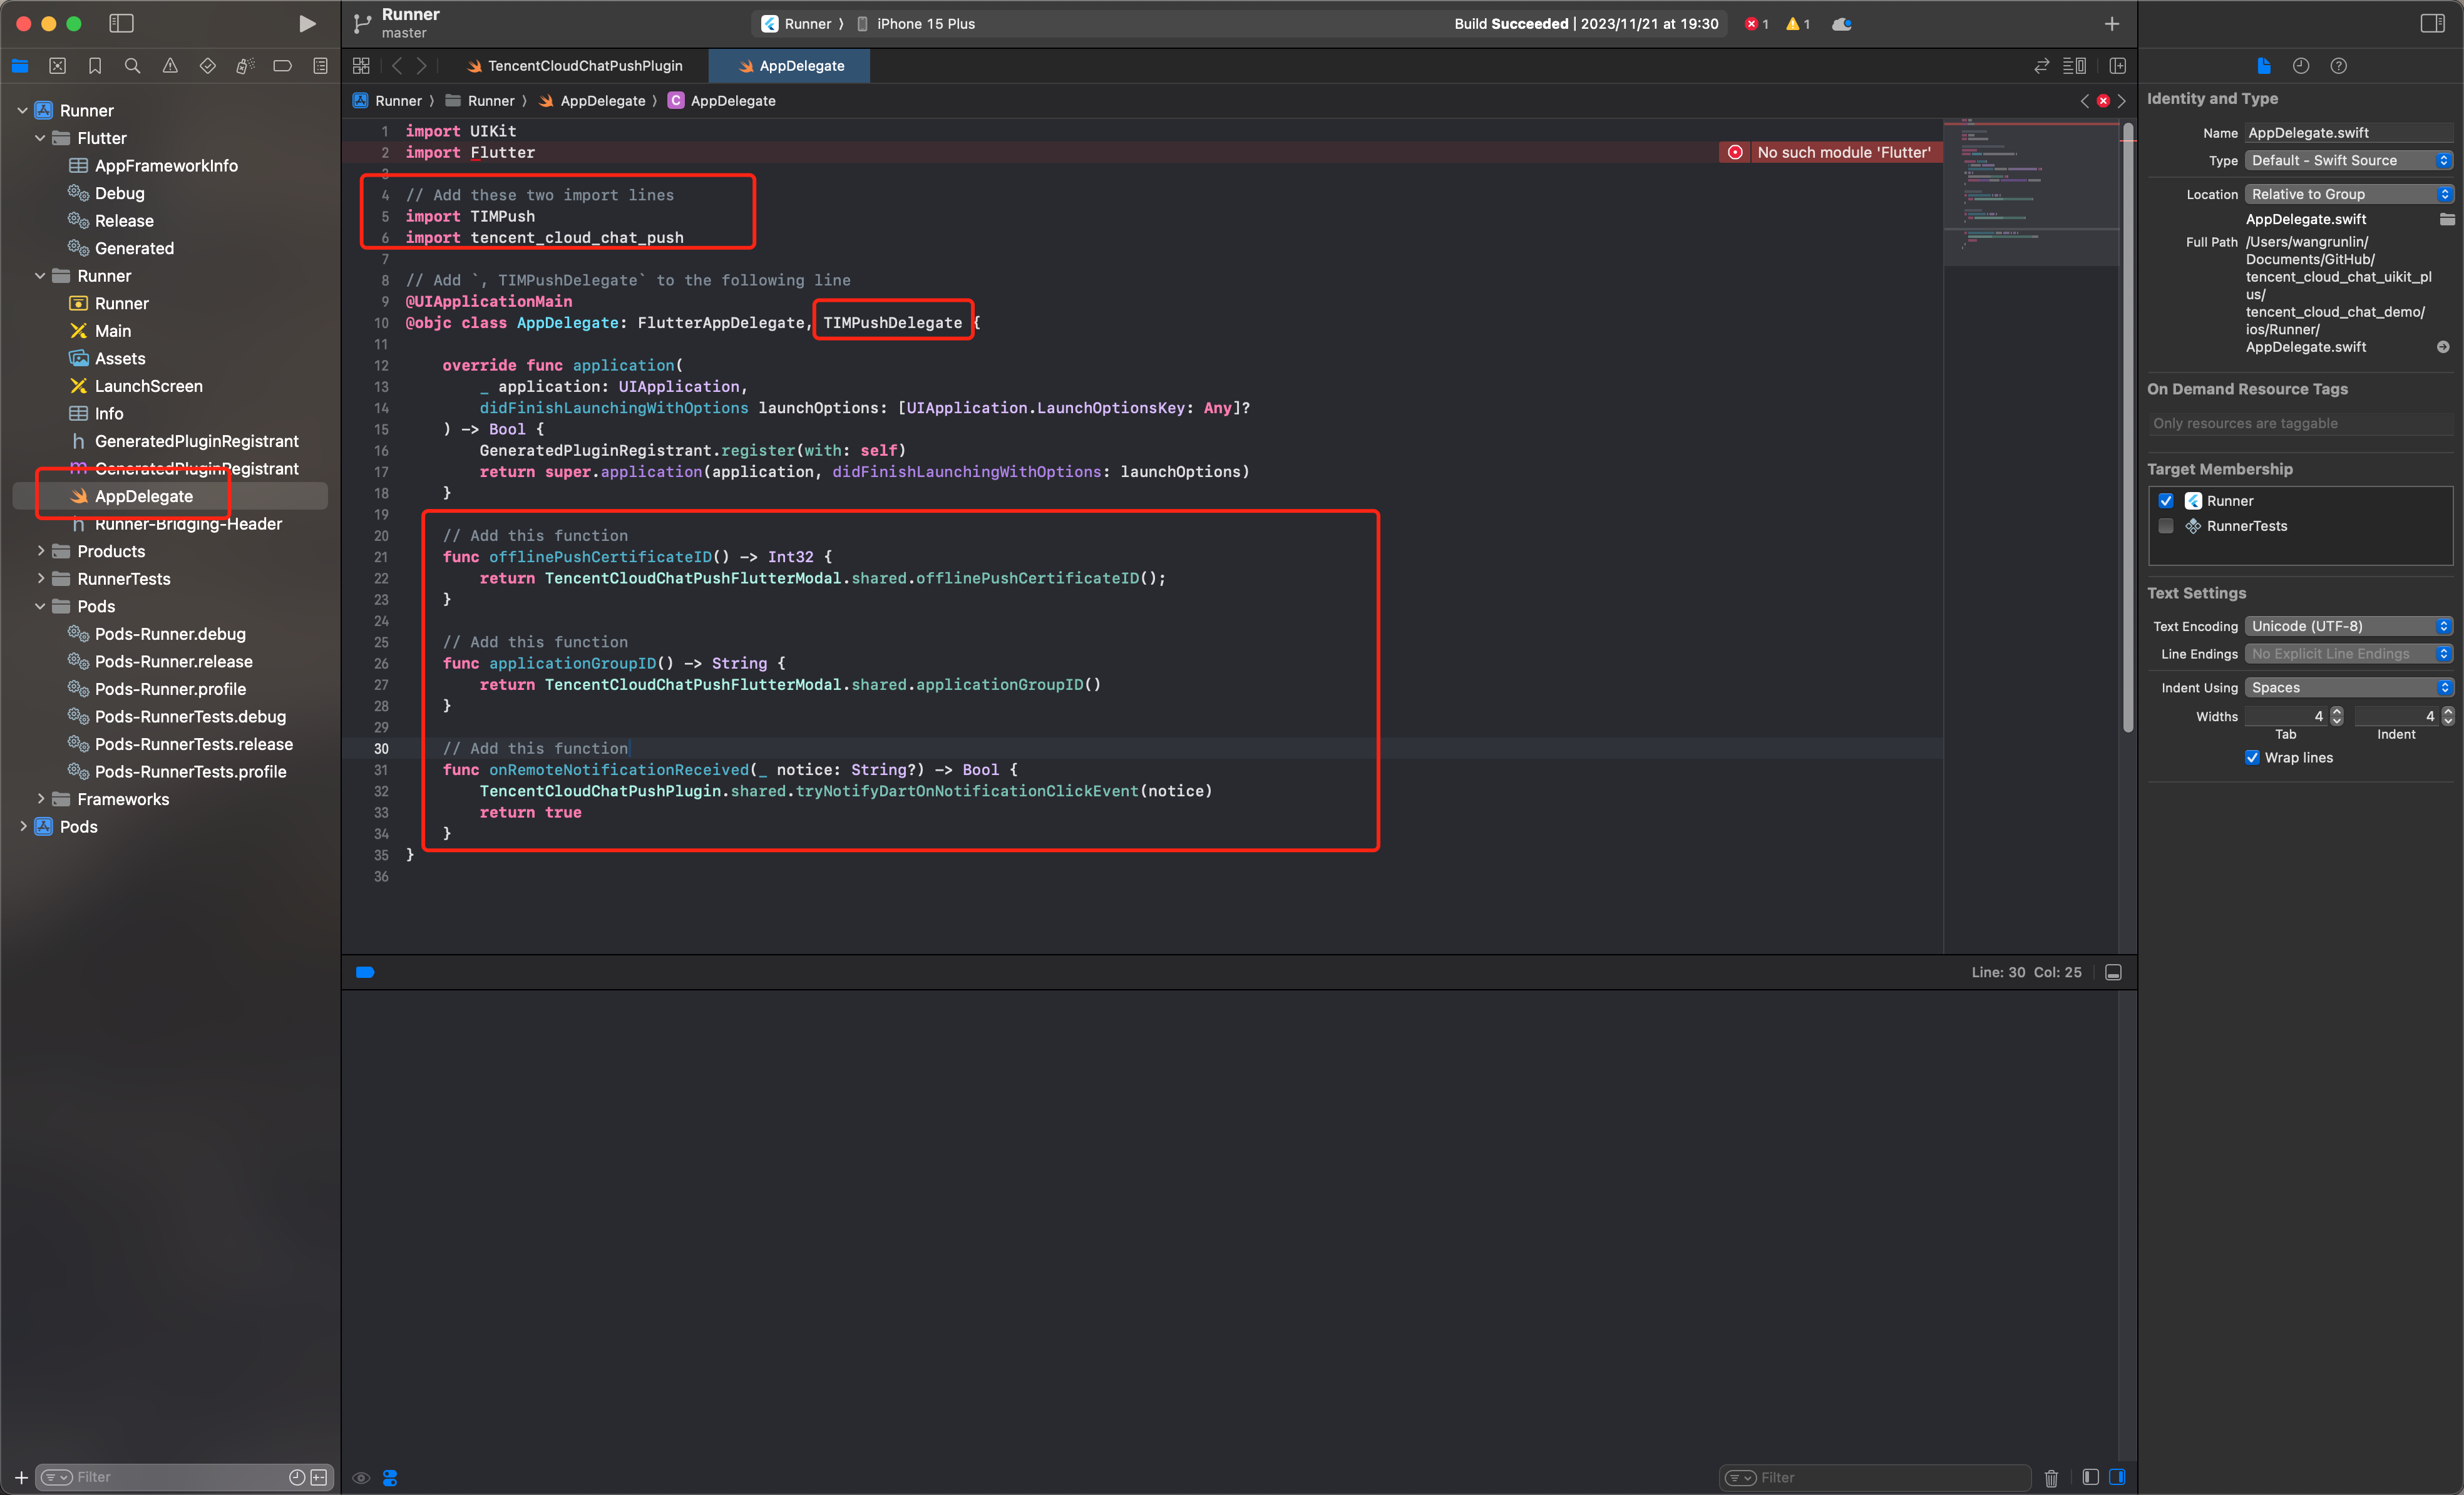
import UIKitimport Flutter// Add these two import linesimport TIMPushimport tencent_cloud_chat_push// Add `, TIMPushDelegate` to the following line@UIApplicationMain@objc class AppDelegate: FlutterAppDelegate, TIMPushDelegate {override func application(_ application: UIApplication,didFinishLaunchingWithOptions launchOptions: [UIApplication.LaunchOptionsKey: Any]?) -> Bool {GeneratedPluginRegistrant.register(with: self)return super.application(application, didFinishLaunchingWithOptions: launchOptions)}// Add this functionfunc offlinePushCertificateID() -> Int32 {return TencentCloudChatPushFlutterModal.shared.offlinePushCertificateID();}// Add this functionfunc applicationGroupID() -> String {return TencentCloudChatPushFlutterModal.shared.applicationGroupID()}// Add this functionfunc onRemoteNotificationReceived(_ notice: String?) -> Bool {TencentCloudChatPushPlugin.shared.tryNotifyDartOnNotificationClickEvent(notice)return true}}
建议使用 Android Studio 完成本部分编辑。
在您项目 android 路径下
MainActivity 同级目录中,新建一个新的 Application 文件类, 例如可命名为 MyApplication。如果您已经自定义了一个 Application 类,则可直接复用,不需要再次创建。
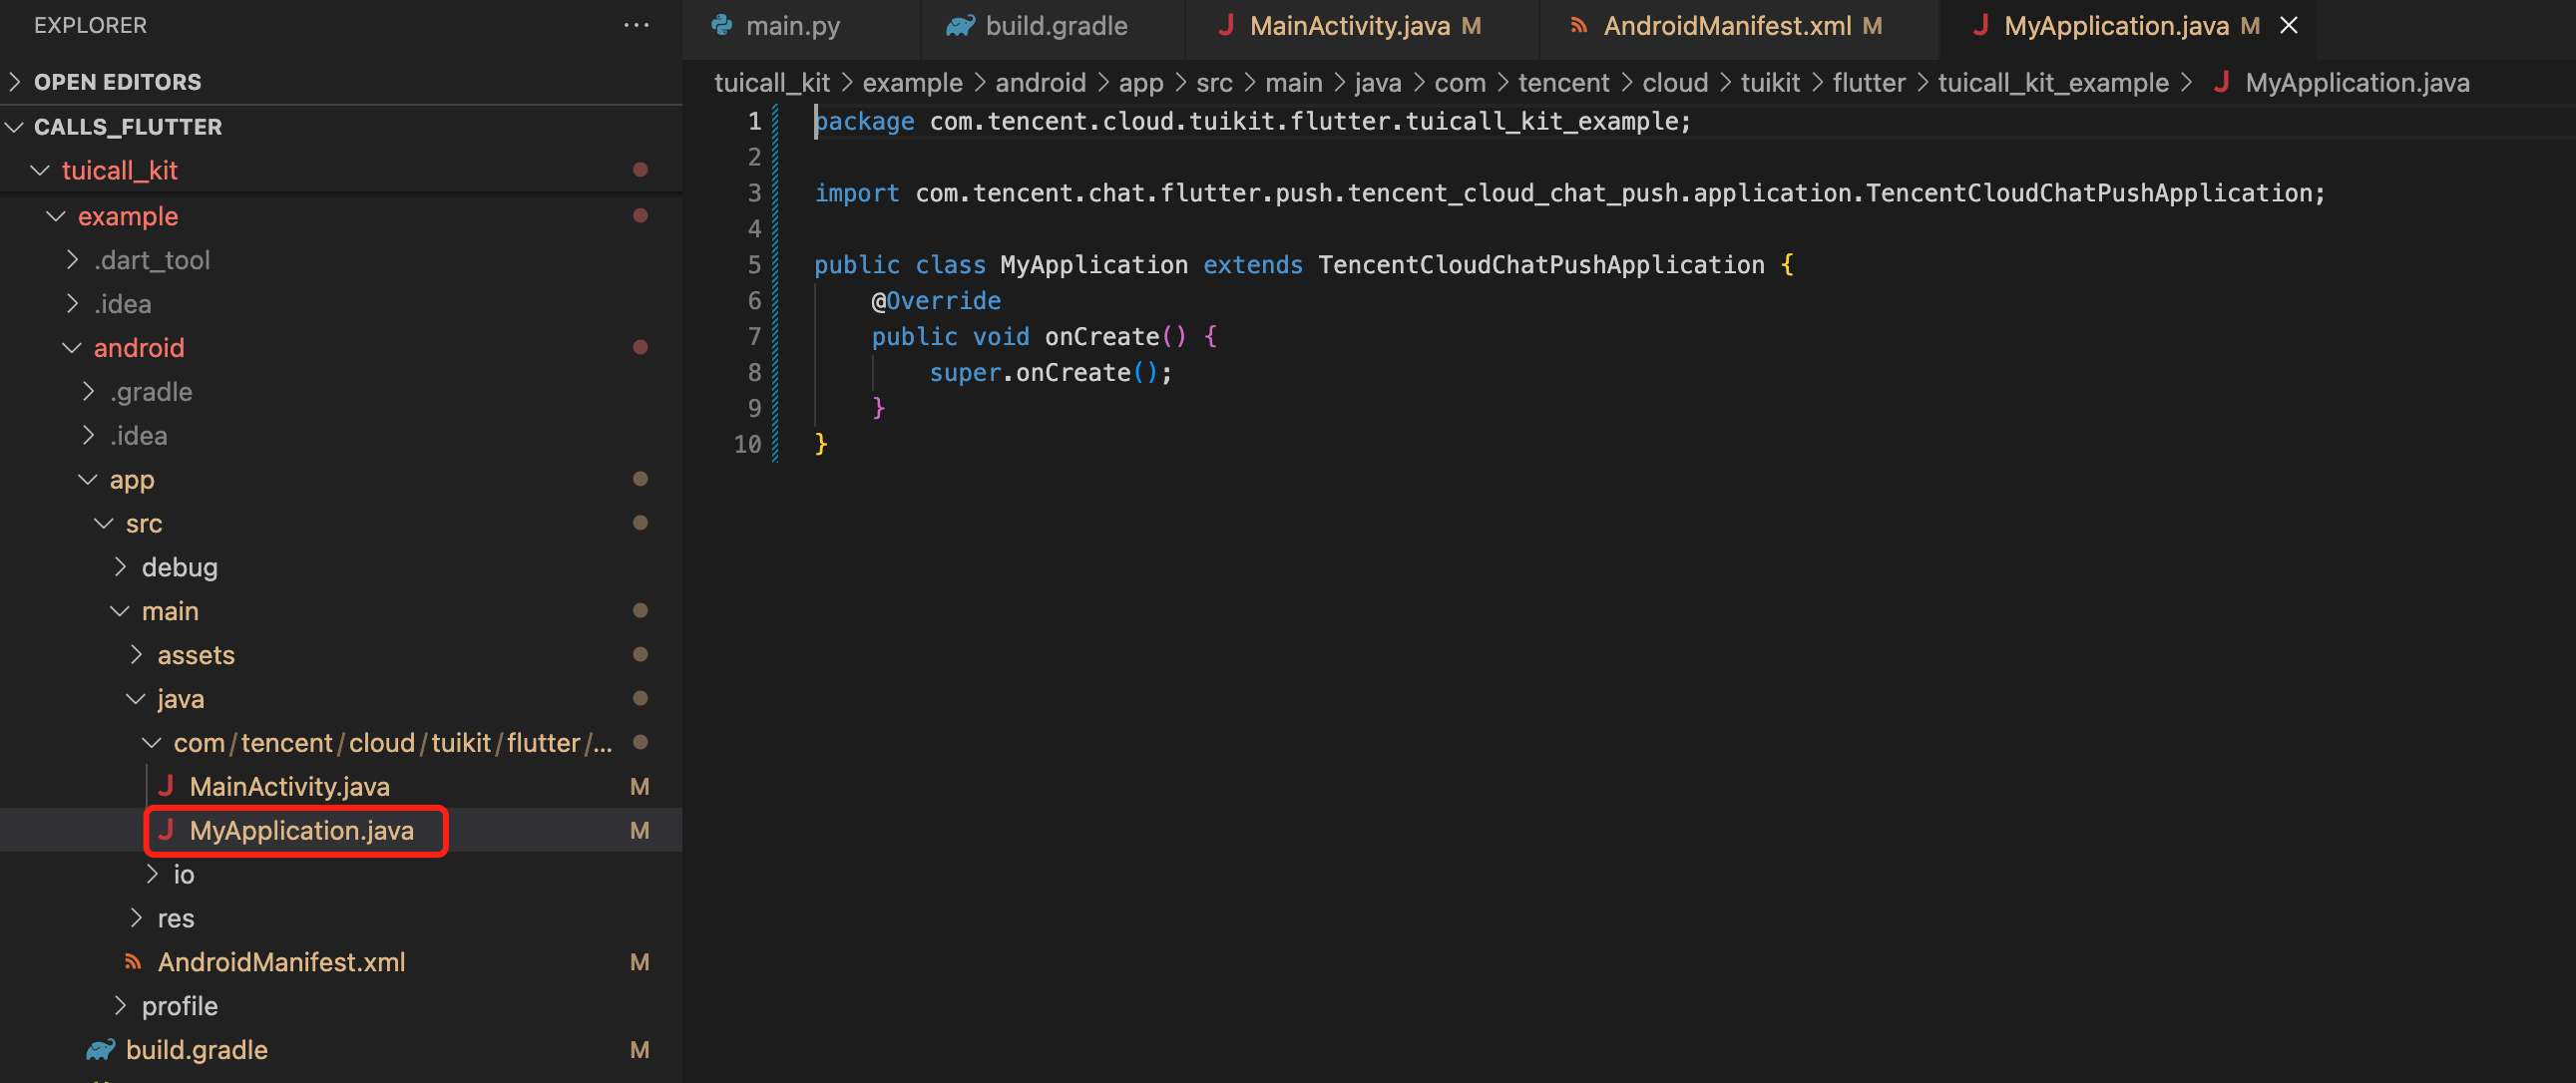

将下列代码粘贴到该文件中, 如上图所示:
package xxxx.xxxx.xx

import com.tencent.chat.flutter.push.tencent_cloud_chat_push.application.TencentCloudChatPushApplication;

public class MyApplication extends TencentCloudChatPushApplication {
    @Override
    public void onCreate() {
        super.onCreate();
    }
}
说明:
如果您已经创建了自己的 Application 为了其他用途,请直接
extends TencentCloudChatPushApplication 并保证 onCreate() 函数中,调用了 super.onCreate(); 即可。同时,您还需要修改您的 MainActivity 文件:
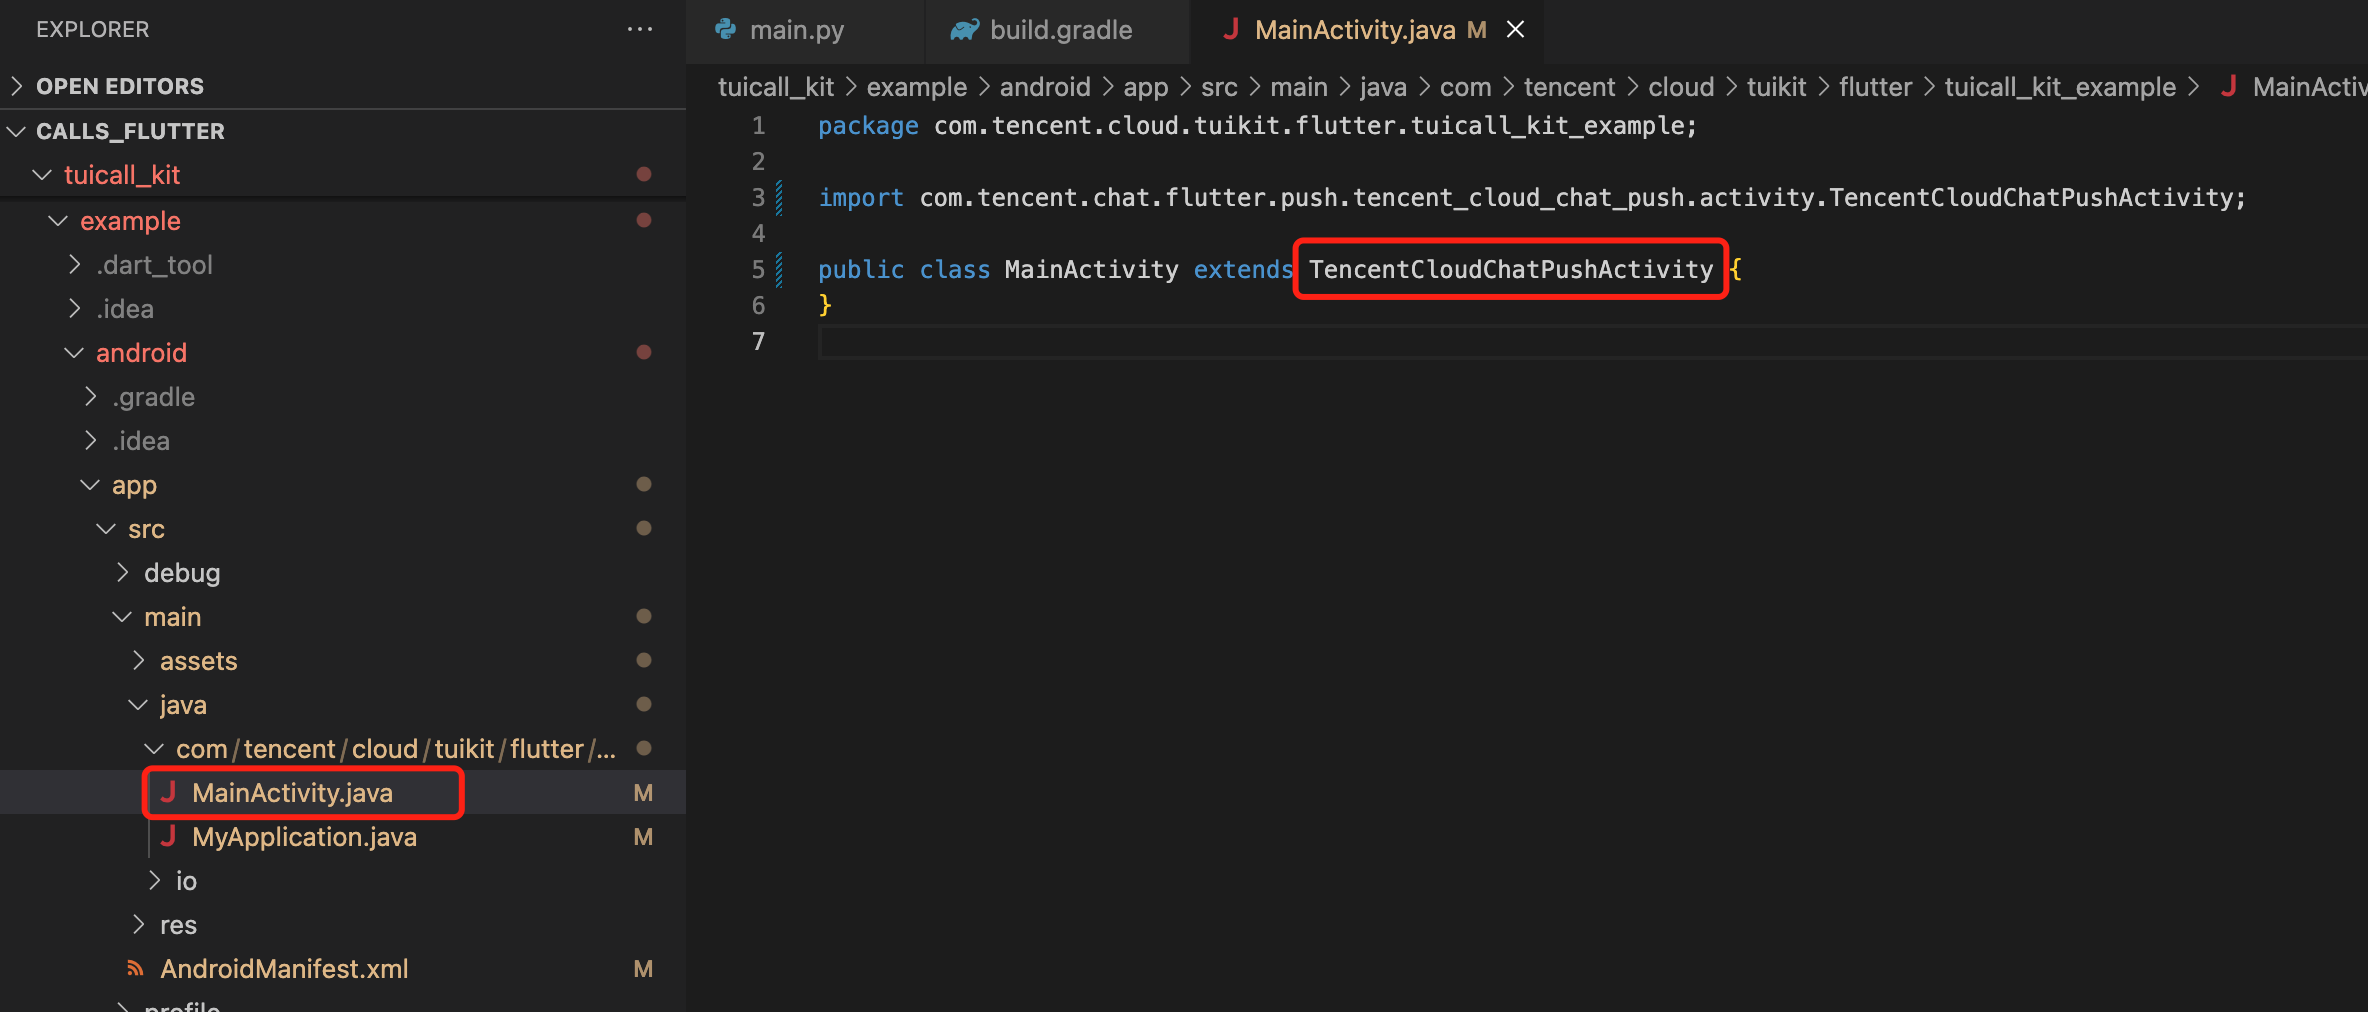

打开
android/app/src/main/AndroidManifest.xml 文件,为 <application> 标签,新增指定一个 android:name 参数即可,指向刚制作的自定义 Application 类。如图所示: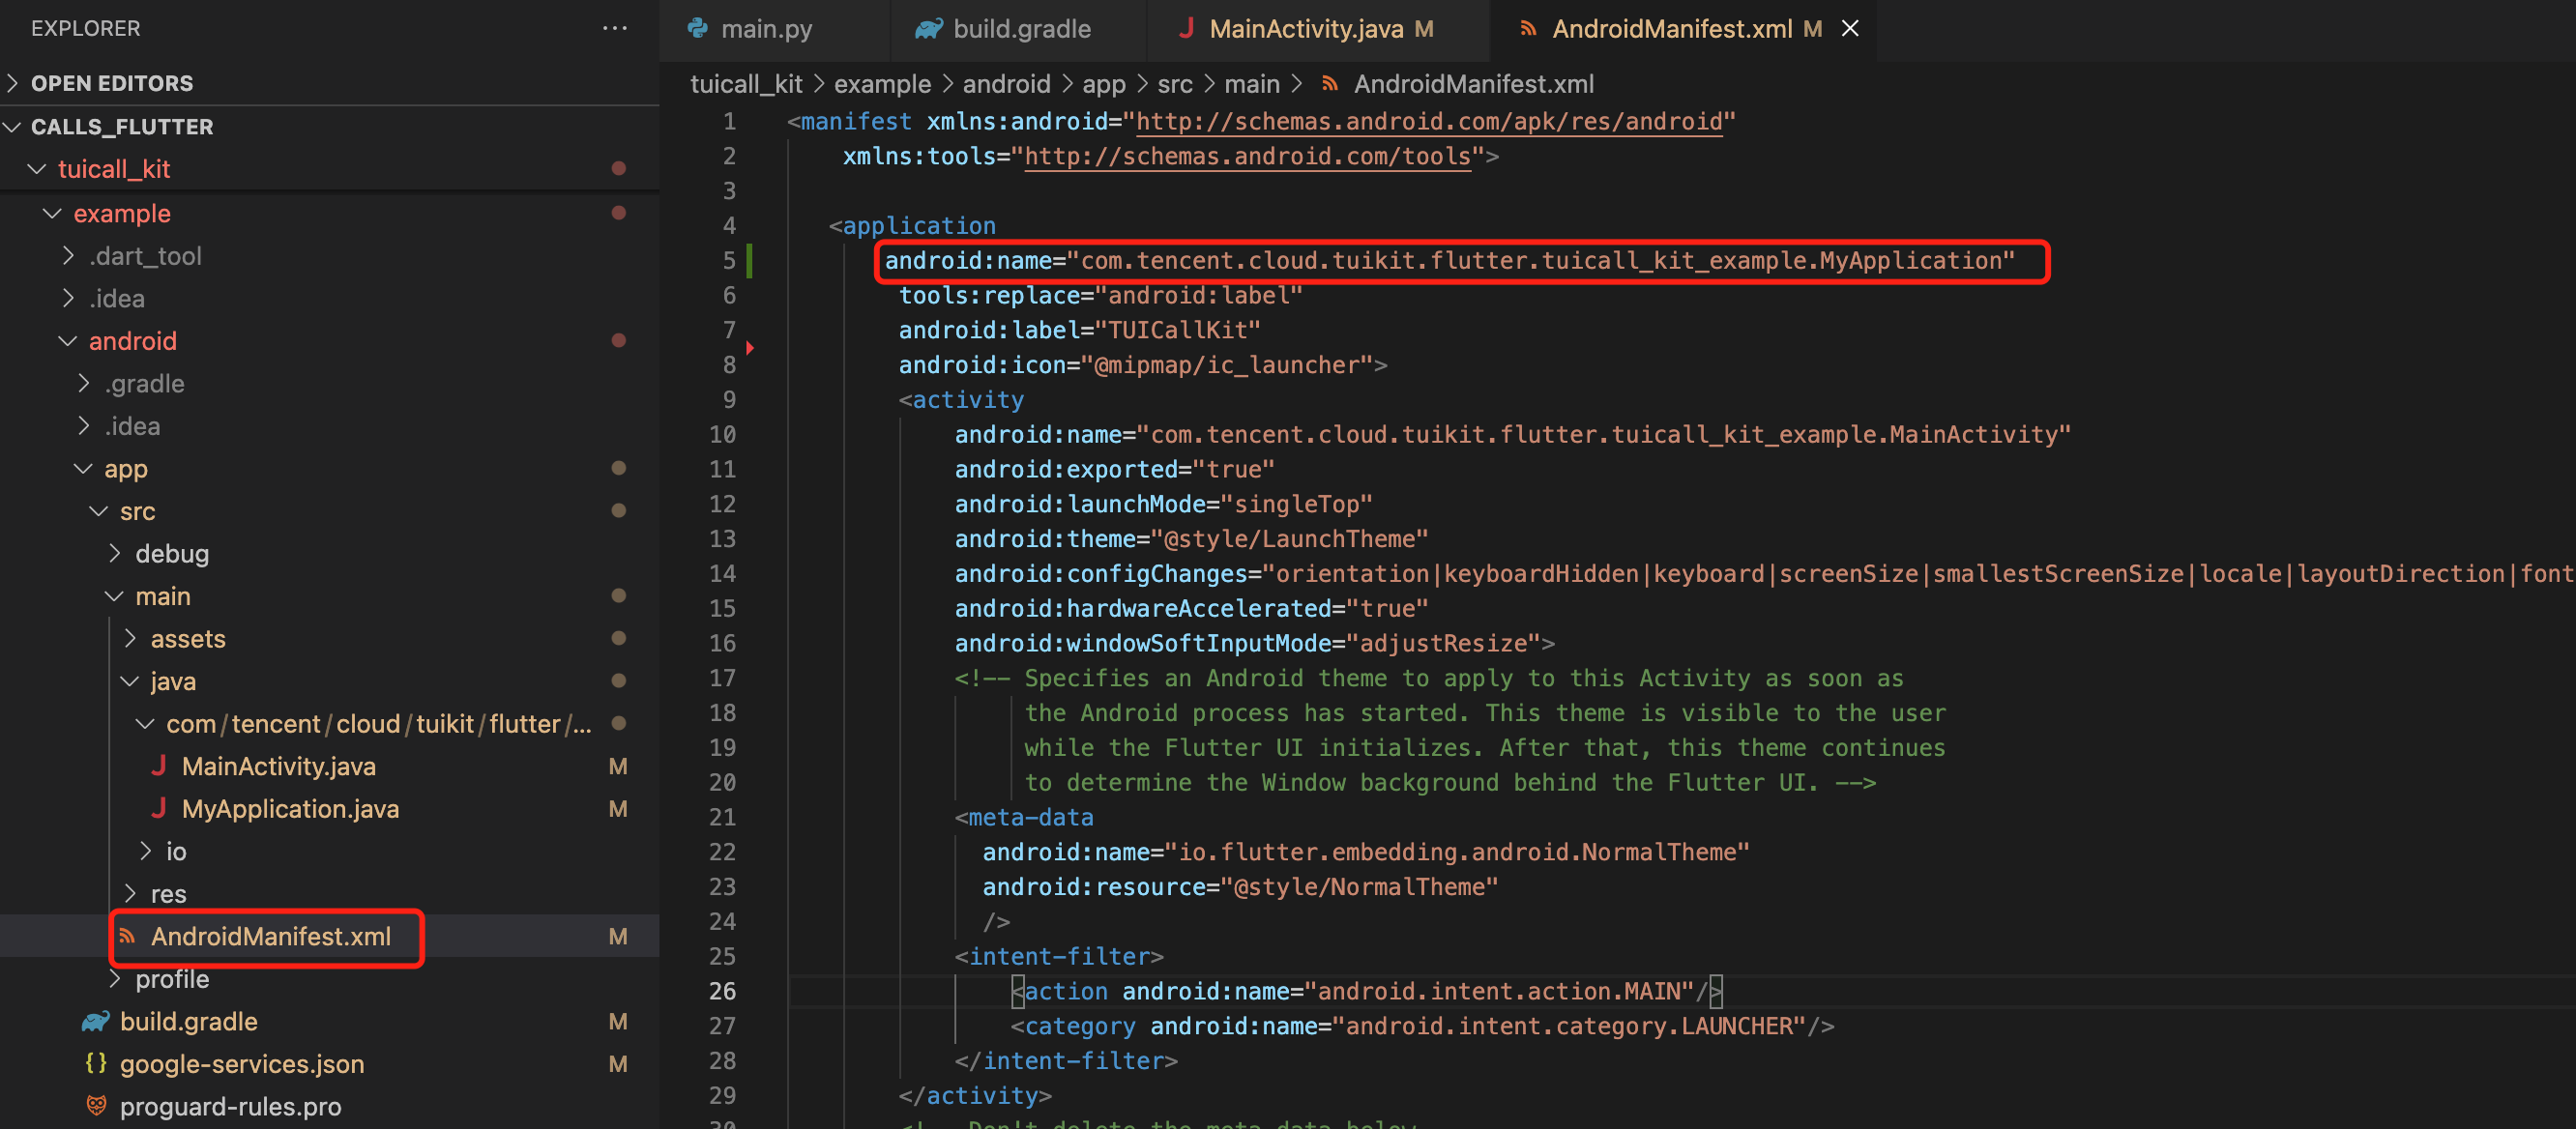

步骤5: 客户端厂商配置
iOS 端无需进行此步骤。
打开 android/app/build.gradle 文件,在最后,新增 dependencies 配置,并根据需要,引入下列全部或部分厂商的推送包。只有引入对应厂商的推送包,才能启用该厂商的原生推送能力。
dependencies {// Google Firebase Cloud Messaging (Google FCM)implementation 'com.tencent.timpush:fcm:${推送插件的版本号}' }
Google FCM 适配
按照厂商方法,集成对应的 plugin 和 json 配置文件。
1.1 下载配置文件添加到工程根目录/Android/app。
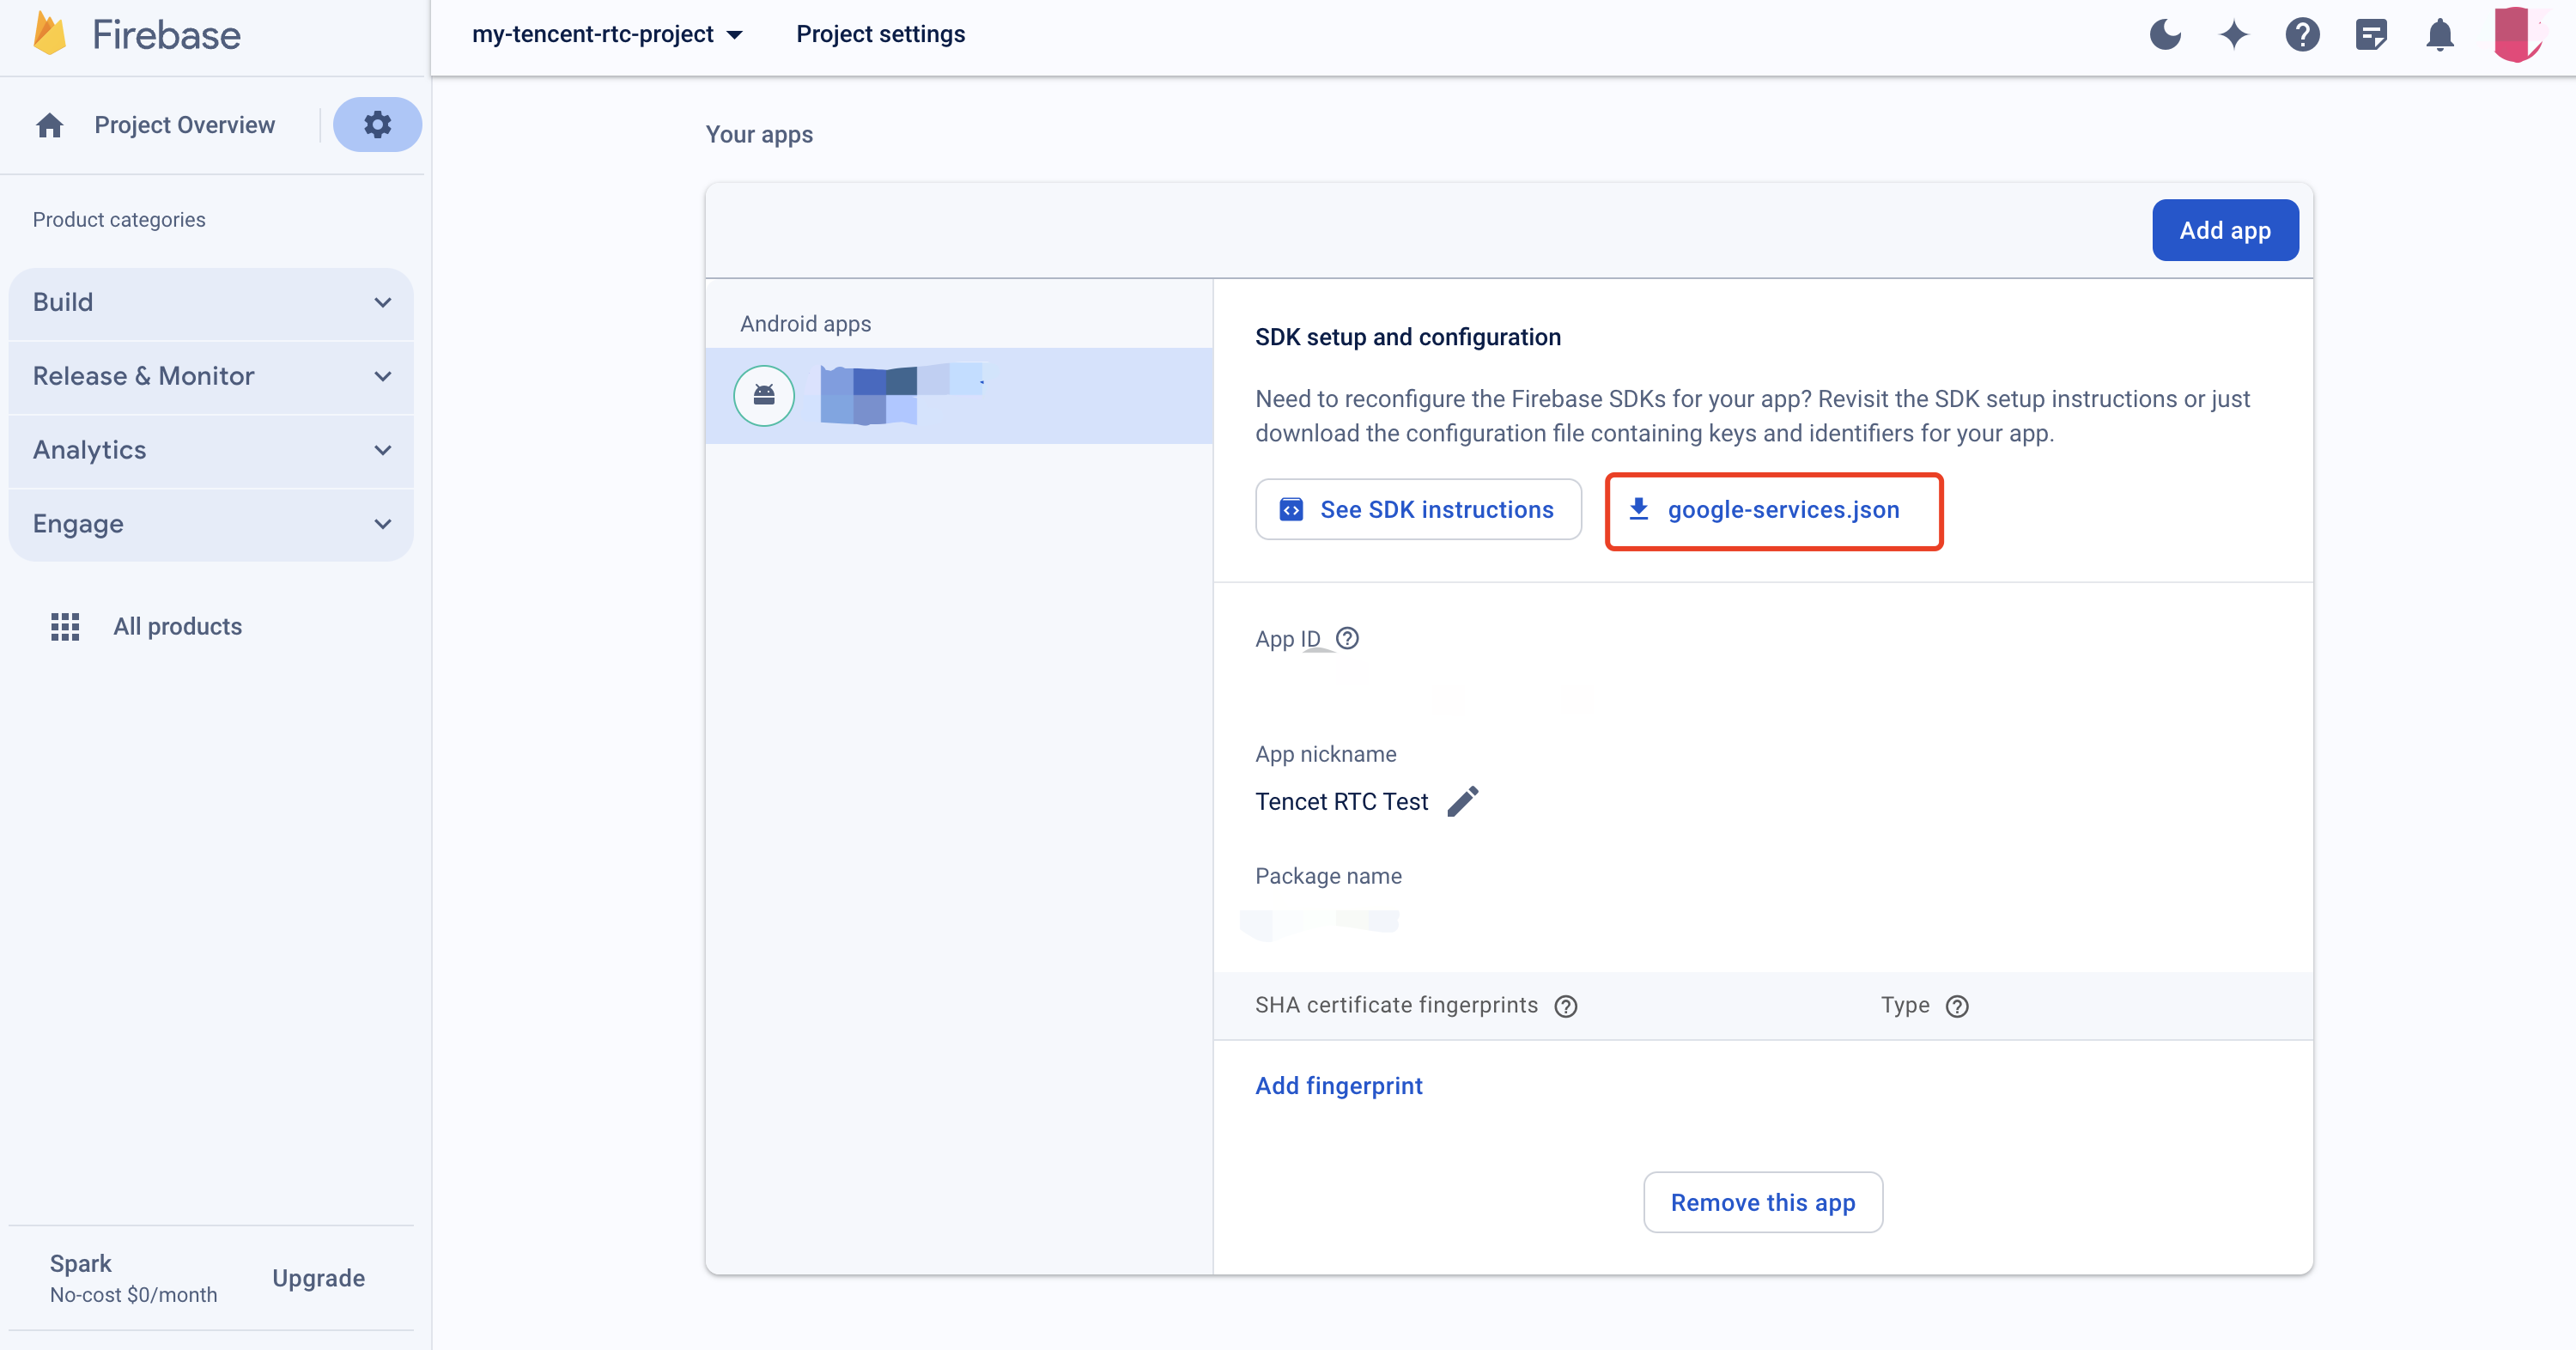

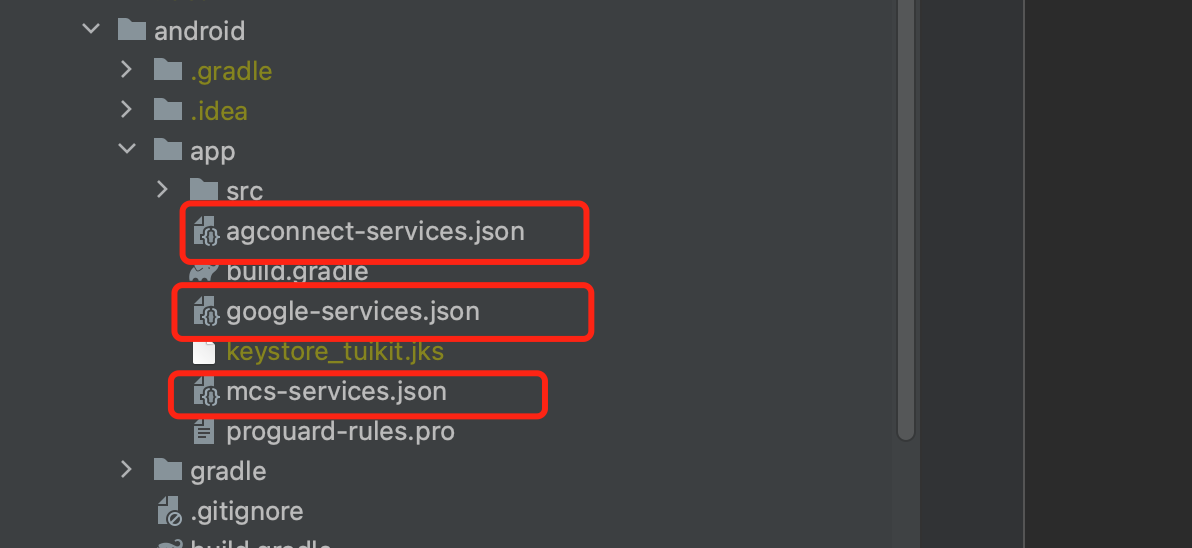
1.2 在项目级 build.gradle 文件中 buildscript -> dependencies 下添加以下配置:
在项目级 build.gradle 文件中 buildscript -> dependencies 下添加以下配置:
buildscript {dependencies {...classpath 'com.huawei.agconnect:agcp:1.6.0.300' classpath 'com.hihonor.mcs:asplugin:2.0.1.300' classpath 'com.google.gms:google-services:4.4.0'}}
在项目级 settings.gradle 文件中 buildscript -> repositories 和 allprojects -> repositories 下添加以下仓库配置:
pluginManagementbuildscript {repositories {gradlePluginPortal() mavenCentral() maven { url "https://mirrors.tencent.com/nexus/repository/maven-public/" } // 配置HMS Core SDK的Maven仓地址。 maven {url 'https://developer.huawei.com/repo/'} maven {url 'https://developer.hihonor.com/repo'}}}allprojects {...repositories {mavenCentral() maven { url "https://mirrors.tencent.com/nexus/repository/maven-public/" } // 配置HMS Core SDK的Maven仓地址。 maven {url 'https://developer.huawei.com/repo/'} maven {url 'https://developer.hihonor.com/repo'}}}}
在项目级 build.gradle 文件中 buildscript 下添加以下配置:
buildscript {repositories {mavenCentral() maven { url "https://mirrors.tencent.com/nexus/repository/maven-public/" } // 配置HMS Core SDK的Maven仓地址。 maven {url 'https://developer.huawei.com/repo/'} maven {url 'https://developer.hihonor.com/repo'}}dependencies {...classpath 'com.google.gms:google-services:4.2.0'classpath 'com.huawei.agconnect:agcp:1.4.1.300'classpath 'com.hihonor.mcs:asplugin:2.0.1.300'}}
在项目级 settings.gradle 文件中 allprojects -> repositories 下添加以下仓库配置:
allprojects {...repositories {mavenCentral() maven { url "https://mirrors.tencent.com/nexus/repository/maven-public/" } // 配置HMS Core SDK的Maven仓地址。 maven {url 'https://developer.huawei.com/repo/'} maven {url 'https://developer.hihonor.com/repo'}}}
在项目级 build.gradle 文件中 buildscript 和 allprojects 下添加以下配置:
buildscript {repositories {mavenCentral() maven { url "https://mirrors.tencent.com/nexus/repository/maven-public/" } // 配置HMS Core SDK的Maven仓地址。 maven {url 'https://developer.huawei.com/repo/'} maven {url 'https://developer.hihonor.com/repo'}}dependencies {...classpath 'com.google.gms:google-services:4.2.0'classpath 'com.huawei.agconnect:agcp:1.4.1.300'classpath 'com.hihonor.mcs:asplugin:2.0.1.300'}}allprojects {repositories {mavenCentral() maven { url "https://mirrors.tencent.com/nexus/repository/maven-public/" } // 配置HMS Core SDK的Maven仓地址。 maven {url 'https://developer.huawei.com/repo/'} maven {url 'https://developer.hihonor.com/repo'}}}
1.3 在应用级 build.gradle 文件中添加下方配置:
apply plugin: 'com.google.gms.google-services'apply plugin: 'com.huawei.agconnect'apply plugin: 'com.hihonor.mcs.asplugin'
步骤6: 处理消息点击回调, 并解析参数
请定义一个函数, 用于接受推送消息点击回调事件.
该函数请定义成
{required String ext, String? userID, String? groupID} 的入参形式。其中, ext字段, 为该消息所携带的完整 ext 信息, 由发送方指定, 如果未指定, 则有默认值. 您可根据解析该字段, 跳转至对应页面。
userID 和 groupID 字段,为本插件,自动尝试解析 ext Json String, 获取里面携带的单聊对方 userID 和 群聊 groupID 信息。如果您未自定义 ext 字段,ext 字段由 SDK 或 UIKit 默认指定,则可使用此处的默认解析。如果尝试解析失败, 则为 null 空。
您可定义一个函数来接收该回调,并据此跳转至对应会话页面或您的业务页面。
示例如下:
void _onNotificationClicked({required String ext, String? userID, String? groupID}) {
  print("_onNotificationClicked: $ext, userID: $userID, groupID: $groupID");
  if (userID != null || groupID != null) {
    // 根据 userID 或 groupID 跳转至对应 Message 页面.
  } else {
    // 根据 ext 字段, 自己写解析方式, 跳转至对应页面.
  }
}
步骤7: 注册推送插件
请在登录完成后, 立即注册推送插件。
调用
TencentCloudChatPush().registerPush 方法, 需传入上一步定义的点击回调函数。此外,您还可选传入
apnsCertificateID iOS 推送证书 ID 及 androidPushOEMConfig Android 推送厂商配置。此二项配置已在前序步骤指定,若无修改必要,可不再传入。TencentCloudChatPush().registerPush(onNotificationClicked: _onNotificationClicked);
说明:
如果您的应用需要使用推送插件进行业务消息通知,并且在启动后不会立即启动并登录 IM 模块,或者在登录 IM 模块之前需要通过获取消息点击回调来处理业务导航,建议您尽早调用
TencentCloudChatPush().registerOnNotificationClickedEvent 方法,手动挂载消息单击回调,以便及时获取消息参数。在这种场景下,您可以在调用
TencentCloudChatPush().registerPush 之前执行此函数,并尽可能提前将其放置在代码中。TencentCloudChatPush().registerOnNotificationClickedEvent(onNotificationClicked: _onNotificationClicked);
步骤8: 拨打离线推送通话
TUIOfflinePushInfo offlinePushInfo = TUIOfflinePushInfo();offlinePushInfo.title = "Flutter TUICallKit";offlinePushInfo.desc = "This is an incoming call from Flutter TUICallkit";offlinePushInfo.ignoreIOSBadge = false;offlinePushInfo.iOSSound = "phone_ringing.mp3";offlinePushInfo.androidSound = "phone_ringing";offlinePushInfo.androidOPPOChannelID = "Flutter TUICallKit";offlinePushInfo.androidVIVOClassification = 1;offlinePushInfo.androidFCMChannelID = "fcm_push_channel";offlinePushInfo.androidHuaWeiCategory = "Flutter TUICallKit";offlinePushInfo.iOSPushType = TUICallIOSOfflinePushType.VoIP;TUICallParams params = TUICallParams(offlinePushInfo: offlinePushInfo);TUICallKit.instance.call(callUserId, TUICallMediaType.audio, params);

 是
是
 否
否
本页内容是否解决了您的问题?