
Android端集成文档
最后更新时间:2025-01-03 15:21:15
Android端集成文档
最后更新时间: 2025-01-03 15:21:15
开发准备
1. 注册腾讯云账号,点击进入eKYC的控制台,即可开通相应服务。
2. 从eKYC SDK下载链接中下载对应版本的SDK,并集成到本地。
3. 联系官网的商务或者客服人员,获取对应版本的license文件。
Android端eKYC SDK接入流程
依赖环境
当前Android端慧眼SDK适用于API 19 (Android 4.4) 及以上版本。
【当前eKYC SDK只支持中国香港身份认证流程】
接入步骤
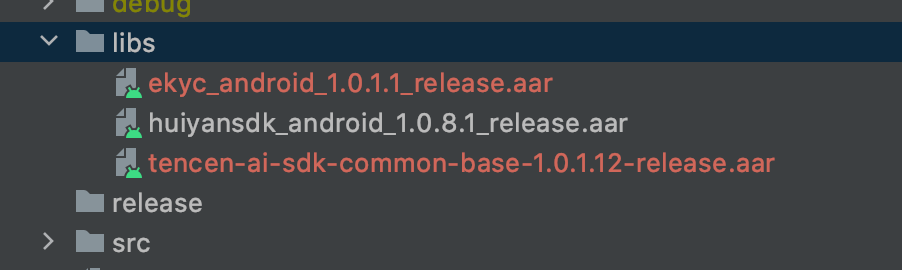
1. 将ekyc_android_1.0.x.x_release.aar、huiyansdk_android_1.0.x.x_release.aar、tencen-ai-sdk-common-base-1.0.x.x-release.aar(具体版本号以官网下载为准)添加到您工程的libs目录下。
2. 在您工程的build.gradle中进行如下配置:
// 设置ndk so架构过滤(以armeabi-v7a为例)ndk {abiFilters 'armeabi-v7a'}dependencies {// eKYC版本库implementation files("libs/ekyc_android_1.0.x.x_release.aar")// 核身组件库implementation files("libs/huiyansdk_android_1.0.x.x_release.aar")// 通用组件库implementation files("libs/tencen-ai-sdk-common-base-1.0.x.x-release.aar")// 引入gson三方库implementation 'com.google.code.gson:gson:2.8.5'}
三、权限声明
同时需要在AndroidManifest.xml文件中进行必要的权限声明
<!-- 摄像头权限 --><uses-permission android:name="android.permission.CAMERA" /><uses-featureandroid:name="android.hardware.camera"android:required="true" /><uses-feature android:name="android.hardware.camera.autofocus" /><!-- SDK需要的权限 --><uses-permission android:name="android.permission.READ_PHONE_STATE" /><uses-permission android:name="android.permission.INTERNET" /><uses-permission android:name="android.permission.WRITE_EXTERNAL_STORAGE" /><uses-permission android:name="android.permission.ACCESS_NETWORK_STATE" />
对于需要兼容Android 6.0以上的用户,以上权限除了需要在AndroidManifest.xml文件中声明权以外,还需使用代码动态申请权限。
SDK接口使用说明
初始化
在您APP初始化的时候调用,推荐在Application中调用,主要是进行一些SDK的初始化操作
@Overridepublic void onCreate() {super.onCreate();EkycHySdk.init(this);}
启动身份认证eKYC检测流程
当您需要启动身份认证eKYC检测流程的时候,只需要调用EkycHySdk.startEkycCheck()函数,同时传入此次身份认证eKYC检测需要的sdkToken、配置信息以及监听结果的回调即可。
// 设置启动的配置EkycHyConfig ekycHyConfig = new EkycHyConfig();// 设置license的名称ekycHyConfig.setLicenseName("ekycLicense.license");ekycHyConfig.setVerAutoTimeOut(20000);ekycHyConfig.setOcrType(OcrRegionType.);// 自定义UI配置OcrUiConfig config = new OcrUiConfig();ekycHyConfig.setOcrUiConfig(config);// 具体的启动核验逻辑// sdkToken 是从服务器端获取的当次流程的唯一凭证EkycHySdk.startEkycCheck(sdkToken, ekycHyConfig, new EkycHyCallBack() {@Overridepublic void onSuccess(EkycHyResult result) {Log.e(TAG, "result: " + result.toString());showToast("核身成功: " + result.toString());}@Overridepublic void onFail(int errorCode, String errorMsg, String ekycToken) {Log.e(TAG, "code: " + errorCode + " msg: " + errorMsg + " token: " + ekycToken);showToast("核身失败: " + "code: " + errorCode + " msg: " + errorMsg + " token: " + ekycToken);}});
sdkToken 为从服务器兑换的本次身份认证流程的唯一凭证。
注意: **"ekycLicense.license"**文件是需要联系商务或者客服人员进行license申请。将申请完成后的license文件放到assets文件下。

SDK资源释放
在您APP退出使用的时候,可以调用SDK资源释放接口
@Overrideprotected void onDestroy() {EkycHySdk.release();super.onDestroy();}
混淆规则配置
如果您的应用开启了混淆功能,为确保SDK的正常使用,请把以下部分添加到您的混淆文件中。
# 需要混淆的对象-keep class com.google.gson.** {*;}-keep class com.tencent.could.** {*;}-keep class com.tencent.youtu.** {*;}-keep class com.tencent.cloud.ocr.** {*;}-keep class com.tencent.cloud.ekyc.** {*;}
常见问题
1. 如果出现**Invoke-customs are only supported starting with Android O (--min-api 26)**错误?
需要在build.gradle中添加如下配置:
// java版本支持1.8compileOptions {sourceCompatibility JavaVersion.VERSION_1_8targetCompatibility JavaVersion.VERSION_1_8}
2. 如果使用了AndResGuard的混淆工具,可以添加混淆配置:
// for EKYC SDK"R.string.ocr_*","R.string.rst_*","R.string.net_*","R.string.msg_*","R.string.fl_*",
文档反馈