Channel Management
Last updated:2025-12-12 10:13:59
Overview
StreamPackage is a high-quality video packaging and origin platform. It offers professional, stable, secure, and easy-to-use video packaging and delivery services globally and helps you enhance origin resilience. You can use StreamPackage to securely and reliably distribute video streams at a large scale.
StreamPackage manages tasks at the channel level. It packages compressed and encoded audio and video tracks into certain formats for distribution.
Console Overview
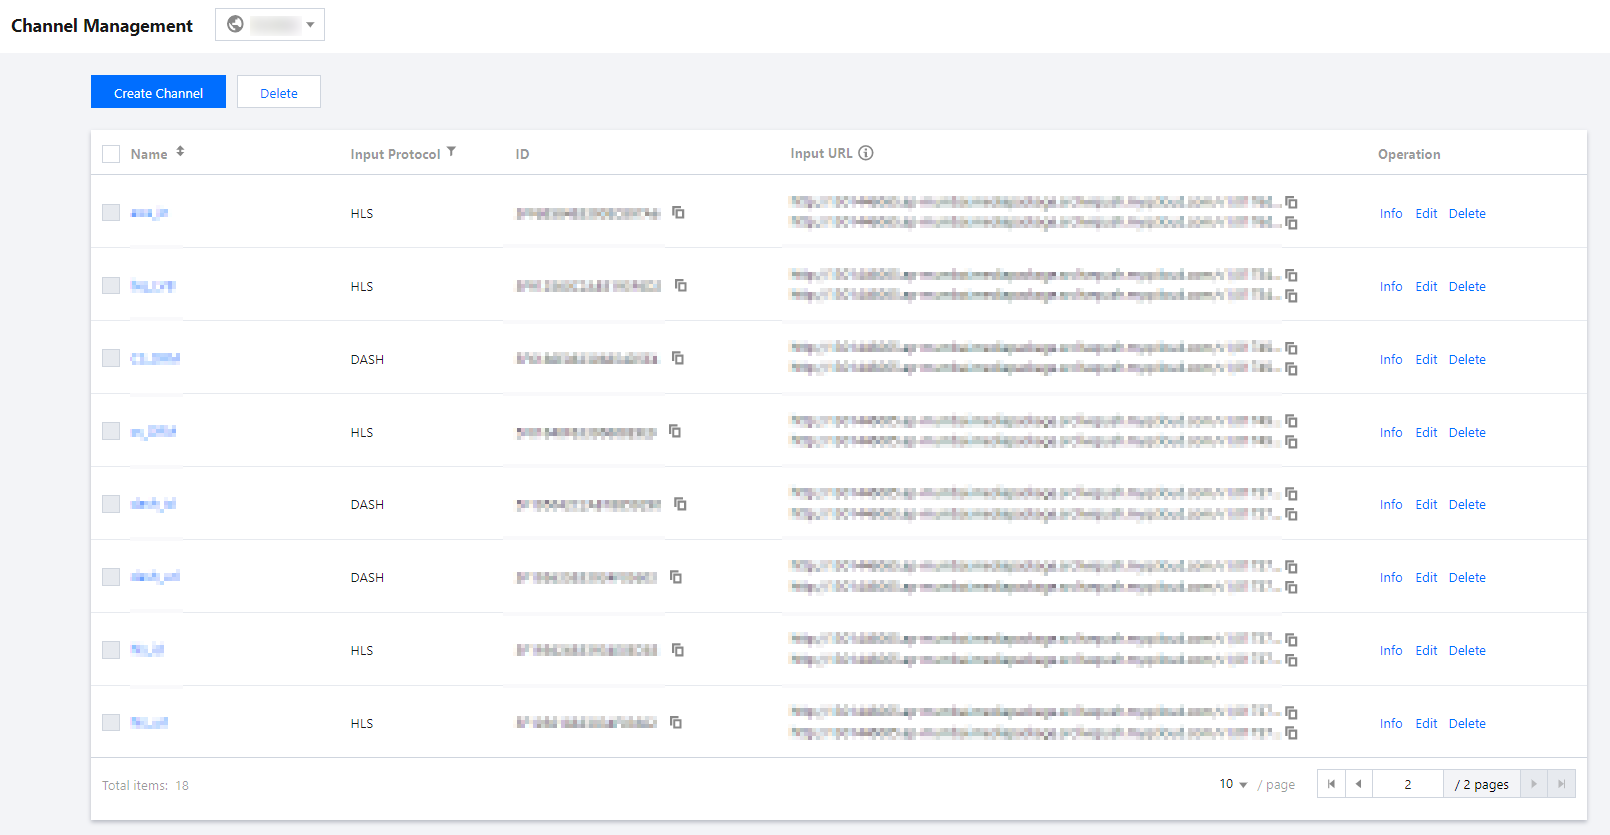
The StreamPackage console provides a rich set of easy-to-use and flexible features. It manages tasks at the channel level and functions through four main sections: channel, input, endpoint, and CDN.
Prerequisites
You have a domain for playing videos from CDNs (if you want to use Tencent Cloud’s live streaming CDN for content distribution).
You have activated CSS.
You have logged in to the StreamPackage console.
Directions
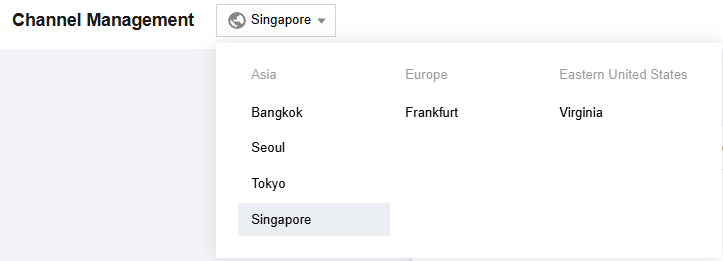
1. Select an AZ
Currently, StreamPackage services are available in Bangkok (Thailand), Seoul (South Korea), Tokyo (Japan), Frankfurt (Germany), and Singapore. If you want to deploy your business in other regions, please contact us.
2. Create a channel
A channel holds basic information about inputs and outputs. You can configure a channel to receive live streams that use a specific protocol. You can also create endpoints to generate content to be distributed.
1. Click Create Channel.
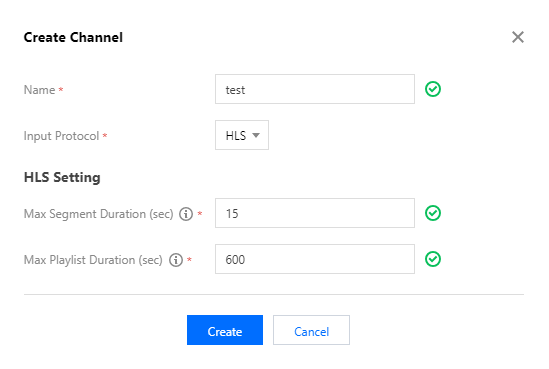
2. Enter a channel name and select an input protocol (HLS and DASH are supported).
3. Complete other HLS/DASH settings.
Max Segment Duration indicates the maximum duration of HLS TS segments or DASH M4S segments pushed to this channel. The default is 15 seconds.
Max Playlist Duration indicates the maximum total duration of the HLS M3U8 or DASH MPD playlist pushed to this channel. The default is 600 seconds.
Note:
If you are sending two streams, one primary stream and one backup stream, to the channel for failover, we recommend you set Max Segment Duration slightly longer than actually needed.
4. Click Create.
3. View channel information
Viewing channel information
After the channel is created, you will be directed to the channel details page (you can also go to the details page by clicking the channel name or Info on the right). This page displays the channel's name, ID (automatically generated), input protocol, and other settings. StreamPackage will generate two inputs of the specified protocol for the channel.

Viewing inputs
An input is the basic unit of the content StreamPackage receives. After a channel is created, StreamPackage will automatically generate two inputs as well as two input URLs for the channel. You can send streams to the URLs.

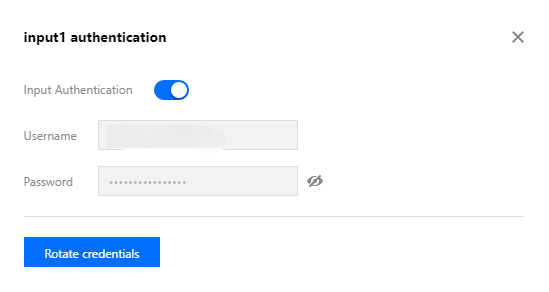
You can enable authentication for an input: Click Authentication in the Operation column. StreamPackage will generate a username and a password for HTTP authentication. Click Rotate credentials to complete the configuration.
Note
Once you rotate credentials, the existing credentials of the channel will become invalid.
Creating an endpoint
You can create endpoints for a channel so that streams can be pulled from the channel.
1. Click Create Endpoint.

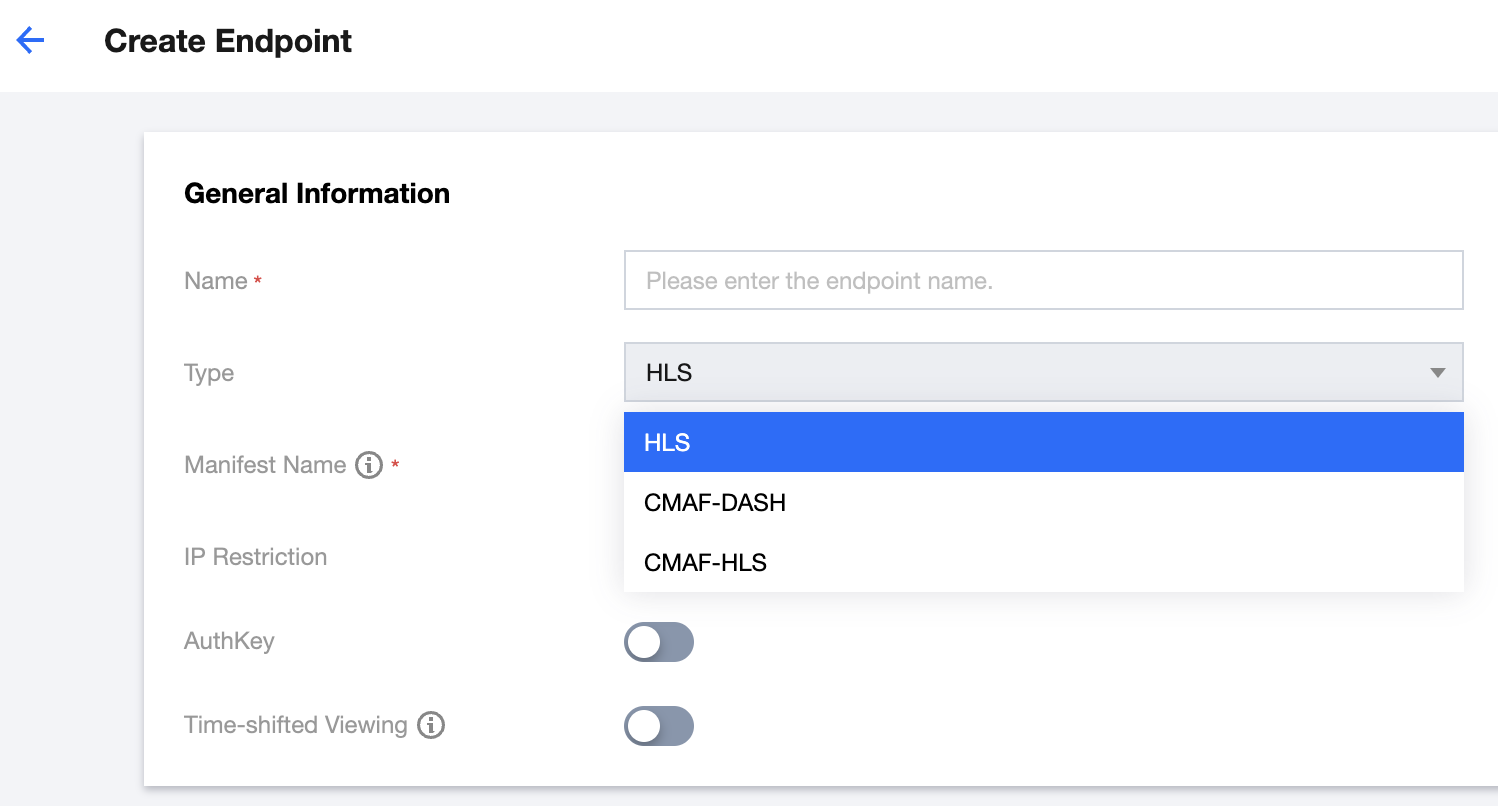
2. Enter an endpoint name. The endpoint type defaults to the same as the channel's input protocol. Additionally, if your input protocol is HLS, you can also select CMAF-DASH or CMAF-HLS as the type. StreamPackage supports remuxing HLS into CMAF-DASH or CMAF-HLS.
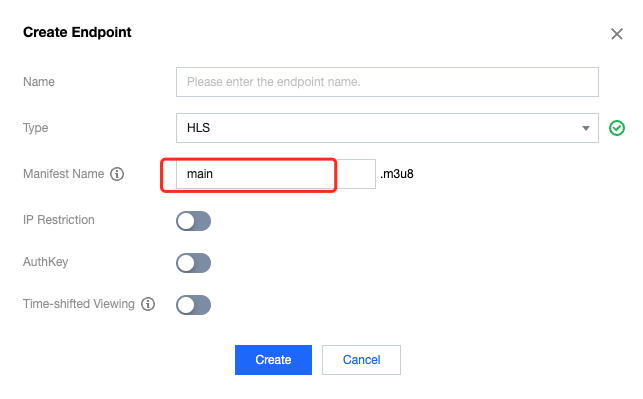
If you want to modify the Manifest Name, please enter the name in “Manifest Name”, the default value is main.
Note:
HLS repackaging into CMAF (DASH format) does not currently support DRM inputs.
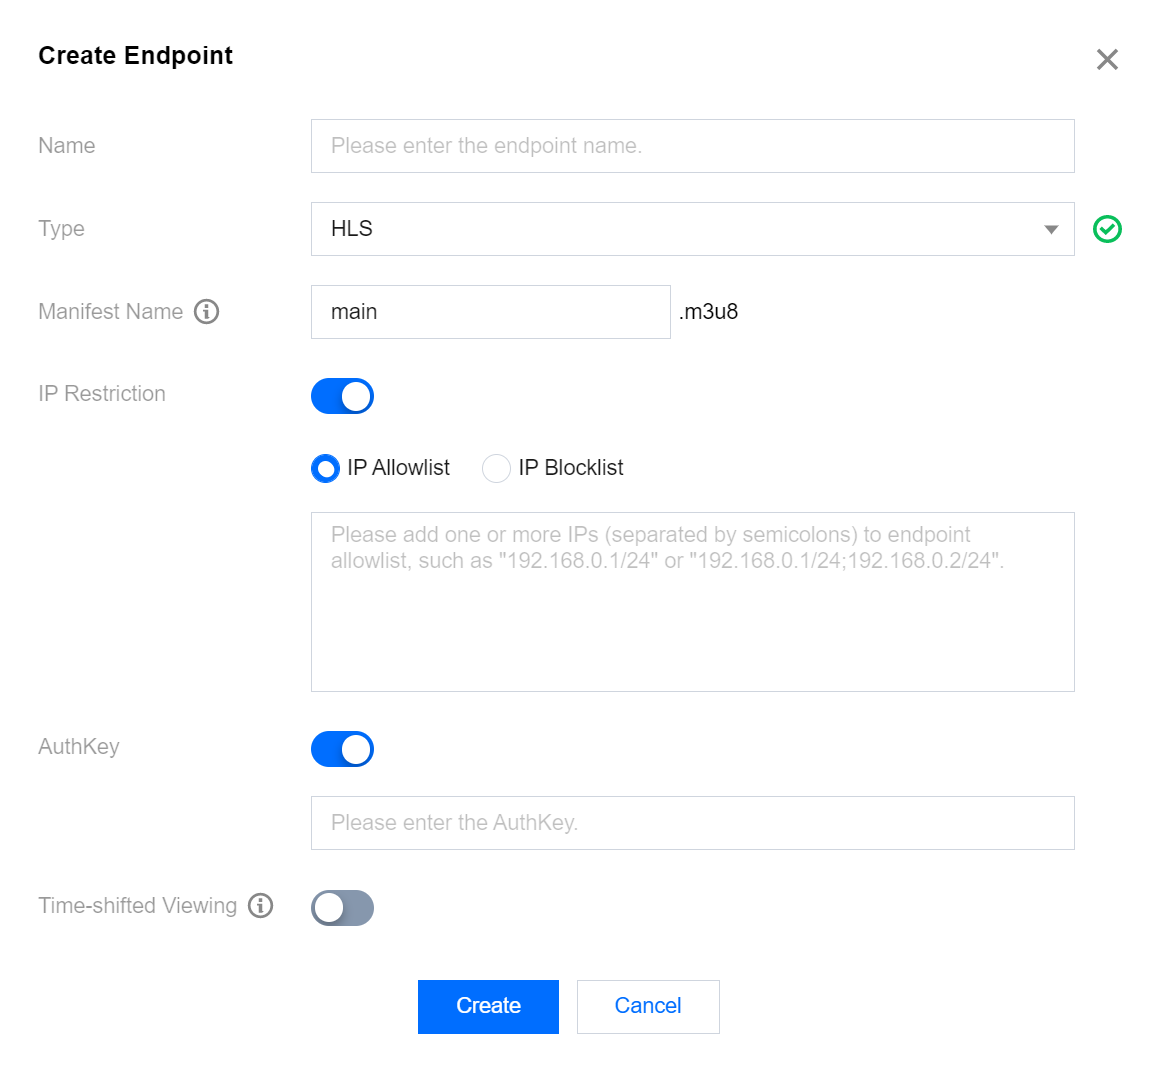
3. You can also enable IP allowlist/blocklist and AuthKey if necessary.
IP allowlist/blocklist: Allow only specific IP address ranges to push or disallow specific IP address ranges to push.
AuthKey: Perform authentication using the HTTP header field X-TENCENT-PACKAGE.
4. If you need the timeshift feature, you can enable the "Time-shifted Viewing" to activate it.
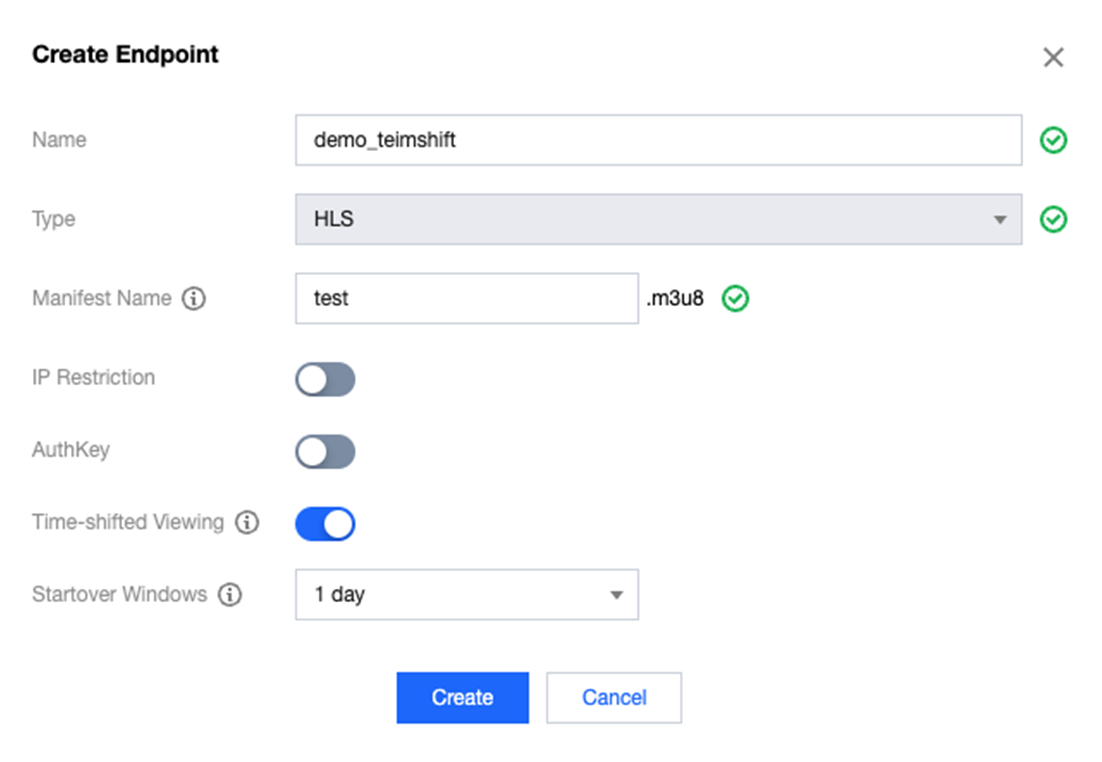
Startover Windows:Set how long StreamPackage will support time-shifted viewing for the content. Default value is 1 day, and 3 days, 7 days, 15 days and 30 days are also supported.
Once timeshift is enabled, live segments will be saved in the cloud, and you can watch them with timeshift by adding specific parameters to the Endpoint URL. The parameters are as follows:
timeshift=1, Indicates that you want to watch TimeShift stream.
start=xxx, indicating the start time of the timeshift. It supports either the ISO 8601 dates format or the POSIX (or Epoch) time format.
end=xxx, indicating the end time of the timeshift. It supports either the ISO 8601 dates format or the POSIX (or Epoch) time format.
Note:
If both start and end are specified, end must be greater than start, otherwise a 400 error will be returned.
The start time must be within the Startover Windows range, otherwise a 400 error will be returned.
Only a maximum of 24 hours of timeshift content can be returned. This means that the time difference between end and start cannot exceed 24 hours, otherwise a 400 error will be returned.
Example timeshift URLs:
Request timeshift content from 2023-07-01T00:00:00Z to 2023-07-01T23:59:59Z:
http://domain/v1/path/subpath/playlist.m3u8?timeshift=1&start=2023-07-01T00:00:00Z&end=2023-07-01T23:59:59Z
or
http://domain/v1/path/subpath/playlist.m3u8?timeshift=1&start=1688169600&end=1688255999
Request live content starting from 2023-07-01T00:00:00Z until the end of the live stream:
http://domain/v1/path/subpath/playlist.m3u8?timeshift=1&start=2023-07-01T00:00:00Z
or
http://domain/v1/path/subpath/playlist.m3u8?timeshift=1&start=1688169600
5. When the created Endpoint type is CMAF-HLS or CMAF-DASH, you can configure DRM.
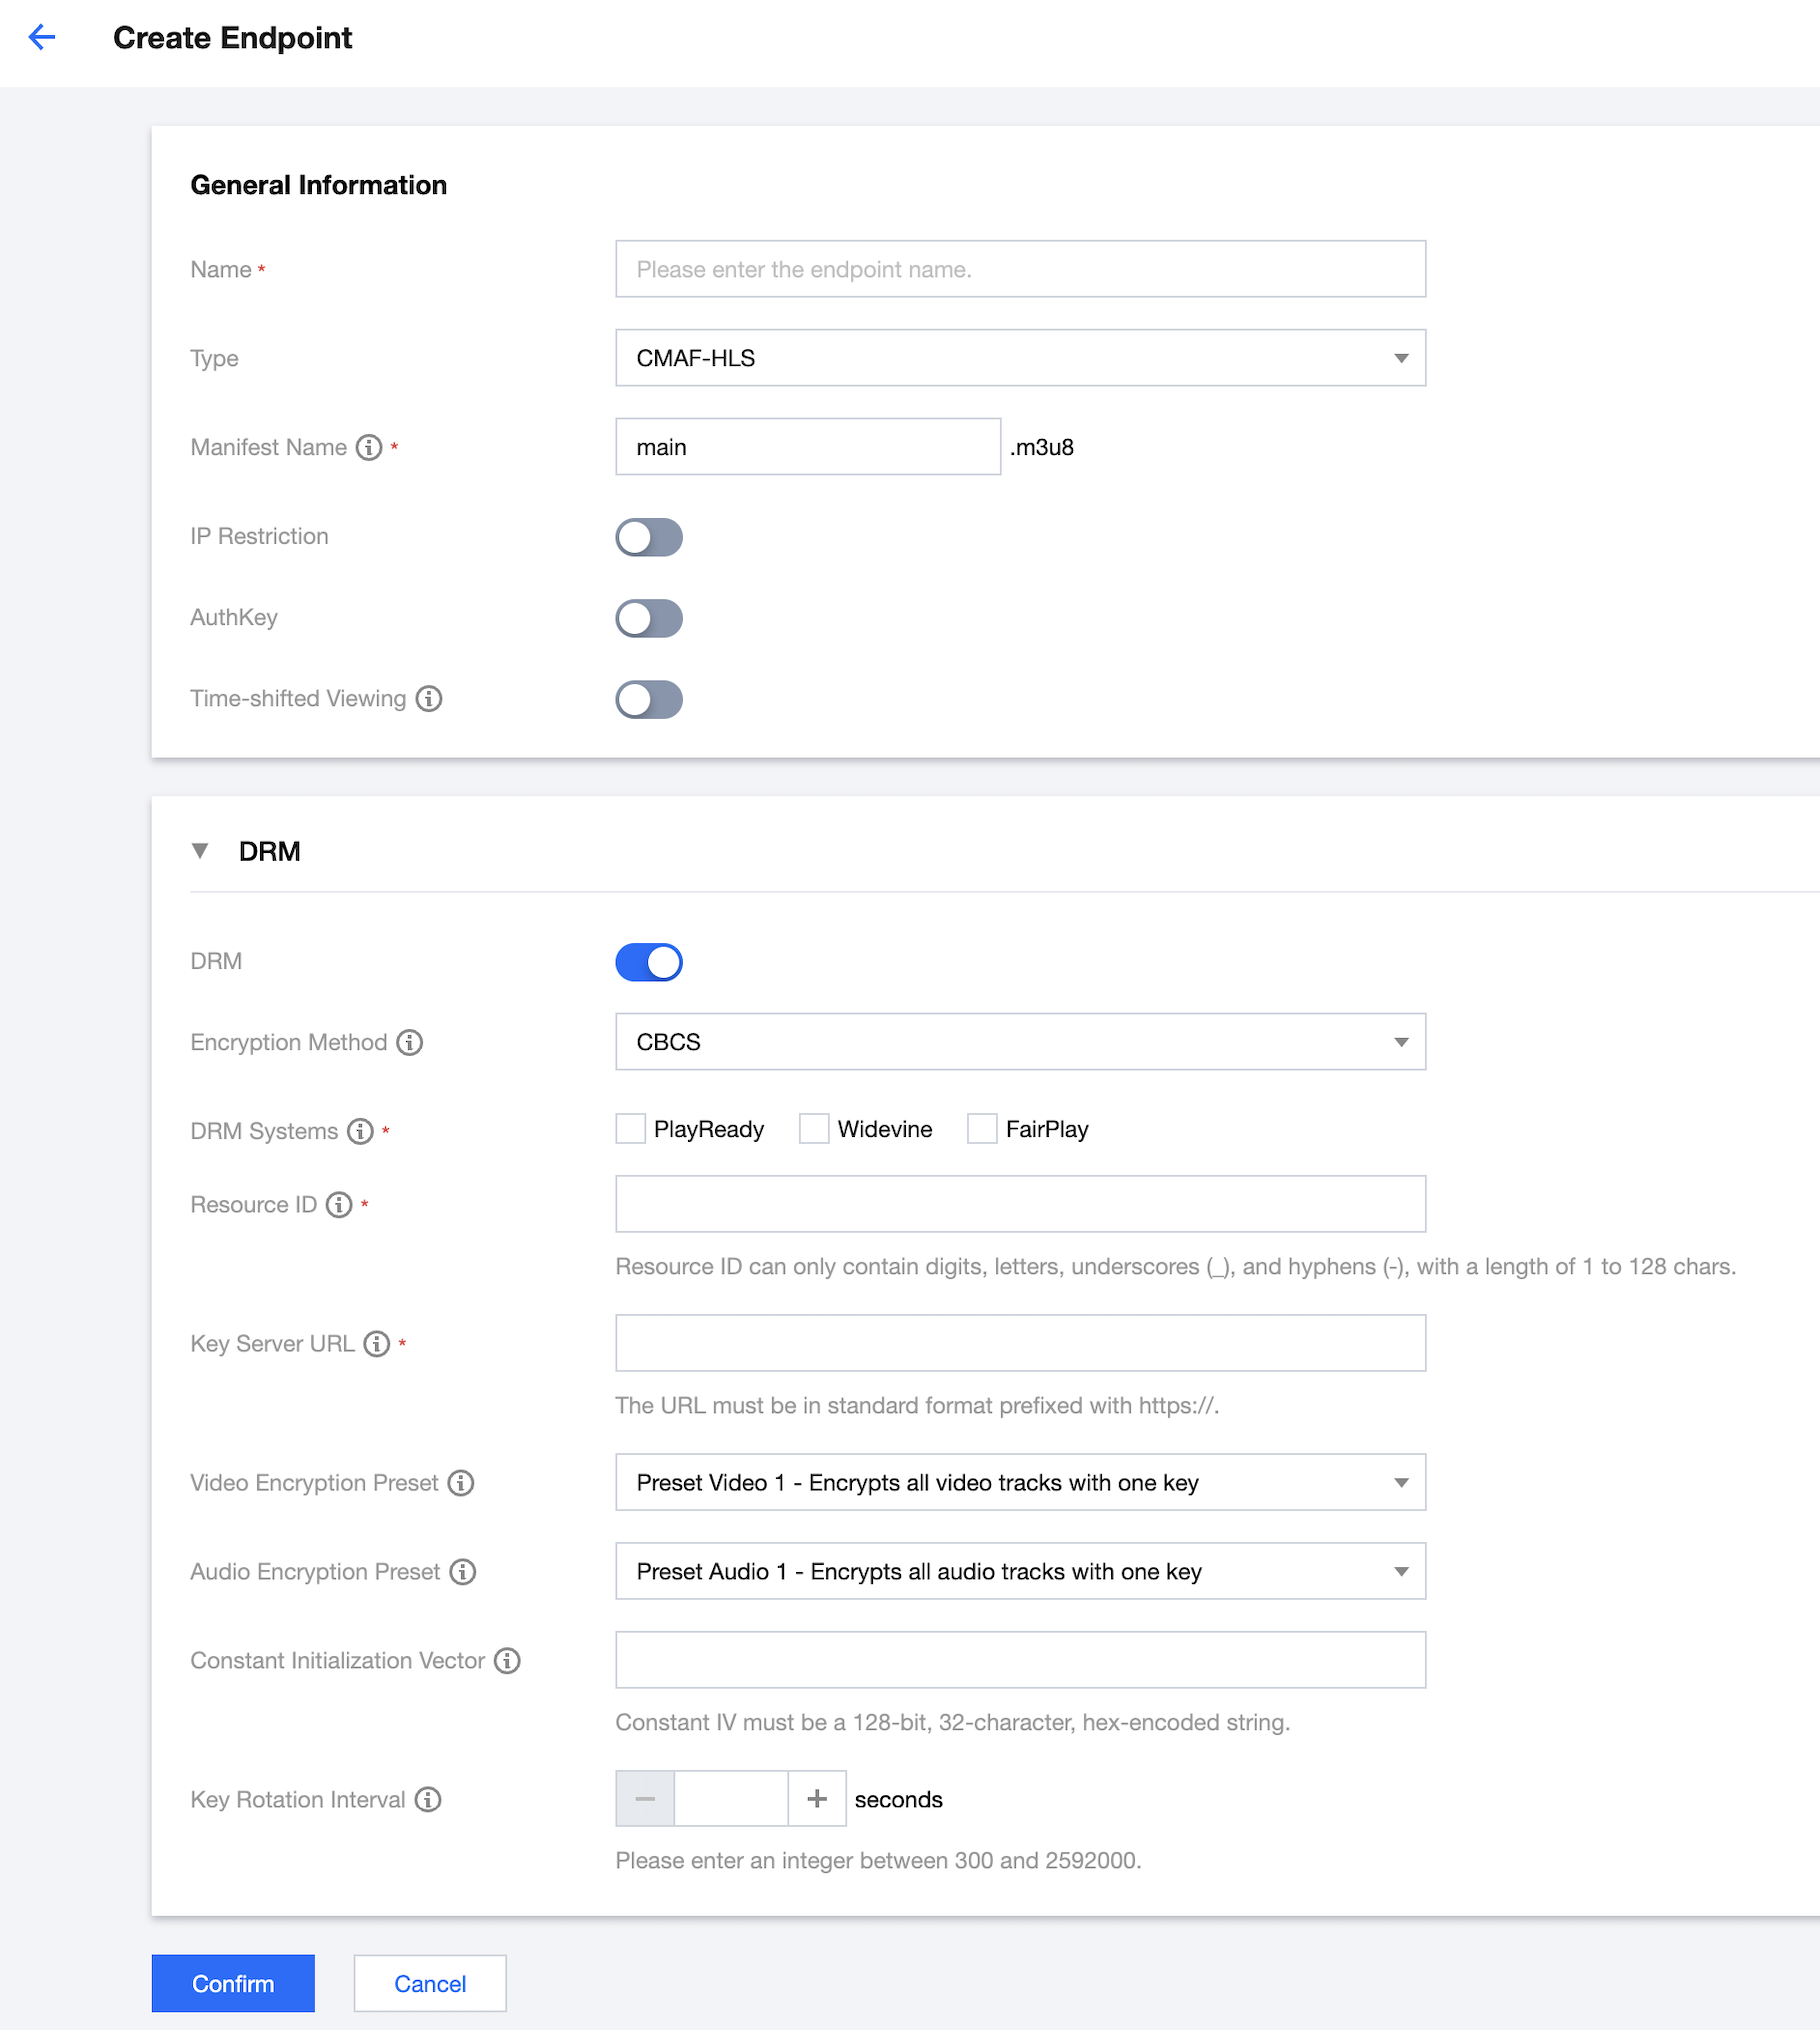
Encryption method: CBCS/CENC optional.
Note:
If you're not using FairPlay, we recommend using Common Encryption (CENC) for better compatibility with older devices.
DRM Platform: PlayReady/Widevine/FairPlay options available.
Resource ID: The ID passed to the DRM provider to identify this stream; the same ID needs to be filled in during playback, and it is recommended to be globally unique.
Key Server URL: HTTP URL of the server supporting the CPIX 2.3 protocol (obtain from your DRM provider).
Video Encryption Preset: Select the encryption method for the video.
Audio Encryption Preset: Select the audio encryption method.
Constant Initialization Vector: Enter the specified initialization vector.
Key Rotation Interval: If key rotation is required, enter the corresponding seconds here. If not filled in, the key will not be updated periodically by default.
6. Click Confirm and the endpoint is created. You can modify or delete the endpoint. From the endpoint URL generated, you can pull streams and distribute them.

Manifest filter
StreamPackage supports filtering manifests by selecting specific properties from the url's carried parameters. The query url format is as follows:
stream.m3u8?manifest_filter=audio_channels:1,2,4-8;video_height:480,720,1080-2160Query syntax:
Delimiter | Description |
; | Split different filters. |
: | Split filter name and value. |
, | Split different filter values. |
- | Value range of filter∑. |
Supported manifest filters:
Category | Name | Description | Parameter Value | Example |
Audio | audio_codec | The audio codec type | AAC/AC-3/NONE | stream.m3u8?manifest_filter=audio_codec:AAC,AC-3 |
Audio | audio_channels | The number of audio channels | 1 - 32767 | stream.m3u8?manifest_filter=audio_channels:2,4,8-16 |
Audio | audio_language | The audio language | ISO 639 language codes | stream.m3u8?manifest_filter=audio_language:eng,fr |
Video | video_codec | The video codec type | H264/H265/NONE | stream.m3u8?manifest_filter=video_codec:H264 |
Video | video_height | The height of the video in pixels | 1 - 32767 | stream.m3u8?manifest_filter=video_height:720,1080 |
Video | video_framerate | The video frame rate | 1.0 - 999.999 | stream.m3u8?manifest_filter=video_framerate:29.97 |
Video | video_bitrate | The video bitrate in bits per second | 1 - 2147483647 | stream.m3u8?manifest_filter=video_bitrate:1000000-4000000 |
Configuring a CDN distribution
You can create a CDN distribution for a StreamPackage channel to distribute the streams in the channel via Tencent Cloud’s live streaming CDN. To achieve this, you need to activate CSS and grant CSS access to StreamPackage and StreamPackage access to CSS.
Before we proceed, make sure you understand the following terms:
LVB CDN: StreamPackage allows you to quickly distribute streams in a channel via the LVB CDN.
CDN domain/CDN playback domain: A playback domain in the LVB CDN, which can be used to distribute live streams.
1. Activate CSS
2. Grant StreamPackage access to CSS
2.1 In the StreamPackage console, go to the details page of the channel for which you want to configure a CDN distribution, select the CDN tab, and click Authorization.
Note:
After the authorization, you will be able to configure a CSS playback domain for a StreamPackage channel.

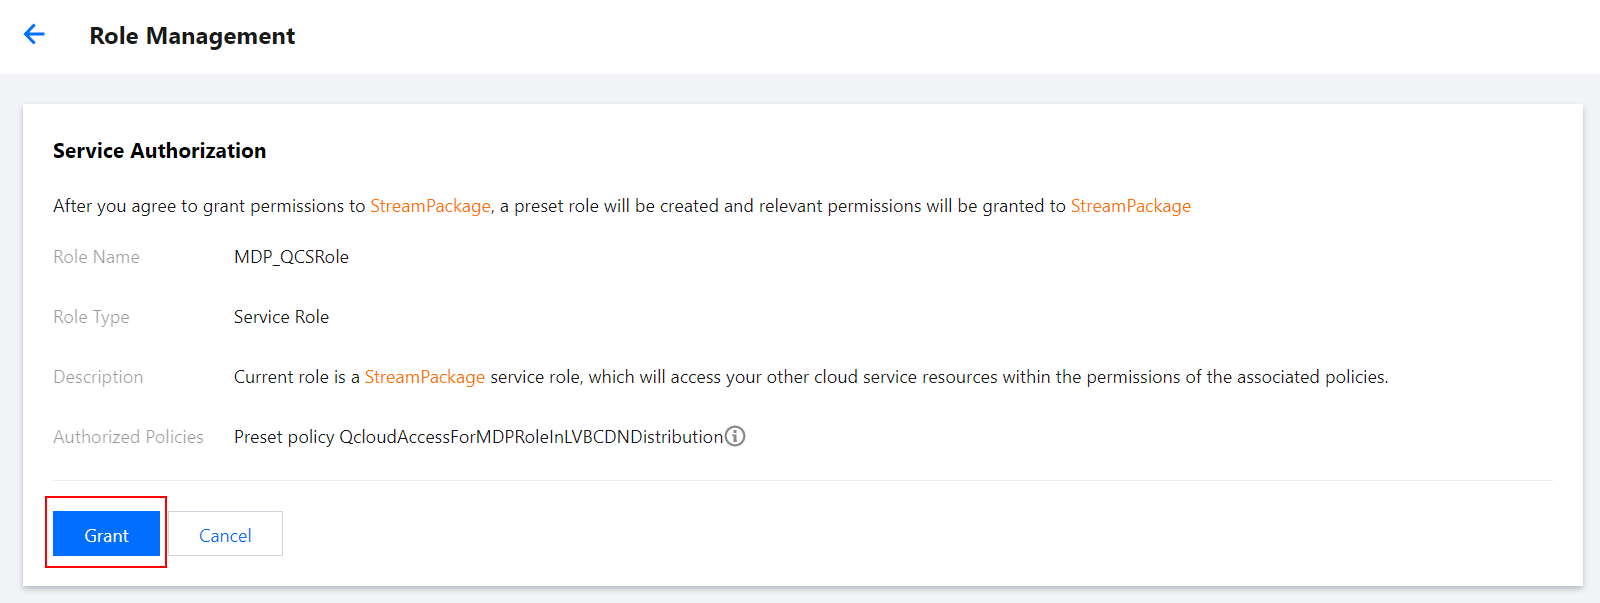
2.2 Click here. To distribute streams via the LVB CDN, you need to allow StreamPackage to access certain resources. This is achieved via a service role. Click Authorize Now to go to the Role Management page, and click Grant to grant StreamPackage the permission to use related APIs.

2.3 You will be directed back to the StreamPackage console. Click Authorization completed.

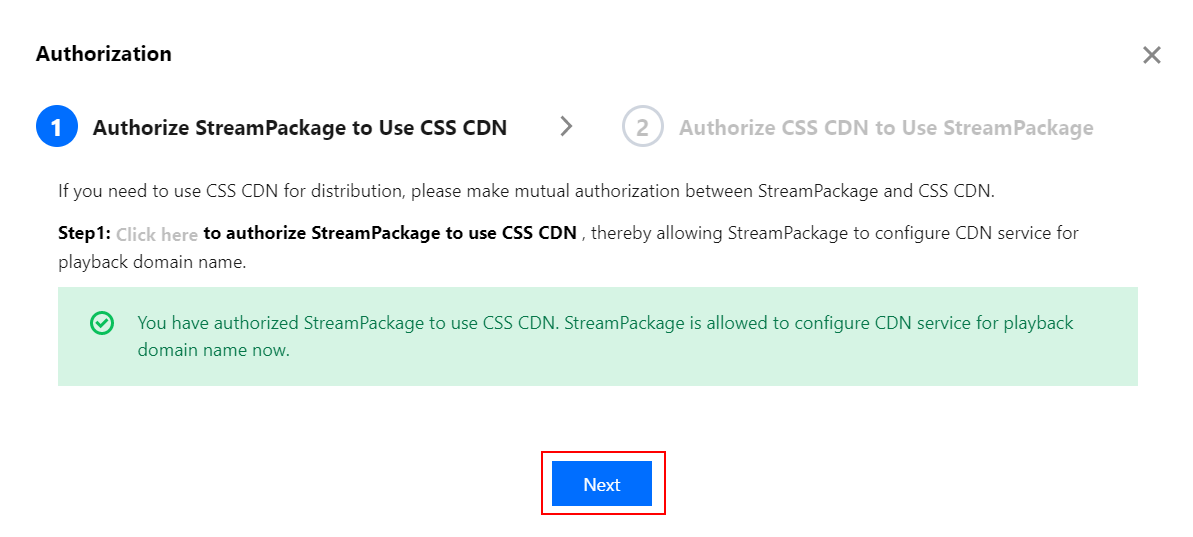
2.4 Click Next.
3. Grant CSS access to StreamPackage
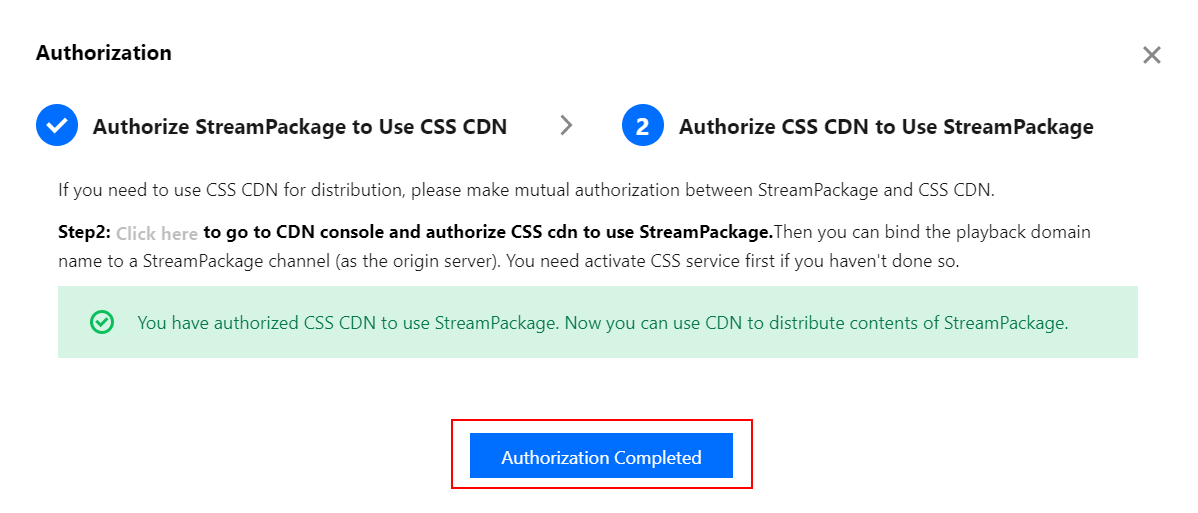
3.1 Click Click here to go to the CDN console and allow the LVB CDN to use StreamPackage. After the authorization, you will see that the authorization status for StreamPackage has become Activated in the CSS console.
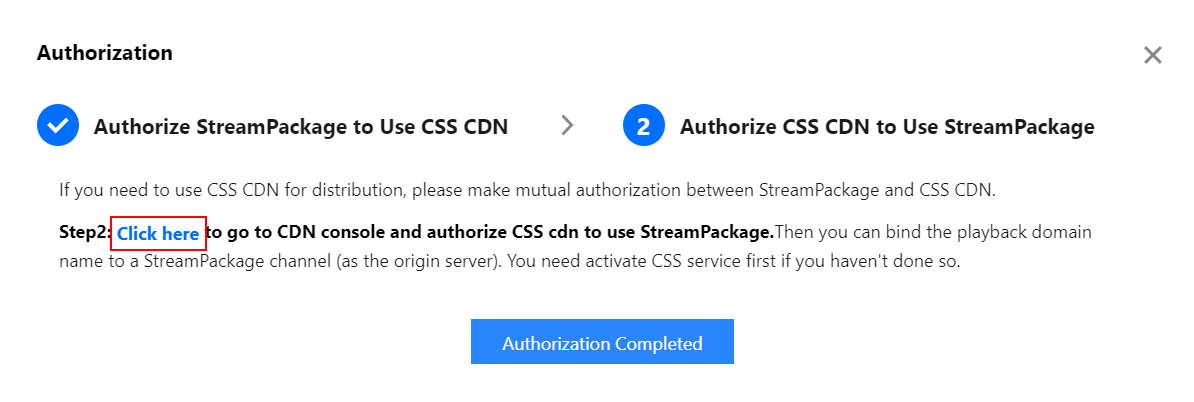

3.2 Return to the StreamPackage console and click Completed.

3.3 Click Authorization Completed. You have now granted the LVB CDN access to StreamPackage and StreamPackage access to the LVB CDN (which means you can now configure a CDN playback domain for a StreamPackage channel and the LVB CDN can pull streams from a StreamPackage channel).
4. Configure a CDN playback domain
4.1 After completing the authorization, under the CDN tab, click Edit Configuration to configure a CDN distribution.

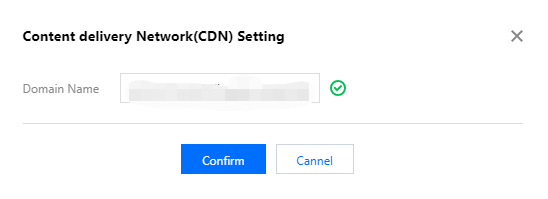
4.2 Enter the domain you want to use for CDN playback and click Confirm.

Note:
After a new playback domain is added, the system will assign it a CNAME which ends with
.liveplay.myqcloud.com. To make the CNAME accessible, you need to add a CNAME record for the domain at your DNS provider. For detailed directions, see Configuring CNAME for Domain Name.The default acceleration region for a CDN playback domain configured in the StreamPackage console is outside the Chinese mainland. If you need to distribute live streams inside the Chinese mainland, according to relevant laws and regulations, ICP filing is required for your domain. You can click Go to the CSS CDN Console to Perform More Actions.
Playing streams via the configured playback domain
To achieve playback via the configured playback domain, after you associate a StreamPackage channel with a CDN playback domain, replace the domain in the channel’s endpoint URL with the CDN playback domain.
For example:
Suppose the endpoint URL of your channel is:
http://123456789.ap-seoul.streampackage.srclivepull.myqcloud.com/v1/017697a3513109df73abda3c4b26/017697a918bf09dfabc033b04d43/main.m3u8Then your CDN playback address is:
http://CDN playback domain name/v1/017697a3513109df73abda3c4b26/017697a918bf09dfabc033b04d43/main.m3u8After the configuration is completed, please contact us for configuration optimization to ensure a better experience for you.
Note:
Using the LVB CDN for distribution will incur playback traffic fees. For details, see Billing of LVB.
4. Edit and delete a channel
You can manage created channels on the Channel Management page. Click Info in the Operation column to view channel details. Click Edit to edit a channel, and click Delete to delete a channel. Note that you cannot delete a channel bound with endpoints. Delete the endpoints first before deleting a channel.

Was this page helpful?
You can also Contact Sales or Submit a Ticket for help.
Yes
No
Feedback

