Configuring Custom Policy

最終更新日:2025-08-11 15:09:24
Overview
In TDMQ for RabbitMQ, when creating a Queue or Exchange, except for essential attributes (such as Durable, Exclusive), you can configure some optional attributes (such as x-message-ttl, x-expires, x-max-length) to achieve different features.
Notably, once a Queue or Exchange is successfully created, its attribute parameters cannot be directly modified unless recreated after deletion.
To enhance flexibility, RabbitMQ provides a Policy mechanism. A Policy is a unique runtime parameter setting method that supports dynamic adjustment of specific attributes. The Policy functions at the Vhost level and can match one or more Queues/Exchanges, thereby achieving batch management. With policies, we can bypass the limitation of being unable to directly modify Queue/Exchange attributes, drastically improving operational efficiency.
This document describes how to create a custom policy on the console with specific operation steps.
Use Limits
Only open-source Managed Clusters support configuring custom policies. Serverless clusters are not currently supported.
Directions
Creating a Policy
When you create a cluster, if mirrored queue is enabled, there will be a default policy under the Policy tab in the console, which can be deleted,and you can also recreate or modify the policy.
1. Log in to the RabbitMQ Console.
2. In the left sidebar, choose Vhost, choose the region, then click the target Vhost's ID to enter the Basic Info page.
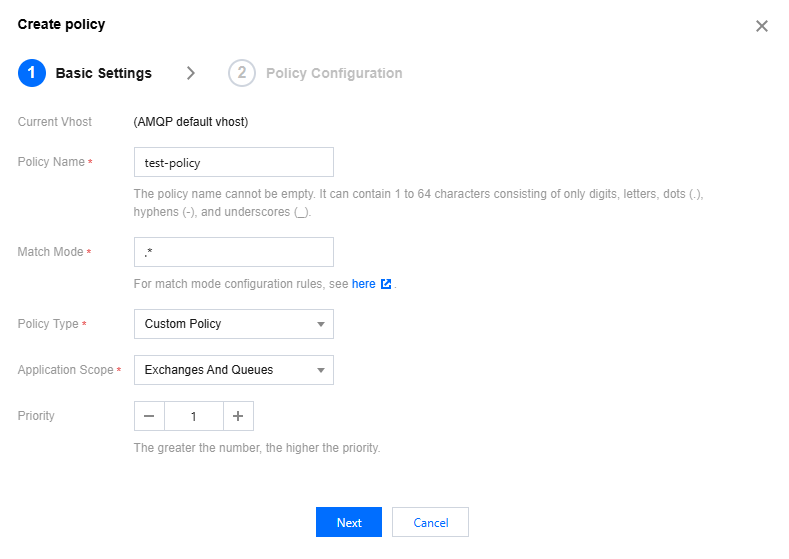
3. Click Policy > Create Policy, and fill in the basic information of the policy.
Basic Settings
Parameter | Description |
Current Vhost | Indicates which Vhost is being created an image policy for. |
Policy Name | Fill in the policy name, comply with the naming rule: 1 - 64 characters, only comprising of digits, letters, ".", "-" and "_". |
Match Mode | A regular expression used to match related Queues or Exchanges. Commonly used match mode regular expressions can be found in: .*: Match all queues or exchanges under this Vhost. ^test.*: Matches all Queues or Exchanges whose names start with "test" under this Vhost. .*test.*: Matches all Queues or Exchanges whose names contain "test" under this Vhost. .*test$: Matches all Queues or Exchanges whose names end with "test" under this Vhost. |
Policy type | Select a custom policy. |
Application Scope | Is used to specify the scope where the current Policy takes effect Exchanges And Queues: Act on all Queues or Exchanges that match the Pattern. Queues: Act on all Queues that match the Pattern. Exchanges: Act on all Exchanges that match the Pattern. |
Priority | Define the priority of a policy, ranging from 0 to 255. If multiple policies act on the same Queue or Exchange, only the Policy with the highest priority number will be useful. |
Strategy definition
You can select the necessary strategy definition fields yourself, as shown in the figure below.
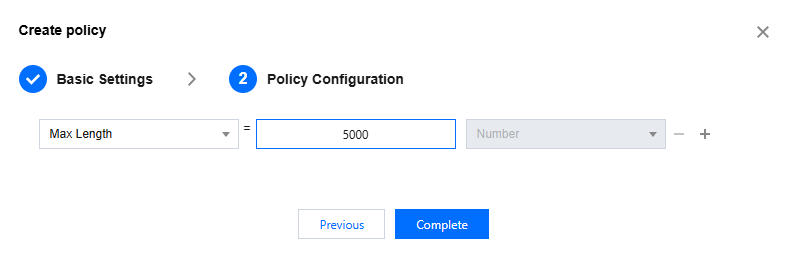
The following are the fields supported by the current cloud console. For more fields, please go to the open-source console to create.
Field Classification | Field Name | Meaning | Data Type Restriction |
Queues (All Types) | Max Length | The maximum number of messages allowed in the queue. When the number of messages in the queue reaches this limit, old messages will be deleted or new messages will be denied according to the Overflow Behaviour setting. | Number |
| Max Length Bytes | The maximum total message bytes allowed in the queue. When the total message bytes in the queue reach this limit, old messages will be deleted or new messages will be denied according to the Overflow Behaviour setting. | Number |
| Overflow Behaviour | The handling method when the queue reaches the maximum length or maximum byte limit. Valid values: drop-head: Delete old messages at the head of the queue. reject-publish: Reject newly published messages. | String |
| Auto Expire | The auto-expiration time of the queue. The unit is milliseconds. When the queue is not accessed (for example, no messages are published, consumed, or the queue status is checked) within this time, the queue will be deleted. | Number |
| Dead letter exchange | Dead-letter exchange. When a message is deleted due to exceeding TTL, reaching the queue maximum length, or being rejected by the consumer, these messages will be sent to the designated dead-letter exchange. | String |
| Dead letter routing key | Dead letter routing key. This routing key can be used for routing when a message is sent to the dead letter exchange. | String |
Queues [Classic] | Message TTL | Message Time to Live (TTL). The unit is milliseconds. This value defines the maximum duration a message can stay alive in the queue. When the message's survival time in the queue exceeds this value, the message will be deleted. If the message is consumed (and confirmed) by the consumer or republished to other queues, the timer will be reset. | Number |
| Lazy mode | Lazy mode. After enabling this mode, RabbitMQ will store messages in the queue to disk as much as possible to reduce memory usage. | String ("lazy") |
Queues [Quorum] | Max in memory length | Maximum unacknowledged messages allowed for each consumer before confirmation | Number |
| Max in memory bytes | The maximum total number of bytes of memory allowed in the queue. When the total number of bytes occupied by messages in the queue reaches this limit, RabbitMQ will attempt to write messages that exceed the limit to disk to reduce memory usage. Please note that this setting may be not applicable to queues with Lazy mode enabled, because in lazy mode, RabbitMQ will save messages to disk as much as possible by default. | Number |
| Delivery limit | Maximum unacknowledged messages allowed for each consumer before confirmation | Number |
Exchanges | Alternate exchange | Standby switch. When a message cannot be routed to any queue (for example, there is no matching routing key or queue), the message will be sent to the designated standby switch. | String |
4. Click Complete to finish policy creation. You can see the created policy in the policy list.
Editing a Policy
1. In the policy list, click Edit in the target policy operation column.
2. In the pop-up window, edit the policy information.
3. Click Complete to complete the modification.
Deleting the Policy
1. In the policy list, find the policy that needs to be deleted and click Delete in the Action column.
2. In the pop-up dialog box, click Delete to complete the deletion.
フィードバック