Apache Ranger is a standardized authentication component that manages access permissions in the big data ecosystem. GooseFS, as an acceleration storage system for big data and data lakes, has been integrated into the comprehensive Apache Ranger authentication platform. This document will describe how to use Apache Ranger to control GooseFS's resource access permissions.
Strengths
GooseFS is a cloud-native accelerated storage system that has achieved nearly the same access control behavior as HDFS with Apache Ranger support. Therefore, big data users who previously used HDFS can easily migrate to GooseFS and directly reuse HDFS Ranger permission policies to obtain a consistent user experience.
GooseFS with Ranger provides an additional joint authentication option of Ranger + native ACL compared with HDFS with Ranger's authentication architecture. When Ranger authentication fails, it can also choose to use native ACL authentication, which can solve some problems of imperfect Ranger authentication policy configuration.
Authentication Architecture of GooseFS with Ranger
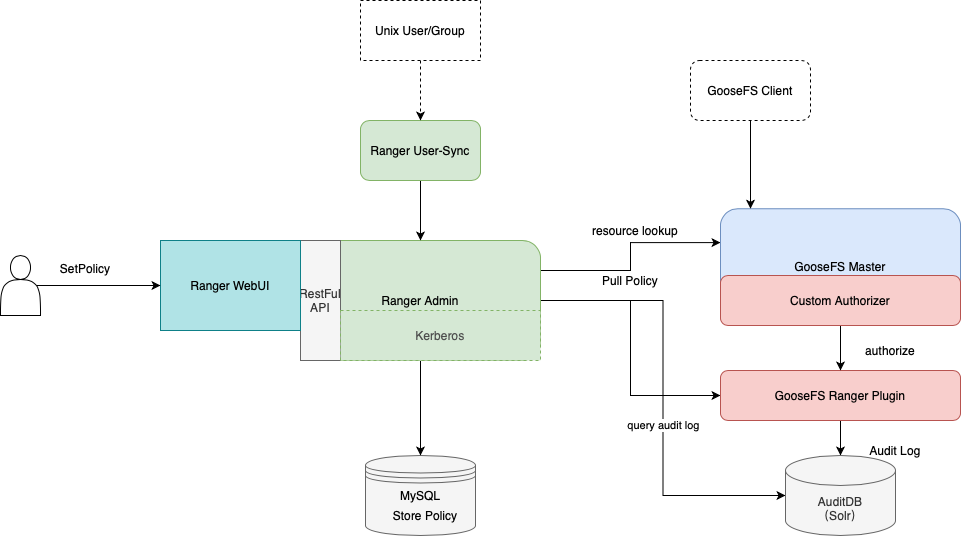
To support integrating GooseFS into the Ranger authentication platform, we developed the GooseFS Ranger Plugin, which is deployed on both the GooseFS Master node and the Ranger Admin side. It is responsible for completing the following tasks:
GooseFS Master node side:
Provide the Authorizer API to deliver auth results for every metadata request on the GooseFS Master.
Connect to Ranger Admin to obtain the configured authentication policy.
On the Ranger Admin:
Provide GooseFS resource lookup capability to Ranger Admin.
Provide configuration verification capability.
Beginning to Deploy
Preparations
Before starting to use, ensure that the relevant Ranger components (i.e., including: Ranger Admin and Ranger UserSync) are deployed and configured in the environment, and ensure that the Ranger WebUI can be opened and used normally.
Deployment Component
Deploy GooseFS Ranger Plugin on Ranger Admin Side and Register the Corresponding Service
1. Create a GooseFS directory under the Ranger service definition directory (Note: The directory permission must at least include x and r permissions).
1.1 If using Tencent Cloud EMR Cluster, the Ranger service definition directory is: /usr/local/service/ranger/ews/webapp/WEB-INF/classes/ranger-plugins.
1.2 If it is a self-built Hadoop Cluster, you can search for components such as hdfs that are already connected to the ranger service by looking in the ranger directory.
2. Place goosefs-ranger-plugin-${version}.jar and ranger-servicedef-goosefs.json under the GooseFS directory and have read permission.
3. Restart the Ranger service.
4. On Ranger, register the GooseFS Service using the following commands.
# Create a service, require the input of the Ranger administrator's account and password, as well as the Ranger service address
# For Tencent Cloud EMR Cluster, the admin user is root, and the password is the root password set when creating the EMR cluster. The IP of the ranger service is the Master IP of the EMR service.
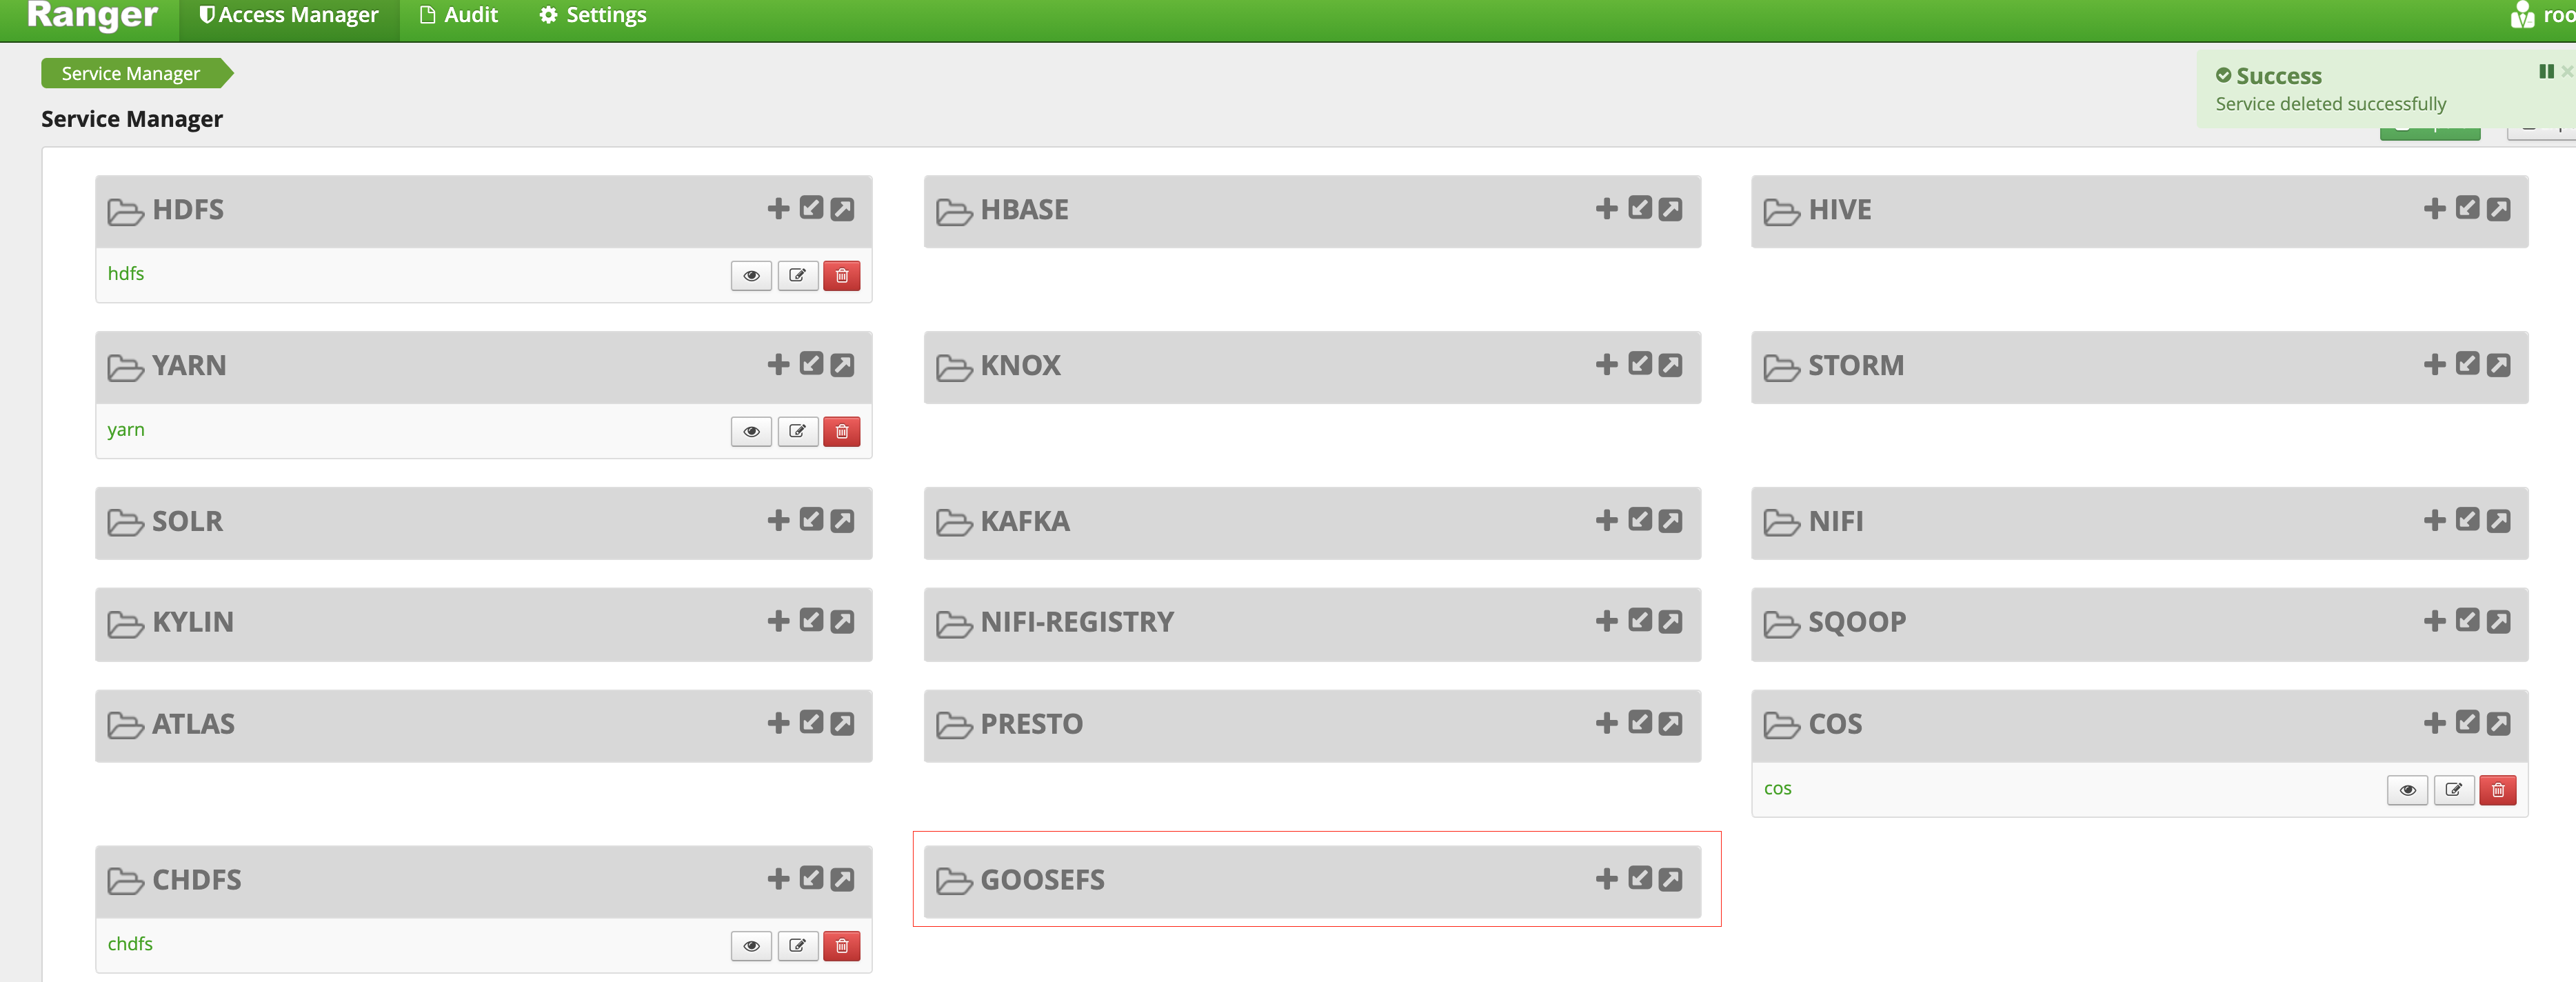
5. After successful creation, you can see GooseFS-related services on the Ranger Web console:
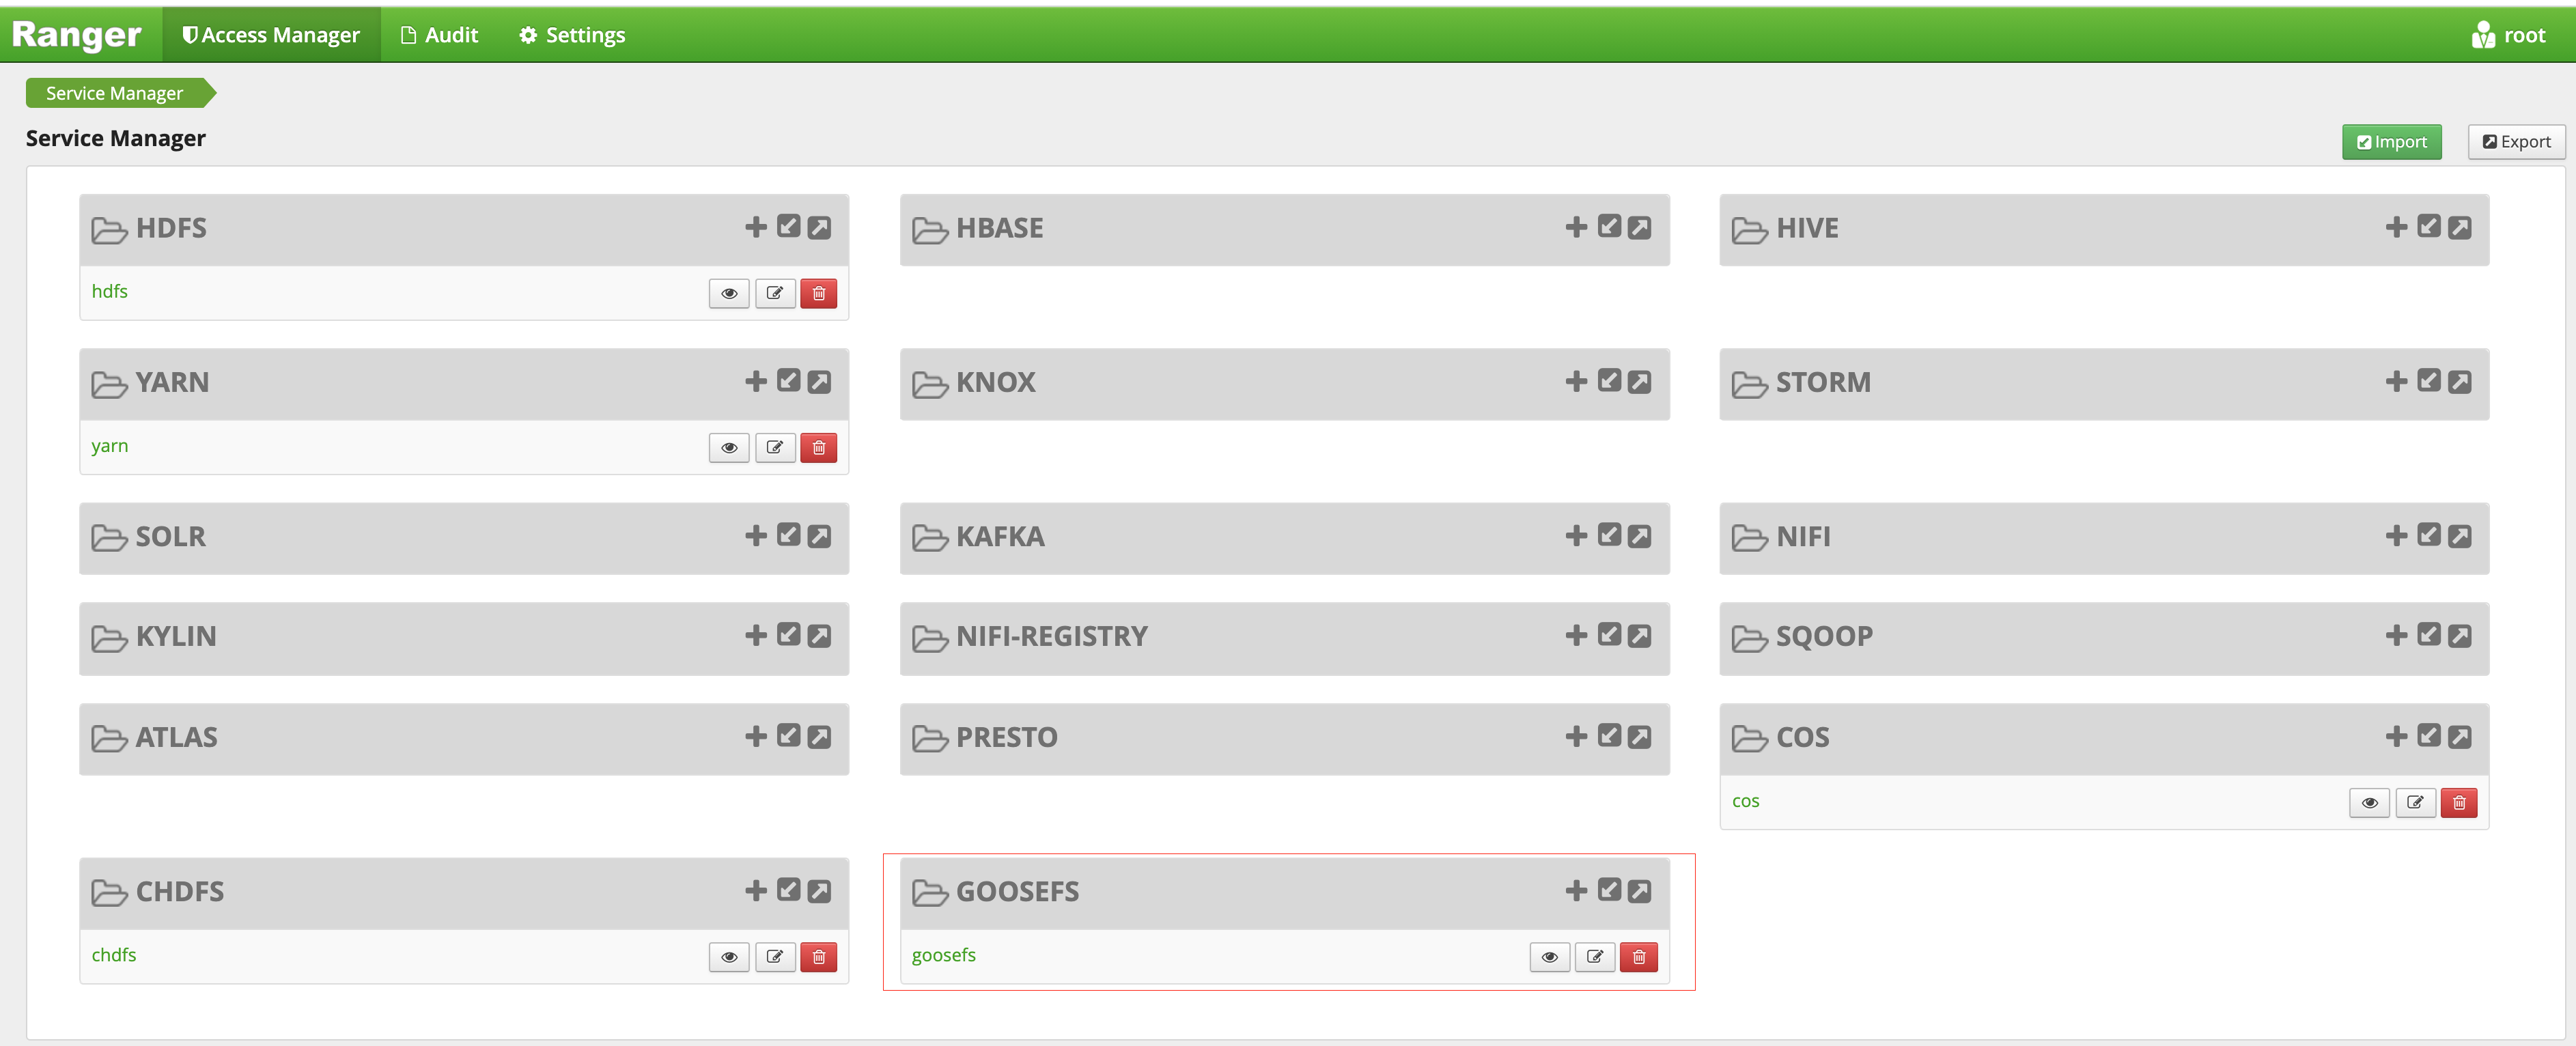
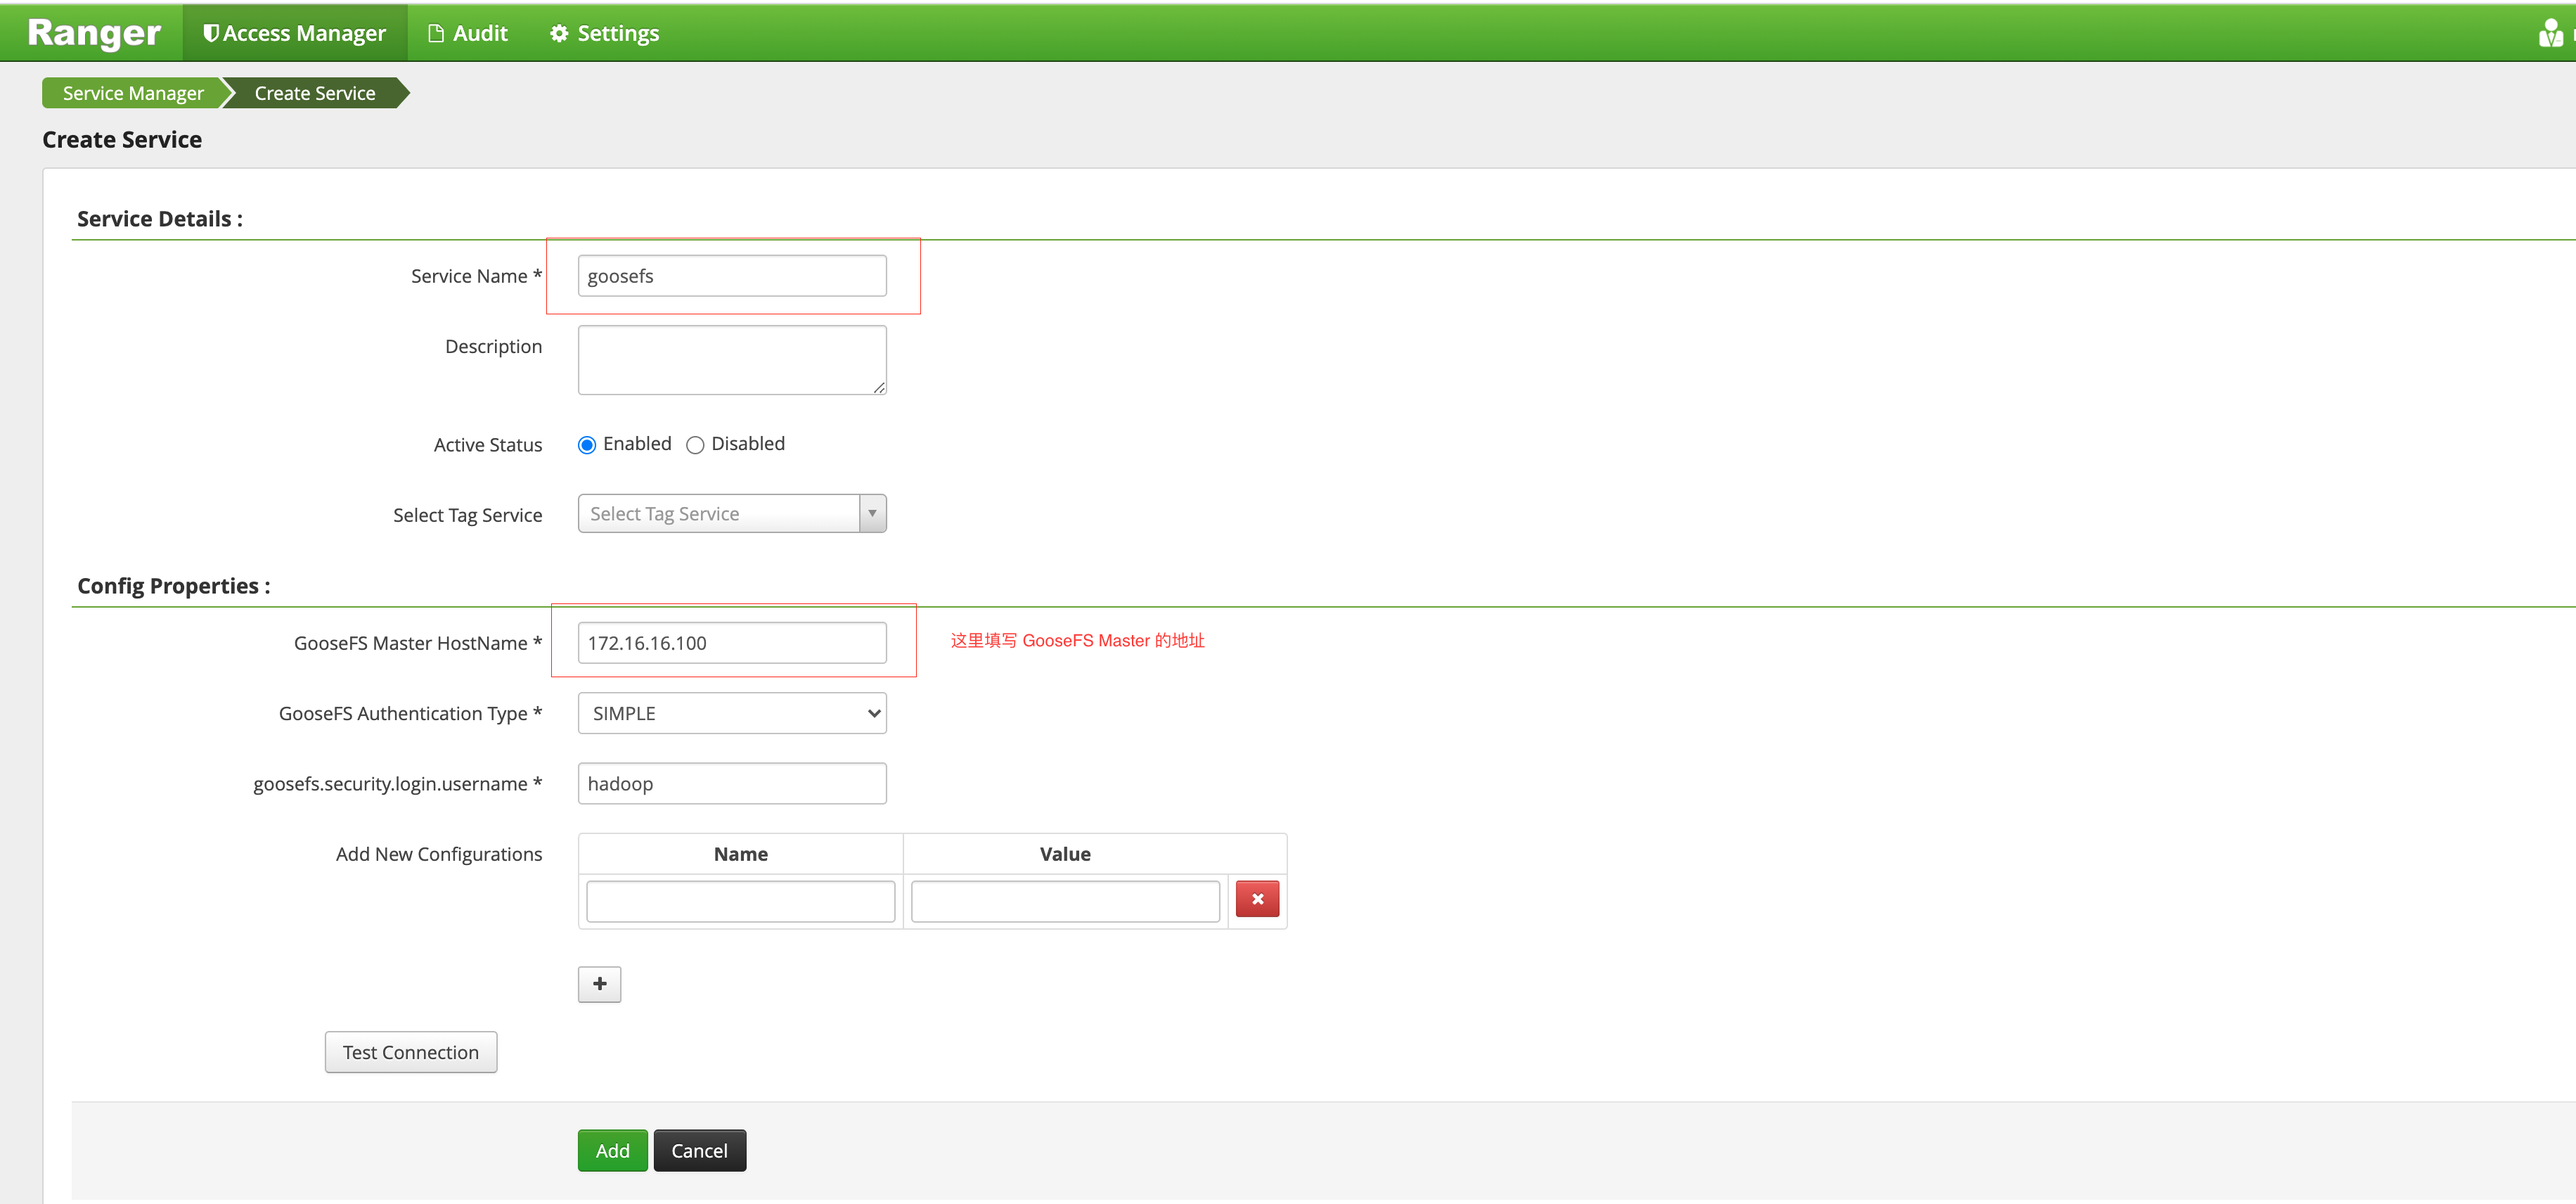
6. On the GooseFS service side, click + to define a goosefs service instance.
7. Click the newly generated goosefs service instance to add an authentication policy.
Deploy GooseFS Ranger Plugin on GooseFS Master Side and Configure to Enable Ranger Authentication
1. Place the goosefs-ranger-plugin-${version}.jar in the ${GOOSEFS_HOME}/lib path and have at least read permission.
2. Place the three files ranger-goosefs-audit.xml, ranger-goosefs-security.xml, and ranger-policymgr-ssl.xml in the ${GOOSEFS_HOME}/conf path, and complete their necessary configurations respectively.
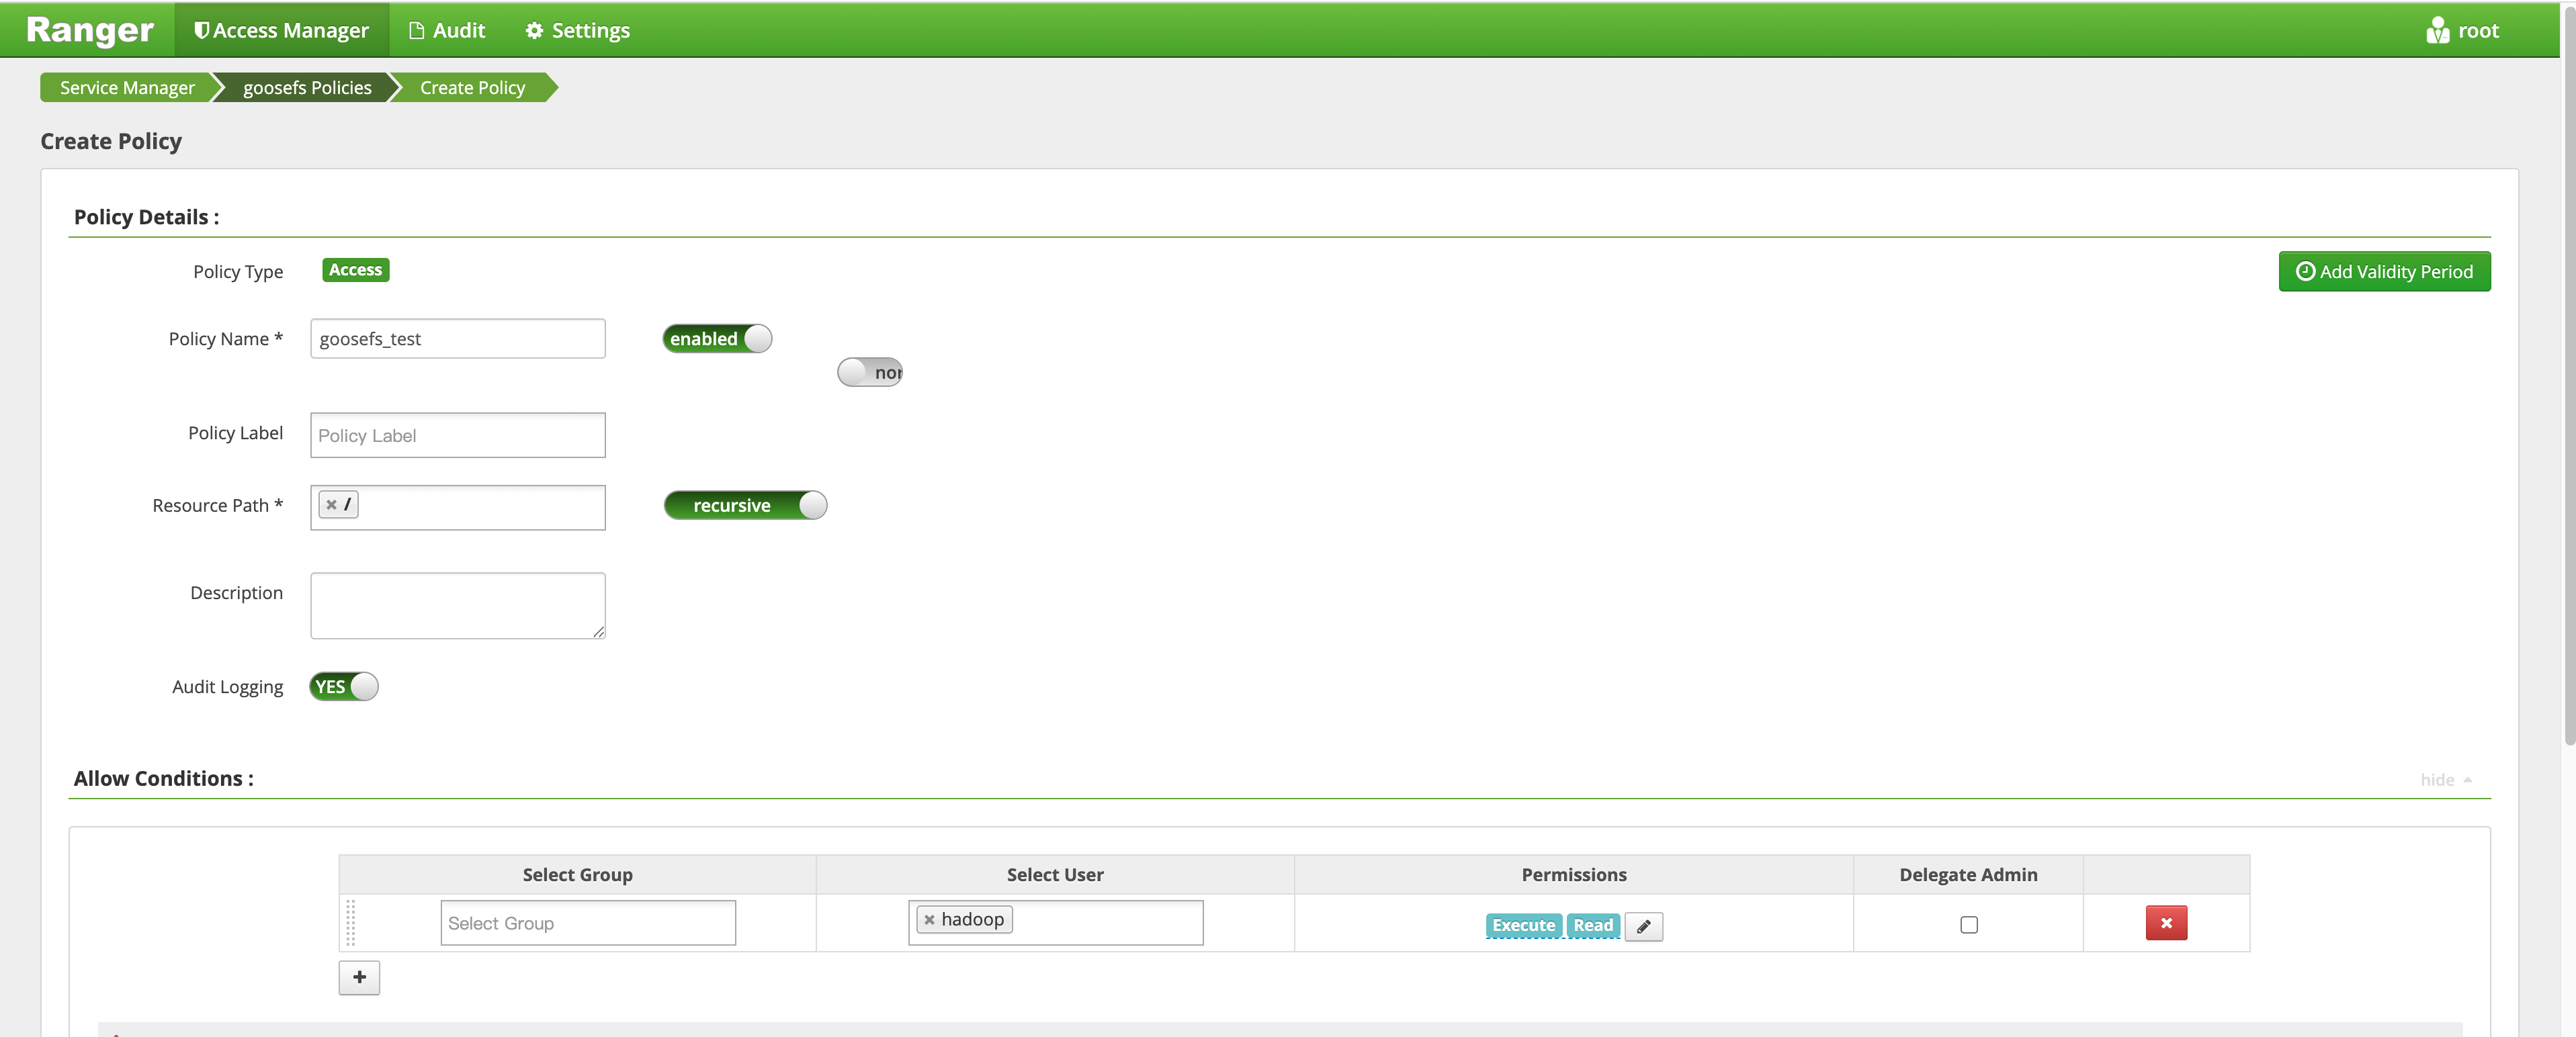
For example, add a policy that allows hadoop users to have read and execute permissions on the root directory of GooseFS, but does not allow write operations. Follow these steps:
1. Add a policy, as follows:
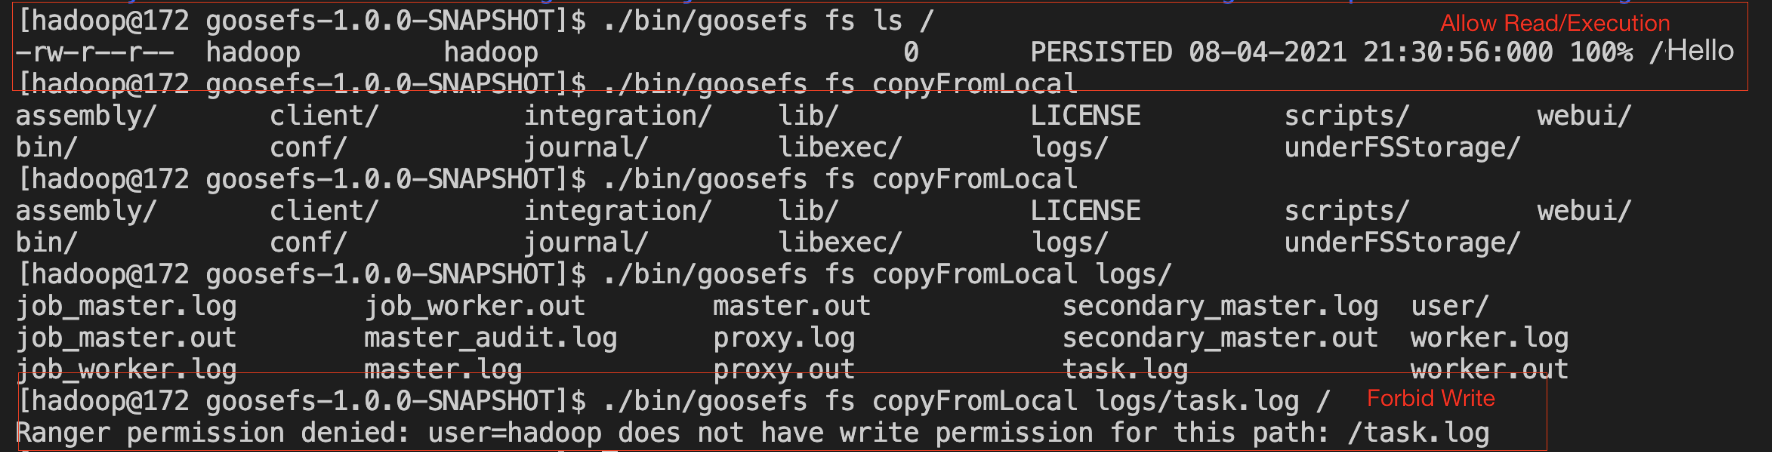
2. Once the policy is added successfully, verify the policy. You will see that the policy is active, as follows: