Metric alarms are proactive alarming behaviors aimed at the status of the report data analysis results. Through metric alarms, business personnel can instantly receive notifications about abnormal metrics, enabling quick identification of issues and the formulation of subsequent policies.
Metric alarms consist of 3 modules, including monitoring configurations, monitoring view, and monitoring management. Business Intelligence (BI) supports alarm message push via email and WeCom Robot (if available).
Edition support: Professional Edition.
Prerequisite: If you want to use WeCom for pushing alarm notifications, you need to first create a WeCom Robot. For reference, see WeCom Push.
This document introduces the following operations in a crosstab:
Monitoring Configurations
Monitoring Management
Monitoring view.
Monitoring Configuration
The monitored object is the component. Monitoring configurations are created and edited in the report editing mode.
1. Configuration path.
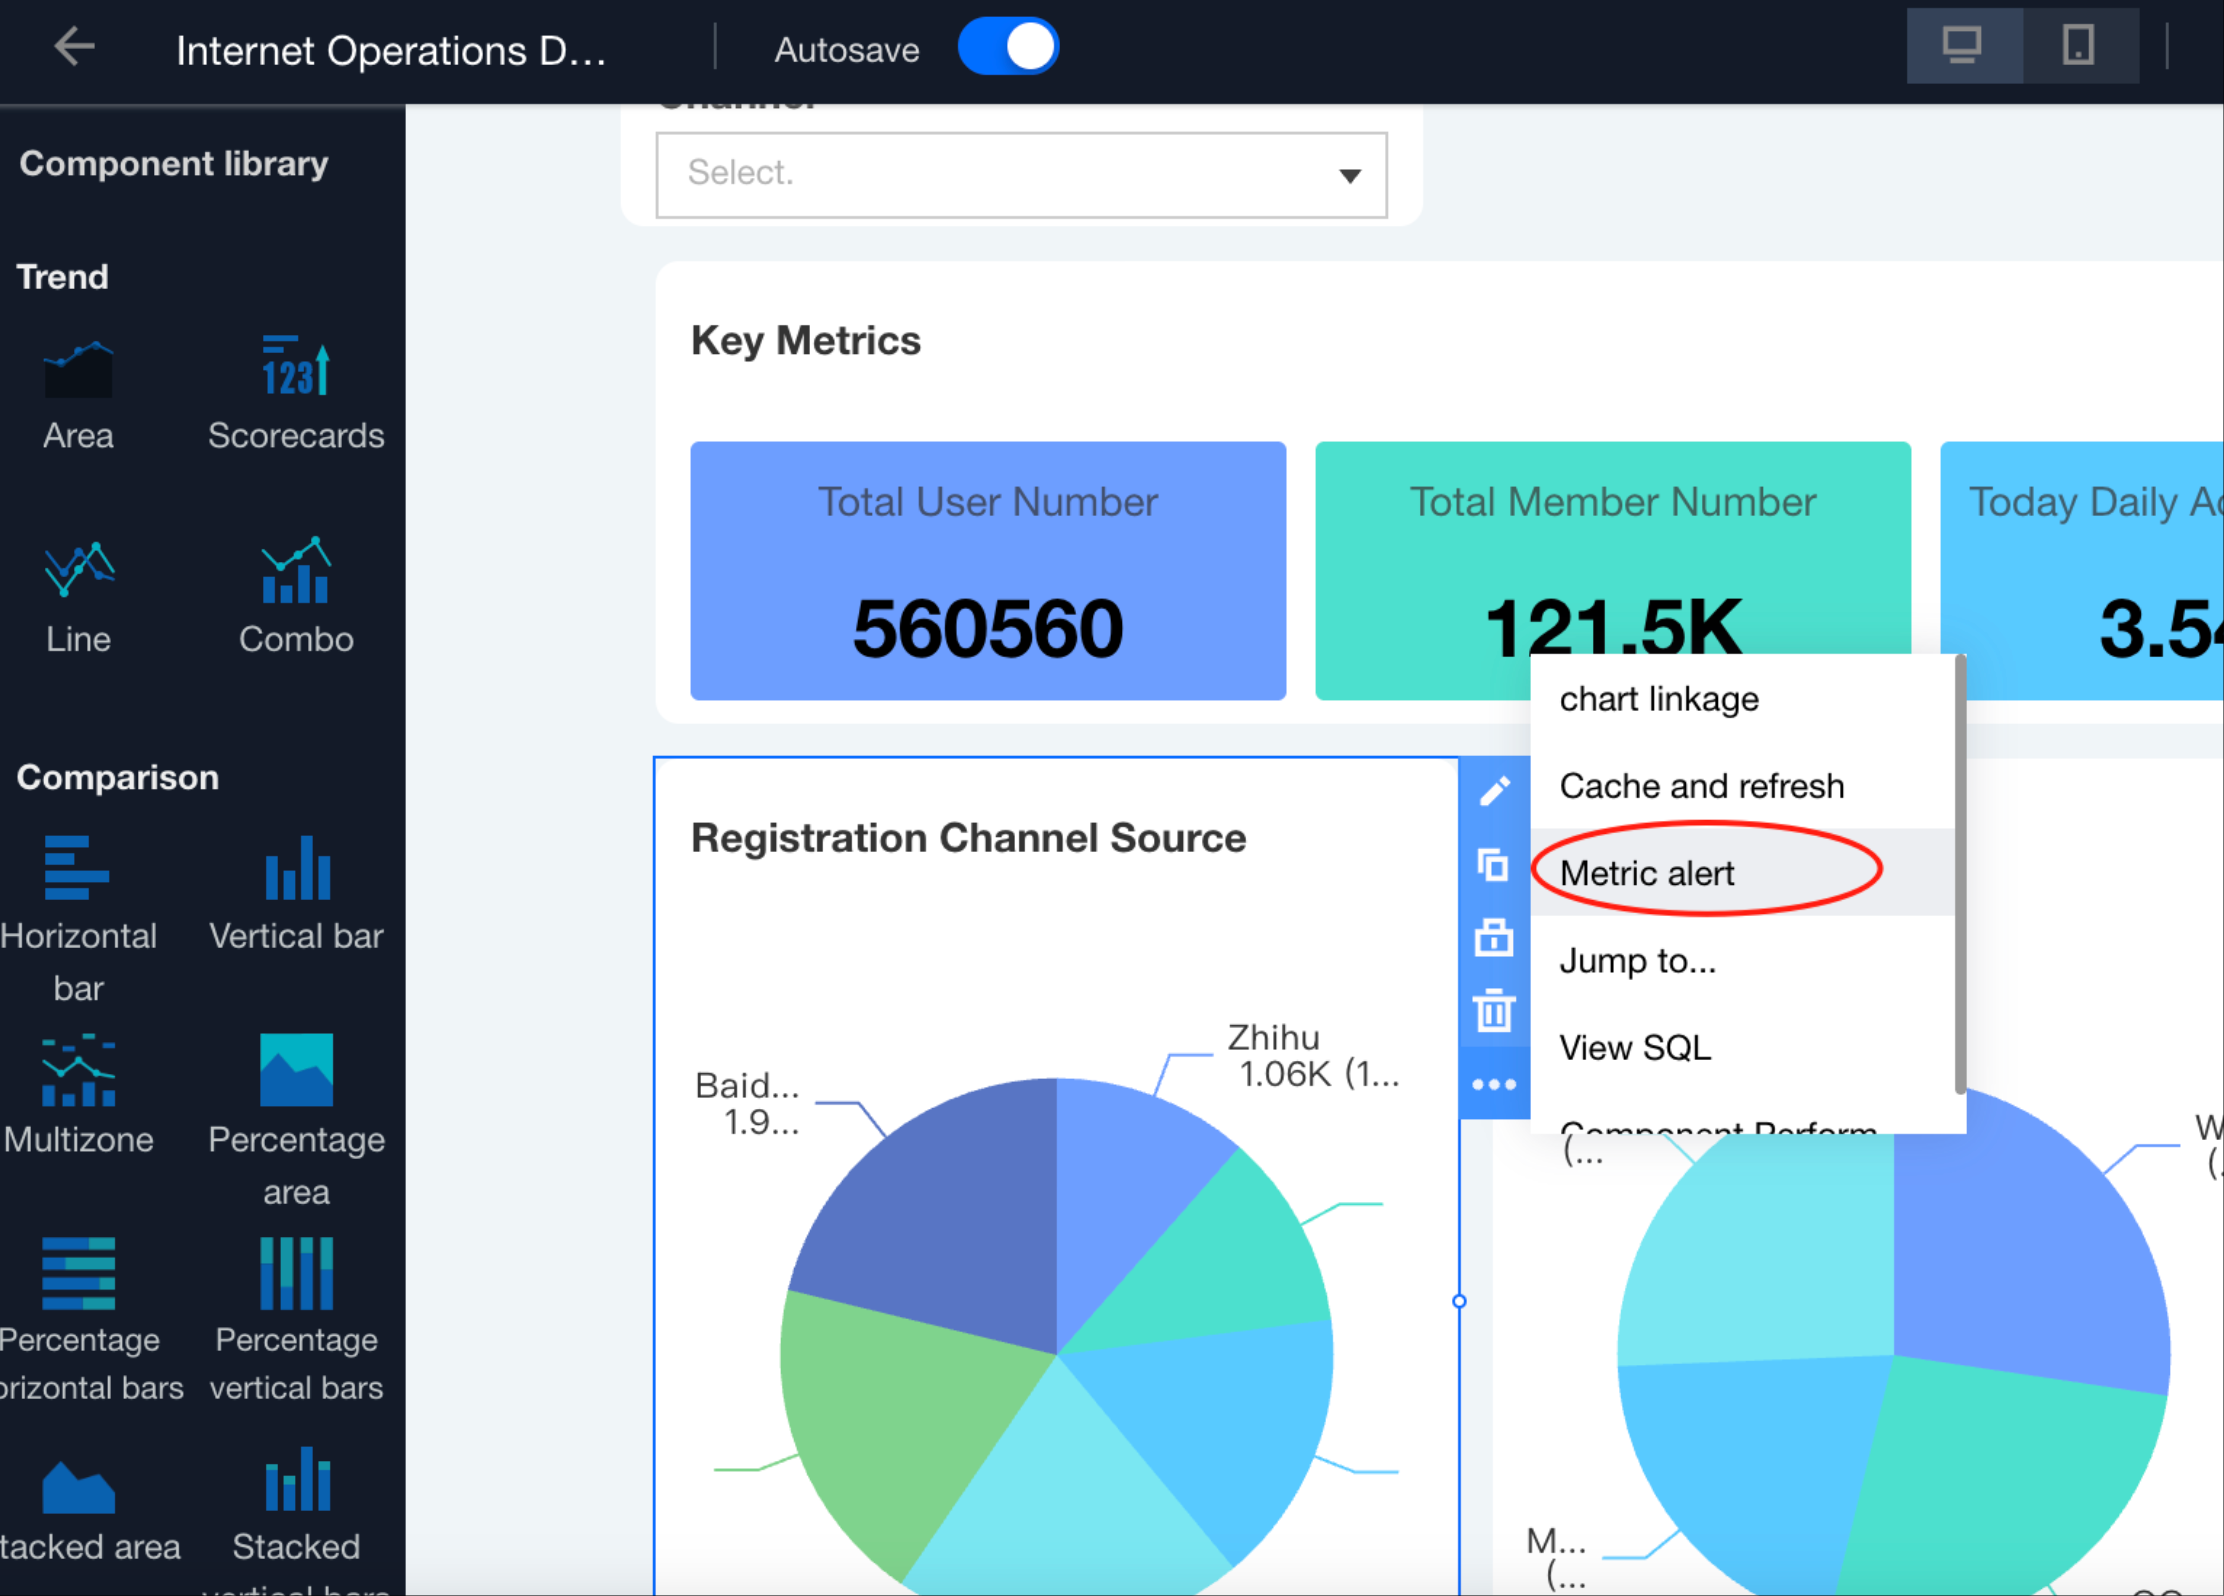
Go to the page editing mode, select the component, and choose "Metric monitoring" in the toolbar to access the monitoring configuration page.
In the pop-up interface, you can manage all alarm configurations for the current component.
From the list on the left, you can add an alarm, select an existing one to edit, or delete an alarm.
After completing the configurations, users can click "Push Test" to verify whether the alarm is working correctly.
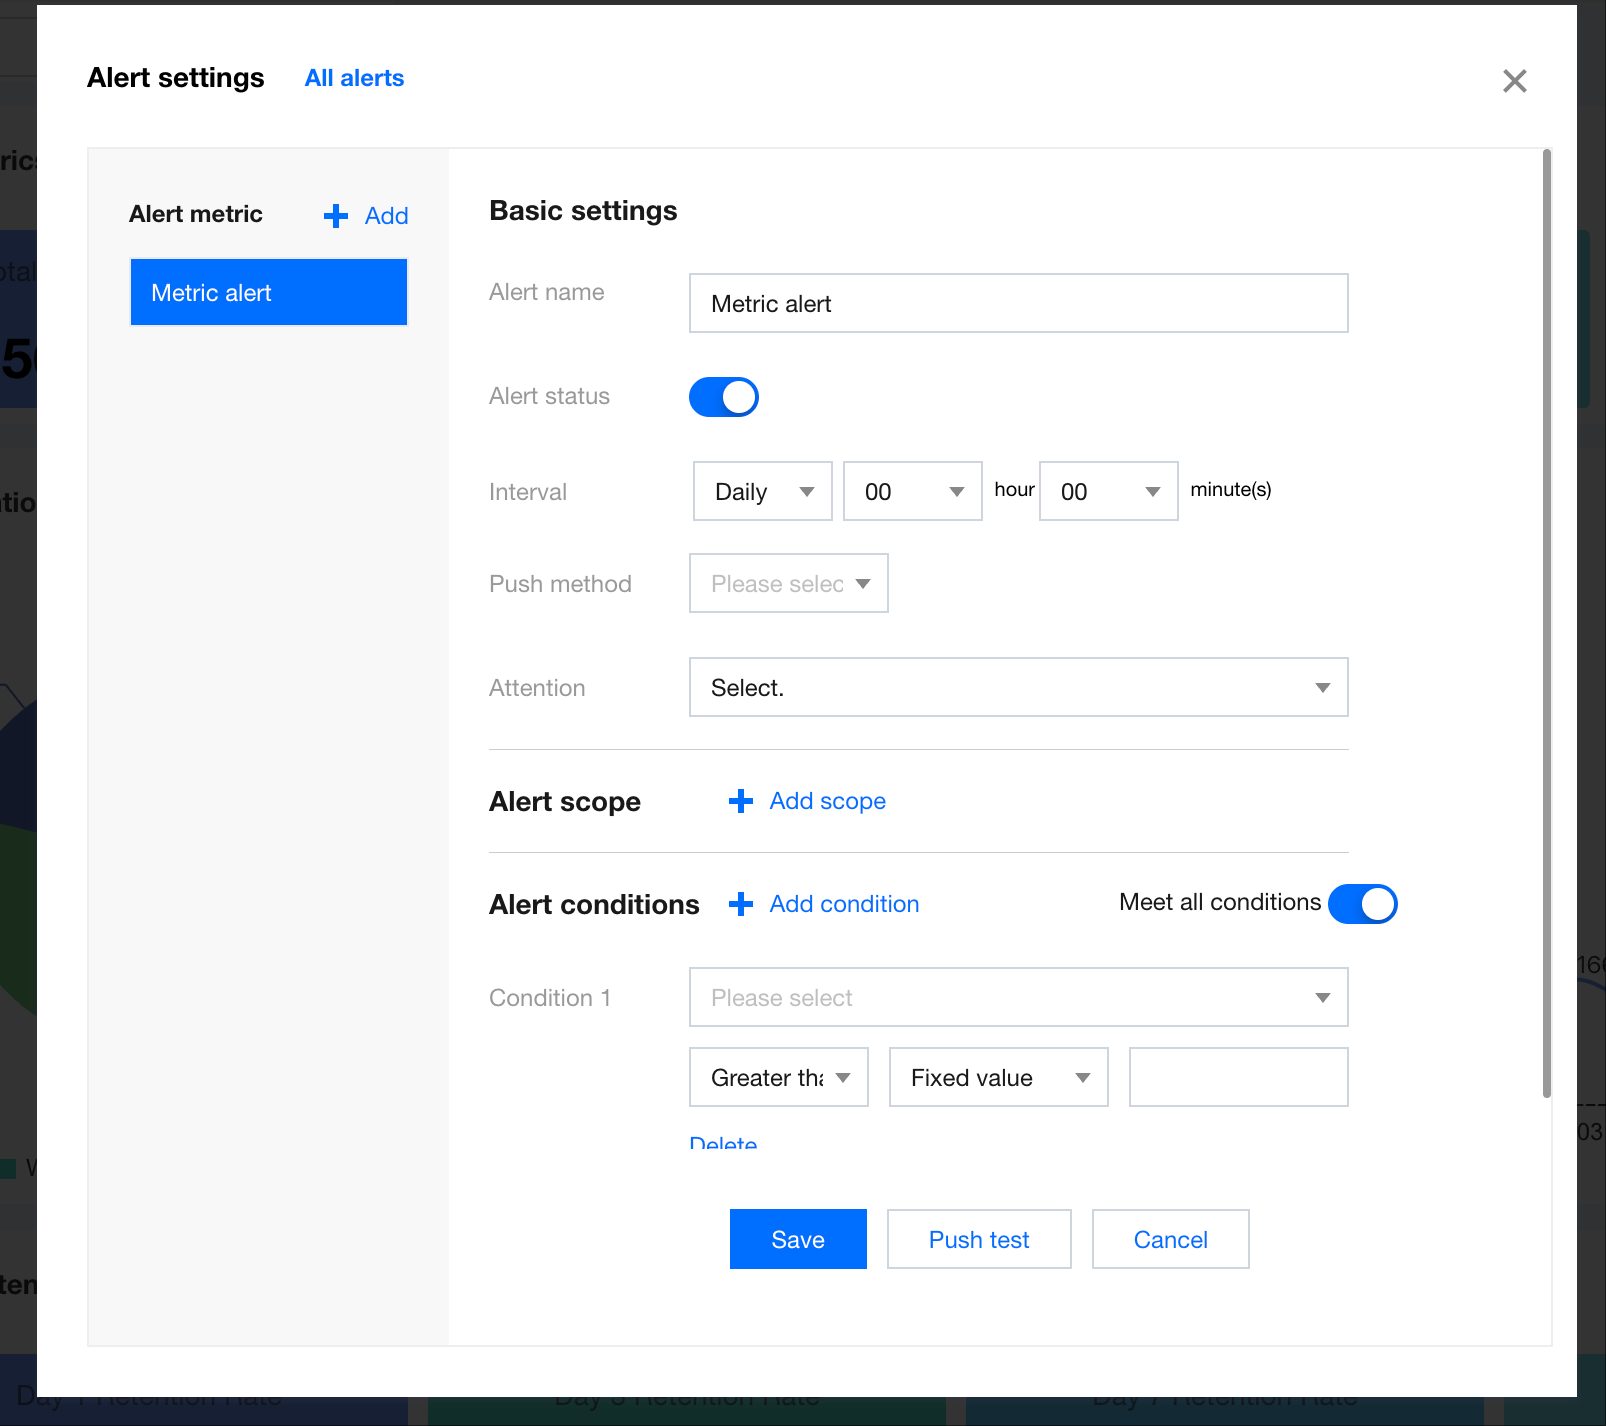
2. Adding and editing alarms.
Users can create an alarm by clicking the "+ Add" button on the left side. An alarm event requires configuring the following information.
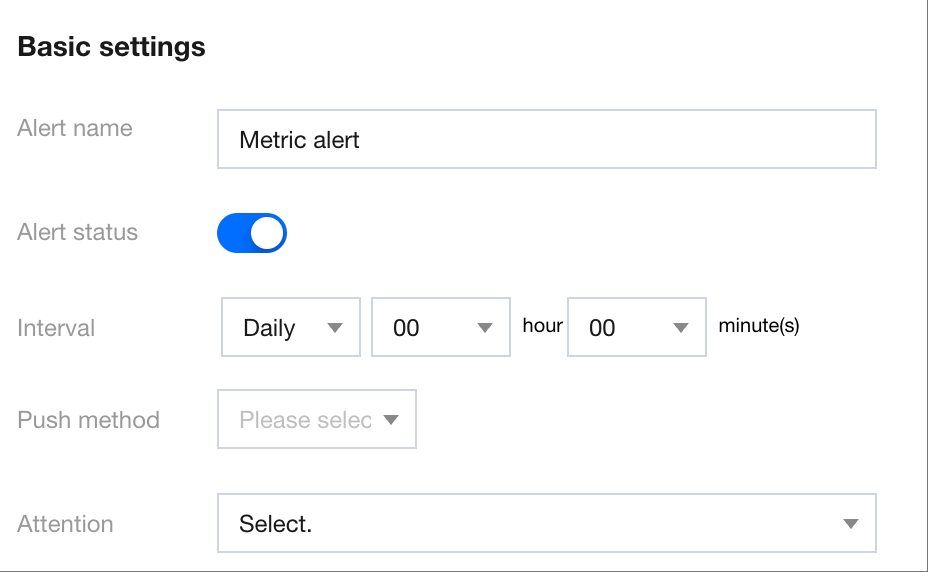
Basic settings: Configure the basic alarm information and push methods.
Alarm name: This name will be displayed in push messages. It is recommended to use easily recognizable terms, for example, "Daily Sales Below Average".
Alarm status: When the status is on, the alarm will trigger monitoring, and push messages will be sent. Disabling this setting will pause the alarm task, and users can enable the setting again at any time.
Monitoring cycle: You can configure monitoring based on the granularity of month, week, day, or hour. The system will initiate the monitoring task according to the configured time. For example, to send a “Daily Report” at 8:30 every day, set the cycle to “Daily” > “08” hours > “30” minutes.
Recommendation: Configure the monitoring cycle reasonably based on your business attributes. Excessive alarm frequency may lead to message delivery failures due to rejections by mail servers or third-party platforms.
Push method: Currently, email and WeCom Robot are supported as push methods. It is recommended to use WeCom Robot for the timely receipt of alarm messages. The official email does not support hourly alarms (this will be available after the email server settings are supported in the future).
Notification recipients: If email is used for push notifications, you need to select the notification recipients. The recipients should be users within the current project and should have their email addresses bound. For configuration details, refer to Platform User Management.
Robot: If WeCom Robot is used for alarm notifications, a Robot needs to be selected (the alarm should be bound to this Robot). For Robot setup and management, see WeCom Push.
Note:
A maximum of 5 alarms can be configured for each component.
The WeCom Robot selected for the alarm needs to be bound to a "metric alarm" template. Otherwise, the Robot cannot be selected.
If the Robot has been deleted in WeCom, BI cannot detect this change. Ensure that the Robot's status is properly maintained on the WeCom side.
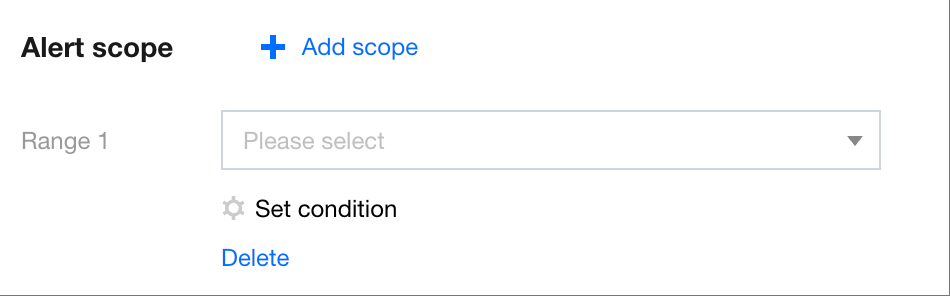
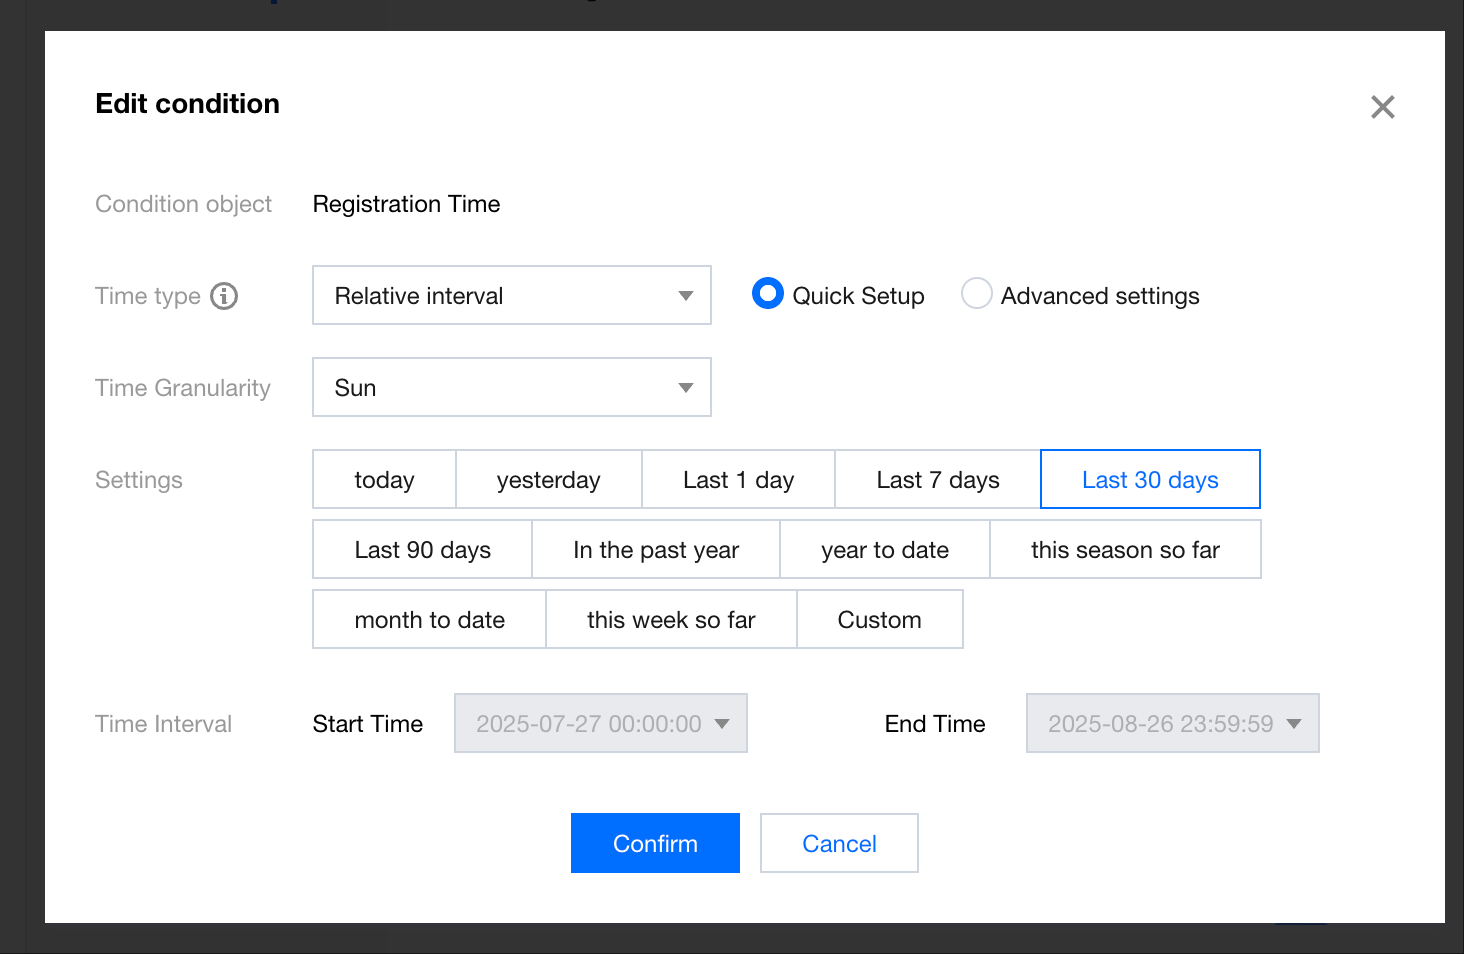
Monitoring Scope Settings
Users can define the data scope for monitoring. For example, if the scope is set to "last 30 days", data outside this period will not be tracked or trigger any alarms.
1. Click + Add Scope to add a monitoring scope and select the "Statistical time" dimension.
2. Click Set conditions and set the time range to "Last 30 days".
3. Click Delete. Upon secondary confirmation, the monitoring scope condition will be removed.
Note:
If no monitoring scope is set, the alarm will track all result data of the current chart (that is, all values within the chart's analysis results, excluding any data outside the analysis).
If multiple monitoring scopes are set, all scope conditions should be met.
The monitored target is determined by the overlap between the monitoring scope conditions and the component's analysis conditions (as illustrated in the diagram below). For example, if the component's analysis condition is set to include "Beijing, Shanghai, Guangzhou, and Shenzhen" for the "Province" field, and the scope condition is set to include "Shanghai, Shenzhen, Shandong, and Henan", the monitored target will be "Shanghai and Shenzhen".
If the data table associated with the chart is bound to user tags (row/column level permissions), the alarms may include data that certain users do not have permission to access. For example, even if User A is only authorized to access data where the "Province" field value is "Shanghai", the system might still push alarms containing the "Shenzhen" data to the user. Therefore, it is recommended to carefully select the recipients when configuring alarms.
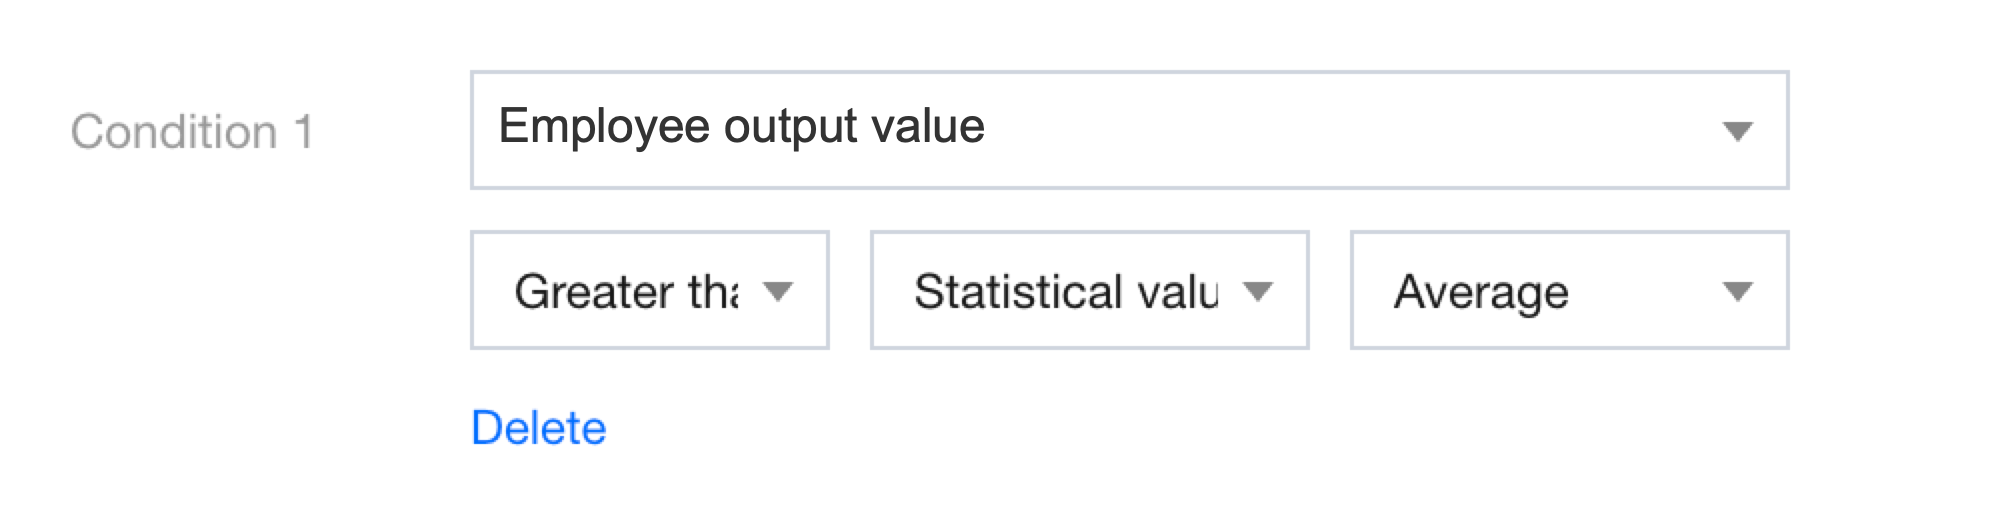
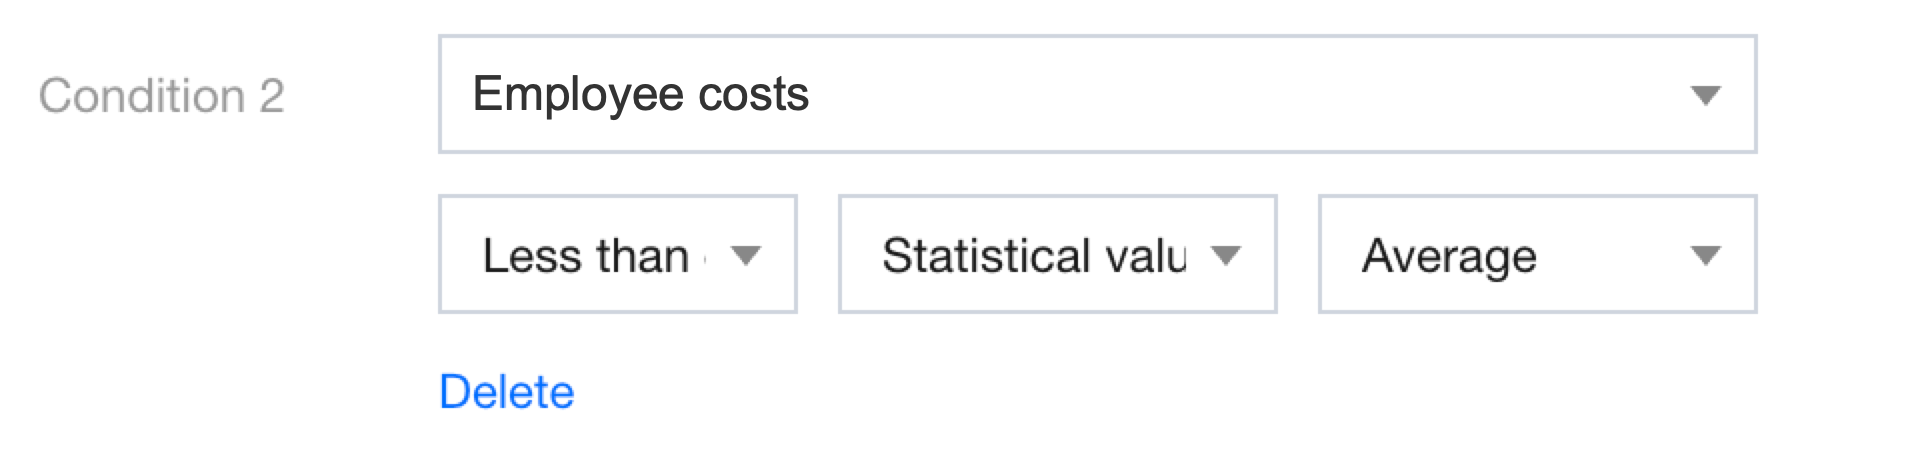
Alarm Condition Settings
Users can set conditions for triggering monitoring. For example, monitoring data with “employee output value greater than the average” and “employee costs less than 70,000”. An alarm will be triggered when the "employee output value" exceeds the average and the "employee costs" are below 70,000.
1. Click + Add Conditions to add a condition. Select the "Employee output value" metric, set the logical condition to "Greater than", set the value type as "Statistical value", and set the value as "Average". You can add a minimum of 1 condition and a maximum of 5 conditions.
2. Click + Add Conditions to add a condition. Select the "Employee costs" metric, set the logical condition to "Less than", set the value type as "Fixed value", and set the value as "70,000".
3. Set the condition relationship and select "Meet all conditions".
4. Click Delete to remove this condition.
Push Test
Once the configurations are complete, you can verify the current configurations by using the Push Test feature, which sends a test message in real-time to the corresponding recipients. The push test does not trigger an actual alarm but simply verifies whether the push channel is working properly.
The email push message example:
The Robot push message example:
If the test content is received in the email or WeCom group, it indicates that the push settings are working properly. The user can then save the alarm settings. (After the settings are saved, ensure that the business has been published. Otherwise, a push exception will occur during subsequent notifications.)
Deleting Alarms
To delete an alarm, hover over the alarm in the alarm list, and click the Delete icon. After the second confirmation, the alarm will be deleted.
Monitoring View
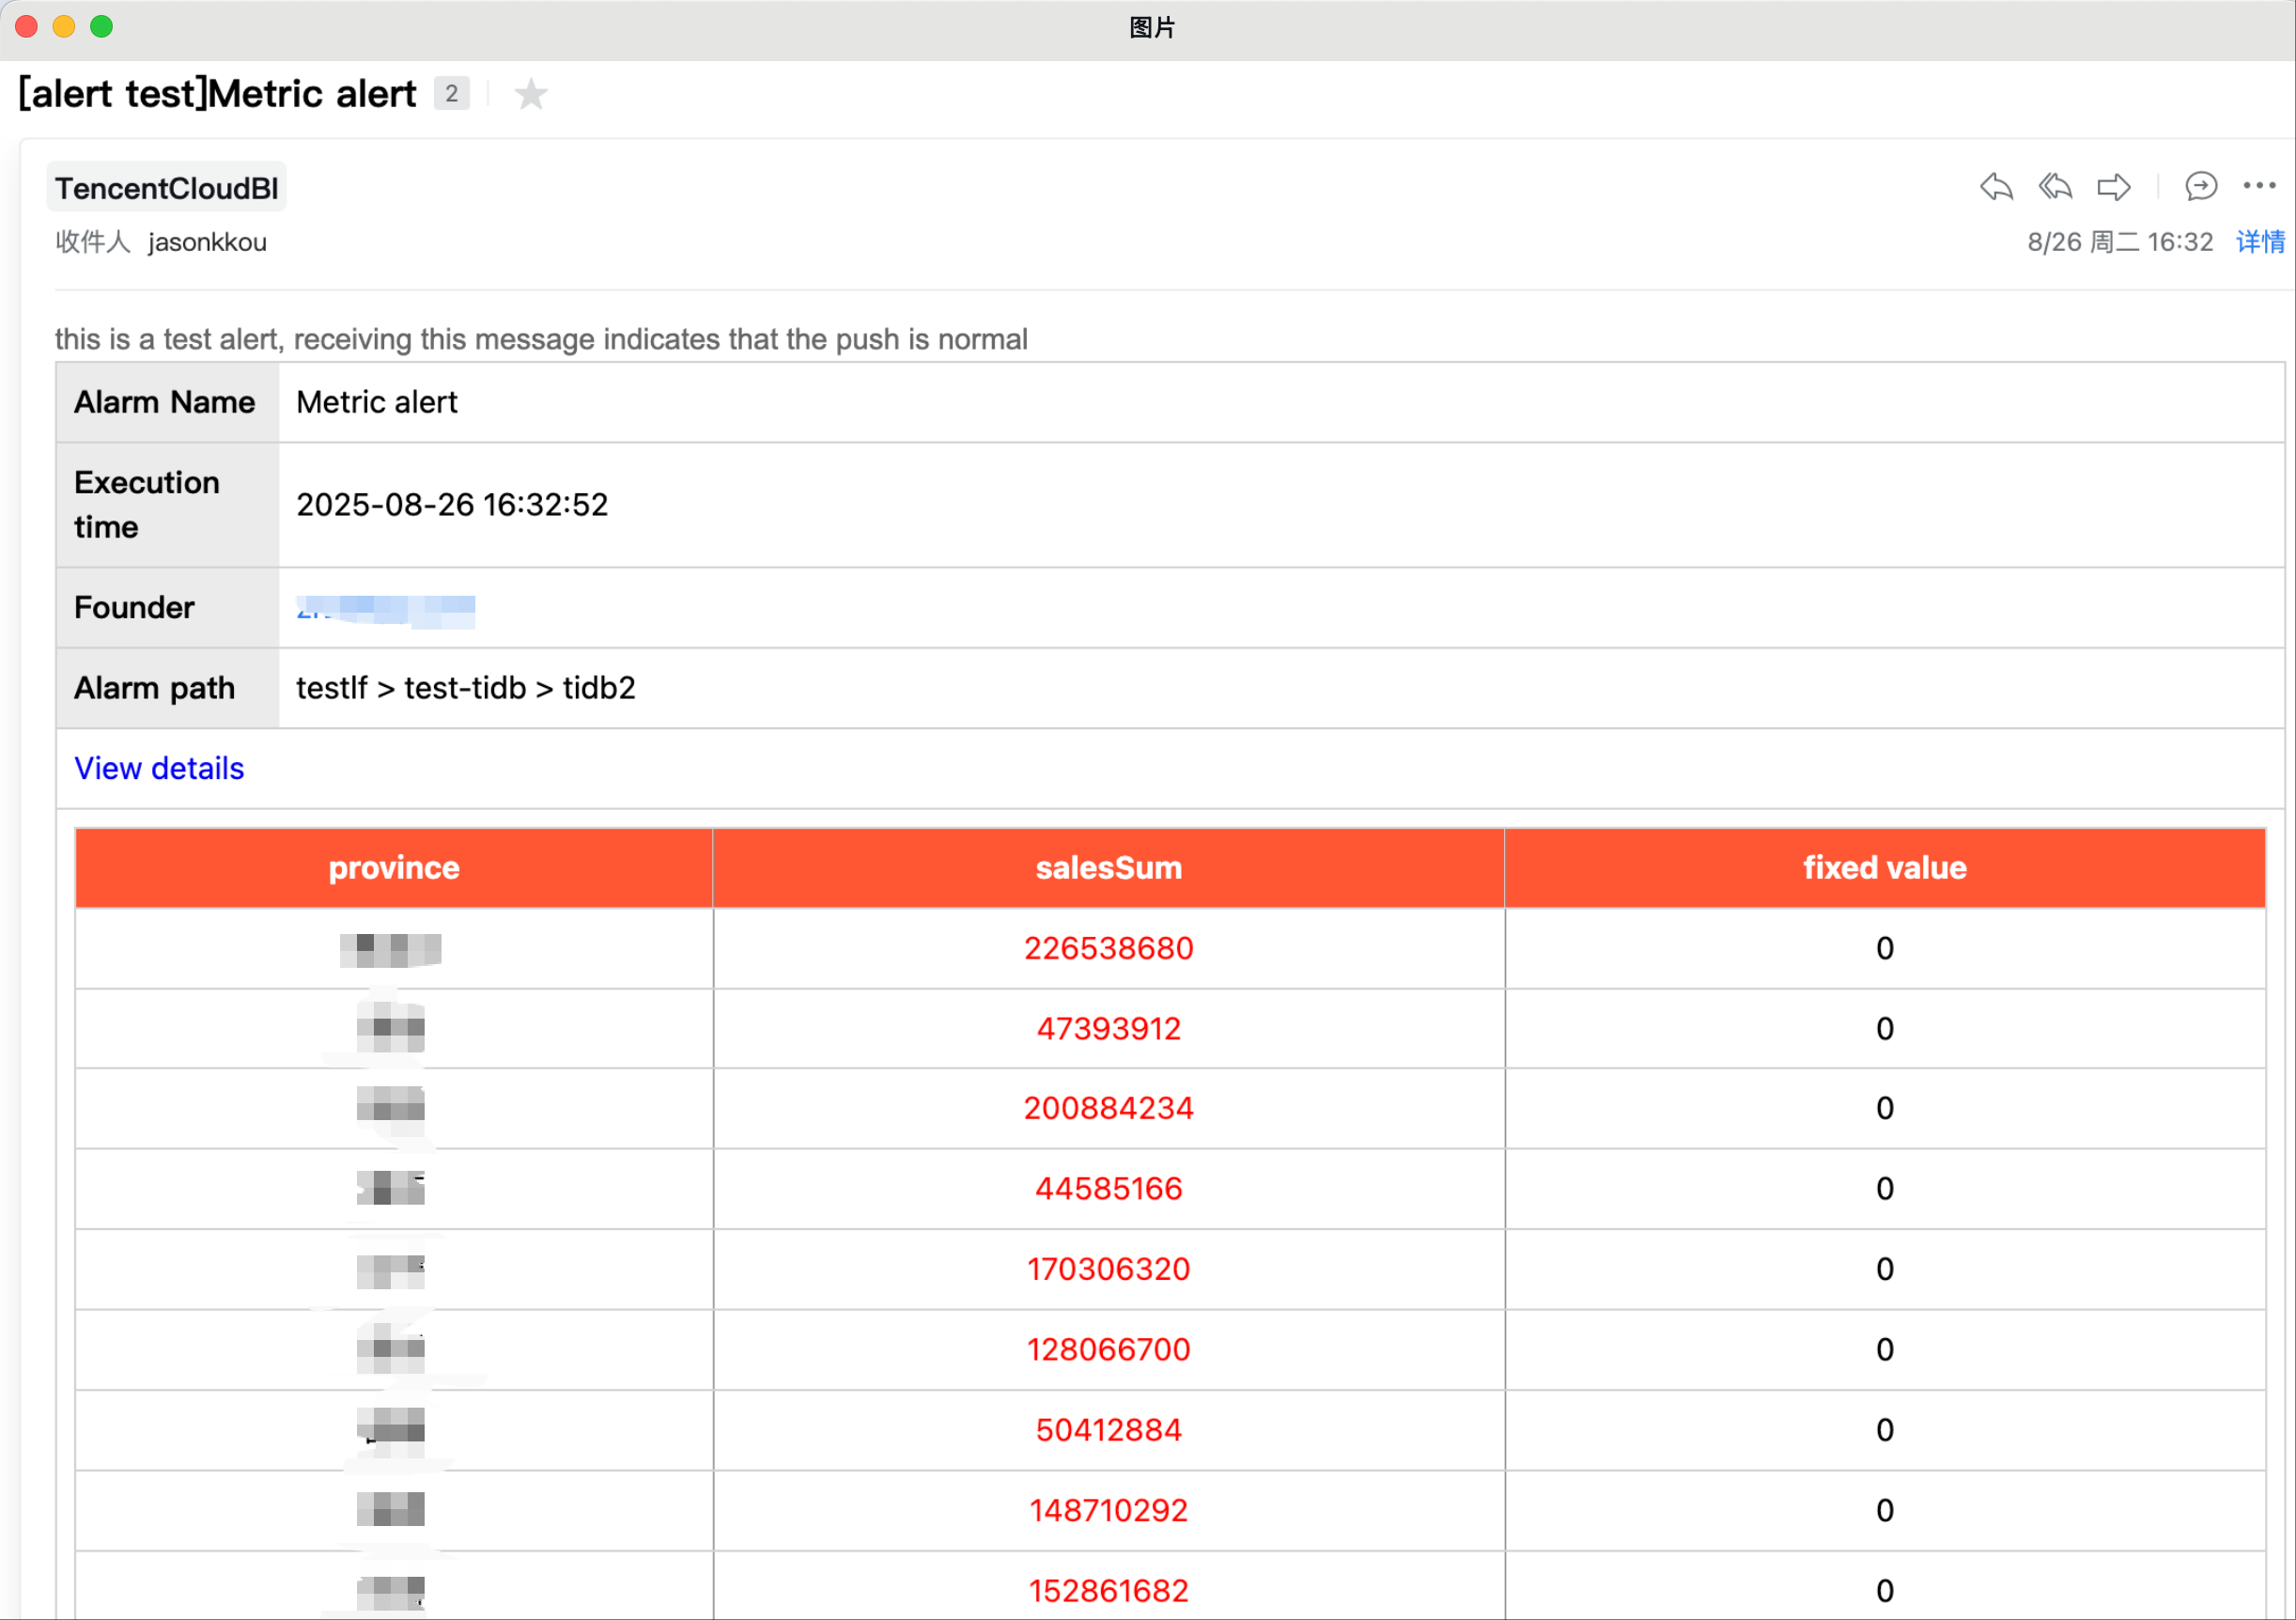
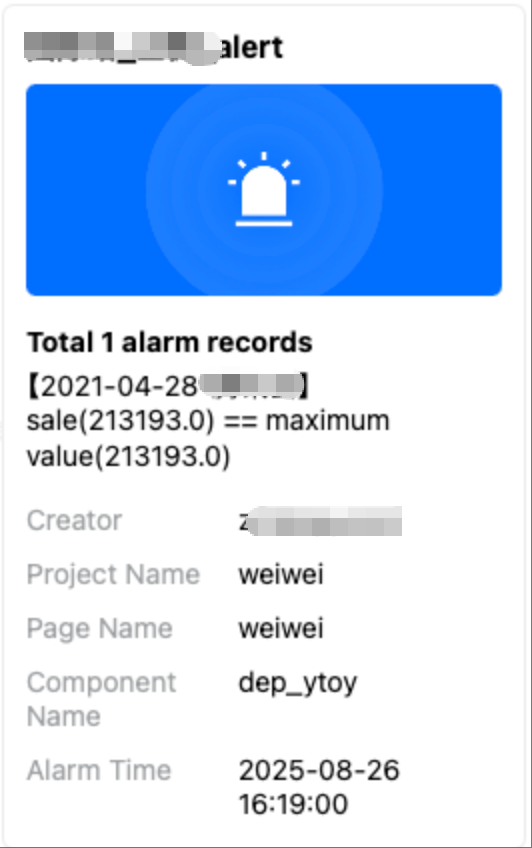
Users can receive monitoring alarms via email or the WeCom group. The alarm effect is as follows (using WeCom Robot as an example).
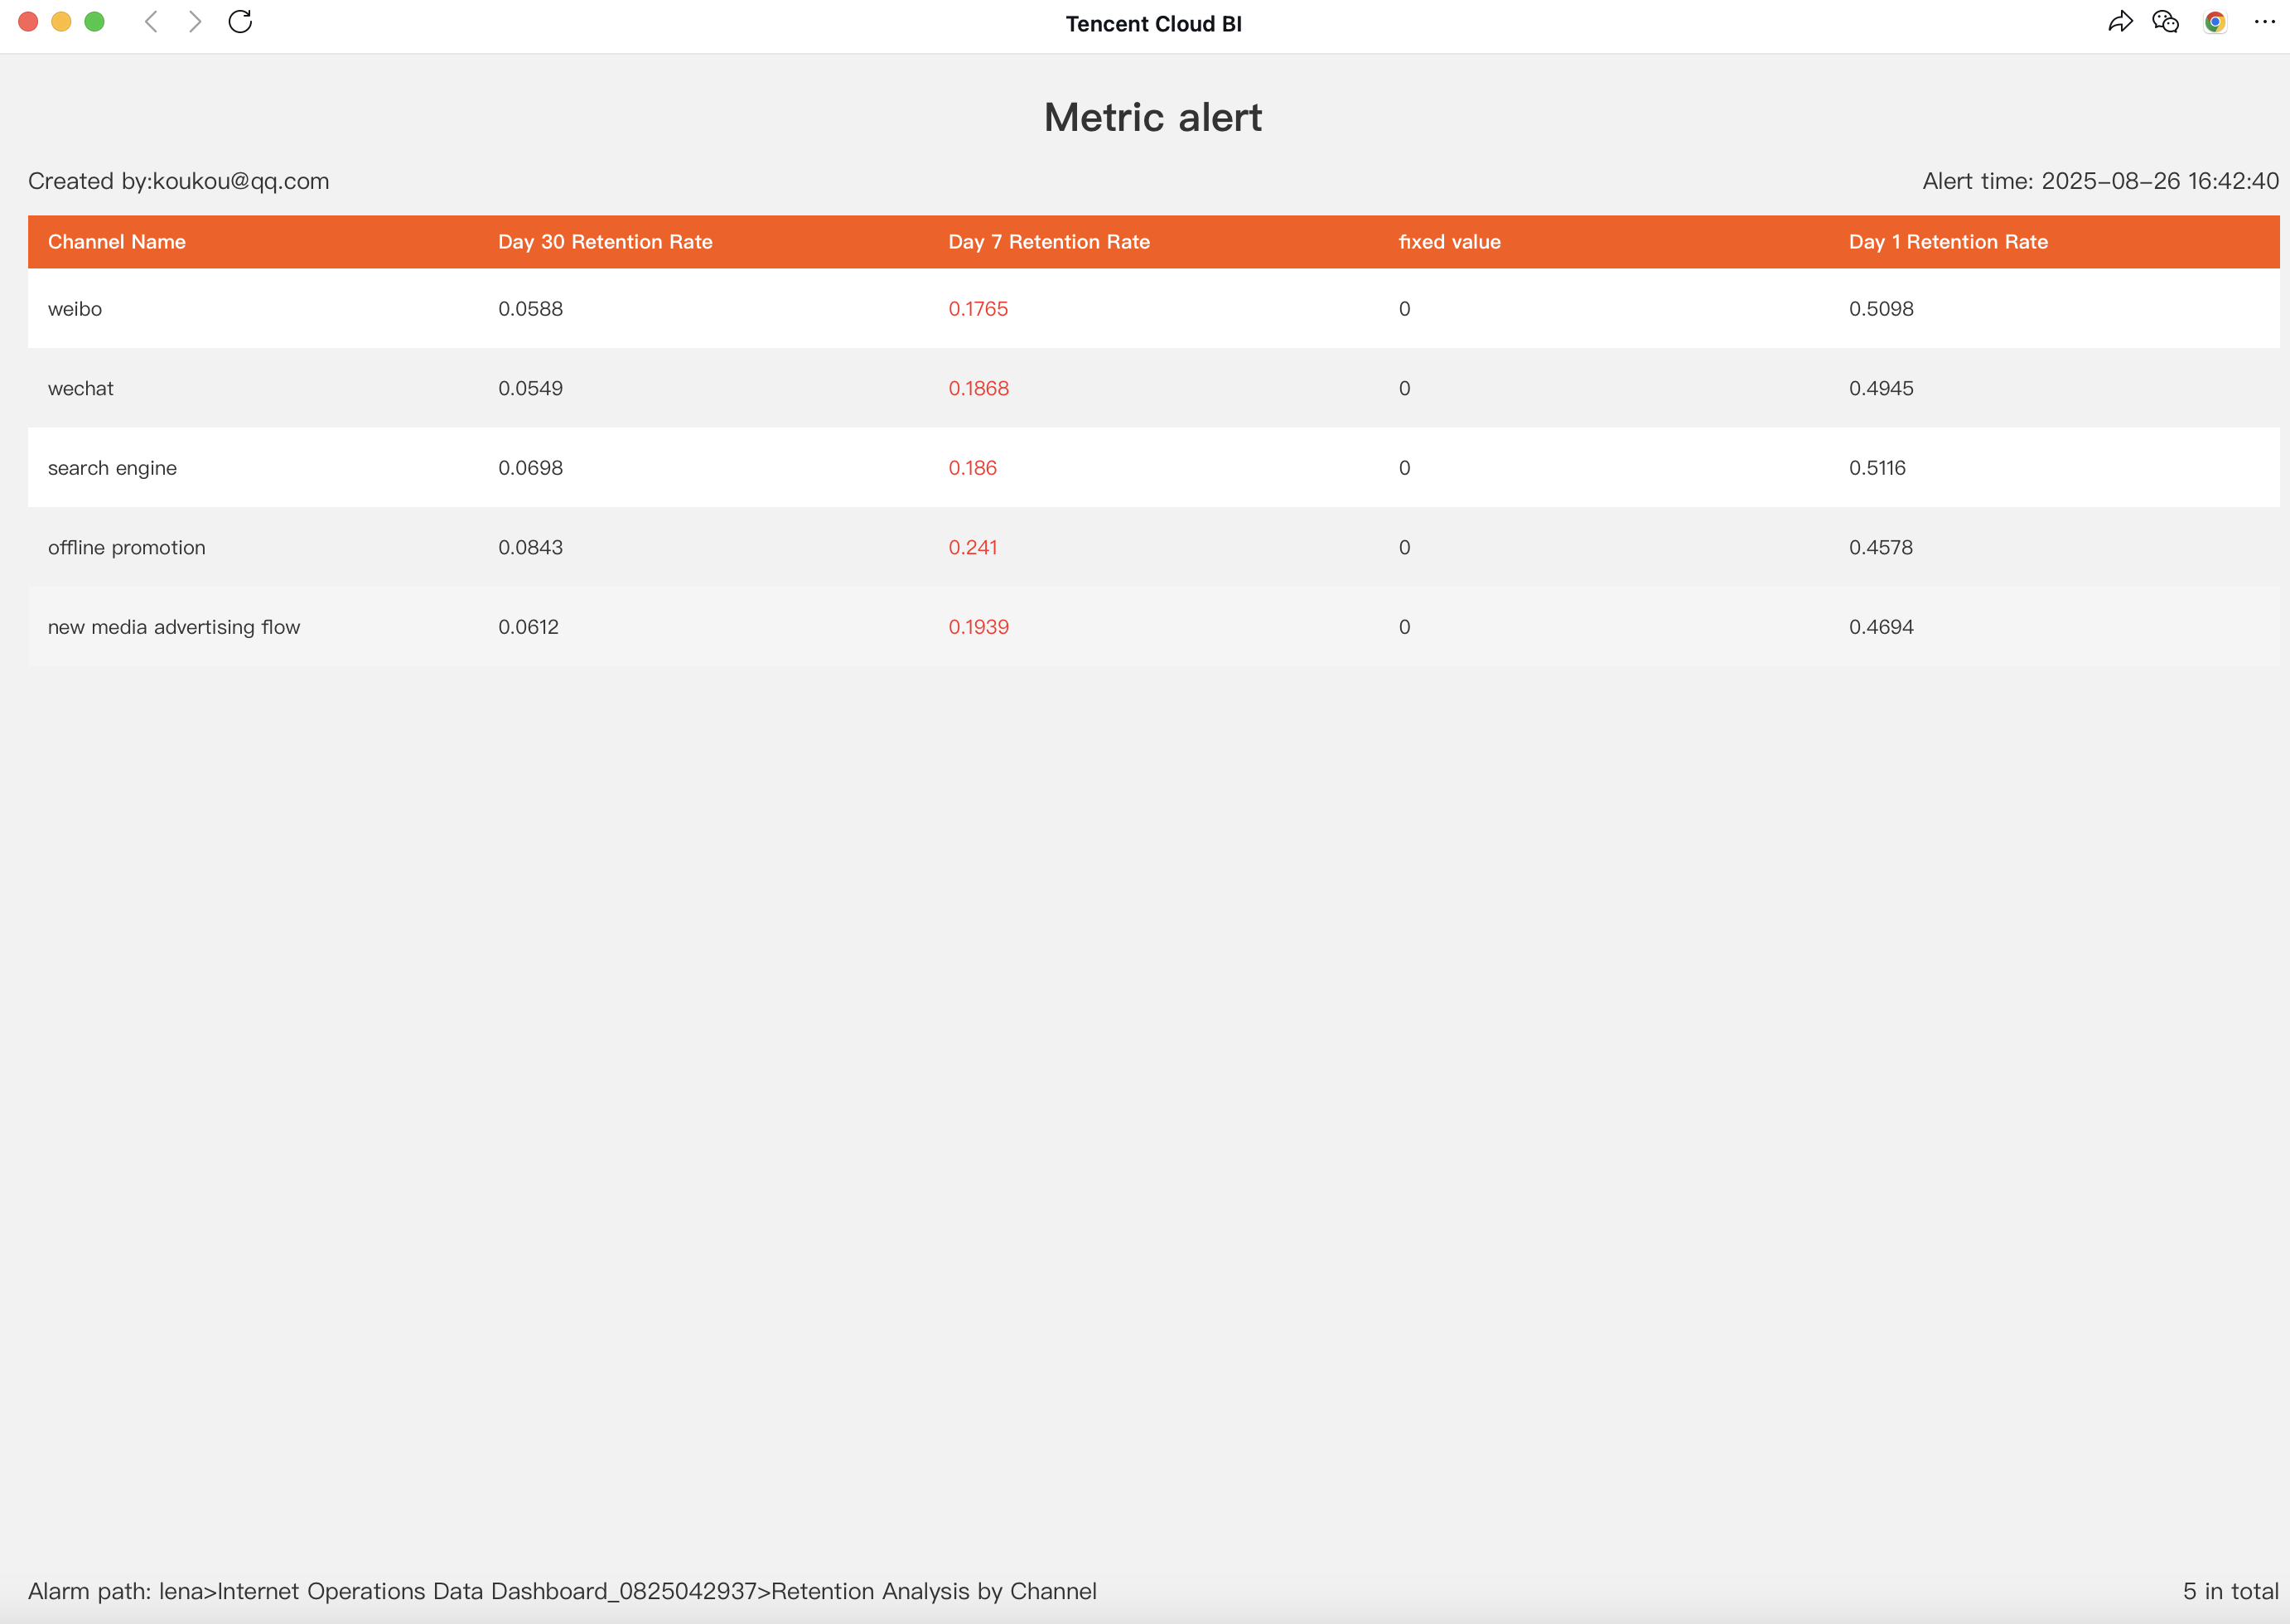
Click the message card (if the Robot's associated message template does not support this action, no details are available) to access the detailed 58 records.
Note:
1. The data displayed in the details reflects the results of the task execution at that moment, not the most recent data. For instance, if 10 alarms were triggered yesterday and none today, accessing the details from yesterday's alarm message will show 10 alarms.
2. Monitoring alarms depend on the status of the page and push channels, including whether the page is published or deleted, whether data access is functional, and whether the WeCom Robot is deleted. During the execution of a monitoring task, if the page is inaccessible, an exception message will be sent to the recipient for timely awareness, as shown below:
3. If the page is unpublished, an alarm exception push notification will be triggered. Be sure to complete editing the page and publish the page.
4. Currently, no permissions are set for viewing the monitoring details page. Therefore, manage the recipients of the push notifications carefully.
Monitoring Management
Users can manage all alarms centrally. Currently, only enterprise administrators and project administrators are allowed to view and manage alarms. Enterprise administrators can manage alarms across all projects within the enterprise, while project administrators can only manage alarms for the projects to which they are assigned.
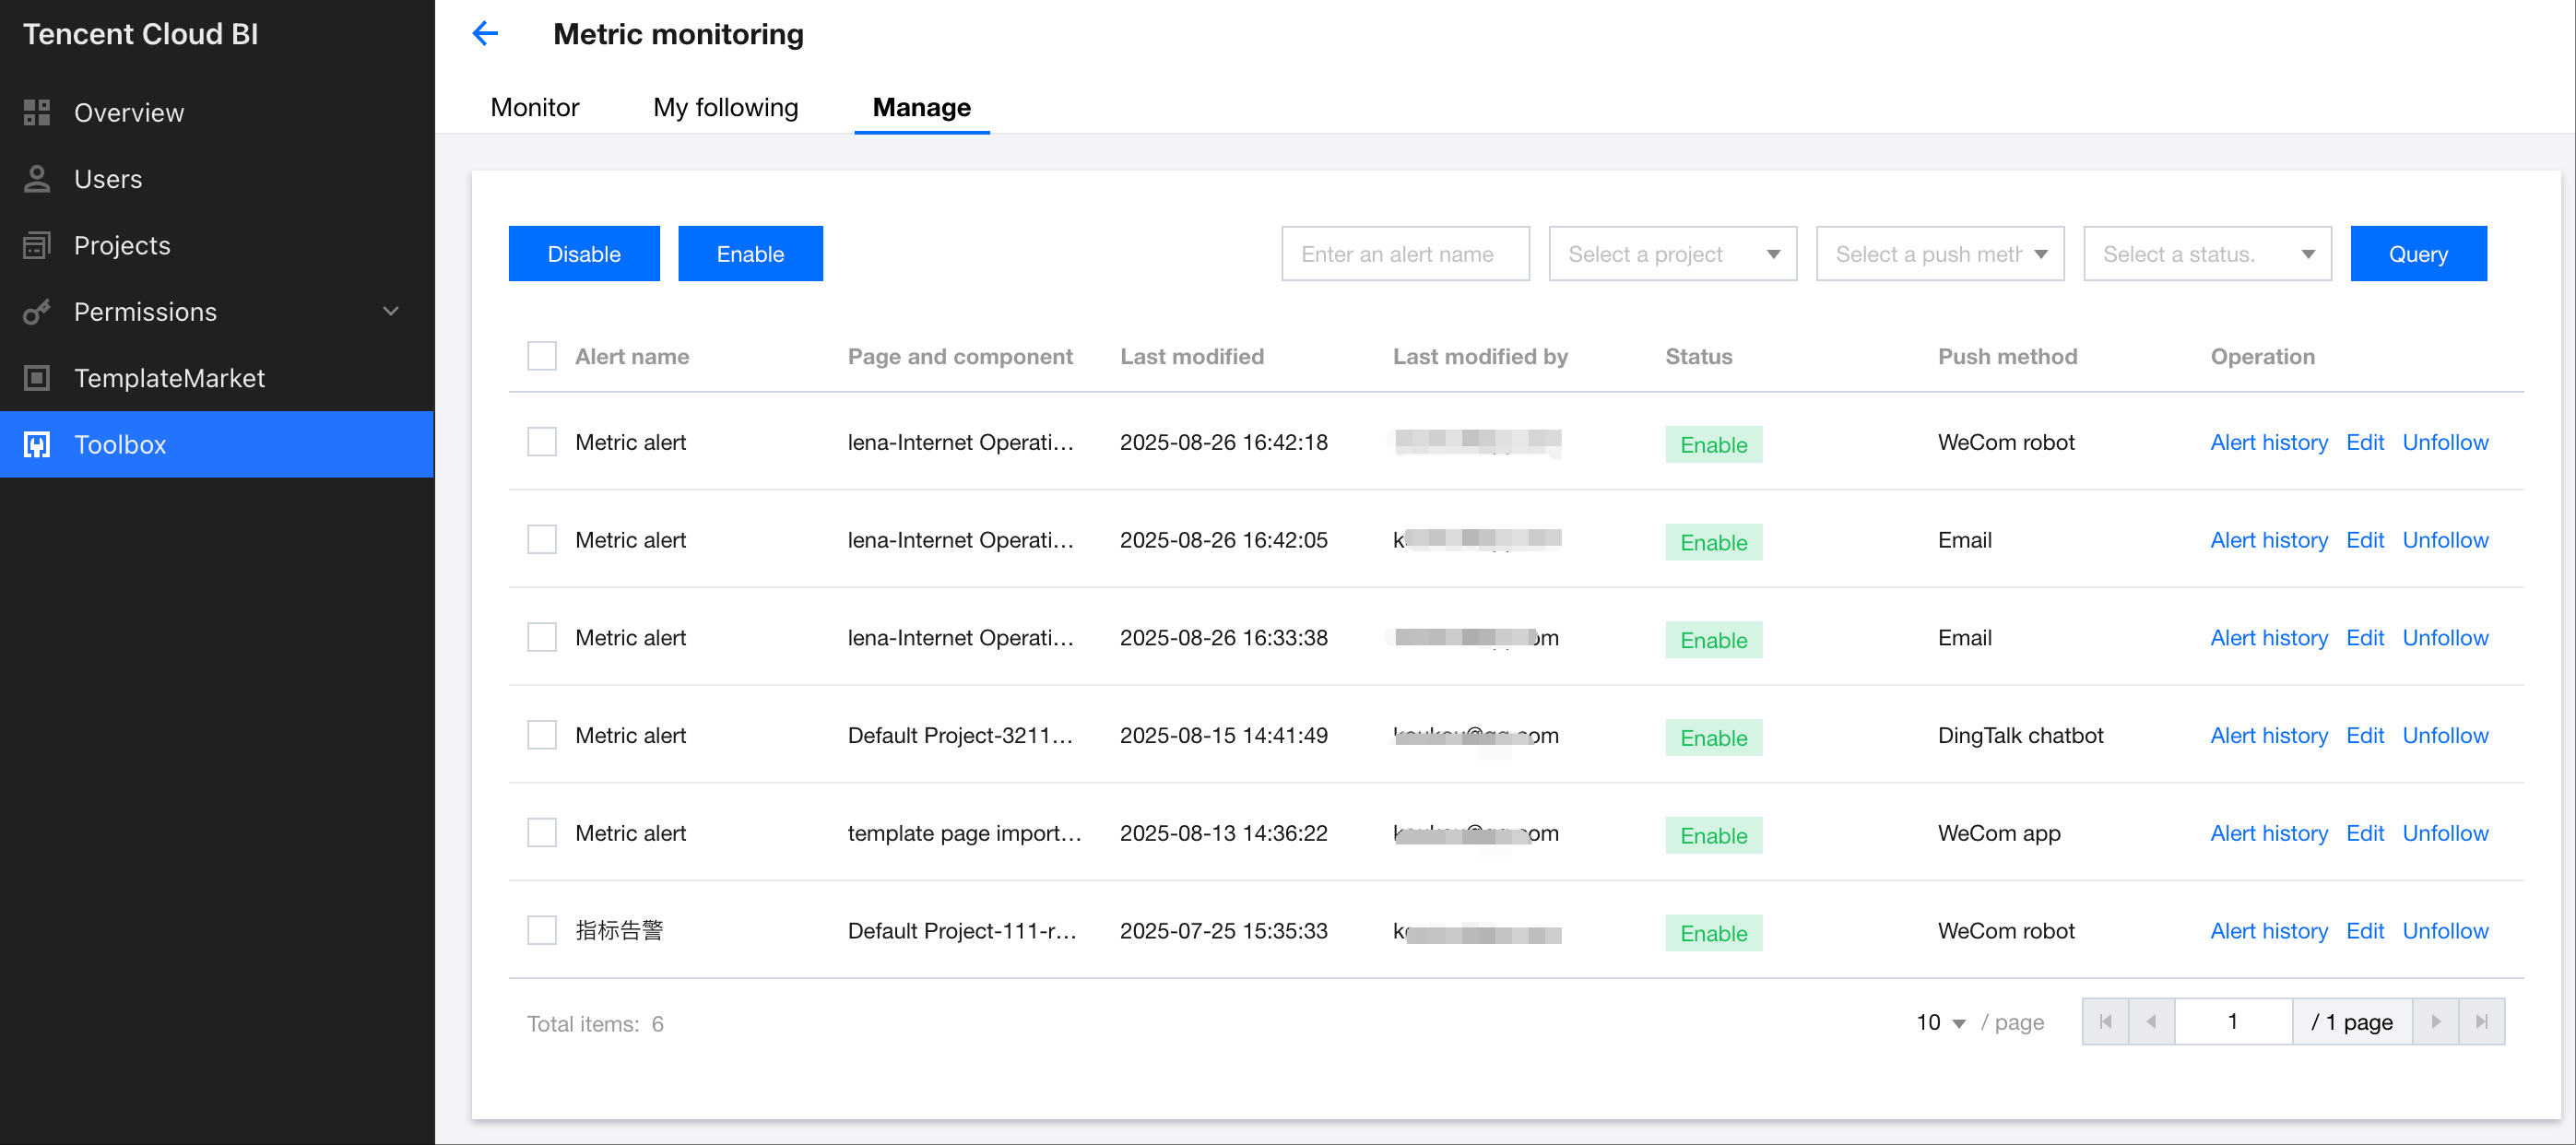
1. Monitoring Management
Through monitoring management, administrators and authorized personnel can manage current monitoring tasks, including enabling, disabling, and quick editing.
Enable and disable: Select the checkboxes on the left side of the list, and click the Enable or Disable buttons to enable or disable the selected tasks. When the task is disabled, the system will pause the push notifications. Enabling the task will resume the push notifications.
Alarm records: Click "Alarm Records" to quickly redirect to the "Monitoring Records" page, where you will be directed straight to the records of the selected alarm.
Edit: Click "Edit" to quickly redirect to the editing page and open the alarm settings for quick modifications.
Follow and unfollow: By default, the project administrators and creator will automatically follow the alarm after the alarm is created. Users can manually change the follow status. Once a monitoring task is followed, the task will appear in the "My Follows" page for easier management of alarms that require attention.
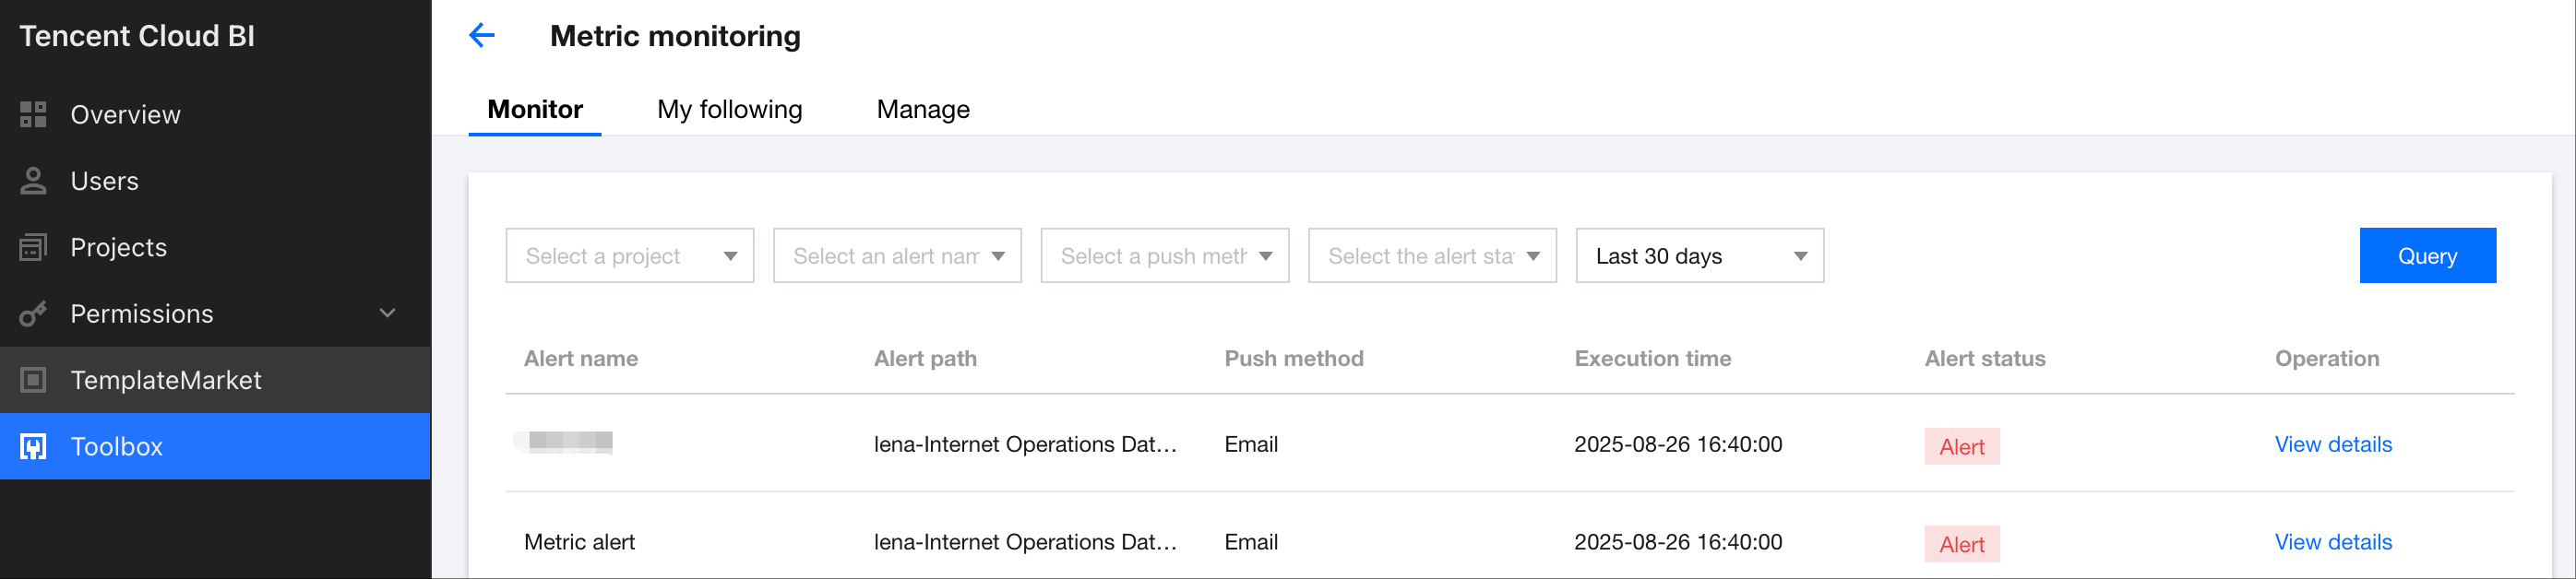
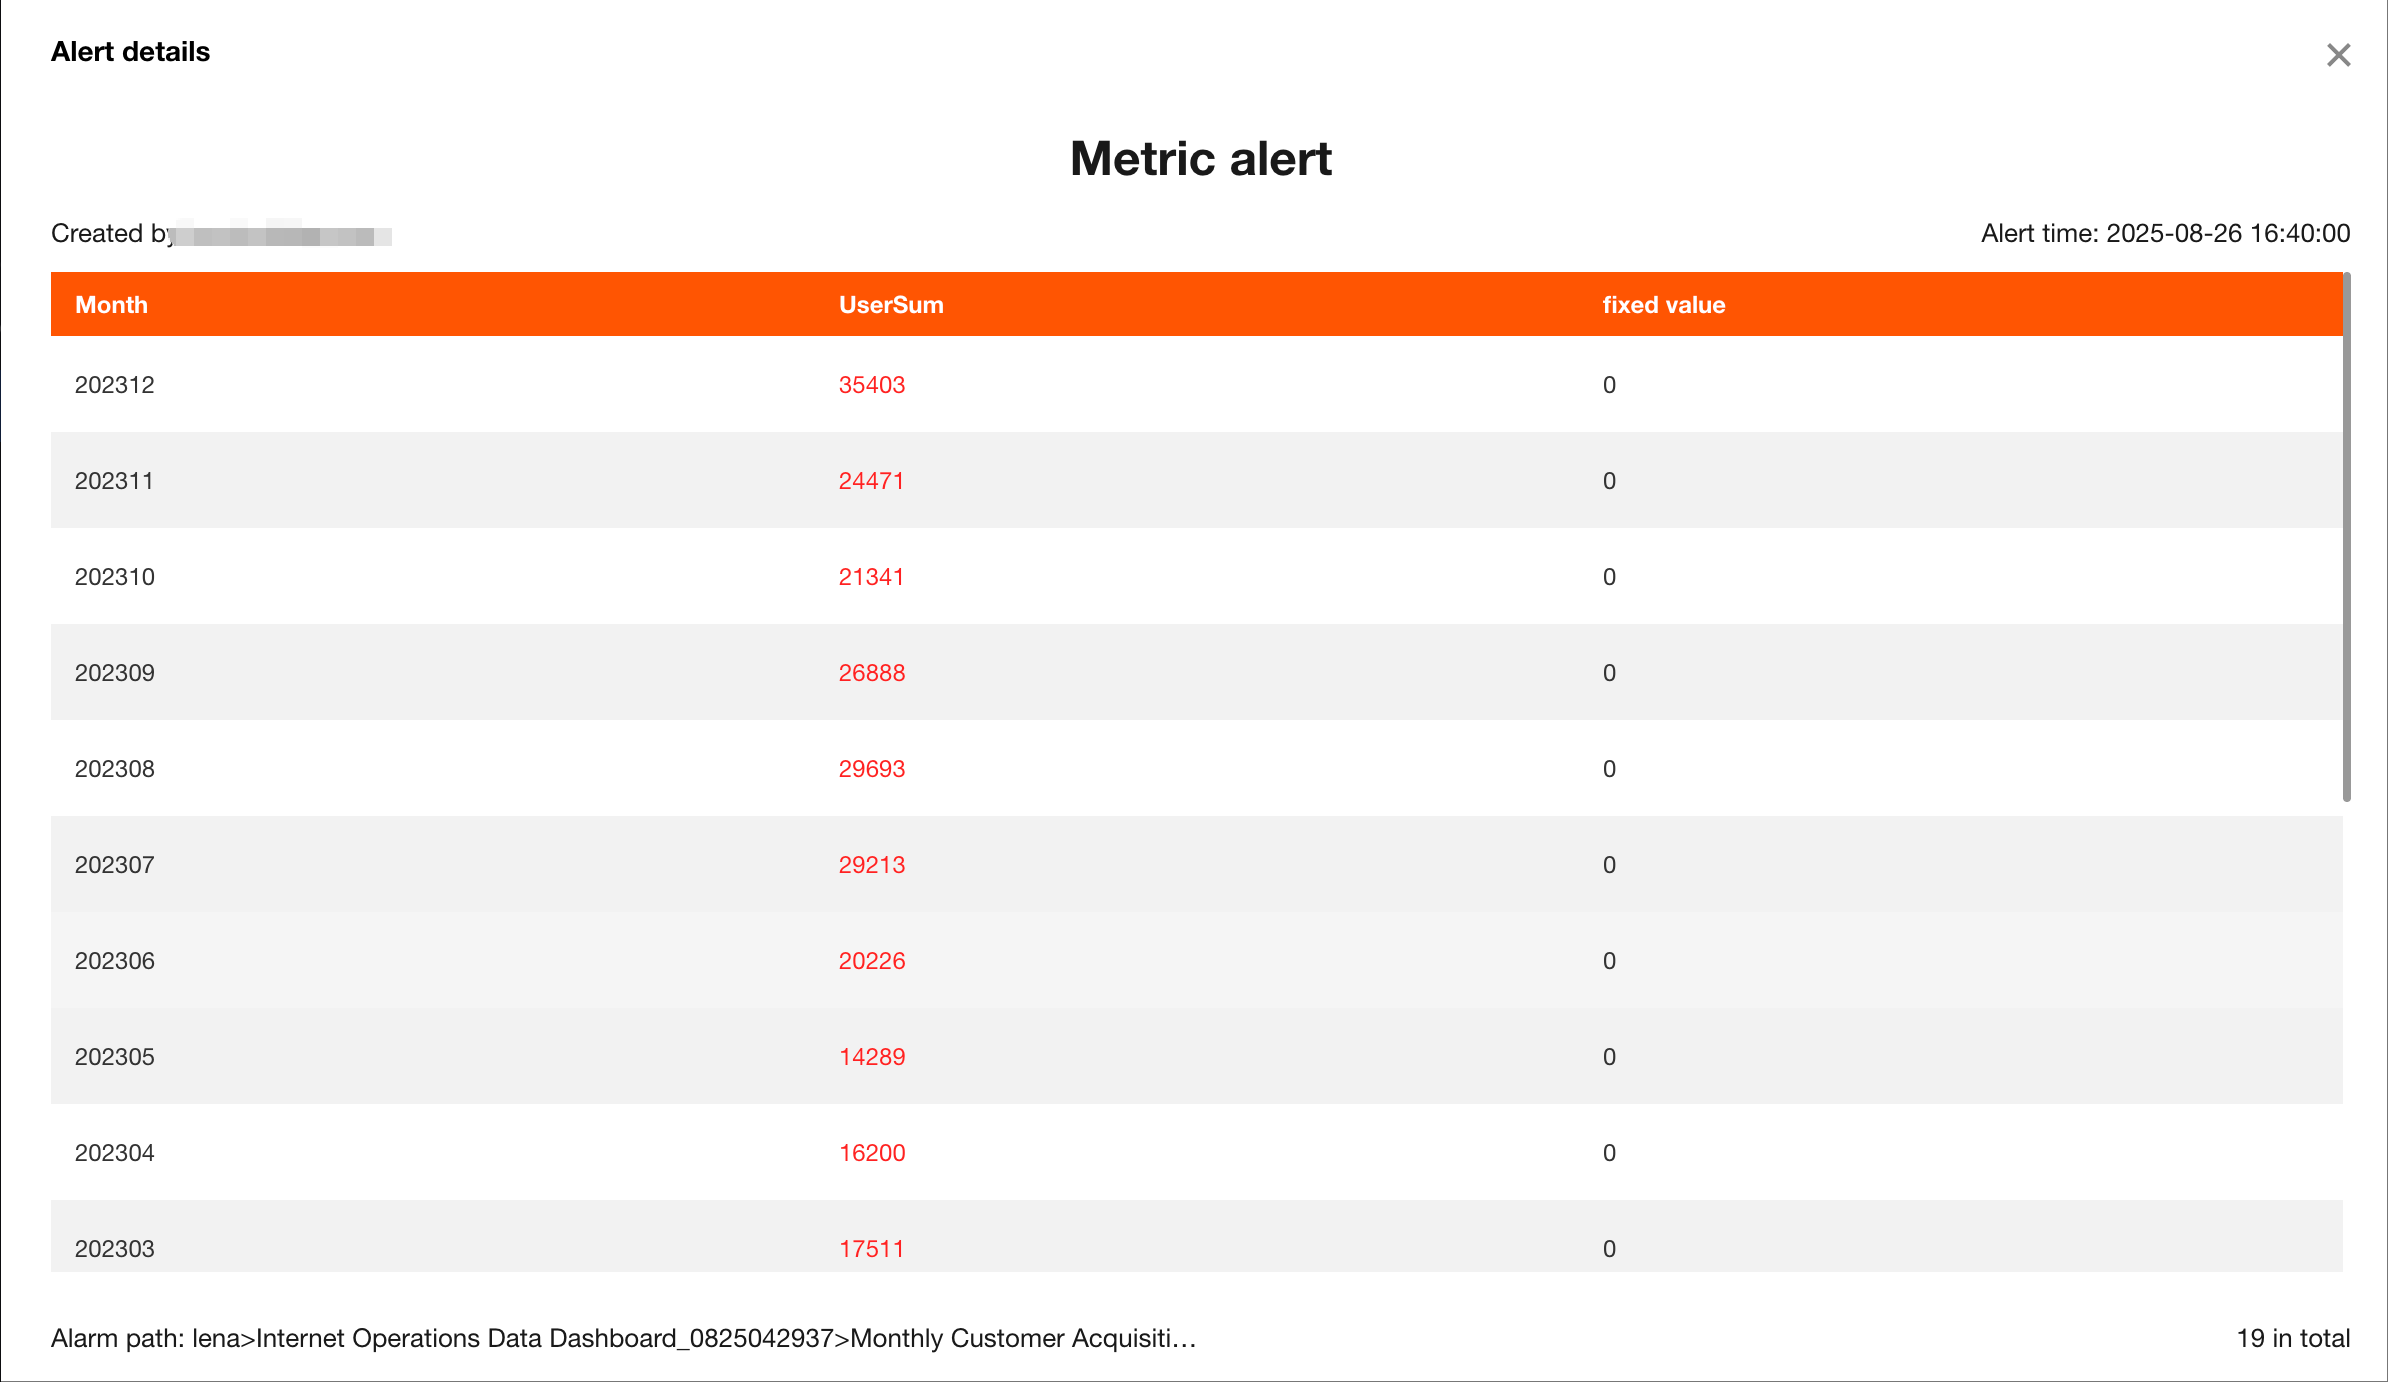
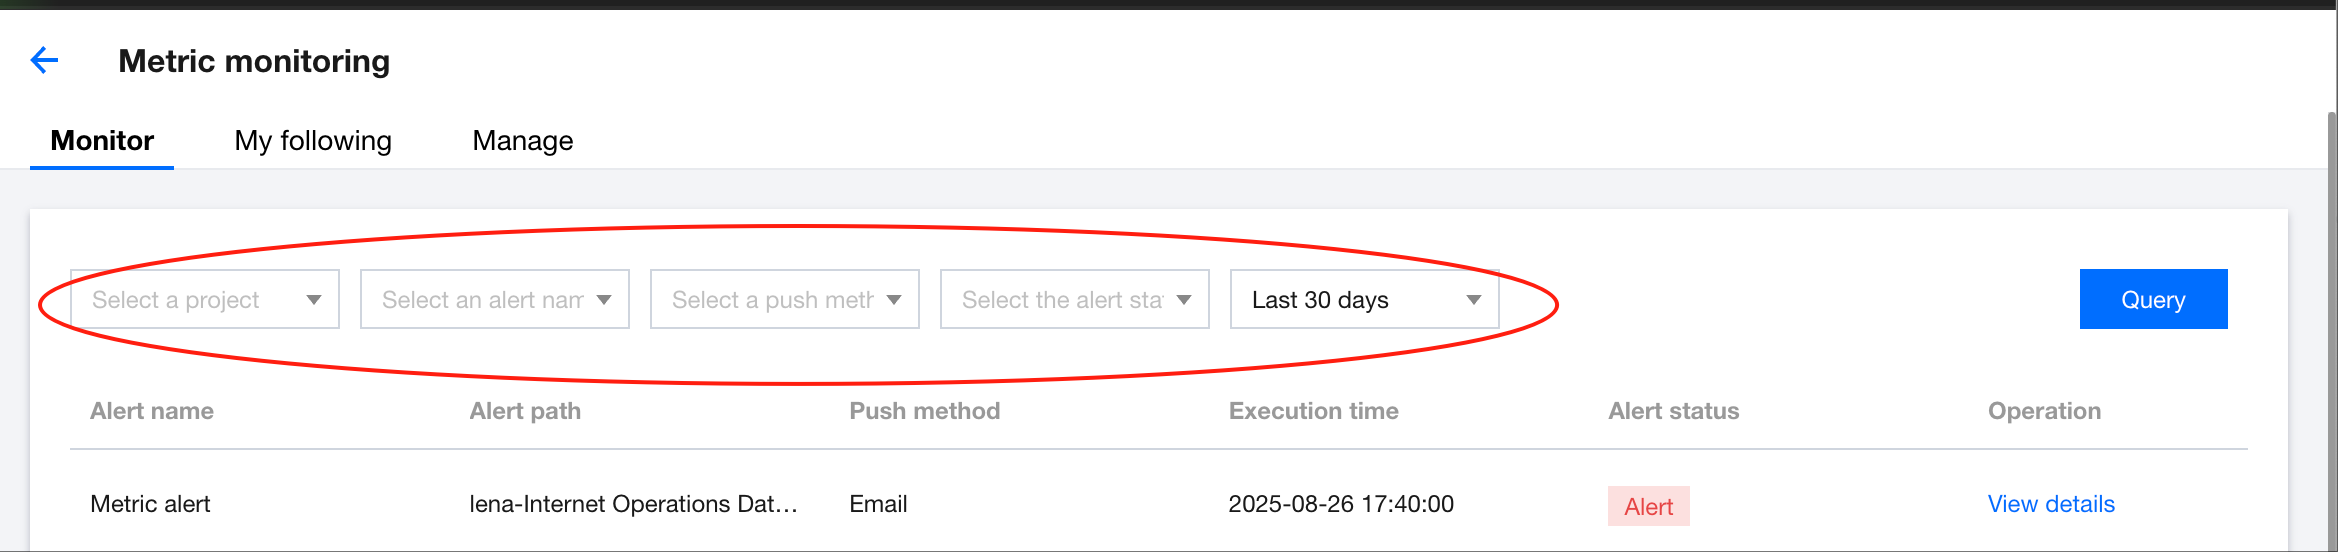
2. Monitoring records.
From the monitoring record list, users can view the status and monitoring information of each monitoring task, including the push method, alarm path, and execution time.
Click View Details to check the detailed content of this alarm, as shown in the diagram below:
In the list, users can use the filter feature to filter records based on conditions, including project, push method, and more.
3. My followings.
By selecting "Follow" in the monitoring management page, users can bookmark the alarms they are tracking. The "My Followings" page operates similarly to the "Monitoring Records" page, displaying only the monitoring records generated by the monitoring tasks currently being followed.