- Release Notes and Announcements
- User Tutorial
- Product Introduction
- Purchase Guide
- Getting Started
- Operation Guide
- Operation Overview
- Access Management
- SDK Connection
- Daily Instance Operation
- Viewing Instance Information
- Assigning Instance to Project
- Editing Instance Tag
- Setting Maintenance Time
- Changing Instance Specification
- Adjusting the Number of Connections
- Enabling/Disabling Read/Write Separation
- Clearing Instances
- Returning and Isolating Instance
- Restoring Isolated Instance
- Eliminating Instance
- Instance Upgrade
- Node Management
- Multi-AZ Deployment Management
- Backup and Restoration
- Data Migration
- Account and Password
- Parameter Configuration
- Slow Log
- Network and Security
- Monitoring and Alarms
- Event Management
- Global Replication
- Performance Optimization
- Sentinel Mode
- Development Guidelines
- Command Compatibility
- Troubleshooting
- Best Practices
- API Documentation
- History
- Introduction
- API Category
- Making API Requests
- Instance APIs
- AddReplicationInstance
- AllocateWanAddress
- ChangeInstanceRole
- ChangeMasterInstance
- CleanUpInstance
- ClearInstance
- CloseSSL
- CreateInstanceAccount
- CreateReplicationGroup
- DeleteInstanceAccount
- DeleteReplicationInstance
- DescribeAutoBackupConfig
- DescribeBandwidthRange
- DescribeInstanceAccount
- DescribeInstanceDTSInfo
- DescribeInstanceZoneInfo
- DescribeInstances
- DescribeProxySlowLog
- DescribeSlowLog
- DescribeTendisSlowLog
- DestroyPostpaidInstance
- DestroyPrepaidInstance
- DisableReplicaReadonly
- EnableReplicaReadonly
- InquiryPriceCreateInstance
- InquiryPriceUpgradeInstance
- KillMasterGroup
- ModifyAutoBackupConfig
- ModifyInstance
- ModifyInstanceAccount
- ModifyInstanceReadOnly
- ModifyMaintenanceWindow
- ModifyNetworkConfig
- OpenSSL
- ReleaseWanAddress
- RenewInstance
- ResetPassword
- StartupInstance
- SwitchProxy
- UpgradeInstanceVersion
- UpgradeProxyVersion
- UpgradeSmallVersion
- UpgradeVersionToMultiAvailabilityZones
- DescribeCommonDBInstances
- ChangeReplicaToMaster
- CloneInstances
- CreateInstances
- DescribeInstanceDealDetail
- DescribeInstanceNodeInfo
- DescribeInstanceShards
- DescribeMaintenanceWindow
- DescribeParamTemplateInfo
- DescribeReplicationGroup
- DescribeSSLStatus
- DescribeTaskInfo
- DescribeTaskList
- ModfiyInstancePassword
- RemoveReplicationInstance
- UpgradeInstance
- DescribeInstanceEvents
- ModifyInstanceAvailabilityZones
- ModifyInstanceEvent
- SwitchAccessNewInstance
- DescribeInstanceSupportFeature
- Parameter Management APIs
- Other APIs
- Region APIs
- Monitoring and Management APIs
- Backup and Restoration APIs
- Data Types
- Error Codes
- FAQs
- Service Agreement
- Glossary
- Contact Us
Private Network Unable to Connect Location Guide
Last updated: 2024-03-29 15:54:07
Issue Description
Issue 1: Use the CVM to connect to a TencentDB for Redis instance at the private network address automatically assigned by the system as instructed in Connecting to TencentDB for Redis Instance. However, the connection fails.
Issue 2: Log in to the Redis console, go to the instance list, click Log In in the Operation column of the target instance to redirect to DMC, connect to the instance. However, the connection fails, as shown in the following figure.
Possible Causes
For database connection failures for the first time, the possible causes are as follows:
Port error.
Network configuration error or incorrect security group configuration.
Password error.
For sudden connection failures during instance running, the possible causes are as follows:
The maximum number of connections has been reached.
Memory or shards have been used up.
A high-availability (HA) switchover occurs, the database service becomes unavailable, a read-only replica switchover occurs, the read-only replica service becomes unavailable, or more.
For client errors, the possible causes are as follows:
Connection pool parameter setting is not proper.
Connections leak.
Troubleshooting
Step 1. Run telnet to Check Whether the Redis Port Can Be Accessed Normally
For most connection failure issues, run
telnet in the command line tool to narrow down the cause of the error:[root@VM-4-10-centos ~]# telnet 10.x.x.34 6379Trying 10.x.x.34...Connected to 10.x.x.34.Escape character is '^]'.
As shown above, if there is successful connection prompt, the port of the Redis instance can be accessed normally. If there is an exception, go to Step 2 to troubleshoot network issues.
Step 2. Check Whether It Is Caused by Network Configuration
To connect over the private network, the CVM and TencentDB for Redis must be under the same account and in the same VPC, or both in the classic network. The connection will fail in the following conditions:
If the CVM instance is in a VPC, while the Redis instance in the classic network, you are advised to switch the network type of the Redis instance from the classic network to VPC.
If the Redis instance is in a VPC, while the CVM instance in the classic network, you are advised to switch the network type of the CVM instance from classic network to VPC. For more information, see Switching to VPC.
If the CVM and Redis are in different VPCs in the same region, you are advised to migrate the Redis instance to the VPC of the CVM instance.
If the CVM and Redis are in different VPCs in different regions, you are advised to create a CCN between the two VPCs.
If the CVM and Redis are in different VPCs under different accounts, you are advised to create a CCN between the two VPCs.
Step 3. Check Whether It Is a Security Group Issue
The CVM instance cannot connect to the Redis if their security group configuration is incorrect.
Incorrect CVM Security Group Configuration
To use the CVM to connect the Redis, you need to configure an outbound rule in the security group of the CVM instance. If the target of the outbound rule is not "0.0.0.0/0" and the protocol port is not "ALL", the IP address and port of the Redis instance need to be added to the rule.
1. Go to the Security Group page in the CVM console and click the name of the CVM-bound security group to open its details page.
2. On the Outbound rule tab, click Add Rule.
Type: Select Custom.
Target: Enter the IP address or IP range of your Redis.
Protocol Port: Enter the private network port of the Redis.
Policy: Select Allow.
Incorrect Redis Security Group Configuration
To use the CVM to connect the Redis, you need to configure an inbound rule in the security group of the Redis instance. If the source of the inbound rule is not "0.0.0.0/0" and the protocol port is not "ALL", the IP address and port of the CVM instance need to be added to the rule.
1. Go to the Security Group page in the CVM console and click the name of the Redis-bound security group to open its details page.
2. On the Inbound rule tab, click Add Rule.
Note that you also need to enable the IP address and port of the Redis in the inbound rule.
Type: Select Custom.
Source: Enter the IP address or IP range of your CVM.
Protocol Port: Enter the private network port of the Redis instance.
Policy: Select Allow.
Note:
The default private network port of Redis is 6379, and the port can be customized. If the default port is changed, the new port need be enabled in the inbound rule of the Redis security group.
If the default port 6379 of the Redis instance is used, it need to be enabled in the inbound rule of the Redis security group.
Step 4. Check Whether the Issue Is Caused by the Password
Run the
info command. If the following information is displayed, the password of the Redis is correct.[root@SNG-Qcloud /data/home/rickyu]# redis-cli -h 10.x.x.34 -p 6379 -a password10.x.x.2:6379> info cpu# CPUused_cpu_sys:1623.176000used_cpu_user:4649.572000used_cpu_sys_children:0.000000used_cpu_user_children:0.000000
If
NOAUTH Authentication required. is displayed, the password is incorrect.10.x.x.31:6379> info memoryNOAUTH Authentication required.10.x.x.31:6379>
Log in to the Redis console and click an instance ID in the instance list to open the instance details page, where you can reset the password. For more information, see Managing Account.
Step 5. Check Whether the Memory or Shards Are Full
If the following error message is displayed for the business:
"-READONLY You can't write against a read only slave.\\r\\n"
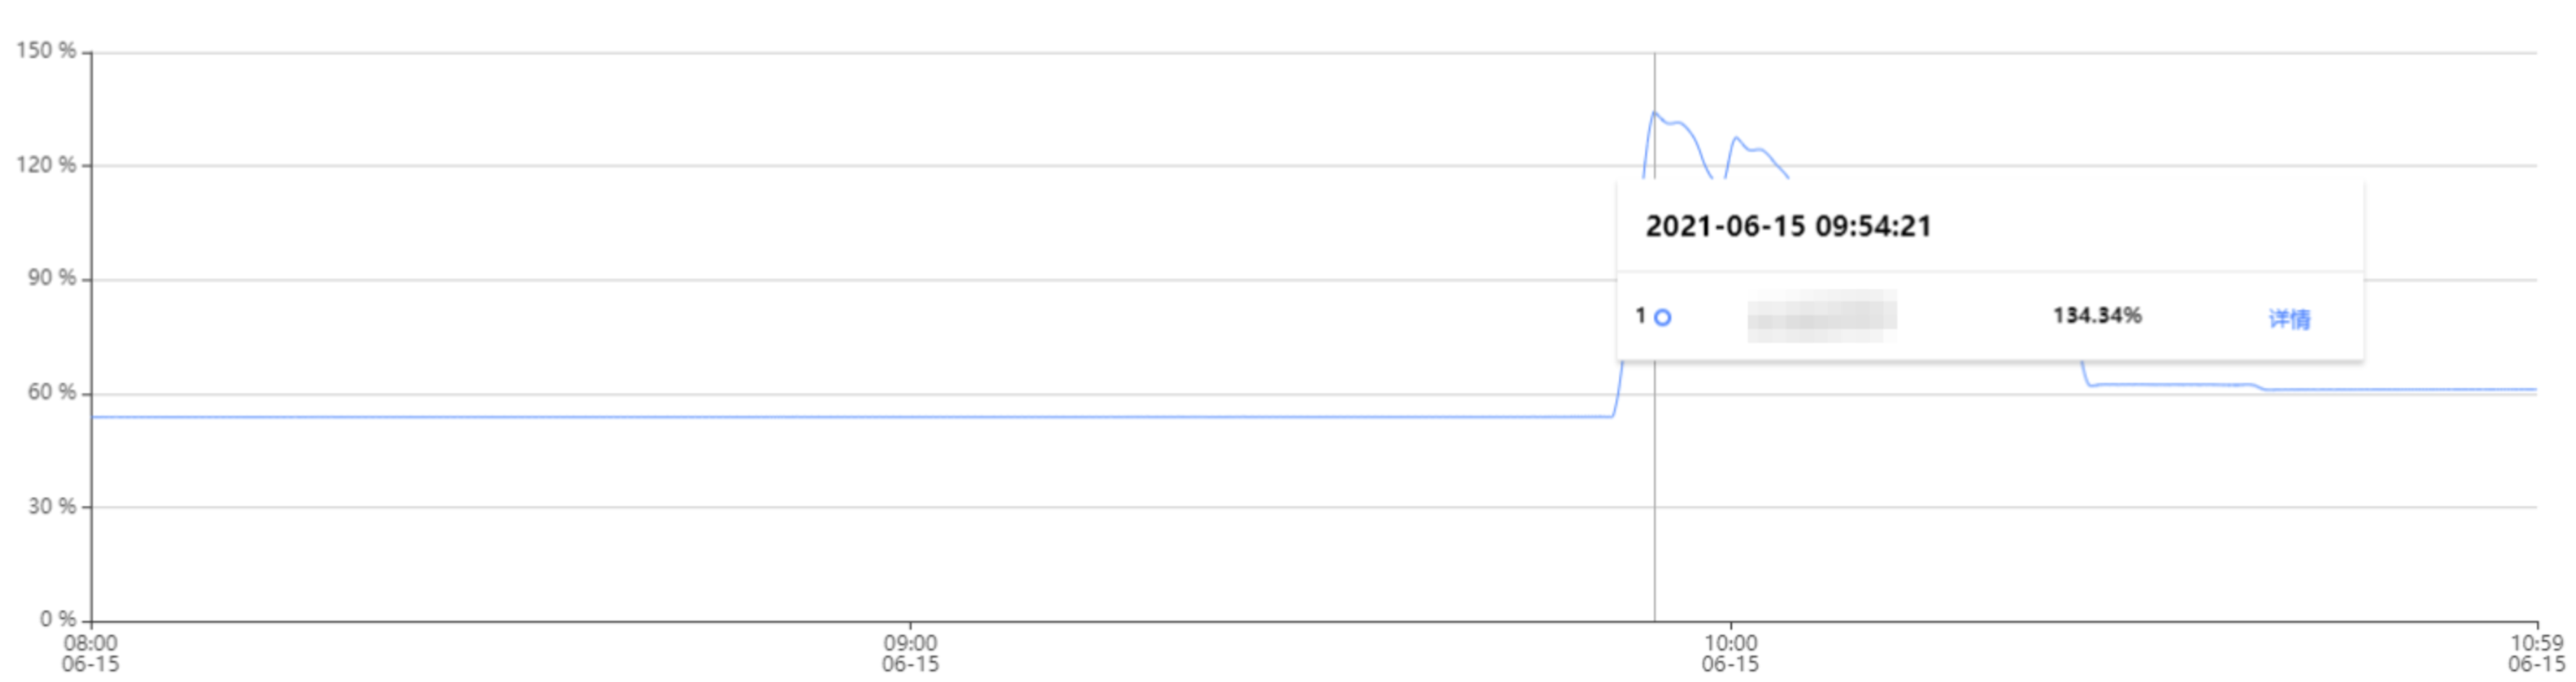
Log in to the Redis console, find the target instance in the instance list, click the instance ID to enter the System Monitoring page, and select Memory Utilization in the Metric drop-down list to view the memory usage of the instance.
If memory is full, writes will fail. In this case, perform the following operations:
Expand the capacity immediately as instructed in Changing Instance Specification.
Modify the database eviction policy as instructed in Managing Instance Parameter. In Parameter Settings, set the
maxmemory-policy parameter to allkeys-lru or volatile-lru. For details, see Setting Instance ParametersNote:
Instance data may be lost if the
allkeys-lru eviction policy is adopted. Assess the impact before doing so.Step 6. Check the Connection Quota
The Connection Utilization metric refers to the ratio of the number of TCP connections from the client to the instance to the maximum number of connections to the instance. If this metric is continuously high, the current database connection quota is insufficient, and the maximum number of connections needs to be adjusted.
Issue
The error message is as follows:
ERR max number of clients reachedSolution
1. Log in to the Redis console. Above the instance list on the right, select the region. In the instance list, find the target instance. Click the instance ID in blue to enter the Instance Details page, click the System Monitoring tab, and then select the Monitoring Metrics tab to view the monitoring data. In the View drop-down list, select Instance Monitoring and Connection Utilization as the metric, and check whether it is continuously high in the monitoring view.
2. If the connection usage is continuously high, adjust the maximum number of connections and modify the specifications for the number of connections. For details, see Adjusting the Number of Connections.
Step 7. Check Whether HA Switchover, Unavailable Database Service, Read-only Replica Switchover, or Unavailable Read-only Replica Service Occurs
If you find abnormal connections or a large number of access errors and slow queries at a certain point in time, and TCOP event alarms for those abnormal events are received, Contact Us for help.
Step 8. Confirm Whether the Configuration of the Jedis Connection Pool Is Correct If You Use It
Issue
If the number of available connections in the connection pool is used up and the old connections are not released in time, the newly created connection will fail, and the following error message will be displayed on the client.
JedisConnectionException: Could not get a resource from the poolSolution
1. Use the following command on the client to confirm the number of connections currently accessing port 6379 of the instance. If this number is close to the maxTotal value configured in the connection pool, a connection failure will occur.
netstat -an | grep 6379 | grep ESTABLISHED | wc -l2. See Java Connection Sample, and check whether to call jedis.close() to release old connections to avoid connection leaks.
3. If all old connections have been released and the concurrent business volume is large, the maxTotal parameter value needs to be increased.
Note:
The maxTotal value of each client connection pool * The number of clients = The maximum number of connections for TencentDB for Redis
References
Viewing the Network Type and VPC Information
To enable connection between CVM and Redis over private network, they must be under the same account and in the same VPC, or both in the classic network.
Note:
If the Network fields in the instance lists both show Classic Network or VPC, the networks of the CVM and Redis are of the same type.
If the Network fields in the instance lists both show the same VPC (in the same region), it means that the CVM and TencentDB for Redis instances are in the same VPC.
Viewing the CVM Network Type

Viewing the Redis Network Type

Enabling Public Network Access
TencentDB for Redis now allows you to manually enable public network access in the console, to access Redis instance from the public network. For detailed directions, see Configuring the Public Network Address.

 Yes
Yes
 No
No
Was this page helpful?