TencentDB for MongoDB allows you to view the change trend of each monitoring metric. This helps you stay up to date with the running status and performance of database resources, so that you can make prejudgments and prevent risks.
Background
Tencent Cloud Observability Platform (TCOP) is a real-time monitoring and alarming service for Tencent Cloud resources. It collects the data of various monitoring metrics of Tencent Cloud services and displays the data through visual charts, helping you intuitively understand the running status and performance of services. For more information, see TCOP.
Note:
Cloud Monitor (CM) was renamed TCOP on February 23, 2023.
In TencentDB for MongoDB, you can use TCOP to create dashboards and various types of charts to compare the metric data of multiple instances. In this way, you can efficiently analyze the changes of monitoring metrics. You can also use TCOP to configure real-time alarms for exceptions during database operations, allowing you to remove risks as soon as they arise.
Version description
Currently, all TencentDB for MongoDB versions support instance monitoring.
Billing Overview
Basic TCOP features such as alarming and monitoring data collection are free of charge.
Currently, only alarm SMS messages are billed.
Notes
The monitoring data is retained for 30 days.
After receiving the alarms reported by Tencent Cloud, you need to troubleshoot problems accordingly.
2. In the MongoDB drop-down list on the left sidebar, select Replica Set Instance or Shard Instance. The directions for the two types of instances are similar.
3. Above the Instance List on the right, select the region.
4. In the instance list, find the target instance.
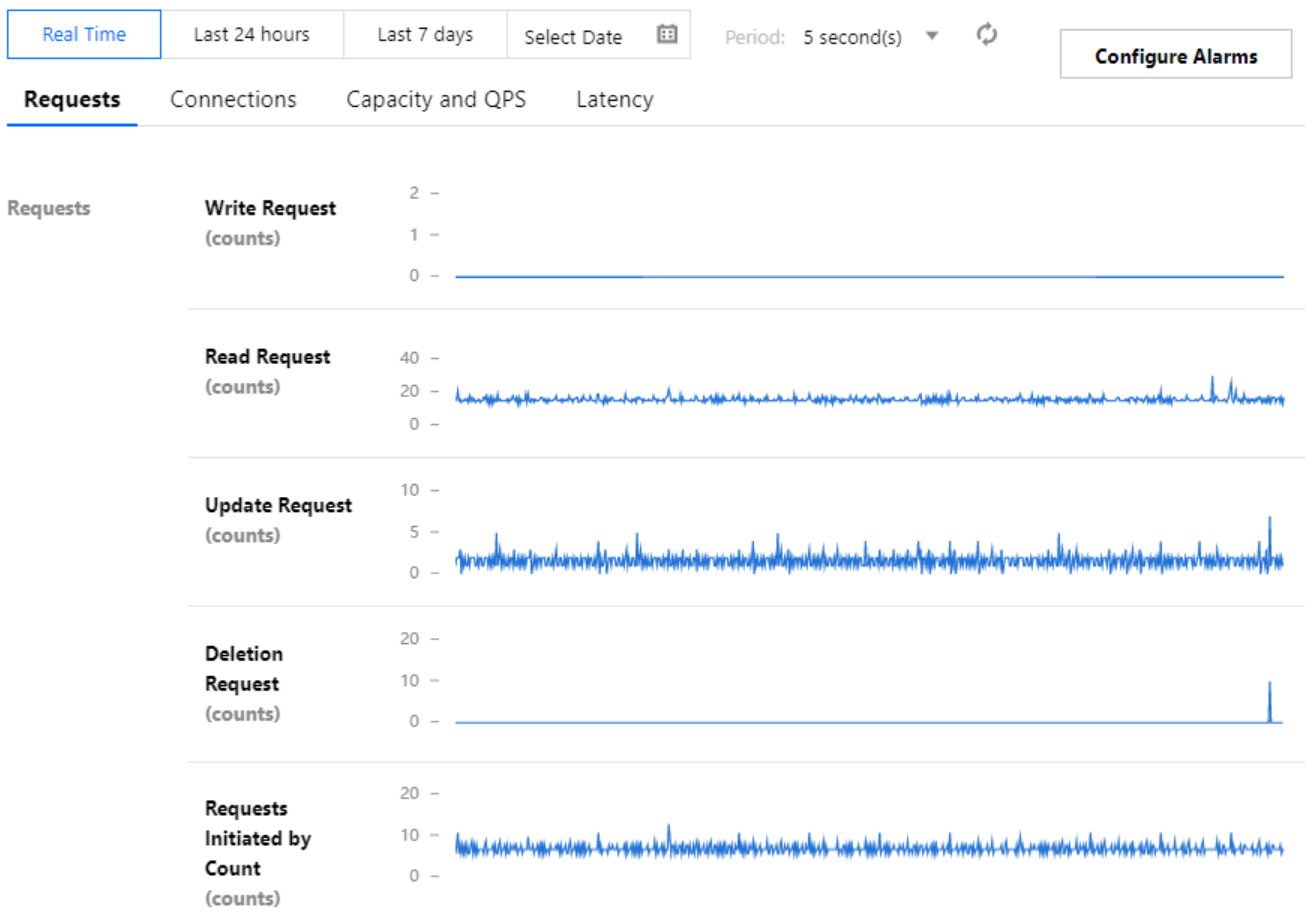
5. In the Monitoring/Status column of the target instance, click
to open the instance monitoring panel, where you can quickly view the instance monitoring data.
You can select Real Time, Last 24 Hours, Last 7 Days, or any time period to view the corresponding monitoring data.
On the Requests, Connections, Capacity and QPS, and Latency tabs, you can view the data of monitoring metrics in different categories.
In the Time Granularity drop-down list, you can set the time granularity for monitoring data collection to get finer-grained data.
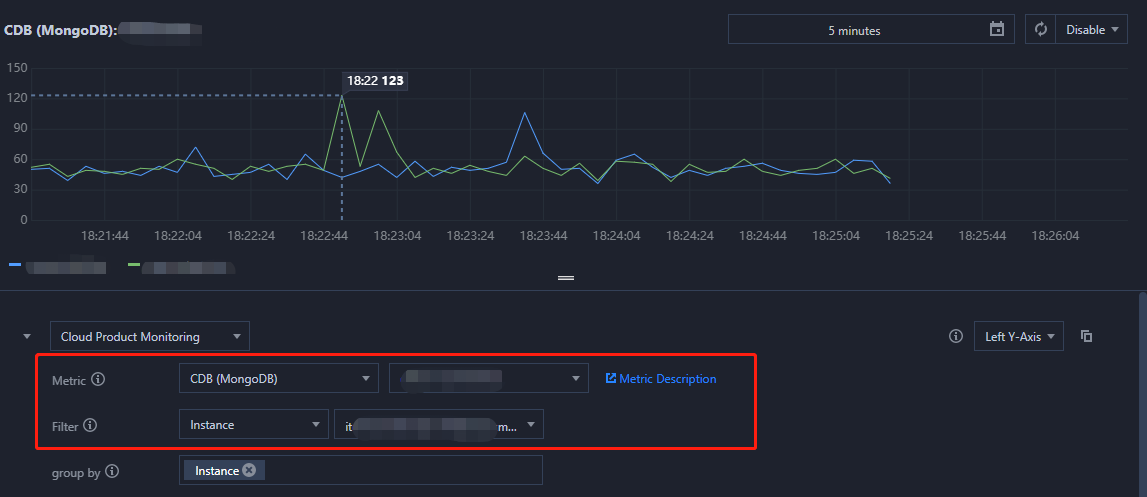
Select Compare Monitoring Data of Instances to enter the Dashboard List page in TCOP, create a dashboard, select the instances to be monitored, set the monitoring chart, and then you can compare the monitoring data of multiple instances in the same chart.
Click Configure Alarms to enter the Create Alarm Policy page in TCOP, set Policy Type to TencentDB for MongoDB Instance, select an alarm recipient, set the trigger condition of the monitoring metric, and configure the alarm notification method. In this way, you can stay on top of the business exceptions and prevent risks and failures promptly. For detailed directions, see Creating Alarm Policy.
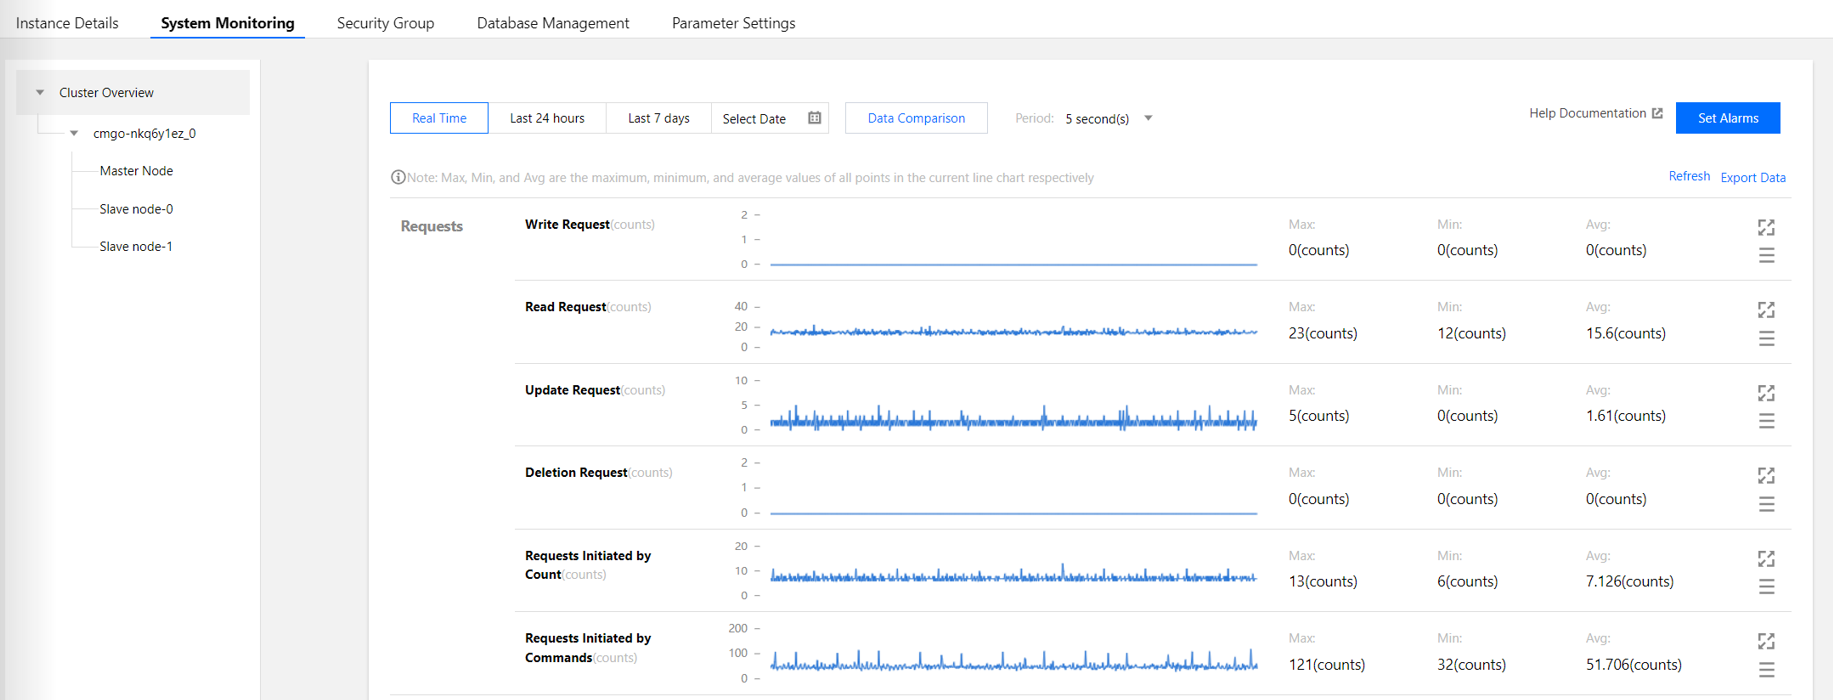
2. Click the target instance ID to enter the Instance Details page.
3. Click the System Monitoring tab to view the change trend of each monitoring metric of the entire cluster as shown below (with a replica set instance as an example):
Viewing monitoring data by monitoring object
Replica set: On the left of the System Monitoring page, select the specific instance name, primary node, and secondary node under the Cluster Overview to view the monitoring metric data of different monitoring objects.
Sharded instance: On the left of the System Monitoring page, select the specific shard name, primary node, and secondary node under the Cluster Overview to view the monitoring metric data of different monitoring objects.
Viewing monitoring data for specified time period
In the top-right corner of the System Monitoring page, select Real Time, Last 24 Hours, Last 7 Days, or any time period to view the corresponding monitoring data.
Viewing monitoring data at different time granularities
In the top-right corner of the System Monitoring page, select 5 seconds, 1 minute, 5 minutes, or 1 day in the drop-down list after Time Granularity to view the monitoring data at different time granularities.
Zooming in change trend chart of single metric
In the metric list on the right of the System Monitoring page, find the target metric and click
to zoom in its change trend chart. You can select a time period and set a time granularity to analyze the metric change trend in a more refined manner.
Exporting monitoring chart
Exporting one metric: In the metric list, select the target metric, click
, and select Export as Image to export its change trend chart. You can also select Export Data to view and analyze the monitoring data with Excel locally.
Batch exporting monitoring data: Click Export Data above the metric list, select the target metrics in the Export Data window, click Export, and then you can view and analyze the monitoring data with Excel locally.
Setting alarm
In the top-right corner of the instance monitoring page, click Configure Alarms to enter the Create Alarm Policy page in TCOP, set Policy Type to TencentDB for MongoDB Instance, select an alarm recipient, set the trigger condition of the monitoring metric, and configure the alarm notification method. In this way, you can stay on top of the metric exceptions and prevent risks and failures promptly. For detailed directions, see Creating Alarm Policy.
Comparing data
In the top-right corner of the instance monitoring page, you can click Data Comparison and set the time period. By default, the data within the past hour is obtained. The curves of the monitoring metric on today and yesterday within the specified time range are displayed in different colors.