- Release Notes and Announcements
- Release Notes
- Announcements
- Announcement about the addition of mobile player SDK premium features authorization verification
- Announcement about the addition of web player SDK license authorization verification
- Announcement on the Official Launch of the Video on Demand Real-Time Log Analysis Feature
- Notice about the adjustment of the VOD adding domain feature
- Announcement on official commercial billing of Video on Demand STANDARD_IA data retrieval and Application Management functions
- Announcement on the Official Launch of the Media Quality Inspection and Play Channel Features
- Announcement on the official launch of the Video-on-Demand QUIC Acceleration feature
- VOD Launched Remaster Feature
- Prepaid Packages Supported for Monthly Billed Accounts
- Cost Allocation by Tag Supported
- Content Moderation Upgraded
- VOD Player Signature Upgrade
- Live Clipping to Become Paid Feature
- Content Recognition to Become Paid Feature
- The “startPlay” API of the Player SDK Renamed
- TESHD Renamed as TSC
- Announcement on VOD Video Acceleration Price Change
- Launching Video on Demand (VOD) Features for Regions Outside the Chinese Mainland
- About Changing the Billing Rule of Transcoding Service for VOD/MPS
- Product Introduction
- Purchase Guide
- Getting Started
- Console Guide
- Console Overview
- Service Overview
- Application Management
- Media Management
- Package Management
- License Management
- Real-Time Log Analysis
- Best Practice
- Media Upload
- Smart Cold Storage of VOD Media Asset Files
- Video Processing
- Distribution and Playback
- How to Receive Event Notification
- How to Migrate Files from Origin Server to VOD
- Live Recording
- How to Make VOD Videos Live Streaming-Like
- Using VOD and WordPress to Build a Website
- How to Pull from Custom Origin Servers
- Development Guide
- Player SDK
- Server APIs
- History
- Introduction
- API Category
- Other APIs
- Media processing related API
- No longer recommended APIs
- Task Management APIs
- Media Upload APIs
- Media Management APIs
- Media Categorization APIs
- Distribution APIs
- AI-based Sample Management APIs
- Region Management APIs
- Statistics APIs
- Just In Time Transcode APIs
- Making API Requests
- AI-based image processing APIs
- Parameter Template APIs
- CreateWatermarkTemplate
- CreateSnapshotByTimeOffsetTemplate
- CreateSampleSnapshotTemplate
- CreateImageSpriteTemplate
- CreateAnimatedGraphicsTemplate
- CreateAdaptiveDynamicStreamingTemplate
- CreateAIAnalysisTemplate
- ModifyWatermarkTemplate
- ModifySnapshotByTimeOffsetTemplate
- ModifySampleSnapshotTemplate
- ModifyImageSpriteTemplate
- ModifyAnimatedGraphicsTemplate
- ModifyAdaptiveDynamicStreamingTemplate
- ModifyAIRecognitionTemplate
- ModifyAIAnalysisTemplate
- DescribeTranscodeTemplates
- DescribeWatermarkTemplates
- DescribeSnapshotByTimeOffsetTemplates
- DescribeSampleSnapshotTemplates
- DescribeImageSpriteTemplates
- DescribeAnimatedGraphicsTemplates
- DescribeAdaptiveDynamicStreamingTemplates
- DescribeAIRecognitionTemplates
- DescribeAIAnalysisTemplates
- DeleteTranscodeTemplate
- DeleteWatermarkTemplate
- DeleteSnapshotByTimeOffsetTemplate
- DeleteSampleSnapshotTemplate
- DeleteImageSpriteTemplate
- DeleteAnimatedGraphicsTemplate
- DeleteAdaptiveDynamicStreamingTemplate
- DeleteReviewTemplate
- DeleteAIRecognitionTemplate
- DeleteAIAnalysisTemplate
- DeleteHeadTailTemplate
- DeleteImageProcessingTemplate
- DescribeReviewTemplates
- CreateReviewTemplate
- CreateTranscodeTemplate
- ModifyReviewTemplate
- ModifyTranscodeTemplate
- CreateAIRecognitionTemplate
- CreateHeadTailTemplate
- CreateImageProcessingTemplate
- DescribeHeadTailTemplates
- DescribeImageProcessingTemplates
- ModifyHeadTailTemplate
- CreateQualityInspectTemplate
- DeleteQualityInspectTemplate
- DescribeQualityInspectTemplates
- ModifyQualityInspectTemplate
- CreateEnhanceMediaTemplate
- DeleteEnhanceMediaTemplate
- ModifyEnhanceMediaTemplate
- DescribeEnhanceMediaTemplates
- Task Flow APIs
- Event Notification Relevant API
- Domain Name Management APIs
- Playlist APIs
- Data Types
- Error Codes
- FAQs
- Agreements
- VOD Policy
- Contact Us
- Glossary
This document describes how to manage audios/videos in the VOD console, including editing basic audio/video information, publishing audios/videos, previewing audios/videos in Player, and generating web player code.
More Features
- Log in to the VOD console and select Application Management on the left sidebar.
- Select the target application.
- Go to Media Assets > Video Management > Uploaded.
- Click More to change the status or storage class of audio/video files or retrieve archived files.
Changing audio/video status
You can control access to a media file by changing its status.
- Playback Prohibited: After the playback of an audio/video is prohibited, error 403 will be returned when resources of the selected asset (including the source file, transcoding result, and screenshots) are requested. You can still play the file in the VOD console.
- Unblocked: Click this to unblock an audio/video file and allow users to access the file normally.
Note:
It takes about 5-10 minutes for the playback prohibiting/unblocking action to fully take effect.
Changing the storage class
You can change the storage class of a media file on this page. Currently, the following storage classes are supported:
| Storage Class | STANDARD | STANDARD_IA | ARCHIVE | DEEP_ARCHIVE |
|---|---|---|---|---|
| Default in VOD | Yes | No | No | No |
| Storage costs | High | Medium | Low | Very low |
| Access performance | High | Low | Not supported | Not supported |
| Data retrieval fees | No | No | Yes | Yes |
| Supported regions | All | All | All | Beijing, Shanghai, and Chongqing |
| Minimum billable duration | None | 30 days | 90 days | 180 days |
Notes:
- For files uploaded to VOD (whether using an API, from the SDK, or from the console), the default storage class is STANDARD.
- For details about storage costs, see Purchase Guide.
- Access performance refers to metrics such as time to first frame (TTFF) and stutter rate. We recommend you do not change the storage class of files that are frequently accessed. ARCHIVE and DEEP ARCHIVE files cannot be directly accessed (played or processed). You need to retrieve them first.
- You can retrieve files from ARCHIVE or DEEP ARCHIVE files to STANDARD. The costs vary depending on the original storage class and retrieval mode.
- DEEP ARCHIVE is currently available only in Beijing, Shanghai, and Chongqing.
- There are minimum storage durations for STANDARD_IA, ARCHIVE, and DEEP ARCHIVE files. Storage fees for the minimum storage duration will be charged even if a file is stored for shorter than the period.
Note:
- Minimum storage duration for STANDARD_IA files is 30 days. Storage fees for 30 days are charged even if the file is stored for a shorter period.
- Minimum storage duration for ARCHIVE files is 90 days. Storage fees for 90 days are charged even if the file is stored for a shorter period.
- Minimum storage duration for DEEP ARCHIVE files is 180 days. Storage fees for 180 days are charged even if the file is stored for a shorter period.
- If a file is deleted before the minimum storage period elapses, the storage fee will be billed the following day for daily billed users and the following month for monthly billed users.
Use limits:
To move a file from ARCHIVE or DEEP ARCHIVE to another storage class, use the data retrieval feature.
Note:You will fail to move a file from ARCHIVE or DEEP ARCHIVE to another storage class using the Change Storage Class feature.
Data Retrieval
You can use the data retrieval feature to move files from ARCHIVE or DEEP ARCHIVE to STANDARD. Multiple retrieval modes are supported, which differ in speed and cost. For details about data retrieval fees, see Data Retrieval.
| Retrieval Mode | From ARCHIVE | From DEEP ARCHIVE |
|---|---|---|
| Expedited | 5 minutes | Not supported |
| Standard | 5 hours | 24 hours |
| Bulk | 12 hours | 48 hours |
Note:
- A media asset (FileId) may be stored as multiple files, including the original file, transcoding results, and screenshots. The time it takes to retrieve these files may vary. VOD does not keep track of the retrieval progress of each file. Instead, it estimates the time it may take for all the files to be retrieved and denies access to the asset before the time elapses (even if all the files have already been retrieved).
- Because a media asset may not be marked as retrieved even when it has actually been retrieved, the actual accessible period of the asset may be shorter than expected. Given this, we recommend you set the validity period of assets retrieved from DEEP_ARCHIVE one day longer than you actually need.
Editing Basic Information
- Log in to the VOD console and select Application Management on the left sidebar.
- Select the target application.
- Go to Media Assets > Video Management > Uploaded.
- Find the target video and click Manage. The Basic Info page shows a media file’s basic information, standard transcoding list, and adaptive bitrate streaming list.
- Basic Info
Field Description Thumbnail - You can click the edit icon next to the thumbnail image to select an existing image in “Image Management” or upload a local image to use as the thumbnail.
- Only JPG, PNG, and static GIF images are supported.
- The image can be up to 1 MB in size and 1920 x 1080 in dimensions.
- The filename cannot contain Chinese characters.
Name - You can rename a media file.
- The name can contain up to 20 characters. Double quotation marks ("), single quotation marks ('), less-than signs (<), and greater-than signs (>) are not supported.
Category - You can modify the category of a media file.
- Click the edit icon, select a category, and click **Confirm**.
Label - You can add labels to a media file.
- Each label can be up to 16 characters long and can contain letters and numbers. Press Enter to add multiple labels.
Description - You can add a brief description to a media file.
- The description can be up to 128 characters long.
Storage Type - You can modify the storage class of a media file.
- Click **Storage Type** to move a file from STANDARD to STANDARD_IA or the other way around.
- You can click the edit icon next to the thumbnail image to select an existing image in “Image Management” or upload a local image to use as the thumbnail.
- Basic Info
- Standard Transcoding List: The source file and transcoding outputs.
- You can copy the URL of a file or preview the file.
- You can also delete a transcoding output file or generate a QR code for sharing.
- Adaptive Bitrate Streaming List
You can copy the URL of a media file, preview the file, and view its details.
Screenshot Information
- Log in to the VOD console and select Application Management on the left sidebar.
- Select the target application.
- Go to Media Assets > Video Management > Uploaded.
- Find the target media file and click Manage to enter the Basic Info page.

- Select the Screenshot Info tab. This page shows screenshots of the source video as well as processed videos, including animated images, image sprites, sampled screenshots, and time point screenshots.
Note:Only the latest 100 entries are displayed. To get the information of all screenshots, click the download icon in the top-right corner.
Publishing Video
- Log in to the VOD console and select Application Management on the left sidebar.
- Select the target application.
- Go to Media Assets > Video Management > Uploaded.
- Find the target media file and click Manage to enter the Basic Info page.
- Click Publish Video to enter the video publishing page, which displays the source and output video files.
Player Preview
After transcoding a video to an adaptive bitstream, you can preview it in the player. VOD supports preview in both the web player and client player.
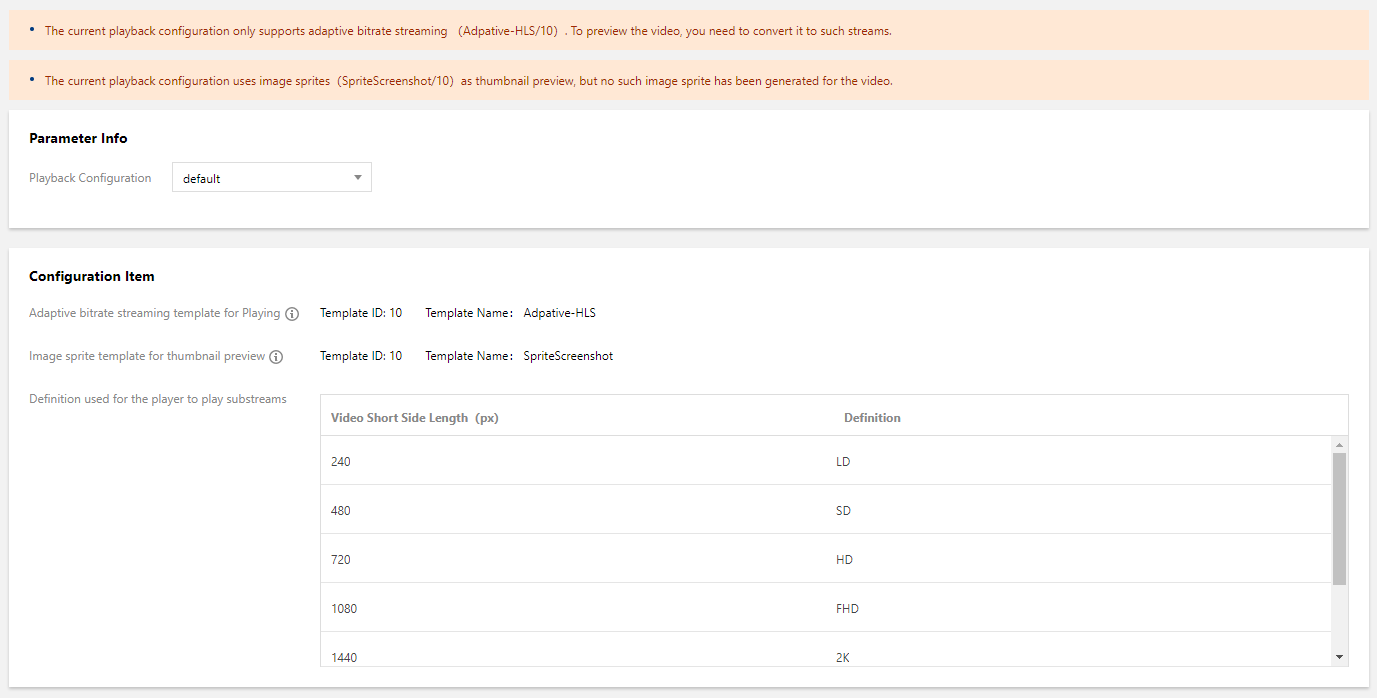
Parameter Info
Playback Configuration: Displays all the configurations of the player. It comes with two configurations: default and basicDrmPreset. To configure your own parameter, you must first enable key hotlink protection for the primary distribution domain name via the Operation tab.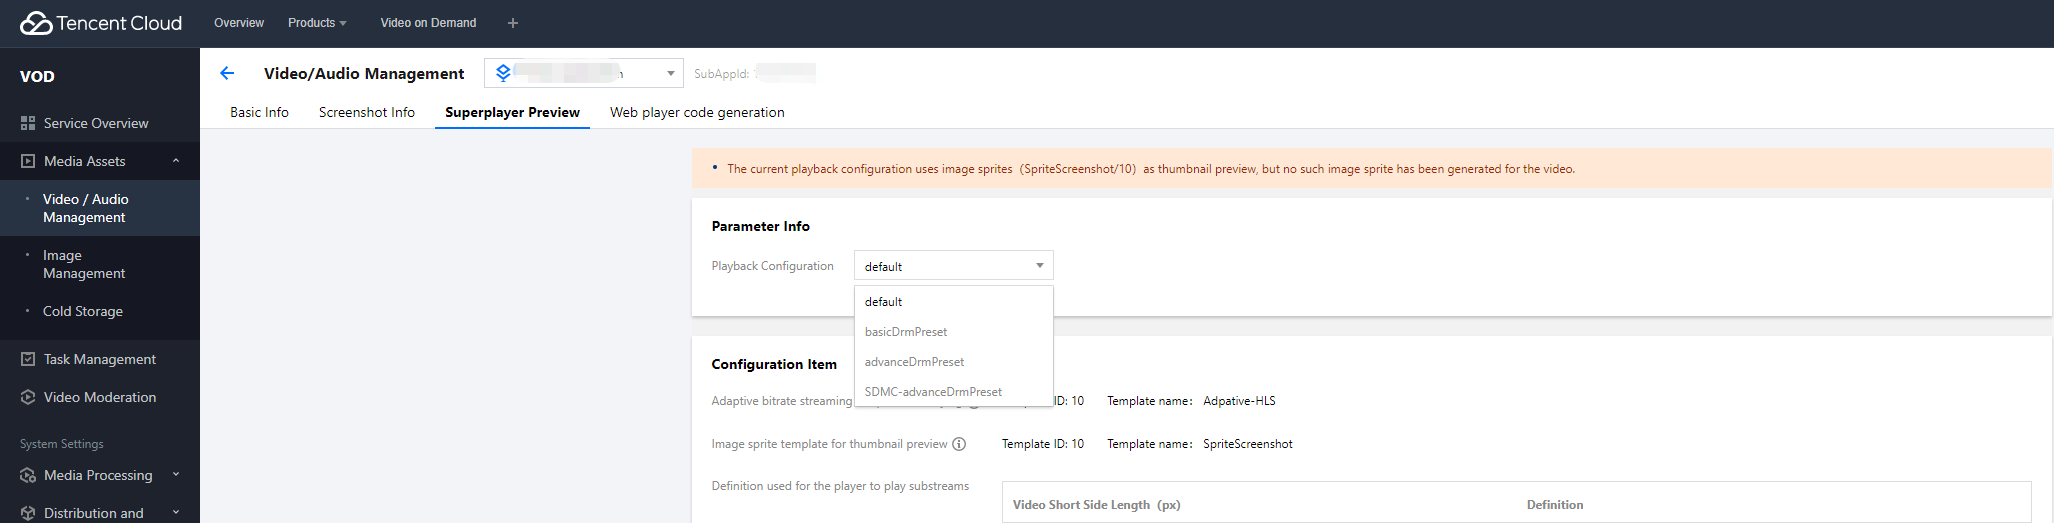
Configuration items
Configuration Item: Shows the configuration items for the selected player configuration.
- If there is an adaptive bitrate stream and image sprite thumbnails for the media asset (file ID), you can preview it using a web player or client player.
- If there isn’t an adaptive bitrate stream or image sprite thumbnails for the media asset (file ID), you will see the following messages:
Playback control
For a player configuration for which key hotlink protection is enabled, you can set parameters including playback URL expiration time, preview duration, and max playback IPs.
- Playback URL expiration time: The expiration time of the playback URL.
- Preview duration: The preview duration of a video, which must be longer than 30 seconds. If it is left empty, there will be no limit on playback duration.
- Max playback IPs: The maximum number of IP addresses allowed to play the file.
Video preview
Web player
You can click a video to preview it on the web player. You can also copy the code and embed it into a webpage.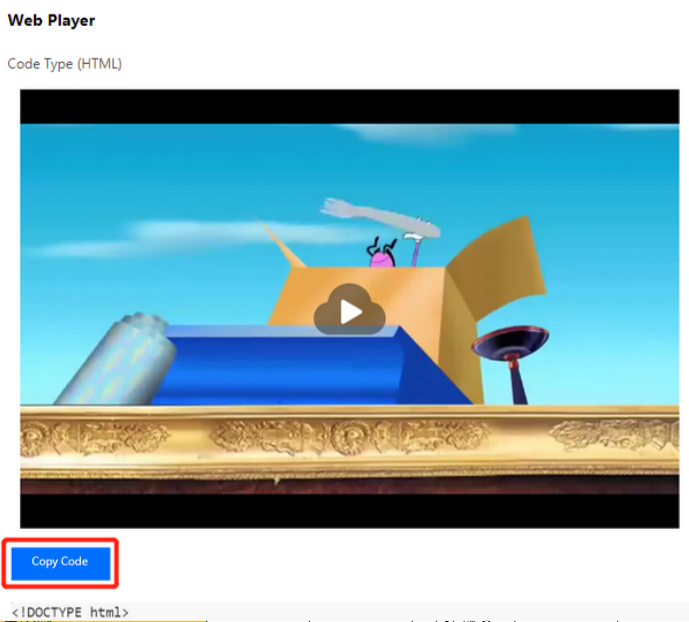
Client player
- Download the Video Cloud Toolkit App.
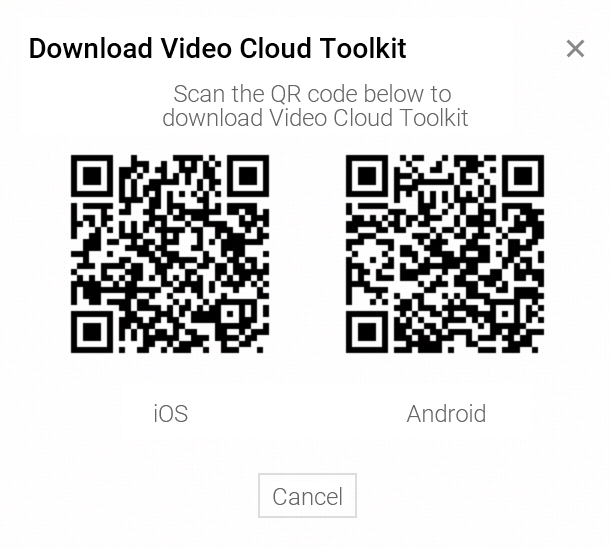
- Use the app to scan the QR code or enter the
appIDandfileIDmanually to preview the video on a client player.
Web Player Code Generation
- Log in to the VOD console and select Application Management on the left sidebar.
- Select the target application.
- Go to Media Assets > Video Management > Uploaded.
- Find the target media file and click Manage to enter the Basic Info page.
- Select the Web Player Code Generation tab to manage your player information and web player code.
- Click Modify in the Parameter Settings area. In the window that pops up, select a player from the drop-down list (for information on player configuration, see Web Player Management), and click Confirm.
- In the Web Player Code area, choose a video resolution from the Video Dimension drop-down list, enable or disable auto playback, and select a code type (HTML or IFRAME).
- Click Copy Code to copy the generated web player code.

 Yes
Yes
 No
No
Was this page helpful?