This document describes how to use Tencent Cloud AS to deploy elastic web application services. AS helps you respond to business needs with the most appropriate number of instances. When your business needs grow, it will seamlessly and automatically add the right number of CVM instances. When your business needs drop, it will automatically remove unnecessary CVM instances to increase the device utilization and reduce your deployment and instance costs.
The scheme provided in this document applies to websites or applications deployed as a cluster, and the sample website structure is simple, with only one application server cluster. For a complex website, there may be application, frontend, and cache server clusters. The operations that can be performed on each cluster are similar, and each cluster corresponds to a scaling group.
Scope of application
The website uses clusters with more than one server.
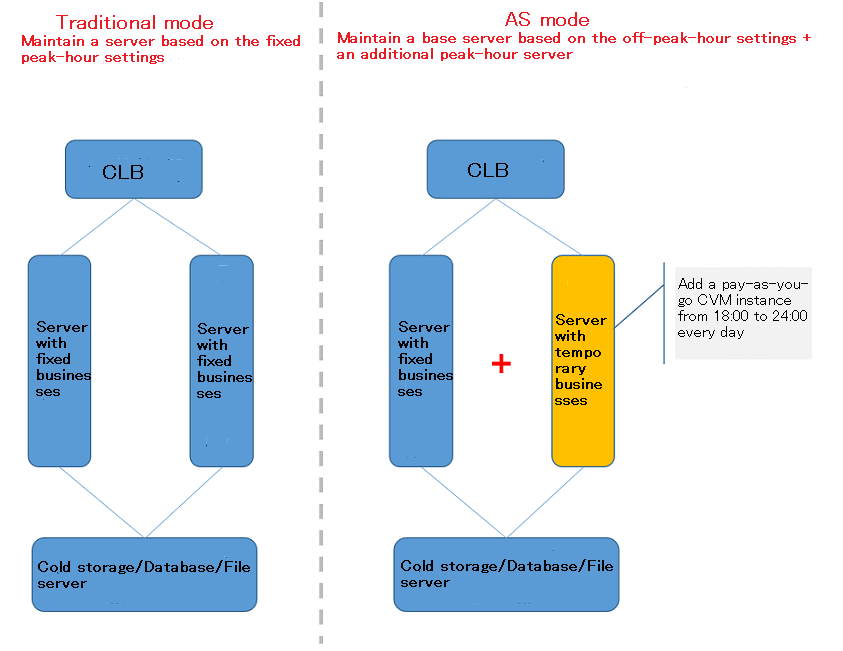
The website has a long period of idle time. Most websites have peak periods of less than eight hours in total per day, and for the remaining 16 hours, we recommend you remove idle servers to save costs.
A leisure website is used as an example, with 20:00 to 24:00 as its peak hours.
Pay-as-you-go CVM instances are used during peak hours. A CVM instance is added at 20:00 and removed at 24:00 through a scheduled action.
2. Before making an image, select the instance to be shut down and click Shutdown at the top.
3. Click More on the right of the target instance and click Create Image.
4. In the pop-up window, enter the Image Name and Description and click OK. It takes some time to create a custom image.
5. After the image is created successfully, select Image on the left sidebar to enter the image list page to view the details.
Step 2. Create a Launch Configuration
AS allows you to create an instance based on the Launch Configuration during a scale-out. Therefore, you need to specify the Region, Model, and Image in Launch Configuration in advance.
1. Log in to the AS console and select Launch Configuration on the left sidebar.
2. At the top of the Launch Configuration list page, select the target project and region of the web application. Here, the Default Project and Guangzhou are selected.
3. Click Create. In the pop-up window, select the model and configuration.
4. Select a model. Here, a Series 1 standard model with 1-core CPU and 1 GB memory is selected.
5. In Image, select Custom image and specify the created image. Here, "test" is used as an example.
6. Select the storage and network as needed and click Next: Set Host.
7. Set the password and security group and click Next: Confirm Configuration.
8. Click Create Launch Configuration.
Step 3. Create a Scaling Group
1. Log in to the AS console and select Scaling group on the left sidebar.
2. On the Scaling group list page, click Create.
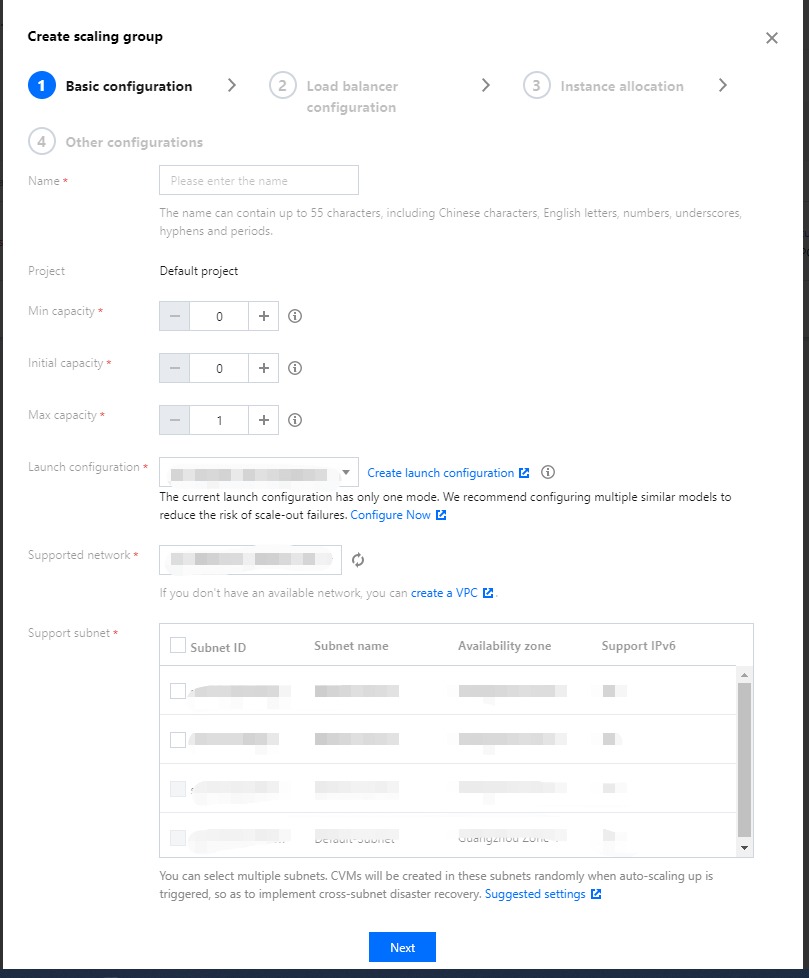
3. On the Create scaling group page, create a scaling group based on the following information and click Next.
Name: Name of the scaling group. Here, "Application server cluster" is used as an example.
Min Capacity: Minimum number of cluster servers. Enter 0 for a sample website.
Initial Capacity: Number of instances automatically created when a scaling group is created. In general, no instances will be created upon scaling group creation. We recommend you enter 0.
Max Capacity: Maximum number of cluster servers. Enter it as needed. Here, 5 is used as an example, that is, the scaling group has up to five instances.
Launch Configuration: Select the launch configuration you just created.
Supported Network: Network environment of the session server. Here, Classic Network is used as an example.
Supported Availability Zones: AZ of the instances to be added. Here, select the AZ of the session server.
Removal policy: Select the default value.
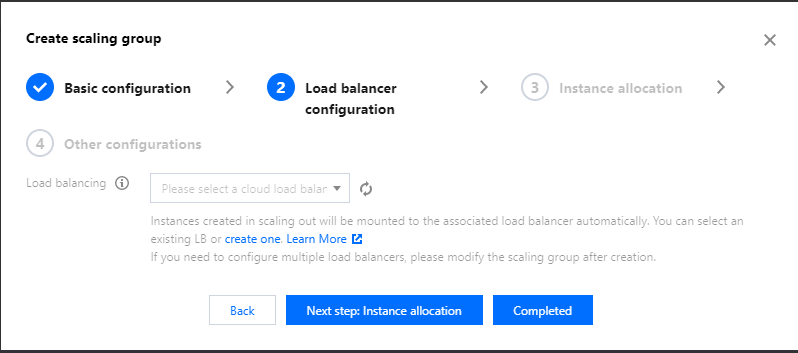
4. Select CLB. The added instances will be automatically mounted to the associated CLB instance. You can select an existing CLB instance or create one. After confirmation, click Completed.
CLB: Select the cluster CLB instance. Here, no CLB instance is selected.
Step 4. Add an Existing CVM Instance to the Scaling Group
1. On the Scaling group page, select the scaling group ID to enter the scaling group management page.
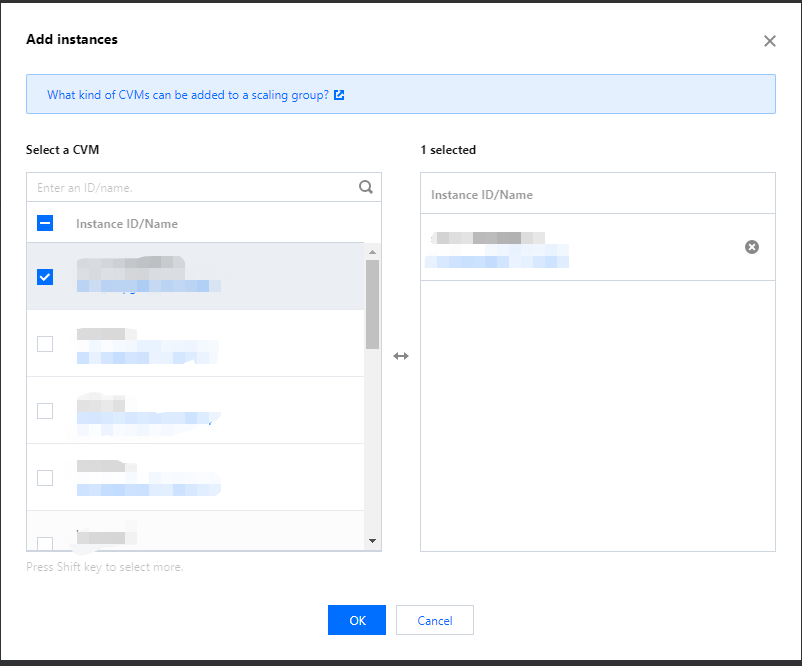
2. Select the Bind with Instance tab and click Add Instances.
3. In the Add Instances pop-up window, select an existing CVM instance to be added to the scaling group.
During off-peak hours, you can return CVM instances in the cluster that are not fully used to save costs. Here, there are two CVM instances named use. One is added to the scaling group and the other can be returned.
4. After adding the CVM instance, enable Removal Protection for it.
On the right of the CVM instance, select Enable Removal Protection and click OK in the pop-up window.
The CVM instance with Enable Removal Protection configured will not be removed. It will remain in the cluster permanently, and AS will not change it.
Step 5. Set the Scaling Policy
AS supports features such as Alarm trigger policy, Scheduled action, Notification, and Scaling activity. You can apply them as needed.
The following uses the scheduled scaling action as an example.
1. On the scaling group management page, select the Scheduled Action tab and click Create.
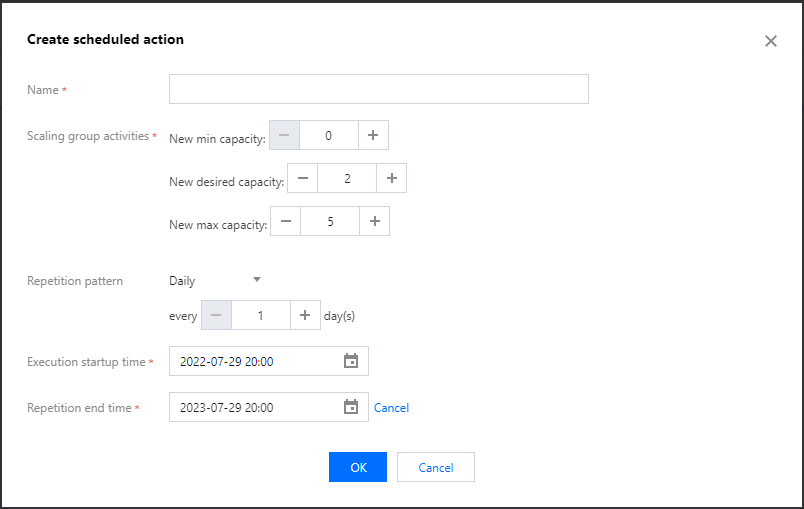
2. In the Create Scheduled Action pop-up window, set a scheduled scale-out action at 20:00 based on the following information to increase the number of CVM instances to 2 at 20:00.
Name: Enter the action name. Here, it is "Scale-out at 20:00".
Scaling group activities:
New min capacity: Minimum number of instances in the scaling group. It is 0 and won't change.
New desired capacity: The action is executed once every day based on the Execution startup time. Here, the number of CVM instances is adjusted to 2 at 20:00 every day.
New max capacity: Maximum number of instances in the scaling group. It is 5 and won't change. Or you can set it as needed.
Repetition pattern: Cycle of the scaling group activity. Here, the activity is performed once every day.
Execution startup time: Fixed start time of the scaling group activity, that is, 2022-07-29 20:00.
Repetition end time: Fixed end time of the scaling group activity, that is, 2023-07-29 20:00.
Note:
A CVM instance can be created in about one minute. If the custom image is large, the creation may take longer. You can set the Execution startup time five minutes earlier.
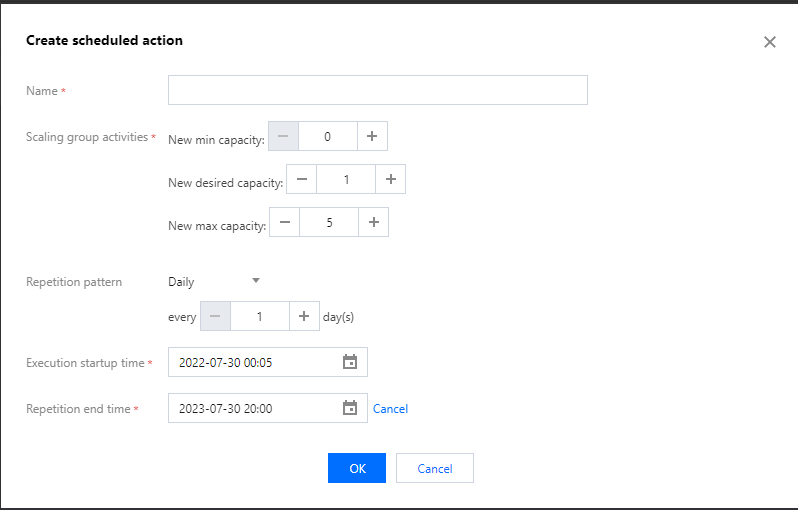
3. Based on the above steps, set a scale-in action at 24:00 to reduce the number of CVM instances to 1 at 24:00.
At this point, the backend cluster of the website has "one fixed application server and one regularly created application server during peak hours".