tencent cloud

Cloud Object Storage

Release Notes and Announcements
Release Notes
Announcements
Product Introduction
Overview
Features
Use Cases
Strengths
Concepts
Regions and Access Endpoints
Specifications and Limits
Service Regions and Service Providers
Billing
Billing Overview
Billing Method
Billable Items
Free Tier
Billing Examples
Viewing and Downloading Bill
Payment Overdue
FAQs
Getting Started
Console
Getting Started with COSBrowser
User Guide
Creating Request
Bucket
Object
Data Management
Batch Operation
Global Acceleration
Monitoring and Alarms
Operations Center
Data Processing
Content Moderation
Smart Toolbox
Data Processing Workflow
Application Integration
User Tools
Tool Overview
Installation and Configuration of Environment
COSBrowser
COSCLI (Beta)
COSCMD
COS Migration
FTP Server
Hadoop
COSDistCp
HDFS TO COS
GooseFS-Lite
Online Tools
Diagnostic Tool
Use Cases
Overview
Access Control and Permission Management
Performance Optimization
Accessing COS with AWS S3 SDK
Data Disaster Recovery and Backup
Domain Name Management Practice
Image Processing
Audio/Video Practices
Workflow
Direct Data Upload
Content Moderation
Data Security
Data Verification
Big Data Practice
COS Cost Optimization Solutions
Using COS in the Third-party Applications
Migration Guide
Migrating Local Data to COS
Migrating Data from Third-Party Cloud Storage Service to COS
Migrating Data from URL to COS
Migrating Data Within COS
Migrating Data Between HDFS and COS
Data Lake Storage
Cloud Native Datalake Storage
Metadata Accelerator
GooseFS
Data Processing
Data Processing Overview
Image Processing
Media Processing
Content Moderation
File Processing Service
File Preview
Troubleshooting
Obtaining RequestId
Slow Upload over Public Network
403 Error for COS Access
Resource Access Error
POST Object Common Exceptions
API Documentation
Introduction
Common Request Headers
Common Response Headers
Error Codes
Request Signature
Action List
Service APIs
Bucket APIs
Object APIs
Batch Operation APIs
Data Processing APIs
Job and Workflow
Content Moderation APIs
Cloud Antivirus API
SDK Documentation
SDK Overview
Preparations
Android SDK
C SDK
C++ SDK
.NET(C#) SDK
Flutter SDK
Go SDK
iOS SDK
Java SDK
JavaScript SDK
Node.js SDK
PHP SDK
Python SDK
React Native SDK
Mini Program SDK
Error Codes
Harmony SDK
Endpoint SDK Quality Optimization
Security and Compliance
Data Disaster Recovery
Data Security
Cloud Access Management
FAQs
Popular Questions
General
Billing
Domain Name Compliance Issues
Bucket Configuration
Domain Names and CDN
Object Operations
Logging and Monitoring
Permission Management
Data Processing
Data Security
Pre-signed URL Issues
SDKs
Tools
APIs
Agreements
Service Level Agreement
Privacy Policy
Data Processing And Security Agreement
Contact Us
Glossary
DocumentationCloud Object Storage

Direct Upload Guide for Mini Program

Focus Mode
Font Size
Last updated: 2026-01-07 17:13:31

Introduction

This document describes how to directly upload files to a Cloud Object Storage (COS) bucket in a mini program using simple code without relying on an SDK.
Note:
This document is based on the XML version of the API.

Prerequisites

1. Log in to the COS console, create a bucket, setting BucketName and Region. For details, see the Creating Buckets documentation.
2. Log in to the CAM console, go to the API Key Management page, and obtain your project's SecretId and SecretKey.
3. Configure the domain name allowlist for the mini program.
To request COS in a mini program, you need to log in to the WeChat Official Accounts Platform, go to "Development" > "Development Settings", and configure the domain name allowlist. The SDK uses two interfaces: wx.uploadFile and wx.request.
cos.postObject uses wx.uploadFile to send requests.
Other methods use wx.request to send requests.
Both require configuring the COS domain name in the corresponding allowlist. For example: examplebucket-1250000000.cos.ap-guangzhou.myqcloud.com.
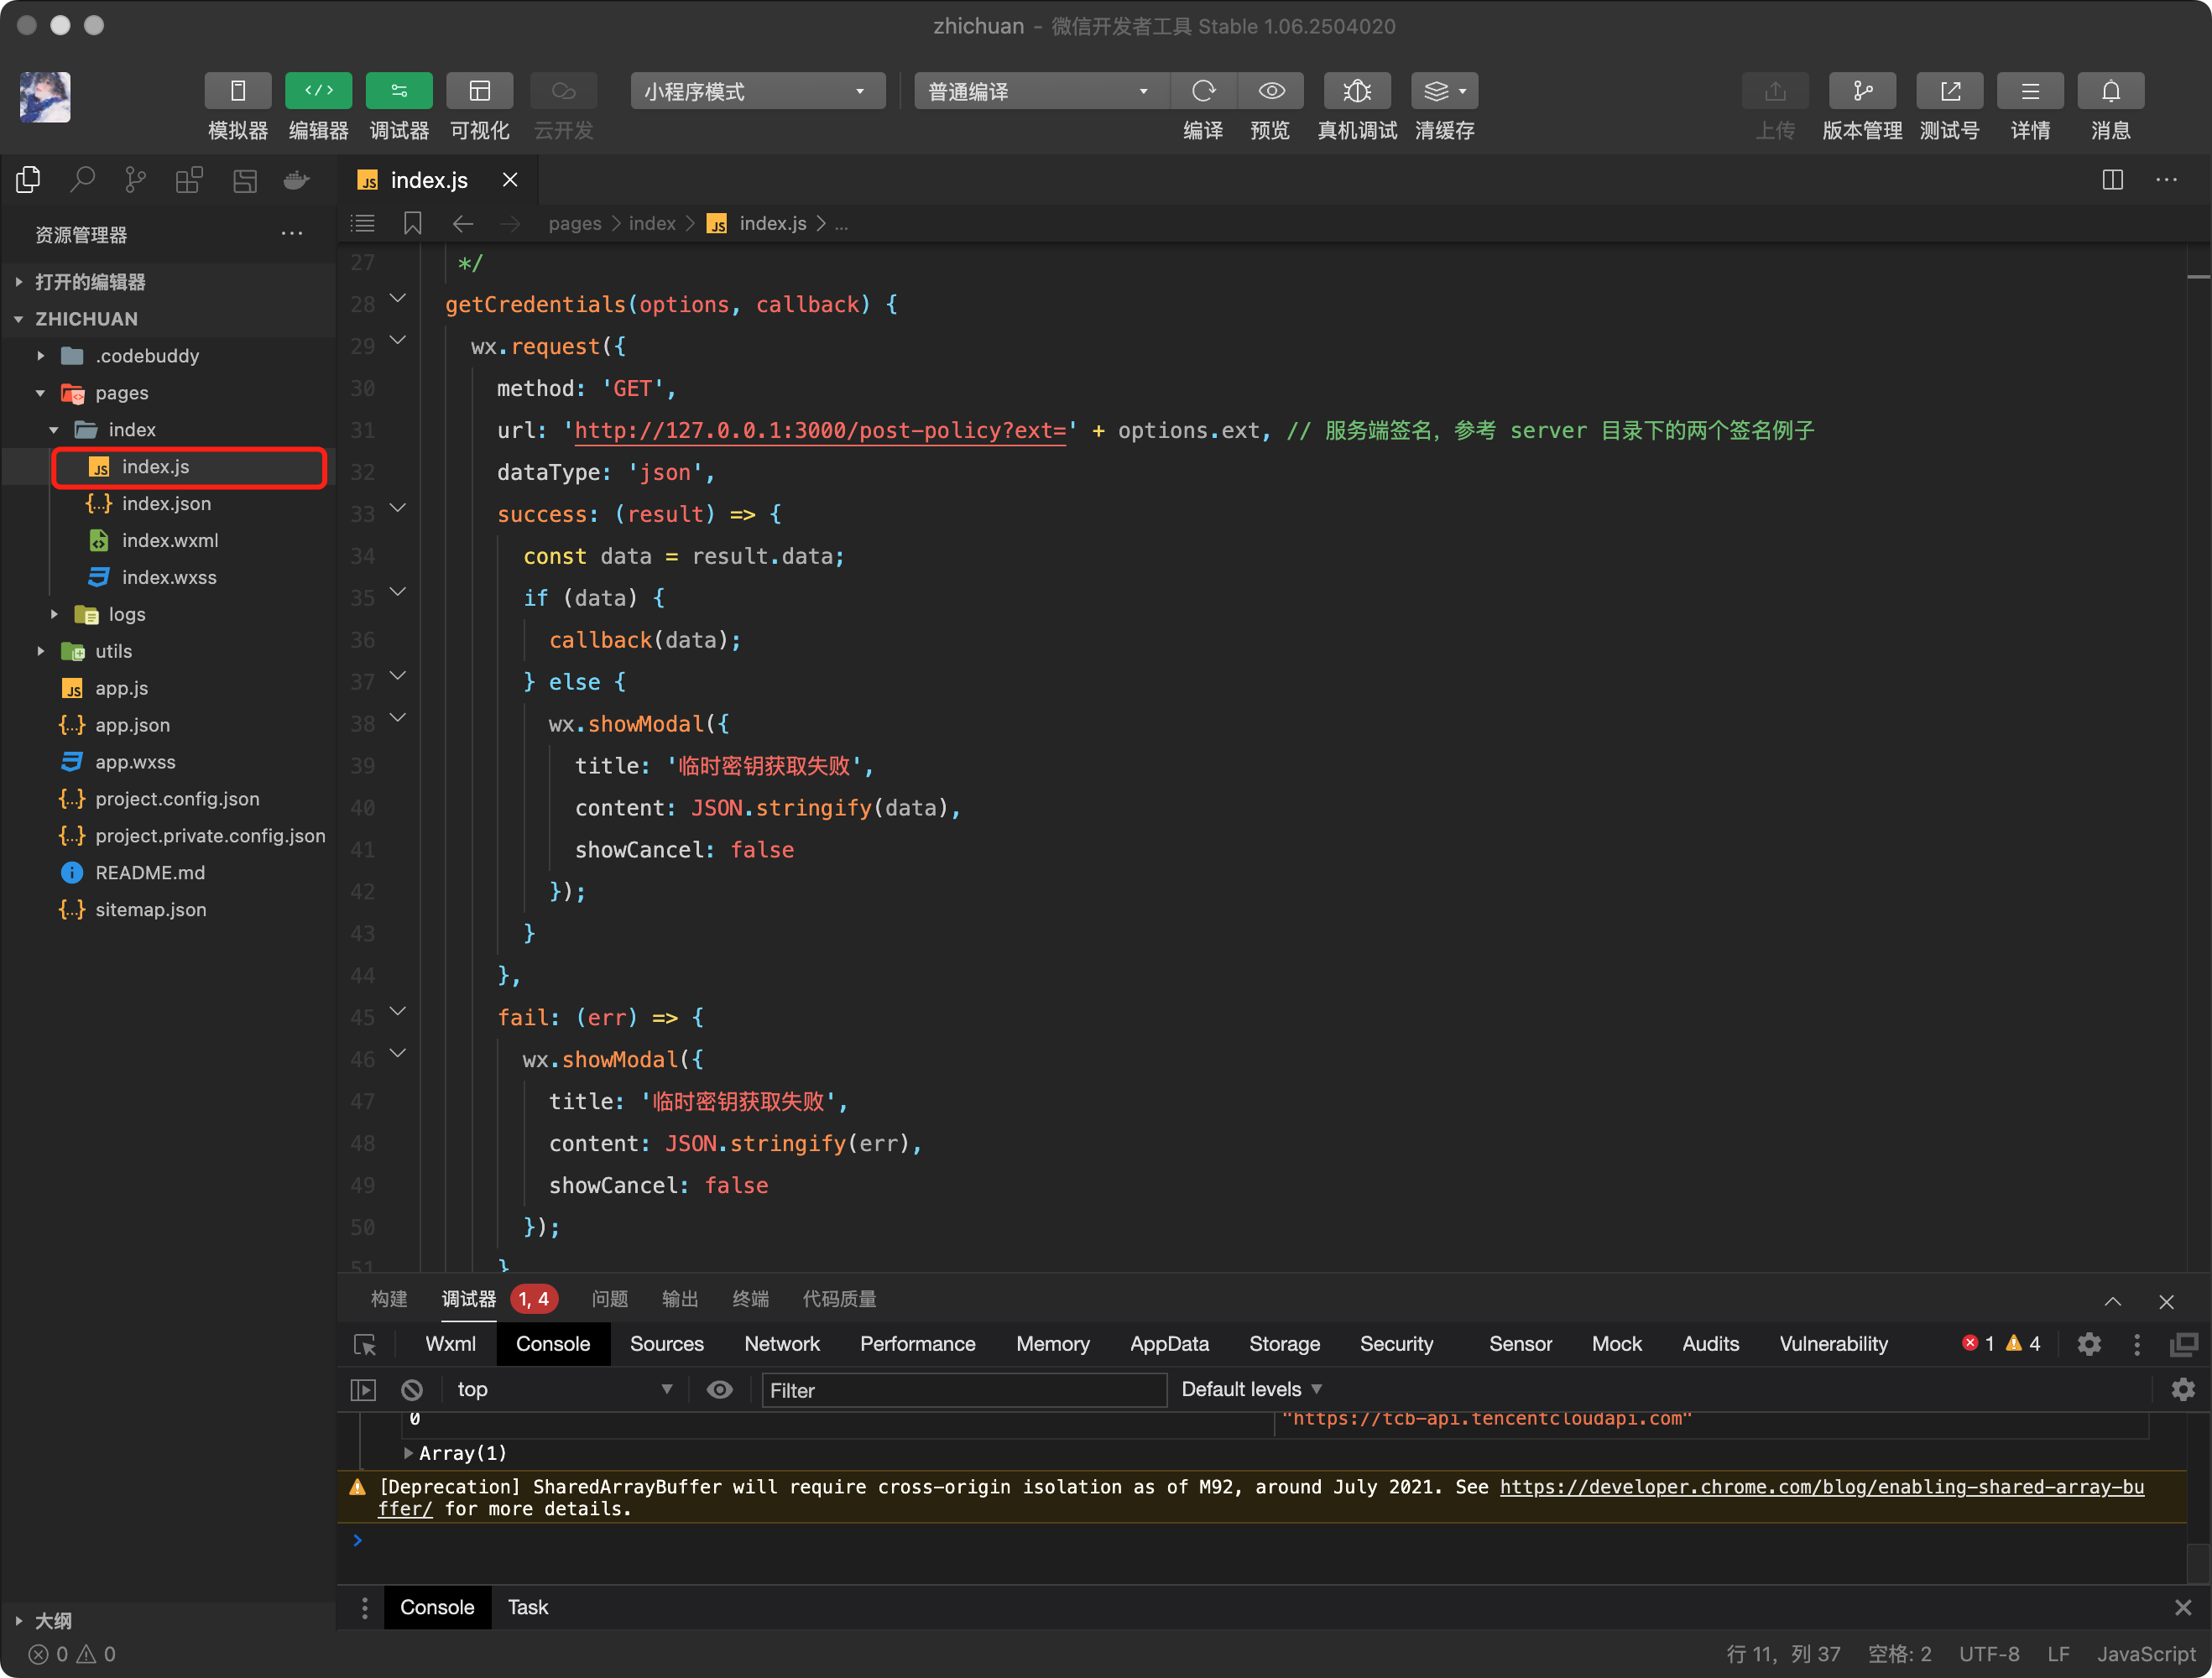
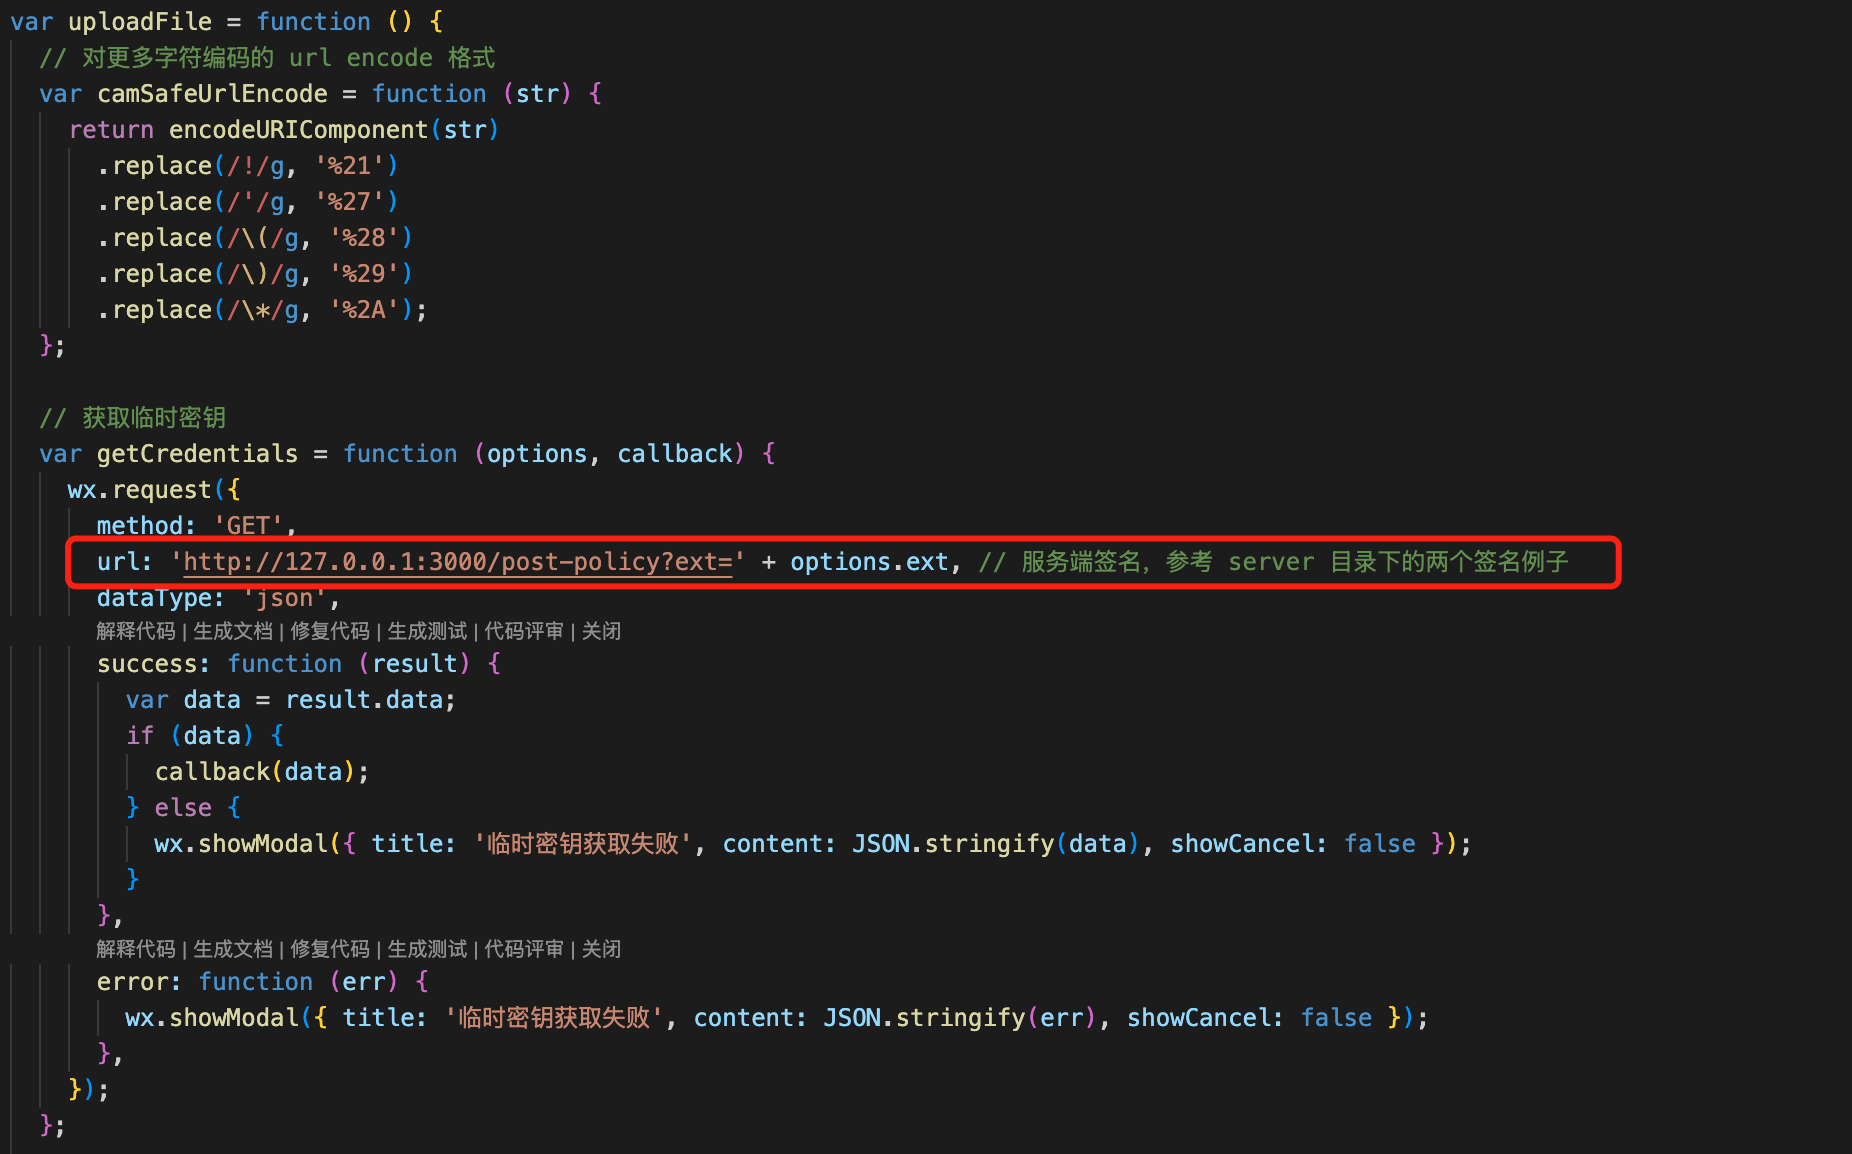
Solution Description

Implementation Process

1. Select a file on the front end, and the front end will send the suffix to the server.
2. The server generates a random COS file path with time according to the suffix, calculates the corresponding signature, and returns the URL and signature information to the front end.
3. The front end uses a PUT or POST request to directly upload the file to COS.

Solution strengths

Permissions security: The scope of security permissions can be effectively limited with the server-side signatures, which can only be used to upload a specified file path.
Path security: The random COS file path is determined by the server, which can effectively avoid the problem of existing files being overwritten and security risks.

Practical Steps

Configuring the Server to Implement Signatures

Note:
Add a layer of authority check on your website itself when the server is officially deployed.
Refer to the document Request Signature for how to calculate the signature.
The server uses Node.js to compute signatures. See Node.js example.
Beginners can refer to Quick Start.

Sample of Mini Program Upload

Specific steps are as follows:

1. Create a project for WeChat Mini Program, open the developer tools, create a new project, and enter the AppID.

2. In the project, find or create a new page, such as pages/index/index.js, and add the following direct upload code.

3. Modify the corresponding server address in the code.

4. The server uses Node.js to compute signatures. See Node.js example.

5. In the Development > Development Settings of the WeChat Official Account Platform, configure the domain allowlist. The SDK uses two interfaces: wx.uploadFile and wx.request.

The following code provides examples for both the PUT Object interface (recommended) and the POST Object interface. Operation instructions are as follows:

Upload Using POST

var uploadFile = function () {
// format for URL encoding of more characters
var camSafeUrlEncode = function (str) {
return encodeURIComponent(str)
.replace(/!/g, '%21')
.replace(/'/g, '%27')
.replace(/\\(/g, '%28')
.replace(/\\)/g, '%29')
.replace(/\\*/g, '%2A');
};

// Obtain the signature
var getAuthorization = function (options, callback) {
wx.request({
method: 'GET',
// Replace with your server address to get the signature for post upload
url: 'http://127.0.0.1:3000/post-policy?ext=' + options.ext,
dataType: 'json',
success: function (result) {
var data = result.data;
if (data) {
callback(data);
} else {
wx.showModal({
title: 'Failed to obtain temporary key',
content: JSON.stringify(data),
showCancel: false,
});
}
},
error: function (err) {
wx.showModal({
title: 'Failed to obtain temporary key',
content: JSON.stringify(err),
showCancel: false,
});
},
});
};
/**
* prefix: URL for COS requests
* filePath: File path of the mini program selected for upload
* key: Upload path for cos
* formData: Authentication parameters returned by the server
*/
var postFile = function ({ prefix, filePath, key, formData }) {
var requestTask = wx.uploadFile({
url: prefix,
name: 'file',
filePath: filePath,
formData: formData,
success: function (res) {
var url = prefix + '/' + camSafeUrlEncode(key).replace(/%2F/g, '/');
if (res.statusCode === 200) {
wx.showModal({ title: 'Upload succeeded', content: url, showCancel: false });
} else {
wx.showModal({
title: 'Upload failed',
content: JSON.stringify(res),
showCancel: false,
});
}
console.log(res.header['x-cos-request-id']);
console.log(res.statusCode);
console.log(url);
},
fail: function (res) {
wx.showModal({
title: 'Upload failed',
content: JSON.stringify(res),
showCancel: false,
});
},
});
requestTask.onProgressUpdate(function (res) {
console.log('Current progress:', res);
});
};

// Upload documents.
var uploadFile = function (filePath) {
var extIndex = filePath.lastIndexOf('.');
var fileExt = extIndex >= -1 ? filePath.substr(extIndex + 1) : '';
// Pass in the file extension, and the server-side generates a signed url
getAuthorization({ ext: fileExt }, function (AuthData) {
// Check whether the AuthData format is correct
console.log(AuthData);
// Parameters used in the request
var prefix = 'https://' + AuthData.cosHost; // Request url
var key = AuthData.cosKey; // Let the server-side determine the filename for greater security.
var formData = {
key: key,
success_action_status: 200,
'Content-Type': '',
'q-sign-algorithm': AuthData.qSignAlgorithm,
'q-ak': AuthData.qAk,
'q-key-time': AuthData.qKeyTime,
'q-signature': AuthData.qSignature,
policy: AuthData.policy,
};
if (AuthData.securityToken)
formData['x-cos-security-token'] = AuthData.securityToken;
postFile({ prefix, filePath, key, formData });
});
};

// Select file
wx.chooseMedia({
count: 1, // default 9
sizeType: ['original'], // Can specify whether to use the original or compressed image. Defaults to original.
sourceType: ['album', 'camera'], // Can specify source as album or camera. Defaults to both.
success: function (res) {
uploadFile(res.tempFiles[0].tempFilePath);
},
});
};

Use PUT Upload

var uploadFile = function () {
// url encode format for encoding more characters
var camSafeUrlEncode = function (str) {
return encodeURIComponent(str)
.replace(/!/g, '%21')
.replace(/'/g, '%27')
.replace(/\\(/g, '%28')
.replace(/\\)/g, '%29')
.replace(/\\*/g, '%2A');
};

// Obtain the signature
var getAuthorization = function (options, callback) {
wx.request({
method: 'GET',
// Replace with your server address to obtain the signature for put upload
url: 'http://127.0.0.1:3000/put-sign?ext=' + options.ext,
dataType: 'json',
success: function (result) {
var data = result.data;
if (data) {
callback(data);
} else {
wx.showModal({
title: 'Failed to obtain temporary key',
content: JSON.stringify(data),
showCancel: false,
});
}
},
error: function (err) {
wx.showModal({
title: 'Failed to obtain temporary key',
content: JSON.stringify(err),
showCancel: false,
});
},
});
};

/**
* prefix: Request url for cos
* filePath: File path of the file selected for upload in the mini program
* key: Path for uploading to cos
* formData: Authentication parameters returned by the server
*/
var putFile = function ({ prefix, filePath, key, AuthData }) {
// put upload requires reading the actual content of the file for uploading.
const wxfs = wx.getFileSystemManager();
wxfs.readFile({
filePath: filePath,
success: function (fileRes) {
var requestTask = wx.request({
url: prefix + '/' + key,
method: 'PUT',
header: {
Authorization: AuthData.authorization,
'x-cos-security-token': AuthData.securityToken,
},
data: fileRes.data,
success: function success(res) {
var url = prefix + '/' + camSafeUrlEncode(key).replace(/%2F/g, '/');
if (res.statusCode === 200) {
wx.showModal({
title: 'Upload succeeded',
content: url,
showCancel: false,
});
} else {
wx.showModal({
title: 'Upload failed',
content: JSON.stringify(res),
showCancel: false,
});
}
console.log(res.statusCode);
console.log(url);
},
fail: function fail(res) {
wx.showModal({
title: 'Upload failed',
content: JSON.stringify(res),
showCancel: false,
});
},
});
},
});
};

// Upload documents.
var uploadFile = function (filePath) {
var extIndex = filePath.lastIndexOf('.');
var fileExt = extIndex >= -1 ? filePath.substr(extIndex + 1) : '';
getAuthorization({ ext: fileExt }, function (AuthData) {
// Check whether the AuthData format is correct.
console.log(AuthData);
const prefix = 'https://' + AuthData.cosHost;
const key = AuthData.cosKey;
putFile({ prefix, filePath, key, AuthData });
});
};

// Select file
wx.chooseMedia({
count: 1, // default 9
sizeType: ['original'], // Can specify whether to use the original or compressed image. Defaults to original.
sourceType: ['album', 'camera'], // Can specify source as album or camera. Defaults to both.
success: function (res) {
uploadFile(res.tempFiles[0].tempFilePath);
},
});
};

References

If you need to use the Mini Program SDK, see the Mini Program SDK Quick Start document.

Help and Support

Was this page helpful?

Help us improve! Rate your documentation experience in 5 mins.

Feedback