NextCloud는 오픈 소스 클라이언트 및 서버 소프트웨어 애플리케이션으로 개인 온라인 파일 스토리지 서비스를 직접 만들 수 있도록 도와줍니다.
NextCloud 서버는 PHP로 작성되었으며 서버의 로컬 디스크를 기본 스토리지로 사용합니다. COS(Cloud Object Storage)를 기본 스토리지로 사용하도록 NextCloud 구성을 수정하여 더 낮은 스토리지 비용으로 더 높은 안정성, 더 강력한 재해 복구 기능 및 무제한 스토리지 공간을 누릴 수 있습니다.
본 문서는 NextCloud 서버가 의존하는 환경과 로컬 스토리지와 COS의 차이점을 비교 분석하고 개인 온라인 파일 스토리지 서비스 구축 방법을 설명합니다.
주의:
기존의 NextCloud 서버 인스턴스를 로컬 스토리지에서 COS로 전환하면 기존 파일이 보이지 않을 수 있습니다. 기존 인스턴스의 저장 방법을 변경하려면 새로운 NextCloud 서버를 구축하고 COS를 스토리지로 구성한 다음 이전 인스턴스에서 새 인스턴스로 데이터를 마이그레이션하는 것이 좋습니다.
NextCloud 서버 환경 소개
NextCloud의 서버는 PHP로 작성되며, 데이터베이스는 SQLite, MySQL, MariaDB 또는 PostgreSQL을 사용할 수 있습니다. 이중 SQLite는 성능의 제약으로 인해 실제 애플리케이션에는 일반적으로 권장되지 않습니다. PHP, MySQL과 관련된 서버 소프트웨어는 Windows 버전을 모두 갖추고 있지만, Windows에서 실행되는 NextCloud 서버에 텍스트 인코딩 등의 문제가 있을 수 있다는 NextCloud 커뮤니티의 피드백에 따라 공식 홈페이지는 Windows에 설치된 NextCloud 서버를 지원하지 않겠다고 발표했습니다.
서버 구성
Cloud Virtual Machine(CVM)은 현재 각각 여러 서브 패밀리가 있는 여러 인스턴스 패밀리를 제공합니다. 다른 인스턴스 패밀리는 큰 메모리 또는 높은 IO와 같은 다른 강점을 가지고 있습니다. NextCloud는 개인, 가정, 중소기업 사용자를 대상으로 하므로 하드웨어 리소스에 대한 요구 사항이 낮고 리소스가 균형 잡힌 표준형 모델을 선택할 수 있습니다. CVM 인스턴스 서브 패밀리의 경우 일반적으로 최신 제품이 비용 대비 성능이 높으므로 최신 서브 패밀리를 선택하면 됩니다.
인스턴스 패밀리 및 서브 패밀리를 결정한 후 특정 vCPU 및 메모리 사양을 선택해야 합니다(사설망 대역폭 및 PPS는 사양에 따라 다름). PHP용 OPcache를 사용하여 성능을 향상시킬 수 있으며, NextCloud 서버는 APCu 메모리 캐시를 사용하여 성능을 더욱 향상시킬 수 있으므로 대용량 메모리를 선택하는 것이 좋습니다.
구매 후 CVM 인스턴스 구성을 조정할 수 있으므로 1코어 vCPU와 4GB MEM과 같은 낮은 사양의 인스턴스를 먼저 구매하고 온라인 파일 스토리지 서비스를 구축하여 운영 환경에 런칭한 후 사용자 및 파일 수와 CVM 모니터링 데이터를 기반으로 성능 향상을 위한 사양 업그레이드 여부를 결정합니다. 가정 또는 중소기업과 같은 다중 사용자 시나리오에서 서비스를 사용해야 하는 경우 충분한 성능을 제공하기 위해 2코어 8GB MEM 또는 4코어 16GB MEM 인스턴스를 구매하는 것이 좋습니다.
서버 운영 체제
주요 Linux 릴리스 버전은 NextCloud 서버를 잘 유지할 수 있습니다. 이들의 구성은 소프트웨어 패키지 설치에 사용되는 명령(패키지 관리 툴)을 제외하고는 기본적으로 동일합니다.
설명:
본문은 CentOS 7.7의 CVM 인스턴스를 예로 들어 설명합니다.
데이터베이스
앞서 언급한 바와 같이 실제 업무에서는 MySQL을 PHP와 함께 사용하는 것이 일반적입니다. MariaDB는 MySQL의 '포크(fork)' 버전으로, MySQL과의 호환성이 높기 때문에 NextCloud 서버는 MySQL 5.7+ 또는 MariaDB 10.2+에서 잘 실행될 수 있습니다.
Tencent Cloud는 TencentDB for MySQL과 TencentDB for MariaDB를 제공합니다. 두 서비스 모두 원본-복제 고가용성 아키텍처를 채택하고 CVM에서 자체 구축한 데이터베이스에 비해 안정성이 더 높습니다. 또한 자동 백업과 같은 사용하기 쉬운 Ops 기능을 지원합니다. 따라서 실제 비즈니스에서 TencentDB를 사용하는 것이 좋습니다.
설명:
본문은 TencentDB for MySQL 5.7 인스턴스를 예로 들어 설명합니다.
Web 서버 및 PHP Runtime
일부 NextCloud 서버 구성은 .htaccess 파일에 지정되어 있으므로 Apache 서버 소프트웨어 애플리케이션을 사용할 때 NextCloud의 내장 구성 항목을 직접 사용할 수 있습니다. Nginx는 최근 급속도로 발전하고 있는 Web 서버 소프트웨어 애플리케이션으로 Apache에 비해 설치 및 구성이 쉽고 리소스 사용량이 적으며 로드 용량이 큰 것이 특징입니다. NextCloud 서버의 .htaccess 구성을 Nginx 구성으로 변환하여 NextCloud 서버를 더 잘 유지할 수 있습니다. 본문은 Nginx 서버 소프트웨어 애플리케이션을 사용하며 참고용으로 완전한 Nginx 구성 예시를 제공합니다.
PHP Runtime은 PHP 7로 업그레이드되었으며 주요 유지 관리 버전에는 모두 NextCloud 서버를 지원하는 7.2, 7.3 및 7.4가 포함됩니다. 여기에서는 최신 버전 7.4를 사용합니다. 또한 NextCloud는 특정 PHP 모듈에 의존합니다. 특정 모듈에 대한 요구 사항은 아래에 자세히 설명되어 있습니다.
Tencent Cloud 네트워크 환경
현재 Tencent Cloud는 클래식 네트워크 및 VPC 환경을 제공합니다. 클래식 네트워크는 모든 Tencent Cloud 사용자가 공유하는 공중망 리소스 풀로, 모든 CVM 인스턴스의 사설망 IP가 Tencent Cloud에 의해 할당되며 IP 범위 또는 IP 주소를 사용자 지정할 수 없습니다. VPC는 Tencent Cloud에서 논리적으로 격리된 네트워크 공간입니다. VPC에서 IP 범위, IP 주소 및 라우팅 정책을 사용자 지정할 수 있습니다. 현재 클래식 네트워크 리소스가 부족하고 확장할 수 없기 때문에 클래식 네트워크는 더 이상 새 계정과 일부 새 AZ에서 지원되지 않습니다. 따라서 이 문서에서는 VPC를 예로 들어 설명합니다.
CBS(Cloud Block Storage) 디스크는 CVM 인스턴스의 로컬 디스크로 운영 체제에 마운트됩니다. NextCloud는 기본적으로 파일 시스템을 사용하여 온라인 파일 스토리지 데이터를 저장하므로 NextCloud 데이터를 운영 체제의 CBS 디스크에 직접 저장할 수 있습니다. CBS와 비교하여 COS는 다음과 같은 이점을 제공합니다.
사용 사례
CBS
CBS는 일종의 블록 스토리지로 CVM 운영 체제에 디스크로 직접 마운트할 수 있습니다. 일반적으로 CBS 디스크는 운영 체제에서만 사용되며 하나의 CVM 인스턴스에만 마운트할 수 있습니다. 그러나 읽기/쓰기 성능이 높고 높은 IO와 낮은 대기 시간이 필요한 시나리오에 적합하며 하나의 CVM 인스턴스에서만 독점적으로 사용됩니다.
COS
COS는 HTTP 프로토콜을 통해 읽기/쓰기 API를 개방하므로 프로그래밍을 통해 COS에 저장된 객체(파일)에 액세스해야 합니다. 파일 경로와 같은 객체 Key를 인덱스로 사용하며 저장 용량이 무제한입니다. 데이터가 네트워크를 통해 전송되기 때문에 COS는 속도가 느리고 대기 시간이 더 깁니다. 그러나 객체에 대한 작업이 수행되므로 애플리케이션에서 객체를 조작한 후 다른 애플리케이션에서 즉시 동일한 객체를 조작할 수 있습니다. 결론적으로 COS는 고성능이 필요하지 않지만 비용 효율적인 대용량 스토리지 또는 공유 액세스가 필요한 시나리오에 적합합니다. 다음과 같은 이유로 온라인 파일 스토리지 애플리케이션을 COS와 함께 사용하는 것이 더 적합합니다. 온라인 파일 스토리지 애플리케이션은 네트워크를 통해 데이터를 전송하며 짧은 대기 시간이 필요하지 않습니다. 온라인 파일 저장 클라이언트에서 서버로 그리고 COS로 연결되는 속도와 대기 시간은 주로 클라이언트 네트워크에 따라 달라집니다. COS는 자체 속도를 제한하지 않습니다.
유지 관리
CBS
CBS에는 고정 용량이 있으며 콘솔 또는 Tencent Cloud API를 통해 확장할 수 있습니다. 확장 후에는 운영 체제에 파티션을 추가해야 하며 파티션 예외가 발생할 수 있으며 일정한 유지 관리 비용이 발생합니다.
COS
COS는 주문형으로 사용되며 총 용량이나 객체(파일)의 수를 제한하지 않으므로 유지 관리가 전혀 필요하지 않습니다.
데이터 보안
CBS와 COS 모두 데이터의 신뢰성을 보장하기 위해 다중 복사와 같은 방법을 사용합니다.
NextCloud 서버에 IP 주소가 아닌 도메인 이름을 사용하려면, 도메인 이름을 등록하고 CVM IP 주소로 리졸브하고, 도메인 등록 기관의 안내 문서에 따라 ICP 비안을 받을 수 있습니다.
NextCloud 서버는 설치 시 사용한 도메인 이름이나 IP 주소를 기록하므로 설치 전에 도메인 이름을 등록, 리졸브 및 ICP 비안을 받아 도메인 이름을 사용하여 NextCloud 서버의 보안 페이지로 이동하는 것이 좋습니다.
NextCloud 서버 설치 완료 후 도메인 또는 IP 주소를 변경해야 할 경우 직접 /var/www/nextcloud/config/config.php 구성 파일의 trusted_domains를 수정할 수 있습니다. 세부 사항은 NextCloud 공식 홈페이지 문서를 참조하십시오.
NextCloud 서버 설치
1. 브라우저를 사용하여 NextCloud 서버에 액세스한 후 관리자 및 사용자 이름과 비밀번호를 생성하고 기억합니다.
2. 스토리지와 데이터베이스를 확장하고 다음과 같이 구성합니다.
구성 항목
값
데이터 폴더
/var/www/nextcloud/data(기본값 유지)
데이터베이스 구성
MySQL/MariaDB
데이터베이스 사용자
root
데이터베이스 비밀번호
TencentDB for MySQL 초기화 중에 입력한 root 사용자의 비밀번호
데이터베이스 이름
nextcloud(또는 사용하지 않는 다른 이름)
데이터베이스 호스트(기본적으로 localhost가 표시됨)
TencentDB for MySQL 인스턴스의 사설망 주소
3. **설치 완료**를 클릭하고 NextCloud 서버 설치가 완료될 때까지 기다립니다.4. 설치 과정에서 504 Gateway Timeout과 같은 오류 정보가 뜨는 경우 새로고침 후 다시 시도합니다.5. 설치 완료 후 관리자 계정을 사용해 NextCloud 서버에 로그인하면 웹 페이지 버전의 NextCloud를 사용할 수 있습니다.
NextCloud 서버 환경 최적화
백그라운드 작업
NextCloud 서버는 사용자와 상호작용이 필요하지 않을 때 데이터베이스 정리와 같은 백그라운드 작업을 실행하는 경우가 있습니다. PHP 실행 특성상 PHP 기반 프로그램은 내부적으로 하나의 독립된 작업 진행 또는 스레드를 유지할 수 없으므로 백그라운드 작업과 같은 시나리오는 외부에서 호출하여 대응하는 PHP 프로그램으로 실행해야 합니다.
NextCloud 서버는 세 가지 백그라운드 작업 호출 방식을 제공합니다. 기본값은 웹 페이지에 로그인한 사용자를 통해 브라우저에서 자동으로 AJAX 요청을 보낸 후 서버의 백그라운드 작업 실행을 호출하는 방식으로, 사용자의 로그인 상태에 크게 의존합니다. 사용자가 로그인하지 않으면 이러한 백그라운드 작업은 실행될 수 없으므로 신뢰성이 가장 낮습니다.
AJAX 기반 백그라운드 작업의 신뢰성이 떨어지는 문제를 피하고자 Linux의 cron을 사용한 백그라운드 작업 설정을 권장합니다. Linux의 cron은 작업 호출 시간을 정확하게 제어합니다. 설정 가능한 Interval은 분, 시간, 한 달 중 특정 일, 월, 요일을 포함합니다. 예를 들어 5분마다(분 수는 5의 배수) 또는 매시 10분 등으로 설정할 수 있습니다. 일부 운영 체제는 초 단위, 연 단위도 지원하여 매우 효율적입니다. cron에 대한 설명과 설정은 관련 자료를 참조하십시오.
NextCloud 서버의 백그라운드 작업을 위해 cron을 설정하는 방법을 소개합니다.
1. SSH 툴을 사용하여 구매한 서버에 로그인합니다.
2. 다음 명령어를 실행하여 PHP 모듈을 설치합니다.
yum install php-posix
3. 다음 명령어를 실행하여 nginx 계정에 사용할 cron 설정을 열거나 생성합니다.
crontab -u nginx -e
4. 다음 편집 인터페이스는 vi/vim입니다. i 키를 눌러 편집 모드로 이동한 후 한 행을 삽입합니다. 내용은 다음과 같습니다.
*/5 * * * * php -f /var/www/nextcloud/cron.php
ESC를 눌러 편집 모드를 종료하고 :wq를 입력하여 저장 후 종료합니다. vi/vim의 구체적인 작업 가이드는 관련 문서를 참조하십시오.
상기 구성에서는 공식적으로 권장되는 실행 빈도를 5분에 한 번씩 설정합니다. 백그라운드 작업이 5분 안에 실행된 후에는 브라우저를 열어 NextCloud 서버에 로그인할 수 있습니다. 그 후, 오른쪽 상단 모서리에서 사용자 이름 첫 글자를 클릭하여 설정 페이지로 이동한 후, 좌측 사이드바에서 기본 설정을 선택하면 기본적으로 Cron이 백그라운드 작업으로 선택되어 있는 것을 확인할 수 있습니다.
메모리 캐시
PHP는 OPcache를 사용하여 성능을 향상할 수 있습니다. NextCloud 서버도 APCu를 사용한 메모리 캐시 성능 향상을 지원합니다. 아래 관련 작업 과정을 소개합니다.
1. SSH 툴을 사용하여 구매한 서버에 로그인합니다.
2. 다음 명령어를 실행하여 PHP 모듈을 설치합니다.
yum install php-pecl-apcu
3. 계속해서 다음 명령어를 실행하여 Nginx와 PHP-FPM을 재시작합니다.
명령어 1:
systemctl restart nginx
명령어 2:
systemctl restart php-fpm
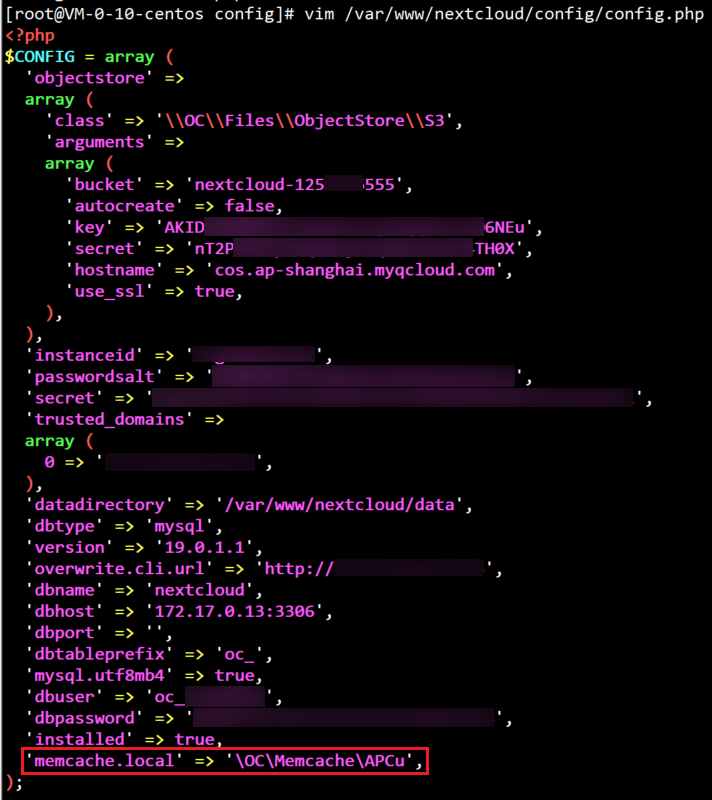
4. vim /var/www/nextcloud/config/config.php를 실행하여 NextCloud 서버의 구성 파일을 열고 $CONFIG = array (에 한 행 'memcache.local' => '\\OC\\Memcache\\APCu',을 추가합니다. 파일을 저장하고 종료합니다.
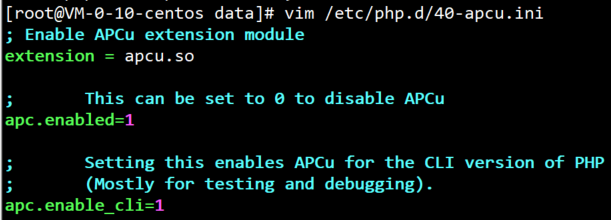
5. cron 설정으로 백그라운드 작업을 최적화한 후 PHP의 apc 설정 변경이 필요합니다. vim /etc/php.d/40-apcu.ini를 실행하여 PHP APCu의 구성 파일을 열고 ;apc.enable_cli=0을 apc.enable_cli=1로 수정(주의: 맨 앞의 세미콜론을 모두 삭제)한 다음 저장하고 종료합니다. /etc/php.d/40-apcu.ini 경로가 존재하지 않을 경우 직접 /etc/php.d/ 디렉터리에서 apc 또는 apcu 문구가 들어간 .ini 구성 파일을 찾아 편집합니다.
클라이언트 액세스 설정
NextCloud 공식 홈페이지가 제공하는 데스크톱 동기화 클라이언트와 모바일 클라이언트는 NextCloud 공식 홈페이지 또는 애플리케이션 스토어에서 다운로드할 수 있습니다. NextCloud 설정 시 NextCloud의 서버 주소(도메인 또는 IP)를 입력해야 합니다. 그런 다음 사용자 이름과 비밀번호를 입력하고 로그인하면 바로 클라이언트를 사용할 수 있습니다.