This document describes how to host a Dubbo application to TKE.
Strengths of hosting Dubbo applications to TKE
Improve the resource utilization.
Kubernetes is a natural fit for microservice architectures.
Improve the Ops efficiency and facilitate DevOps implementation.
Highly scalable Kubernetes makes it easy to dynamically scale applications.
TKE provides Kubernetes master management to ease Kubernetes cluster Ops and management.
TKE is integrated with other cloud-native products of Tencent Cloud to help you better use Tencent Cloud products.
Best Practices
The following describes how to host a Dubbo application to TKE by using the Q Cloud Book Mall (QCBM) project as an example.
QCBM overview
QCBM is an online bookstore demo project developed by using the microservice architecture and the Dubbo 2.7.8 framework. It is deployed and hosted on CODING. For more information, see here. QCBM contains the following microservices:
Microservice
Description
QCBM-Front
Frontend project developed through React, built and deployed based on the Nginx 1.19.8 Docker image.
QCBM-Gateway
API gateway that accepts HTTP requests from the frontend and converts them into Dubbo requests at the backend.
User-Service
Dubbo-based microservice, providing user registration, login, and authentication features.
Favorites-Service
Dubbo-based microservice, providing book favorites.
Order-Service
Dubbo-based microservice, providing order generation and query features.
Store-Service
Dubbo-based microservice, providing the book information storage feature.
QCBM architecture and add-ons
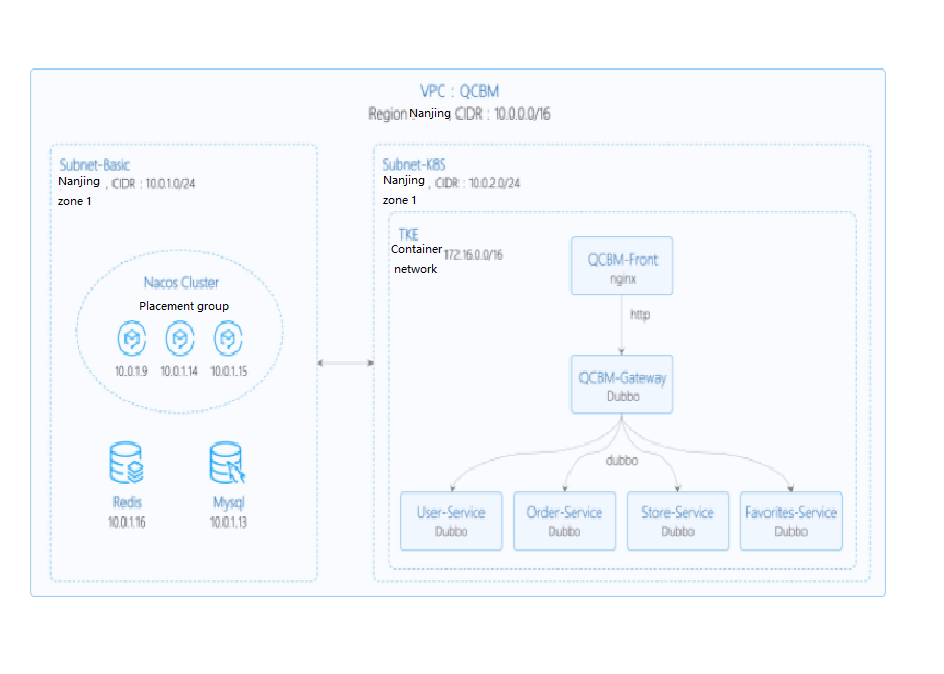
In the following best practice, applications deployed in CVM are containerized and hosted to TKE. In this use case, one VPC is used and divided into two subnets:
Subnet-Basic: Deployed with stateful basic services, including Dubbo's service registry Nacos, MySQL, and Redis.
Subnet-K8S: Deployed with QCBM application services, all of which are containerized and run in TKE.
The VPC is divided as shown below:
The network planning for the QCBM instance is as shown below:
Network Planning
Description
Region/AZ
Nanjing/Nanjing Zone 1
VPC
CIDR: 10.0.0.0/16
Subnet-Basic
Nanjing Zone 1, CIDR block: 10.0.1.0/24
Subnet-K8S
Nanjing Zone 1, CIDR block: 10.0.2.0/24
Nacos cluster
Nacos cluster built with three 1-core 2 GB MEM Standard SA2 CVM instances, with IP addresses of 10.0.1.9, 10.0.1.14, and 10.0.1.15
The add-ons used in the QCBM instance are as shown below:
Add-on
Version
Source
Remarks
k8s
1.8.4
Tencent Cloud
TKE management mode
MySQL
5.7
Tencent Cloud
TencentDB for MySQL with two nodes
Redis
5.0
Tencent Cloud
TencentDB for Redis Standard Edition
CLS
N/A
Tencent Cloud
Log service
TSW
N/A
Tencent Cloud
Accessed with SkyWalking 8.4.0 Agent, which can be downloaded here
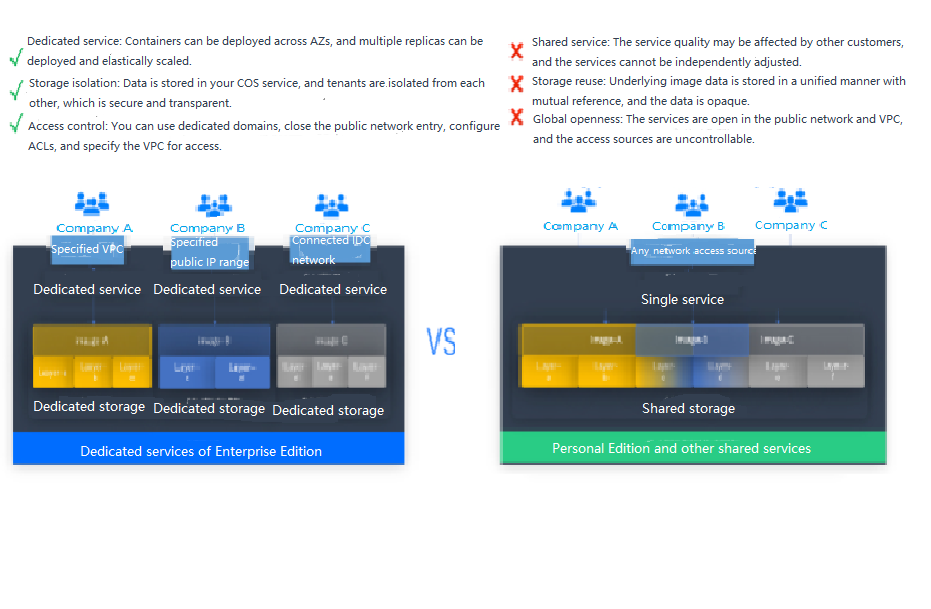
Tencent Cloud Tencent Container Registry (TCR) are available in Personal Edition and Enterprise Edition as differentiated below:
QCBM is a Dubbo containerized demo project, so TCR Personal Edition is perfectly suited to its needs. However, for enterprise users, TCR Enterprise Edition is recommended. To use an image repository, see Basic Image Repository Operations.
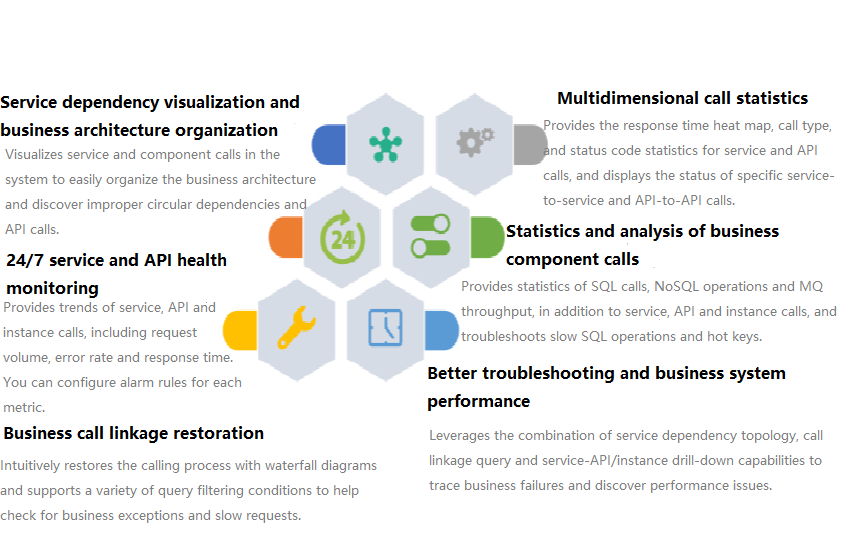
TSW
Tencent Service Watcher (TSW) provides cloud-native service observability solutions that can trace upstream and downstream dependencies in distributed architectures, draw topologies, and provide multidimensional call observation by service, API, instance, and middleware. It is further described as shown below:
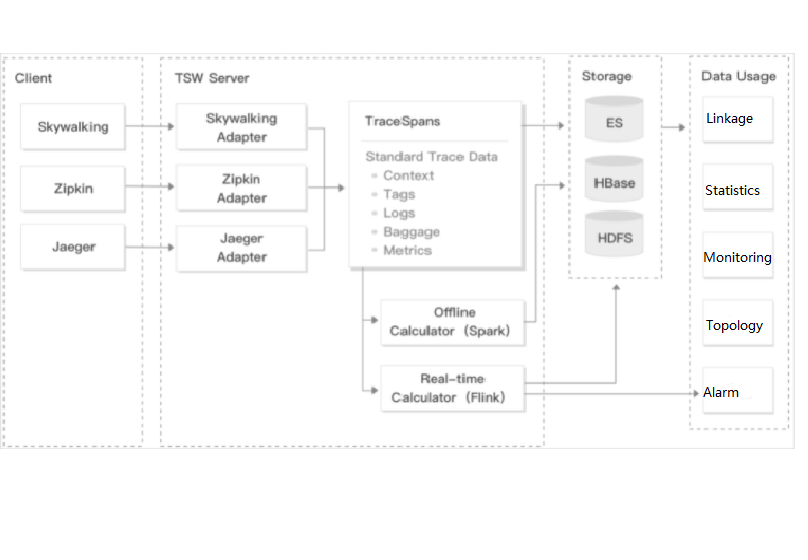
TSW is architecturally divided into four modules:
Data collection (client)
You can use an open-source probe or SDK to collect data. If you are migrating to the cloud, you can change the reporting address and authentication information only and keep most of the configurations on the client.
Data processing (server)
Data is reported to the server via the Pulsar message queue, converted by the adapter into an OpenTracing-compatible format, and assigned to real-time and offline computing as needed.
- Real-time computing provides real-time monitoring, statistical data display, and fast response to the connected alarming platform. - Offline computing aggregates the statistical data in large amounts over long periods of time and leverages big data analytics to provide business value.
Storage
The storage layer can adapt to use cases with different data types, writing at the server layer, and query and reading requests at the data usage layer.
Data usage
The data usage layer provides underlying support for console operations, data display, and alarming.
In the CLB console, create a private network CLB instance for Subnet-K8S (the ID of this CLB instance will be used later). For more information, see Creating CLB Instances.
Apply for the TSW beta test. TSW is currently in beta test and supports both Java and Go.
The following uses user-service as an example to describe how to write a Dockerfile. The project directory structure of user-service is displayed, Dockerfile is in the root directory of the project, and user-service-1.0.0.zip is the packaged file that needs to be added to the image.
➜ user-service tree
├── Dockerfile
├── assembly
│ ....
├── bin
│ ....
├── pom.xml
├── src
│ ....
├── target
│ .....
│ └── user-service-1.0.0.zip
└── user-service.iml
The Dockerfile of user-service is as shown below:
FROM java:8-jre
ARG APP_NAME=user-service
ARG APP_VERSION=1.0.0
ARG FULL_APP_NAME=${APP_NAME}-${APP_VERSION}
# The working directory of the container is `/app`.
WORKDIR /app
# Add the locally packaged application to the image.
COPY ./target/${FULL_APP_NAME}.zip .
# Create the `logs` directory. Decompress and delete the original files and directory after the decompression.
Java applications in the production environment have a lot of configuration parameters, making the start script complex. It's a heavy workload to write all the content of the start script to the Dockerfile, which is far less flexible than shell scripts and can't implement fast troubleshooting. We recommend you not enable the start script.
In general, nohup is used at the end of the start script to start the Java application, but the deamon process that comes along will cause the container to exit directly after execution. Therefore, you need to change nohup java ${OPTIONS} -jar user-service.jar > ${LOG_PATH} 2>&1 & to java ${OPTIONS} -jar user-service.jar > ${LOG_PATH} 2>&1.
As each Run command in the Dockerfile will generate an image layer, we recommend you combine these commands into one.
Building image
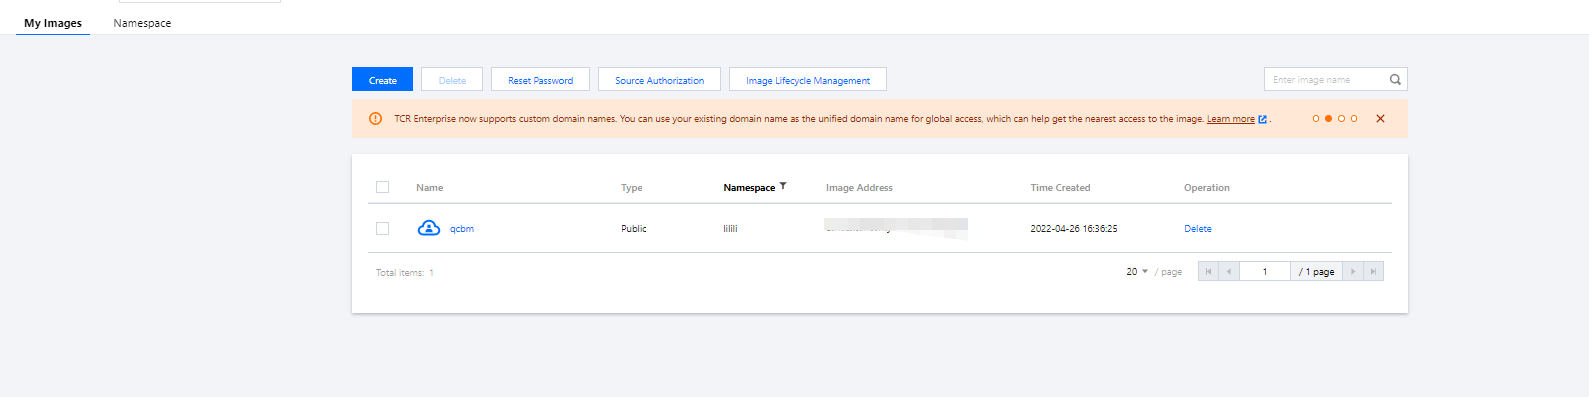
TCR provides both automatic and manual methods to build an image. To demonstrate the build process, the manual method is used.
The image name needs to be in line with the convention of ccr.ccs.tencentyun.com/[namespace]/[ImageName]:[image tag]:
Here, namespace can be the project name to facilitate image management and use. In this document, QCBM represents all the images under the QCBM project.
ImageName can contain the subpath, generally used for multi-project use cases of enterprise users. In addition, if a local image is already built, you can run the docker tag command to rename the image in line with the naming convention.
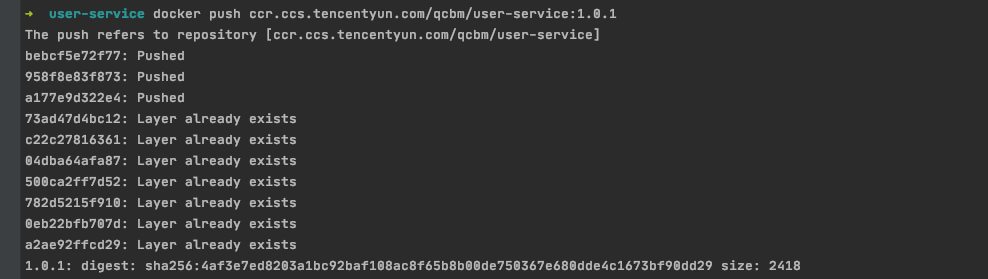
1. Run the following command to build an image as shown below:
# Recommended build method, which eliminates the need for secondary tagging operations
You can get your Tencent Cloud account ID on the Account Info page.
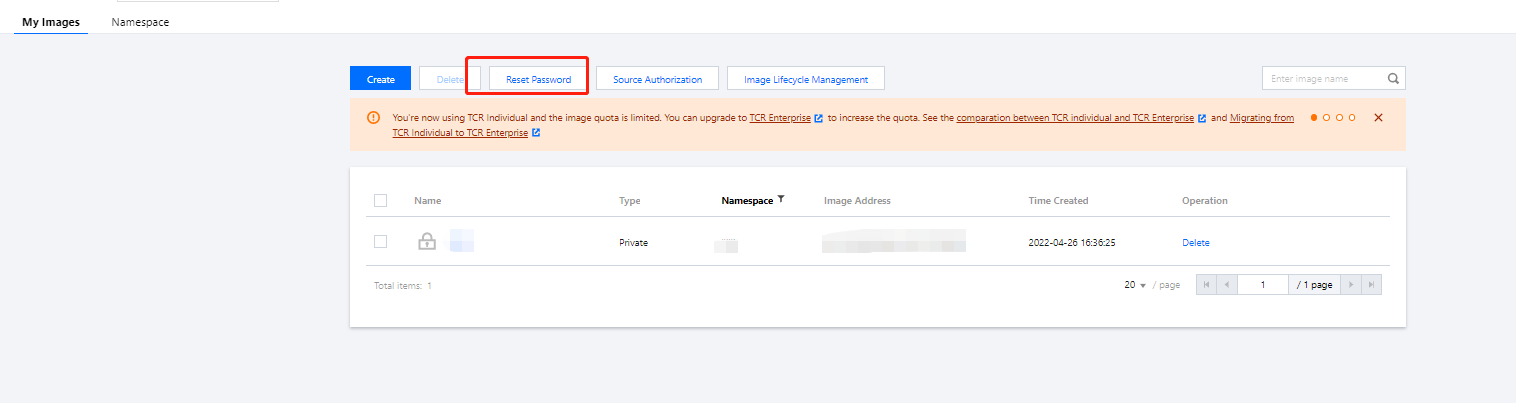
If you forget your TCR login password, you can reset it in My Images of TCR Personal Edition.
If you are prompted that you have no permission to run the command, add sudo before the command and run it as shown below. In this case, you need to enter two passwords, the server admin password required for sudo and the TCR login password.
When a cluster is created, we recommend you enable Placement Group on the Select Model page. It helps distribute CVM instances across different hosts to increase the system reliability.
2. After the cluster is created, you can view its information on the cluster management page in the TKE console. Here, the new cluster is named qcbm-k8s-demo as shown below:
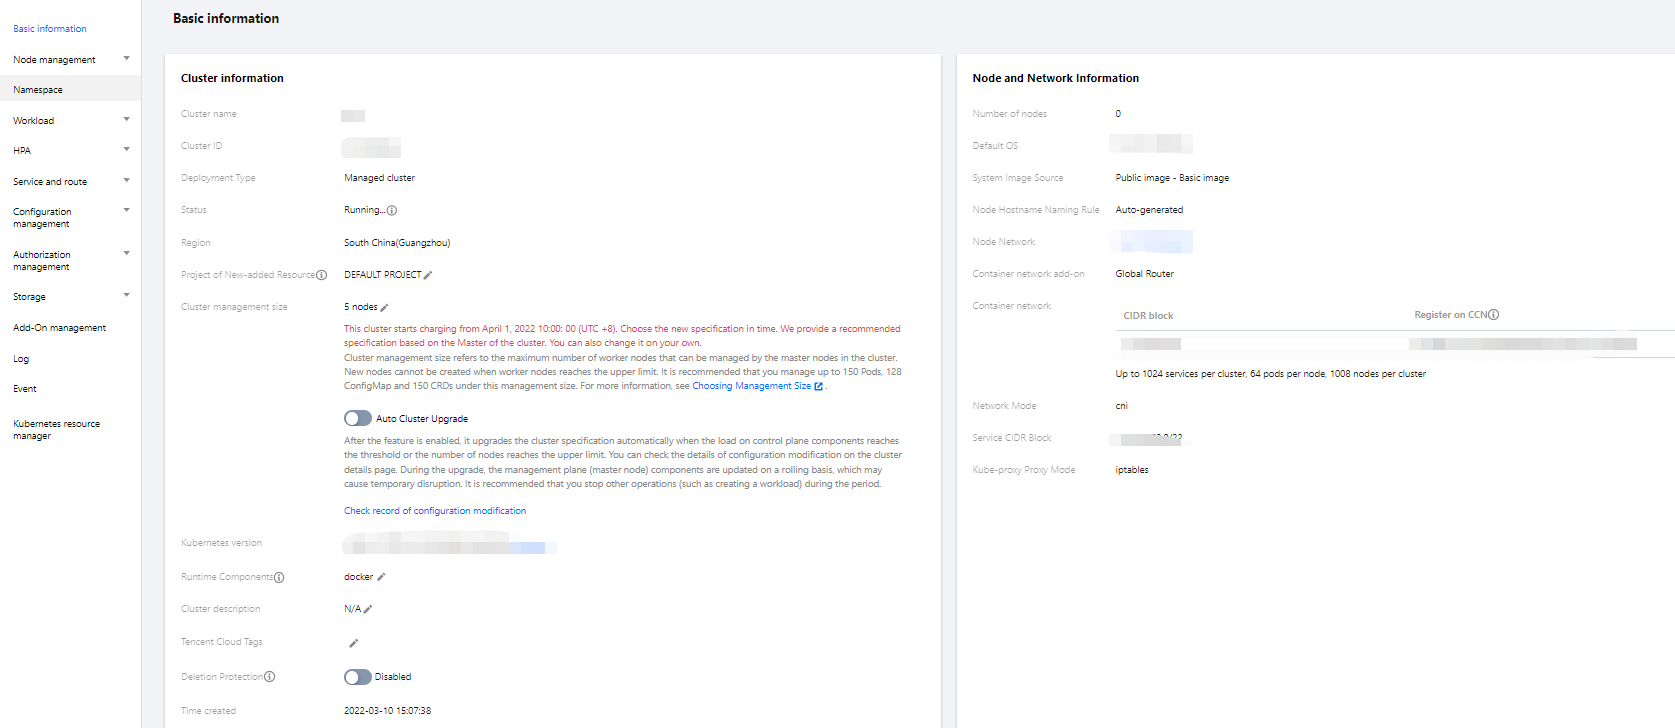
3. Click the Cluster Name to enter the Basic Info page to view the cluster configuration information as shown below:
4. (Optional) If you want to use K8s management tools such as kubectl and Lens, you need to follow two steps:
4.1 Enable public network access.
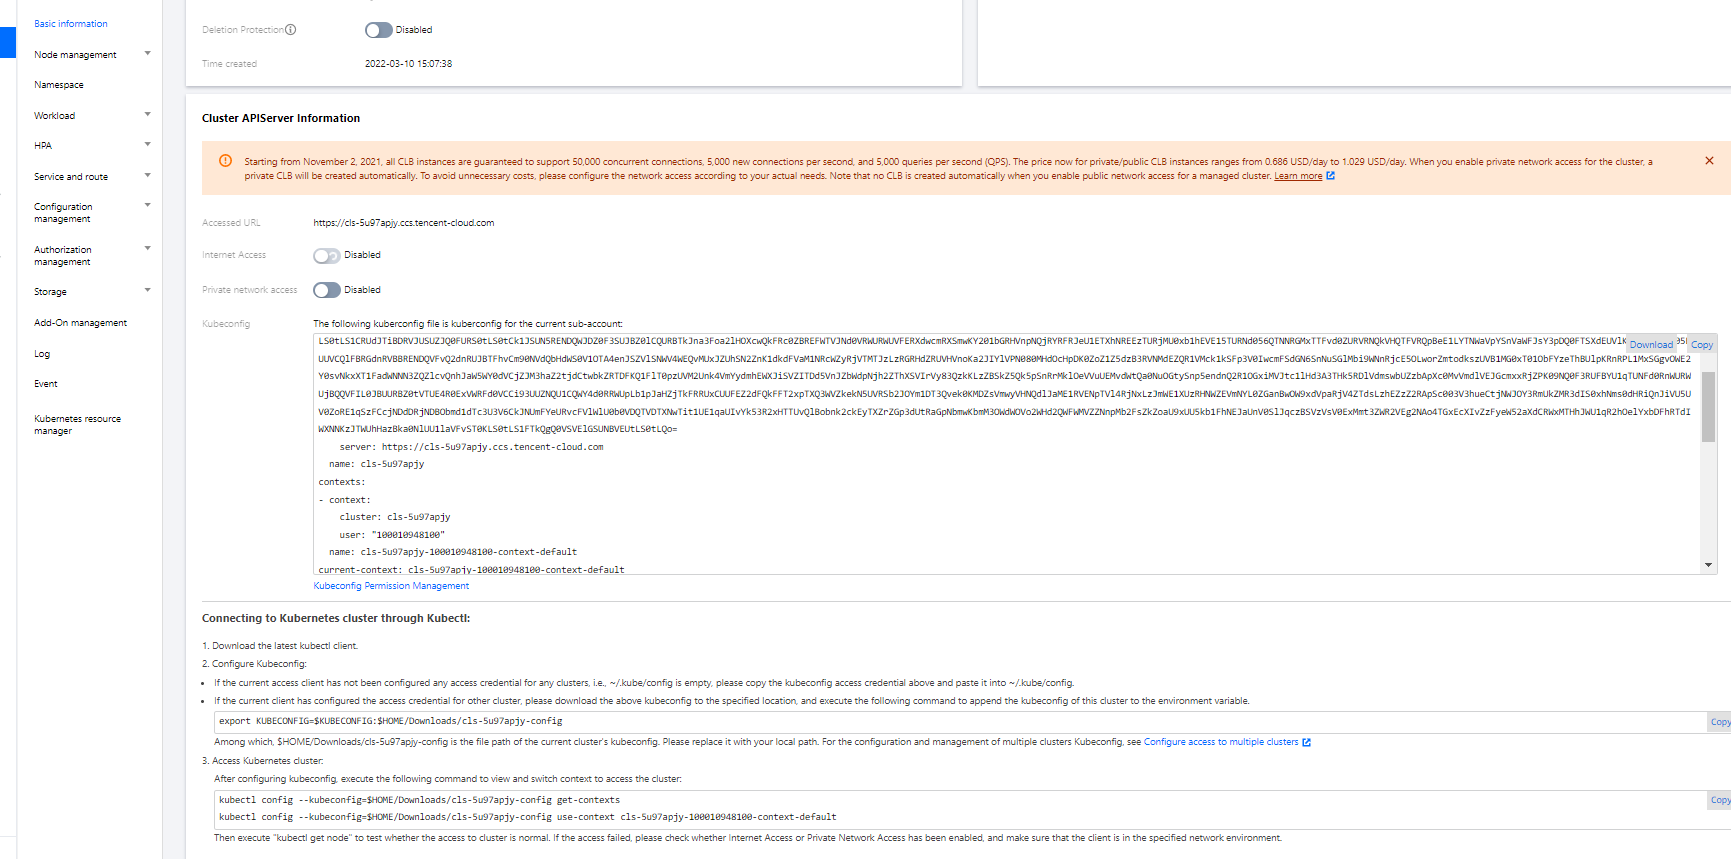
4.2 Store the API authentication token in the local config file under user home/.kube (choose another if the config file has content) to ensure that the default cluster can be accessed each time. If you choose not to store the token in the config file under .kube, see the Instructions on Connecting to Kubernetes Cluster via kubectl under Cluster API Server Info in the console as shown below:
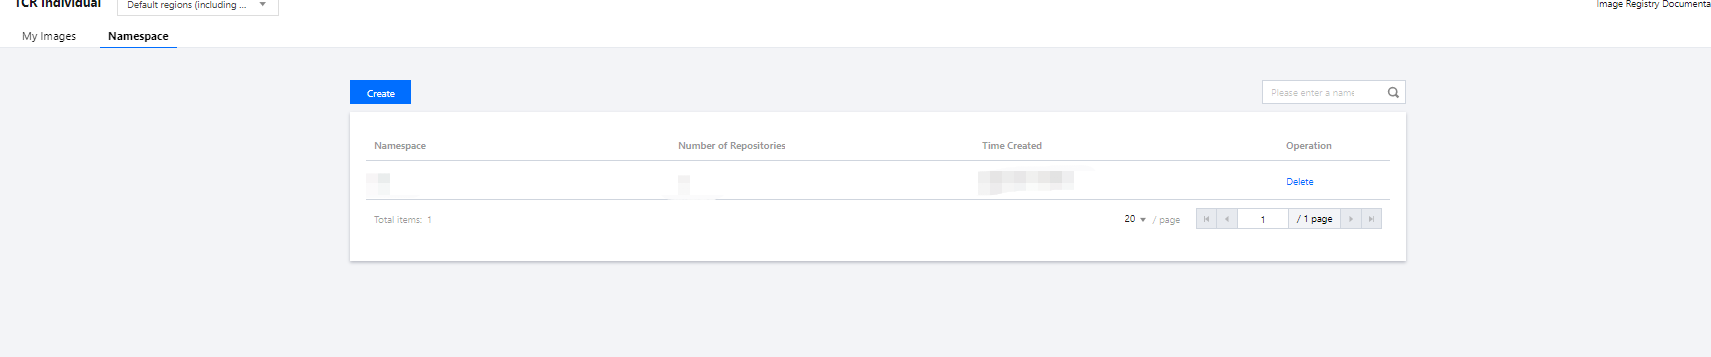
Creating namespace
A namespace is a logical environment in a Kubernetes cluster that allows you to divide teams or projects. You can create a namespace in the following three methods, and method 1 is recommended.
Method 1. Use the command line
Method 2. Use the console
Method 3. Use YAML
Run the following command to create a namespace:
kubectl create namespace qcbm
1. Log in to the TKE console and click the Cluster ID/Name to enter the cluster details page.
2. Click Namespace > Create to create a namespace named qcbm.
Run the following command to create a namespace with YAML:
shkubctl create –f namespace.yaml
Here, namespace.yaml is as shown below:
# Create the `qcbm` namespace.
apiVersion: v1
kind: Namespace
metadata:
name: qcbm
spec:
finalizers:
- kubernetes
Using ConfigMap to store configuration information
ConfigMap allows you to decouple the configuration from the running image, making the application more portable. The QCBM backend service needs to get the Nacos, MySQL, and Redis host and port information from the environment variables and store them by using ConfigMap.You can use ConfigMap to store configuration information in the following two methods:
Method 1. Use YAML
Method 2. Use the console
The following is the ConfigMap YAML for QCBM, where values of pure digits require double quotation marks, for example, MYSQL_PORT in the sample YAML below:
# Create a ConfigMap.
apiVersion: v1
kind: ConfigMap
metadata:
name: qcbm-env
namespace: qcbm
data:
NACOS_HOST: 10.0.1.9
MYSQL_HOST: 10.0.1.13
REDIS_HOST: 10.0.1.16
NACOS_PORT:"8848"
MYSQL_PORT:"3306"
REDIS_PORT:"6379"
SW_AGENT_COLLECTOR_BACKEND_SERVICES: xxx # TSW access address as described below
1. Log in to the TKE console and click the Cluster ID/Name to enter the cluster details page.
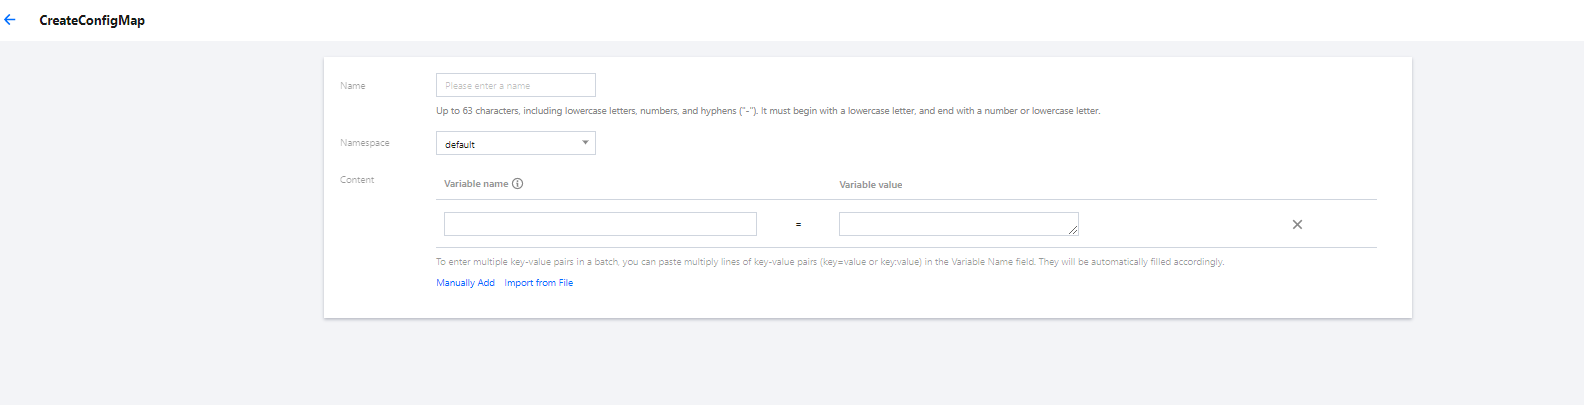
2. Click Configuration Management > ConfigMap > Create to create a ConfigMap named qcbm-env for storing the configuration. The qcbm namespace is as shown below:
Using Secret to store sensitive information
A Secret can be used to store sensitive information such as passwords, tokens, and keys to reduce exposure risks. QCBM uses it to store account and password information.You can use a Secret to store sensitive information in the following two methods:
Method 1. Use YAML
Method 2. Use the console
The following is the YAML for creating a Secret in QCBM, where the value of the Secret needs to be a Base64-encoded string.
# Create a Secret.
apiVersion: v1
kind: Secret
metadata:
name: qcbm-keys
namespace: qcbm
labels:
qcloud-app: qcbm-keys
data:
# `xxx` is the Base64-encoded string, which can be generated by using the `echo -n raw string | base64` shell command.
MYSQL_ACCOUNT: xxx
MYSQL_PASSWORD: xxx
REDIS_PASSWORD: xxx
SW_AGENT_AUTHENTICATION: xxx # TSW access token as described below
type: Opaque
1. Log in to the TKE console and click the Cluster ID/Name to enter the cluster details page.
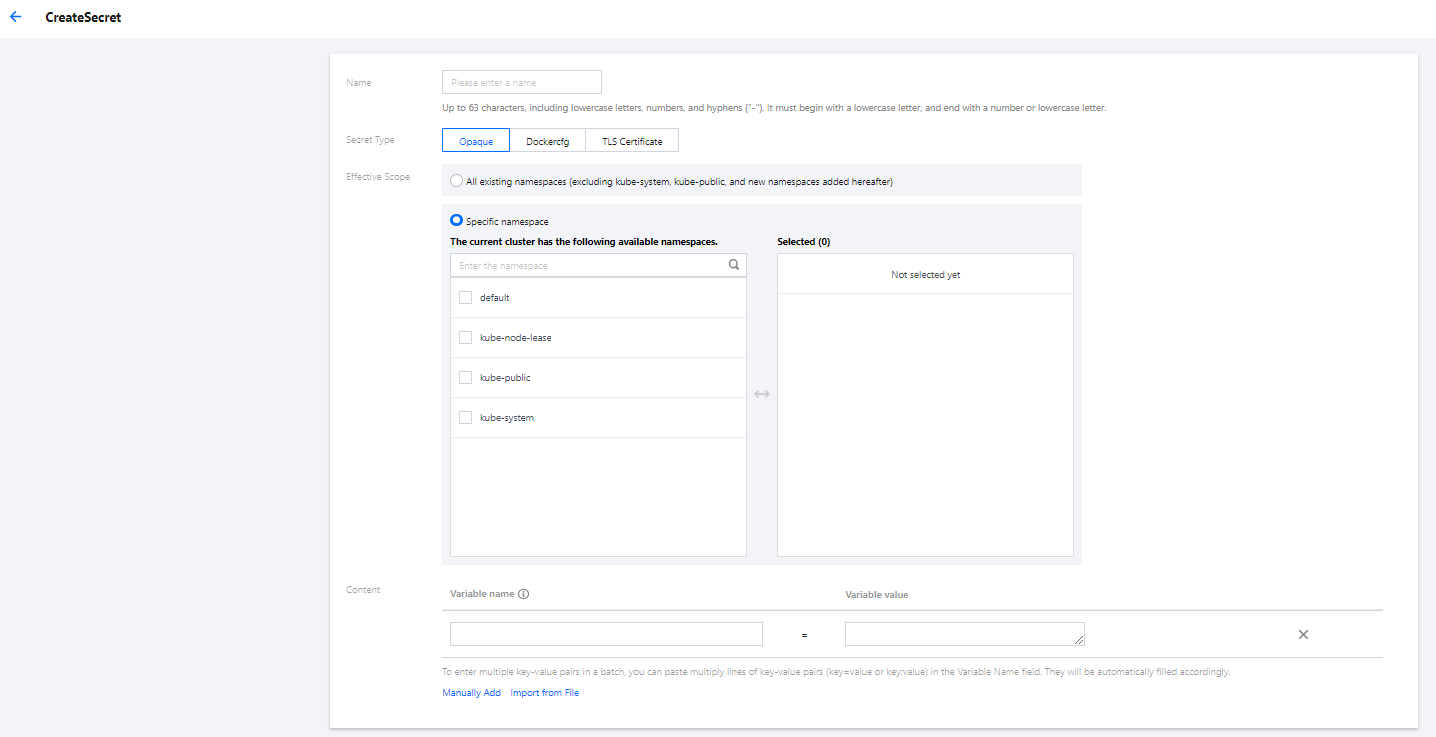
2. Click Configuration Management > Secret > Create to create a Secret named qcbm-keys as shown below:
Deploying Deployment
A Deployment declares the Pod template and controls the Pod running policy, which is suitable for deploying stateless applications. Both front and Dubbo services of QCBM are stateless applications and can use the Deployment.
YAML parameters for the user-service Deployment are as shown below:
Parameter
Description
replicas
Indicates the number of Pods to be created.
image
Image address
imagePullSecrets
The key to pull an image, which can be obtained from Cluster > Configuration Management > Secret. It is not required for public images.
env
Defines Pod environment variables and values.
The key-value defined in the ConfigMap can be referenced by using configMapKeyRef.
The key-value defined in the Secret can be referenced by using secretKeyRef.
ports
Specifies the port number of the container. It is 20880 for Dubbo applications.
A complete sample YAML file for the user-service Deployment is as follows:
-name: NACOS_HOST # IP address of the Dubbo service registry Nacos
valueFrom:
configMapKeyRef:
key: NACOS_HOST
name: qcbm-env
optional:false
-name: MYSQL_HOST # MySQL address
valueFrom:
configMapKeyRef:
key: MYSQL_HOST
name: qcbm-env
optional:false
-name: REDIS_HOST # Redis IP address
valueFrom:
configMapKeyRef:
key: REDIS_HOST
name: qcbm-env
optional:false
-name: MYSQL_ACCOUNT # MySQL account
valueFrom:
secretKeyRef:
key: MYSQL_ACCOUNT
name: qcbm-keys
optional:false
-name: MYSQL_PASSWORD # MySQL password
valueFrom:
secretKeyRef:
key: MYSQL_PASSWORD
name: qcbm-keys
optional:false
-name: REDIS_PASSWORD # Redis password
valueFrom:
secretKeyRef:
key: REDIS_PASSWORD
name: qcbm-keys
optional:false
-name: SW_AGENT_COLLECTOR_BACKEND_SERVICES # SkyWalking backend service address
valueFrom:
configMapKeyRef:
key: SW_AGENT_COLLECTOR_BACKEND_SERVICES
name: qcbm-env
optional:false
-name: SW_AGENT_AUTHENTICATION # Authentication token for SkyWalking Agent to connect to the backend service
valueFrom:
secretKeyRef:
key: SW_AGENT_AUTHENTICATION
name: qcbm-keys
optional:false
ports:
-containerPort:20880# Dubbo port name
protocol: TCP
imagePullSecrets:# The key to pull the image. It is not required as the images of all QCBM services are public.
-name: qcloudregistrykey
Deploying Service
You can specify the Service type with Kubernetes ServiceType, which defaults to ClusterIP. Valid values of ServiceType include the following:
LoadBalancer: Provides public network, VPC, and private network access.
NodePort: : Accesses services through the CVM IP and host port.
ClusterIP: Accesses services through the service name and port.
For a production system, the gateway needs to be accessible within the VPC or private network, and the front needs to provide access to the private and public networks. Therefore, you need to set ServiceType to LoadBalancer for the QCBM gateway and front.TKE enriches the LoadBalancer mode by configuring the Service through annotations.
If you use the service.kubernetes.io/qcloud-loadbalancer-internal-subnetid annotations, a private network CLB instance will be created when the Service is deployed. In general, we recommend you create the CLB instance in advance and use the service.kubernetes.io/loadbalance-id annotations in the deployment YAML to improve the efficiency.
The deployment YAML for the qcbm-front Service is as follows:
# Deploy the `qcbm-front` Service.
apiVersion: v1
kind: Service
metadata:
name: qcbm-front
namespace: qcbm
annotations:
# ID of the CLB instance of `Subnet-K8S`
service.kubernetes.io/loadbalance-id: lb-66pq34pk
spec:
externalTrafficPolicy: Cluster
ports:
-name: http
port:80
targetPort:80
protocol: TCP
selector:# Map the backend `qcbm-gateway` to the Service.
app: qcbm-front
version: v1
type: LoadBalancer
Deploying Ingress
An Ingress is a collection of rules that allow external access to the cluster Service, thereby eliminating the need to expose the Service. For QCBM projects, you need to create an Ingress for qcbm-front, which corresponds to the following YAML:
So far, you have completed the deployment of QCBM in TKE and can view the deployment result in the following steps:
1. Log in to the TKE console and click the Cluster ID/Name to enter the cluster details page.
2. Click Services and Routes > Ingress to enter the Ingress page, where you can see the created Ingress. You can access the QCBM page through the Ingress VIP.
Integrating CLS
Enabling container log collection
The container log collection feature is disabled by default and needs to be enabled as instructed below:
1. Log in to the TKE console and click Cluster Ops > Feature Management on the left sidebar.
2. At the top of the Feature Management page, select the region. On the right of the target cluster, click Set.
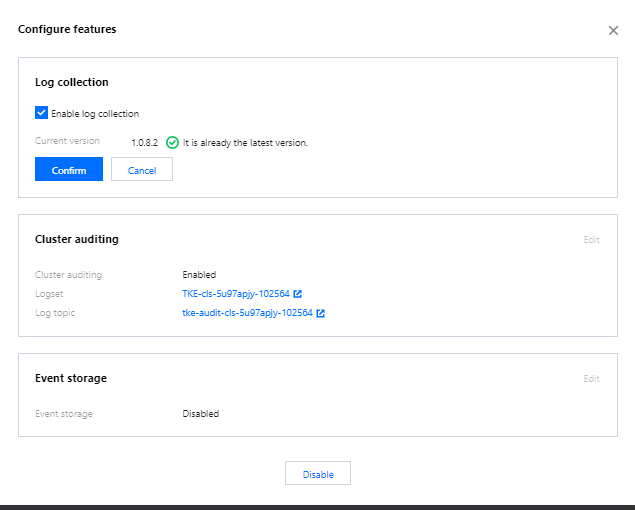
3. On the Configure Features page, click Edit for log collection and select Enable Log Collection as shown below:
4. Click OK.
Creating log topic and logset
QCBM is deployed in Nanjing region, so you need to select Nanjing region when creating logsets:
1. Log in to the CLS console and select Nanjing region on the Log Topic page.
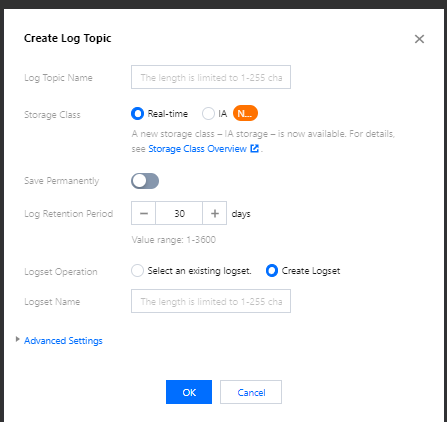
2. Click Create Log Topic and enter the relevant information in the pop-up window as prompted as shown below:
Log Topic Name: Enter qcbm.
Logset Operation: Select Create Logset.
Logset Name: Enter qcbm-logs.
3. Click OK.
Note:
As QCBM has multiple backend microservices, you can create a log topic for each microservice to facilitate log categorization.
A log topic is created for each QCBM service.
You need the log topic ID when creating log rules for containers.
Configuring log collection rule
You can configure container log collection rules in the console or with CRD.
Method 1. Use the console
Method 2. Use CRD
Log rules specify the location of a log in a container:
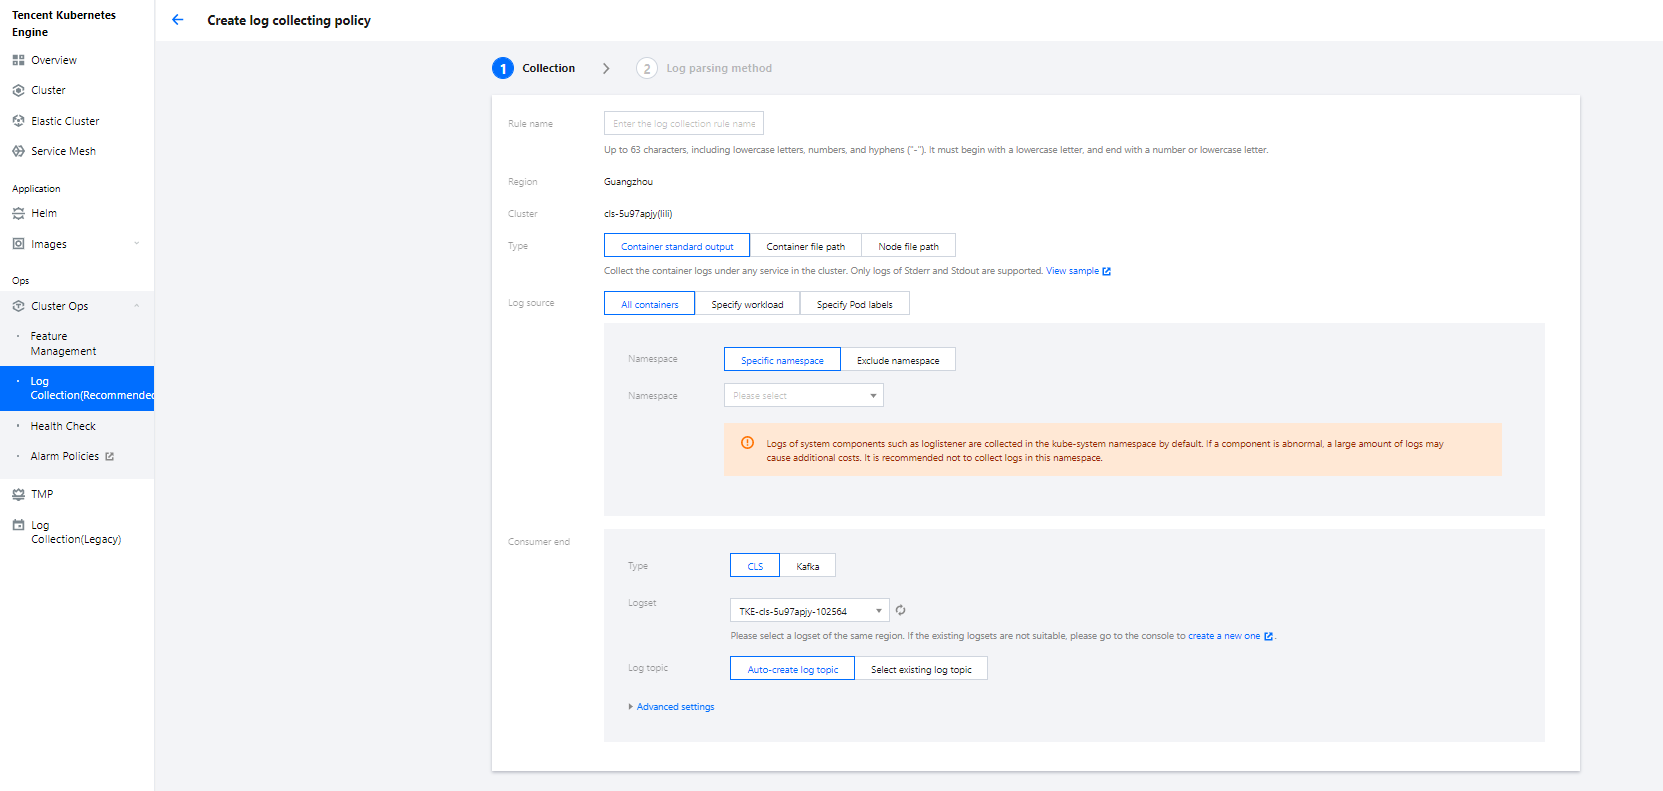
1. Log in to the TKE console and click Cluster Ops > Log Rules on the left sidebar.
2. On the Log Rules page, click Create to create a rule.
Log Source: Specify the location of a log in a container. All the QCBM logs are output to the /app/logs directory, so you can use the container file path to specify the workload and log location.
Consumer: Select the previously created logset and topic.
3. Click Next to enter the Log Parsing Method. Here, single-line text is used for QCBM. For more information on the log formats supported by CLS, see Full Text in a Single Line.
You can also configure log collection via Custom Resource Definition (CRD). QCBM uses a container file path for collection and single-line text. The following is a configuration YAML for user-service log collection. For more information on CRD collection configuration, see Using CRD to Configure Log Collection via YAML.
apiVersion: cls.cloud.tencent.com/v1
kind: LogConfig
metadata:
name: user-log-rule
spec:
clsDetail:
extractRule:{}
# Single-line text
logType: minimalist_log
# ID of the `user-log` log topic
topicId: 0c544491-03c9-4ed0-90c5-9bedc0973478
inputDetail:
# The container, workload, and log output directory where the logs are located
containerFile:
container: user-service
filePattern:'*.log'
logPath: /app/logs
namespace: qcbm
workload:
kind: deployment
name: user-service
# The log collection type is the container file path.
type: container_file
Viewing log
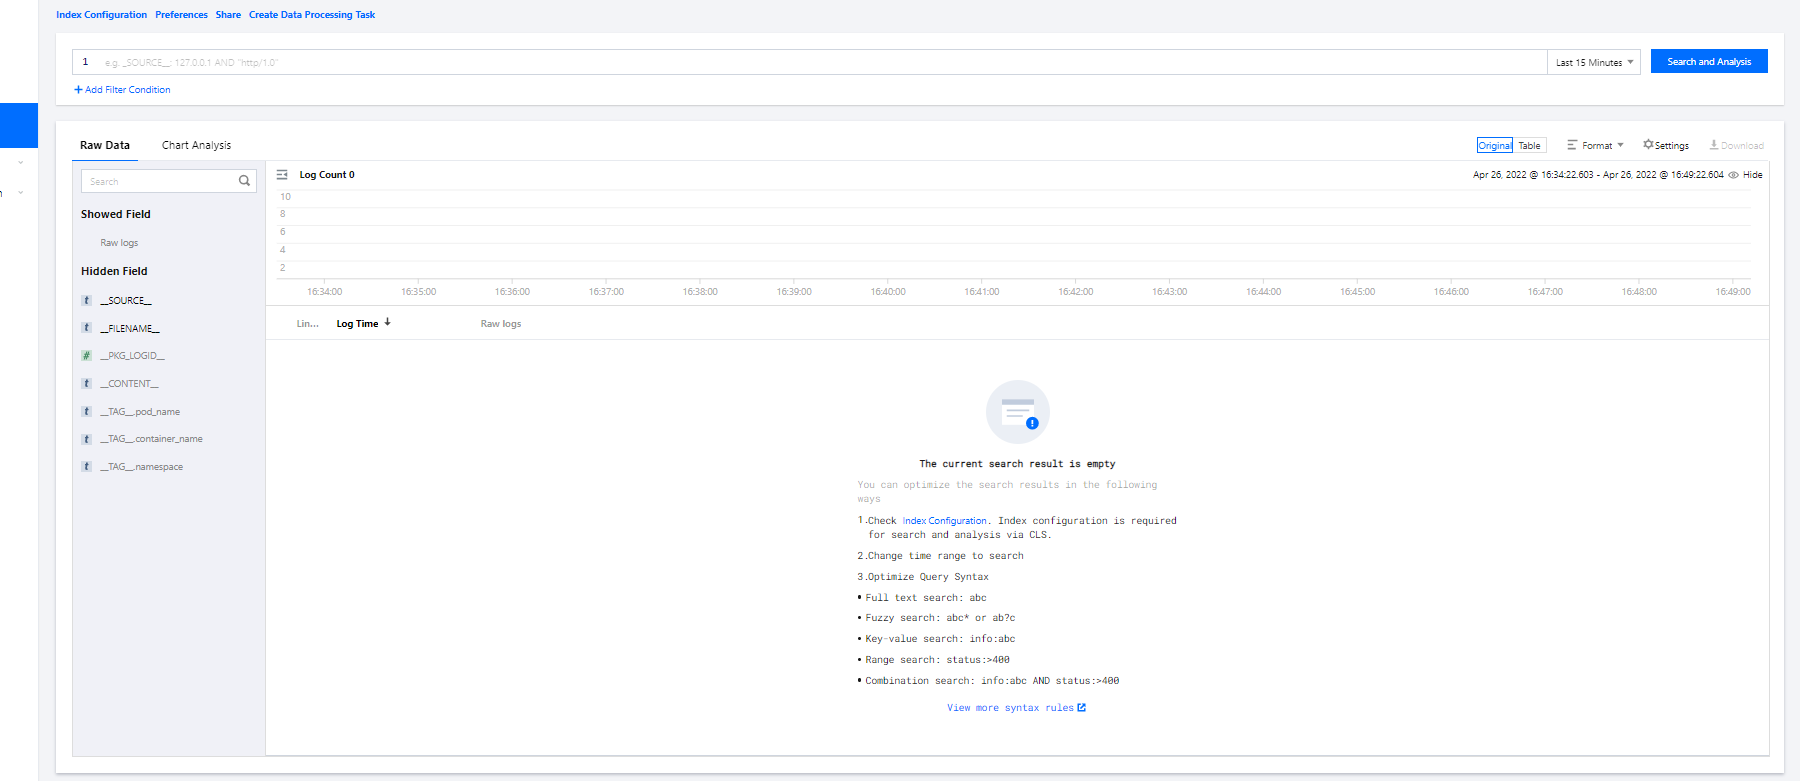
1. Log in to the CLS console and enter the Search and Analysis page.
2. On the Search and Analysis page, Create Index for the logs first and then click Search and Analysis to view the logs.
Note:
You can't find logs if no indexes are created.
Integrating TSW
TSW is currently in beta test and can be deployed in Guangzhou and Shanghai. Here, Shanghai is used as an example (QCBM is deployed in Nanjing).
Accessing TSW - getting access point information
1. Log in to the TSW console and click Service Observation > Service List on the left sidebar.
2. Click Access Service and select Java and the SkyWalking data collection method. The access method provides the Access Point and Token information.
Accessing TSW - application and container configuration
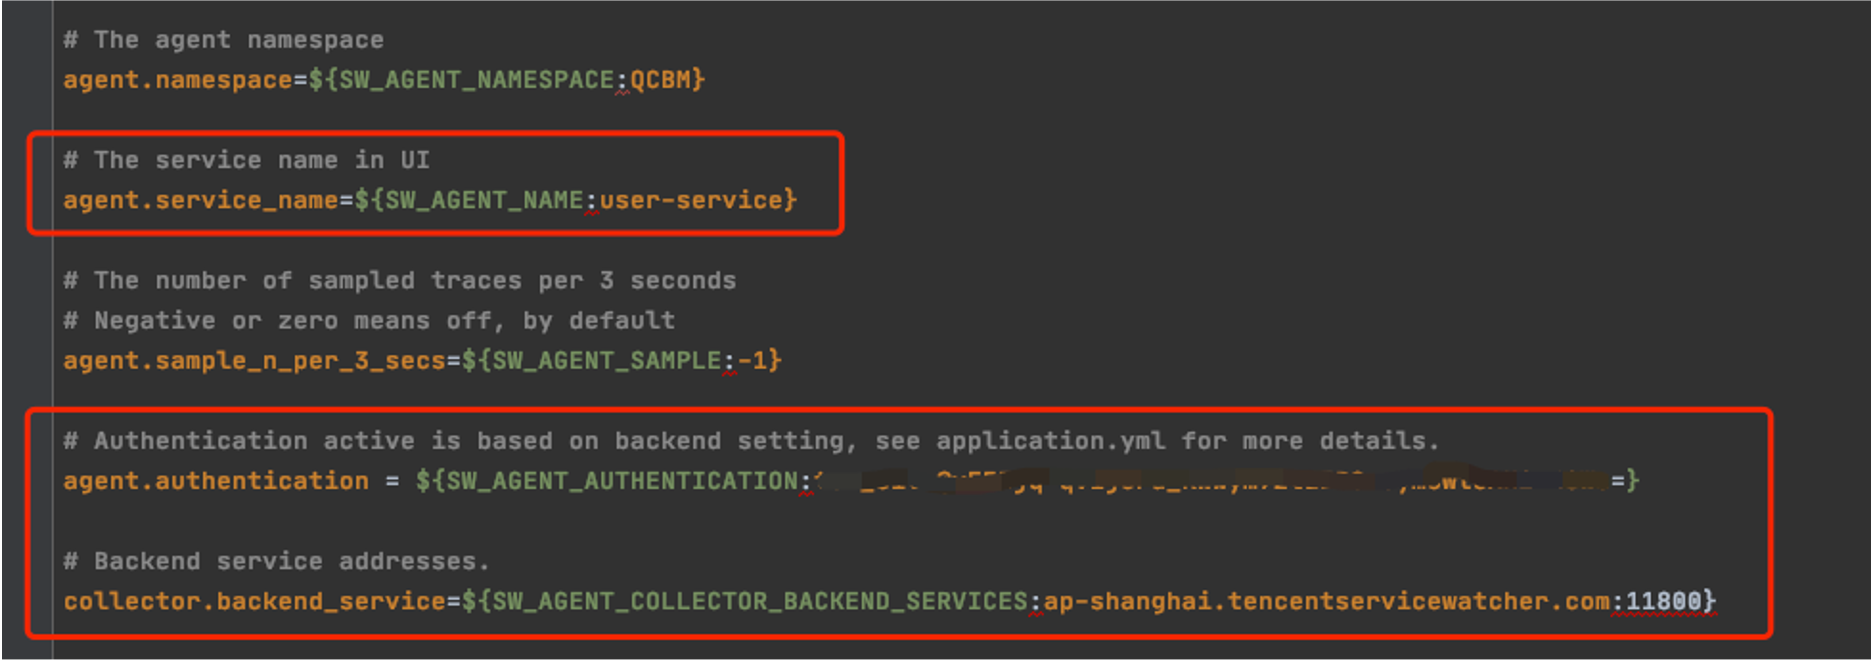
Enter the Access Point and Token of the TSW obtained in the previous step in collector.backend_service and agent.authentication respectively in the agent.config of SkyWalking. agent.service_name is the service name, and agent.namespace can be used to group microservices under the same domain. user-service configuration is as shown below:
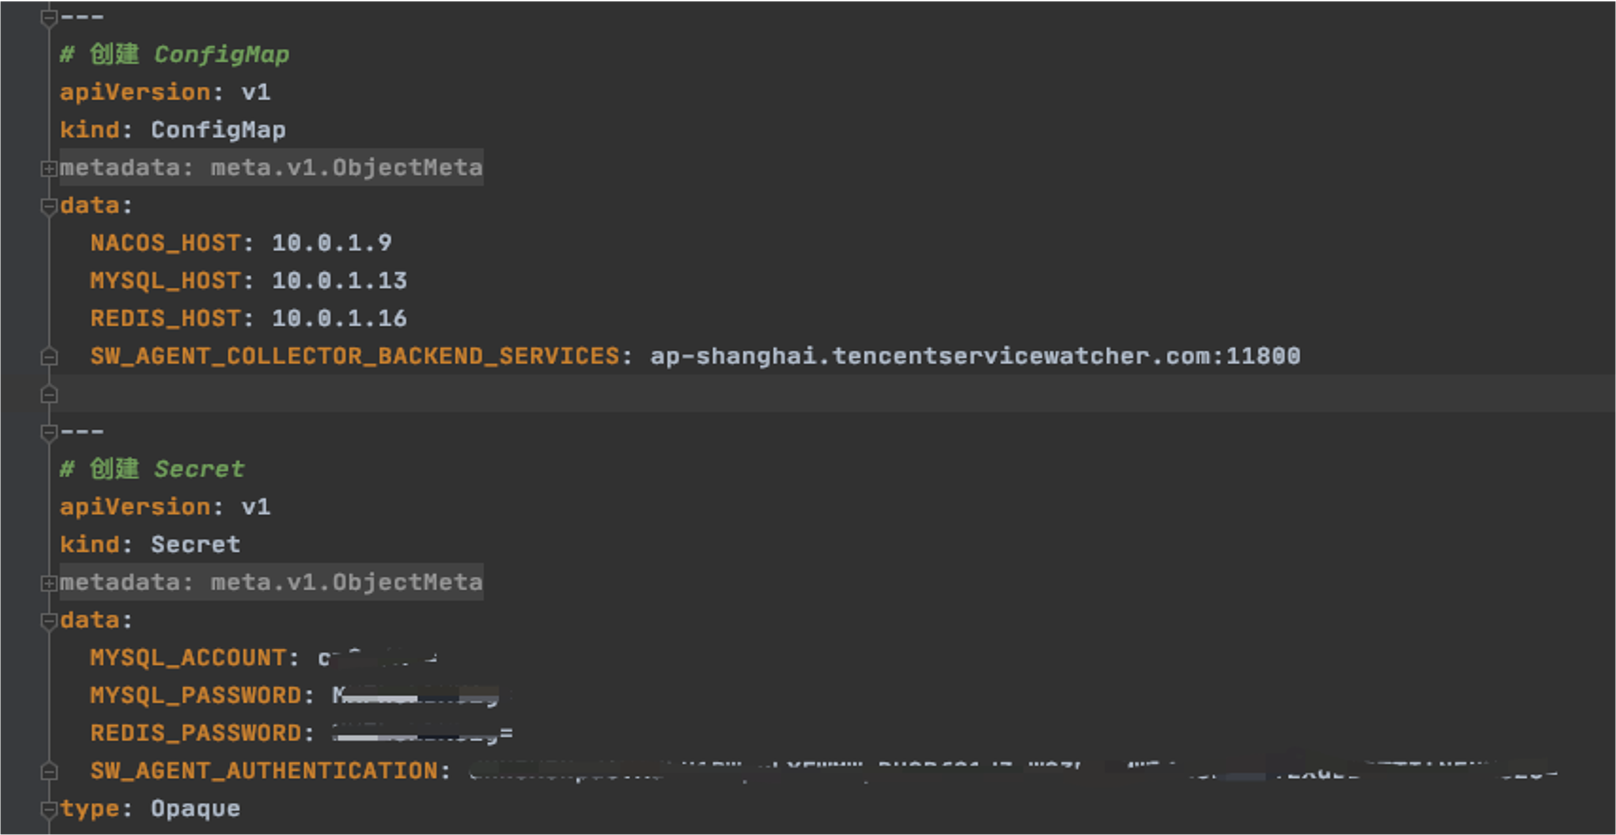
You can also configure SkyWalking Agent by using environment variables. QCBM uses the ConfigMap and Secret to configure environment variables:
Use the ConfigMap to configure SW_AGENT_COLLECTOR_BACKEND_SERVICES.
Use the Secret to configure SW_AGENT_AUTHENTICATION.
As shown below:
At this point, you have completed TSW access. After starting the container service, you can view the call chain, service topology, and SQL analysis in the TSW console.
Using TSW
Viewing call exception through service API or call chain
1. Log in to the TSW console and click Service Observation > API Observation on the left sidebar.
2. On the API Observation page, you can view the call status of all APIs under a service, including the number of requests, success rate, error rate, response time, and other metrics.
Using TSW to analyze add-on (such as SQL and caching) call
1. Log in to the TSW console and click Add-on Call Observation > SQL Call on the left sidebar.
2. On the SQL Call page, you can view the call details of SQL, NoSQL, MQ, and other add-ons. For example, you can quickly locate frequent SQL requests and slow queries in your application with the number and durations of SQL requests.
Viewing service topology
1. Log in to the TSW console and click Chain Tracing > Distributed Dependency Topology on the left sidebar.
2. On the Distributed Dependency Topology page, you can view the completed service dependencies as well as information such as the number of calls and average latency.