- Getting Started
- Product Introduction
- Purchase Guide
- API Documentation
- FAQs
- Service Level Agreement
- Contact Us
- Glossary
- Getting Started
- Product Introduction
- Purchase Guide
- API Documentation
- FAQs
- Service Level Agreement
- Contact Us
- Glossary
Configure HTTP Header
Last updated: 2021-08-05 12:21:37
This document is currently invalid. Please refer to the documentation page of the product.
Note:If your application has been migrated to the CDN console, you can go to the console for operation by referring to Content Delivery Network.
An HTTP message generally contains:
- Request message sent from client to server.
- Response message sent from server to client.
These messages all consist of a beginning line, one or multiple headers, a blank line indicating the end of headers, and an optional message body.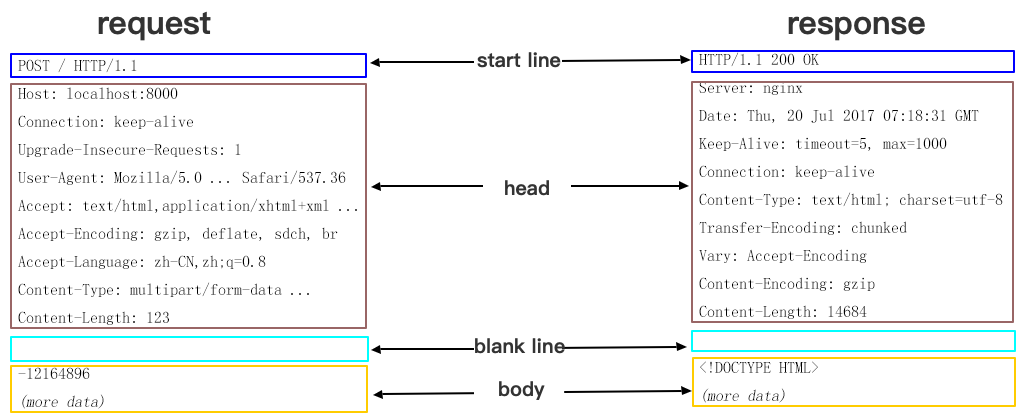
HTTP headers divide into common header, request header, response header, and entity header. Each header consists of a domain name, colon (":"), and domain value, such as Connection:keep-alive.
If you use the HTTP header configuration feature provided by ECDN, when an end user requests a business resource, you can add a custom header in the returned response message to implement cross-origin access.
Note:
- As the HTTP header configuration is for a specified domain name, once the configuration takes effect, the configured header will be added to the response messages of user requests for any resource under this domain name.
- HTTP header configuration affects only response of the client (such as browser) rather than ECDN node's caching behaviors.
Configuration Description
ECDN allows you to configure the following headers:
- Content-Disposition: it activates download in the browser and sets the default filename of the downloaded file.
- Content-Language: it specifies the language used in the client (such as browser) response for the resource.
- Access-Control-Allow-Origin: it specifies the sources of cross-origin requests allowed to access the resource.
- Access-Control-Allow-Methods: it specifies the allowed methods of cross-origin requests.
- Access-Control-Max-Age: it specifies the validity period for caching the returned result of preflight request for a particular resource when a cross-origin request is initiated.
- Access-Control-Expose-Headers: it specifies the headers visible to the client when a cross-origin request is initiated.
General configuration
Content-Disposition
Content-Disposition is used to activate download in the browser and set the default filename of the downloaded resource. When the server sends a file to the client browser, if it is in a type supported by the browser, such as .txt or .jpg, it will be directly opened in the browser by default. If you want to ask the user to save the file, you can configure the Content-Disposition field to override the browser's default behavior. The common configuration is Content-Disposition:attachment;filename=FileName.txt
Content-Language
Content-Language specifies the code of the language used by the webpage. Common configurations are as follows:
Content-Language: zh-CNContent-Language: en-US
Cross-Origin access configuration
Cross-origin access refers to a scenario where a resource under a domain name, such as www.abc.com, initiates a request to another resource under another domain name, such as www.def.com. As the resource domain names are different, cross-origin access will occur. Using different protocols or ports can cause cross-origin access. You need to add configuration related to cross-origin access in the response header to make the first resource get the desired data.
Access-Control-Allow-Origin
Access-Control-Allow-Origin is used to solve the problem of cross-origin permissions of resources. Its value specifies the origins that can access the resource. You can also set the wildcard \* to allow all origins to access the resource. Common configurations are as follows:
Access-Control-Allow-Origin: *Access-Control-Allow-Origin: http://www.test.com
Pay attention to the following limits when configuring Access-Control-Allow-Origin:
- Do not use wildcard domain names, e.g.,
*.qq.com. - Only configure it as
\*or specify a URI. - When configuring a specified domain name, add the "http://" or "https://" prefix.
Access-Control-Allow-Methods
Access-Control-Allow-Methods is used to specify the HTTP request methods allowed for cross-origin access. Multiple methods can be set as follows:Access-Control-Allow-Methods: POST, GET, OPTIONS
Access-Control-Max-Age
Access-Control-Max-Age specifies the validity period of a preflight request.
For a non-simple cross-origin request, before the formal communication, an HTTP query request called "preflight request" needs to be made to check whether the cross-origin request is secure and acceptable. The following requests are considered as non-simple cross-origin requests:
- The request is initiated in a method other than
GET,HEAD, andPOSTor is initiated by usingPOSTwith a data type other thanapplication/x-www-form-urlencoded,multipart/form-data, andtext/plain, such asapplication/xmlortext/xml. - A custom request header is used.
Access-Control-Max-Age is measured in seconds. Here, the configuration sample Access-Control-Max-Age: 1728000 indicates that no more preflight requests will be sent for the cross-domain access to this resource within 1,728,000 seconds (20 days).
Access-Control-Expose-Headers
Access-Control-Expose-Headers specifies which headers can be accessed when a cross-region request is initiated. By default, the following six types of headers can be exposed to the client:
- Cache-Control
- Content-Language
- Content-Type
- Expires
- Last-Modified
- Pragma
If you want the client to access other header information, you can set as follows (separate multiple headers with ;):Access-Control-Expose-Headers: Content-Length, QCloud-DSA-MyCustom-HeaderY
Then, the server will allow requests to contain the Content-Length and QCloud-DSA-MyCustom-HeaderY fields.
Custom header
ECDN allows you to add custom headers as needed.
The following fields cannot be added currently:
Date
Expires
Content-Type
Content-Encoding
Content-Length
Transfer-Encoding
Cache-Control
If-Modified-Since
Last-Modified
Connection
Content-Range
ETag
Accept-Ranges
Age
Authentication-Info
Proxy-Authenticate
Retry-After
Set-Cookie
Vary
WWW-Authenticate
Content-Location
Content-MD5
Content-Range
Meter
Allow
Error
Configuration process
- Log in to the ECDN Console and click Domain Management on the left sidebar. On the management page, click Manage on the right of the target domain name to enter the domain management page.
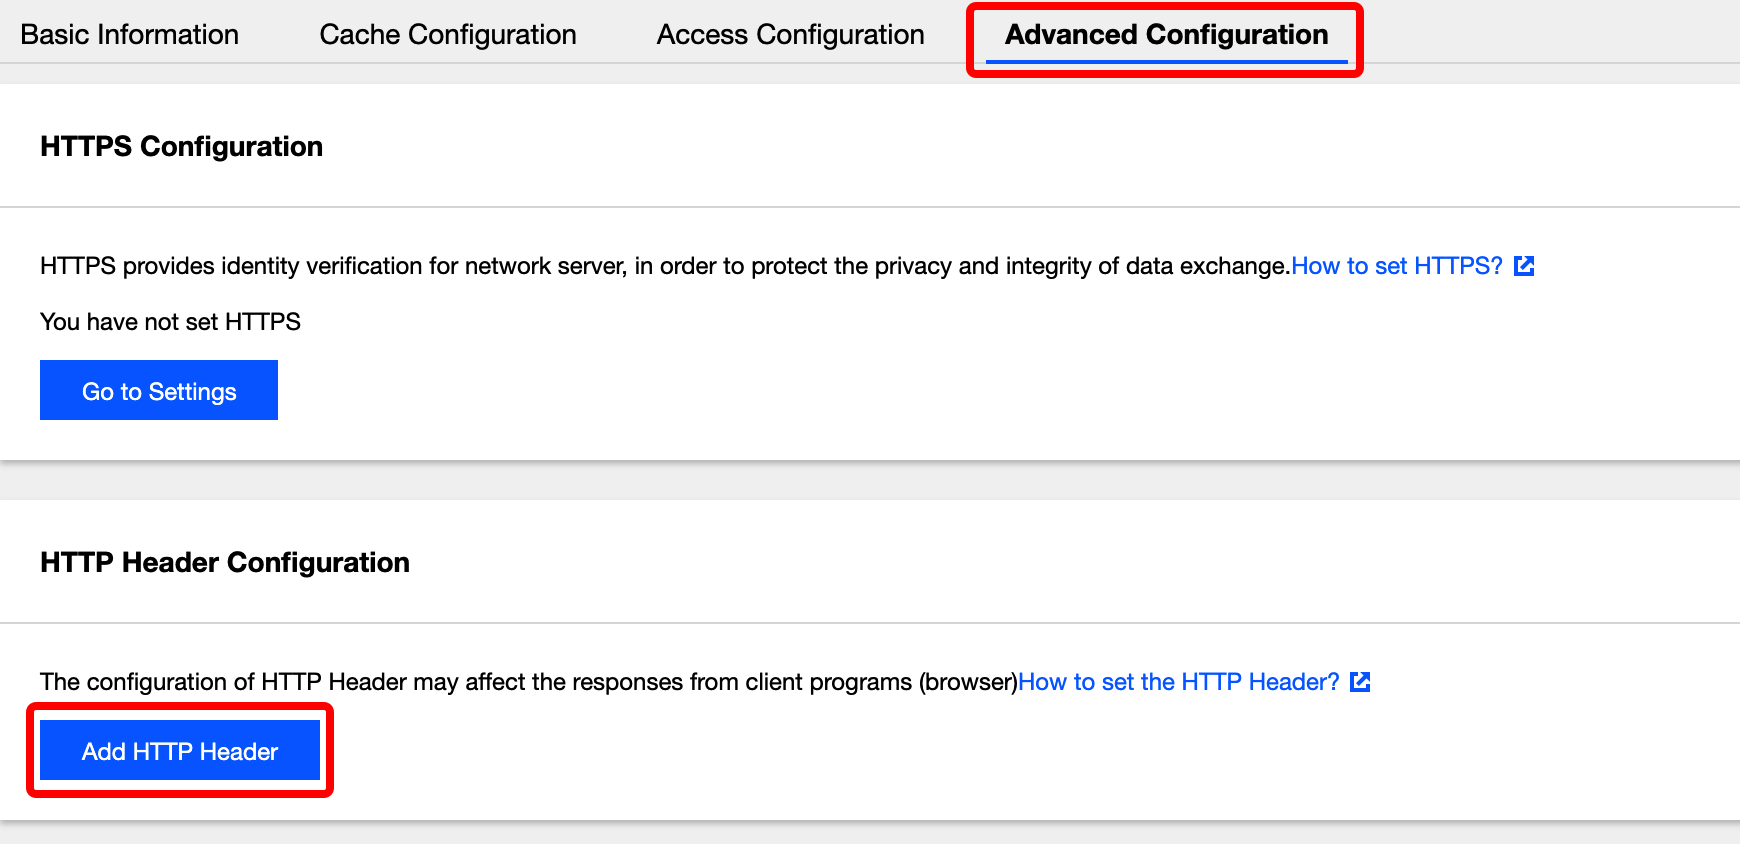
- Click Advanced Configuration and click Add HTTP Header in the HTTP Header Configuration module.
- In the pop-up window, select the HTTP header to be added and enter the corresponding value. You can click Add Parameter to add more header fields. Click OK to submit the settings.

- The configuration will take effect in about 5 minutes. In the table at the bottom, you can view the added HTTP headers. You can click Modify or Delete on the right of a header to perform the corresponding operation as needed.
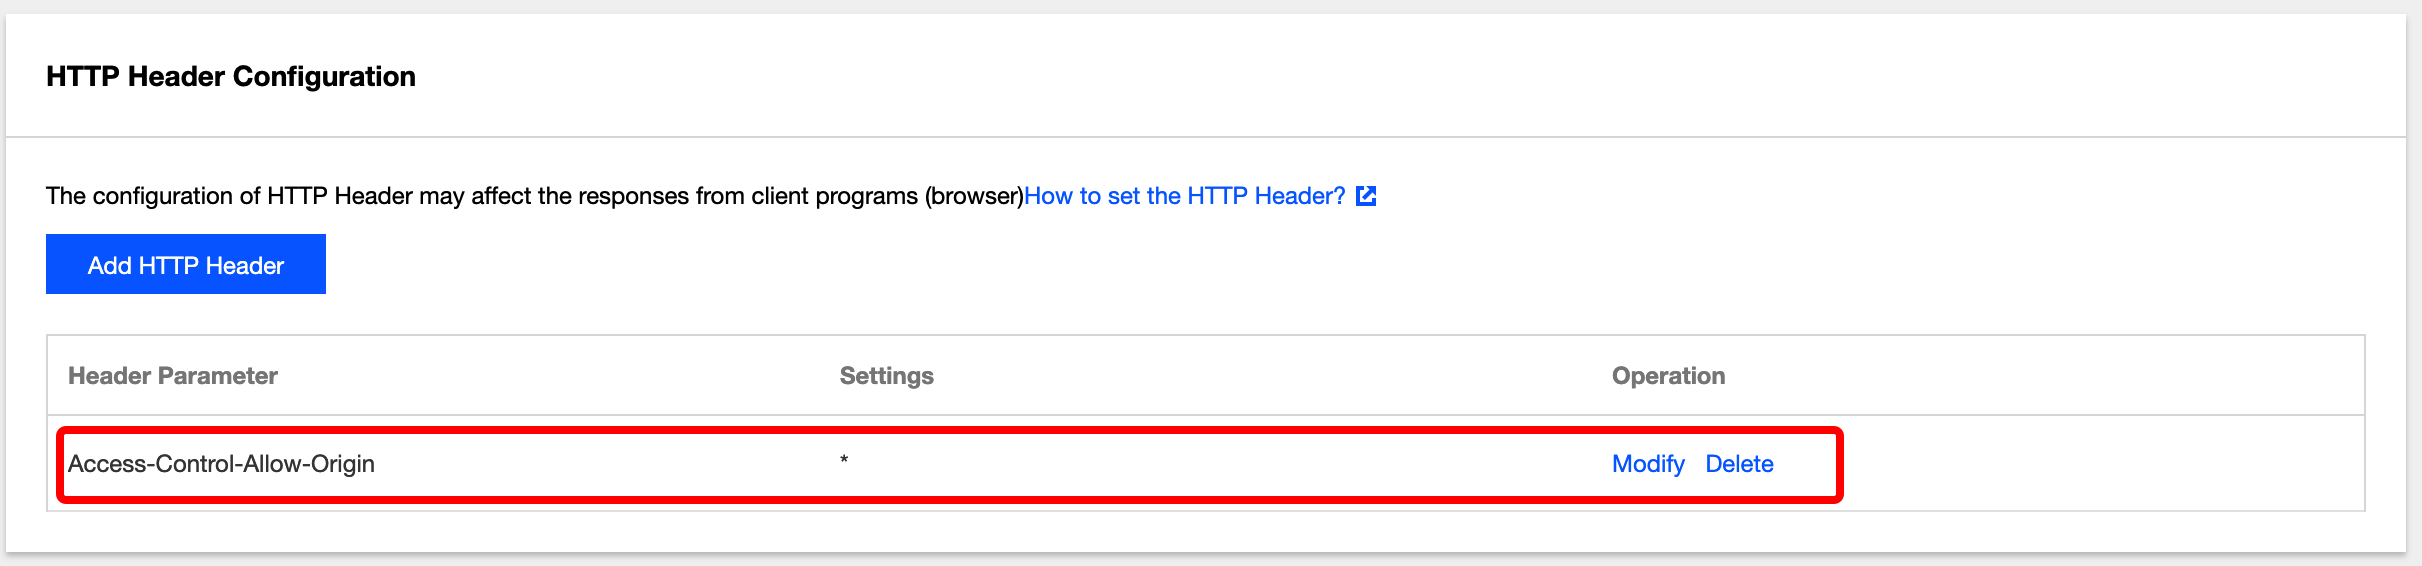
- You can click Add HTTP Header to add more HTTP headers, each of which can be added only once.

 Yes
Yes
 No
No
Was this page helpful?