Welcome to Tencent Cloud Software Development Kit (SDK) 3.0, a companion tool for the TencentCloud API 3.0 platform. SDK 3.0 is unified and features the same SDK usage, API call methods, error codes, and returned packet formats for different programming languages.
This document describes how to use, debug, and connect to TencentCloud APIs with the SDK for C++ 3.0 as an example.
This version currently supports various Tencent Cloud products such as CVM, VPC, and CBS and will support more products in the future.
Dependent Environment
The compiler for C++ v11 or above is required, i.e., GCC v4.8 or above. Currently, only the Linux installation environment is supported, while Windows is not.
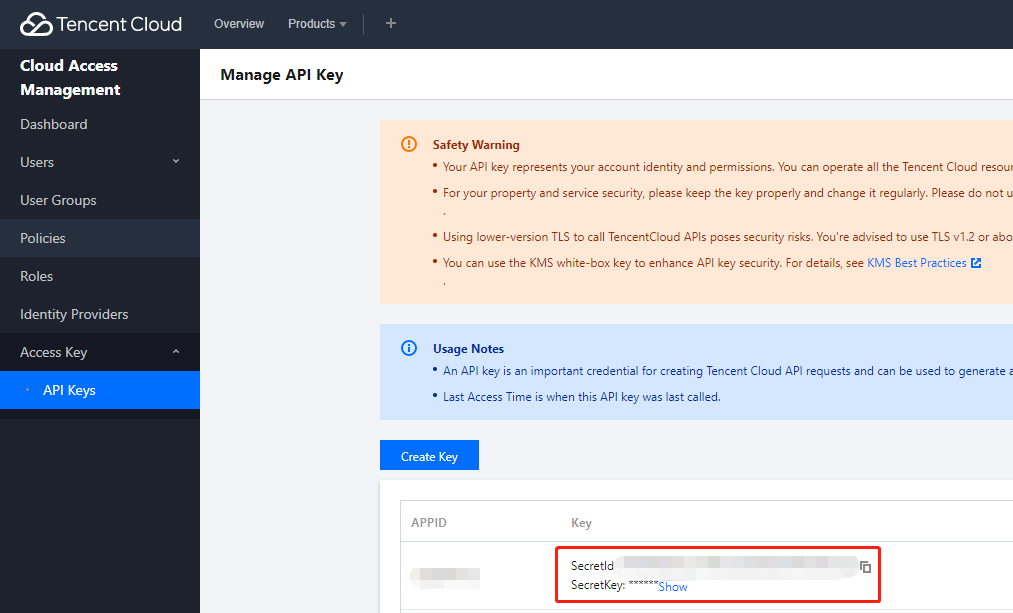
Get the security credential, which consists of SecretId and SecretKey. SecretId is used to identify the API requester, while SecretKey is a key used for signature string encryption and authentication by the server. You can get them on the API Key Management page as shown below:
Note:
Your security credential represents your account identity and granted permissions, which is equivalent to your login password. Do not disclose it to others.
Get the calling address (endpoint), which is generally in the format of *.tencentcloudapi.com and varies by product. For example, the endpoint of CVM is cvm.tencentcloudapi.com. For specific endpoints, please see the API documentation of the corresponding product .
Install CMake 3.0 or above. Below is the sample code for installation:
ubuntu
sudoapt-getinstall cmake
centos
yum install cmake3
Install the libcurl dependency library. We recommend you install the latest version of libcurl; otherwise, there may be a libcurl memory leak bug.
ubuntu
sudoapt-getinstall libcurl4-openssl-dev
centos
yum install libcurl-devel
Install the openssl dependency library. Below is the sample code for installation:
ubuntu
sudoapt-getinstall libssl-dev
centos
yum install openssl-devel
Install the libuuid dependency library. Below is the sample code for installation:
2. Enter the SDK and create necessary build files. Here, path/to/ represents the actual path of the tencentcloud-sdk-cpp package.
cd<path/to/tencentcloud-sdk-cpp>
mkdir sdk_build
cd sdk_build
cmake ..
make
sudomakeinstall
Using SDK
Note:
The demo cannot be run directly. You need to replace the key and other information with your real and usable information. It is better to configure them in environment variables to avoid exposing them in the code.
The following describes how to call the DescribeInstances API of CVM.
using namespace TencentCloud::Cvm::V20170312::Model;
using namespace std;
intmain()
{
TencentCloud::InitAPI();
// use the sdk
// Instantiate an authentication object. Pass in `secretId` and `secretKey` of your Tencent Cloud account as the input parameters and keep them confidential
string secretId ="<your secret id>";
string secretKey ="<your secret key>";
Credential cred =Credential(secretId, secretKey);
// (Optional) Instantiate an HTTP option
HttpProfile httpProfile =HttpProfile();
httpProfile.SetKeepAlive(true);// Specify whether to enable the keepalive feature. The default value is `False`
httpProfile.SetEndpoint("cvm.ap-guangzhou.tencentcloudapi.com");// Specify the endpoint. If you do not specify the endpoint, nearby access is enabled by default
httpProfile.SetReqTimeout(30);// Specify the request timeout value in seconds. The default value is 60s
httpProfile.SetConnectTimeout(30);// Specify the response timeout value in seconds. The default value is 60s
If the system returns an error indicating that a dynamic library is not found, you can specify the path to the dynamic library. For example, if the libtencentcloud-sdk-cpp-core.so library is installed in /usr/local/lib, then add the following line:
For more samples, please see the example directory.
Unit Testing
Creating dependent library for gtest
The sample installation code is as follows:
git clone https://github.com/google/googletest
cd googletest
cmake CMakeLists.txt
make
Copy the generated libgtest.a and libgtest_main.a static libraries and the header file of gtest to the system directory.
Configuring environment variables
ENV_SecretId: secret ID
ENV_SecretKey: secret Key
Testing
Run the following script:
sh function_test.sh
Relevant Configuration
Proxy
If you use the SDK to call an API in a proxy environment, you need to set the system environment variable https_proxy (as shown in the sample code); otherwise, it may not be called normally, and a connection timeout exception will be thrown.