Implementing Batch Automated Video Editing with SCF and FFmpeg
Download
Focus Mode
Font Size
Last updated: 2024-12-02 17:40:42
Overview
Common video editing tools such as Premiere and AE can implement complex editing effects and are widely used in promotional and advertising video production. However, in the following scenarios, traditional editing tools and template-based video processing software programs cannot meet the requirements for batch, automated, and custom video editing:
A school expects to output the highlight videos of all students during online class with the school logo and slogan added immediately after the students finish the classes and allow them to quickly share such videos. Suppose there are 10,000 students and one unique video should be produced for each student, then the school needs to complete the batch editing of 10,000 different videos automatically.
Profile photo-based videos need to be generated for users to attract them to a marketing campaign. As each user has a different profile photo, the generated videos are also different. There may be tens of thousands of users; therefore, automatic editing is desired.
An MCN company wants to generate unified promotional videos for 100 hosts. It may be acceptable to designate a person to edit 100 videos. However, it will be very troublesome if 100 videos need to be edited every week. Therefore, automated, batch, and custom editing is desired.
In these video editing scenarios, resource usage is concentrated within certain hours, and the volume of computed data is high. In this case, dedicated high-end servers may have a low utilization, while low-end servers' computing power cannot meet the requirements. By contrast, SCF perfectly satisfies such requirements with its pay-as-you-go billing mode and high-performance computing power. It not only achieves a 100% utilization but also provides high computing power on demand. In addition, it delivers a higher flexibility by supporting multiple programming environments for developers with different development habits.
Prerequisites
All video editing features mentioned in this document are implemented by FFmpeg.
How to Use FFmpeg
FFmpeg is an open-source video processing tool. It supports video editing, transcoding, splicing, audio processing, text adding, and live stream push/pull. You can use different FFmpeg commands to program and implement different video editing features. You can also combine and orchestrate them to execute various batch automated tasks.
Below are common video editing scenarios:
1. Video transcoding
2. Video clipping
3. Text adding to video
4. Image adding to video
5. Video splicing
6. Audio adding to video
7. Video transition
8. Video special effect
9. Video playback speed adjusting
FFmpeg commands
Some FFmpeg commands are as described below. You can install FFmpeg locally first and then perform tests.
// Convert an .mov video to an .mp4 video
ffmpeg -i input.mov output.mp4
// Change the frame rate of the original video to 24 FPS
ffmpeg -i input.mp4 -r 24-an output.mp4
// Convert an .mp4 video to a video stream suitable for live streaming
// Add text such as subtitles and title to the video
// `fontfile` is the path of the font to be used, and `text` is the text to be added
// `fontcolor` is the font color, `fontsize` is the font size, and `box` is the text box
// `box=1` indicates to enable the text box, while `0` indicates to disable it. `boxcolor` is the box color. `black@0.5` indicates black with 50% transparency. `boxborderw` is the width between the box and the text
// `x` and `y` indicate the text position. They can be numbers or expressions. For more information, visit the FFmpeg website
// Add an image such as logo, profile photo, and sticker to the video. `filter_complex` indicates a complex filter, `overlay` indicates the X and Y coordinates of the image, and `enable` indicates the image display period (from second 0 to second 20)
// Add audio to the video. `stream_loop` indicates whether to loop the audio (-1: infinite loop; 0: no loop). `shortest` indicates to complete encoding when the shortest .mp3 input stream ends.
raise KeyError("Failed to process the video. Error:", child)
Using FFmpeg in SCF
1. Log in to the SCF console and select Function Service on the left sidebar.
2. At the top of the Function Service page, select a region and click Create to enter the function creation page.
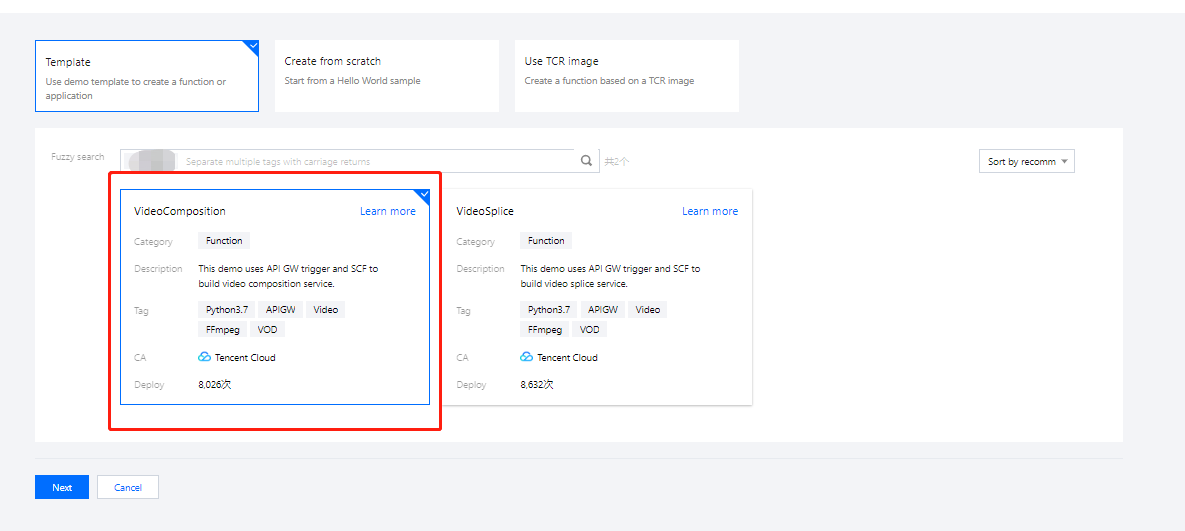
3. Set the following parameter information and click Next as shown below:
Creation method: Select Template.
Fuzzy search: Enter video editing and search.
Click Learn More in the template to view relevant information in the Template Details pop-up window, which can be downloaded. You can click the GitHub address to get the template source code, where you can view the API call parameters and use methods.
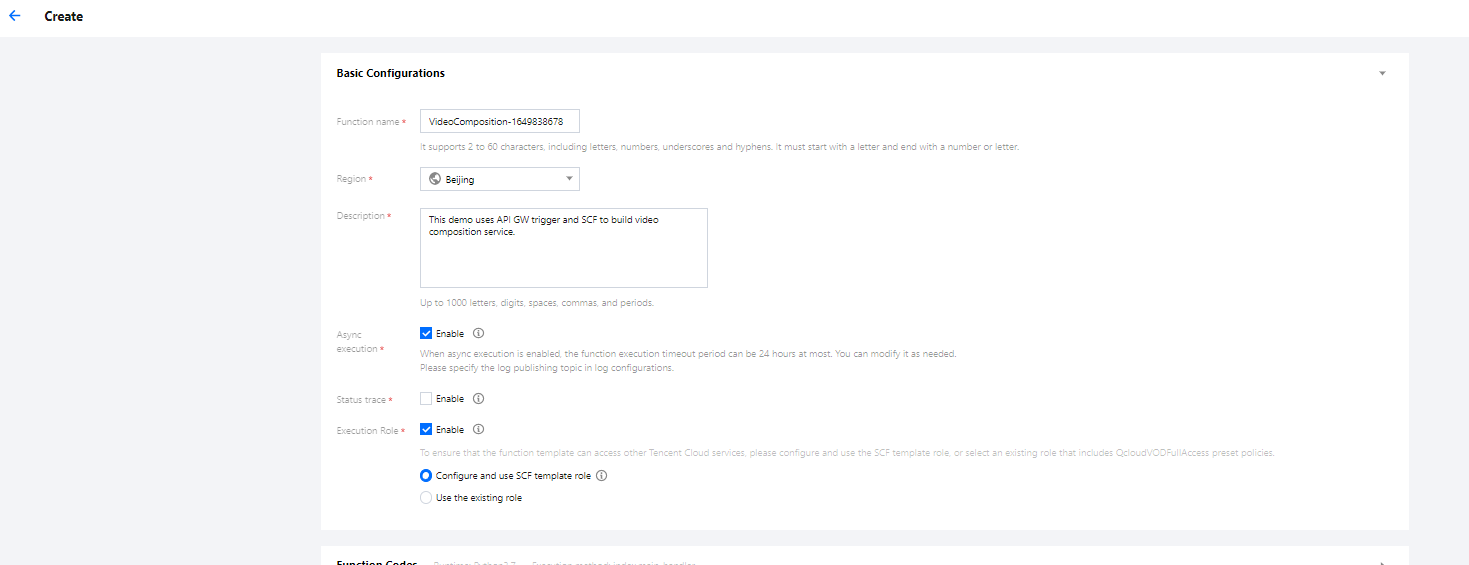
4. In Basic Configurations, Function Name is generated by default, which can be modified as needed. You can configure async execution and execution role as follows:
Async Execution: Select Enable.
Execution Role: Select Enable, select Configure and use SCF template role, and the system will automatically create and select an SCF template execution role associated with full access permissions of VOD. You can also check Use the existing role and select an existing role that has the above permissions in the drop-down list. This document takes Configure and use SCF template role as an example, as shown below:
Note:
This example requires SCF to have the operation permissions of VOD. Execution Role has been enabled by default, and an execution role has been automatically created and associated with the required VOD permission policy QcloudVODFullAccess. If you need to make adjustments, select Use the existing role or disable Execution Role.
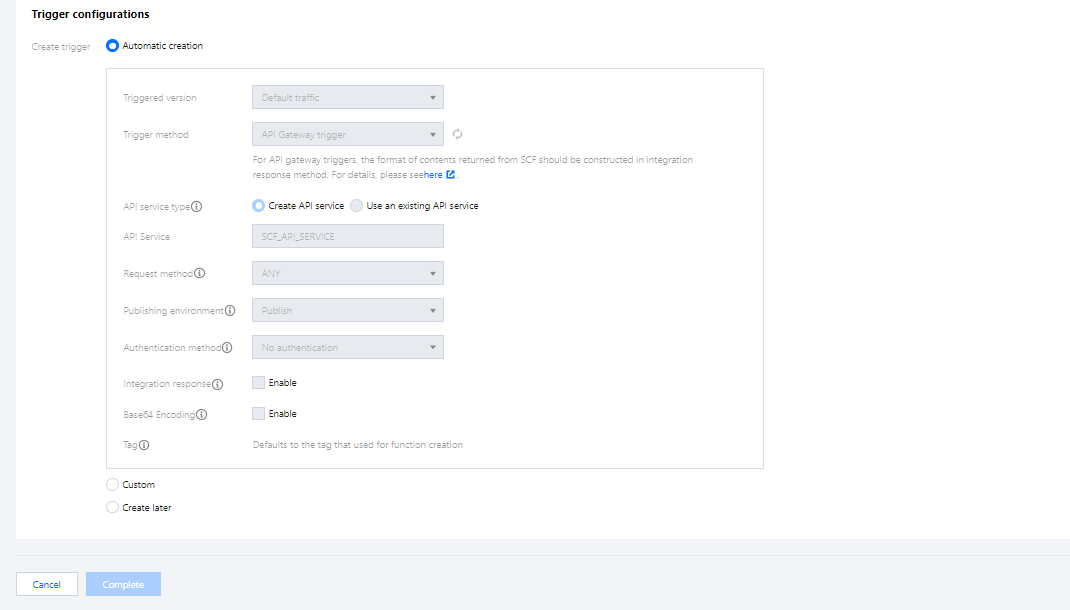
5. In Trigger Configurations, select Automatic creation as shown below:
Note:
To use an existing API service to create an API Gateway trigger or modify the trigger configuration, select Custom.
6. Click Complete to complete function and trigger creation and get the HTTP triggering domain of the function.
Success Story
The customer is an online education company. It needs to create 30-second videos as students' study results from online class recordings every time students finish classes. This case has the following key information:
1. Generally, a class has 200 students, so 200 videos need to be produced at the same time.
2. A one-hour class recording needs to be clipped into a 30-second video.
3. As the screen of each student is different, the recorded videos are also different.
4. Student names and profile photos need to be added to the final output videos.
5. The time points when students finish a class are concentrated; therefore, there may be a short time period of high concurrency during video production.
6. Videos need to be produced only after the class is over; therefore, video production start times are fixed and concentrated.
Based on the above characteristics, SCF has the following strengths for video editing:
1. SCF can sustain 200 concurrent video editing tasks, so the customer doesn't need to set up additional servers.
2. SCF incurs no fees during idle hours.
3. SCF has a high computing power to quickly produce videos.
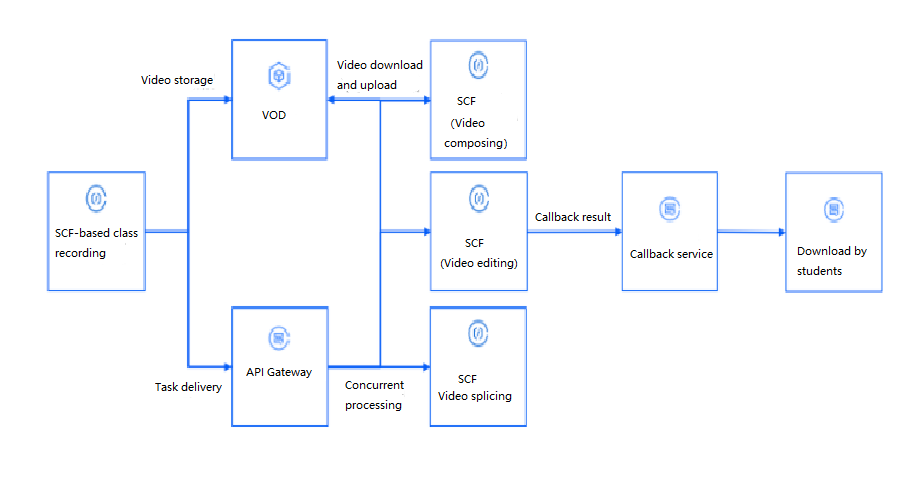
The reference architecture for this case is as shown below:
Summary
You can orchestrate, combine, and reuse the above audio/video editing capabilities to meet the requirements for various scenarios. You can also convert the parameters used to control various effects in video editing to the parameters passed in during service call in order to implement various custom effects.