Setting Image Moderation
Download
Mode fokus
Ukuran font
Overview
This document describes how to use the image moderation feature in the console. After you enable image moderation, new images uploaded to a bucket will be automatically moderated, and the identified non-compliant content can be automatically blocked (by denying public read access to the content).
The incremental image moderation feature can check image content for pornographic, illegal, and advertising information.
After you configure image moderation, new images uploaded to a bucket will be automatically moderated during upload, and the identified non-compliant content can be automatically blocked (by denying public read access to the content).
You can also scan historical image files in COS to detect pornographic, illegal, and advertising content. For more information, see Setting Historical Data Moderation Task and Moderating Image.
Note:
Supported image formats: PNG, JPEG, JPG, BMP, WEBP, GIF.
Supported image file size: < 32 MB. To moderate images larger than 5 MB in size, you need to enable the large image moderation feature.
Supported image dimensions: > 20 * 20 px (width * height).
Use Limits
All Content Moderation features are supported in the following regions:
China regions: Beijing, Shanghai, Guangzhou, Chengdu, Chongqing, Nanjing, Hong Kong (China).
Overseas regions: Singapore, Frankfurt.
Note:
Operation Process
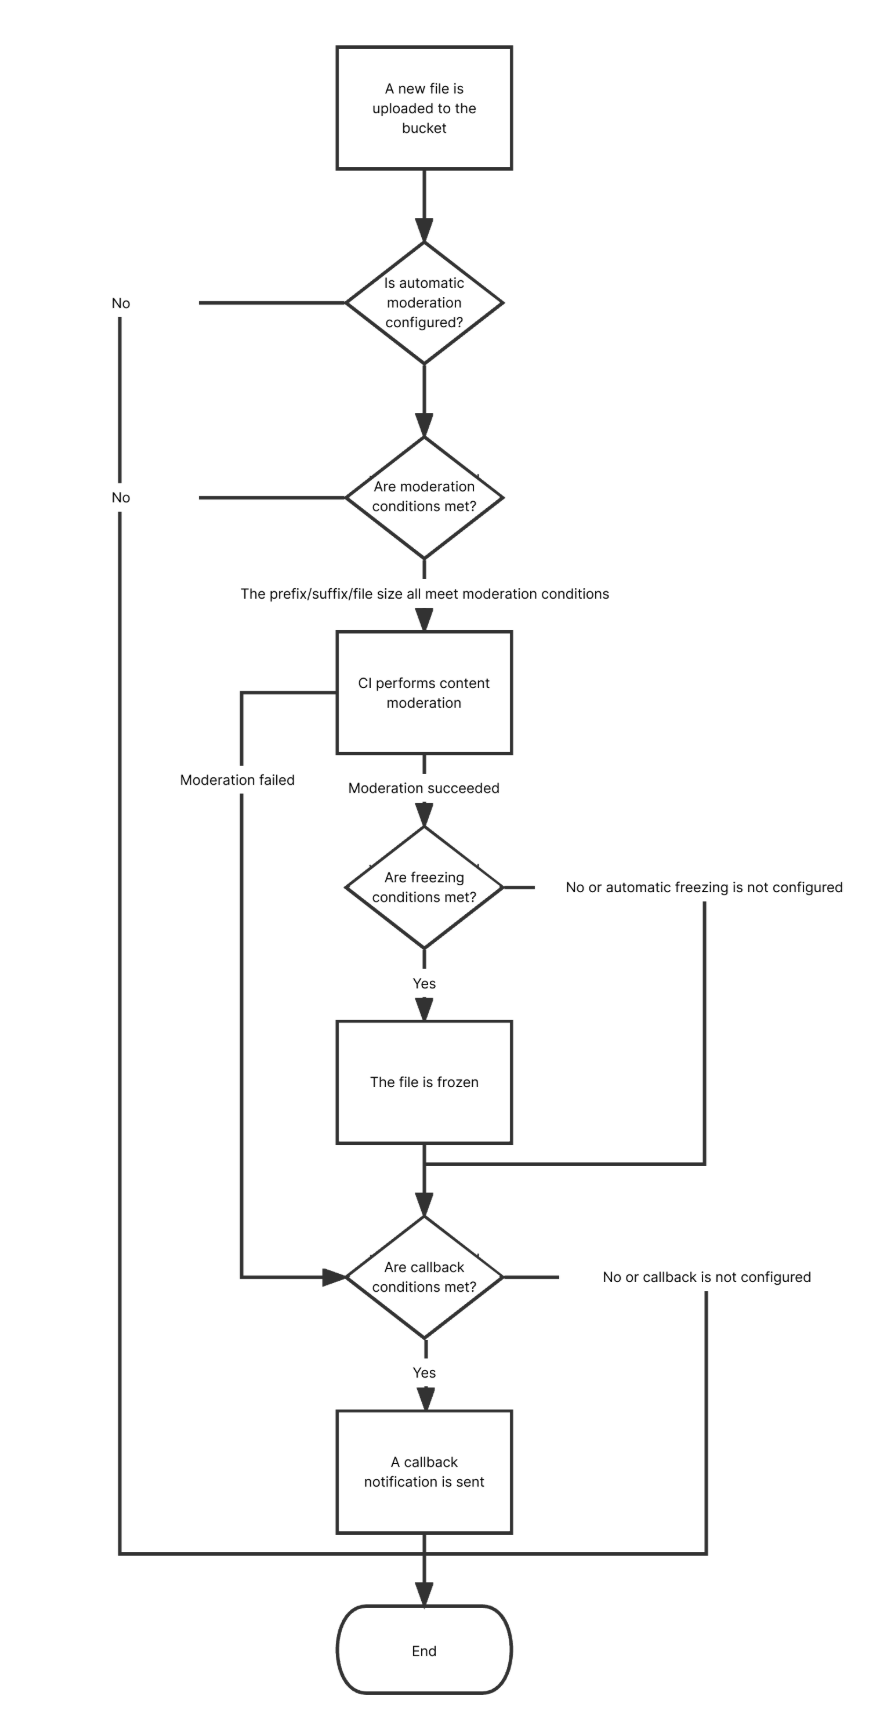
Directions
1. Log in to the CI console. On the Bucket Management page, select the target bucket to enter the bucket management page.
2. On the left sidebar, select Sensitive Content Moderation > Automatic Moderation Configuration and click Image Moderation.
3. Click Add Automatic Image Moderation Configuration and set the following configuration items:
Moderation Scope: You can select The whole bucket or Specified Range.
The whole bucket: Images uploaded to any location in the bucket will be automatically moderated.
Path: If you select Specified Range, enter the path of the images to be moderated.
Example 1: To moderate files in the test directory, set this field to
test/.Example 2: To moderate files prefixed with
123, set this field to 123.Wildcard matching: You can use wildcards to customize the matching of files to be moderated. The currently supported wildcards are "*" and "?". If your path contains these wildcards, you need to escape them; otherwise, we will treat them as wildcards for matching.
Note:
You can add multiple moderation configurations, but the paths cannot be duplicate or have inclusion relationships. If you have configured to moderate the entire bucket, you cannot add a moderation configuration for a specific path in the bucket.
Moderation Suffix: The following image formats can be moderated: JPG, JPEG, PNG, BMP, WEBP, and GIF. Two options are supported: Smart and Without suffix.
Note:
Smart: After you select this option, the system will intelligently determine whether a file is an image based on its file extension and content.
Large Image Auditing: Image Auditing supports moderating only images smaller than 5 MB. For images that exceed this size limit, you can enable the large image auditing feature. The backend will compress the images before auditing them, with a maximum supported compression size of 32 MB. Using the large image auditing feature incurs basic Image Processing fees. For details about the fees, see Basic Image Processing Fees.
Moderation Policy: Select a moderation policy. You can create different policies for refined moderation. Moderation scene options include Pornographic, Illegal, and Advertisement, and you can select one or multiple options. For detailed directions on how to configure a moderation policy, see Setting Moderation Policy.
Associated Risk Library: The risk library associated with the moderation policy.
Moderation Scene: It displays the default scene or the scene that you configure in the moderation policy. You can select the target scene as needed.
Daily Moderation Quota: After you set a quota, a fixed number of images will be moderated on that day. Images exceeding the quota will not be moderated. Newly added images will be moderated on the following day.
Restricted File Block: You can enable this service to authorize CI to perform automatic or manual moderation and block the identified non-compliant files by denying public read access to them.
Blocking Methods: The following two blocking methods are currently supported.
Change file to private read: You can achieve the effect of file blocking by modifying the file's access permissions to private read (private). When this method is used, accessing the file again will return a "403" status code, indicating that access to the file is unauthorized. For information about file permissions, see File ACL Overview.
Move files to a backup directory: You can achieve the effect of file blocking by moving files to a backup file directory. When this method is used, accessing the file again will return a "404" status code, indicating that the file does not exist. The backup directory is automatically generated by the backend and is located under the current Bucket at the path: audit_freeze_backup/increment_audit.
Block Type: You can select a block type and mechanism. Machine moderation and block is selected by default. If you select Manual review freeze, TenDI's professional team will review suspiciously sensitive images identified during machine moderation. You can select the image score range for blocking (by specifying an integer between 60 and 100; the greater the score, the more sensitive the image).
Refresh CDN After Blocking: After you enable this feature, Cloud Infinite will refresh the corresponding CDN cache data while blocking the COS source files. The Cloud Infinite service will call the CDN URL refresh API to perform the refresh. There is a daily quota limit for URL refreshes. For specific limits, see CDN Refresh URL API.
Callback: After callback is enabled, you will receive image moderation results. You need to select the moderation type, callback content, callback URL, and image domain name. If you select Custom Callback Threshold, you need to set the score range of the images for callback. After the callback URL is set, CI will send the default callback message to the set URL to check whether it can receive callback messages normally. For more information on callback, see Viewing Image Moderation Callback Content.
4. After completing the configuration, click Save. Images uploaded subsequently will be moderated.
Notes
Image moderation adopts a scoring mechanism, with a score between 0 and 100 returned for each image.
1. The confirmed part refers to the images that are confirmed to be normal or sensitive (with a score in the range of [0,60] or (90,100]). For such images, no manual intervention is required.
2. The uncertain part refers to the images that are suspected to be sensitive (with a score in the range of (60,90]). For such images, manual moderation is recommended.
Bantuan dan Dukungan
Apakah halaman ini membantu?
Anda juga dapat Menghubungi Penjualan atau Mengirimkan Tiket untuk meminta bantuan.
masukan