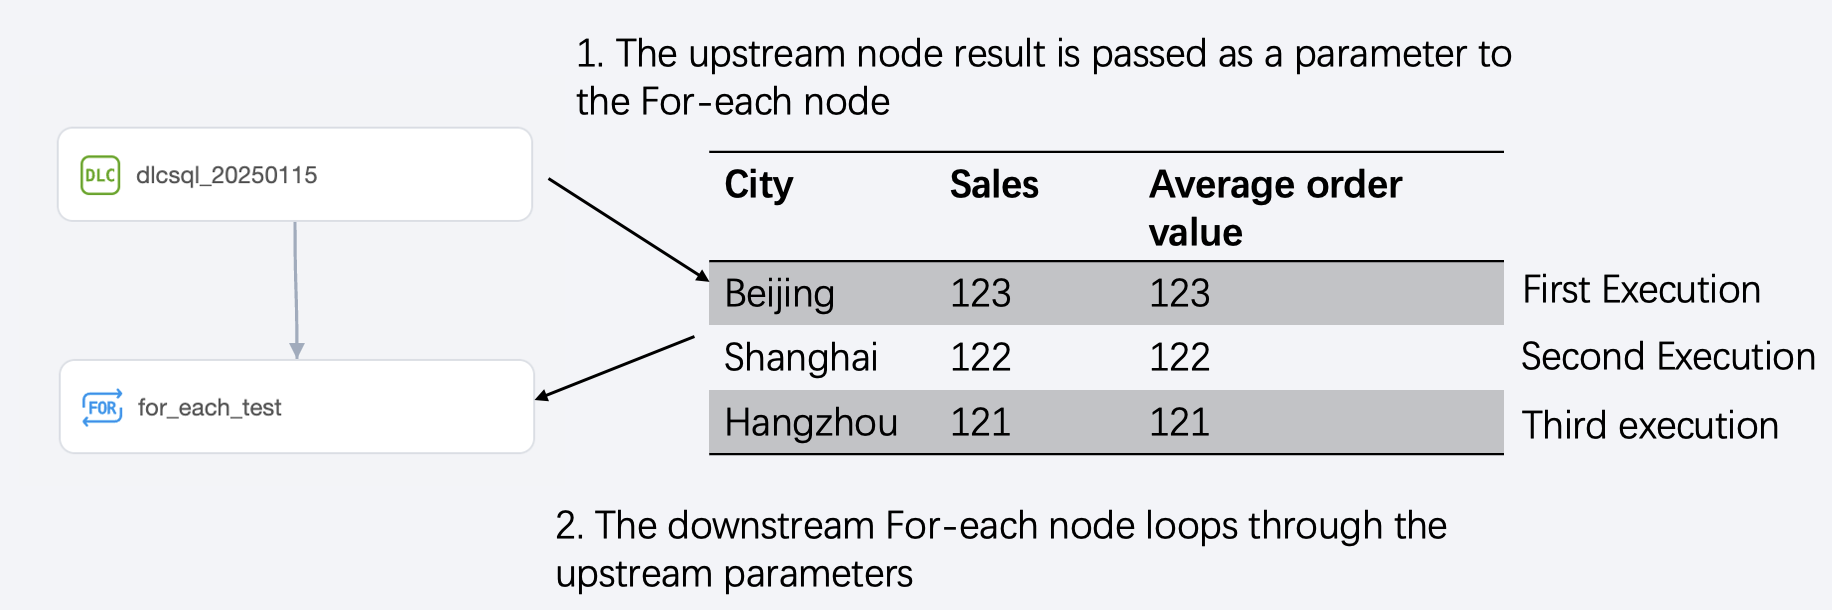
The typical usage scenario of the For-each node is to loop through the parameters passed by the upstream node to implement the business logic inside the For-each node. The following will introduce the usage scenario, usage limitations, configuration method, built-in parameters, and usage example of the For-each node.
The usage scenario of the For-each node is usually to transmit the results of the upstream task as parameters to the For-each node, which then performs loop execution to traverse the upstream parameters.
Use Limits
Note:
The maximum number of loops for the For-each node is 128, and the actual number of loops depends on the number of rows in the output parameter from the upstream.
Loop execution is serial execution; the next one is executed only after the previous one is completed.
Configuration Method
Creating a For-Each Node
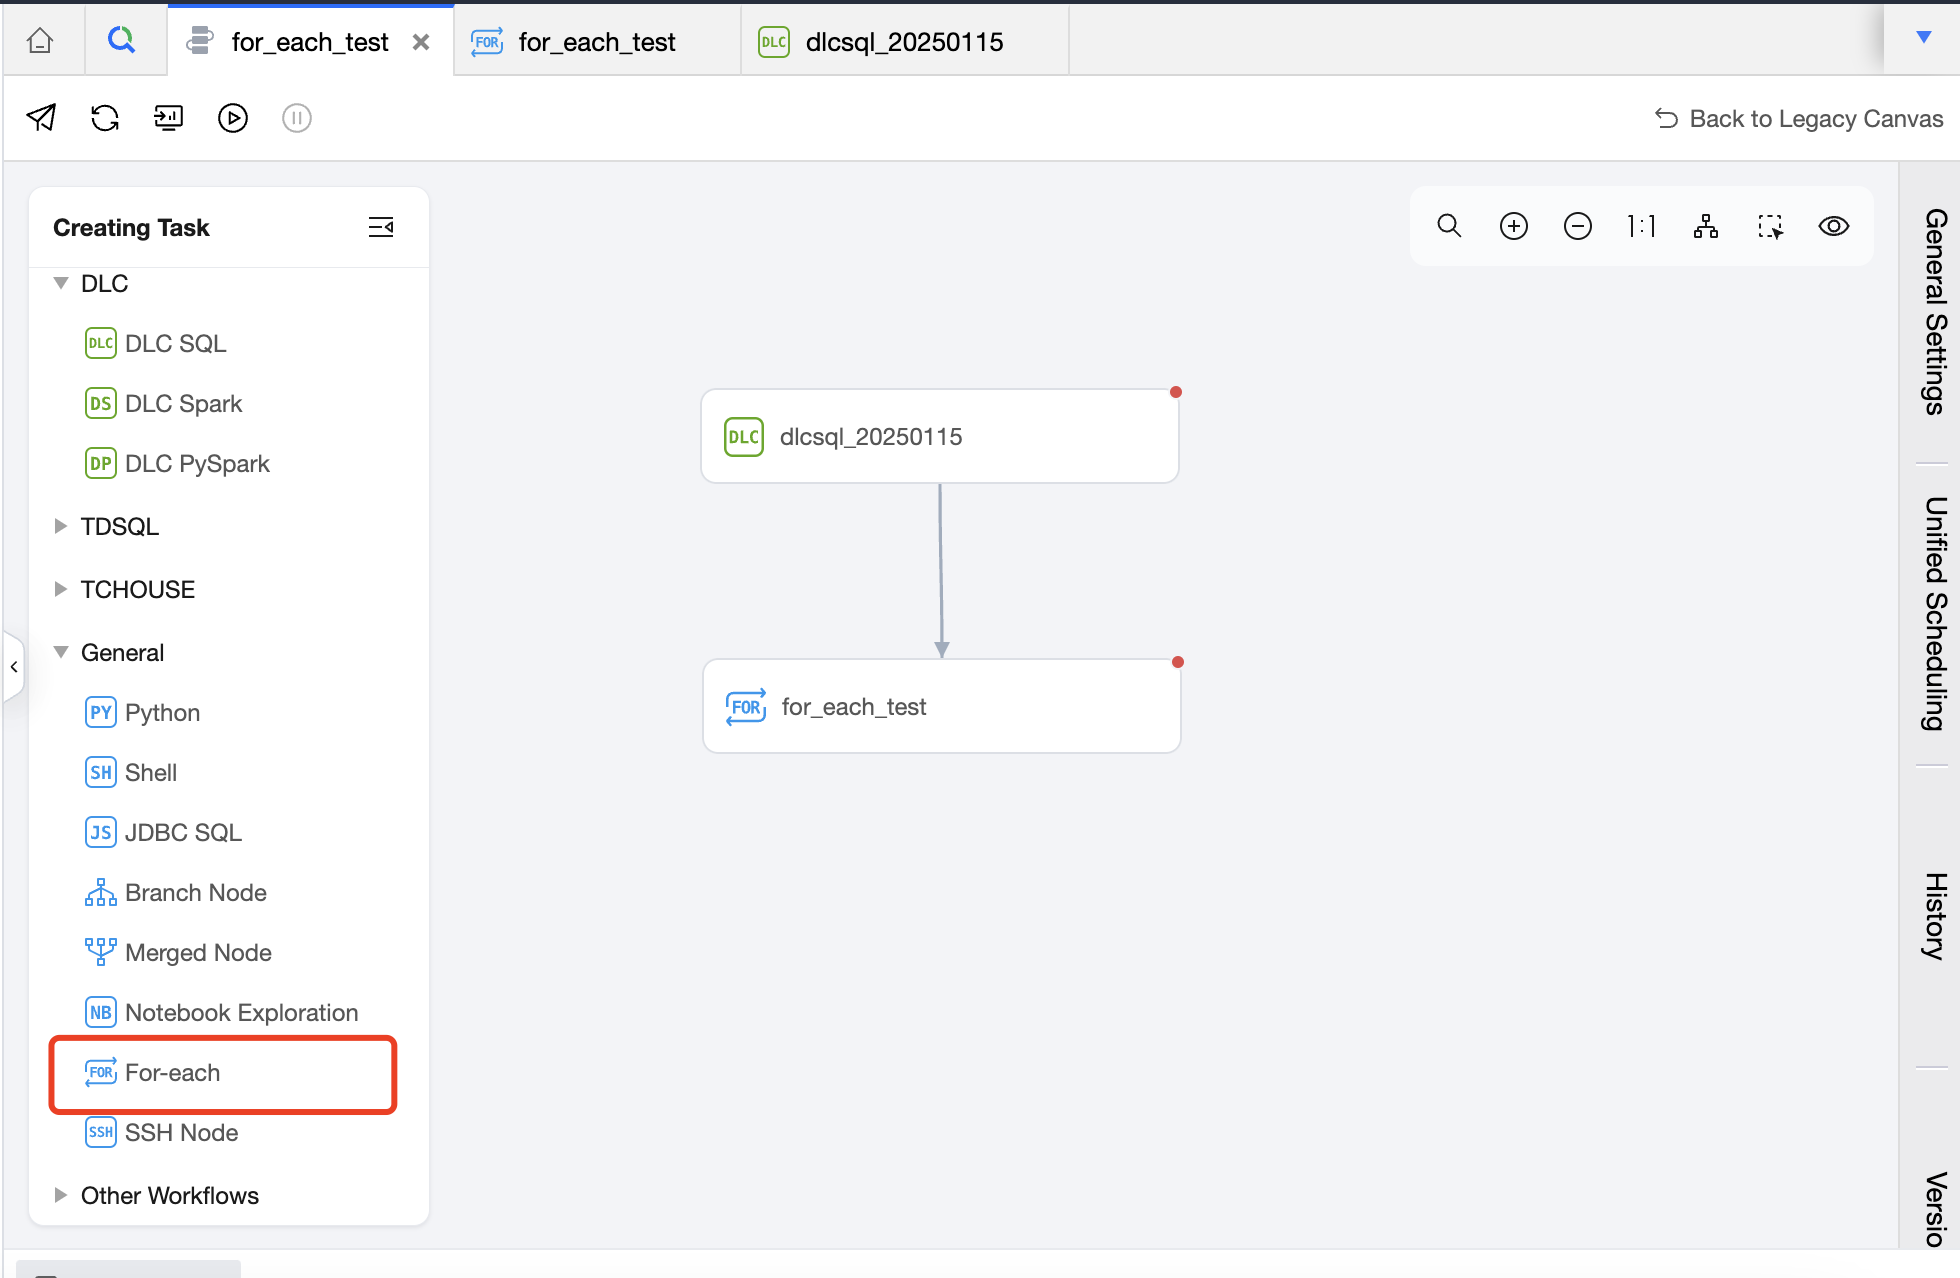
1. In the Create New Task list, select the general task type For-each Node.
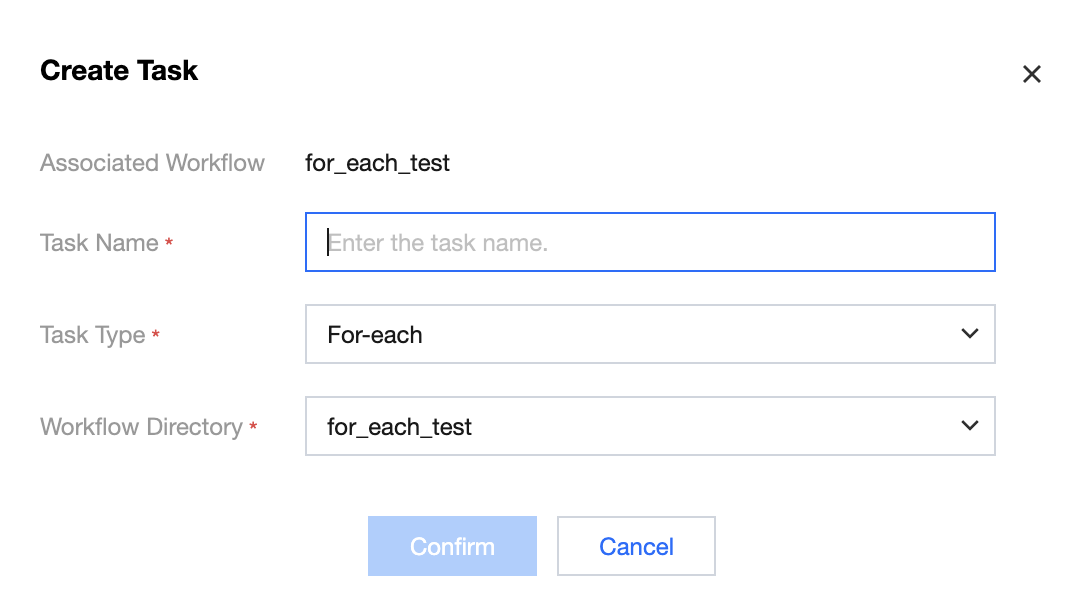
2. In the Create Task pop-up window, fill in the task name, associated workflow, and other information, and click confirm.
Configuring a For-Each Node
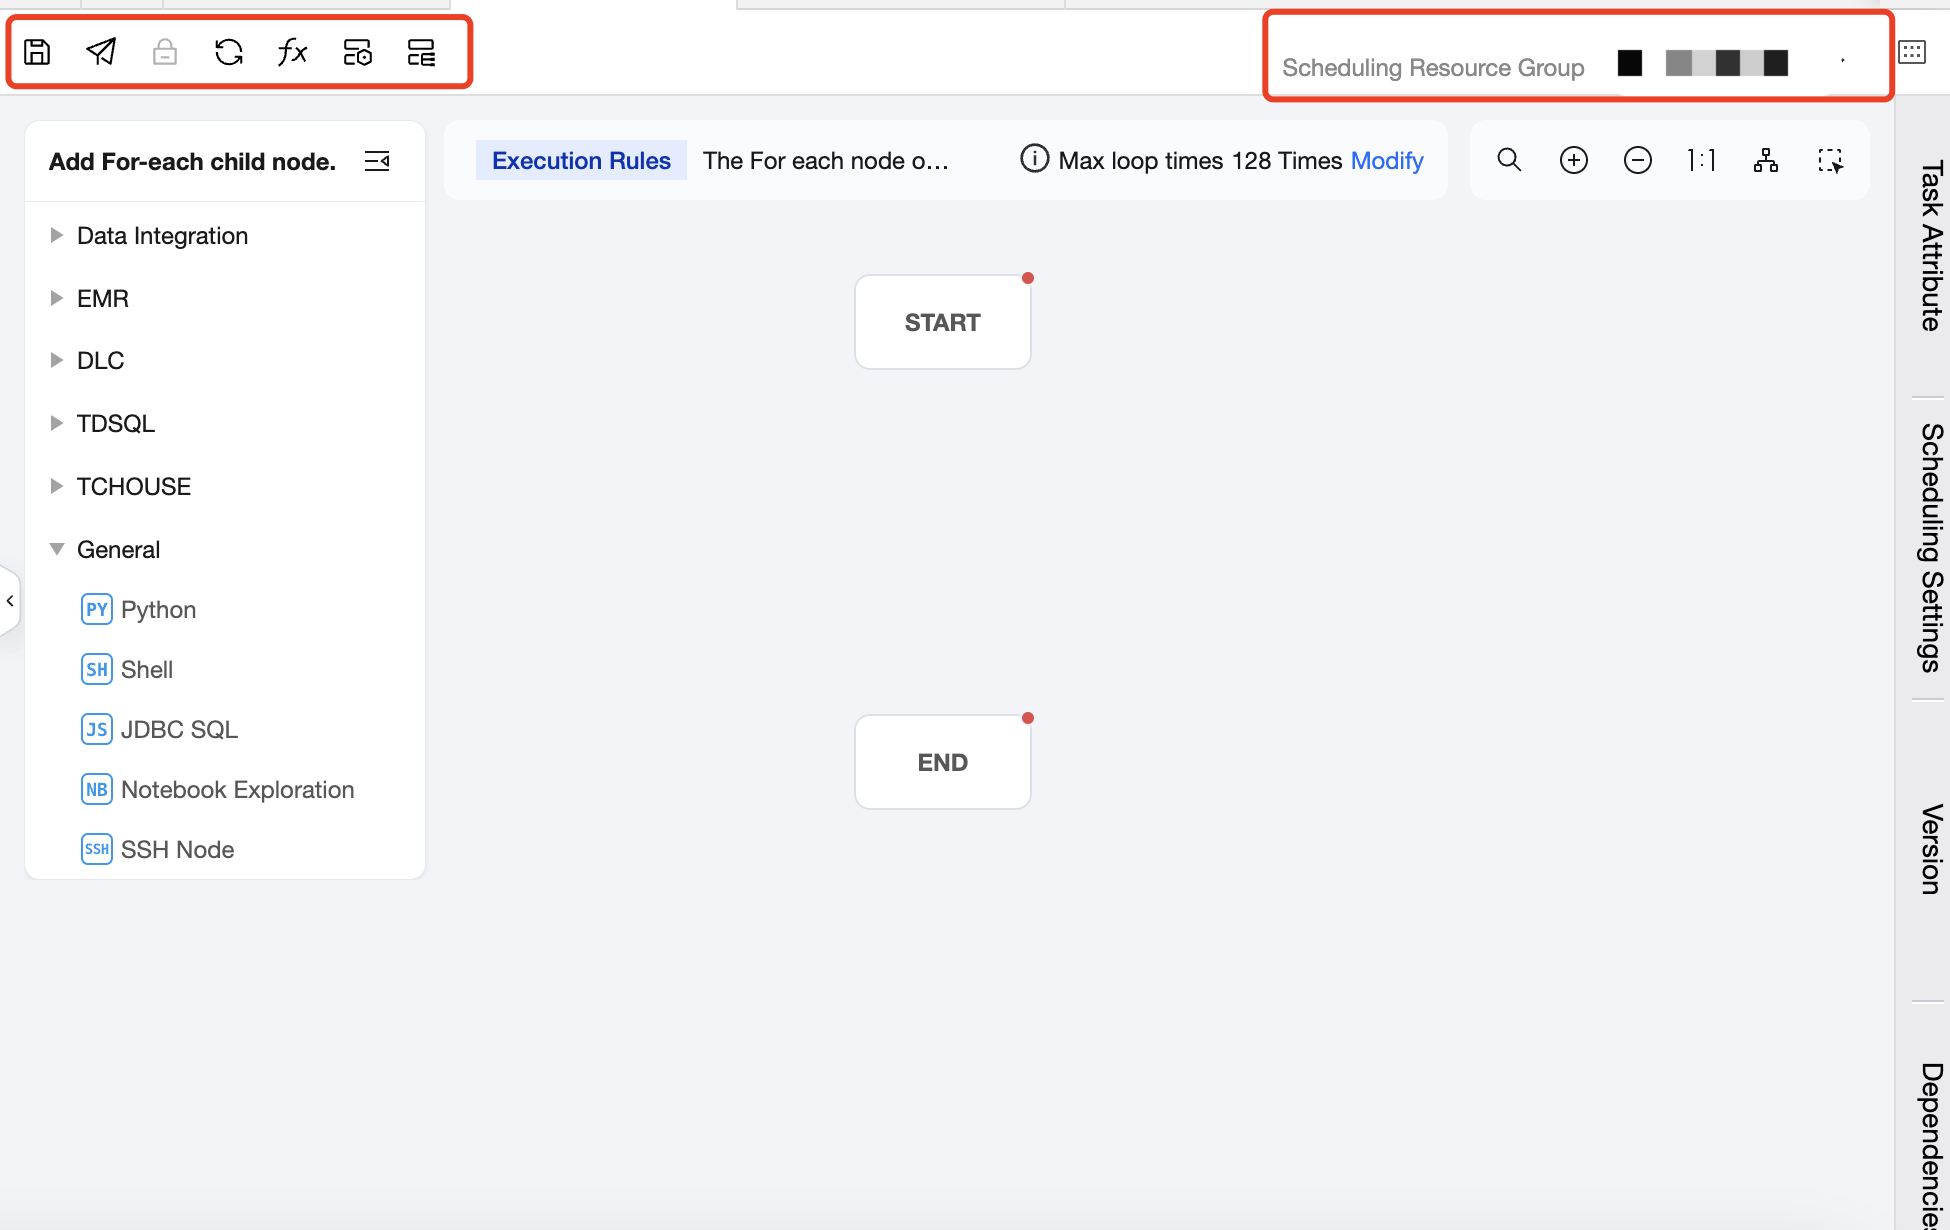
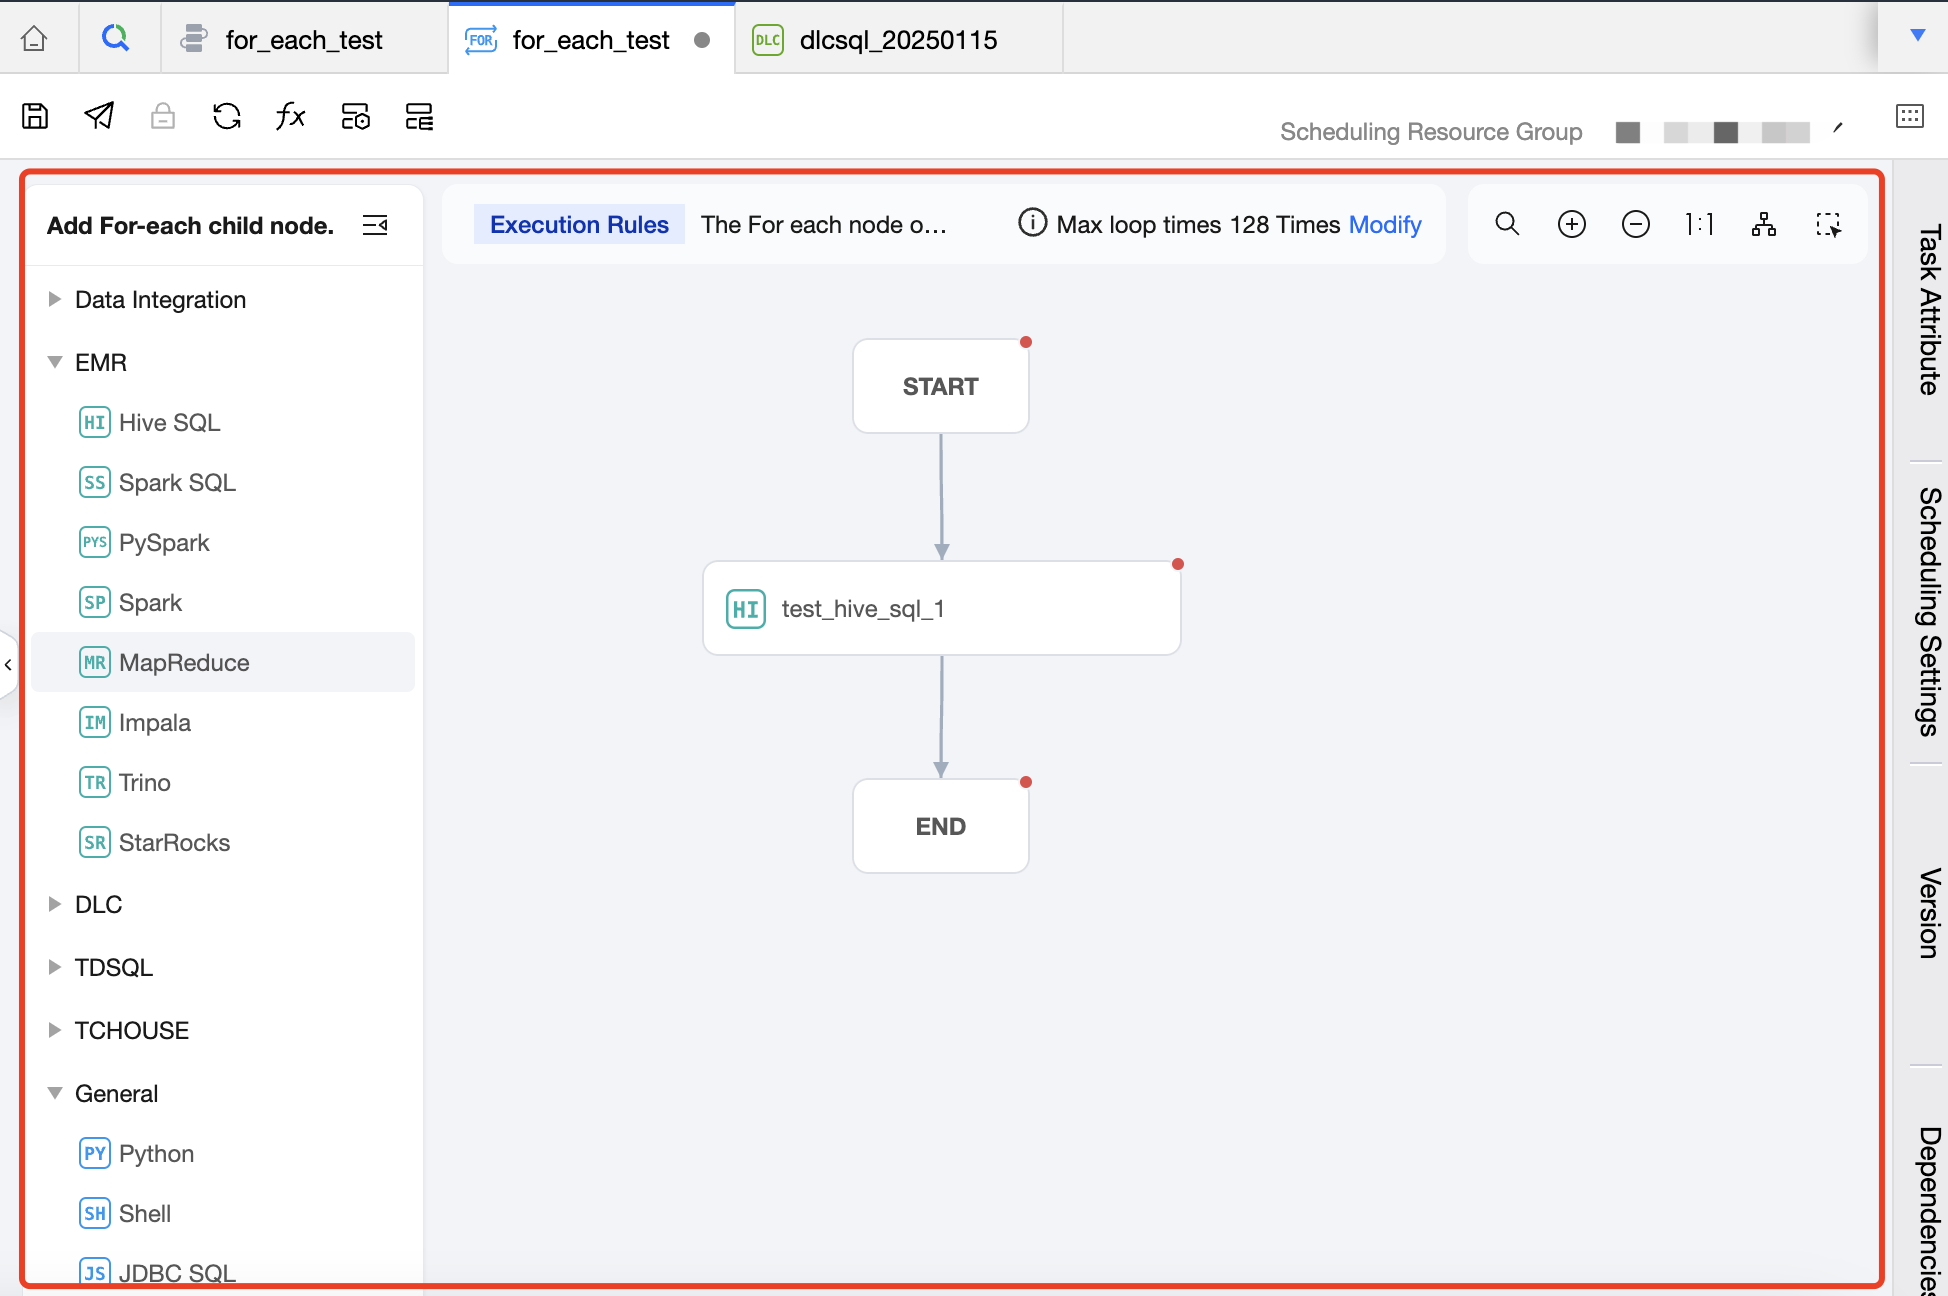
The configuration page for the For-each node is similar to a workflow configuration page, with features introduced below.
Operation Bar Above
Includes operations such as Save, Submit, Lock, Refresh, Project Parameter, Task Operations, Instance Ops, and Configure Scheduling Resource Groups.
Note:
The For-each node does not provide operations such as test-run, advanced run, or terminate run. If you need to verify whether the For-each node meets expectations, you can submit it to the Ops center for test execution after configuration.
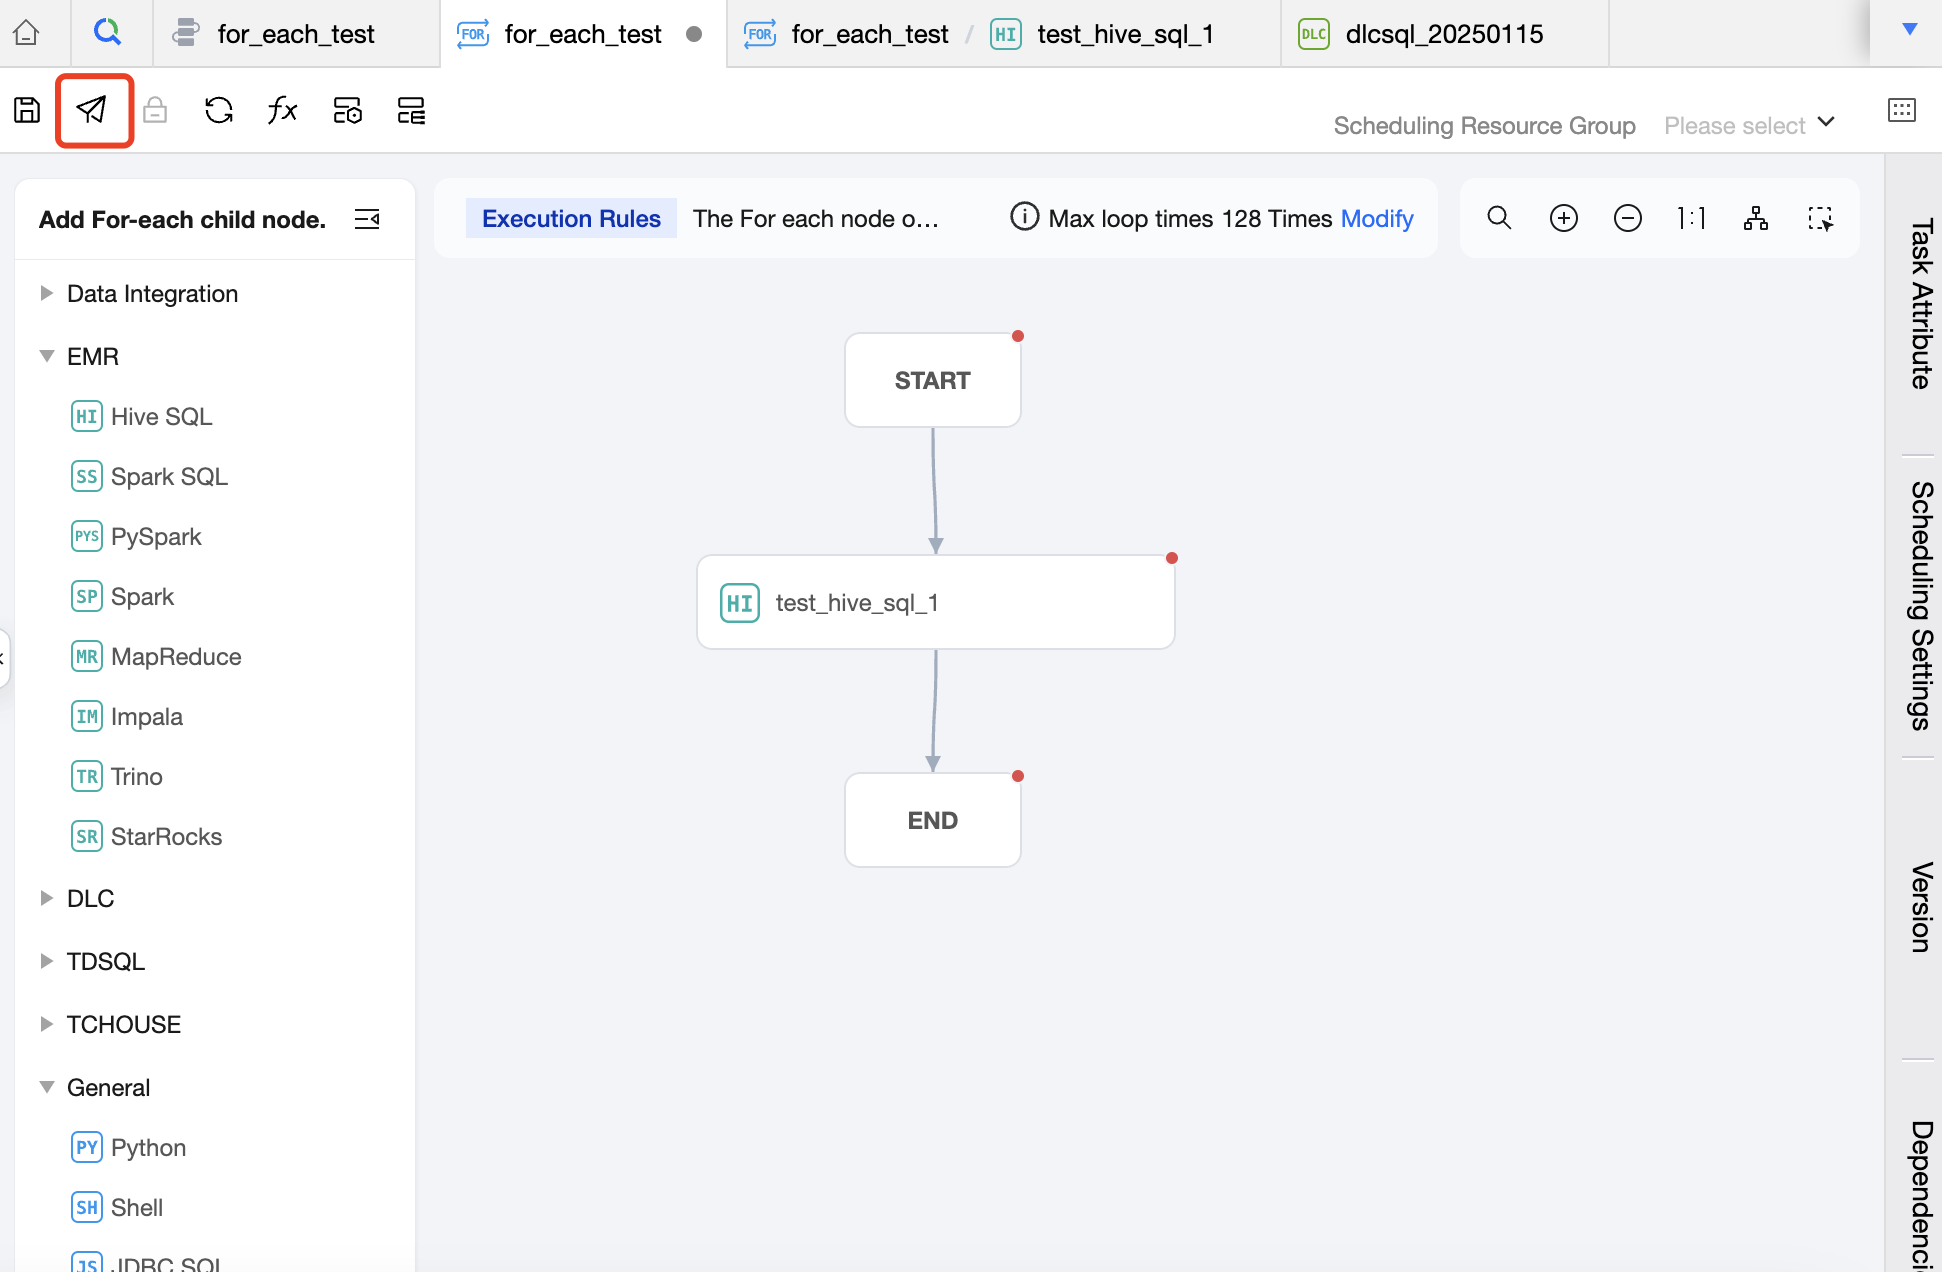
Create Sub-Node Area
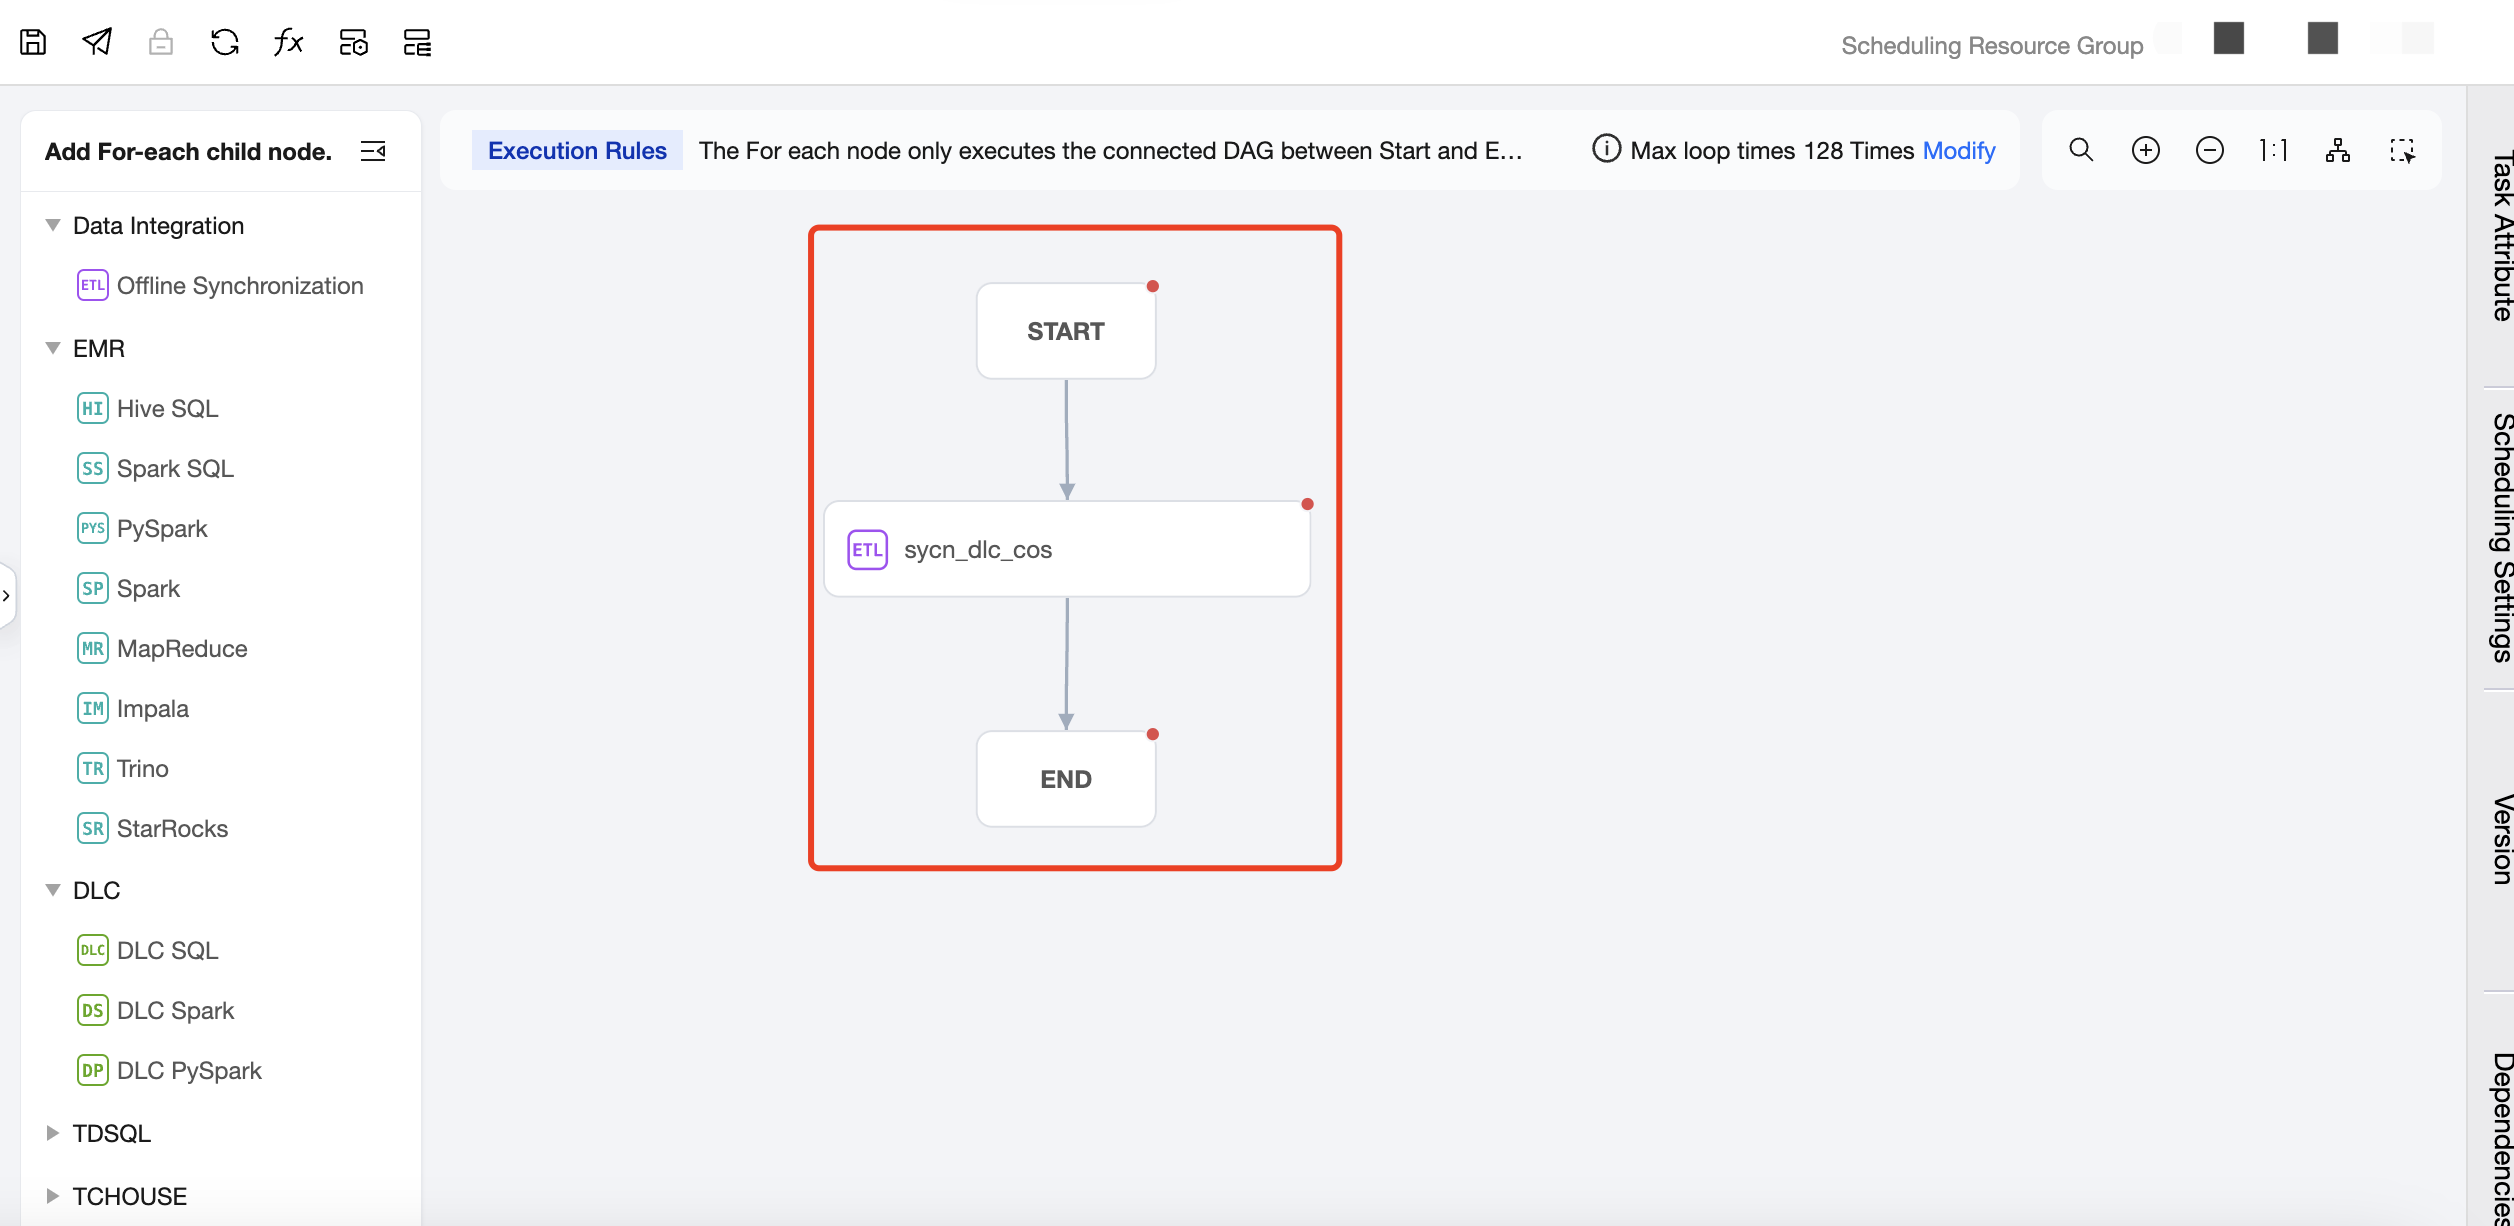
Intermediate Area: Used to create and orchestrate the sub-nodes of the For-each node, that is, the main content of the loop. Except for For-each, cross-workflow nodes, branch nodes, and merge nodes, all other nodes can be used as sub-nodes of the For-each node.
Task Type: Click on the task type on the left to add a sub-node. In the canvas area, you can orchestrate the sub-nodes and establish an upstream and downstream relationship. The For-each node will only run the DAG that is connected between START and END, and will not run the non-connected or forked part of the DAG. Therefore, nodes that you want to execute in a loop should be placed between the START node and the END node and connected with lines.
Notes:
The number of loops can be set on the canvas. The default number of loops is 128, which can be adjusted as needed. The maximum number of loops cannot exceed 128. If the actual number of loops exceeds 128 during execution, the excess executions will be marked as failed. The actual number of loops depends on the row count of the upstream output parameter.
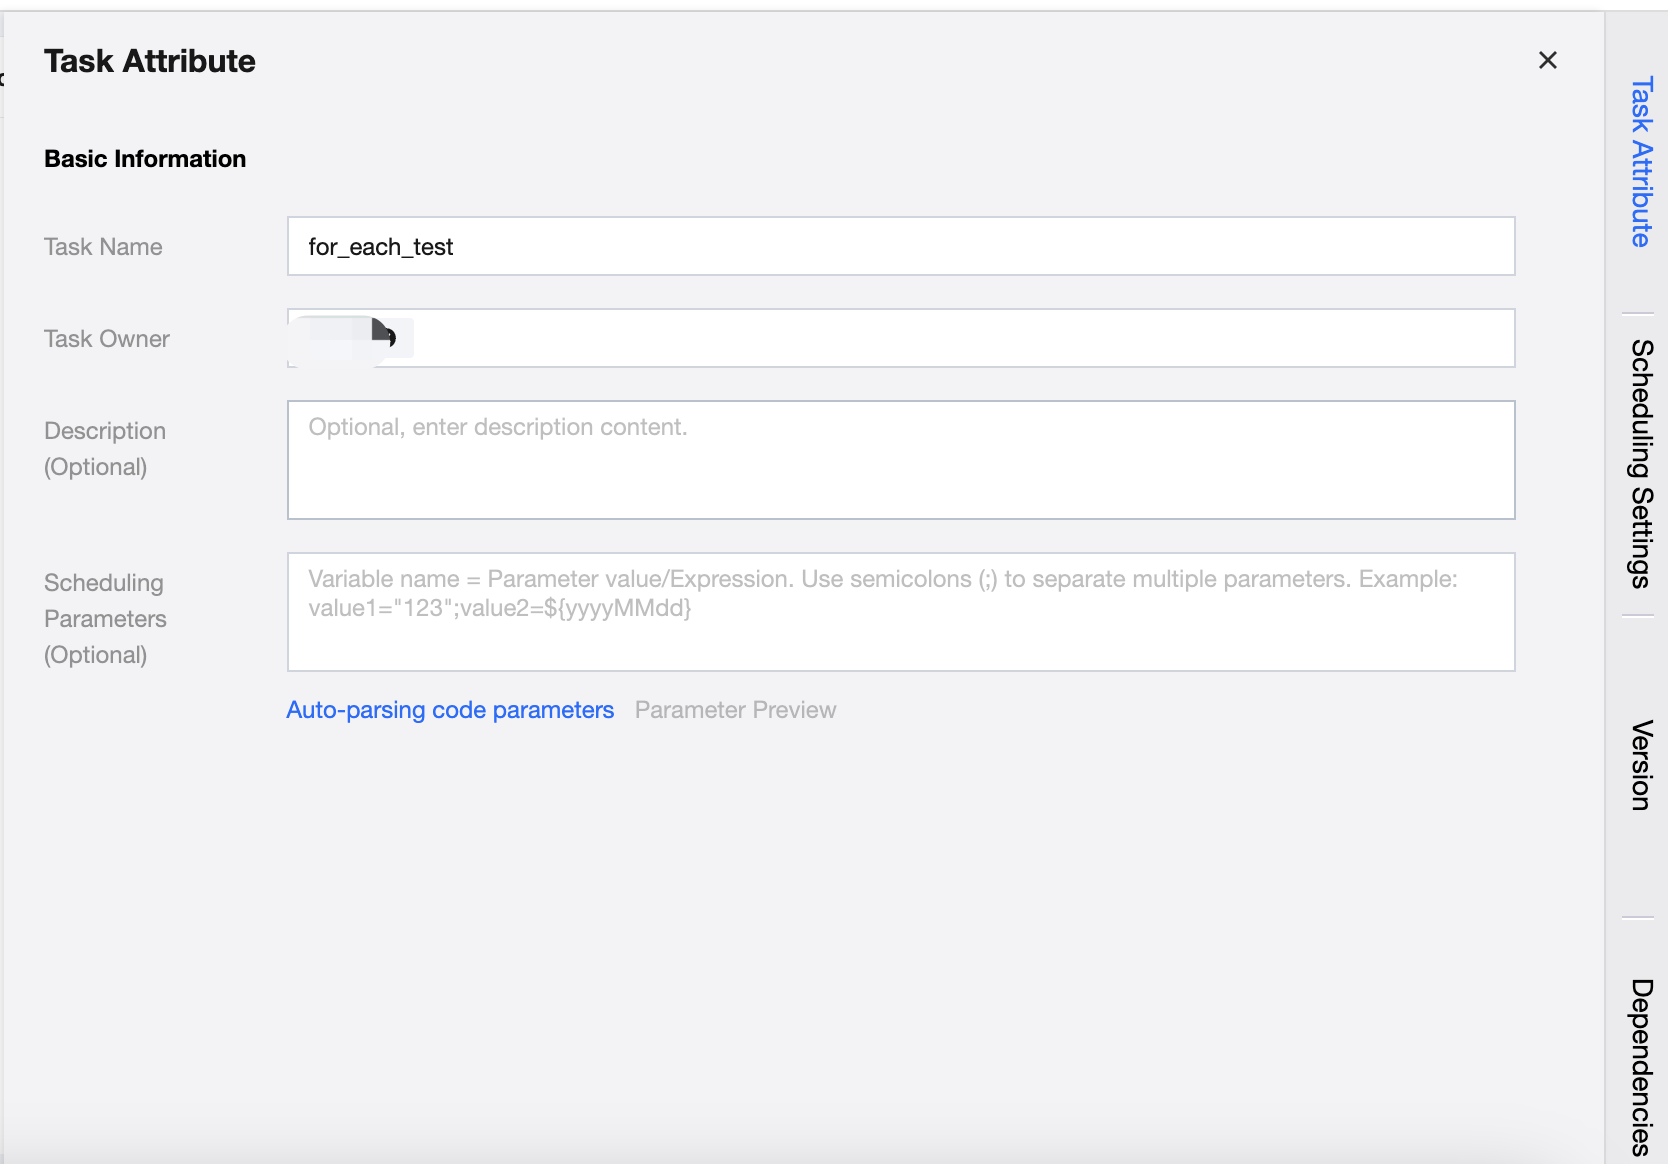
Right Drawer - Task Attribute
Configure the basic information of the task, including the task name, task owner, description, and scheduling parameters.
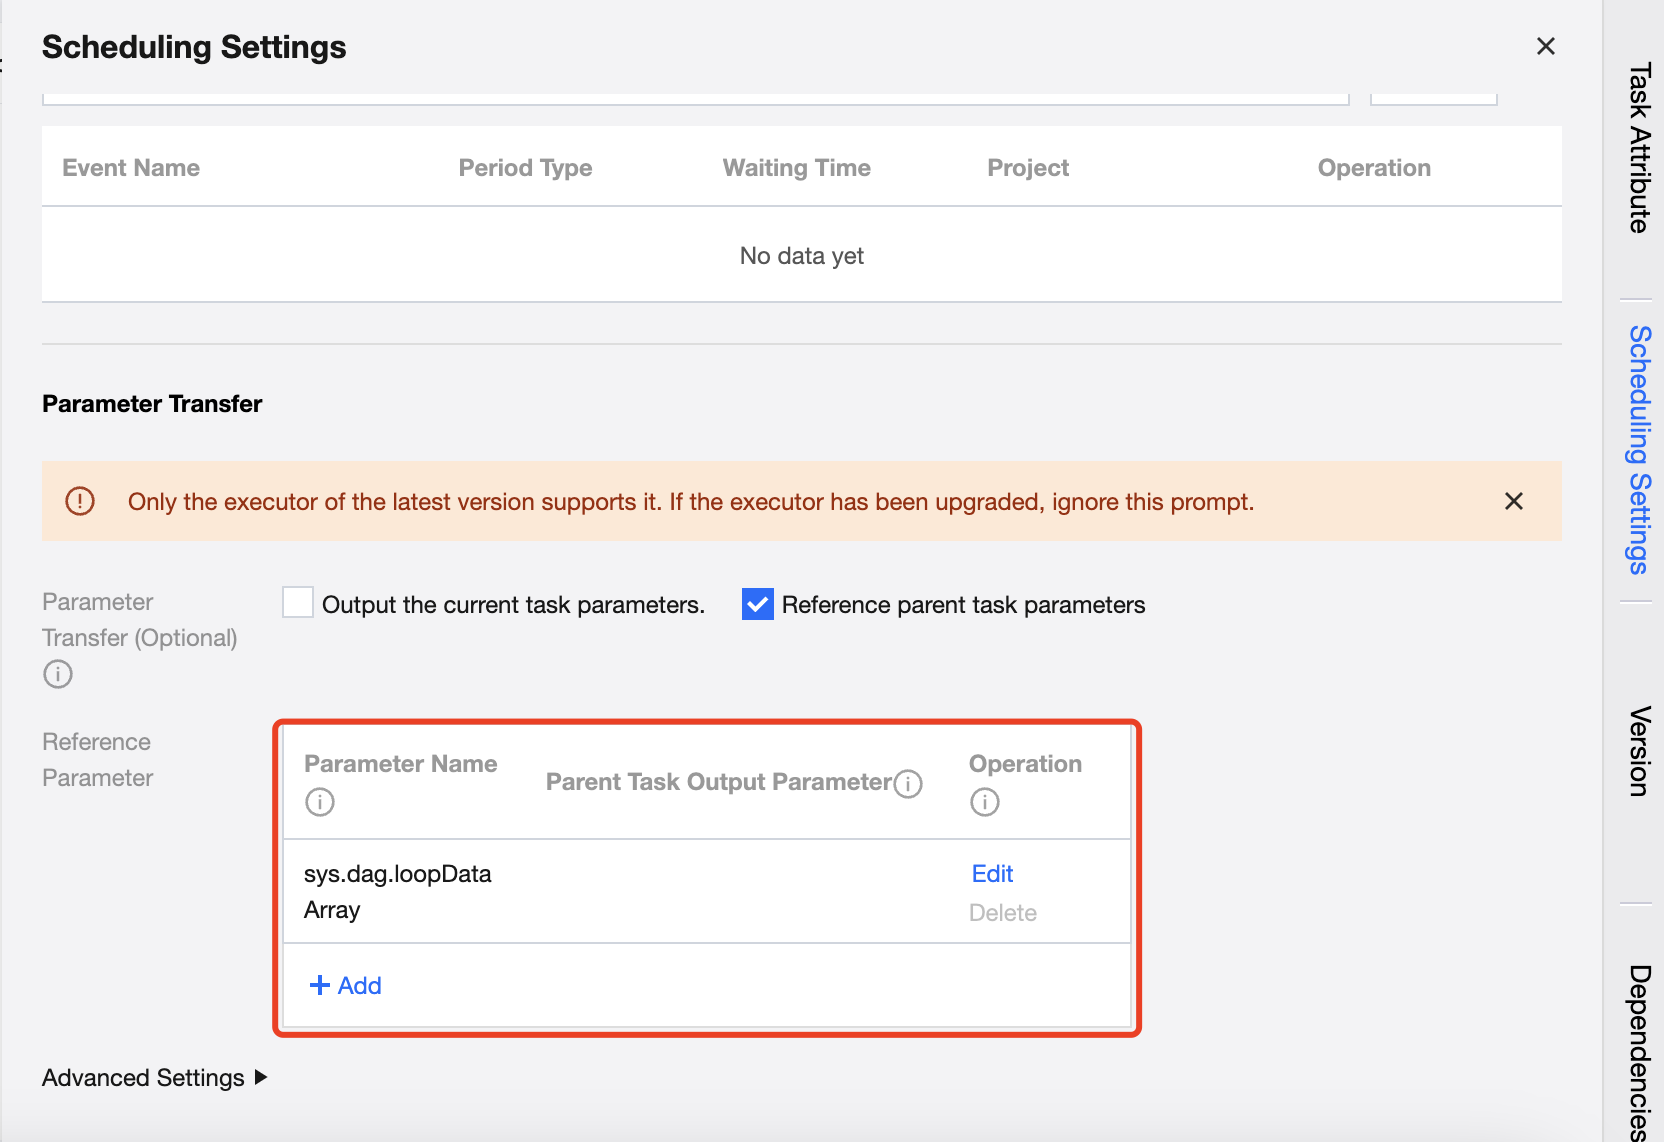
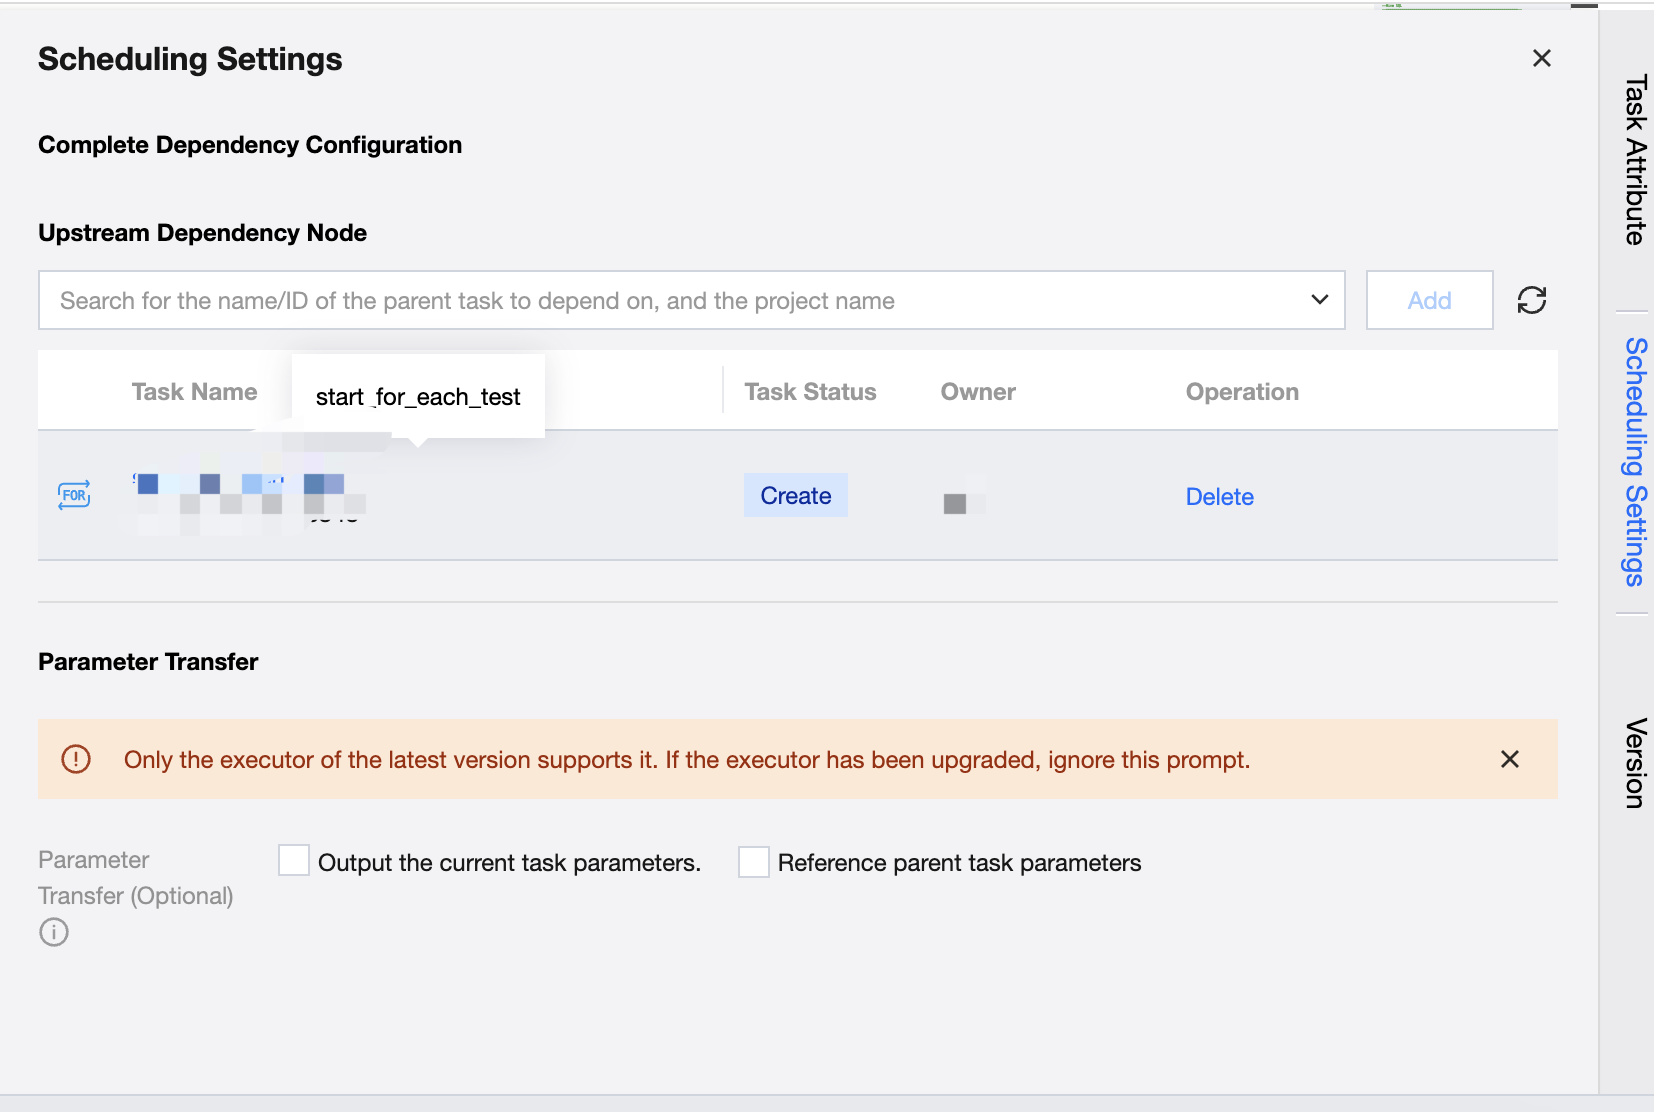
Right Sidebar - Scheduling Settings
The scheduling settings for the For-each node are basically the same as those for other task types, supporting the configuration of scheduling policies, upstream dependencies, event dependencies, parameter passing, and advanced settings for the node.
Notes:
By default, parameter passing needs to obtain the passed parameters from the upstream, and the default parameter name is: sys.dag.loopDataArray. This parameter is used for loop traversal at runtime, and if it is not configured, the task cannot be submitted.
Right Sidebar - Version/Dependencies
Currently, viewing the configuration of For-each node tasks is not supported in version management; only viewing task attribute information is supported.
The upstream and downstream relationship of the For-each node can be viewed in the dependencies.
Configuring Subnodes In a For-Each Node
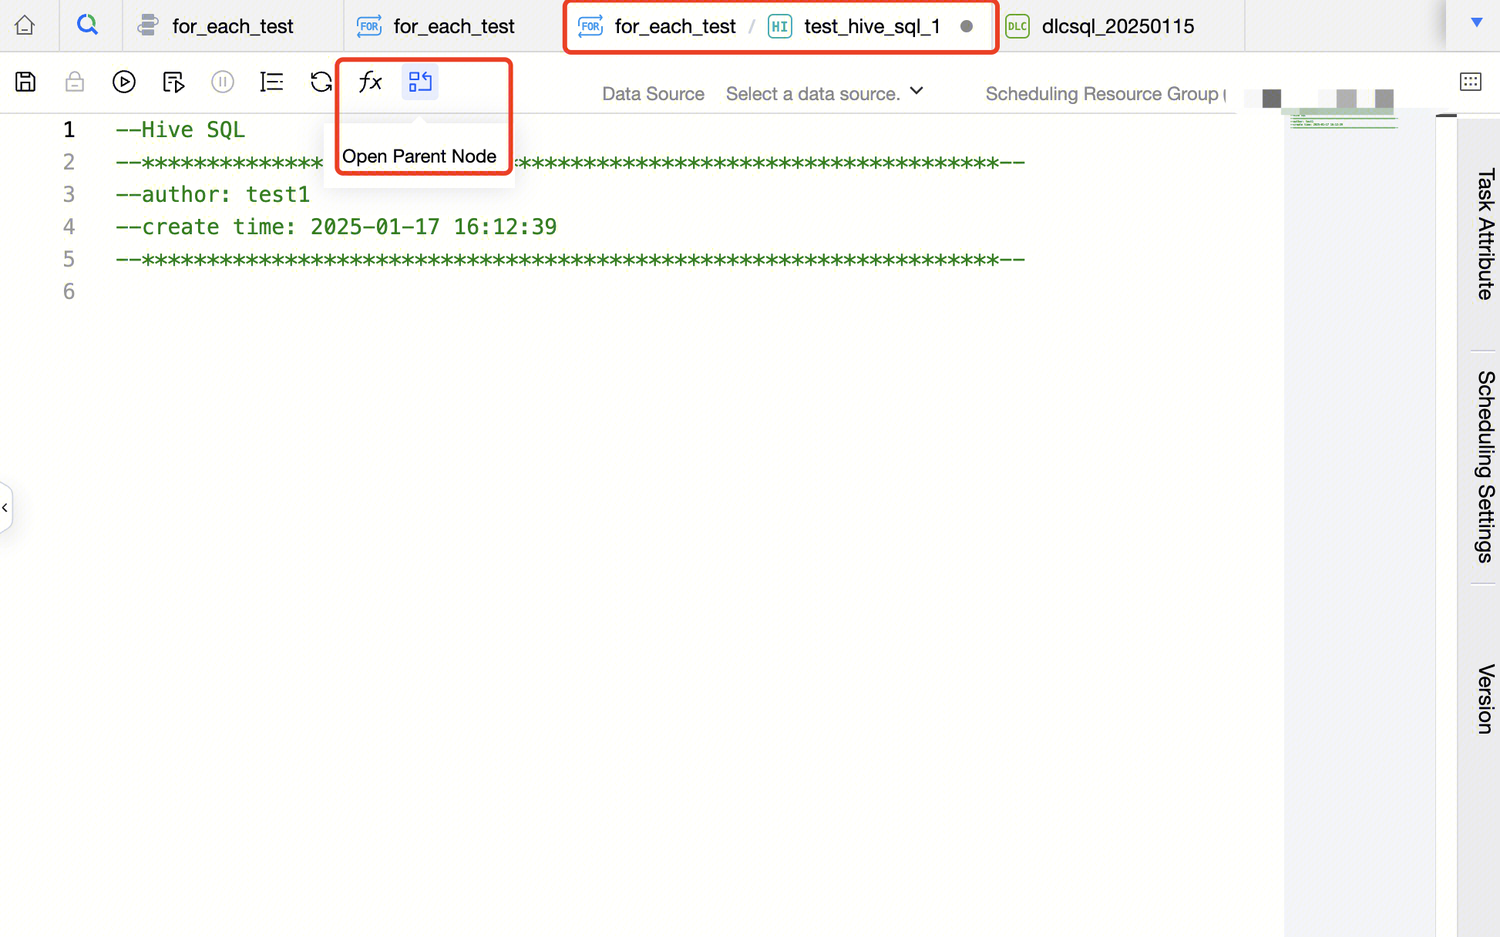
In the DAG graph of the For-each node, click a sub-node to enter the sub-node configuration page. The name of the sub-node will be displayed as For-each node name/sub-node name. The configuration of the sub-node is basically the same as that of other basic task types. The following only introduces the different parts:
Operation Bar Above
There are no entries to task operations and instance Ops in the operation bar, because sub-nodes do not have independent Ops pages in the Ops center and only For-each nodes can be operated on.
The operation bar provides the feature to open the parent node, that is, operating on the sub-node can open the corresponding For-each node.
Scheduling Configuration
Because the sub-nodes of For-each will follow the scheduling configuration of the For-each node to execute, the sub-nodes of For-each do not need to configure a scheduling policy separately.
The scheduling settings of the For-each node's sub-nodes support the configuration of upstream tasks and parameter passing.
Submit To Scheduling
You can operate the submission in the For-each node or the workflow where the For-each node is located. The task submitted to the scheduling will be executed periodically according to the scheduling configuration.
For-each Node Operation Entry:
Operation entry for the workflow containing the For-each node:
Built-In Parameter
Introduction To Parameters
In the sub-nodes of the For-each task, built-in parameters can be used to obtain the array passed from the upstream task. The parameters received by the For-each node must be in the format of a two-dimensional array, one-dimensional array, or single value; otherwise, the task will fail to execute.
The parameter name passed from the upstream is sys.dag.loopDataArray, and the configuration method of this parameter is shown in the following figure.
Assuming that the parameter value passed by the upstream node is a two-dimensional array, there are a total of three rows and four columns of data, with the columns representing ID, name, age, and sex, respectively, as shown in the following table:
001
Jack
21
Male
002
Helen
22
Female
003
Emily
23
Female
Available parameters in the sub-node are as follows:
Built-In Parameter Name
Parameter Meaning
The Value Returned Based On the Parameters In the Above Table
Obtain the current traversal value, that is, obtain the data of the corresponding row in the current loop
First loop:
[["001", "Jack", "21", "Male"]]
Second loop:
[["002", "Helen", "22", "Female"]]
Third loop:
["003", "Emily", "23", "Female"]
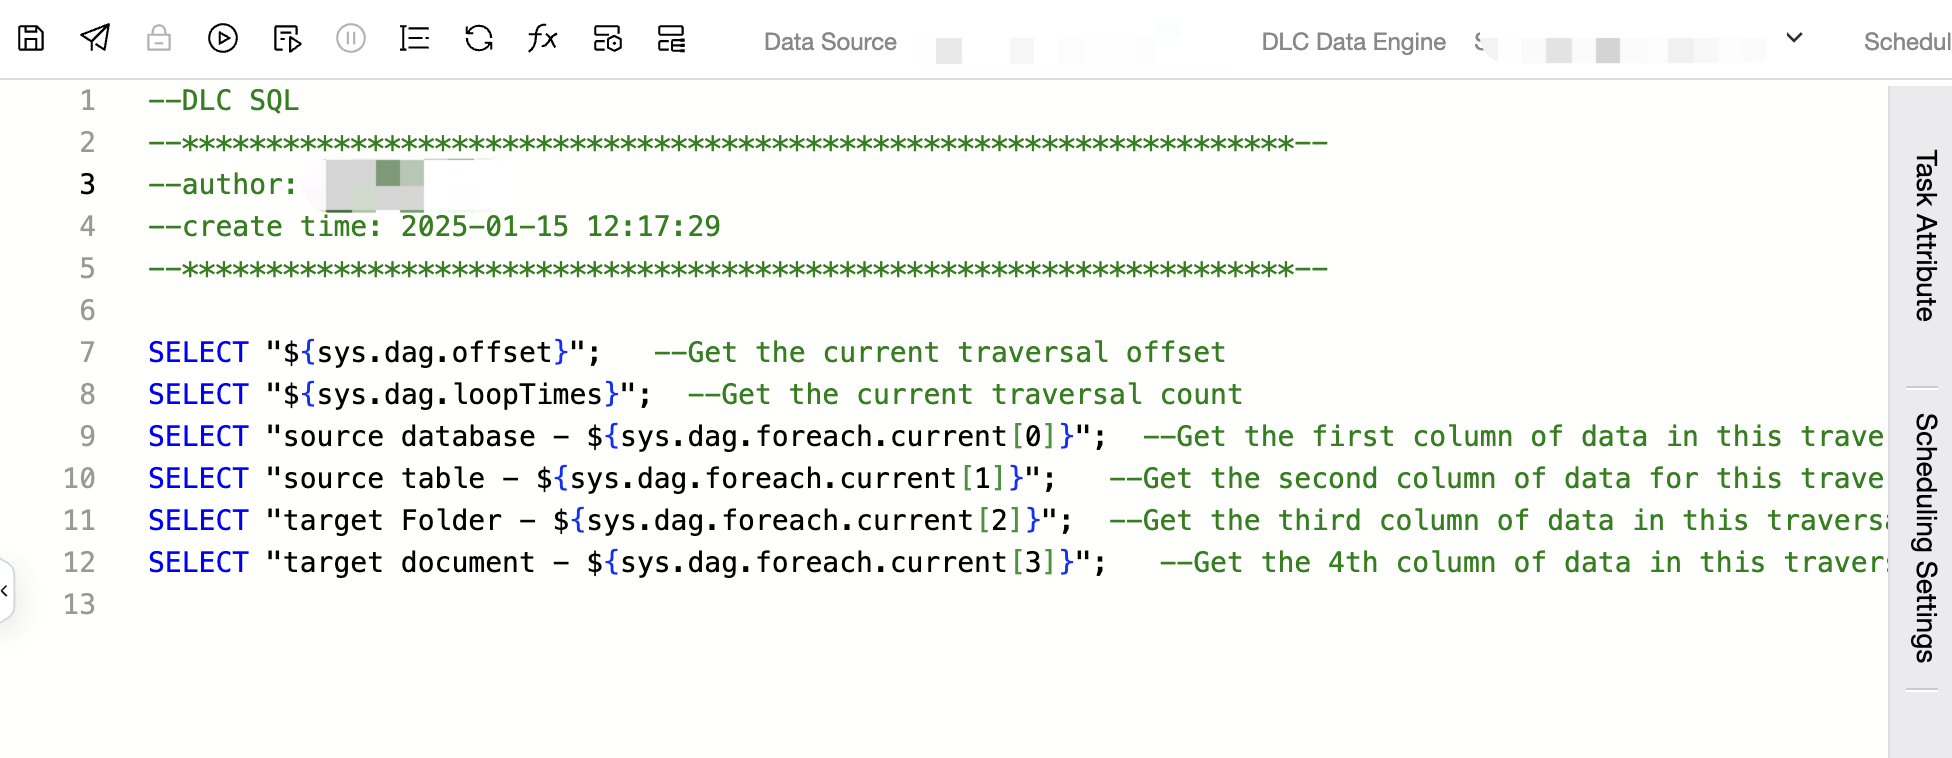
${sys.dag.loopTimes}
Obtain the current traversal count, that is, starting from 1, obtain which loop the current loop corresponds to.
First loop:
1
Second loop:
2
Third loop:
3
${sys.dag.offset}
The current offset, that is, starting from 0, obtain which loop the current loop corresponds to.
First loop:
0
Second loop:
1
Third loop:
2
${sys.dag.foreach.current[n]}
When the output result of the upstream assignment node is a two-dimensional array, obtain the data of the nth column of the current data row each time of traversal. (n starts from 0)
When the output result of the upstream assignment node is a one-dimensional array, obtain the data of the nth column. (n starts from 0)
First loop: ${dag.foreach.current[0]}:
001
Second loop: ${dag.foreach.current[1]}:
Helen
Third loop: ${dag.foreach.current[2]}:
23
${sys.dag.loopDataArray[n][m]}
When the output result of the upstream assignment node is a two-dimensional array, obtain the data of the nth row and mth column in the dataset. (n and m start from 0)
${dag.loopDataArray[0][0]}:
001
${dag.loopDataArray[2][3]}:
Female
Parameter Usage Example
The following describes how the above parameters are used in sub-nodes. Built-in parameters are currently supported in script tasks, offline integration tasks, and non-script tasks.
Applicable Sub-Node Task Types
Description
Usage Example
Script Sub-Node
The above built-in parameters can be directly used in the SQL script.
Offline Integration Sub-Node
All input boxes can support the use of system variables.
For example: source and target database, source and target table, filtering condition, advanced parameter, pre-SQL, post-SQL, COS path.
Non-Script Sub-Node
Non-Script Task Node: EMR-Spark, TCHouse-X, DLC Spark, DLC PySpark, MapReduce support the use of built-in variables, with configurable items including:
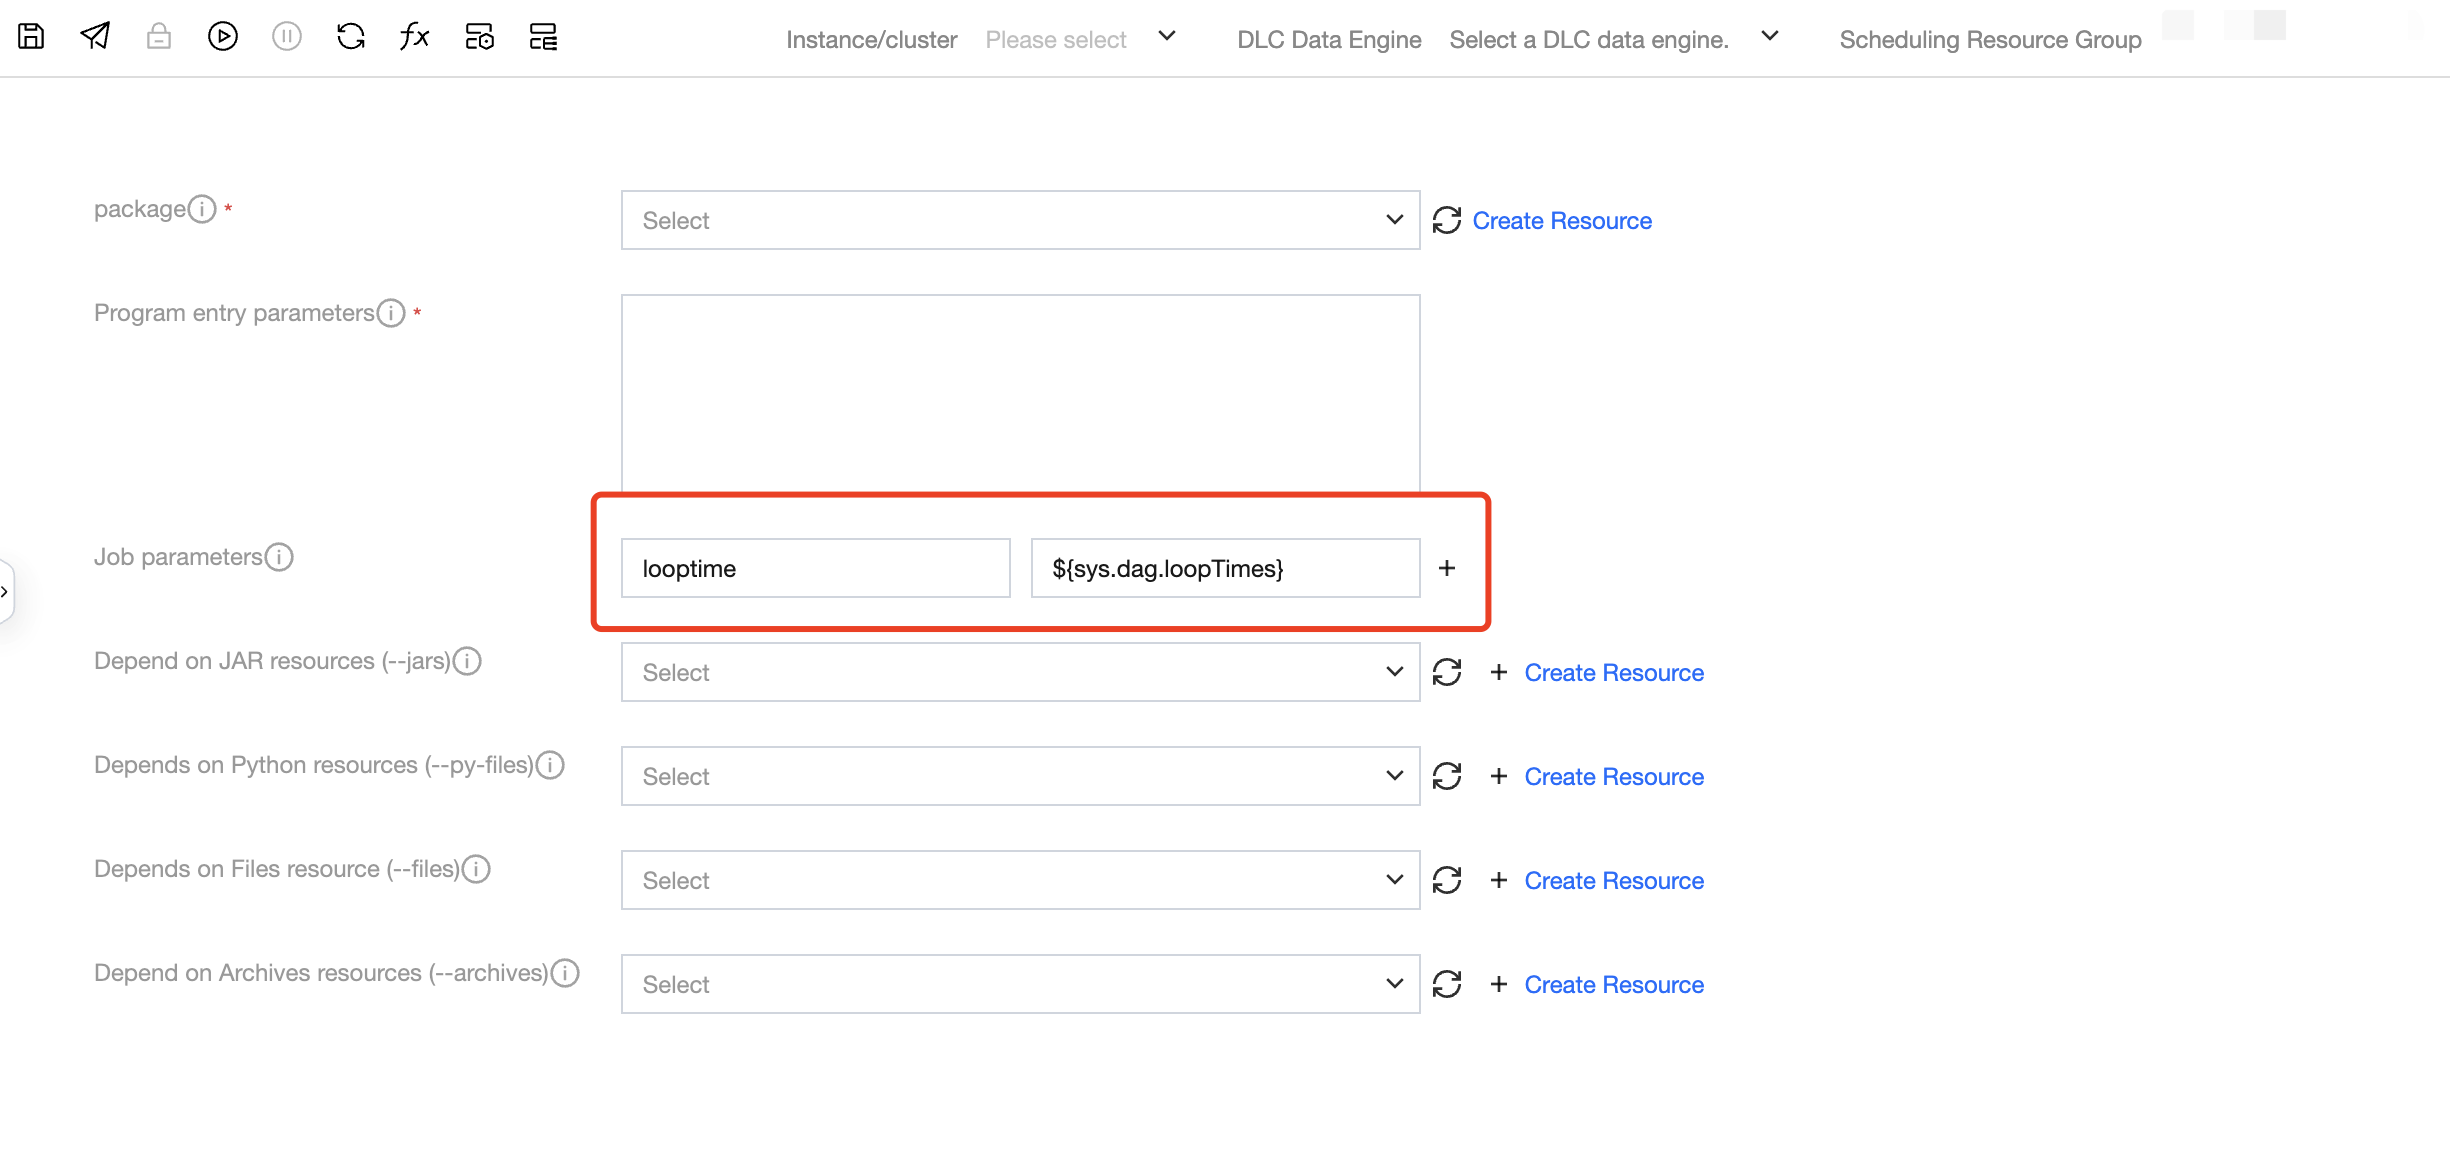
EMR-Spark-jar: program input parameter, application parameter, job parameter.
Data from different cities exists in different DLC tables, and users expect to synchronize this data into different COS files. Without using a For-each node, the number of data integration tasks that need to be configured is equal to the number of cities, resulting in low task configuration efficiency.
If a For-each node is used, information about the source DLC table and the destination COS file can be placed in a single table. Configure a task to pass the table information as a parameter to the For-each node. Then, read the parameters in the For-each node and use built-in parameters to configure the data integration task to achieve the desired effect for the user. Below is an introduction to the specific configuration method.
Step 1: Configure the Upstream Task To Obtain the Source and Destination Information Of the Data Integration Task Table and Pass Parameters Downstream.
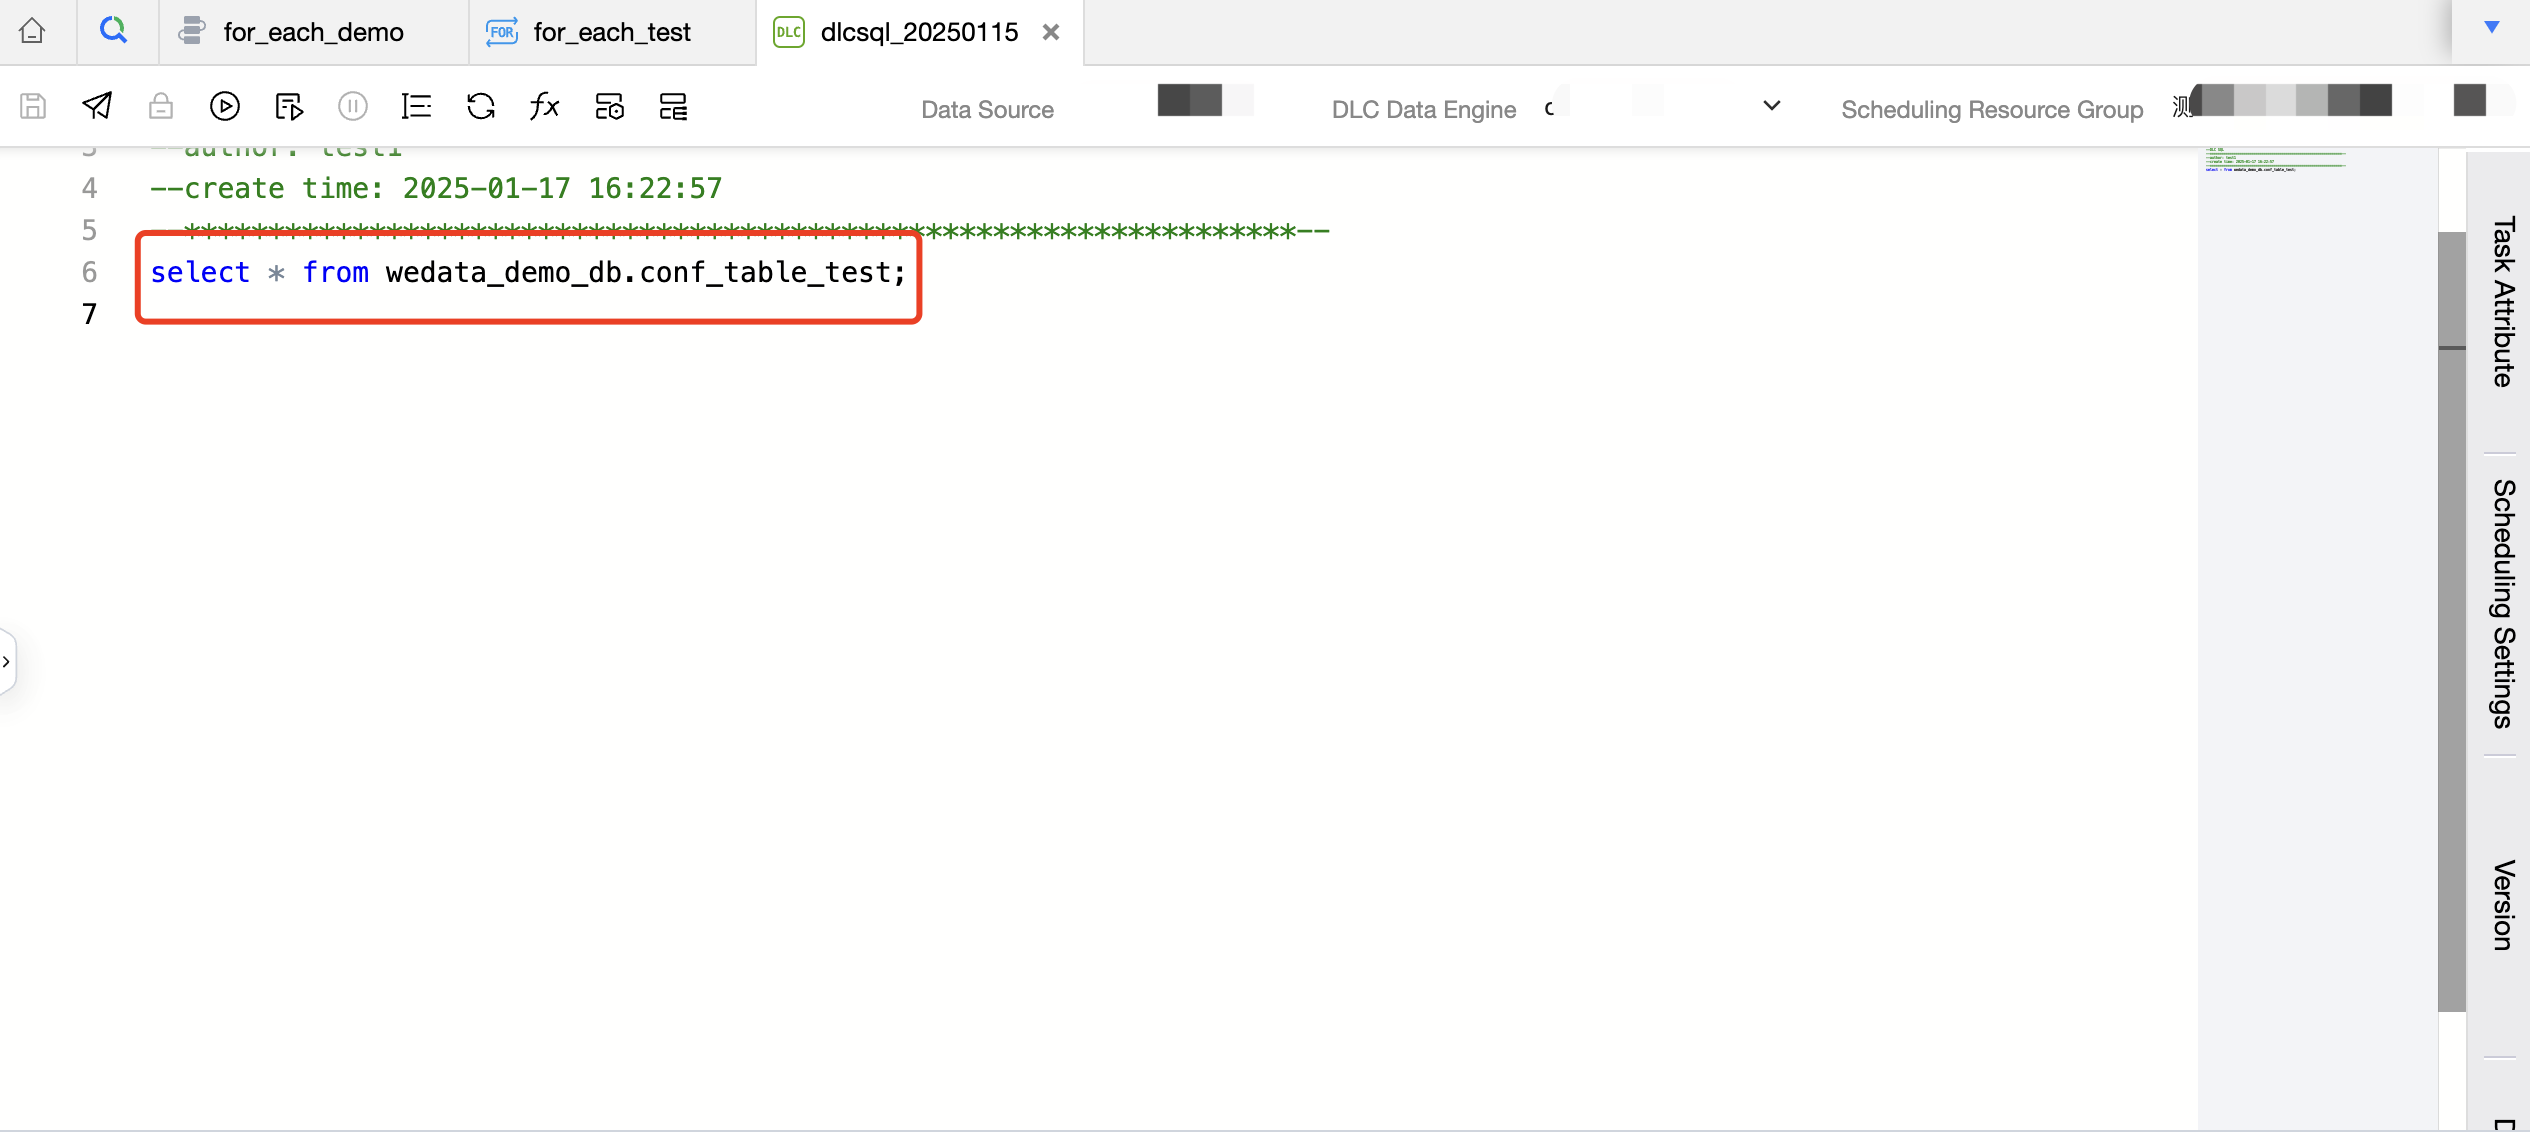
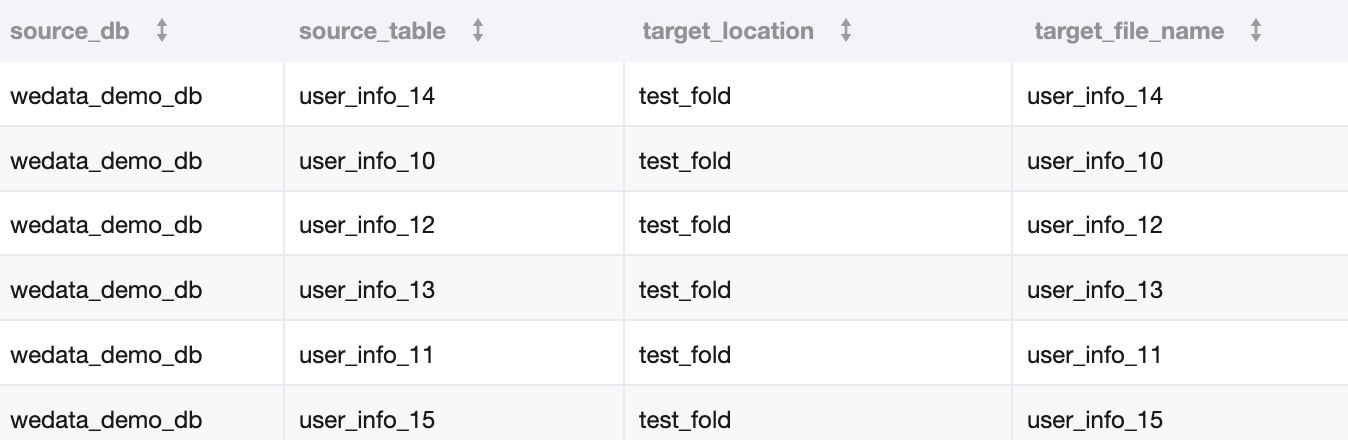
1. Store the data integration source database information, source table information, destination database information, and destination table information in a single DLC table wedata_demo_db.conf_table_test. Create a DLC SQL task and read the data in the table wedata_demo_db.conf_table_test in the DLC SQL task.
Below is the code:
select*from wedata_demo_db.conf_table_test;
2. The data in Table A is as follows:
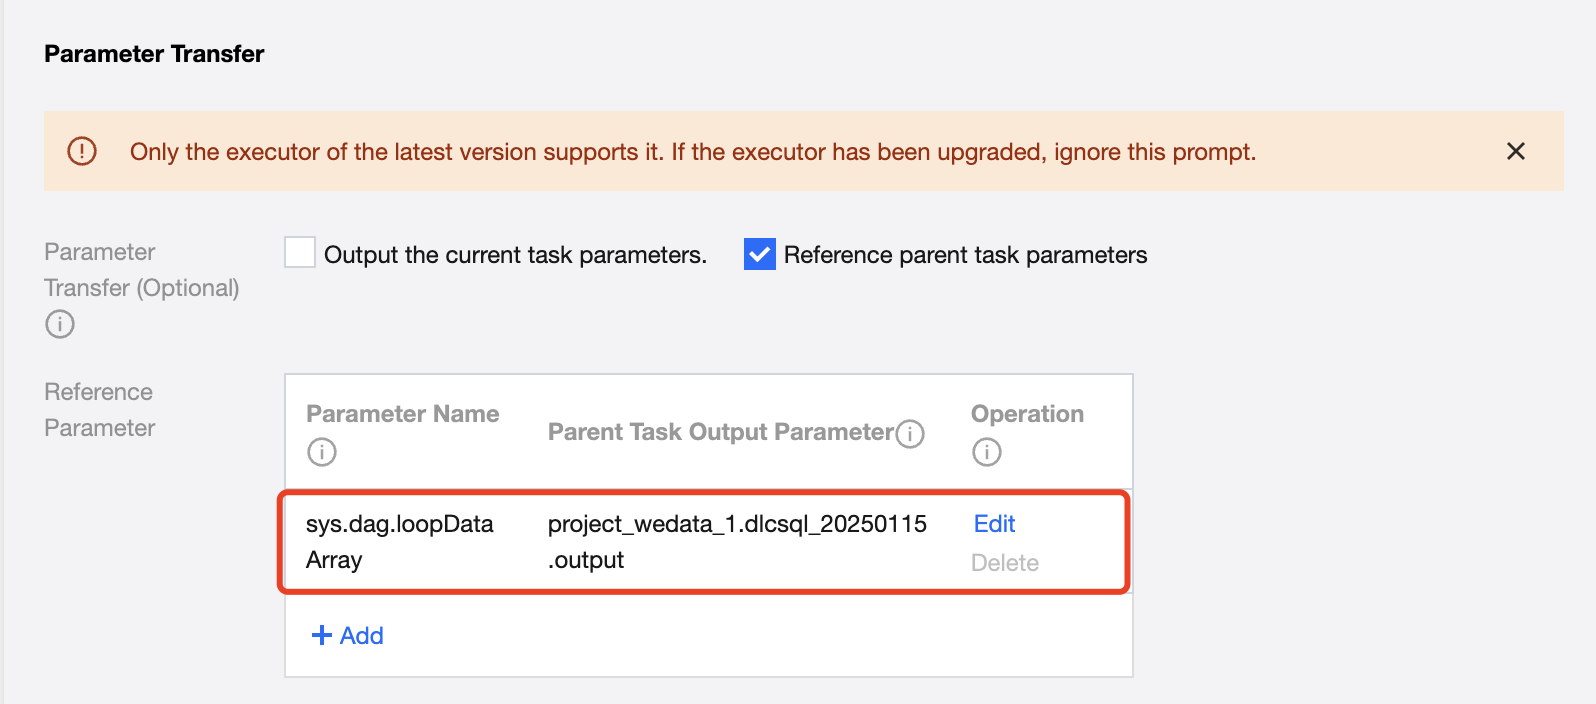
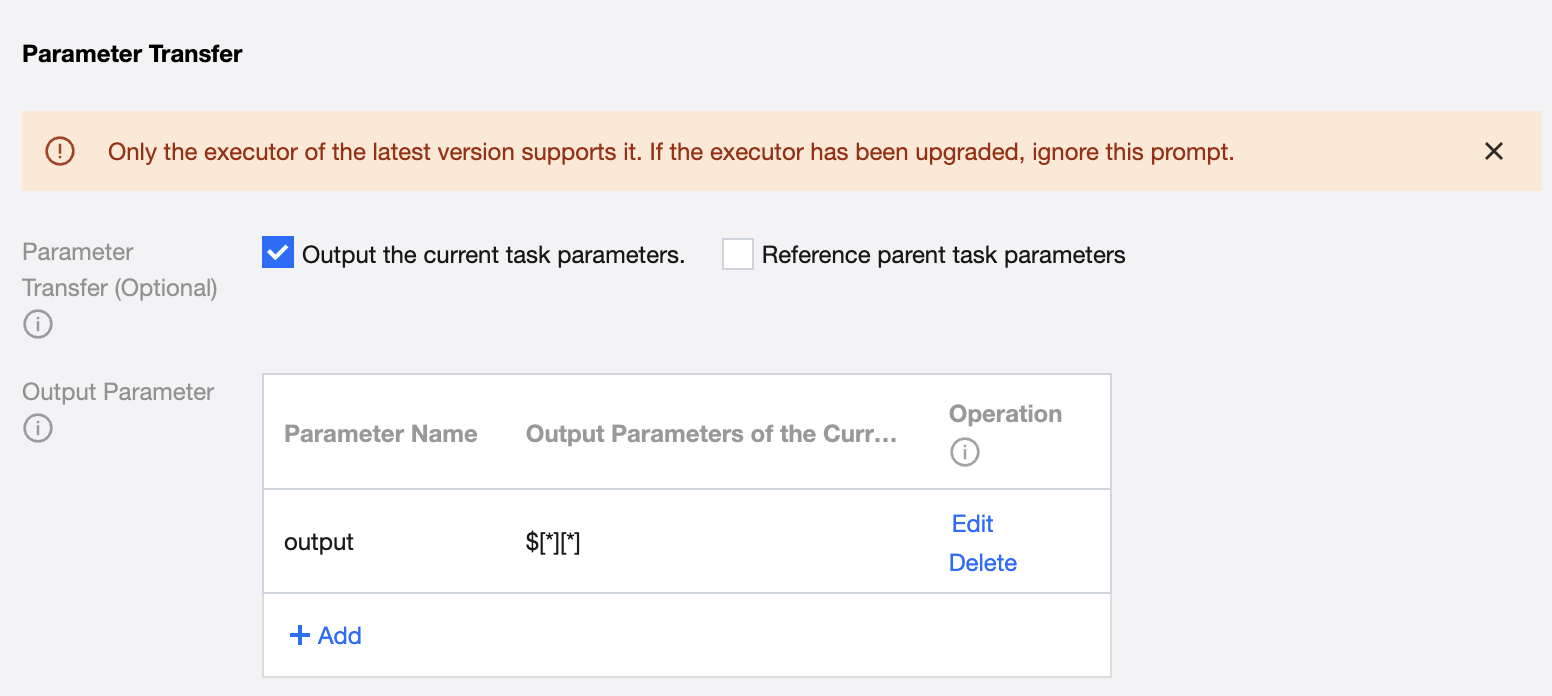
3. The configuration in parameter passing is as follows:
Define the parameter name and current task output parameter, using $[*][*] to indicate that the two-dimensional array is passed to downstream.
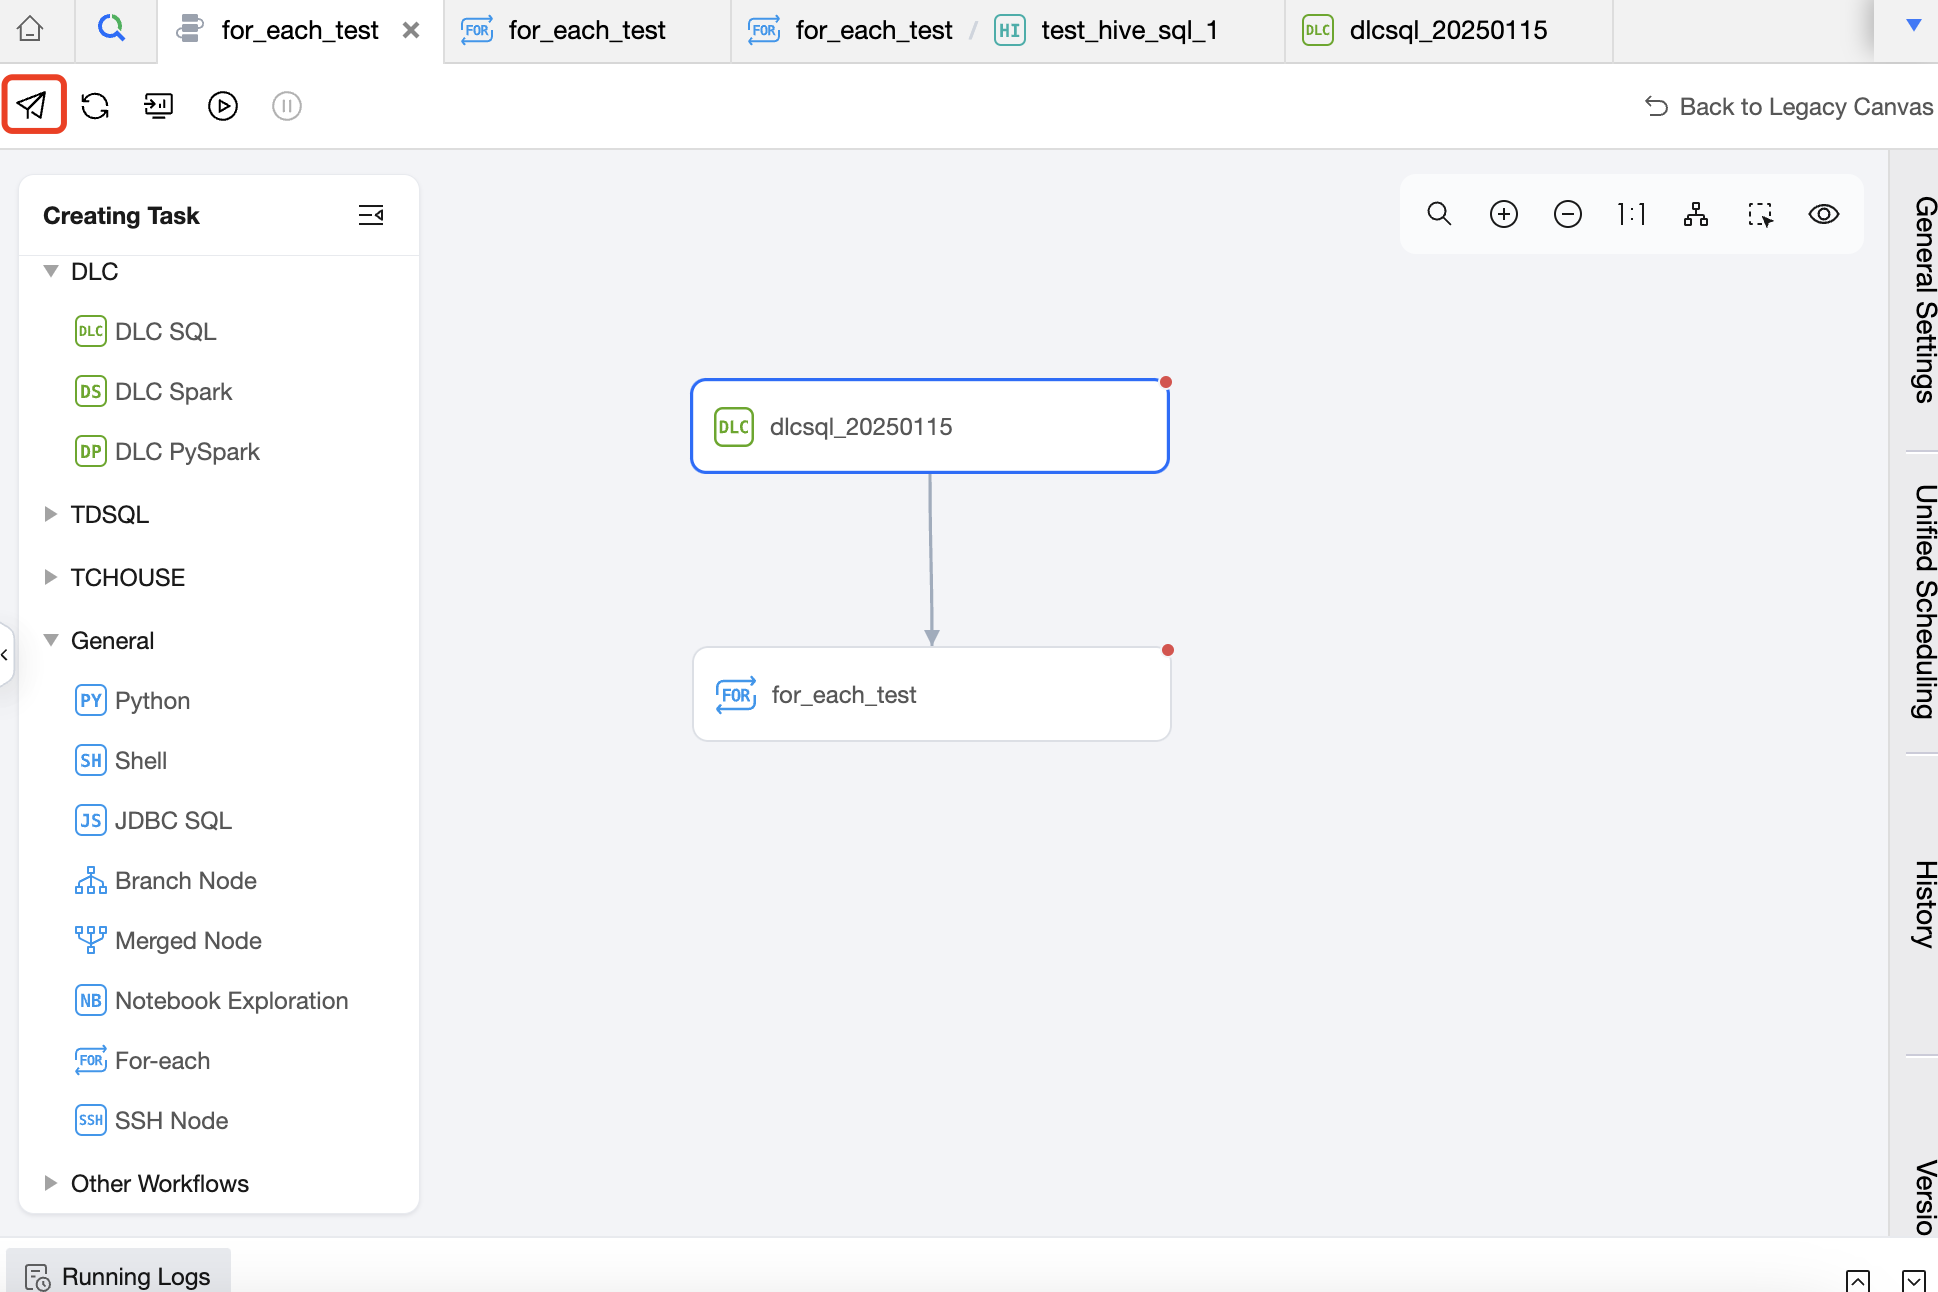
Step 2: Create a For-Each Node and Configure the Child Node Of the For-Each Node - Data Integration Task
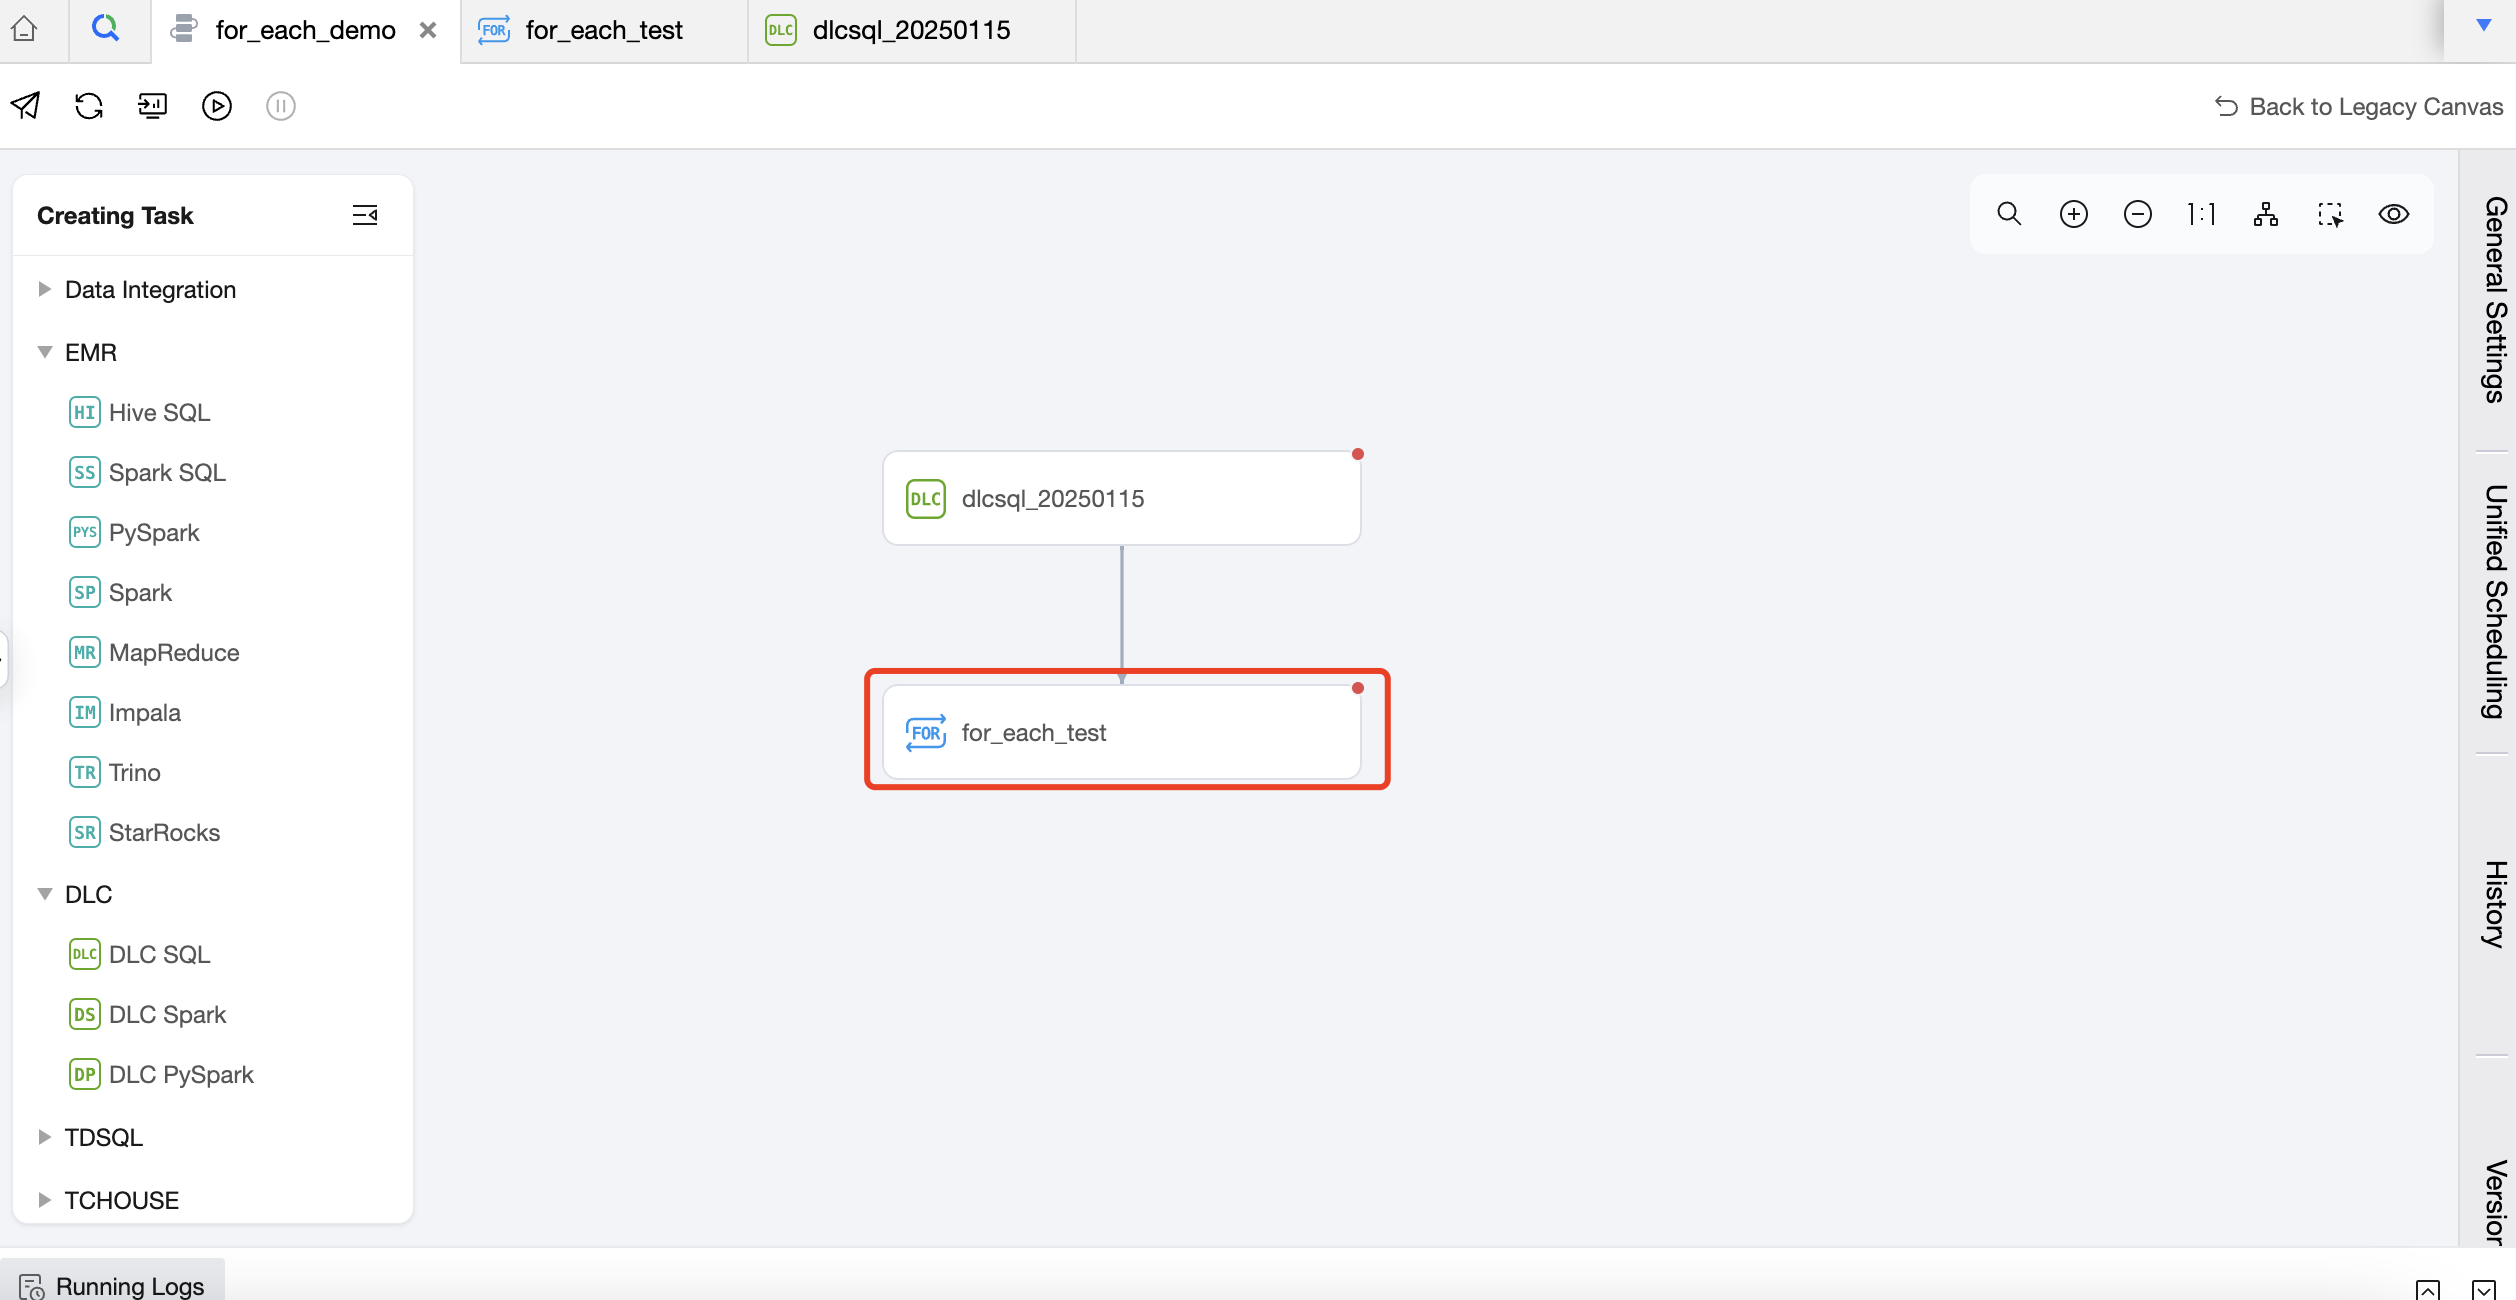
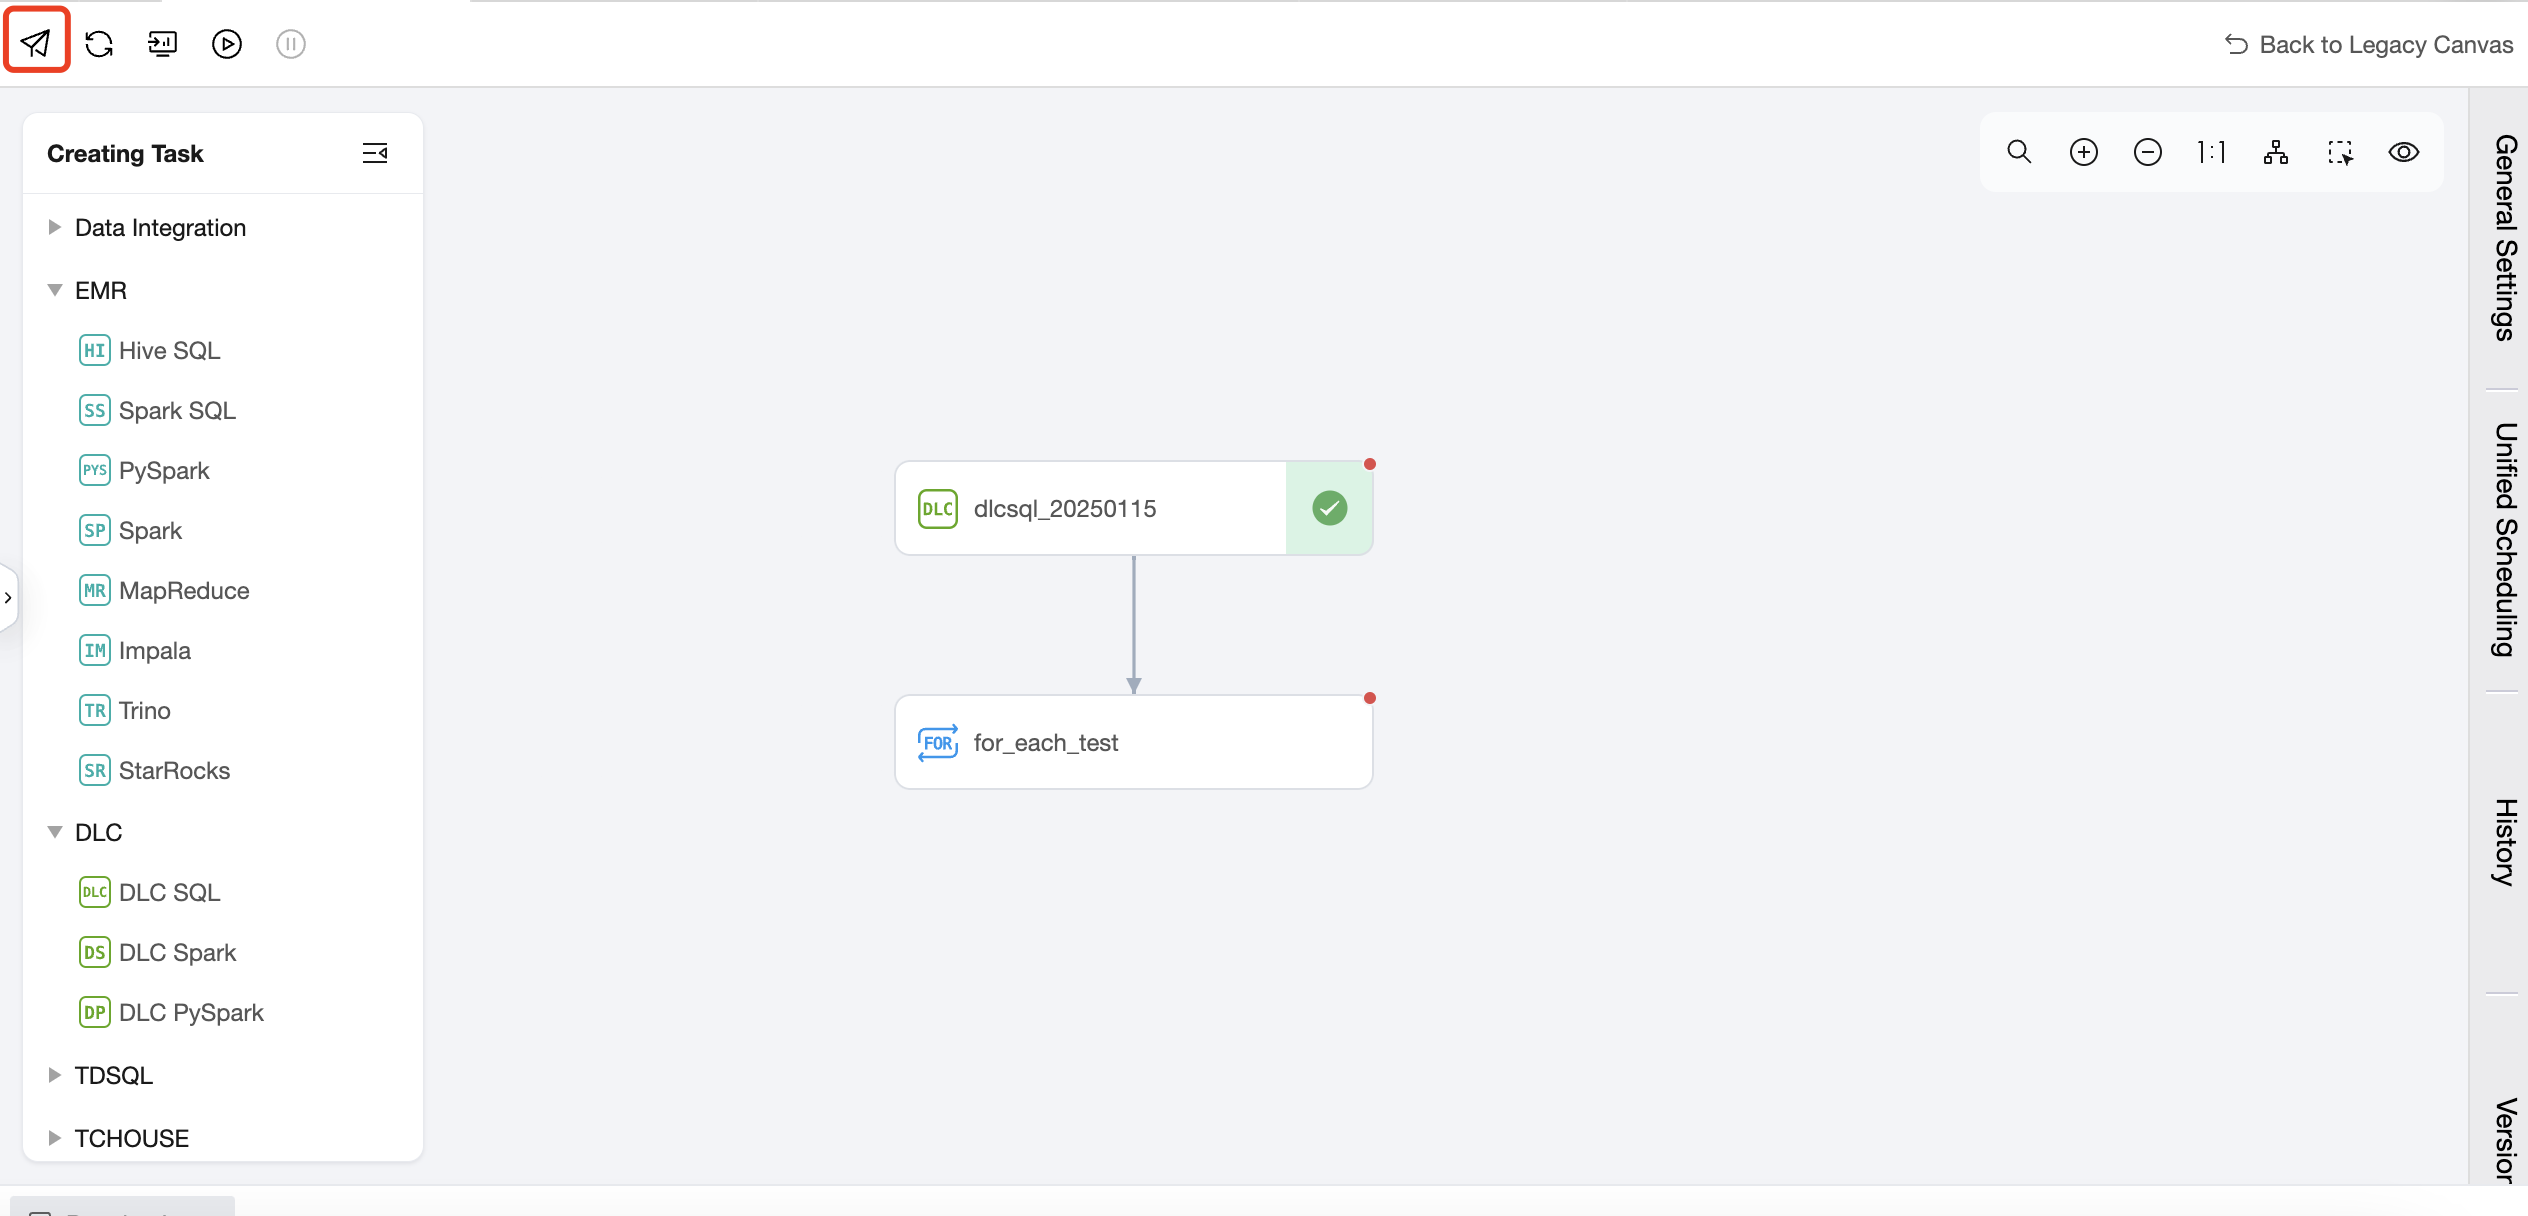
1. Create a For-each node in the workflow and suggest an upstream and downstream relationship with the DLC SQL task.
2. Double-click the For-each node in the workflow to enter the For-each node configuration page and configure the For-each node.
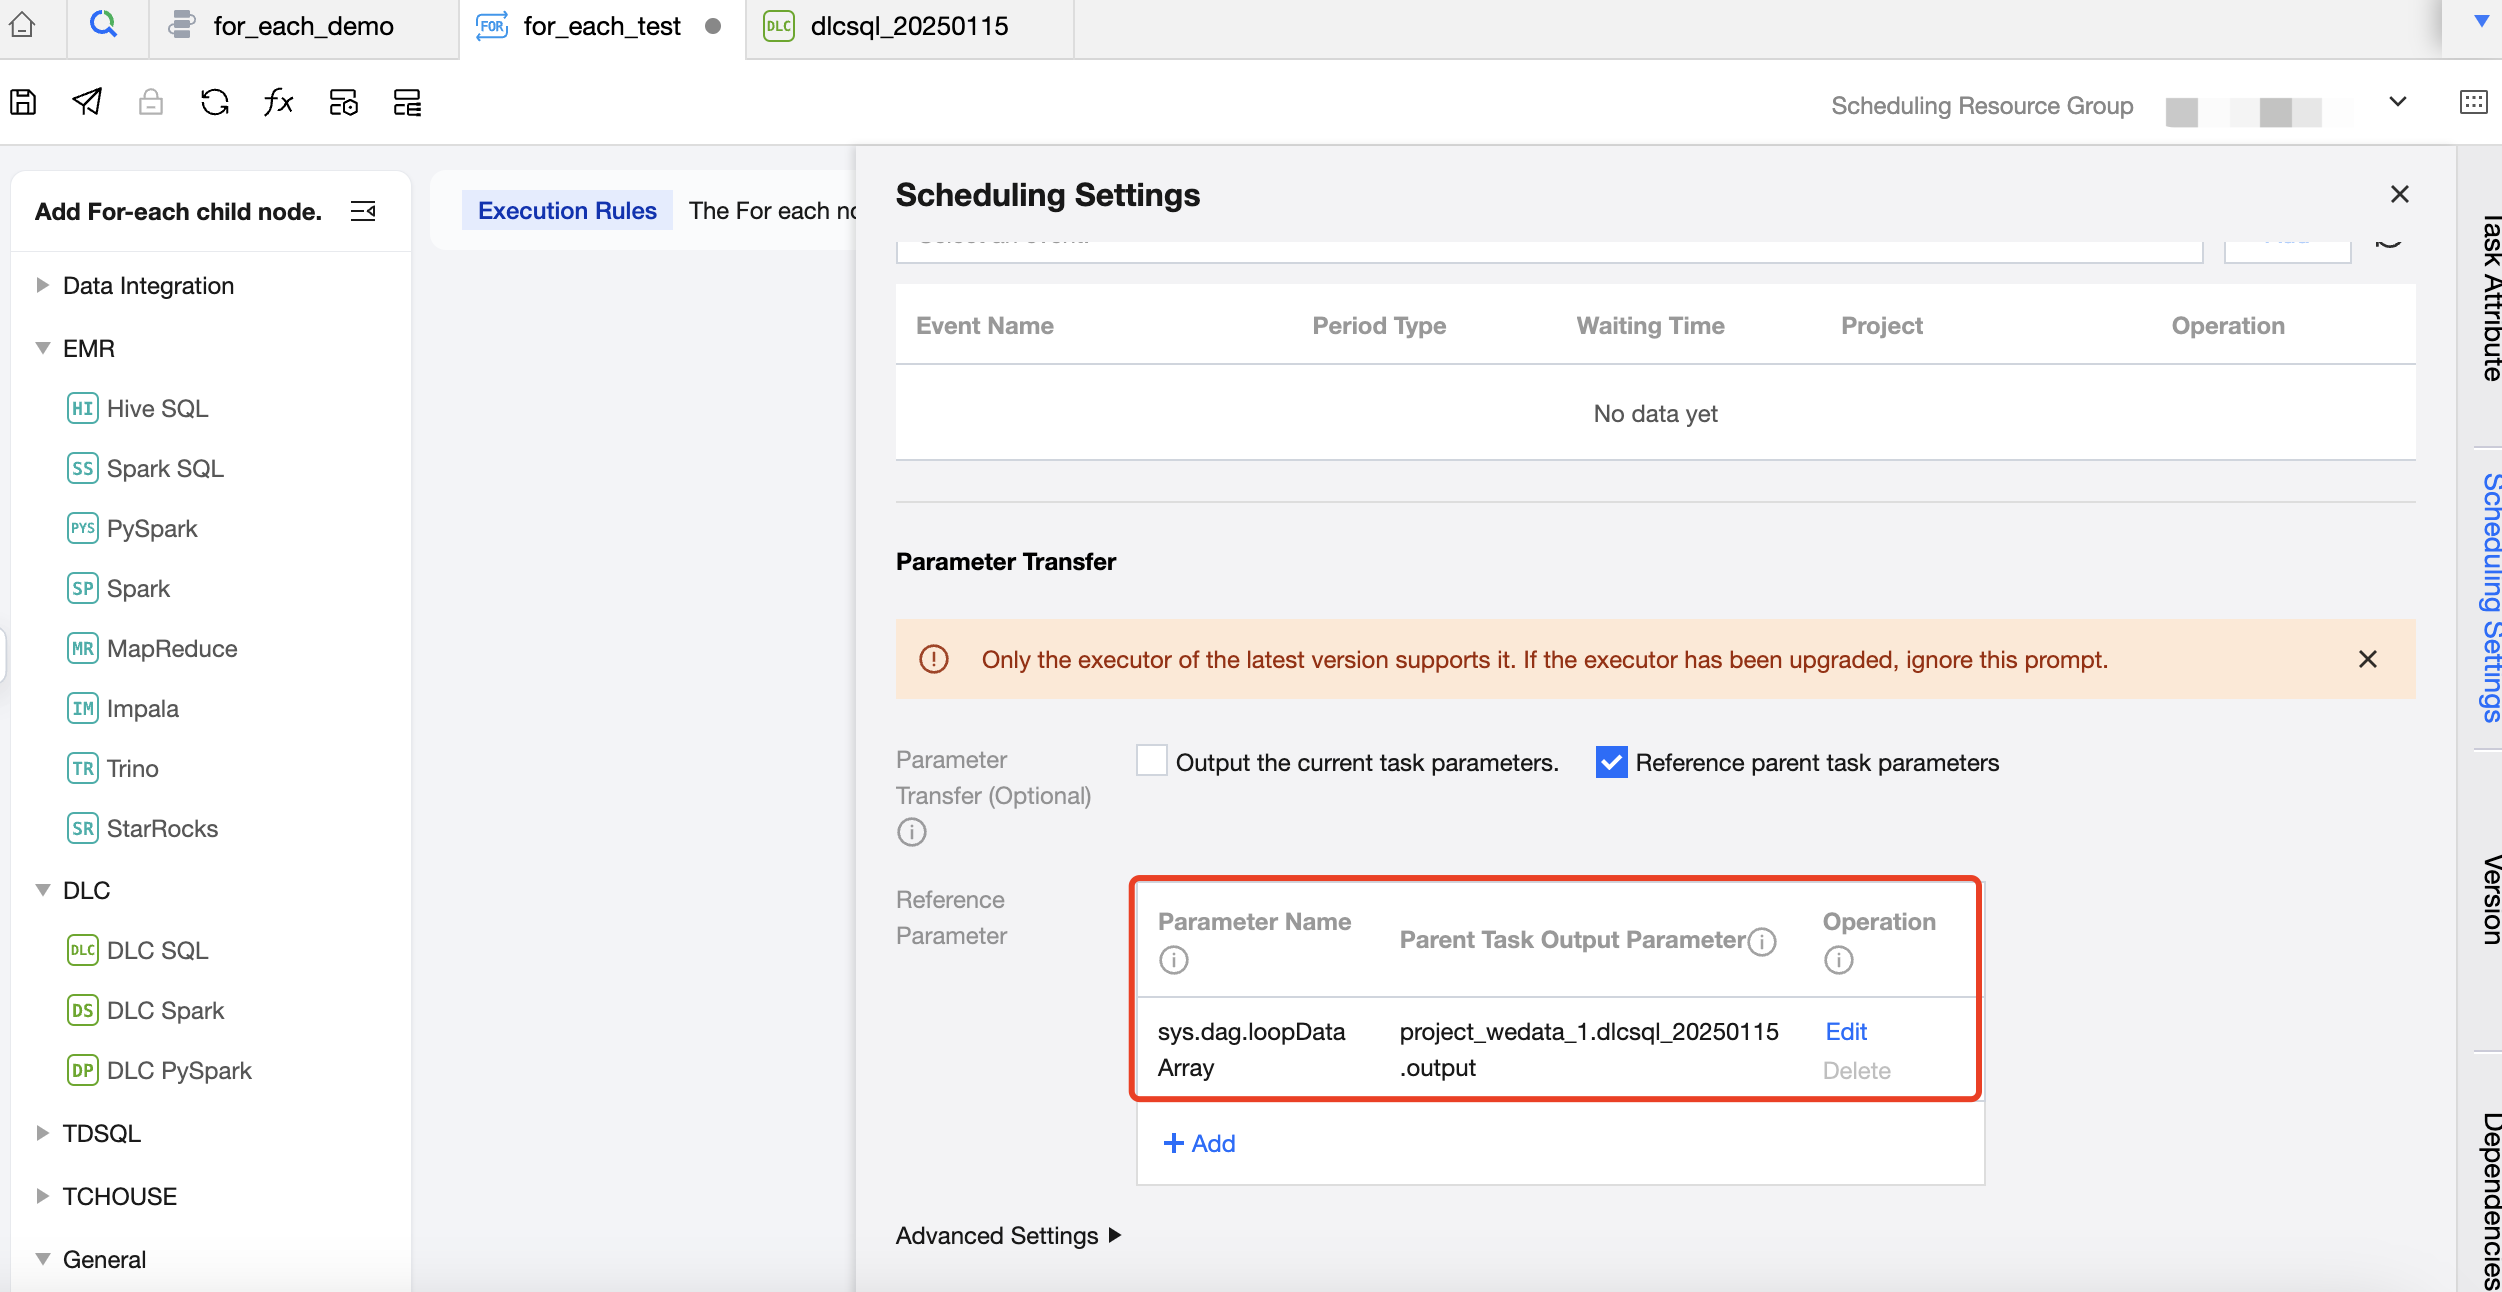
Configure the basic information and scheduling information of the For-each task, with a focus on referencing parent task parameters. Define parameters in the parameter passing module and configure parent task output parameters to read passed parameters from the upstream DLC-SQL.
3. Create a subtask - data integration task in the For-each node, connect it with the START and END nodes, and configure the maximum number of loops.
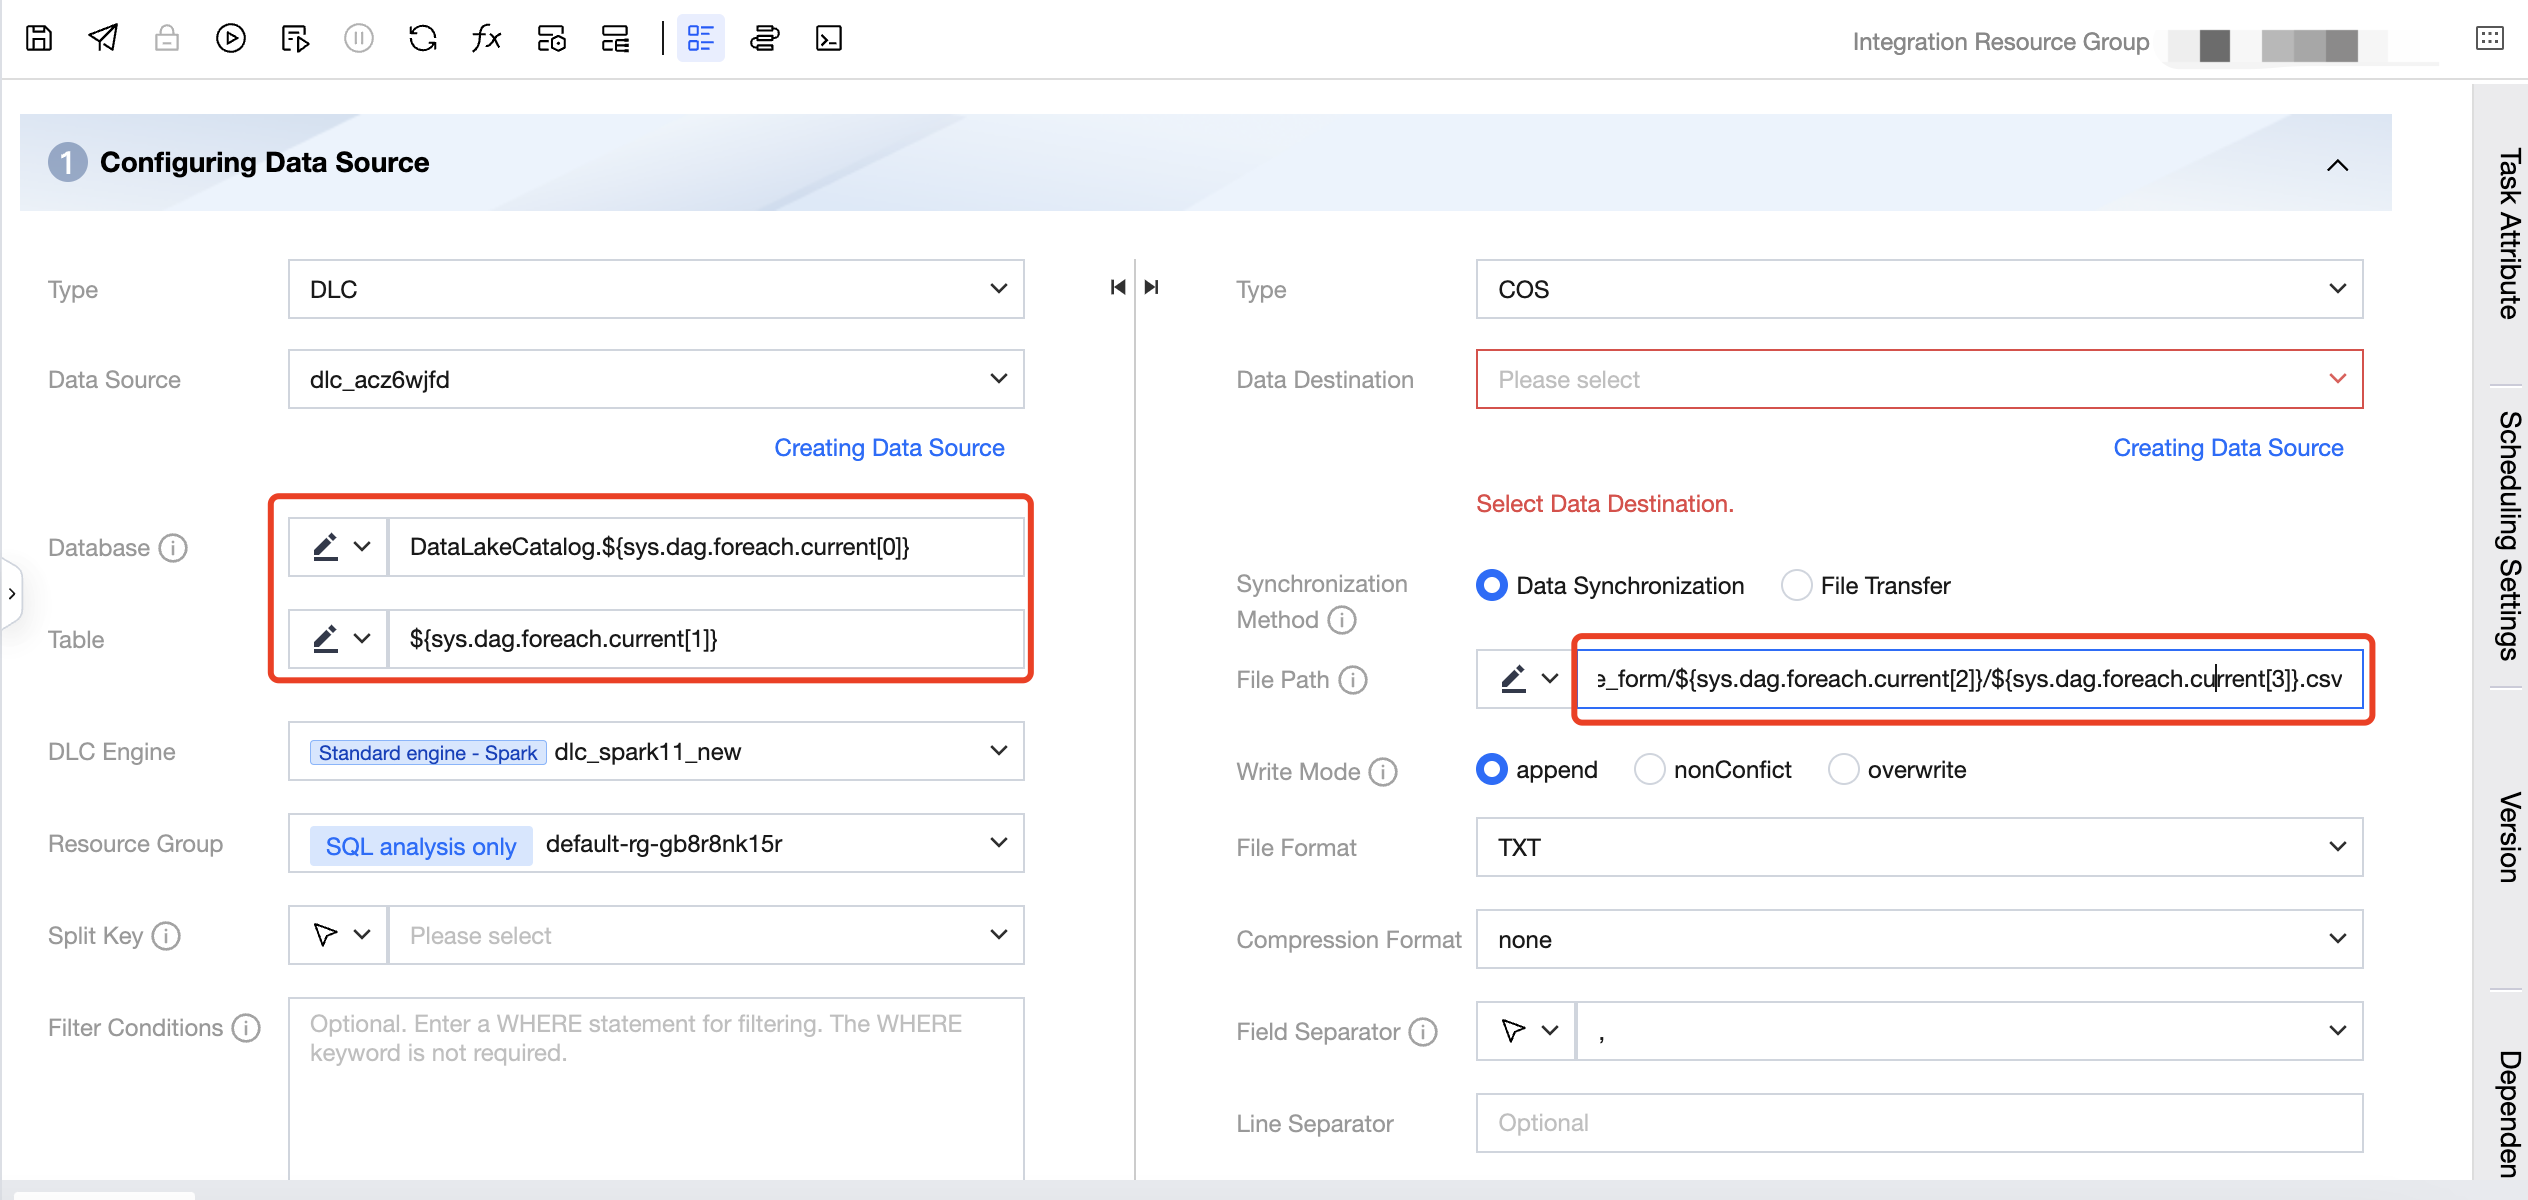
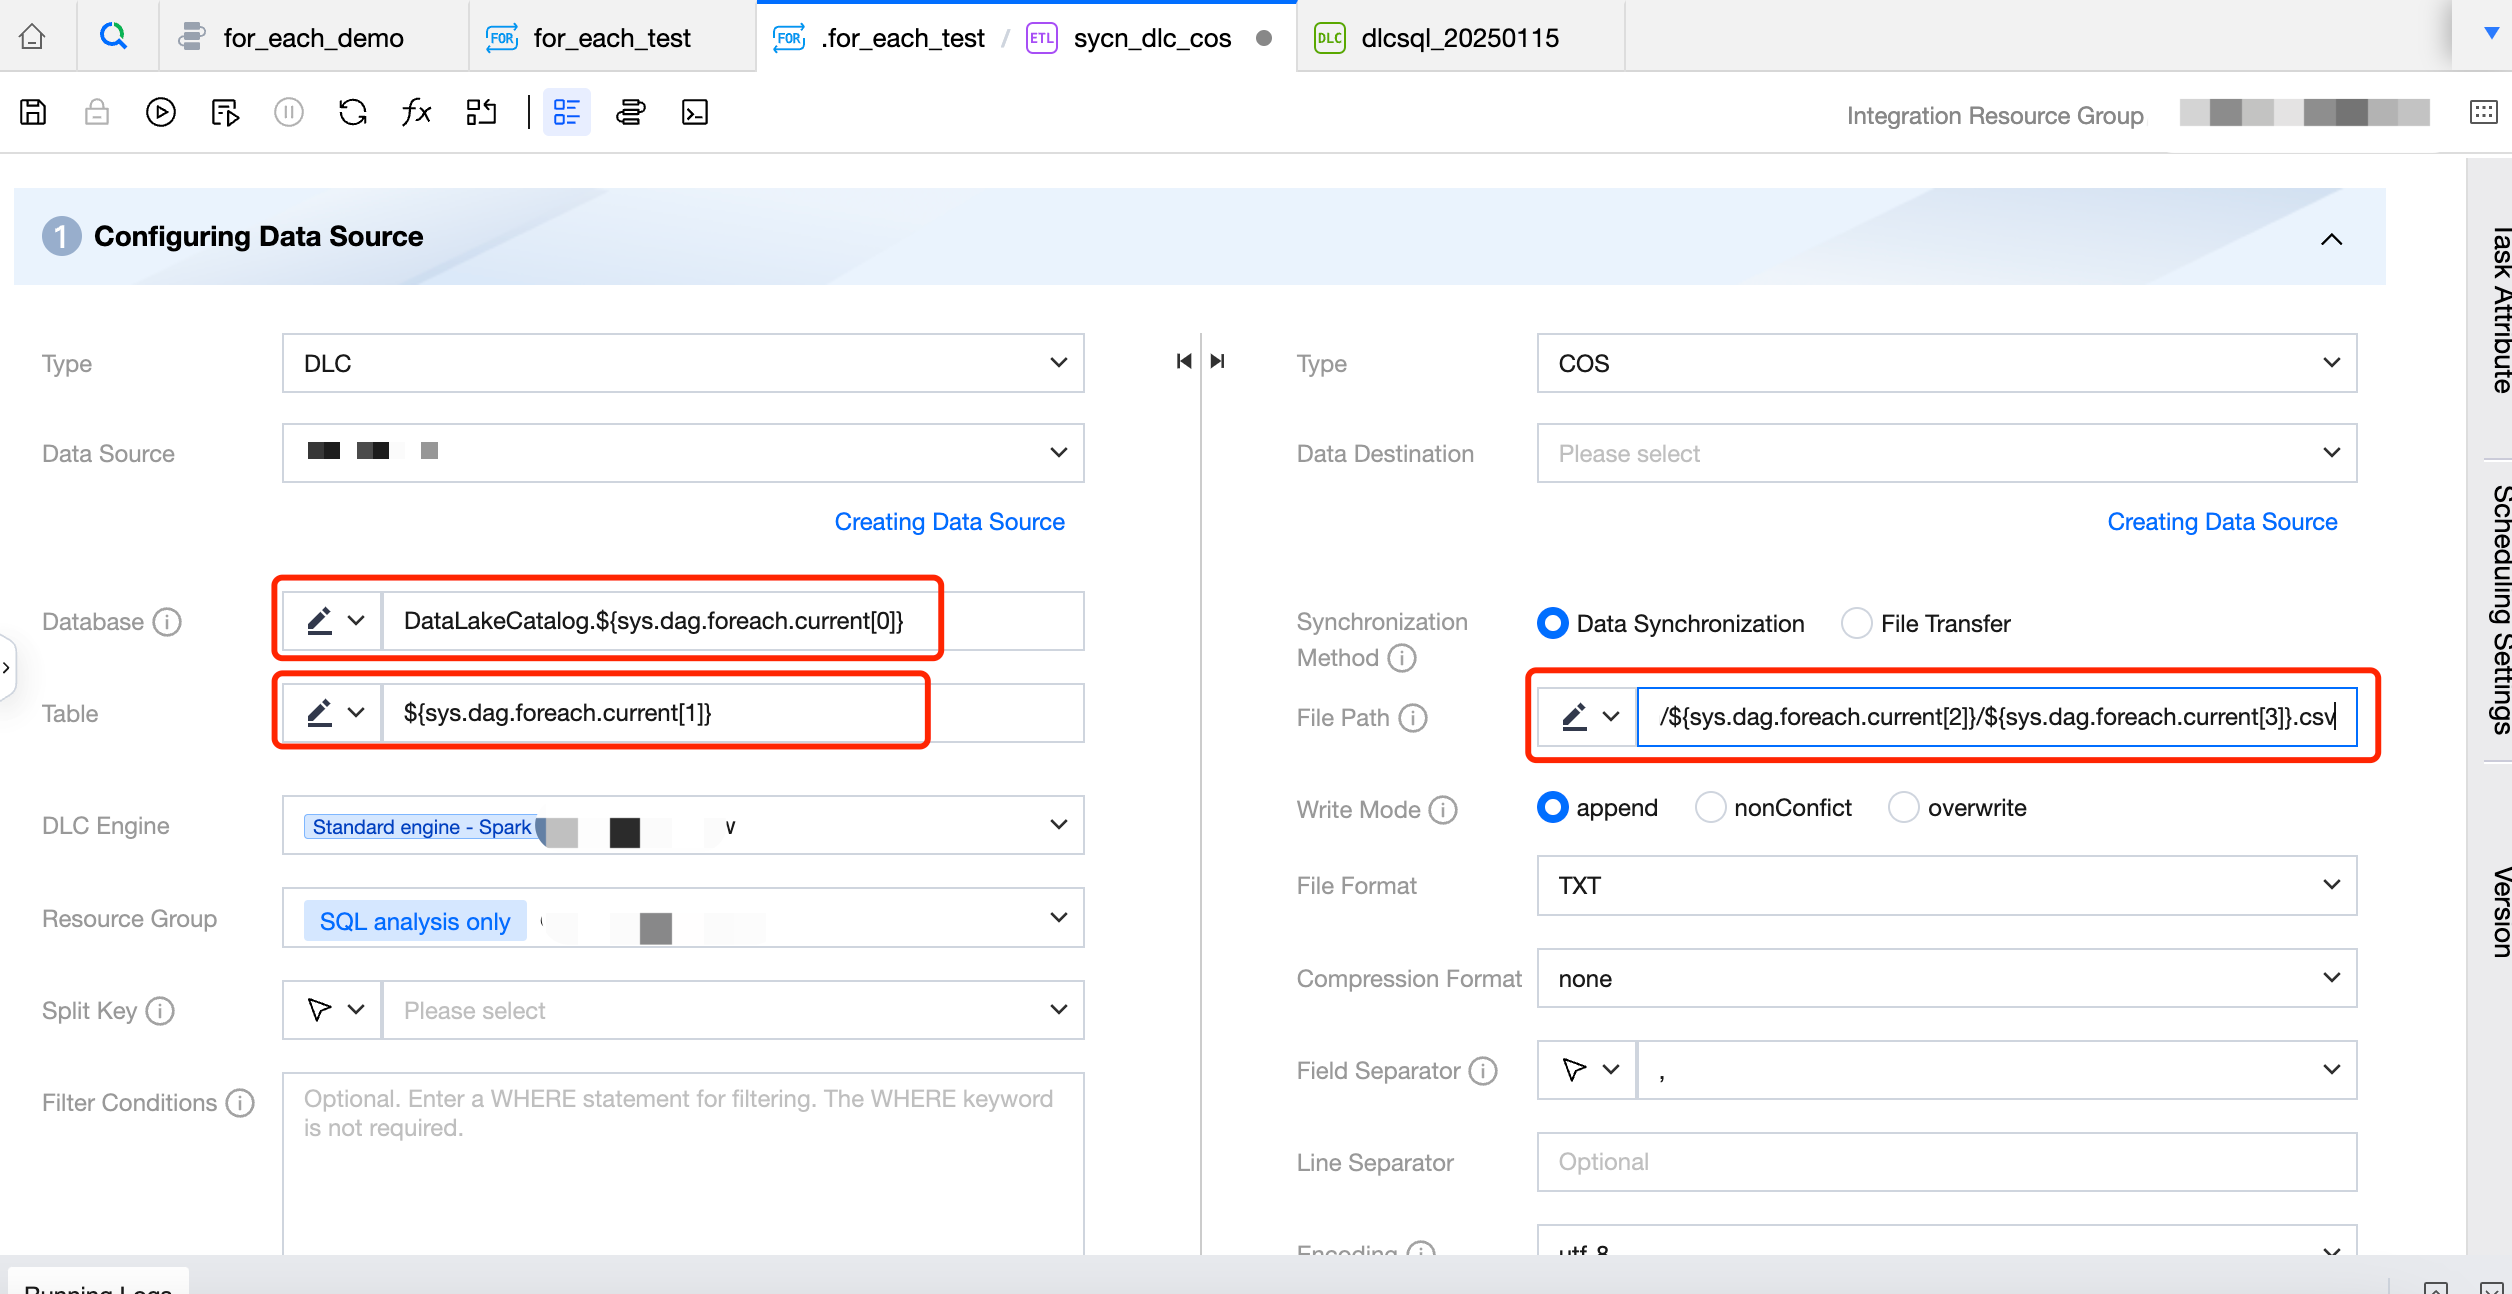
4. Click the Data Integration task to enter and configure the Data Integration task.
The configuration of the source database name needs to reference a built-in parameter, configured as DataLakeCatalog.${sys.dag.foreach.current[0]}, indicating that the source database name changes dynamically with each iteration. The specific database name is obtained from the parameters passed from upstream, representing the data in the 0th column of the current iteration's corresponding row from the upstream parameter, that is, the source database information.
The configuration of the source table is: ${sys.dag.foreach.current[1]}, indicating that the name of the source table changes dynamically with each iteration. The specific table name is obtained from the parameters passed from upstream, representing the data in the 1st column of the current iteration's corresponding row from the upstream parameter, that is, the source table information.
The COS path for the destination is configured as: COS:/Bucket Name/dlc_write_form/${sys.dag.foreach.current[2]}/${sys.dag.foreach.current[3]}.csv, indicating that the COS path changes dynamically with each iteration. Here, the data from the 2nd and 3rd columns of the current iteration's corresponding row are concatenated to obtain the final COS path.
Based on the above data as columns, the source database table and destination COS path for the integration task are as follows:
Perform the submission in the workflow, submitting both the upstream DLC SQL task and the downstream For-each task to the scheduling.
View Operating Condition In Ops Center
On the instance detail page in the Ops center, you can view the operating condition of the For-each node. For example, here the upstream DLC SQL passed 6 rows of data, so the data integration task of the For-each sub-node was executed a total of 6 times.