Overview
This document describes how to bind a custom domain name to a bucket. You can access the files in the bucket via the custom domain name.
Note:
Up to 20 custom domain names can be added via the COS console. If you want to raise the upper limit of the number of custom domain names, please contact us. After enabling the custom domain name, you also need to configure CNAME domain name resolution for the changes to take effect. For details, see Configure Domain Name Resolution. Directions
2. Click Bucket List on the left sidebar.
3. Click the bucket for which you need to set a domain name to go to the bucket configuration page.
4. In the left sidebar, select Domains and Transfer > Custom Endpoint.
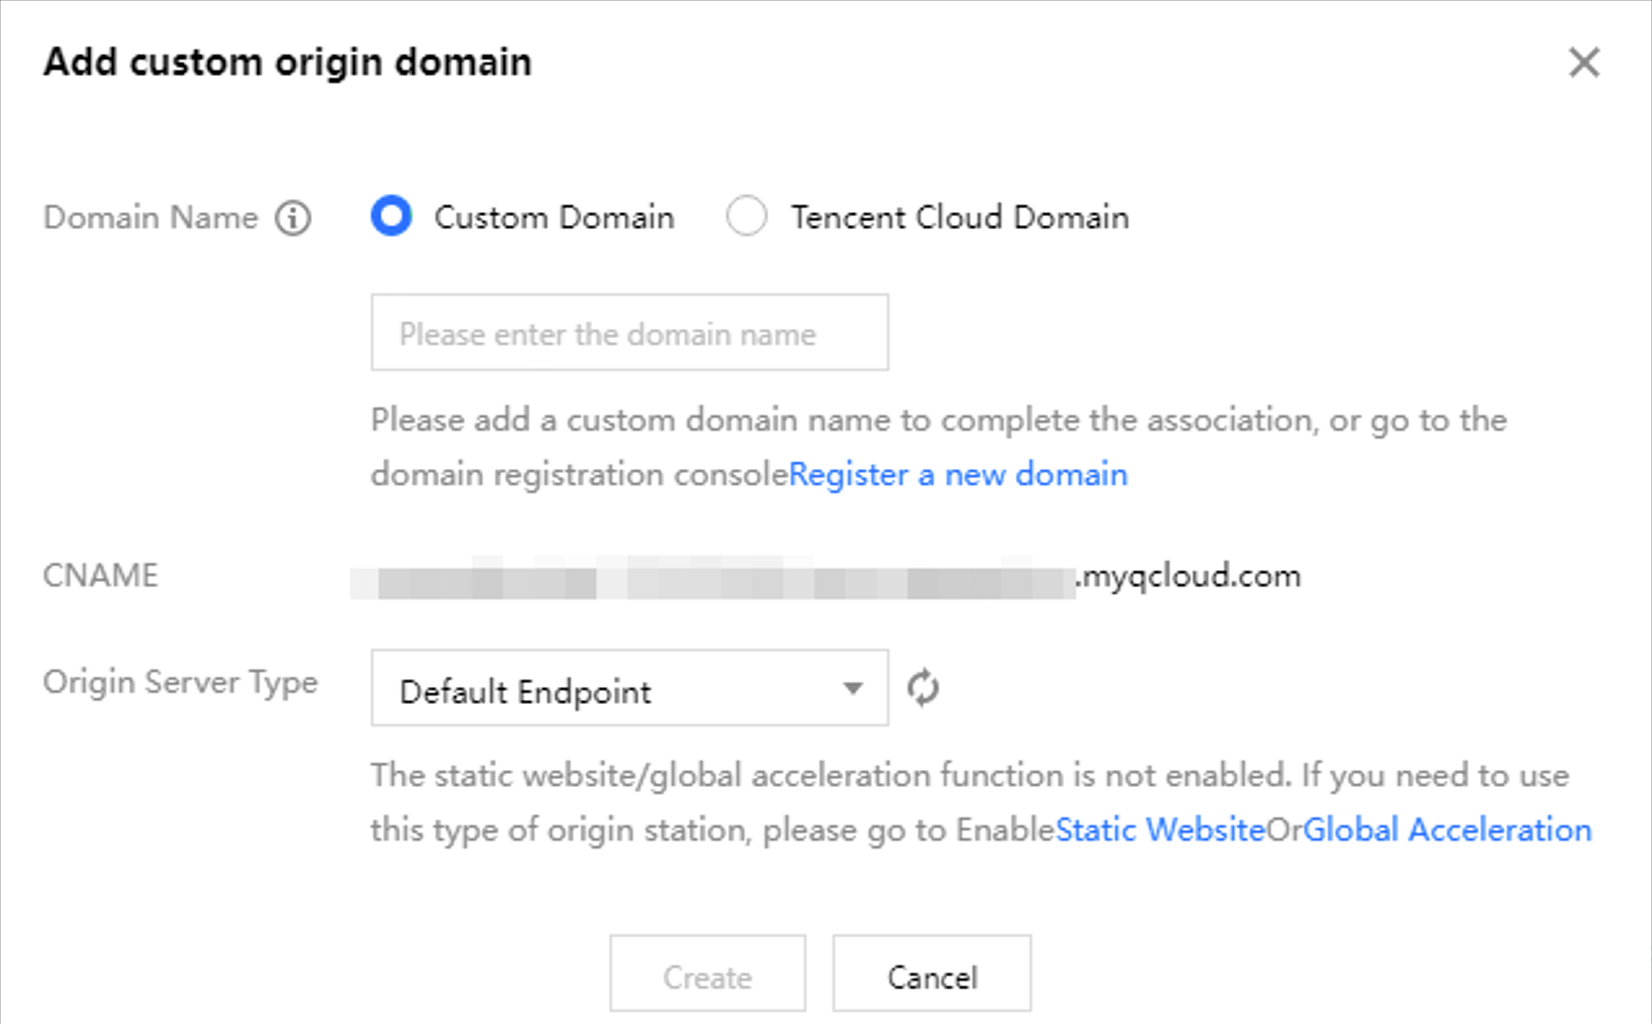
5. On the Custom Endpoint page, click Add Domain. Configuration items are described below.
Domain Name: Enter the custom domain name to be bound (for example, www.example.com) or scroll down to select an existing Tencent Cloud domain name. Please ensure that the entered domain name has been added for resolution at the DNS service provider.
Note:
If you have no available domain name (or need to add a new domain name), click Register a new domain to quickly go to the domain name registration console to perform registration. After the new domain name is registered successfully, you can select "Tencent Cloud domain name" and drop down to select that domain name, then continue with the next operation.
CNAME: Configure the corresponding CNAME record at the DNS service provider to route the request to COS.
Origin Server Type: Divide into the following several types.
Default Endpoint: If you wish to use the custom domain name as the default endpoint, please select the default endpoint.
Static Website Endpoint: If you wish to use the custom domain name as a static website, first enable the static website functionality for the bucket, and then select the static website endpoint.
Global Acceleration Endpoint: If you wish to use the custom domain name for global acceleration, first enable the global acceleration feature for the bucket, and then select the global acceleration endpoint.
6. After the configuration is complete, click Create to see the configured custom endpoint domains on the list page.
Note:
Addition, launch, or offline of domain name operations do not take effect immediately. The actual configuration takes some time and generally takes effect 30 minutes later. It is subject to the actual access status of your domain.
If the domain is bound to a certificate, changing from the default origin, static website origin to the global acceleration origin is not supported at this time. Please submit a ticket for assistance. 7. If you need to configure a certificate, click Bind Certificate
to configure. After binding, it is expected to take effect within 30 minutes. The certificate source supports selecting a newly uploaded certificate or a hosted certificate, as follows. Newly uploaded certificate: The original self-owned certificate. If you wish to use a self-owned certificate, please select this item.
Hosted certificate: The original Tencent Cloud certificate. If you wish to use a certificate applied for by using Tencent Cloud, please select this item.
8. According to the selected certificate source, configure the following information.
Note:
COS in all regions has supported managed HTTPS certificates for custom endpoint domains. If your domain name does not yet have an HTTPS certificate, you can click Apply for Tencent Cloud certificate. You can also achieve HTTPS access by configuring a custom domain name via reverse proxy (with CDN acceleration disabled). Refer to method 2. Newly Uploaded Certificate
Certificate content:
Normally, a certificate is a file with an extension such as.crt or.pem (for example, imgsc.aa.com_bundle.crt). Please use a corresponding text editor to open the certificate file.
The certificate format begins with "-----BEGIN CERTIFICATE-----" and ends with "-----END CERTIFICATE-----".
Include the complete certificate chain in the certificate content.
private key content:
Normally, a private key is a file with an extension such as.key or.pem (for example, imgsc.aa.com.key). Please use a corresponding text editor to open the private key file.
The private key format begins with "-----BEGIN (RSA) PRIVATE KEY-----" and ends with "-----END (RSA) PRIVATE KEY-----".
Managed SSL:
Supports hosting newly uploaded certificates to SSL, with default check. It is recommended that you host them on SSL. After hosting, you can manage the certificates in the SSL console and enjoy managed services such as certificate expiration notifications, alarms, and updates. Normally, a private key is a file with an extension such as.key or.pem (for example, imgsc.aa.com.key). Please use a corresponding text editor to open the private key file.
The private key format begins with "-----BEGIN (RSA) PRIVATE KEY-----" and ends with "-----END (RSA) PRIVATE KEY-----".
Certificate list: Show the hosted certificates list. Include certificate ID, domain name, and certificate expiration time.
9. After successful binding, on the custom endpoint list page, you can see the certificate ID and expiration date of the current certificate.
10. If you wish to rebind the certificate, click Bind Certificate. If you do not wish to bind the current certificate, click Unbind Certificate.
Appendix: Configure Domain Name Resolution
Go to the appropriate DNS service to configure the CNAME Resolution Record. Directions:
1. Add domain: Manually input the custom endpoint domain to be resolved, for example, www.example.com.
2. Add a record: Add a resolution record with record type CNAME for the custom endpoint domain. The record value is the default endpoint of the bucket pointed to by the CNAME, for example, bucket-1250000000.cos.ap-beijing.myqcloud.com.
3. Verify whether the resolution is successful: The resolution record takes some time to take effect. You can use the dig command or COS console to view whether the resolution is successful. Follow these steps for verification: Enter the command dig mydomain.com in the command prompt to check whether the CNAME record has taken effect correctly. (Replace mydomain.com with your custom domain name during use.)
Log in to the COS console, view the custom domain name for bucket. If the CNAME of the domain name does not take effect successfully, a corresponding notification will appear.