COS can be used on Windows mainly with APIs, COSBrowser, or COSCMD.
However, users using Windows Server can only use COSBrowser as cloud storage, which is not friendly to run programs or perform operations. In this case, you can mount the cost-effective COS to Windows Server as local drive by reading this guide.
Note:
Examples given in this document apply only to Windows 7 or Windows Server 2012/2016/2019/2022.
Directions
Download and installation
Three types of software are involved in examples given in this document. You can install the software version that is compatible with your system.
1. Go to GitHub to download WinFsp.
winfsp-1.12.22301 is downloaded as an example. You can then install it with the default options.
Note:
For Windows Server 2012 R2, WinFsp 1.12.22242 is not compatible, but WinFsp 1.11.22176 is compatible.
2. Go to Git or GitHub to download Git.
Git-2.38.1-64-bit is downloaded as an example. You can then install it with the default options.
3. Go to Rclone or GitHub to download Rclone.
rclone-v1.60.1-windows-amd64 is downloaded as an example. Note that you only need to decompress it to any directory named in English (decompressing to a path containing Chinese characters might cause an error). In this example, the package is decompressed to the E:\\AutoRclone.
Note:
If GitHub cannot be opened or offers a low download speed, you can find another way for the download.
Rclone configuration
Note:
The following configuration process takes rclone-v1.60.1-windows-amd64 as an example. Note that the configuration process may vary by version.
1. Open any folder, find This PC in the left navigation pane, right-click and select Properties > Advanced system settings > Environment Variables > System variables > Path**, and click New.
2. In the pop-up window, enter the path where Rclone is decompressed (E:\\AutoRclone) and then click OK.
3. Open Windows PowerShell and run the rclone --version command to check whether Rclone is installed successfully.
4. If Rclone is installed successfully, run the rclone config command in Windows PowerShell.
5. In Windows PowerShell, enter n and then press Enter to create a New remote.
6. In Windows PowerShell, enter the name of the disk (for example, myCOS) and then press Enter.
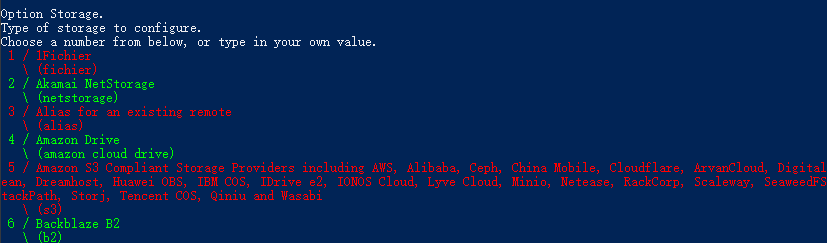
7. From the options that are displayed, select the option containing Tencent COS (that is, enter 5) and then press Enter.
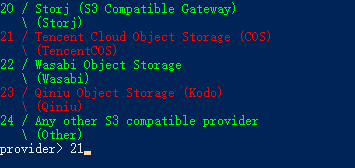
8. From the options that are displayed, select the option containing TencentCOS (that is, enter 21) and then press Enter.
9. When env_auth> is displayed, press Enter.
10. When access_key_id> is displayed, enter the SecretId of COS and then press Enter.
Note:
Using sub-account permissions is recommended. You can go to Manage API Key to view your SecretId and SecretKey.
11. When secret_access_key> is displayed, enter the SecretKey of COS and then press Enter.
12. Choose the region of the bucket according to the gateway addresses of the Tencent Cloud regions that are displayed.
The Guangzhou region is used as an example herein. Therefore, you can enter 4 (cos.ap-guangzhou.myqcloud.com) and then press Enter.
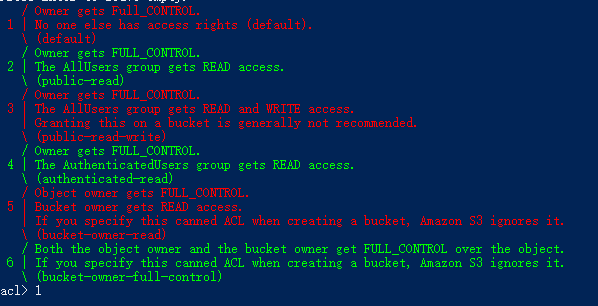
13. Select the object permission (such as default or public-read) as needed, which takes effect only for objects that are uploaded later. default is used as an example herein. Therefore, you can enter 1 and then press Enter.
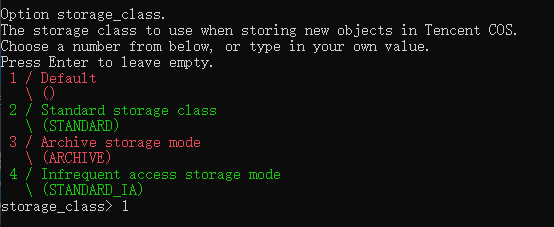
14. Select the storage class for your objects uploaded to COS. Default is used as an example herein. Therefore, you can enter 1 and then press Enter.
Default: default option
Standard storage class: STANDARD
Archive storage mode: ARCHIVE
Infrequent access storage mode: STANDARD_IA
Note:
To use the INTELLIGENT TIERING or DEEP ARCHIVE storage class, use the modifying the configuration file method and then set the value of storage_class to INTELLIGENT_TIERING or DEEP_ARCHIVE. For more information about the storage class, see Overview.
15. When Edit advanced config? (y/n) is displayed, press Enter.
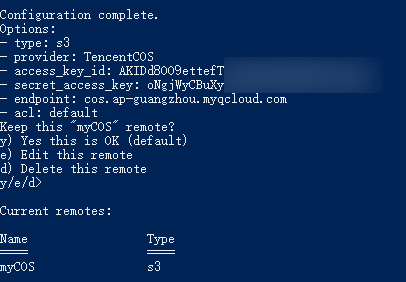
16. After confirming the information, press Enter.
17. Enter q to complete the configuration.
Modifying the configuration file
After the preceding configuration is complete, a configuration file named rclone.conf will be generated in the C:\\Users\\Username\\AppData\\Roaming\\rclone directory. You can directly modify the file to update the Rclone configuration. If the file is not found, you can run the rclone config file command in the command line window to view the Rclone configuration file.
Mounting COS as local drive
1. Open the installed Git Bash and enter the command in it. Two use cases are provided here for your choice as needed.
To mount COS as a shared drive on LAN (recommended), run the following command:
To mount COS as a local drive, run the following command:
rclone mount myCOS:/ Y: --cache-dir E:\\temp --vfs-cache-mode writes &
myCOS: Replace it with the user-defined disk name.
Y: Replace it with the drive letter you want to assign to the drive. Ensure that it does not overlap with other drive letters.
E:\\temp: A local cache directory, which can be set as needed. Note that you have the permission for the directory.
If “The service rclone has been started” is displayed, the mount is successful.
2. Enter exit to close the terminal.
3. Find the myCOS(Y:) drive in This PC.
If you open this drive, you can see all buckets in the Guangzhou region. You can upload, download, create, delete files, and do more via the drive as needed.
Note:
If any error is reported during the process, you can view the error messages from Git Bash.
If you delete a bucket from the drive, the bucket will be deleted, regardless of whether there are objects stored in the bucket or not.
If you change the name of a bucket from the drive, the bucket name in COS will also be changed.
Running the mounted drive automatically at startup
The mounted drive will disappear after the server is restarted. Therefore, you can perform the following operations to set the drive to auto-run at startup.
1. Create the startup_rclone.vbs and startup_rclone.bat files in the E:\\AutoRclone directory.
Note:
Use correct encoding when you create text files through PowerShell. Otherwise, the generated .bat and .vbs files cannot be executed.
2. In startup_rclone.bat, write the following mount command:
If COS is mounted as a shared drive on a LAN, run the following command:
4. Cut the startup_rclone.vbs file to the %USERPROFILE%\\AppData\\Roaming\\Microsoft\\Windows\\Start Menu\\Programs\\Startup directory.
5. Restart the server.
Note:
Usually, the successful mounting prompt will be displayed tens of seconds after auto-mounting configuration is complete and the server is restarted.
More
Using a third-party tool to mount COS to a Windows server as local drive is also available. The following shows the mounting procedure using the TntDrive tool:
1. Download and install TntDrive.
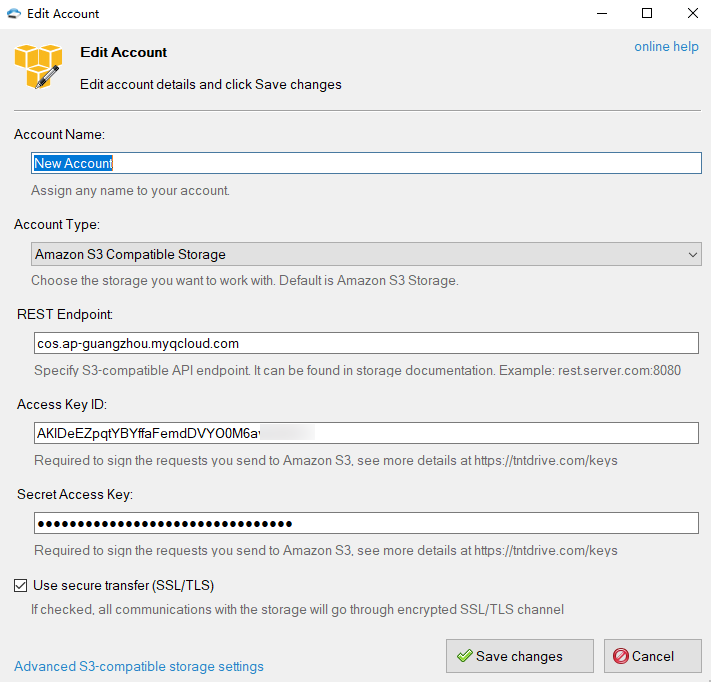
2. Open TntDrive and then click Account > Add New Account to create an account.
The main parameters are described as follows:
Account Name: user-defined account name
Account Type: account type. As COS is compatible with S3, you can select Amazon S3 Compatible Storage.
REST Endpoint: region of your bucket. For example, if your bucket resides in the Guangzhou region, set this parameter to cos.ap-guangzhou.myqcloud.com.
Access Key ID: the value of SecretId, which can be created/obtained at Manage API Key.
Secret Access Key: the value of SecretKey
3. Click Add new account.
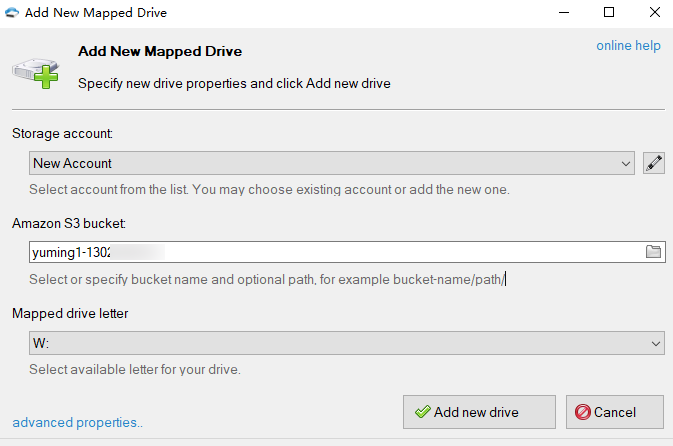
4. In the TntDrive window, click Add New Mapped Drive to create a mapped drive.
The main parameters are described as follows:
Amazon S3 bucket: path or name of the bucket. You can click the icon on the right to select a bucket. In this example, the bucket residing in the Guangzhou region that is set in step 2 is selected (mapping a bucket as a single network drive).
Mapped drive letter: drive letter of the mapped drive, which cannot overlap with existing drive letters.
5. Click Add new drive.
6. Find the drive in This PC. If you want to map all buckets to the Windows server, repeat the steps above.
Reasons for Mounting Failure
1. Check if the following parameters are configured correctly:
Ensure that SecretId and SecretKey are entered correctly.
When selecting Option Storage, make sure to choose TencentCOS.
2. If there is an error, modify the parameters and restart the server to remount.
3. If you are using a non-Administrator built-in account for the mounting operation, there may be issues with not seeing drive letters or directories within the drive. If you must use a non-Administrator account, please carefully disable the Windows UAC feature, and a restart is required for it to take effect. The command to disable Windows UAC is as follows: