tencent cloud

masukan

Accessing COS over HDFS in CDH Cluster

Terakhir diperbarui:2024-03-25 16:04:01

    Overview

    CDH (Cloudera's distribution, including Apache Hadoop) is one of the most popular Hadoop distributions in the industry. This document describes how to access a COS bucket over the HDFS protocol, a flexible, cost-effective big-data solution, in a CDH environment to separate big data computing from storage.
    Note:
    To access a COS bucket over the HDFS protocol, you need to enable metadata acceleration first.
    Currently, the support for big data modules by COS is as follows:
    Module Name
    Supported
    Service Module to Restart
    YARN
    Yes
    NodeManager
    YARN
    Yes
    NodeManager
    Hive
    Yes
    HiveServer and HiveMetastore
    Spark
    Yes
    NodeManager
    Sqoop
    Yes
    NodeManager
    Presto
    Yes
    HiveServer, HiveMetastore, and Presto
    Flink
    Yes
    None
    Impala
    Yes
    None
    EMR
    Yes
    None
    Self-built component
    To be supported in the future
    No
    HBase
    Not recommended
    None

    Versions

    This example uses software versions as follows:
    CDH 5.16.1
    Hadoop 2.6.0

    How to Use

    Configuring the storage environment

    1. Log in to Cloudera Manager (CDH management page).
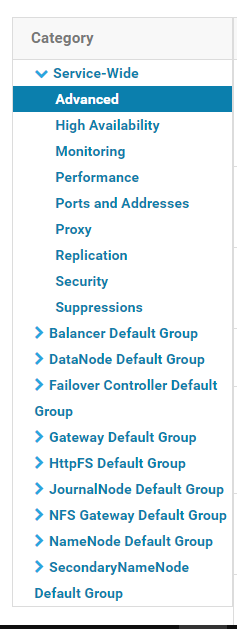
    2. On the homepage, select Configuration > Service-Wide > Advanced as shown below:
    
    
    3. Specify your COS settings in the configuration snippet Cluster-wide Advanced Configuration Snippet(Safety Valve) for core-site.xml.
    <property>
    <name>fs.AbstractFileSystem.ofs.impl</name>
    <value>com.qcloud.chdfs.fs.CHDFSDelegateFSAdapter</value>
    </property>
    <property>
    <name>fs.ofs.impl</name>
    <value>com.qcloud.chdfs.fs.CHDFSHadoopFileSystemAdapter</value>
    </property>
    <!--Temporary directory of the local cache. For data read/write, data will be written to the local disk when the memory cache is insufficient. This path will be created automatically if it does not exist-->
    <property>
    <name>fs.ofs.tmp.cache.dir</name>
    <value>/data/emr/hdfs/tmp/chdfs/</value>
    </property>
    <!--appId-->
    <property>
    <name>fs.ofs.user.appid</name>
    <value>1250000000</value>
    </property>
    The following lists the required settings (to be added to core-site.xml). For other settings, see Mounting COS Bucket to Compute Cluster.
    Configuration Item
    Value
    Description
    fs.ofs.user.appid
    1250000000
    User `appid`
    fs.ofs.tmp.cache.dir
    /data/emr/hdfs/tmp/chdfs/
    Temporary directory of the local cache
    fs.ofs.impl
    com.qcloud.chdfs.fs.CHDFSHadoopFileSystemAdapter
    The implementation class of CHDFS for `FileSystem` is fixed at `com.qcloud.chdfs.fs.CHDFSHadoopFileSystemAdapter`.
    fs.AbstractFileSystem.ofs.impl
    com.qcloud.chdfs.fs.CHDFSDelegateFSAdapter
    The implementation class of CHDFS for `AbstractFileSystem` is fixed at `com.qcloud.chdfs.fs.CHDFSDelegateFSAdapter`.
    4. Take action on your HDFS service by clicking. Now, the core-site.xml settings above will apply to servers in the cluster.
    5. Place the latest client installation package in the path of the JAR package of the CDH HDFS service and replace the relevant information with the actual value as shown below:
    cp chdfs_hadoop_plugin_network-2.0.jar /opt/cloudera/parcels/CDH-5.16.1-1.cdh5.16.1.p0.3/lib/hadoop-hdfs/
    Note:
    The SDK JAR file needs to be put in the same location on each server in the cluster.

    Data migration

    Use Hadoop Distcp to migrate your data from CDH HDFS to a COS bucket. For details, see Migrating Data Between HDFS and COS.

    Using CHDFS for big data suites

    MapReduce

    Directions
    1. Configure HDFS as instructed in Data migration and put the client installation package of COS in the correct HDFS directory.
    2. On the Cloudera Manager homepage, find YARN and restart the NodeManager service (recommended). You can choose not to restart it for the TeraGen command, but must restart it for the TeraSort command because of the internal business logic.
    Sample
    The example below shows TeraGen and TeraSort in Hadoop standard test:
    hadoop jar ./hadoop-mapreduce-examples-2.7.3.jar teragen -Dmapred.map.tasks=4 1099 ofs://examplebucket-1250000000/teragen_5/
    
    hadoop jar ./hadoop-mapreduce-examples-2.7.3.jar terasort -Dmapred.map.tasks=4 ofs://examplebucket-1250000000/teragen_5/ ofs://examplebucket-1250000000/result14
    Note:
    Replace the part after ofs:// schema with the mount point path of your CHDFS instance.

    Hive

    MR engine
    Directions
    1. Configure HDFS as instructed in Data migration and put the client installation package of COS in the correct HDFS directory.
    2. On the Cloudera Manager homepage, find HIVE and restart the Hiveserver2 and HiverMetastore roles.
    Sample
    To query your actual business data, use the Hive command line to create a location as a partitioned table on CHDFS:
    CREATE TABLE `report.report_o2o_pid_credit_detail_grant_daily`(
    `cal_dt` string,
    `change_time` string,
    `merchant_id` bigint,
    `store_id` bigint,
    `store_name` string,
    `wid` string,
    `member_id` bigint,
    `meber_card` string,
    `nickname` string,
    `name` string,
    `gender` string,
    `birthday` string,
    `city` string,
    `mobile` string,
    `credit_grant` bigint,
    `change_reason` string,
    `available_point` bigint,
    `date_time` string,
    `channel_type` bigint,
    `point_flow_id` bigint)
    PARTITIONED BY (
    `topicdate` string)
    ROW FORMAT SERDE
    'org.apache.hadoop.hive.ql.io.orc.OrcSerde'
    STORED AS INPUTFORMAT
    'org.apache.hadoop.hive.ql.io.orc.OrcInputFormat'
    OUTPUTFORMAT
    'org.apache.hadoop.hive.ql.io.orc.OrcOutputFormat'
    LOCATION
    'ofs://examplebucket-1250000000/user/hive/warehouse/report.db/report_o2o_pid_credit_detail_grant_daily'
    TBLPROPERTIES (
    'last_modified_by'='work',
    'last_modified_time'='1589310646',
    'transient_lastDdlTime'='1589310646')
    Perform a SQL query:
    select count(1) from report.report_o2o_pid_credit_detail_grant_daily;
    The output is as shown below:


    Tez engine

    You need to import the client installation package of COS as part of a Tez tar.gz file. The following example uses apache-tez.0.8.5:
    Directions
    1. Locate and decompress the Tez tar.gz file installed in the CDH cluster, e.g., /usr/local/service/tez/tez-0.8.5.tar.gz.
    2. Put the client installation package of COS in the directory generated after decompression and recompress it to output a compressed package.
    3. Upload this new file to the path as specified by tez.lib.uris, or simply replace the existing file with the same name.
    4. On the Cloudera Manager homepage, find HIVE and restart hiveserver and hivemetastore.

    Spark

    Directions
    1. Configure HDFS as instructed in Data migration and put the client installation package of COS in the correct HDFS directory.
    2. Restart NodeManager.
    Sample
    The following uses the conducted Spark example word count test as an example.
    spark-submit --class org.apache.spark.examples.JavaWordCount --executor-memory 4g --executor-cores 4 ./spark-examples-1.6.0-cdh5.16.1-hadoop2.6.0-cdh5.16.1.jar ofs://examplebucket-1250000000/wordcount
    The output is as shown below:


    Sqoop

    Directions
    1. Configure HDFS as instructed in Data migration and put the client installation package of COS in the correct HDFS directory.
    2. Put the client installation package of COS in the sqoop directory, for example, /opt/cloudera/parcels/CDH-5.16.1-1.cdh5.16.1.p0.3/lib/sqoop/.
    3. Restart NodeManager.
    Sample
    For example, to export MySQL tables to COS, refer to Import/Export of Relational Database and HDFS.
    sqoop import --connect "jdbc:mysql://IP:PORT/mysql" --table sqoop_test --username root --password 123 --target-dir ofs://examplebucket-1250000000/sqoop_test
    The output is as shown below:


    Presto

    Directions
    1. Configure HDFS as instructed in Data migration and put the client installation package of COS in the correct HDFS directory.
    2. Put the client installation package of COS in the presto directory, for example, /usr/local/services/cos_presto/plugin/hive-hadoop2.
    3. Presto does not load the gson-2...jar JAR file (only used for COS), from Hadoop Common, so you need to manually put it into the presto directory, for example, /usr/local/services/cos_presto/ plugin/hive-hadoop2.
    4. Restart HiveServer, HiveMetaStore, and Presto.
    Sample
    The example below queries the COS scheme table as a HIVE-created Location:
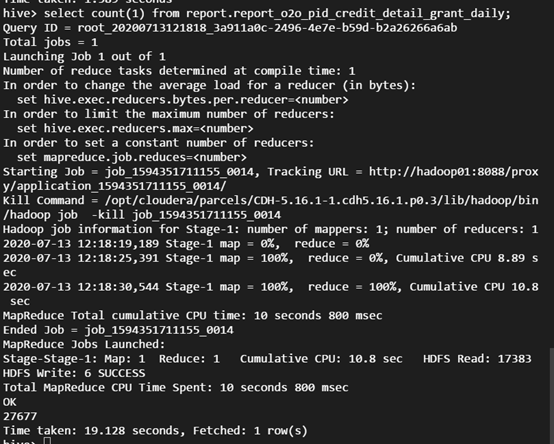
    select * from chdfs_test_table where bucket is not null limit 1;
    Note:
    chdfs_test_table is a table with location as "ofs scheme".
    The output is as shown below:
    
    
    Hubungi Kami

    Hubungi tim penjualan atau penasihat bisnis kami untuk membantu bisnis Anda.

    Dukungan Teknis

    Buka tiket jika Anda mencari bantuan lebih lanjut. Tiket kami tersedia 7x24.

    Dukungan Telepon 7x24