tencent cloud

Tencent Kubernetes Engine

Release Notes and Announcements
Release Notes
Announcements
Release Notes
Product Introduction
Overview
Strengths
Architecture
Scenarios
Features
Concepts
Native Kubernetes Terms
Common High-Risk Operations
Regions and Availability Zones
Service Regions and Service Providers
Open Source Components
Purchase Guide
Purchase Instructions
Purchase a TKE General Cluster
Purchasing Native Nodes
Purchasing a Super Node
Getting Started
Beginner’s Guide
Quickly Creating a Standard Cluster
Examples
Container Application Deployment Check List
Cluster Configuration
General Cluster Overview
Cluster Management
Network Management
Storage Management
Node Management
GPU Resource Management
Remote Terminals
Application Configuration
Workload Management
Service and Configuration Management
Component and Application Management
Auto Scaling
Container Login Methods
Observability Configuration
Ops Observability
Cost Insights and Optimization
Scheduler Configuration
Scheduling Component Overview
Resource Utilization Optimization Scheduling
Business Priority Assurance Scheduling
QoS Awareness Scheduling
Security and Stability
TKE Security Group Settings
Identity Authentication and Authorization
Application Security
Multi-cluster Management
Planned Upgrade
Backup Center
Cloud Native Service Guide
Cloud Service for etcd
TMP
TKE Serverless Cluster Guide
TKE Registered Cluster Guide
Use Cases
Cluster
Serverless Cluster
Scheduling
Security
Service Deployment
Network
Release
Logs
Monitoring
OPS
Terraform
DevOps
Auto Scaling
Containerization
Microservice
Cost Management
Hybrid Cloud
AI
Troubleshooting
Disk Full
High Workload
Memory Fragmentation
Cluster DNS Troubleshooting
Cluster kube-proxy Troubleshooting
Cluster API Server Inaccessibility Troubleshooting
Service and Ingress Inaccessibility Troubleshooting
Common Service & Ingress Errors and Solutions
Engel Ingres appears in Connechtin Reverside
CLB Ingress Creation Error
Troubleshooting for Pod Network Inaccessibility
Pod Status Exception and Handling
Authorizing Tencent Cloud OPS Team for Troubleshooting
CLB Loopback
API Documentation
History
Introduction
API Category
Making API Requests
Elastic Cluster APIs
Resource Reserved Coupon APIs
Cluster APIs
Third-party Node APIs
Relevant APIs for Addon
Network APIs
Node APIs
Node Pool APIs
TKE Edge Cluster APIs
Cloud Native Monitoring APIs
Scaling group APIs
Super Node APIs
Other APIs
Data Types
Error Codes
TKE API 2022-05-01
FAQs
TKE General Cluster
TKE Serverless Cluster
About OPS
Hidden Danger Handling
About Services
Image Repositories
About Remote Terminals
Event FAQs
Resource Management
Service Agreement
TKE Service Level Agreement
TKE Serverless Service Level Agreement
Contact Us
Glossary
DokumentasiTencent Kubernetes Engine

Using Nginx Ingress to Implement Canary Release

Mode fokus
Ukuran font
Terakhir diperbarui: 2024-12-13 19:51:06
This document introduces the use cases, usage, and practices of implementing Canary Release by using Nginx Ingress.
Note:
For clusters that implement Canary Release by using Nginx Ingress, Nginx Ingress should be deployed as the Ingress Controller, and a unified traffic entry should be opened for external access. For more information, see Deploying Nginx Ingress on TKE.

Use Cases

The application scenarios where Canary Release is implemented through Nginx Ingress mainly depend on the business traffic splitting policy. Currently, Nginx Ingress supports three types of traffic splitting policies, which are based on Header, Cookie, and service weight, respectively. Based on these three types of policies, the following two deployment scenarios can be implemented:

Scenario 1: providing some users with a new version for beta testing

Assume that Service A, which provides Layer-7 service to external users, has been running online; you want to activate a newly developed version, Service A', for some users as a beta test, without replacing the existing Service A; you want to let it run stably for some time before gradually and fully activating the new version and smoothly deactivating the old version. For this scenario, you can use Nginx Ingress to make deployments under traffic split policies based on Header or Cookie. Business uses Header or Cookie to mark different types of users and configures Ingress to enable requests with the specified Header or Cookie to be forwarded to the new version while other requests are still forwarded to the old version. In this way, the new version is available to some users for beta testing. See the figure below:


Scenario 2: splitting a certain proportion of traffic to the new version

Assume that Service B, which provides Layer-7 service to external users, has been running online for some time; you have rectified some issues in Service B and to activate a new version, Service B', for some users for beta testing, without replacing the existing Service B; and you want to first split 10% of the traffic to the new version and let it run stably for some time before gradually increasing the proportion of traffic to the new version to ultimately replace and deactivate the old version smoothly. See the figure below:


Annotation Descriptions

You can implement Canary Release by specifying the annotation supported by Nginx Ingress for Ingress resources. You need to create two Ingresses for the service: one is a regular Ingress, and the other, which carries the fixed annotation of nginx.ingress.kubernetes.io/canary: "true" is called a Canary Ingress. The Canary Ingress usually represents the new version of a service. By configuring this and the annotation of the traffic splitting policy, you can implement Canary Release in multiple scenarios. The following section introduces relevant annotations in detail:
nginx.ingress.kubernetes.io/canary-by-header Indicates that if the request header contains the specified header name and the value is always, the request will be forwarded to the corresponding real server defined by the Ingress. If the value is never, it will not be forwarded and can be used for rollback to the old version. In case of other values, this annotation will be ignored.
nginx.ingress.kubernetes.io/canary-by-header-value This annotation can be a supplement to canary-by-header. You can specify a custom value for the request header, including but not limited to always or never. When the value of the request header matches the specified custom value, the request will be forwarded to the corresponding real server defined by the Ingress. In case of other values, this annotation will be ignored.
nginx.ingress.kubernetes.io/canary-by-header-pattern This annotation is similar to canary-by-header-value. The difference is that this annotation uses a regular expression, instead of a fixed value, to match the value of the request header. If this annotation and canary-by-header-value exist at the same time, this annotation will be ignored.
nginx.ingress.kubernetes.io/canary-by-cookie Similar to canary-by-header, this annotation is used for cookie and supports only always and never.
nginx.ingress.kubernetes.io/canary-weight 
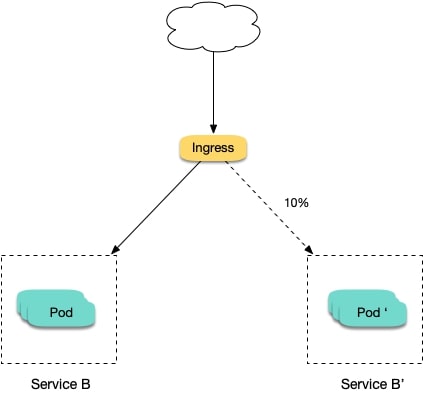
Indicates the proportion of the traffic assigned to the Canary Ingress. The value range is [0-100]. For example, the value 10 indicates that 10% of the traffic is assigned to the corresponding real server of the Canary Ingress.
Note:
The above rules will be assessed according to the priority sequence: canary-by-header > canary-by-cookie > canary-weight.
When an Ingress is marked as the Canary Ingress, all non-Canary annotations, other than nginx.ingress.kubernetes.io/load-balance and nginx.ingress.kubernetes.io/upstream-hash-by, will be ignored.

Sample

Note:
The following sample uses a TKE cluster as an example. From this sample, you can quickly learn how to implement Canary Release by using Nginx Ingress. Please note:
1. For a single service, only one Canary Ingress can be defined, so the real server can only support up to two versions.
2. A domain name must be configured in the Ingress. Otherwise, the Ingress will not work.
3. Even if all traffic is switched to the Canary Ingress, the old version still needs to exist. Otherwise, an error will be reported.

Using YAML to create resources

This document introduces the following two methods for using YAML to deploy workloads and create Services:
Method 1: on the details page of the TKE or EKS cluster, click Use YAML to Create Resources in the upper right corner and input the YAML sample file content in this document to the editing interface.
Method 2: save the sample YAML as a file and use kubectl to specify the YAML file to create resources, for example, kubectl apply -f xx.yaml.

Deploying two versions of a service

1. Deploy the first version of Deployment in the cluster. Here nginx-v1 is used as an example. The YAML sample is as follows:
apiVersion: apps/v1
kind: Deployment
metadata:
name: nginx-v1
spec:
replicas: 1
selector:
matchLabels:
app: nginx
version: v1
template:
metadata:
labels:
app: nginx
version: v1
spec:
containers:
- name: nginx
image: "openresty/openresty:centos"
ports:
- name: http
protocol: TCP
containerPort: 80
volumeMounts:
- mountPath: /usr/local/openresty/nginx/conf/nginx.conf
name: config
subPath: nginx.conf
volumes:
- name: config
configMap:
name: nginx-v1

---

apiVersion: v1
kind: ConfigMap
metadata:
labels:
app: nginx
version: v1
name: nginx-v1
data:
nginx.conf: |-
worker_processes 1;

events {
accept_mutex on;
multi_accept on;
use epoll;
worker_connections 1024;
}

http {
ignore_invalid_headers off;
server {
listen 80;
location / {
access_by_lua '
local header_str = ngx.say("nginx-v1")
';
}
}
}

---

apiVersion: v1
kind: Service
metadata:
name: nginx-v1
spec:
type: ClusterIP
ports:
- port: 80
protocol: TCP
name: http
selector:
app: nginx
version: v1
2. Deploy the second version of Deployment. Here nginx-v2 is used as an example. The YAML sample is as follows:
apiVersion: apps/v1
kind: Deployment
metadata:
name: nginx-v2
spec:
replicas: 1
selector:
matchLabels:
app: nginx
version: v2
template:
metadata:
labels:
app: nginx
version: v2
spec:
containers:
- name: nginx
image: "openresty/openresty:centos"
ports:
- name: http
protocol: TCP
containerPort: 80
volumeMounts:
- mountPath: /usr/local/openresty/nginx/conf/nginx.conf
name: config
subPath: nginx.conf
volumes:
- name: config
configMap:
name: nginx-v2
---

apiVersion: v1
kind: ConfigMap
metadata:
labels:
app: nginx
version: v2
name: nginx-v2
data:
nginx.conf: |-
worker_processes 1;

events {
accept_mutex on;
multi_accept on;
use epoll;
worker_connections 1024;
}

http {
ignore_invalid_headers off;
server {
listen 80;
location / {
access_by_lua '
local header_str = ngx.say("nginx-v2")
';
}
}
}

---

apiVersion: v1
kind: Service
metadata:
name: nginx-v2
spec:
type: ClusterIP
ports:
- port: 80
protocol: TCP
name: http
selector:
app: nginx
version: v2
You can log in to the TKE Console and go to the workload details page of the cluster to view the deployment information, as shown in the figure below:


3. Create an Ingress, open the service to external access, and point to the v1 service. The YAML sample is as follows:
apiVersion: extensions/v1beta1
kind: Ingress
metadata:
name: nginx
annotations:
kubernetes.io/ingress.class: nginx
spec:
rules:
- host: canary.example.com
http:
paths:
- backend:
serviceName: nginx-v1
servicePort: 80
path: /
4. Run the following commands to verify access.
curl -H "Host: canary.example.com" http://EXTERNAL-IP # EXTERNAL-IP should be replaced with the opened IP address of Nginx Ingress.
The returned result is as follows:
nginx-v1

Traffic splitting based on the header

Create a Canary Ingress, specify the real server of the v2 version, and add an annotation to enable requests with the Region field in the header and the corresponding value of cd or sz to be forwarded to the current Canary Ingress. For example, if you select users in Chengdu and Shenzhen for the beta test of the new version, the YAML sample is as follows:
apiVersion: extensions/v1beta1
kind: Ingress
metadata:
annotations:
kubernetes.io/ingress.class: nginx
nginx.ingress.kubernetes.io/canary: "true"
nginx.ingress.kubernetes.io/canary-by-header: "Region"
nginx.ingress.kubernetes.io/canary-by-header-pattern: "cd|sz"
name: nginx-canary
spec:
rules:
- host: canary.example.com
http:
paths:
- backend:
serviceName: nginx-v2
servicePort: 80
path: /
Run the following commands to perform an access test.
$ curl -H "Host: canary.example.com" -H "Region: cd" http://EXTERNAL-IP # EXTERNAL-IP should be replaced with the opened IP address of Nginx Ingress.
nginx-v2
$ curl -H "Host: canary.example.com" -H "Region: bj" http://EXTERNAL-IP
nginx-v1
$ curl -H "Host: canary.example.com" -H "Region: cd" http://EXTERNAL-IP
nginx-v2
$ curl -H "Host: canary.example.com" http://EXTERNAL-IP
nginx-v1
You can see that the v2 service responds only to requests in which the value of the header field Region is cd or sz.

Traffic splitting based on cookies

To use cookies, you cannot set a custom value. For example, if you want to select users in Chengdu for the beta test, then only requests with the cookie of user_from_cd will be forwarded to the current Canary Ingress. The YAML sample is as follows:
Note:
If you have created a Canary Ingress through the above steps, please delete it and then refer to this step for creation.
apiVersion: extensions/v1beta1
kind: Ingress
metadata:
annotations:
kubernetes.io/ingress.class: nginx
nginx.ingress.kubernetes.io/canary: "true"
nginx.ingress.kubernetes.io/canary-by-cookie: "user_from_cd"
name: nginx-canary
spec:
rules:
- host: canary.example.com
http:
paths:
- backend:
serviceName: nginx-v2
servicePort: 80
path: /
Run the following commands to perform an access test.
$ curl -s -H "Host: canary.example.com" --cookie "user_from_cd=always" http://EXTERNAL-IP # EXTERNAL-IP should be replaced with the opened IP address of Nginx Ingress.
nginx-v2
$ curl -s -H "Host: canary.example.com" --cookie "user_from_bj=always" http://EXTERNAL-IP
nginx-v1
$ curl -s -H "Host: canary.example.com" http://EXTERNAL-IP
nginx-v1
You can view that the v2 service responds only to requests in which the value of the cookie user_from_cd is always.

Traffic splitting based on service weight

To use a Canary Ingress based on service weight, you only need to specify the proportion of traffic to be imported. For example, to import 10% of traffic to the v2 version, the YAML sample is as follows:
Note:
If you have created a Canary Ingress through the above steps, please delete it and then refer to this step to create a new one.
apiVersion: extensions/v1beta1
kind: Ingress
metadata:
annotations:
kubernetes.io/ingress.class: nginx
nginx.ingress.kubernetes.io/canary: "true"
nginx.ingress.kubernetes.io/canary-weight: "10"
name: nginx-canary
spec:
rules:
- host: canary.example.com
http:
paths:
- backend:
serviceName: nginx-v2
servicePort: 80
path: /
Run the following commands to perform an access test.
$ for i in {1..10}; do curl -H "Host: canary.example.com" http://EXTERNAL-IP; done;
nginx-v1
nginx-v1
nginx-v1
nginx-v1
nginx-v1
nginx-v1
nginx-v2
nginx-v1
nginx-v1
nginx-v1
You can see that the chance of the v2 service responding is 10%, which corresponds to the 10% service weight setting.

References

Bantuan dan Dukungan

Apakah halaman ini membantu?

masukan