IPv4 CLBのシーンでのクライアントリアルIPの取得
Download
フォーカスモード
フォントサイズ
CLBでのクライアントリアルIPの取得に関する説明
CLBのレイヤー4(TCP/UDP/TCP SSL)およびレイヤー7(HTTP/HTTPS)サービスでは、どちらもバックエンドCVM上でクライアントのリアルIPを直接取得することができ、追加設定を行う必要はありません。
レイヤー4CLBでは、バックエンドCVM上で取得するソースIPがクライアントIPです。
レイヤー7CLBでは、CLBとバックエンドサービス間の短い接続を使用する場合、バックエンドCVMで取得したソースIPがクライアントIPとなります。CLBとバックエンドサービス間の長い接続を使用する場合、CLBはソースIPをパススルーしなくなりますので、X-Forwarded-Forフィールドまたはremote_addrフィールドでクライアントIPを直接取得できます。レイヤー7CLBのアクセスログについては、アクセスログのCLSへの保存設定をご参照ください。
説明:
レイヤー4CLBでは、バックエンドCVM上で追加設定を行うことなくクライアントIPを取得できます。
SNATを行ったその他のレイヤー7ロードバランシングサービスでは、バックエンドCVM上での設定を行ってからX-Forwarded-Forメソッドを使用してクライアントのリアルIPを取得する必要があります。
次に、一般的なアプリケーションサーバー設定スキームについてご説明します。
IIS 6設定スキーム
1. F5XForwardedForプラグインモジュールをダウンロードしてインストールし、ご自身のサーバーのOSバージョンに応じて
x86\\Releaseまたはx64\\Releaseディレクトリ下のF5XForwardedFor.dllをあるディレクトリにコピーします。ここでは仮にC:\\ISAPIFiltersとします。同時にIISプロセスのこのディレクトリに対する読み取り権限を確保します。2. IISマネージャーを開き、現在開いているウェブサイトを見つけ、このウェブサイト上で右クリックしてプロパティを選択し、プロパティページを開きます。
3. プロパティページでISAPIフィルターに切り替え、追加をクリックすると、追加ウィンドウがポップアップします。
4. 追加ウィンドウの「フィルター名」に「F5XForwardedFor」、「実行可能ファイル」に
F5XForwardedFor.dllの完全なパスをそれぞれ入力し、OKをクリックします。5. IISサーバーを再起動し、設定が有効になるのを待ちます。
IIS 7設定スキーム
1. F5XForwardedForプラグインモジュールをダウンロードしてインストールし、ご自身のサーバーのOSバージョンに応じて
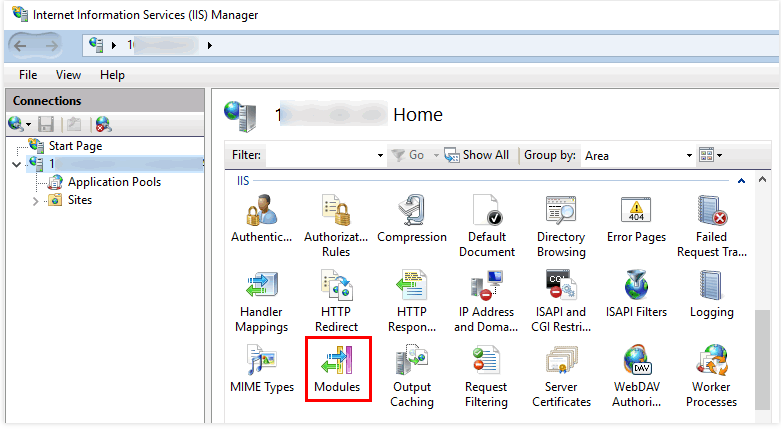
x86\\Releaseまたはx64\\Releaseディレクトリ下のF5XFFHttpModule.dllとF5XFFHttpModule.iniをあるディレクトリにコピーします。ここでは仮にC:\\x_forwarded_forとし、IISプロセスのこのディレクトリに対する読み取り権限を確保します。2. IISサーバーを選択し、モジュール機能をダブルクリックします。
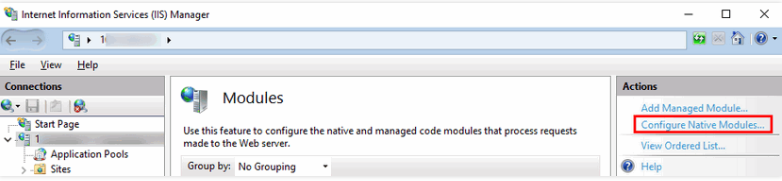
3. ネイティブモジュールの設定をクリックします。
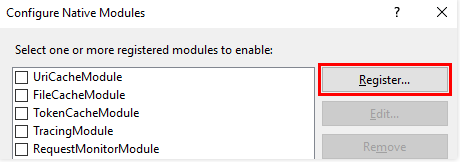
4. ポップアップボックスで、登録をクリックします。
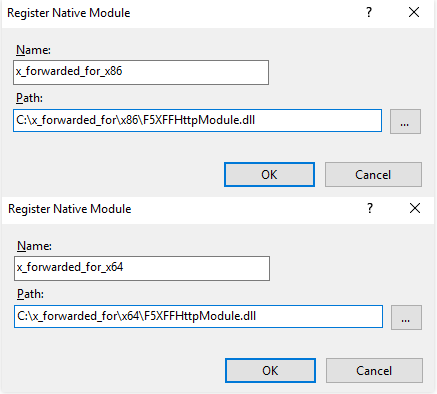
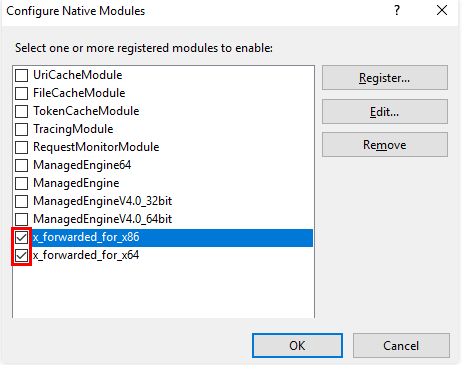
5. 下図のように、ダウンロードしたDLLファイルを追加します。
6. 追加が完了したら、チェックを入れてOKをクリックします。
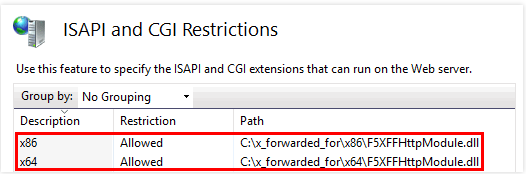
7. 「ISAPIおよびCGIの制限」に上記の2つのDLLファイルを追加し、制限を許可に設定します。
8. IISサーバーを再起動し、設定が有効になるのを待ちます。
Apache設定スキーム
1. Apacheのサードパーティモジュール「mod_rpaf」をインストールします。
wget http://stderr.net/apache/rpaf/download/mod_rpaf-0.6.tar.gztar zxvf mod_rpaf-0.6.tar.gzcd mod_rpaf-0.6/usr/bin/apxs -i -c -n mod_rpaf-2.0.so mod_rpaf-2.0.c
2. Apacheの設定
/etc/httpd/conf/httpd.confを変更し、末尾に次を追加します。LoadModule rpaf_module modules/mod_rpaf-2.0.soRPAFenable OnRPAFsethostname OnRPAFproxy_ips IPアドレス(このIPアドレスは最初はCLBが提供するパブリックIPではありません。具体的なIPについてはApacheログで確認できます。通常は2つあり、どちらも入力が必要です)RPAFheader X-Forwarded-For
3. 追加が完了したら、Apacheを再起動します。
/usr/sbin/apachectl restart
Nginx設定スキーム
1. Nginxをサーバーにする場合、クライアントのリアルIPを取得するにはhttp_realip_moduleを使用します。デフォルトでインストールされているNginxにはこのモジュールがインストールされていないため、Nginxを再コンパイルして
--with-http_realip_moduleを追加する必要があります。yum -y install gcc pcre pcre-devel zlib zlib-devel openssl openssl-develwget http://nginx.org/download/nginx-1.17.0.tar.gztar zxvf nginx-1.17.0.tar.gzcd nginx-1.17.0./configure --prefix=/path/server/nginx --with-http_stub_status_module --without-http-cache --with-http_ssl_module --with-http_realip_modulemakemake install
2. nginx.confファイルを変更します。
vi /etc/nginx/nginx.conf
設定フィールドと情報を変更します。
説明:
このうち
xx.xx.xx.xxは実際のIPアドレスに変更する必要があります。このIPアドレスはCLBが提供するパブリックIPではありません。具体的なIPアドレスはNginxログで確認できます。複数のIPアドレスがある場合は、すべて入力が必要です。fastcgi connect_timeout 300;fastcgi send_timeout 300;fastcgi read_timeout 300;fastcgi buffer_size 64k;fastcgi buffers 4 64k;fastcgi busy_buffers_size 128k;fastcgi temp_file_write_size 128k;# 設定フィールドと情報を変更しますset_real_ip_from xx.xx.xx.xx;real_ip_header X-Forwarded-For;real_ip_recursive on;
3. Nginxを再起動します。
service nginx restart
4. Nginxのアクセスログを確認し、クライアントのリアルIPを取得できます。
cat /path/server/nginx/logs/access.log
フィードバック