Switching Instance Network
Download
フォーカスモード
フォントサイズ
You can directly switch the network of a TencentDB for MongoDB instance in the console to adjust the network status promptly.
Overview
Tencent Cloud supports classic network and VPC as described in Overview, which are capable of offering a diversity of smooth services. On this basis, we provide more flexible services as shown below to help you manage network connectivity with ease.
Switch from classic network to VPC: A single TencentDB source instance can be switched from classic network to VPC.
Switch from VPC A to VPC B: A single TencentDB source instance can be switched from VPC A to VPC B.
Version Description
Currently, TencentDB for MongoDB 3.2, 3.6, 4.0, 4.2, 4.4, 5.0, and 6.0 support instance network switch.
Billing Overview
Switching the instance network doesn't incur additional fees.
Note
Switching the network may cause the change of instance's private IP. The original IP will become invalid after the reclamation time has elapsed. You need to change the instance IP on the client promptly.
The switch from classic network to VPC is irreversible. After the switch to a VPC, the TencentDB instance cannot communicate with Tencent Cloud services in another VPC or classic network.
The network switch of a primary instance doesn't apply to its associated read-only instances or disaster recovery instances, you need to manually switch the network for these instances.
Prerequisites
You have created a TencentDB for MongoDB instance. For more information, see Creating TencentDB for MongoDB Instance.
The TencentDB for MongoDB replica set or sharded cluster instance is in Running status.
Directions
1. Log in to the TencentDB for MongoDB console.
2. In the MongoDB drop-down list on the left sidebar, select Replica Set Instance or Sharded Cluster Instance. The directions for replica set instances and sharded cluster instances are similar.
3. Above the Instance List on the right, select the region.
4. In the instance list, find the target instance.
5. Click the target instance ID to enter the Instance Details page and click Change Network on the right of Network.
6. In the Change Network pop-up window, select a VPC and subnet in the current region in the drop-down list next to Network.
If existing networks can't meet your requirements, you can click Create VPCs or Create Subnets to create a network and select it.
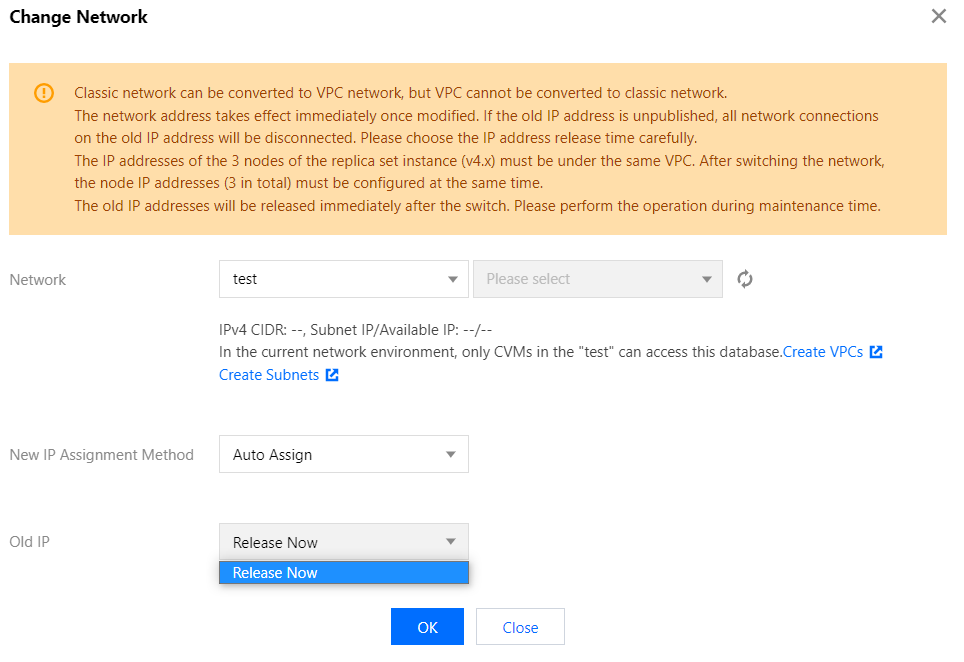
New IP Assignment Method: Select Auto Assign or Designate address.
Auto Assign: The system will automatically assign an available IP address based on the currently selected network environment.
Designate Address: You can enter a specific IP address in the New IPv4 Address input box. The specified IP address must be unoccupied and within the IP range of the specified VPC.
Note:
You can only select a VPC in the region of the instance.
We recommend that the VPC where the CVM instance resides should be selected; otherwise, the CVM instance will not be able to access TencentDB for MongoDB over the private network, unless a CCN is created between the two VPCs.
Old IP: For a replica set instance, the old IP address can be released immediately. For a sharded cluster instance, you need to select the release time of the old IP address in the drop-down list, which can be Release Now, Release after 1 day, Release after 2 days, Release after 3 days, or Release after 7 days. The IP address will be released after the retention time has elapsed.
Note:
When the delayed release is selected, there will be a transition period for IP address conversion, which is called "delay time". During the delay time, the old IP address can still be connected to, and the new IP address also takes effect. When the delay time is over, the old IP address will be reclaimed, the relevant cleanup task will be started to clear the configurations and records related to it, and all network connections to it will be closed immediately. You should choose the release time carefully.
7. After confirming the network switch, click OK. Return to the instance details page where you can view the new network of the instance.
フィードバック