Setting Account CAM Verification
Download
Modo Foco
Tamanho da Fonte
This document introduces the instructions and procedures for configuring account CAM authentication via the console.
Notes:
Supported Region
This feature is currently supported in the following regions: Beijing, Shanghai, and Guangzhou.
Background
In cloud database scenarios, you typically need to create independent accounts and passwords for the database and grant access and operation permissions to relevant users. This method of account management is complex and prone to security issues such as account and password leakage. To address this, TDSQL-C for MySQL supports enabling the CAM authentication feature for accounts. By linking Tencent Cloud platform sub-accounts with database accounts and adding CAM credential authentication, it simplifies the complexity of account permission management and enhances database security and account management efficiency.
Scenarios
If you have high security requirements, you can use this feature to bind CAM to database account authentication. When making a request, you can obtain the corresponding dynamic password to access the database, thereby enhancing database security. We recommend enabling CAM authentication in the following two scenarios.
Use CAM identity authentication as a mechanism for temporary personal access to the database.
Use CAM identity authentication only for workloads that can be retried easily.
Note
Use persistent connections to access the database whenever possible.
Before CAM authentication is enabled, you must configure the relevant CAM permission rules in advance.
Password modification is not supported after CAM authentication is enabled.
The root account also supports enabling CAM authentication.
After you disable CAM authentication, you cannot obtain access credentials through CAM. Therefore, you must enter a new password when CAM authentication is disabled.
Feature Limits
This feature is temporarily unavailable for Serverless clusters.
Password reset operations for the account are not supported after CAM authentication is enabled.
CAM authentication can be enabled only for accounts that are bound to a single host address.
If CAM authentication is enabled for an instance first, the Custom Password Strength feature cannot be enabled.
If the Custom Password Strength feature is enabled for an instance, you cannot adjust the password strength rules after CAM authentication is enabled.
If the password check strength level for custom password strength is set to STRONG, this feature cannot be enabled.
Prerequisites
You have created a cluster. For details, see Creating a Cluster.
The instance must use pre-configured resources. This feature is temporarily unavailable for Serverless.
A ticket has been submitted to apply for using this feature.
The instance status is Running.
Step 1: Configuring CAM Permission Rules
Before the account CAM authentication feature is used, you must configure the relevant CAM permission rules.
Policy Content
{"version": "2.0","statement": [{"effect": "allow","action": ["cam:BuildDataFlowAuthToken"],"resource": ["qcs::cam::uin/<User uin>:resourceUser/<Instance ID>/<Account name>"]}]}
<User uin>: Replace it with the actual account ID.
<Instance ID>: Replace it with the actual ID of the instance that needs to be authorized.
<Account name>: Replace it with the actual name of the account that needs to be authorized.
Operation Guide
1. Log in to the CAM console using an administrator account. On the Policies page, create a custom policy using the policy generator (see Creating a Custom Policy Using the Policy Generator).
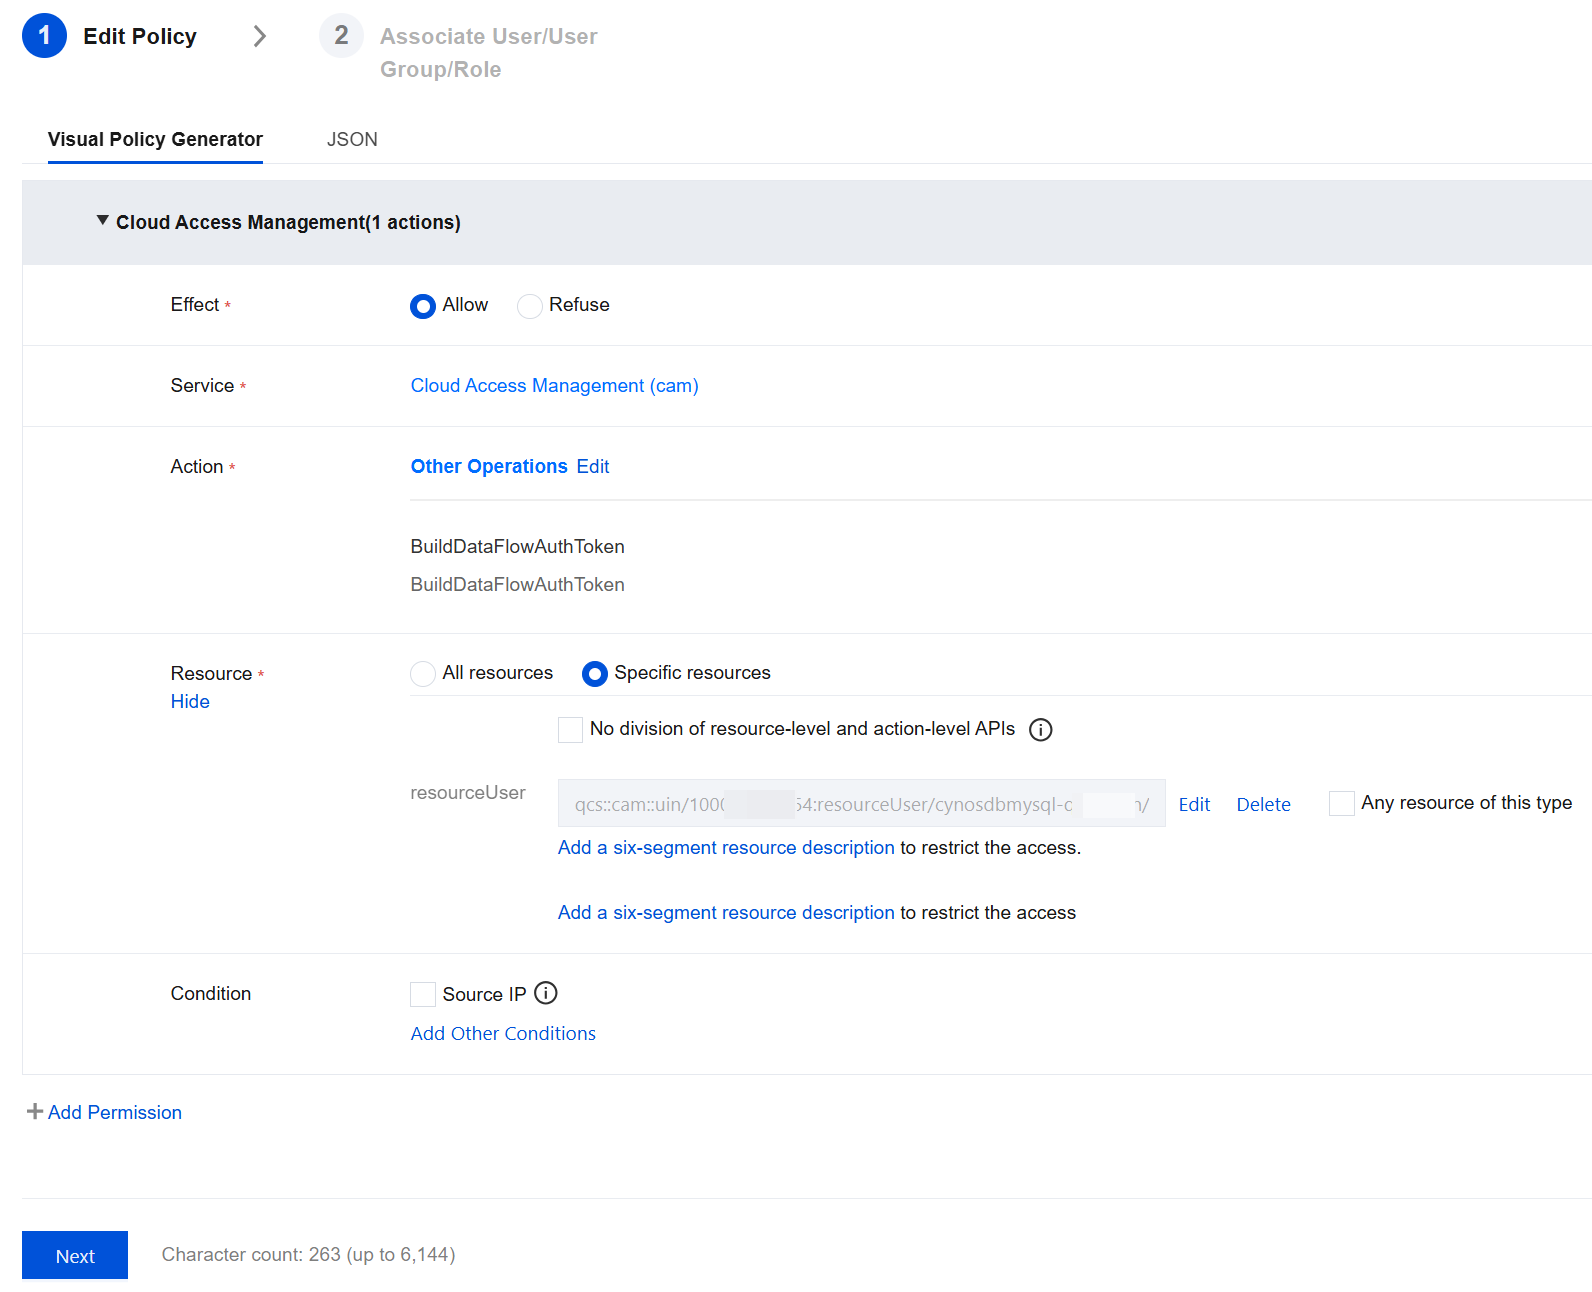
Effect: Allowed.
Service: Cloud Access Management (CAM).
Action: Other Operations - BuildDataFlowAuthToken.
Resource: Specific resources - Add a six-segment resource description.
Enter the resource: <Instance ID>/<Account name>.
2. Click Next, customize the policy name, and grant the policy to the target sub-account.
3. Click Complete to complete authorization.
Step 2: Enabling CAM Authentication
Enabling CAM authentication involves two scenarios: enabling CAM authentication during account creation and enabling CAM authentication for an existing account. You can follow the steps below to perform operations respectively:
1. Log in to the TDSQL-C for MySQL console.
2. Click the target cluster in the cluster list on the left to enter the cluster management page.
3. On the cluster management page, choose Account Management > Create Account. In the pop-up dialog box, fill in the relevant information and click OK after confirming it is correct.
Notes:
For the operation of creating an account, see Create Account. The following only describes the steps related to enabling CAM authentication.
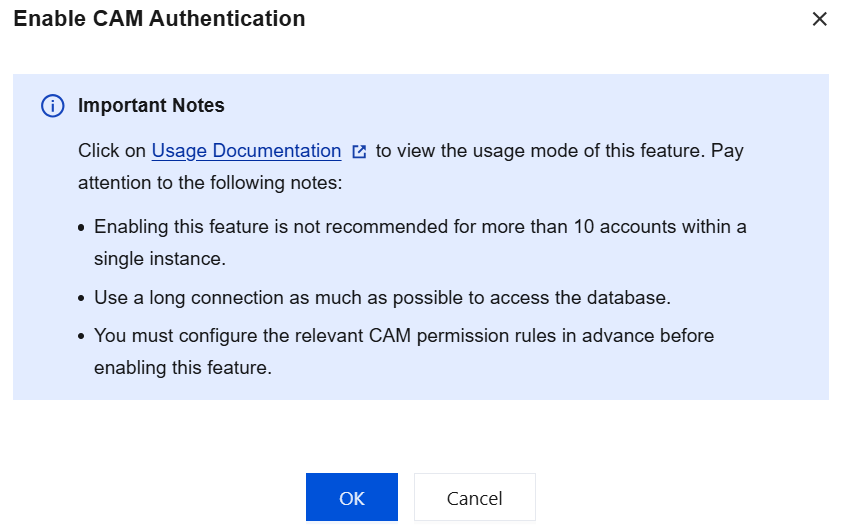
Enable CAM Authentication: Turn on the button next to "Enable CAM Authentication", read the important note in the pop-up window, and then click OK.
4. "CAM Authentication Enabled" is displayed under the name of an account that has successfully enabled CAM authentication.
1. Log in to the TDSQL-C for MySQL console.
2. Click the target cluster in the cluster list on the left to enter the cluster management page.
3. On the cluster management page, select Account Management.
4. On the account management page, locate the target account and click Enable CAM Authentication in its Operation column.
5. After reading the important note in the pop-up window, click OK.

6. "CAM Authentication Enabled" is displayed under the name of an account that has successfully enabled CAM authentication.
Step 3: Obtaining the Password via Code in the Application
After an account is granted the relevant CAM permission rules and CAM authentication is enabled, users can obtain passwords by invoking Java code in their applications to connect to database instances. You can also use Python to connect to database instances. For specific methods, see Appendix 1: Connecting to a Database Using Python. Additionally, you can use go to connect to database instances. For specific methods, see Appendix 2: Connecting to a Database Using go.
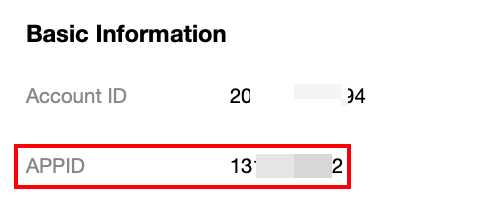
1. In the Tencent Cloud console, query the account AppID on the account information page.
2. Log in to the CAM console, and go to the API Key Management page to obtain the SecretID and SecretKey.
3. Use the following code at the application side.
<dependency><groupId>com.tencentcloudapi</groupId><artifactId>tencentcloud-dbauth-sdk-java</artifactId><version>1.0.4</version></dependency>
Indirect dependency item: tencentcloud-sdk-java 3.1.1039 or later versions.
<dependency><groupId>com.tencentcloudapi</groupId><artifactId>tencentcloud-sdk-java</artifactId><version>3.1.1039</version></dependency>
Example of obtaining a password through calling code
package com.tencentcloud.dbauth;import com.tencentcloudapi.common.Credential;import com.tencentcloud.dbauth.model.GenerateAuthenticationTokenRequest;import com.tencentcloudapi.common.exception.TencentCloudSDKException;import com.tencentcloudapi.common.profile.ClientProfile;import com.tencentcloudapi.common.profile.HttpProfile;public class GenerateDBAuthentication {public static void main(String[] args) {// Define authentication token parameters.String region = "<Instance region>";String instanceId = "<Instance ID>";String userName = "<Account name>";// Obtain credentials from environment variables.Credential credential = new Credential(System.getenv("<TENCENTCLOUD_SECRET_ID>"), System.getenv("<TENCENTCLOUD_SECRET_KEY>"));System.out.println(getAuthToken(region, instanceId, userName, credential));}public static String getAuthToken(String region, String instanceId, String userName, Credential credential) {try {// Instantiate an http option (optional). Skip it if there are no special requirements.HttpProfile httpProfile = new HttpProfile();httpProfile.setEndpoint("cam.tencentcloudapi.com");// Instantiate a client option (optional). Skip it if there are no special requirements.ClientProfile clientProfile = new ClientProfile();clientProfile.setHttpProfile(httpProfile);// Build GenerateAuthenticationTokenRequest.GenerateAuthenticationTokenRequest tokenRequest = GenerateAuthenticationTokenRequest.builder().region(region).credential(credential).userName(userName).instanceId(instanceId).clientProfile(clientProfile) // clientProfile is optional..build();return DBAuthentication.generateAuthenticationToken(tokenRequest);} catch (TencentCloudSDKException e) {e.printStackTrace();}return "";}}
<Instance region>: Replace it with the region of the instance that needs to be accessed. For example, ap-guangzhou.
<Instance ID>: Replace it with the actual ID of the instance that needs to be accessed.
<Account name>: Replace it with the actual login account name.
<TENCENTCLOUD_SECRET_ID>: Replace it with the SecretID obtained from the CAM console.
<TENCENTCLOUD_SECRET_KEY>: Replace it with the SecretKey obtained from the CAM console.
Step 4: Connecting to TDSQL-C for MySQL Using an Identity Token
After obtaining the authentication token (AuthToken) in Step 3, you can connect to the database using the token. An example is provided below.
mysql --host=<IP address> --port=<port number> --user=<account name> --password=<password>;
<IP address>: Replace it with the IP address of your instance.
<Port number>: Replace it with the port number of your instance. If the port number has not been modified, it defaults to 3306.
<Account name>: Replace it with the actual login account name.
<Password>: Replace it with the AuthToken obtained in Step 3.
Example: Connecting to a Database Using Java Code
package com.tencentcloud.examples;import com.tencentcloud.dbauth.DBAuthentication;import com.tencentcloud.dbauth.model.GenerateAuthenticationTokenRequest;import com.tencentcloudapi.common.Credential;import com.tencentcloudapi.common.exception.TencentCloudSDKException;import com.tencentcloudapi.common.profile.ClientProfile;import com.tencentcloudapi.common.profile.HttpProfile;import java.sql.Connection;import java.sql.DriverManager;import java.sql.ResultSet;import java.sql.Statement;public class CAMDatabaseAuthenticationTester {public static void main(String[] args) throws Exception {// Define the variables required for the connection.String region = "ap-guangzhou";String instanceId = "cynosdb-123456";String userName = "test";String host = "192.*.*.11";int port = 3306;String dbName = "mysql";String secretId = System.getenv("TENCENTCLOUD_SECRET_ID");String secretKey = System.getenv("TENCENTCLOUD_SECRET_KEY");// Obtain a connection.Connection connection = getDBConnectionUsingCAM(secretId, secretKey, region,instanceId, userName, host, port, dbName);// Verify whether the connection is successful.Statement stmt = connection.createStatement();ResultSet rs = stmt.executeQuery("SELECT 'Success!';");while (rs.next()) {String id = rs.getString(1);System.out.println(id); // It should print "Success!"}// Close the connection.stmt.close();connection.close();}/*** Obtain a database connection using CAM database authentication.** @param secretId The secret ID.* @param secretKey The secret key.* @param region The region.* @param instanceId The instance ID.* @param userName The username.* @param host The host.* @param port The port.* @param dbName The database name.* @return The Connection object.* @throws Exception An exception.*/private static Connection getDBConnectionUsingCAM(String secretId, String secretKey, String region, String instanceId, String userName,String host, int port, String dbName) throws Exception {// Obtain credentials from the secretId and secretKey.Credential credential = new Credential(secretId, secretKey);// Define the maximum number of attempts.int maxAttempts = 3;Exception lastException = null;for (int attempt = 1; attempt <= maxAttempts; attempt++) {try {// Obtain an authentication token using the credentials.String authToken = getAuthToken(region, instanceId, userName, credential);String connectionUrl = String.format("jdbc:mysql://%s:%d/%s", host, port, dbName);return DriverManager.getConnection(connectionUrl, userName, authToken);} catch (Exception e) {lastException = e;System.out.println("Attempt " + attempt + " failed.");Thread.sleep(5000);}}System.out.println("All attempts failed. error: " + lastException.getMessage());throw lastException;}/*** Obtain an authentication token.** @param region The region.* @param instanceId The instance ID.* @param userName The username.* @param credential The credential.* @return The authentication token.*/private static String getAuthToken(String region, String instanceId, String userName, Credential credential) throws TencentCloudSDKException {// Instantiate an http option (optional). Skip it if there are no special requirements.HttpProfile httpProfile = new HttpProfile();httpProfile.setEndpoint("cam.tencentcloudapi.com");// Instantiate a client option (optional). Skip it if there are no special requirements.ClientProfile clientProfile = new ClientProfile();clientProfile.setHttpProfile(httpProfile);// Build GenerateAuthenticationTokenRequest.GenerateAuthenticationTokenRequest tokenRequest = GenerateAuthenticationTokenRequest.builder().region(region).credential(credential).userName(userName).instanceId(instanceId).clientProfile(clientProfile) // clientProfile is optional..build();return DBAuthentication.generateAuthenticationToken(tokenRequest);}}
Password Rotation Cycle
After an account enables the CAM authentication feature, its password rotation cycle defaults to 24 hours and cannot be modified for now.
Refreshing the Password
After an account enables the CAM authentication feature, you can update the password by performing a password refresh operation. For example, if the password rotation cycle is set to 24 hours by default, you can immediately update the password by performing a password refresh operation before the rotation cycle is reached.
Note:
Note: After you refresh the password, the current login credentials become invalid. You need to observe whether the database access status of your business meets expectations.
1. Log in to the TDSQL-C for MySQL console.
2. Click the target cluster in the cluster list on the left to enter the cluster management page.
3. On the cluster management page, select Account Management.
4. On the account management page, locate the target account and click More > Refresh Password in its Operation column.
5. After reading the risk note in the pop-up window, click OK.
Disabling CAM Authentication
Note:
After you disable CAM authentication, you cannot obtain access credentials through CAM. Please update your password promptly.
1. Log in to the TDSQL-C for MySQL console.
2. Click the target cluster in the cluster list on the left to enter the cluster management page.
3. On the cluster management page, select Account Management.
4. On the account management page, locate the target account and click More > Disable CAM Authentication in its Operation column.
5. Enter and confirm the new password in the pop-up window, then click OK.
Appendix 1: Connecting to a Database Using Python
1. In the Tencent Cloud console, query the account AppID on the account information page.

2. Log in to the CAM console, and go to the API Key Management page to obtain the SecretID and SecretKey.
3. Install the TencentDB CAM Python SDK into your project using pip. Run the following command in the command line:
pip install git+https://github.com/TencentCloud/dbauth-sdk-python.git
Note: If both Python 2 and Python 3 environments are present, you must use the pip3 command to install the Python 3 environment.
Indirect dependency item: tencentcloud-sdk-python 3.0.1224 or later versions.
Example: Connecting to a Database Using Python
import loggingimport osimport timeimport pymysqlfrom dbauth.db_authentication import DBAuthenticationfrom dbauth.model.generate_authentication_token_request import GenerateAuthenticationTokenRequestfrom tencentcloud.common import credentialfrom tencentcloud.common.exception.tencent_cloud_sdk_exception import TencentCloudSDKExceptionfrom tencentcloud.common.profile.client_profile import ClientProfilefrom tencentcloud.common.profile.http_profile import HttpProfile# Configure the root loggerlogging.basicConfig(level=logging.INFO,format='[%(asctime)s] - [%(threadName)s] - {%(module)s:%(funcName)s:%(lineno)d} %(levelname)s - %(message)s',datefmt='%Y-%m-%d %H:%M:%S')log = logging.getLogger(__name__)def main():region = "ap-guangzhou"instance_id = "cynosdb-123456"user_name = "camtest"host = "192.*.*.11"port = 3306db_name = "test"secret_id = os.environ['AK']secret_key = os.environ['SK']connection = Nonetry:# Obtain a connectionconnection = get_db_connection_using_cam(secret_id, secret_key, region,instance_id, user_name, host, port, db_name)# Verify whether the connection is successful.with connection.cursor() as cursor:cursor.execute("SELECT 'Success!';")result = cursor.fetchone()log.info(result[0]) # It should print "Success!"except Exception as e:log.error(f"An error occurred: {e}")finally:if connection and connection.open:connection.close()def get_db_connection_using_cam(secret_id, secret_key, region, instance_id, user_name, host, port, db_name):cred = credential.Credential(secret_id, secret_key)max_attempts = 3last_exception = Nonefor attempt in range(1, max_attempts + 1):try:auth_token = get_auth_token(region, instance_id, user_name, cred)connection = pymysql.connect(host=host,port=port,user=user_name,password=auth_token,database=db_name)return connectionexcept Exception as e:last_exception = elog.info(f"Attempt {attempt} failed.")time.sleep(5)log.error(f"All attempts failed. error: {last_exception}")raise last_exceptiondef get_auth_token(region, instance_id, user_name, cred):try:# Instantiate an http option (optional). Skip it if there are no special requirements.http_profile = HttpProfile()http_profile.endpoint = "cam.tencentcloudapi.com"# Instantiate a client option (optional). Skip it if there are no special requirements.client_profile = ClientProfile()client_profile.httpProfile = http_profilerequest = GenerateAuthenticationTokenRequest(region=region,instance_id=instance_id,user_name=user_name,credential=cred,client_profile=client_profile, # optional)return DBAuthentication.generate_authentication_token(request)except TencentCloudSDKException as err:log.error(err)raiseif __name__ == "__main__":main()
Appendix 2: Connecting to a Database Using go
Dependency environment: go version 1.17 or later.
Indirect dependency item: tencentcloud-sdk-go v1.0.1015 or later versions.
1. In the Tencent Cloud console, query the account AppID on the account information page.

2. Log in to the CAM console, and go to the API Key Management page to obtain the SecretID and SecretKey.
3. Run the following command in the command line:
go get -v -u github.com/tencentcloud/dbauth-sdk-go
Example: Connecting to a Database Using go
package mainimport ("database/sql""fmt""os""time"_ "github.com/go-sql-driver/mysql""github.com/sirupsen/logrus""github.com/tencentcloud/dbauth-sdk-go/dbauth""github.com/tencentcloud/dbauth-sdk-go/dbauth/model""github.com/tencentcloud/tencentcloud-sdk-go/tencentcloud/common""github.com/tencentcloud/tencentcloud-sdk-go/tencentcloud/common/profile")func init() {logrus.SetOutput(os.Stdout)logrus.SetFormatter(&logrus.TextFormatter{FullTimestamp: true})logrus.SetLevel(logrus.InfoLevel)}func main() {// Define database connection parameters.region := "ap-guangzhou"instanceId := "cynosdb-123456"userName := "camtest"host := "192.*.*.11"port := 3306dbName := "test"ak := os.Getenv("TENCENTCLOUD_SECRET_ID")sk := os.Getenv("TENCENTCLOUD_SECRET_KEY")// Obtain a connection.connection, err := getDBConnectionUsingCam(ak, sk, region, instanceId, userName, host, port, dbName)if err != nil {logrus.Error("Failed to get connection:", err)return}// Verify whether the connection is successful.stmt, err := connection.Query("SELECT 'Success!';")if err != nil {logrus.Error("Failed to execute query:", err)return}for stmt.Next() {var result stringstmt.Scan(&result)logrus.Info(result) // Success!}// Close the connection.if err := stmt.Close(); err != nil {logrus.Error("Failed to close statement:", err)}if err := connection.Close(); err != nil {logrus.Error("Failed to close connection:", err)}}// Obtain a database connection using CAM.func getDBConnectionUsingCam(secretId, secretKey, region, instanceId, userName, host string, port int, dbName string) (*sql.DB, error) {credential := common.NewCredential(secretId, secretKey)maxAttempts := 3var lastErr errorfor attempt := 1; attempt <= maxAttempts; attempt++ {// Obtain an authentication Token.authToken, err := getAuthToken(region, instanceId, userName, credential)if err != nil {return nil, err}connectionUrl := fmt.Sprintf("%s:%s@tcp(%s:%d)/%s", userName, authToken, host, port, dbName)db, err := sql.Open("mysql", connectionUrl)if err != nil {lastErr = errlogrus.Warnf("Open connection failed. Attempt %d failed.", attempt)time.Sleep(5 * time.Second)continue}if err = db.Ping(); err != nil {lastErr = errlogrus.Warnf("Ping failed. Attempt %d failed.", attempt)time.Sleep(5 * time.Second)continue}return db, nil}logrus.Error("All attempts failed. error:", lastErr)return nil, lastErr}// Obtain an authentication Token.func getAuthToken(region, instanceId, userName string, credential *common.Credential) (string, error) {// Instantiate a client option (optional). Skip it if there are no special requirements.cpf := profile.NewClientProfile()cpf.HttpProfile.Endpoint = "cam.tencentcloudapi.com"// Create a GenerateAuthenticationTokenRequest object. The ClientProfile is optional.tokenRequest, err := model.NewGenerateAuthenticationTokenRequest(region, instanceId, userName, credential, cpf)if err != nil {logrus.Errorf("Failed to create GenerateAuthenticationTokenRequest: %v", err)return "", err}return dbauth.GenerateAuthenticationToken(tokenRequest)}
Ajuda e Suporte
Esta página foi útil?
Você também pode entrar em contato com a Equipe de vendas ou Enviar um tíquete em caso de ajuda.
comentários