Real-time single table synchronization monitors and synchronizes source data in real-time through binlog logs. Single table synchronization uses a fixed field synchronization method, only the source field data specified in the task configuration is synchronized to the destination. Single table tasks support two configuration modes: Canvas and Form, covering data sources such as MySQL, Kafka, Mongo, SqlServer, Doris, and DLC.
Conditions and Restrictions
1. The data source of both source and target has been completed for subsequent task usage.
2. The DataInLong Resource Group has been purchased.
3. Network connectivity between the DataInLong Resource Group and the data source has been completed.
4. The data source environment preparation has been completed. Based on the sync configuration you need, grant the data source configuration account the necessary operation permissions in the database before executing the sync task.
5. If the database account configured for the data source lacks read and write permissions, it will cause the task to fail. Please configure an account with appropriate permissions according to the actual read and write scenarios.
Operation step
Step One: Create Real-time Synchronization Task
After entering the DataInLong > Real-time Synchronization task page, click Create single table synchronization task.
In the popup, configure the basic task information, and click OK to proceed to the task configuration page. The task creation parameters and descriptions are as follows:
Parameter
Description
Task Name
Required Fields
Naming Convention: Only supports Chinese, English, numbers, and underscores
Length: Cannot exceed 100 characters
Task Mode
Form Mode: Suitable for single table to single table offline synchronization, applicable to ODS layer data synchronization without the need for a data cleansing phase. Default option.
Canvas Mode: Mainly uses visual drag-and-drop, suitable for data links containing cleansing phases.
Form Mode: Suitable for single table to single table offline synchronization, applicable to ODS layer data synchronization without the need for a data cleansing phase
Description
Optional Item
Note:
In the current version, Canvas Mode only supports one write node and two read nodes; a single read node can only connect to one downstream node.
A task cannot contain unconnected isolated nodes; otherwise, the submission of the task will fail.
The default naming convention for data nodes is: ${Node Type}_${Code}.
Step 2: Choose a task configuration mode
Currently, task configuration offers two modes: form and canvas:
Form Mode is suitable for source layer data synchronization, supporting data transformation using built-in Flink functions.
Canvas Mode provides a transition node, supporting custom complex data transformations during the data synchronization process.
Configuration Mode 1: Form Configuration
Serial number
Parameter description
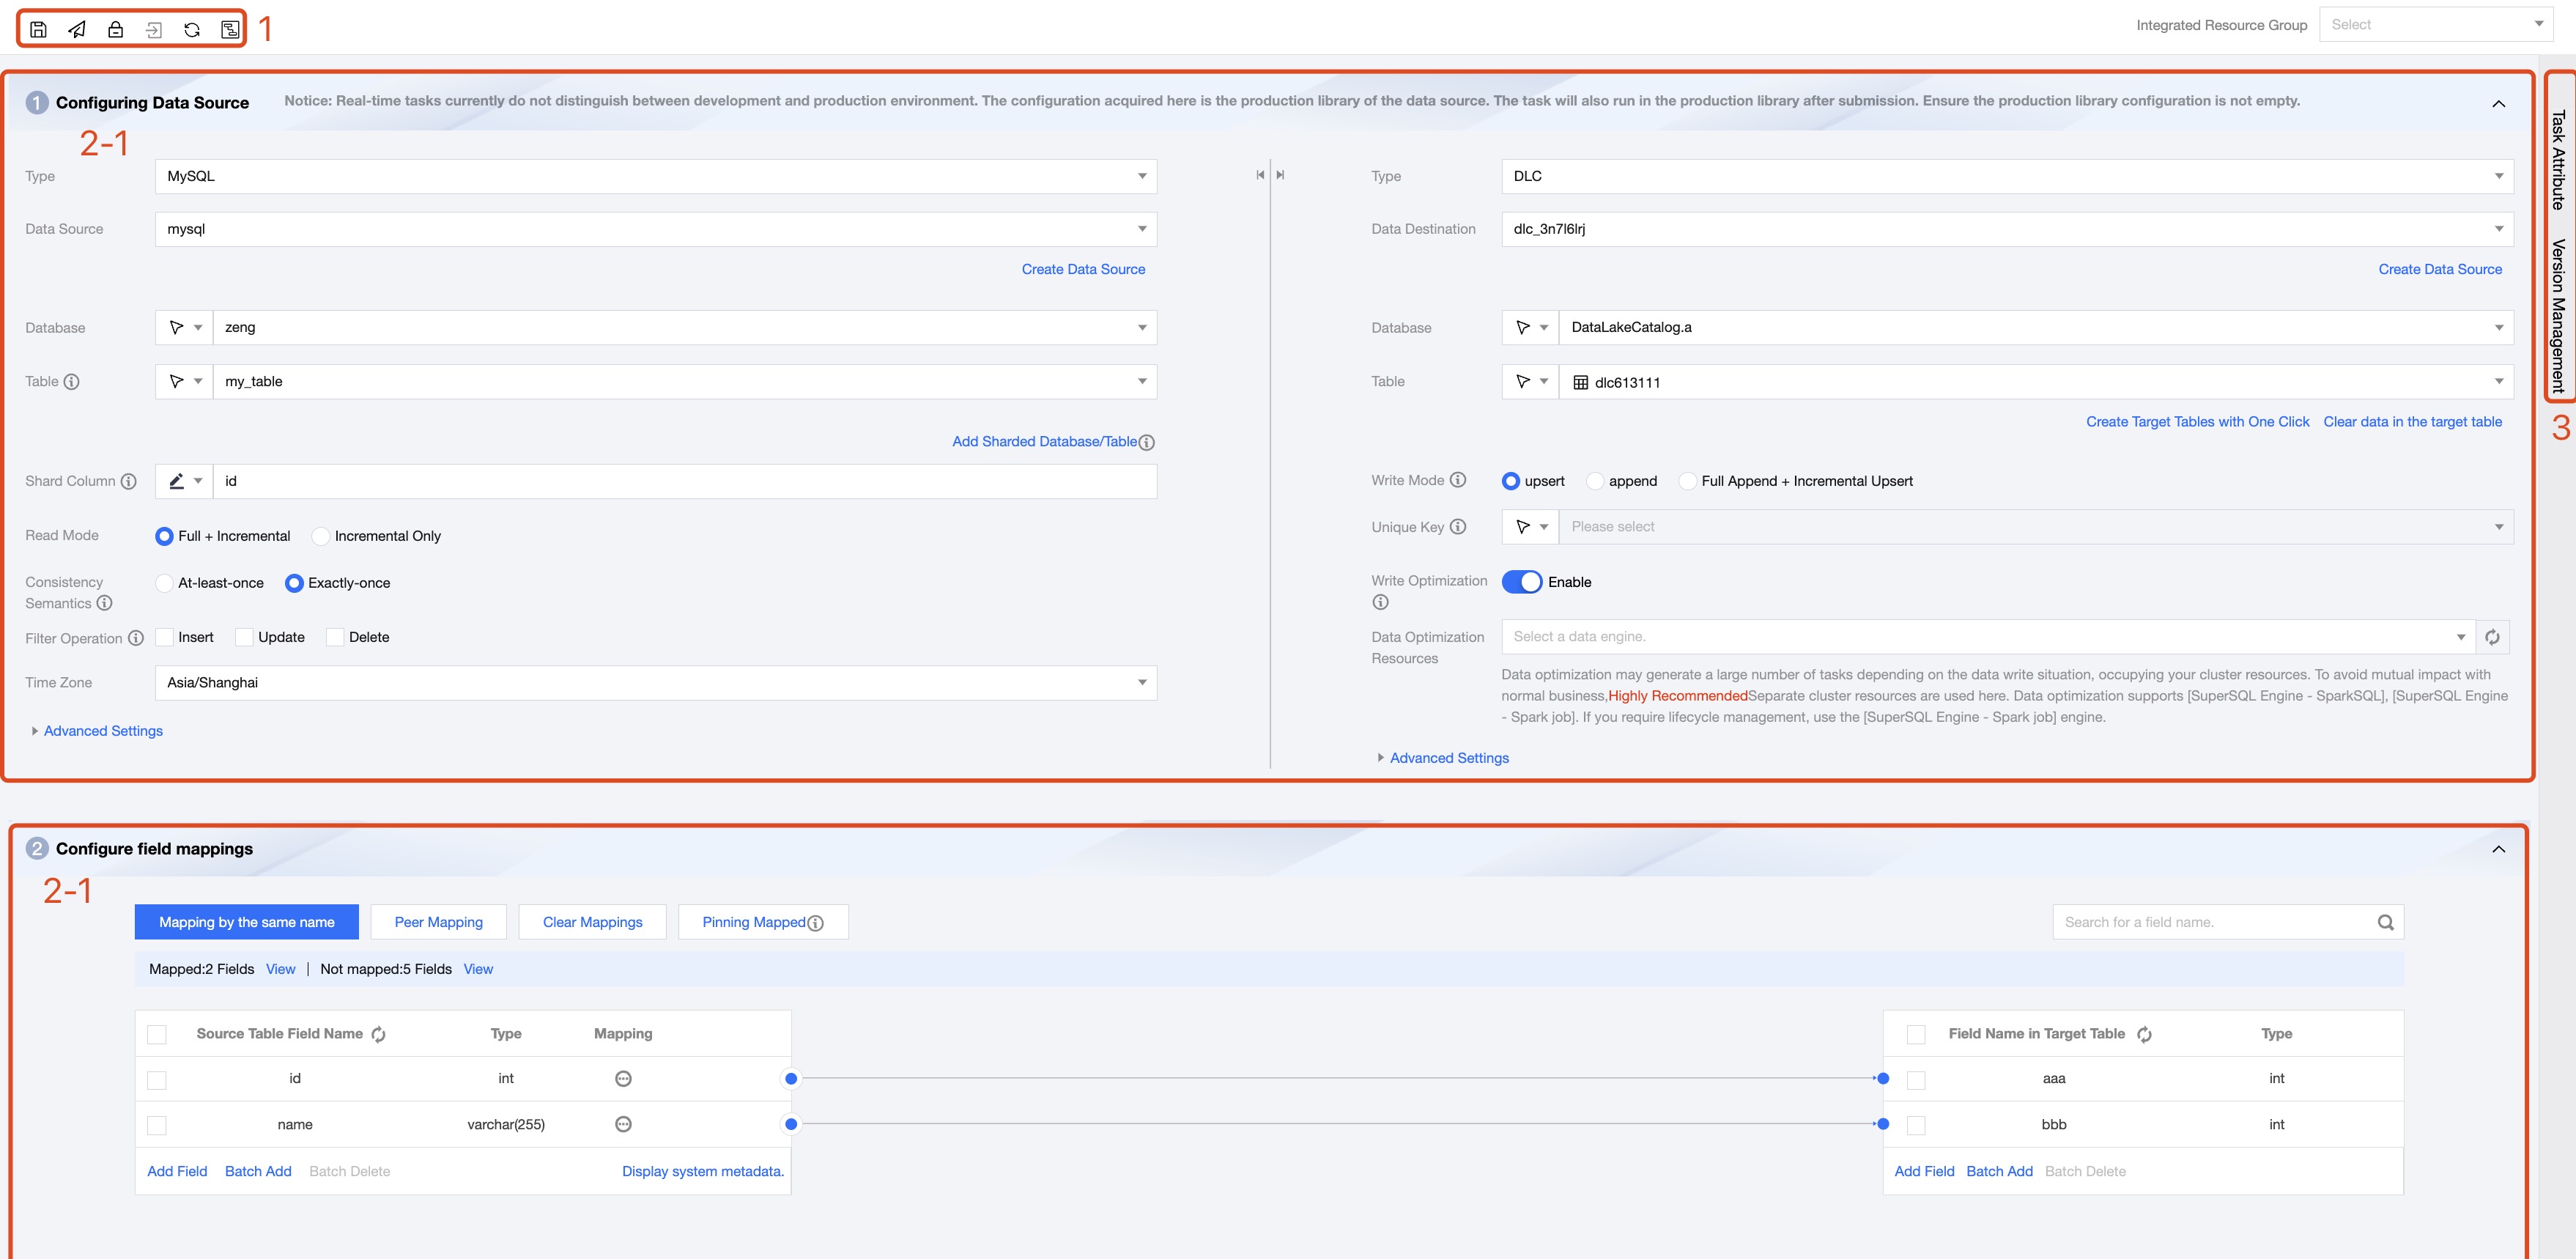
1
Task operation bar. Operations applicable to the entire task include save, submit, lock/unlock, go to maintenance, refresh, and Canvas conversion.
2
2-1
Data Source and Destination: Configure the data source, library, table for task reading and writing, and the read-write mode.
2-2
Field Mapping: Set the corresponding relationship between source and destination data. Subsequent tasks will only synchronize the data between fields that have a mapping relationship.
Note:
Some non-relational databases cannot automatically retrieve field information and require manual addition of fields one by one or in bulk.
3
Task configuration, this configuration information applies to global tasks:
Real-time tasks include task properties, version management configuration, providing task resource parallelism, and CU usage configuration.
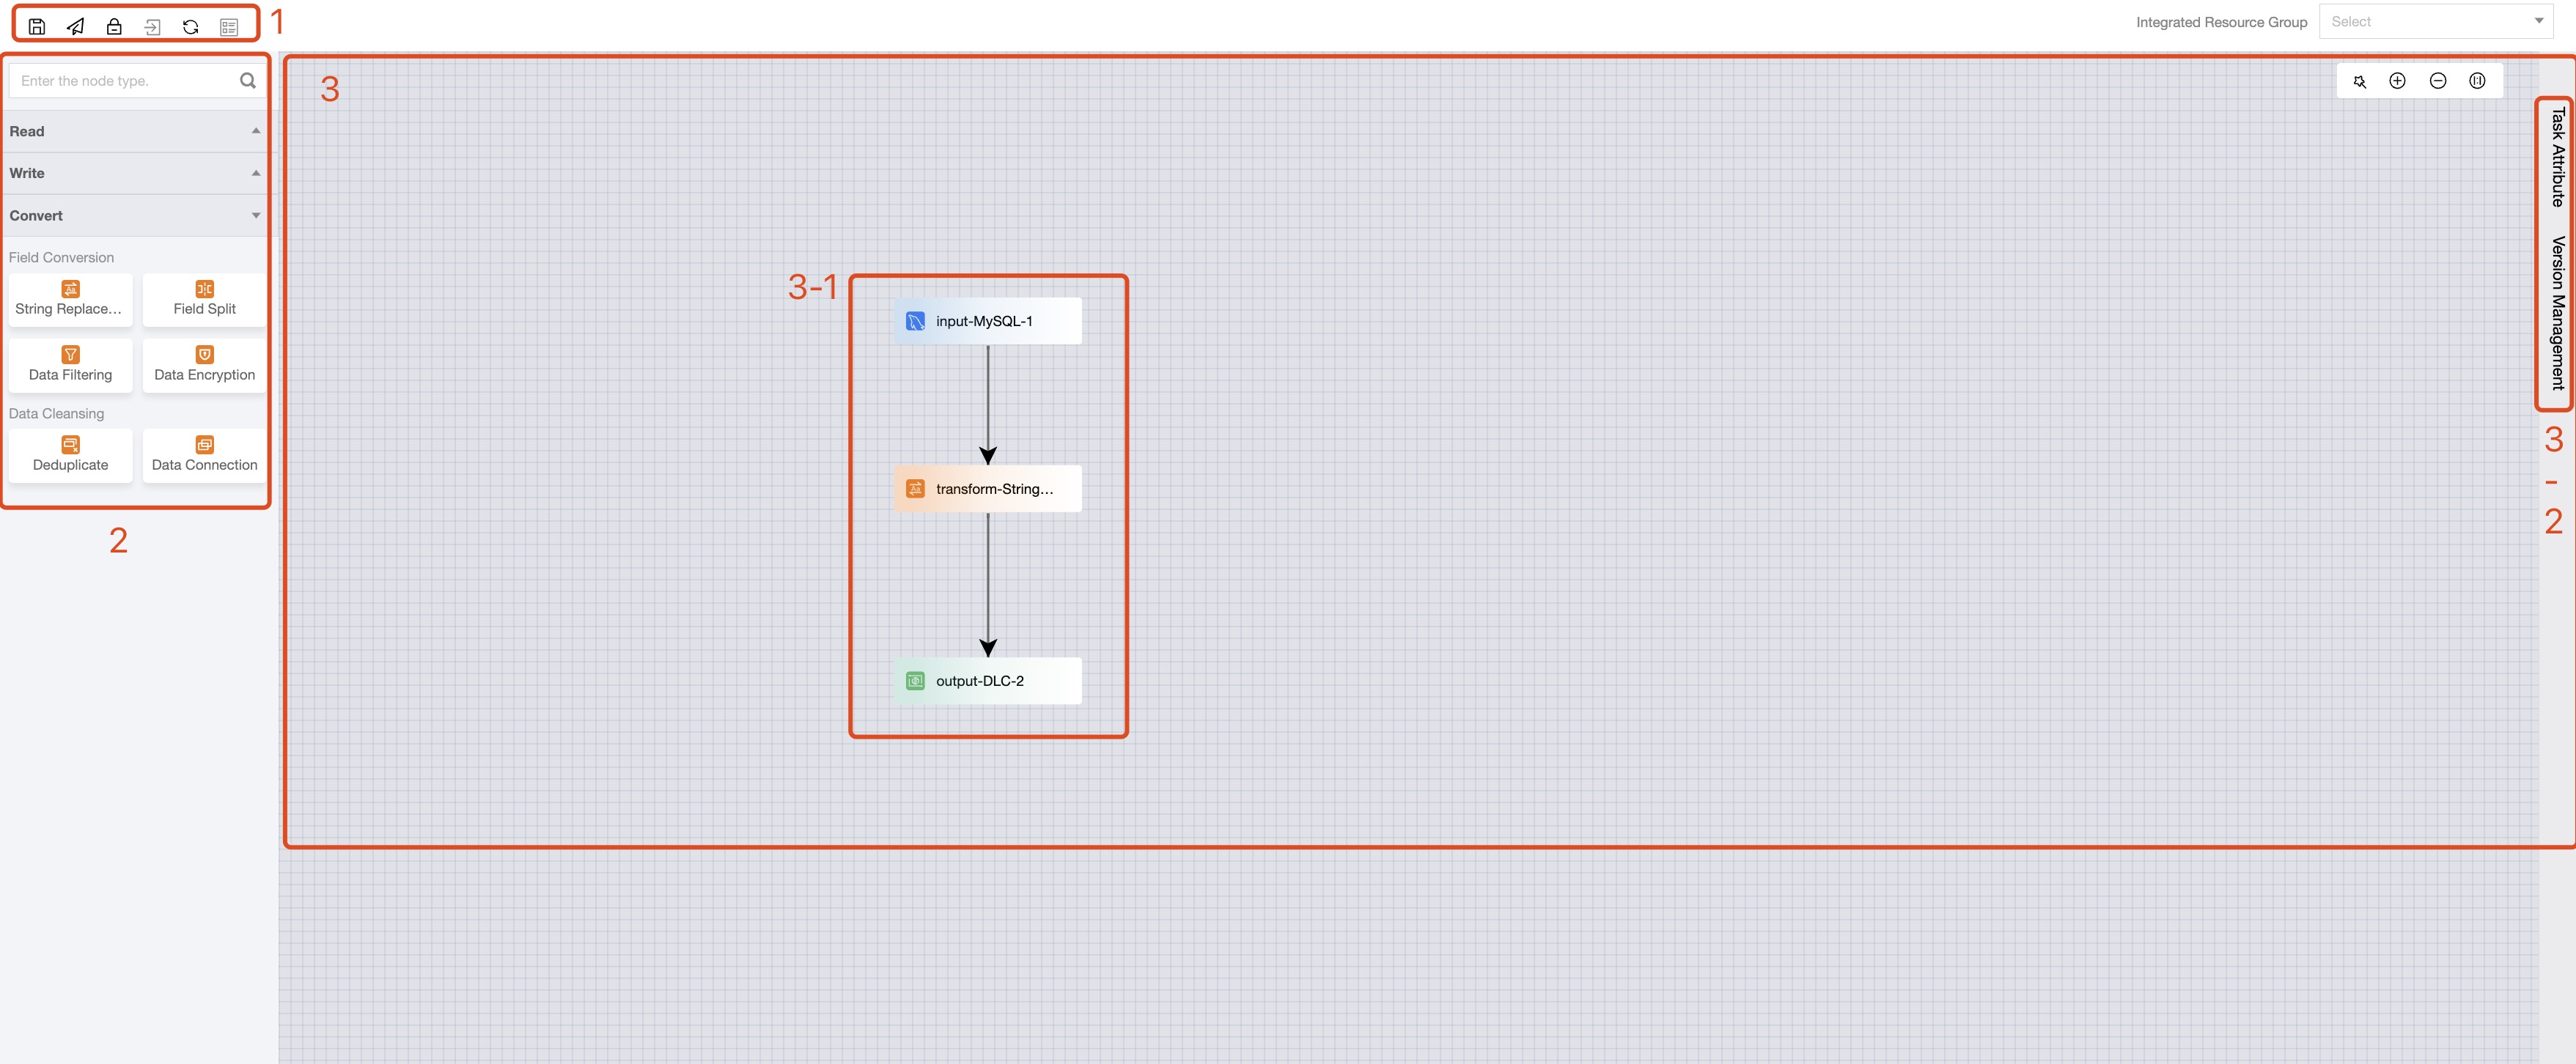
Configuration Mode 2: Canvas Mode
Click on Task Name in the list to enter the task configuration page. The interface overall includes a task operation bar, a data node menu, and a link configuration area:
Serial number
Parameter description
1
Task operation bar. Operations applicable to the entire task include save, submit, lock/unlock, go to maintenance, refresh, and Form conversion.
2
Data Node Menu. Categorizes the link object into read, write, and transition nodes, supporting direct drag-and-drop addition of nodes to the canvas.
3
3-1
Data Link. Comprises read, write, and transition nodes, and the connections between nodes, representing the data flow direction within the synchronization task.
3-2
Task configuration, this configuration information applies to global tasks:
Real-time tasks include task properties, version management configuration, providing task resource parallelism, and CU usage configuration.
Step 3: Configure the data node
After creating a new task, you can enter the task canvas or form interface by clicking on the Task Name in the task list. In canvas mode, you can directly drag and drop data nodes and lines from the right-side node menu, and the system will automatically create data flow links based on the connectivity between nodes.
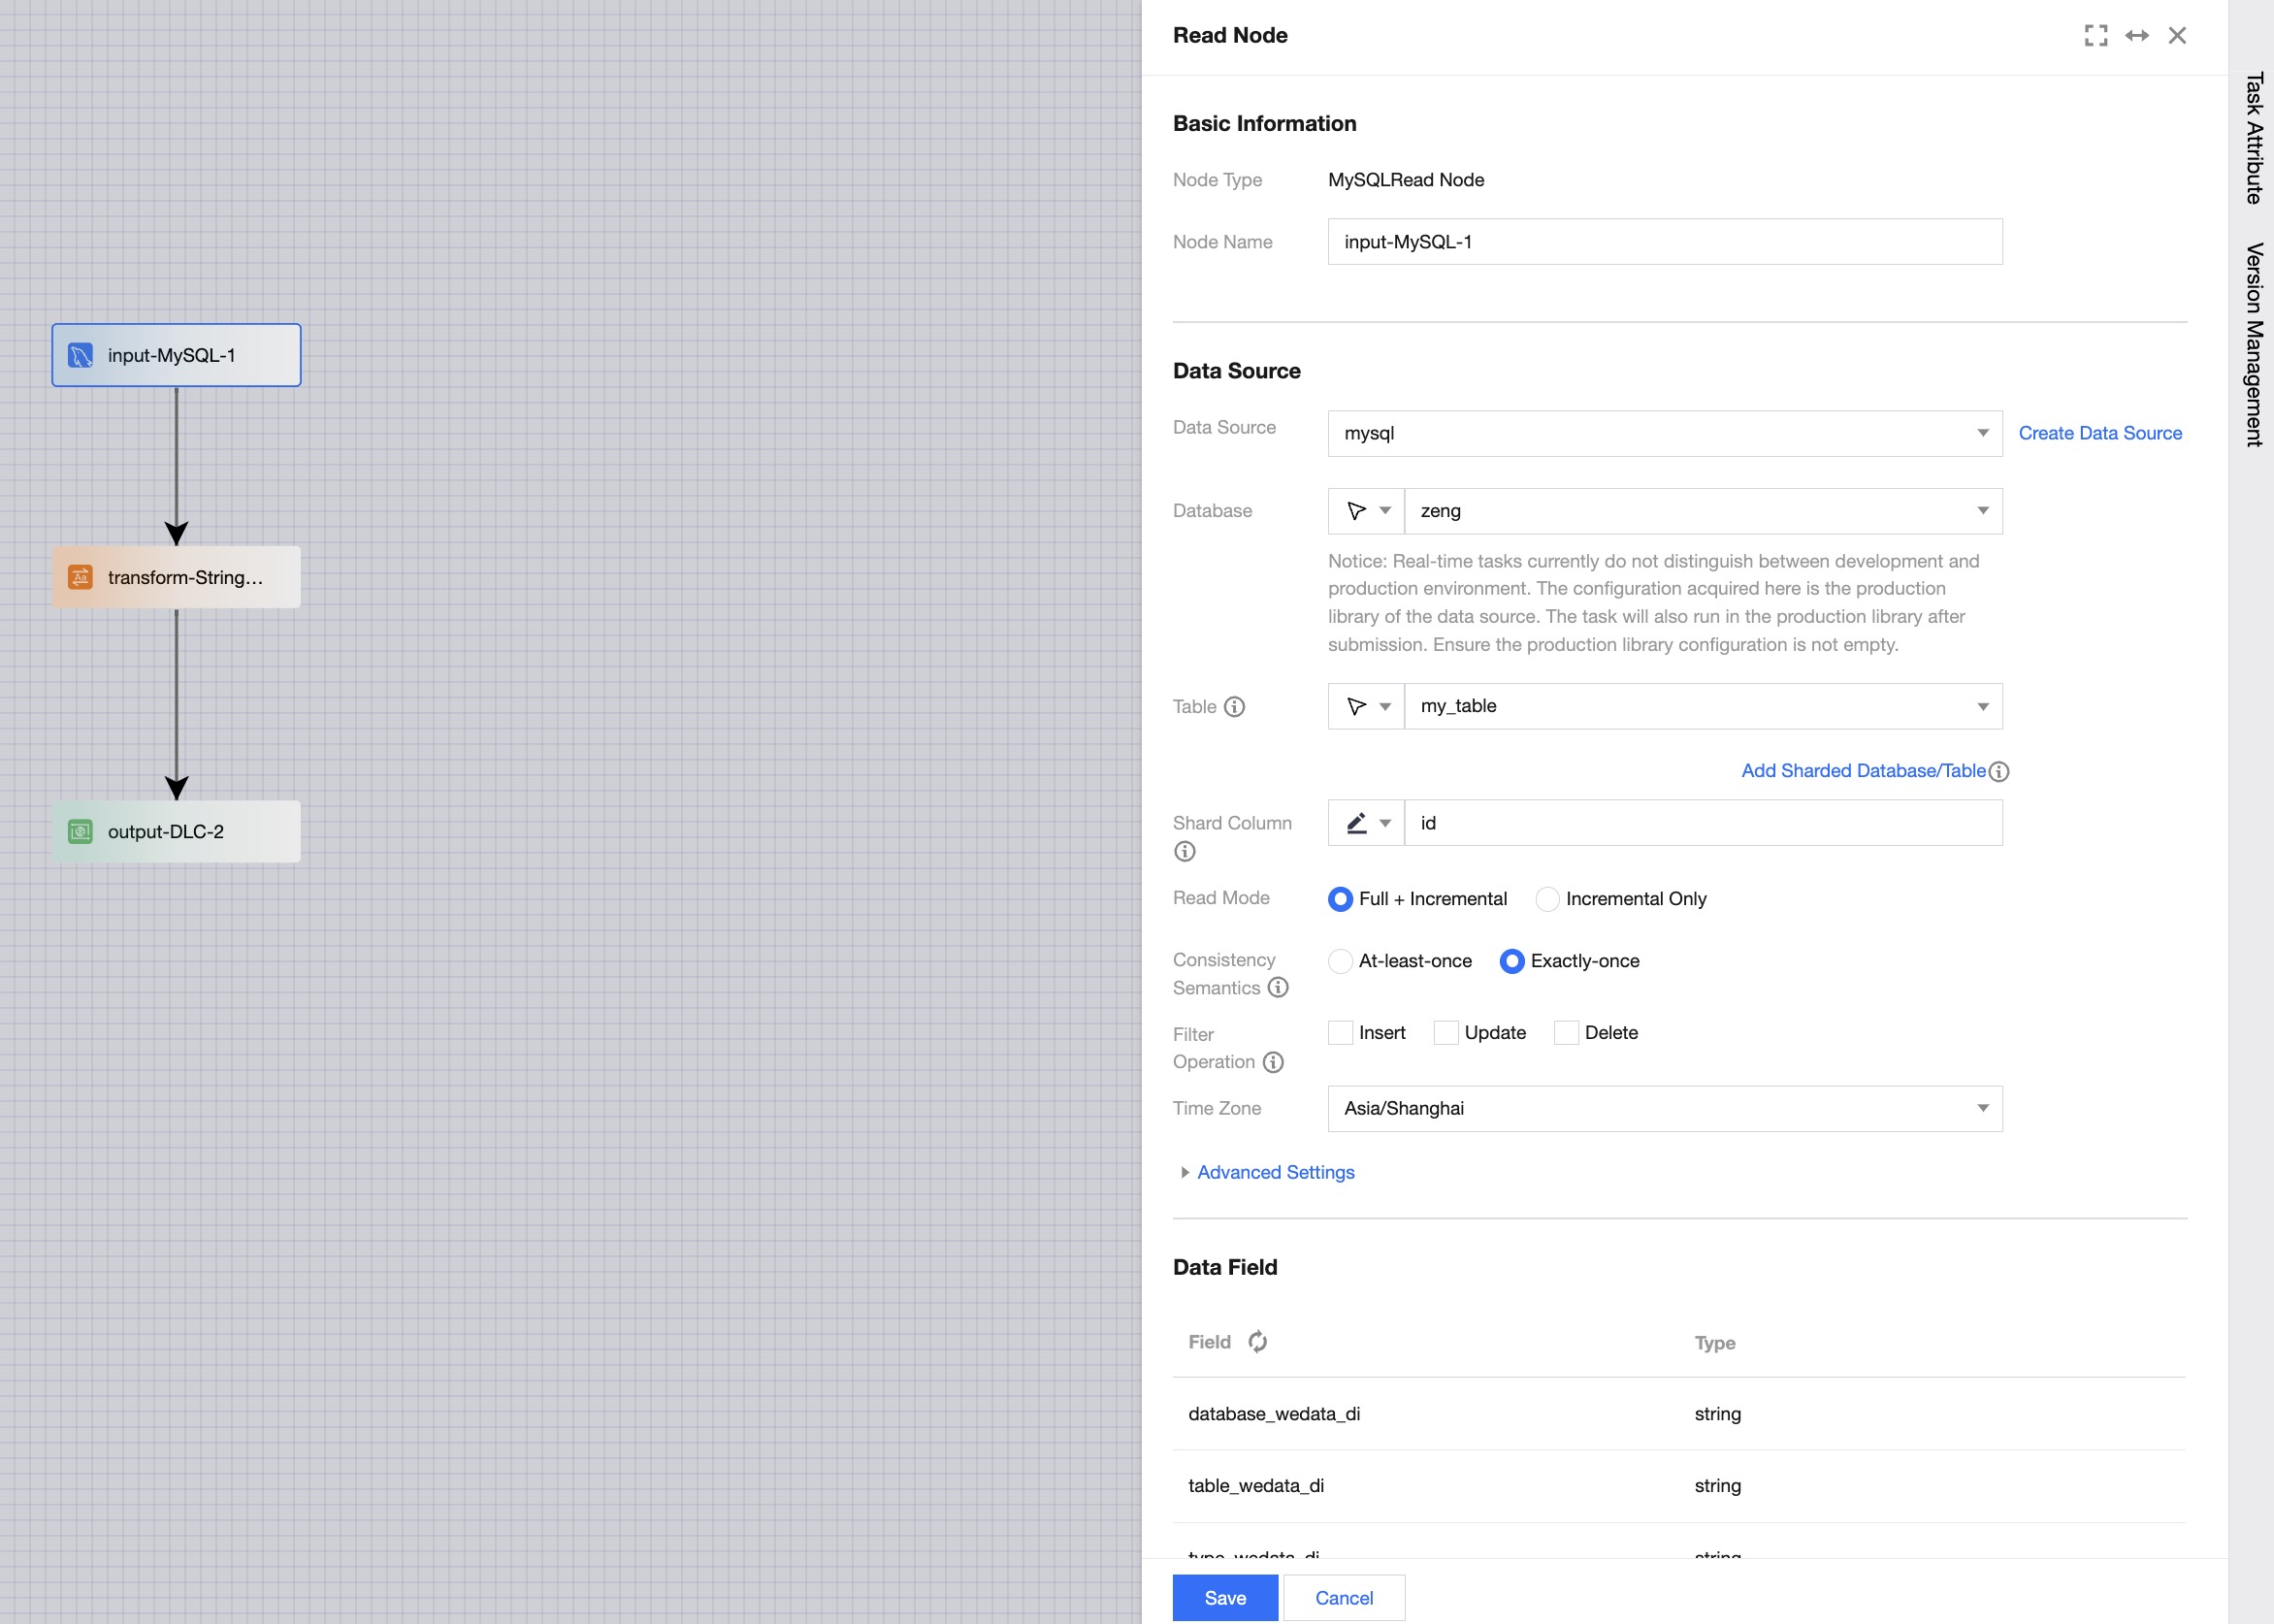
Configure read node
Read node configuration includes basic information, data source, and data fields.
Basic Information
The node name cannot be empty, and there cannot be data nodes with the same name within a single task.
Data Source
Configure the database table object to be read and the synchronization method, etc.
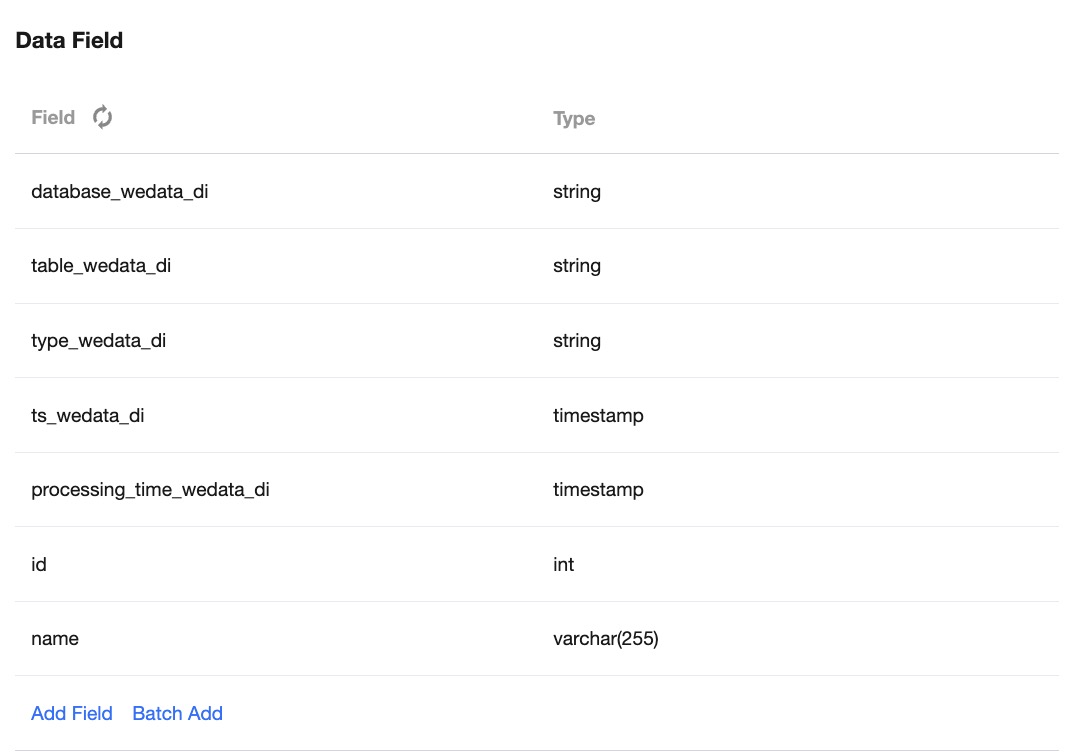
Data Fields
Based on the configured data table object, the system supports two methods: default pulling of field metadata information and manual field configuration.
Default Pulling: For types such as MySQL, Hive, PostgreSQL, etc., the system supports automatic pulling of metadata fields and types based on their database table information, without the need for manual editing.
Manual Configuration: For file data sources (e.g., HDFS, COS) and columnar storage data sources (e.g., HBase, Mongo), the system does not support automatic metadata pulling. You can click to add fields manually and specify the field names and types. Reading nodes also support constants and function types.
Note
Constant Fields: Only reading nodes support configuring constant fields. Constant fields can be used to write a certain constant value into the target table when the number of fields in the source and target tables do not match.
Function Fields: Only reading nodes support function constant fields. Function fields can be processed based on the source fields to form new fields that are written into the target table. For specific supported Flink functions, please refer to the Flink Documentation.
Configure Transition Node (Optional)
Transition node configuration includes basic information, conversion rules, and data fields. The transition node must be downstream of the reading node. After creating and connecting to the reading node, the system will automatically retrieve the field information from the upstream node and complete the data conversion based on the conversion rules.
Basic Information
Configure node name information. The node name cannot be empty, and there cannot be data nodes with the same name within a single task.
Conversion Rules
Configure field or data level conversion rules, where field information is inherited from the upstream node. After connecting to the upstream node, the system will automatically retrieve the field information from the upstream node.
Data Fields
By default, pull all data fields from the upstream node for subsequent mapping in the writing node.
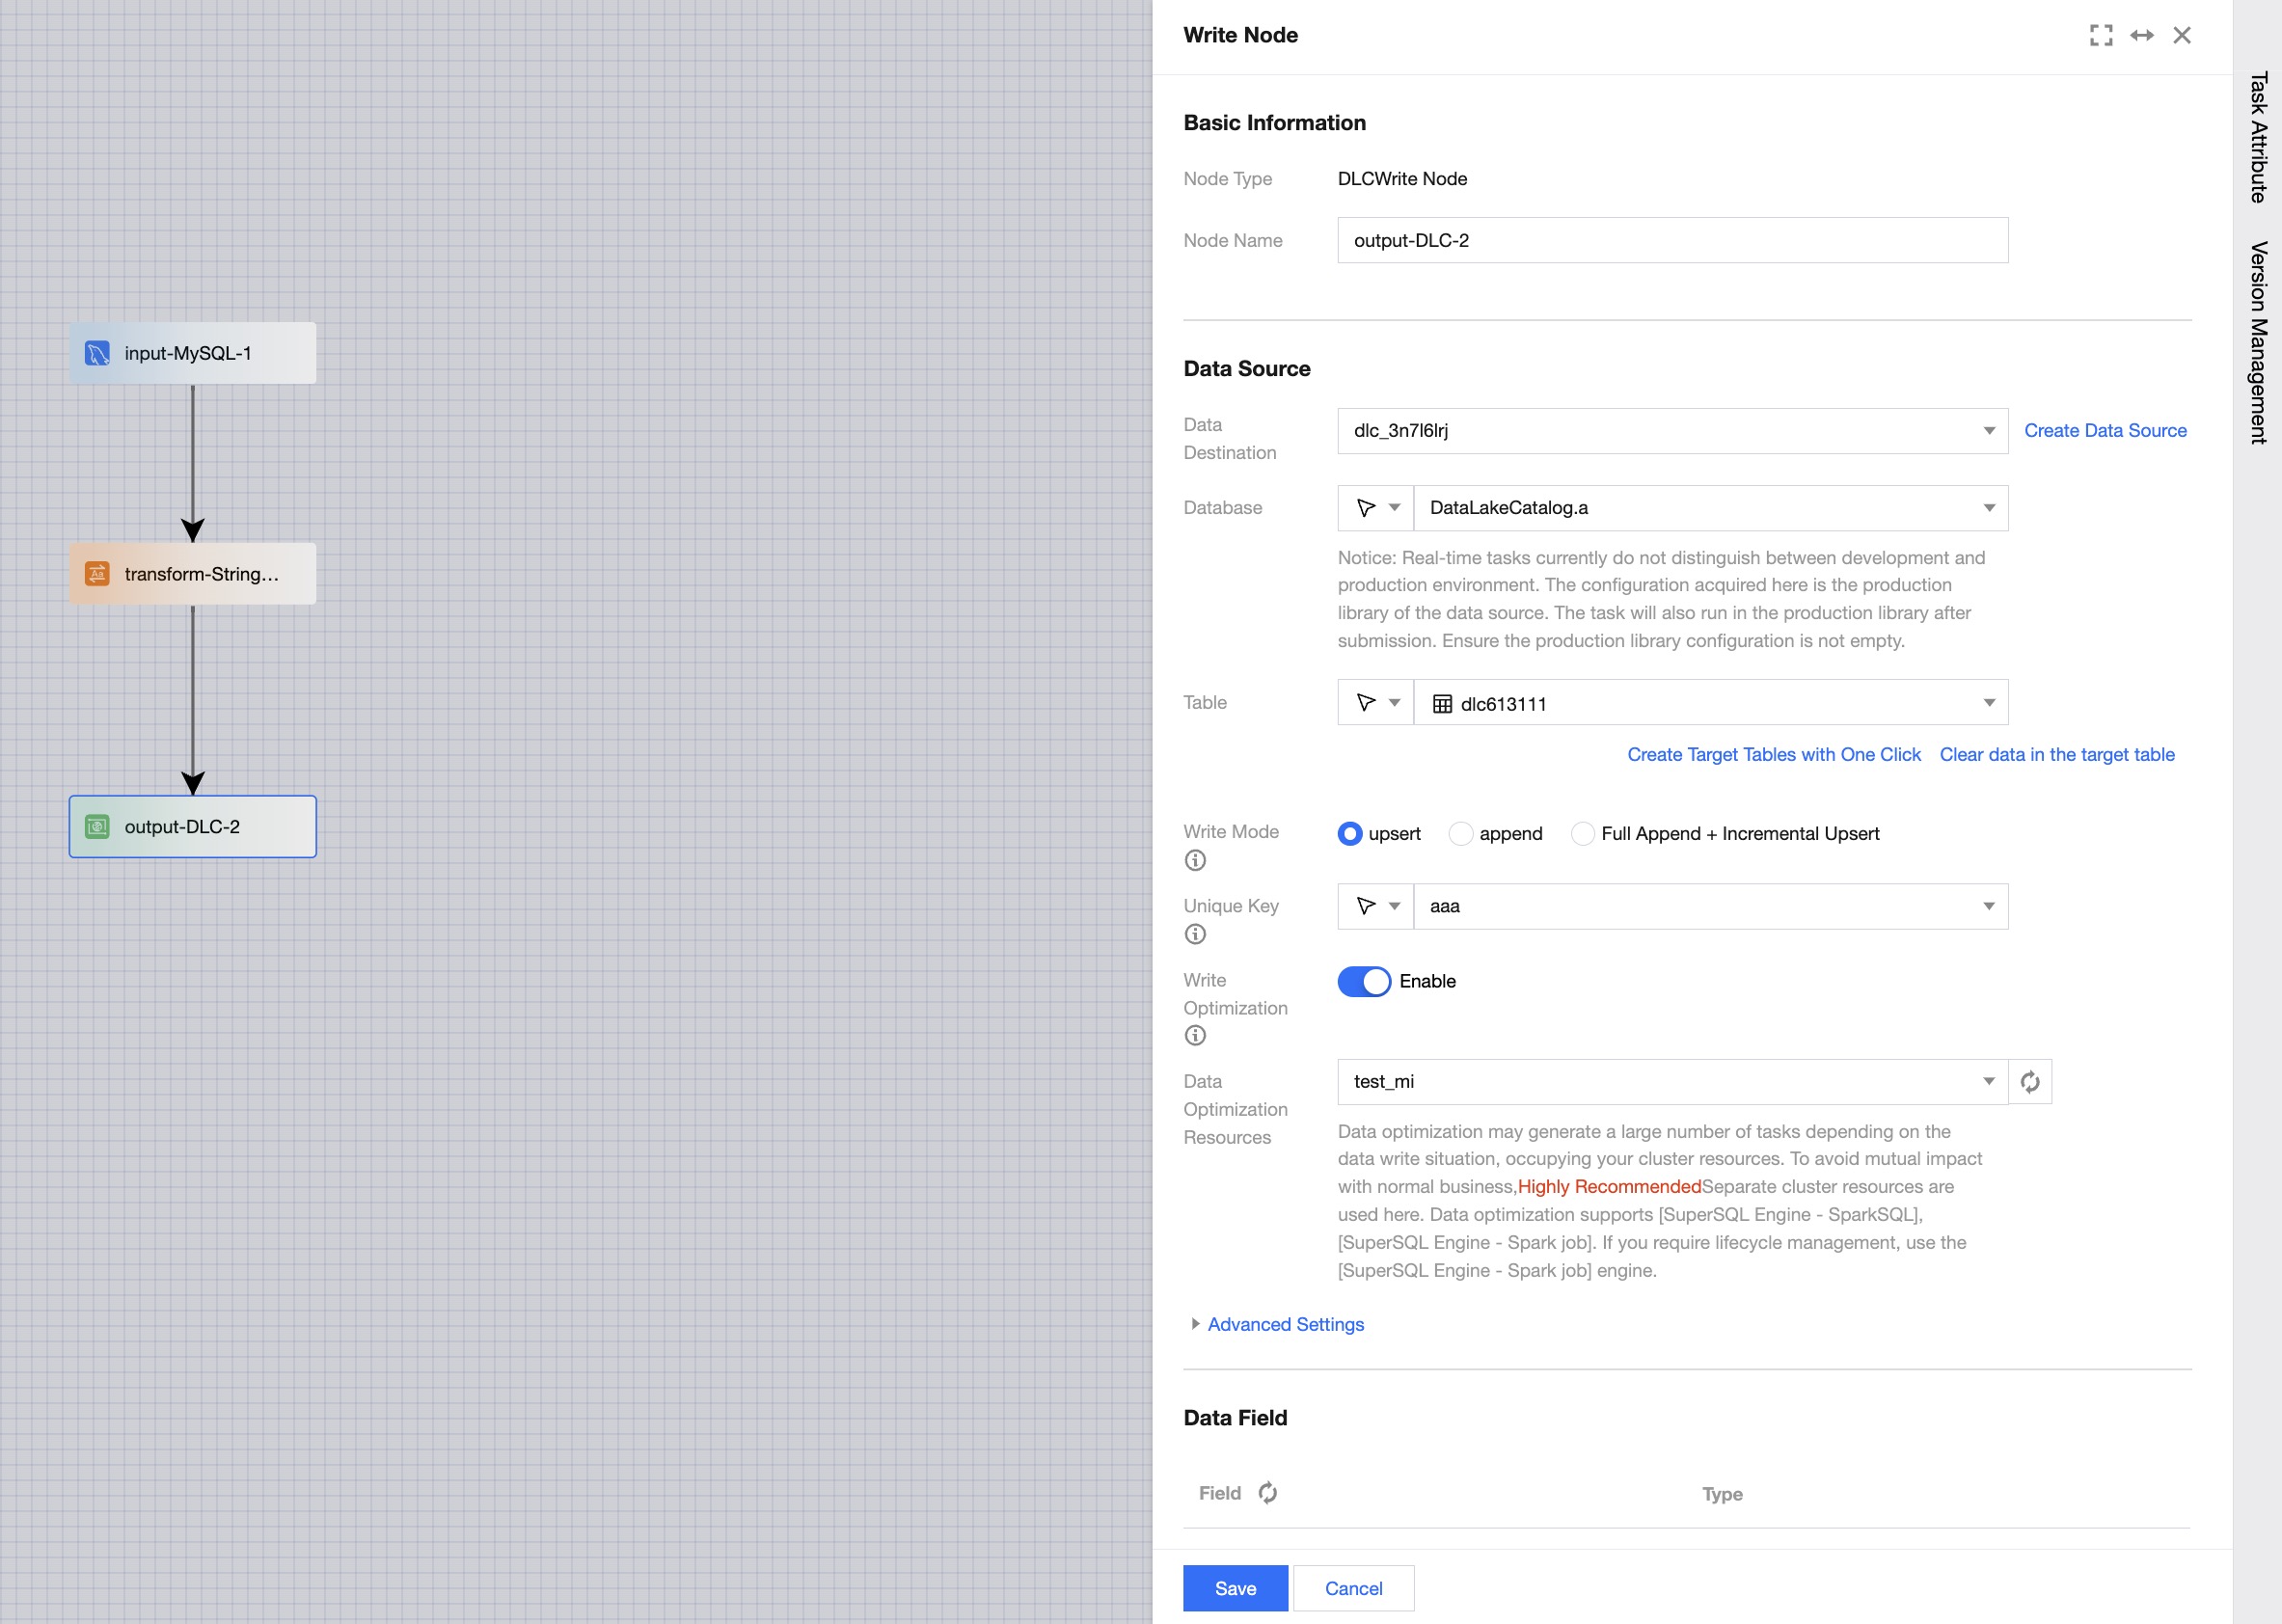
Configure Writing Node
Writing node configuration includes basic information, data source, data fields, and field mapping. The writing node will write the upstream data content into the target object based on the connection relationship.
Basic Information
The node name cannot be empty, and there cannot be data nodes with the same name within a single task.
Data Source
Configure the database table object to be read and the synchronization method, etc.
Data Fields
Based on the configured data table object, the system supports two methods: default pulling of field metadata information and manual field configuration.
Default Pulling: For types such as MySQL, Hive, PostgreSQL, etc., the system supports automatic pulling of metadata fields and types based on their database table information, without the need for manual editing.
Manual Configuration: For file data sources (e.g., HDFS, COS) and columnar storage data sources (e.g., HBase, Mongo), the system does not support automatic metadata pulling. You can click Field Configuration to add field names and types manually.
Field Mapping
The write node requires an additional configuration of the field mapping relationship compared to the read node. The purpose of the field mapping relationship is to specify the source of the target field content by connections, supporting same name mapping, same row mapping, and manual connection as three ways to configure the relationship between the source and the target node.
Note
The prerequisite for configuring field mapping is that the current write node has a connected source (either a read node or a transformation node).
The content of target fields without configured mapping relationships will be empty.
If the source field type cannot be converted to the target field type, it may lead to task failure.
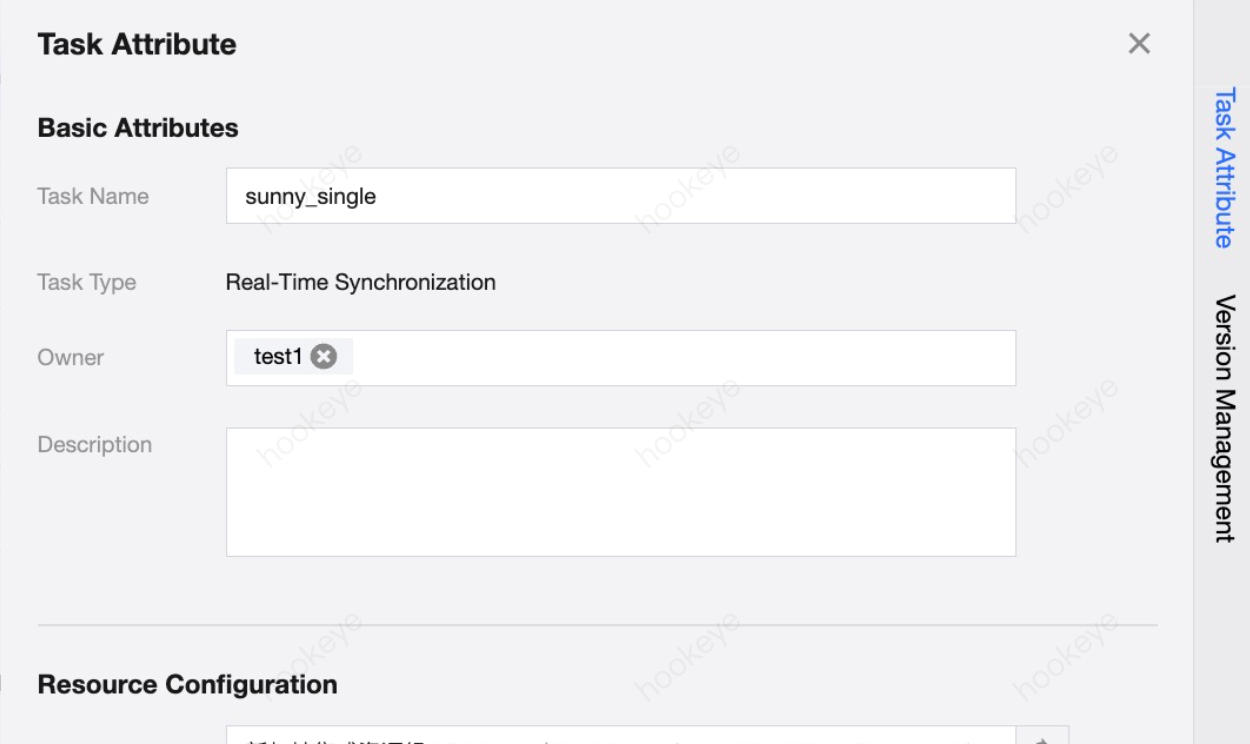
Step 4: Real-time Task Attribute Configuration
Real-time Task Attribute Configuration includes two parts: Basic Attributes and Resource Configuration:
Category
Parameter
Description
Task Attributes
Task Name/Type
Displays the basic information of current task name and type.
Owner
Name of one or more space members responsible for this task, by default, the task creator.
Description
Displays the remark information of the current task.
Resource configuration
Integrated Resource Group
Specifies the name of the Integrated Resource Group used by the current task. A task can only be bound to one resource group.
Resource Allocation Method
Integration resources support multiple allocation methods:
Fixed Allocation: In this mode, tasks do not differentiate between synchronization phases. A fixed amount of resources is allocated to the current task throughout the full and incremental synchronization process. This method prevents resource preemption between tasks and is suitable for scenarios where data may undergo significant changes during task execution.
Allocate by Synchronization Phase: Resources are allocated according to the planned usage for full and incremental synchronization phases to save overall resource usage.
JobManager
Supports 0.25, 0.5, 1, 2C. After setting, the task will by default occupy this specification.
CU The actual CU number occupied by the task = JobManager specification + TaskManager specification × Parallelism.
TaskManager
Supports 0.25, 0.5, 1, 2CU. After setting, the task will by default occupy this specification.
CU The actual CU number occupied by the task = JobManager specification + TaskManager specification × Parallelism.
Parallelism
The default parallelism of each operator.
Running Strategy
Checkpoint Interval
Set the checkpoint interval time, supports minutes/seconds level.
Maximum Restart Attempts
Set the maximum restart threshold for a task in case of failure during execution. If the number of restarts during runtime exceeds this threshold, the task status will become Failed. The setting range is [-1,100], where a threshold of 0 means no restarts, and -1 means unlimited restart attempts.
Associated Alerts
Supports associating alert rules with the current task
Step Five: Job Submission
After completing the real-time synchronization task configuration, you can configure the running strategy and submit it to the production environment for execution. Currently, the task configuration page supports save, submit, lock/unlock, go to operations, and form/canvas conversion operations.
Serial number
Parameter
Description
1
Save
Save the current task configuration information, including data node configuration, node connections, and task properties configuration.
2
Submit
Submits the current task to the production environment. At the time of submission, depending on whether there are production status tasks for the current task, different running strategies can be chosen.
If there are no effective online tasks for the current task, either because it's the first submission or the online task is in a "Failed" state, it can be submitted directly.
If there are online tasks in a "Running" or "Suspension" state, different strategies must be chosen. Stopping an online job will discard the previous task runtime position and start consuming data from the beginning, while keeping the job status will continue running from the last consumed point after a restart.
Note:
Clicking Start Task Now will begin running immediately after submission; otherwise, it needs to be manually triggered to start running.
3
Lock/Unlock
By default, the creator is the first lock holder, allowing only the lock holder to edit task configurations and run tasks. If the lock holder does not make an edit operation within 5 minutes, others can click the icon to grab the lock, and successful lock grabbing allows for editing operations.
4
Go to Operations
Quickly navigate to the real-time operation and maintenance page based on the current task name.
5
Canvas Conversion/Form Conversion
Form mode and canvas mode can be converted into each other. Form mode provides a canvas conversion feature, and canvas mode provides a form conversion feature.
Note:
Currently, only tasks in a successfully saved state are allowed to convert.
If the canvas mode contains conversion nodes, switching to form mode is not supported.
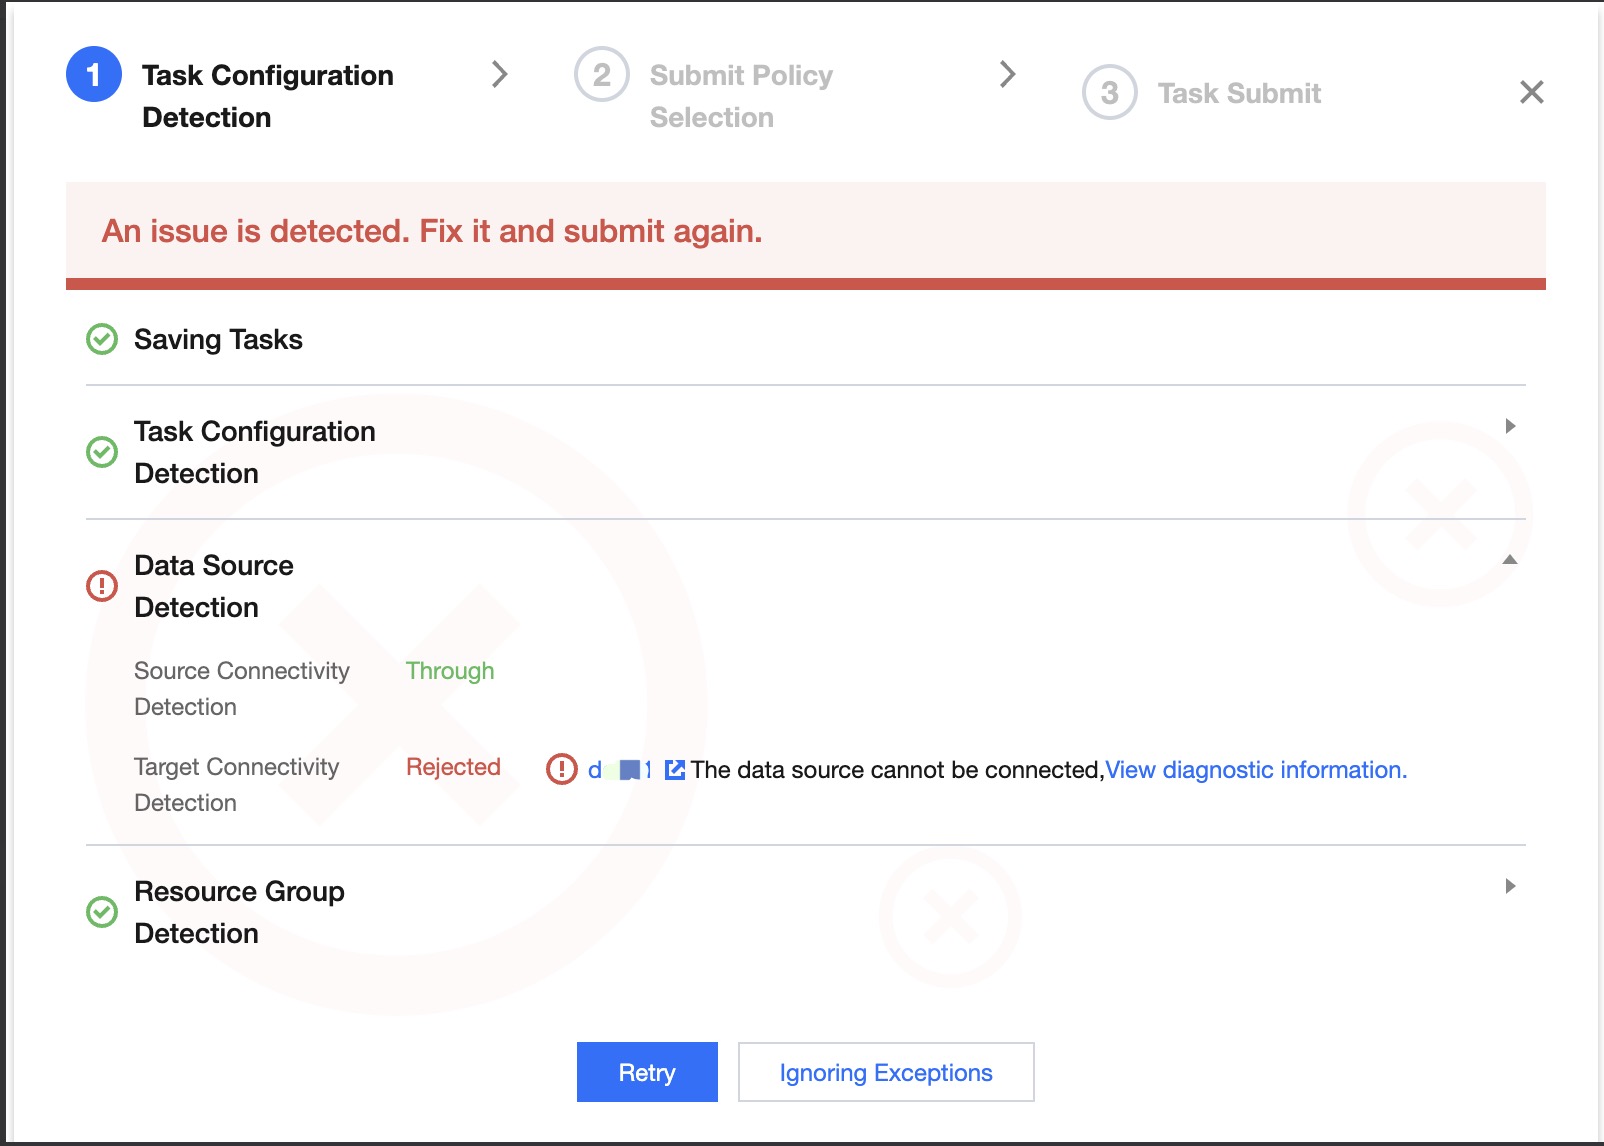
Task Configuration Detection
When submitting a task, a basic environment and configuration check will be performed. Please pay special attention to failed items and warning items. Failed items are likely to cause task failures, and warning items should be assessed based on the business situation. The current check results will not block task submission; you can choose to recheck or ignore the exception and continue submitting.
Currently supported detection items:
Detection Classification
Check Items
Description
Task Configuration Detection
Source Configuration
Check whether mandatory items in the source configuration are missing
Destination Configuration
Check whether mandatory items in the destination configuration are missing
Mapping Relationship Configuration
Check whether field mapping has been configured
Resource Group Configuration
Check whether the resource group is configured
Same Data Table Check
Detect whether there are the same source table, target table, or both source and target tables in all real-time single table tasks (including both submitted and unsubmitted) under the current project. The criterion for judging the same table is whether it is the same named table under the same DB of the same data source. This detection item is mainly for scenarios where multiple tasks are not desirable to repeatedly read the same table.
Data Source Detection
Source Connectivity Detection
Check whether the source data source and the task configuration resource group have network connectivity. If the detection fails, you can view the diagnostic information. After resolving the network issue, you can recheck. Otherwise, the task is likely to fail.
Destination Connectivity Detection
Check whether the destination data source and the task configuration resource group have network connectivity. If the detection fails, you can view the diagnostic information. After resolving the network issue, you can recheck. Otherwise, the task is likely to fail.
Resource Detection
Resource Status Detection
Check whether the resource group is in an available status. If the resource status is unavailable, please replace the task configuration resource group. Otherwise, the task is likely to fail.
Resource Margin Detection
Check whether the current remaining resources in the resource group meet the task configuration resource requirements. If the detection fails, please appropriately reduce the task resource configuration or expand the resource group.
Submission Strategy Selection
After normal submission or ignoring exceptions, you will enter the submission strategy selection page, where you can choose different running strategies based on business needs:
Different task running statuses support different submission running strategies:
Task Status
Submission Strategies
Description
1. First Submission
2. Stopped/Detect Anomalies/Initialization (Not the First Submission)
Start Now, Synchronize from Default Position
Under this policy, reading will start from the default position based on the source configuration. If the source is configured to "full + incremental" reading, it will by default first synchronize the existing data (full phase), and after completion, consume binlog to obtain changed data (incremental phase); if the source is set to "incremental only", it will by default start reading from the latest position of binlog.
Start Now, Synchronize from Designated Time Point
Under this strategy, a specific start time must be selected to match the position by time.
1. Start reading data from the specified point in time. If the specified position is not matched, the task will default to synchronizing from the earliest binlog position
2. If your source reading method is Full + Incremental, selecting this strategy will skip the full phase by default and start syncing from the specified incremental time point
Do Not Start Yet, Manually Start the Task Later in Real-Time Task Operation and Maintenance
Under this strategy, the task will only be submitted to real-time operation and maintenance without starting the task. Subsequent batch task starts can be performed from the real-time operation and maintenance page.
Running (not the first submission)
Continue Running, Retain Job Status Data, Continue Running from Last Synchronization Position
Under this strategy, the new version of the task, once submitted, will continue running from the last synchronization position.
Restart from a specified time point and continue running
Under this strategy, you can specify the read start location. The task will ignore the old version and start reading from the specified location. If the designated time location is not found, the task will default to synchronizing from the earliest binlog location.
Restart and stop the running task, discarding its state, and start running from the default location
This policy will stop the currently running task and discard the task state, then start reading from the default point according to the source end configuration. If the source end is configured for "Full + Increment" reading mode, it will first synchronize the existing data (full stage). Once completed, it will consume binlog to get changed data (increment stage). If the source end is configured for "Increment Only" reading, it will start reading from the latest binlog point by default.
Paused (not the first submission)
Continue Running, Retain Job Status Data, Continue Running from Last Synchronization Position
Under this strategy, the new version of the task, once submitted, will continue running from the last synchronization position.
Note:
Pausing operation will create a snapshot, and the task can be resubmitted to continue running from the last checkpoint.
Forced Pause does not generate a snapshot. When the task is resubmitted, it will continue from the last snapshot taken during task operation. This type of pause may cause partial data replay. If the target write is Append, there will be duplicate data. If the target write is Upsert, there will be no duplication.
Restart from a specified time point and continue running
Under this strategy, you can specify the read start location. The task will ignore the old version and start reading from the specified location. If the designated time location is not found, the task will default to synchronizing from the earliest binlog location.
Restart and stop the running task, discarding its state, and start running from the default location
This policy will stop the currently running task and discard the task state, then start reading from the default point according to the source end configuration. If the source end is configured for "Full + Increment" reading mode, it will first synchronize the existing data (full stage). Once completed, it will consume binlog to get changed data (increment stage). If the source end is configured for "Increment Only" reading, it will start reading from the latest binlog point by default.
Failed (not the first submission)
Resume operation from the last failed checkpoint
This policy will continue running from the point where the task last failed
Restart and run from the default point according to the task reading configuration
Under this policy, reading will start from the default position based on the source configuration. If the source is configured to "full + incremental" reading, it will by default first synchronize the existing data (full phase), and after completion, consume binlog to obtain changed data (incremental phase); if the source is set to "incremental only", it will by default start reading from the latest position of binlog.
In Progress (not the first submission)
Not supported
When there is an online task with the same name and its status is in progress, resubmitting the task is not supported
Additionally, each submission will generate a new real-time task version, and you can configure the version description in the dialog.
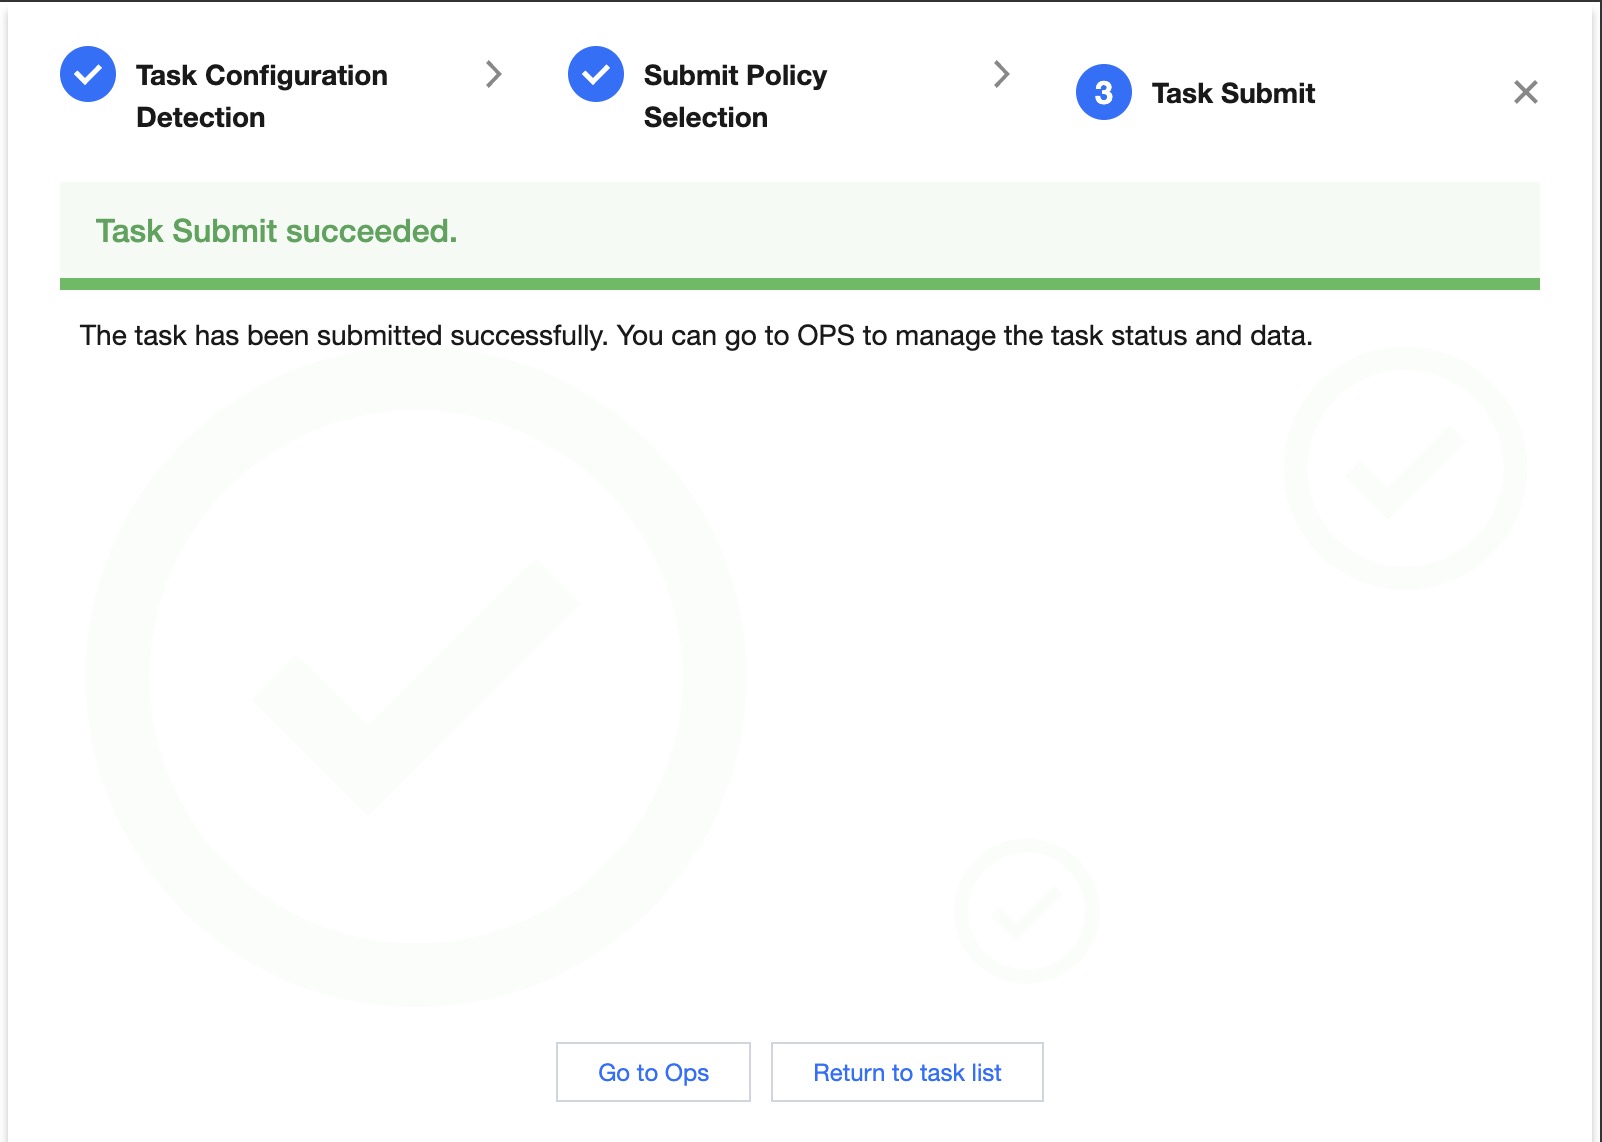
Submit results
After clicking the Submit button above, the submission progress and result will appear:
Task Submitting:
Display Submission Progress Percentage.
Task submission result - Successful:
Display Task Submission Successful Result.
You can go to Operations and Maintenance for task management or return to the task list
Task submission result - Failed:
Display the reason for task submission failure
Subsequent Steps
After completing the task configuration and submission, you can carry out operation and maintenance, monitoring, and alerting for the created task, such as task configuration monitoring and alerting, and view key indicators of task execution.