tencent cloud

Cloud Object Storage

Release Notes and Announcements
Release Notes
Announcements
Product Introduction
Overview
Features
Use Cases
Strengths
Concepts
Regions and Access Endpoints
Specifications and Limits
Service Regions and Service Providers
Billing
Billing Overview
Billing Method
Billable Items
Free Tier
Billing Examples
Viewing and Downloading Bill
Payment Overdue
FAQs
Getting Started
Console
Getting Started with COSBrowser
User Guide
Creating Request
Bucket
Object
Data Management
Batch Operation
Global Acceleration
Monitoring and Alarms
Operations Center
Data Processing
Content Moderation
Smart Toolbox
Data Processing Workflow
Application Integration
User Tools
Tool Overview
Installation and Configuration of Environment
COSBrowser
COSCLI (Beta)
COSCMD
COS Migration
FTP Server
Hadoop
COSDistCp
HDFS TO COS
GooseFS-Lite
Online Tools
Diagnostic Tool
Use Cases
Overview
Access Control and Permission Management
Performance Optimization
Accessing COS with AWS S3 SDK
Data Disaster Recovery and Backup
Domain Name Management Practice
Image Processing
Audio/Video Practices
Workflow
Direct Data Upload
Content Moderation
Data Security
Data Verification
Big Data Practice
COS Cost Optimization Solutions
Using COS in the Third-party Applications
Migration Guide
Migrating Local Data to COS
Migrating Data from Third-Party Cloud Storage Service to COS
Migrating Data from URL to COS
Migrating Data Within COS
Migrating Data Between HDFS and COS
Data Lake Storage
Cloud Native Datalake Storage
Metadata Accelerator
GooseFS
Data Processing
Data Processing Overview
Image Processing
Media Processing
Content Moderation
File Processing Service
File Preview
Troubleshooting
Obtaining RequestId
Slow Upload over Public Network
403 Error for COS Access
Resource Access Error
POST Object Common Exceptions
API Documentation
Introduction
Common Request Headers
Common Response Headers
Error Codes
Request Signature
Action List
Service APIs
Bucket APIs
Object APIs
Batch Operation APIs
Data Processing APIs
Job and Workflow
Content Moderation APIs
Cloud Antivirus API
SDK Documentation
SDK Overview
Preparations
Android SDK
C SDK
C++ SDK
.NET(C#) SDK
Flutter SDK
Go SDK
iOS SDK
Java SDK
JavaScript SDK
Node.js SDK
PHP SDK
Python SDK
React Native SDK
Mini Program SDK
Error Codes
Harmony SDK
Endpoint SDK Quality Optimization
Security and Compliance
Data Disaster Recovery
Data Security
Cloud Access Management
FAQs
Popular Questions
General
Billing
Domain Name Compliance Issues
Bucket Configuration
Domain Names and CDN
Object Operations
Logging and Monitoring
Permission Management
Data Processing
Data Security
Pre-signed URL Issues
SDKs
Tools
APIs
Agreements
Service Level Agreement
Privacy Policy
Data Processing And Security Agreement
Contact Us
Glossary
DocumentaçãoCloud Object StorageData Lake StorageGooseFSData SecurityUsing Apache Ranger to Manage GooseFS Access Permissions

Using Apache Ranger to Manage GooseFS Access Permissions

PDF
Modo Foco
Tamanho da Fonte
Última atualização: 2024-03-25 16:04:01

Overview

Apache Ranger is a standardized authentication component that manages access permissions across the big data ecosystem. GooseFS, as an acceleration storage system used for big data and data lakes, can be integrated into the comprehensive Apache Ranger authentication platform. This document describes how to use Apache Ranger to manage access permissions for GooseFS.

Advantages

GooseFS is a cloud-native accelerated storage system that has supported Apache Range access permission management nearly in the same way as it supported HDFS. Therefore, HDFS big data users can easily migrate to GooseFS and reuse HDFS Ranger permission policies.
Compared with HDFS with Ranger, GooseFS with Ranger offers an authentication option of “Ranger + native ACL” that allows you to use the native ACL authentication when Ranger authentication fails, which solves the problem of imperfect Ranger authentication policy configurations.

Framework of GooseFS with Ranger


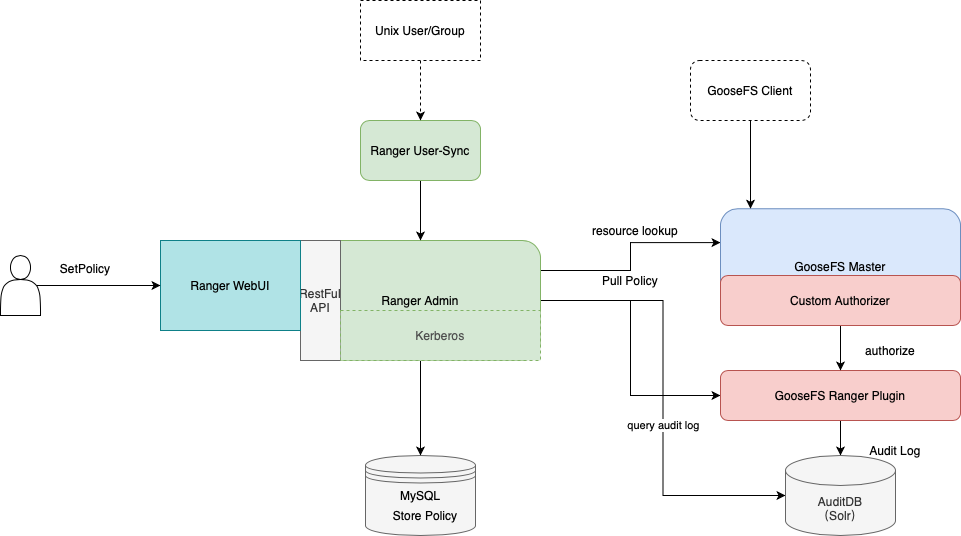
To integrate GooseFS into Ranger, we developed the GooseFS Ranger plugin that should be deployed on the GooseFS master node and Ranger Admin. The plugin does the following operations:
On the GooseFS master node:
Provides the Authorizer API to authenticate each metadata request on the GooseFS master node.
Connects to Ranger Admin to obtain user-configured authentication policies.
On the Ranger Admin:
Supports GooseFS resource lookup for Ranger Admin.
Verifies configurations.

Deployment

Preparations

Before you start, ensure that you have deployed and configured Ranger components (including Ranger Admin and Ranger UserSync) in the environment and can open and use the Ranger web UI normally.

Component Deployment

Deploying GooseFS Ranger plugin to Ranger Admin and registering service

Note:
Click here to download the GooseFS Ranger plugin.
Deploy as follows:
1. Create a GooseFS directory in the Ranger service definition directory. Note that you should at least have execute and read permissions on the directory.
1. If you use a Tencent Cloud EMR cluster, the Ranger service definition directory is /usr/local/service/ranger/ews/webapp/WEB-INF/classes/ranger-plugins.
2. If you use a self-built Hadoop cluster, you can search for the path of Ranger-integrated components (such as HDFS) in Ranger to locate the path.
Ranger service definition directory

3. Put goosefs-ranger-plugin-${version}.jar and ranger-servicedef-goosefs.json in the GooseFS directory. Note that you should have read permission.
4. Restart Ranger.
5. In Ranger, run the following commands to register the GooseFS service:
# Create the service. The Ranger admin account and password, as well as the Ranger service address should be specified.
# For the Tencent Cloud EMR cluster, the admin is the root, and the password is the root account’s password that is set when the EMR cluster is created. The Ranger service IP is the master node IP of the EMR.
adminUser=root
adminPasswd=xxxx

rangerServerAddr=10.0.0.1:6080

curl -v -u${adminUser}:${adminPasswd} -X POST -H "Accept:application/json" -H "Content-Type:application/json" -d @./ranger-servicedef-goosefs.json http://${rangerServerAddr}/service/plugins/definitions

# When the service is successfully registered, a service ID will be returned, which should be remembered.
# To delete the GooseFS service, pass the service ID returned to run the following command:
serviceId=104
curl -v -u${adminUser}:${adminPasswd} -X DELETE -H "Accept:application/json" -H "Content-Type:application/json" http://${rangerServerAddr}/service/plugins/definitions/${serviceId}
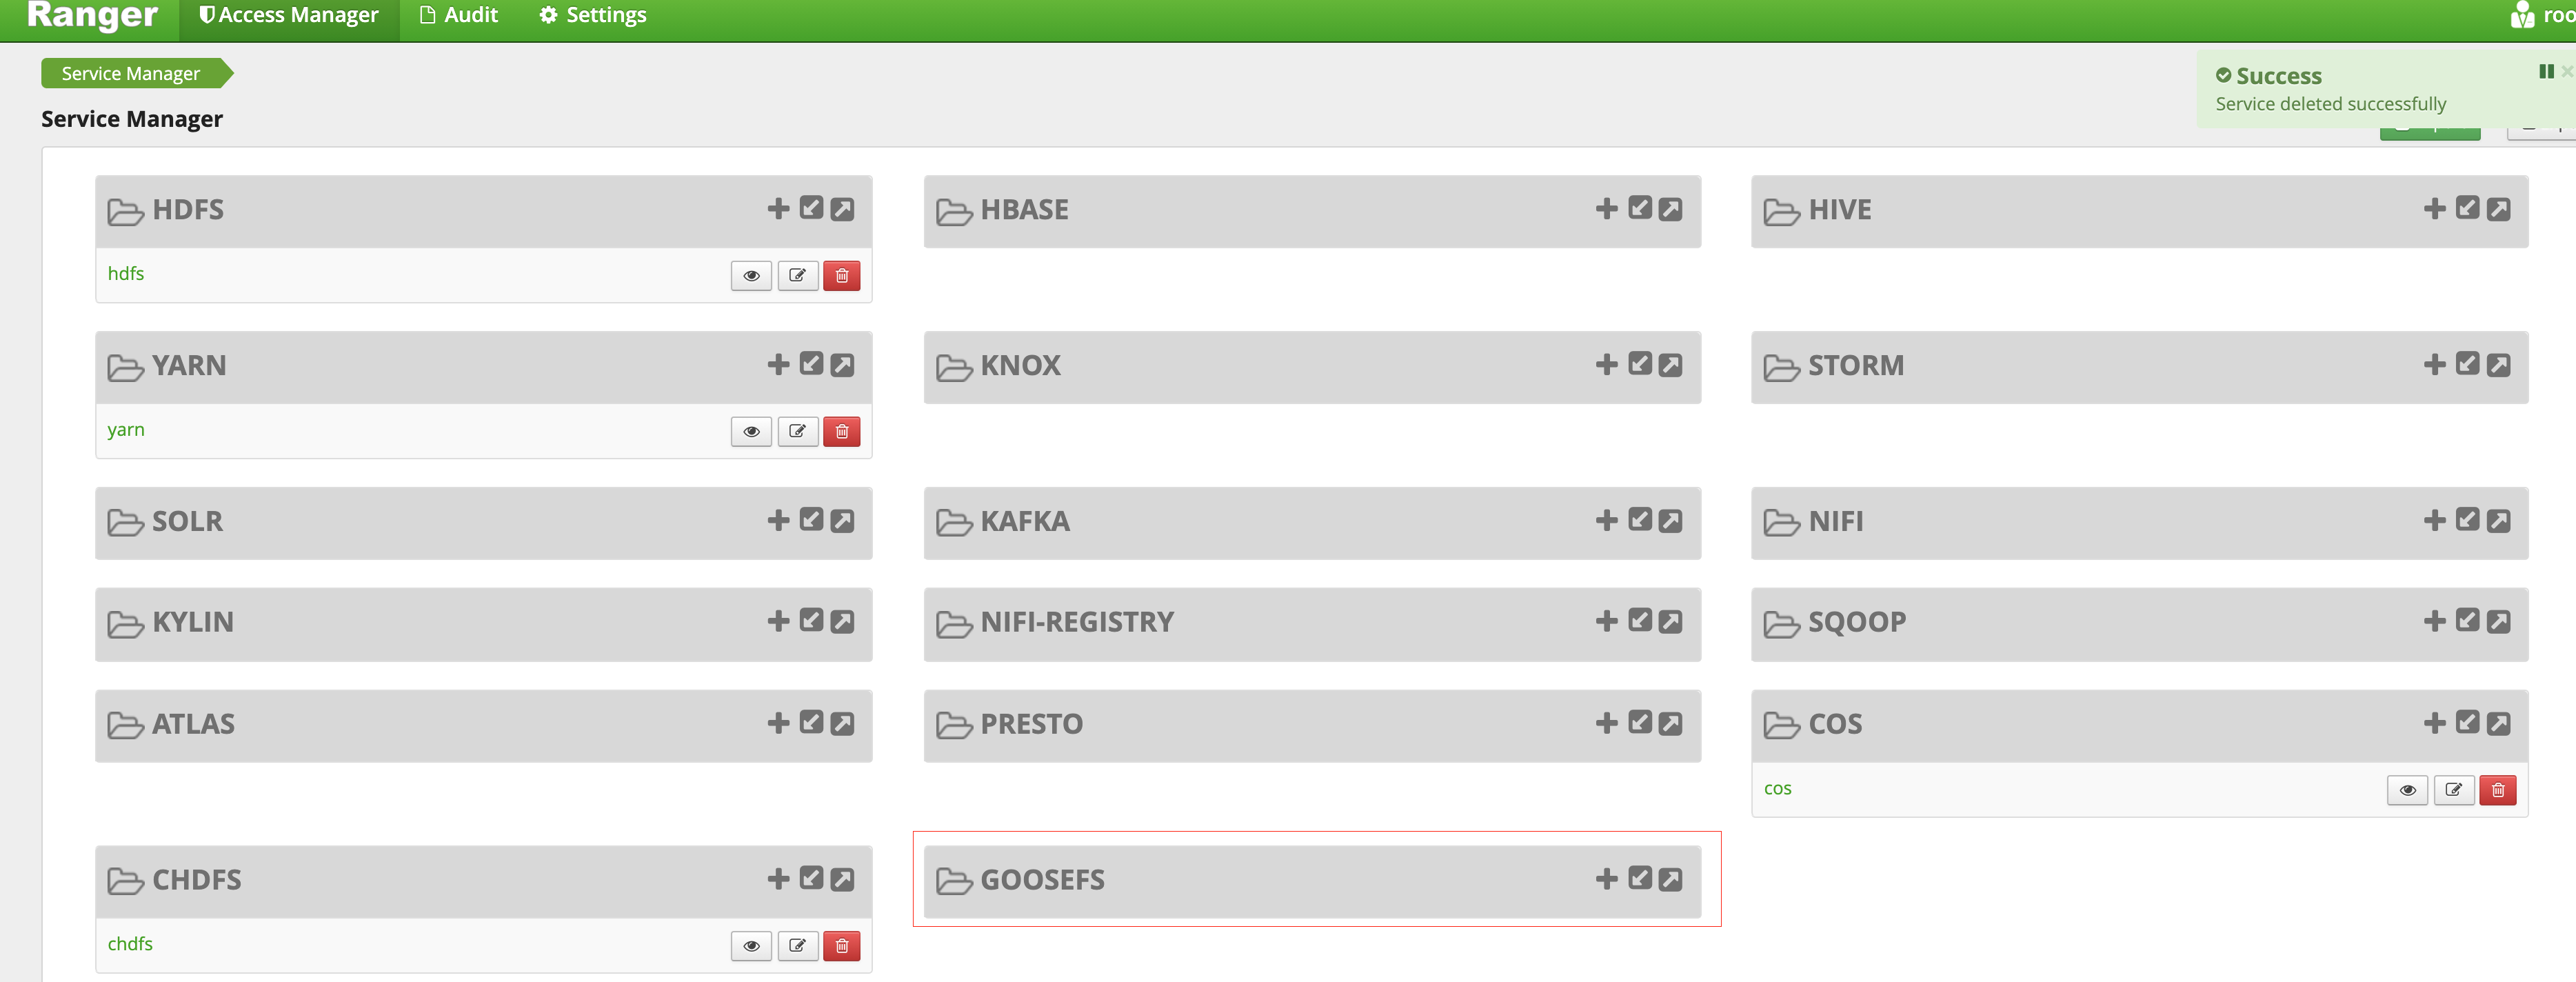
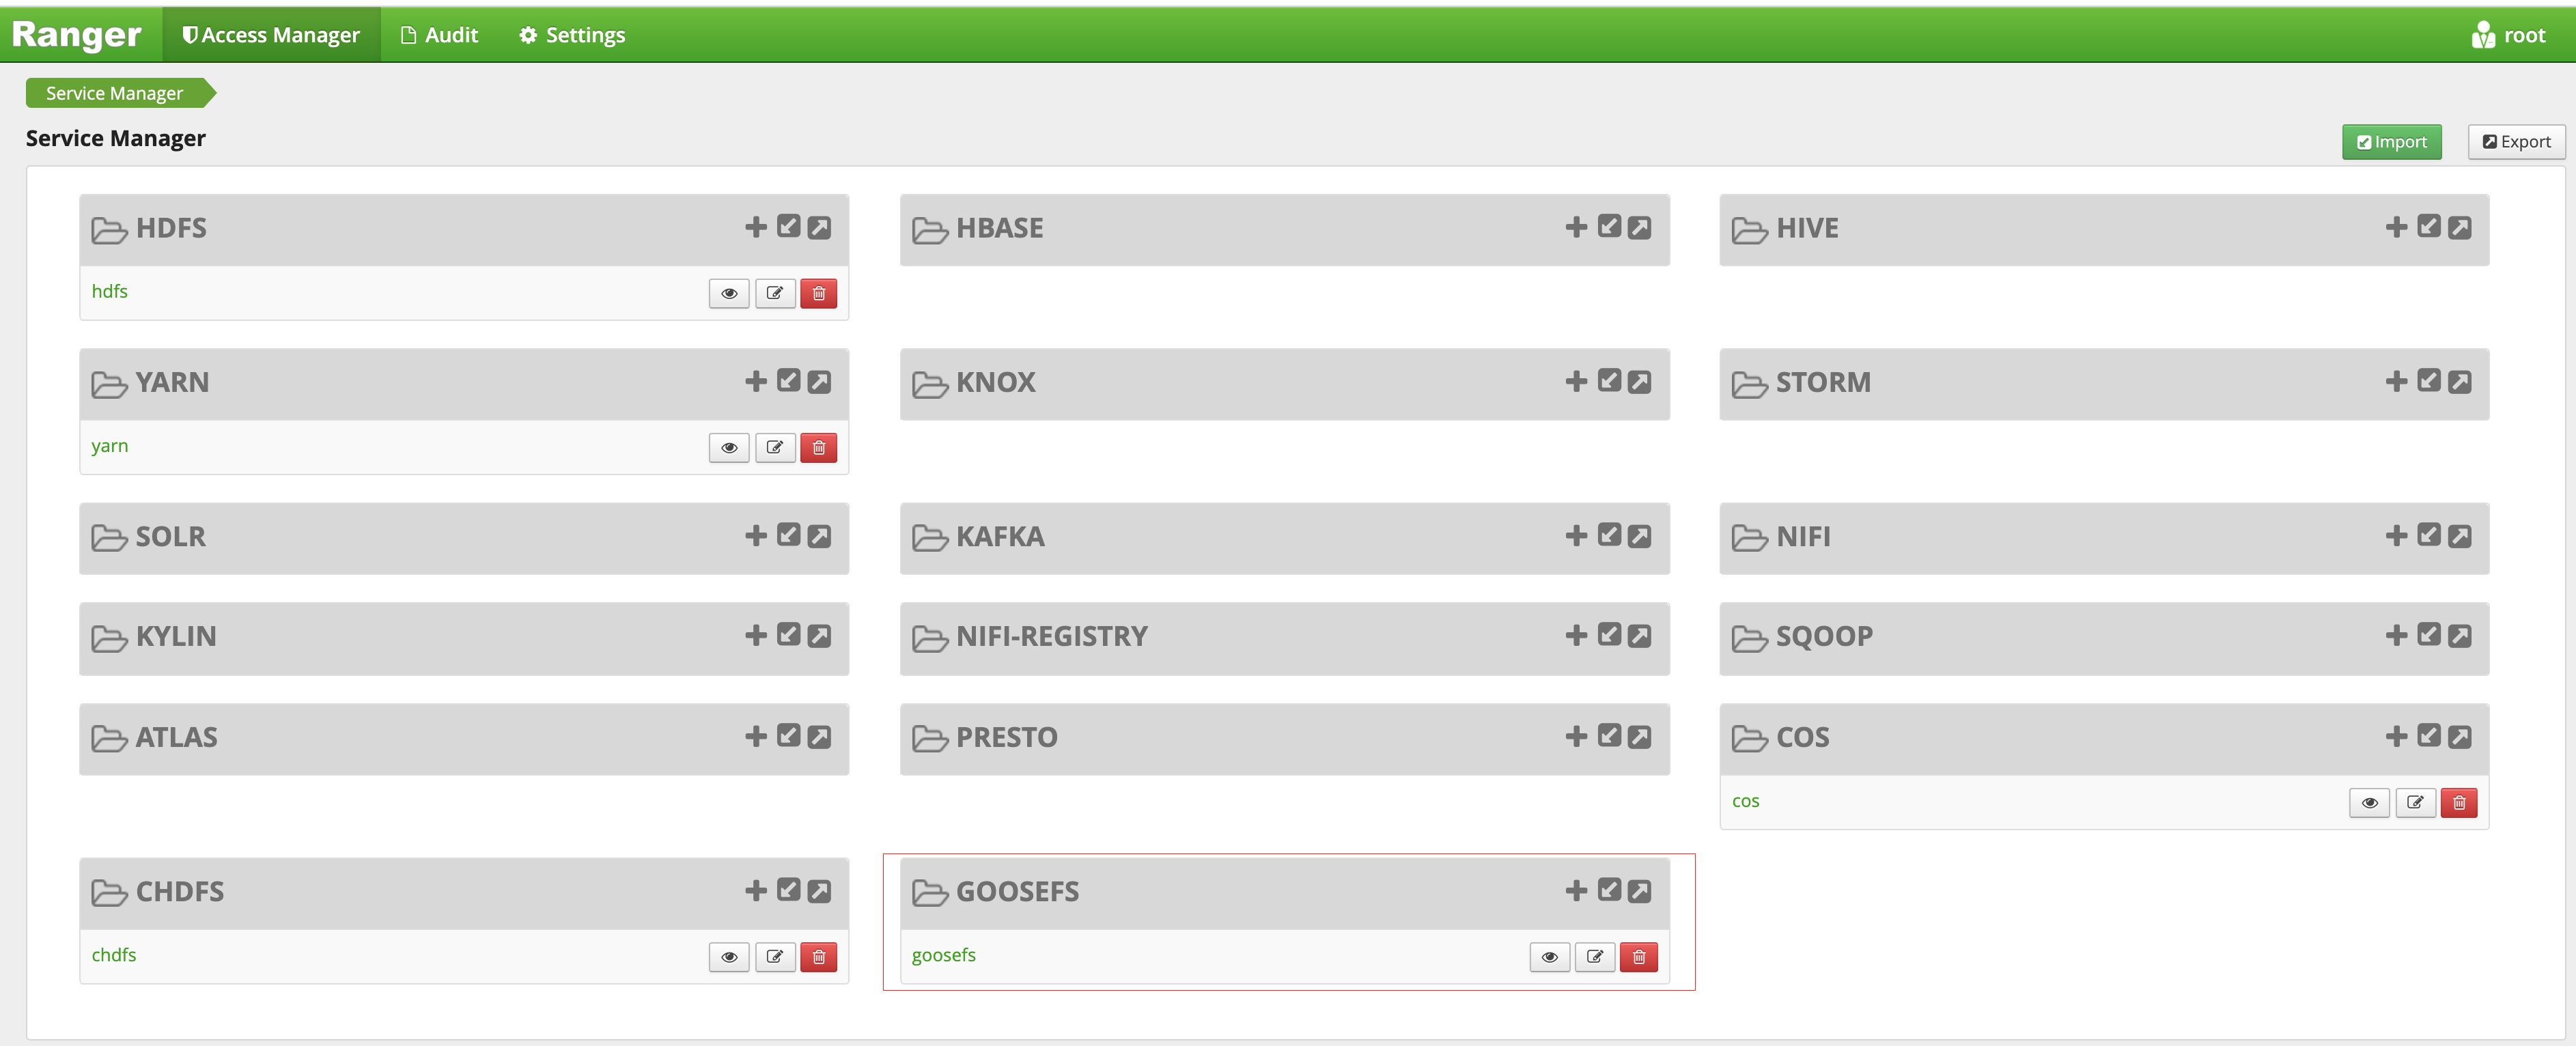
6. After the GooseFS service is created, you can view it in the Ranger console.
Ranger Console

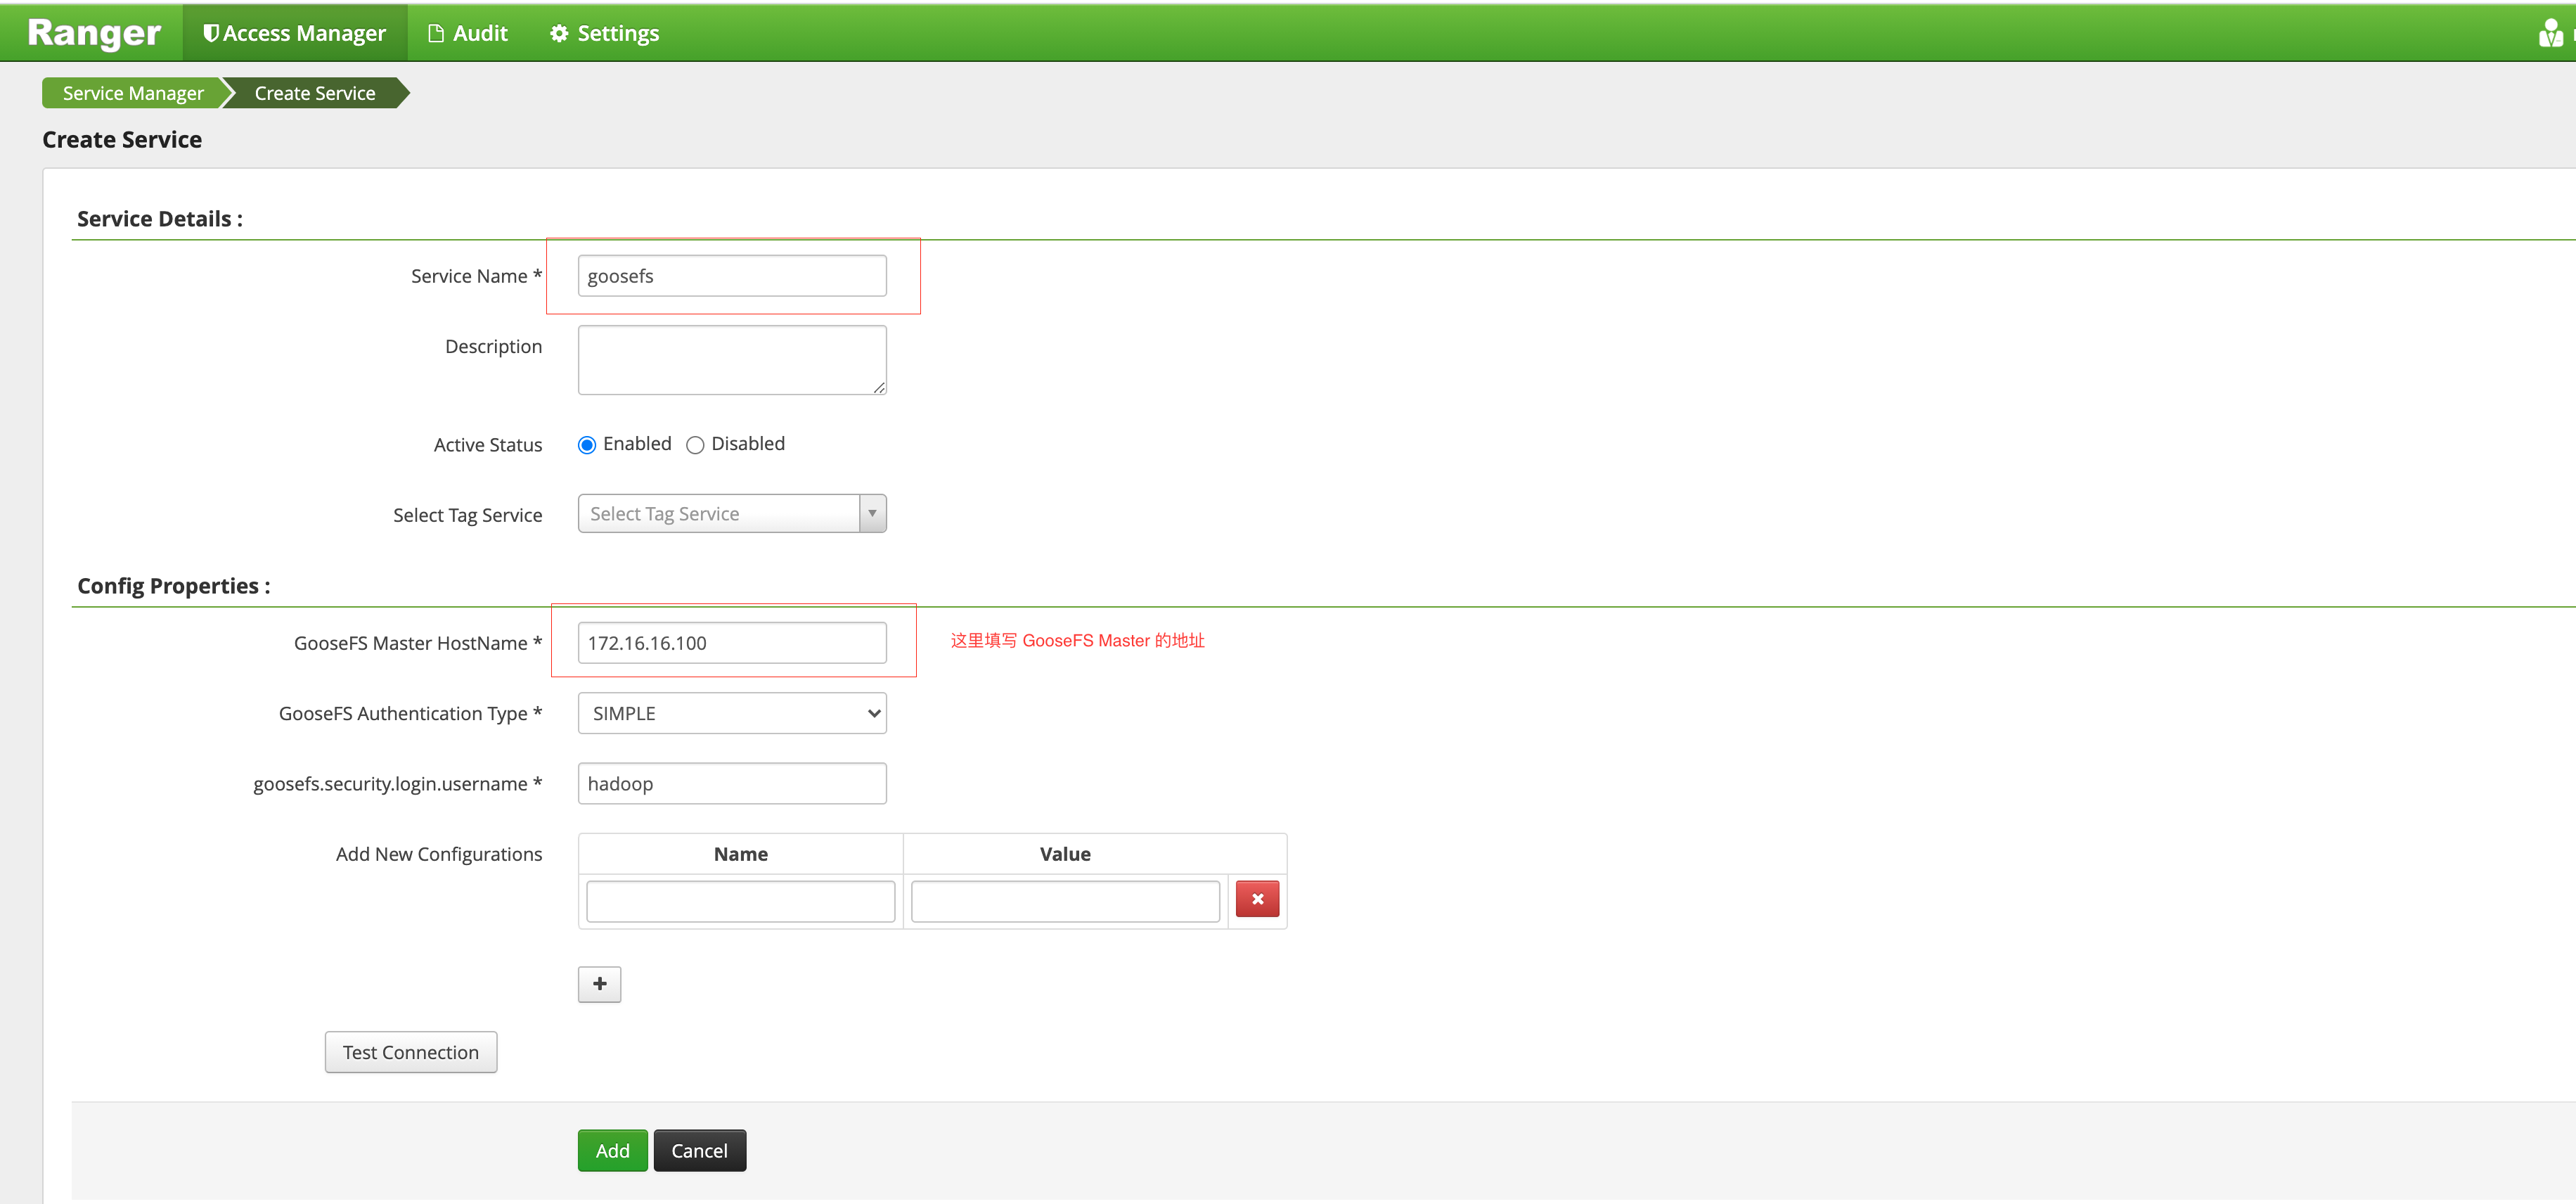
7. Click + to define the GooseFS service instance.
Defining GooseFS in the Ranger Console

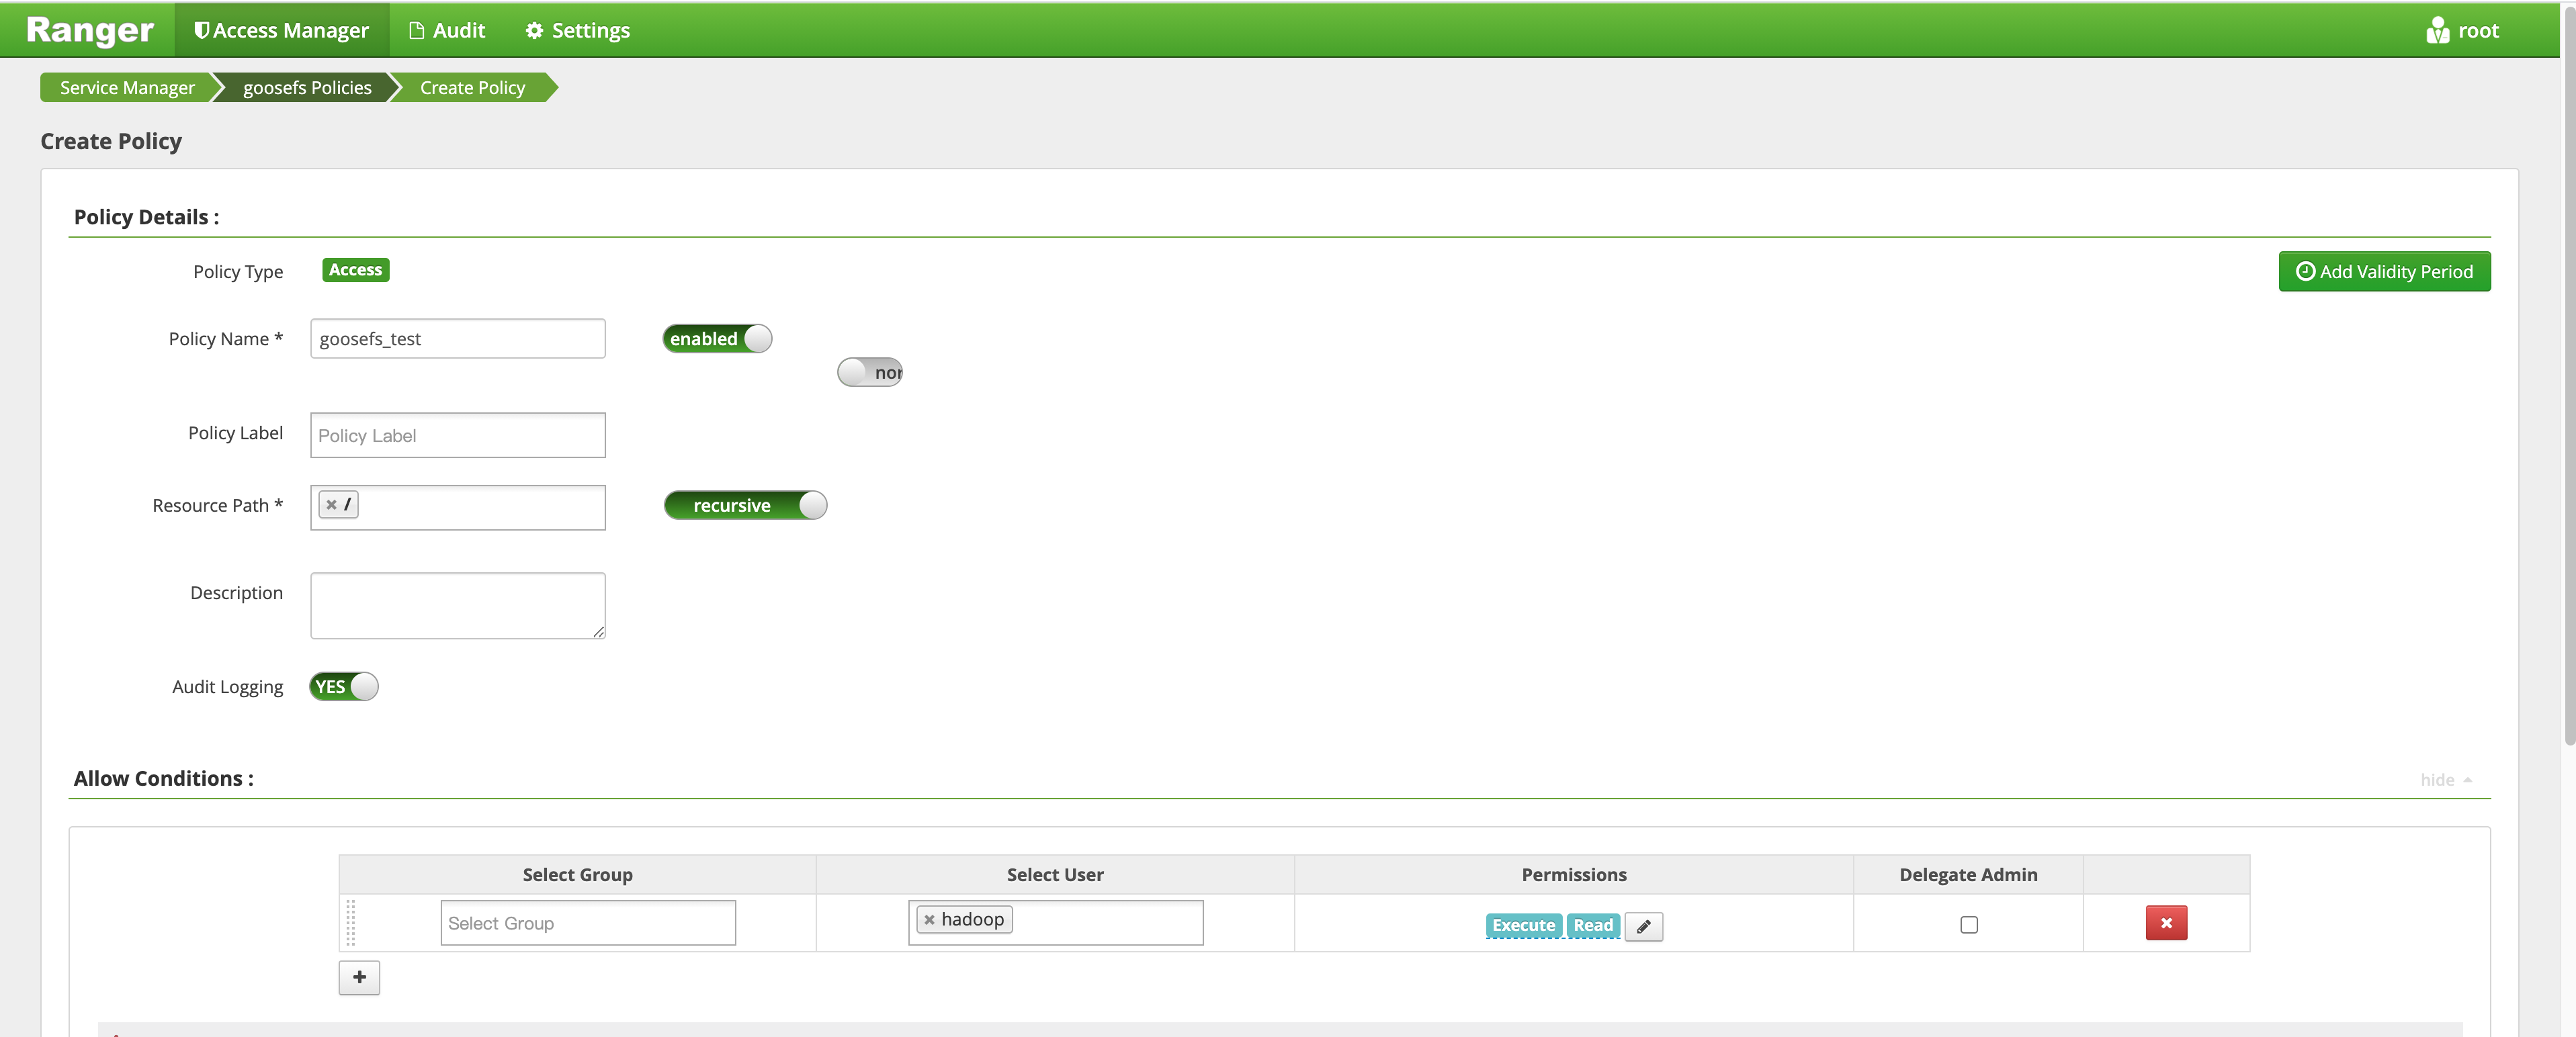
8. Click the created GooseFS instance and add a policy.
Adding New Policy


Deploying GooseFS Ranger plugin and enabling Ranger authentication

1. Put goosefs-ranger-plugin-${version}.jar in the \\${GOOSEFS_HOME}/lib directory. You should at least have read permission.
2. Put ranger-goosefs-audit.xml, ranger-goosefs-security.xml, and ranger-policymgr-ssl.xml to the \\${GOOSEFS_HOME}/conf directory and configure the required parameters as follows:
ranger-goosefs-security.xml:
<configuration xmlns:xi="http://www.w3.org/2001/XInclude">
<property>
<name>ranger.plugin.goosefs.service.name</name>
<value>goosefs</value>
</property>

<property>
<name>ranger.plugin.goosefs.policy.source.impl</name>
<value>org.apache.ranger.admin.client.RangerAdminRESTClient</value>
</property>

<property>
<name>ranger.plugin.goosefs.policy.rest.url</name>
<value>http://10.0.0.1:6080</value>
</property>

<property>
<name>ranger.plugin.goosefs.policy.pollIntervalMs</name>
<value>30000</value>
</property>

<property>
<name>ranger.plugin.goosefs.policy.rest.client.connection.timeoutMs</name>
<value>1200</value>
</property>

<property>
<name>ranger.plugin.goosefs.policy.rest.client.read.timeoutMs</name>
<value>30000</value>
</property>
</configuration>
ranger-goosefs-audit.xml (you can skip it if audit is disabled):
<configuration>
<property>
<name>xasecure.audit.is.enabled</name>
<value>false</value>
</property>

<property>
<name>xasecure.audit.db.is.async</name>
<value>true</value>
</property>

<property>
<name>xasecure.audit.db.async.max.queue.size</name>
<value>10240</value>
</property>

<property>
<name>xasecure.audit.db.async.max.flush.interval.ms</name>
<value>30000</value>
</property>

<property>
<name>xasecure.audit.db.batch.size</name>
<value>100</value>
</property>

<property>
<name>xasecure.audit.jpa.javax.persistence.jdbc.url</name>
<value>jdbc:mysql://localhost:3306/ranger_audit</value>
</property>

<property>
<name>xasecure.audit.jpa.javax.persistence.jdbc.user</name>
<value>rangerLogger</value>
</property>

<property>
<name>xasecure.audit.jpa.javax.persistence.jdbc.password</name>
<value>none</value>
</property>

<property>
<name>xasecure.audit.jpa.javax.persistence.jdbc.driver</name>
<value>com.mysql.jdbc.Driver</value>
</property>

<property>
<name>xasecure.audit.credential.provider.file</name>
<value>jceks://file/etc/ranger/hadoopdev/auditcred.jceks</value>
</property>

<property>
<name>xasecure.audit.hdfs.is.enabled</name>
<value>true</value>
</property>

<property>
<name>xasecure.audit.hdfs.is.async</name>
<value>true</value>
</property>

<property>
<name>xasecure.audit.hdfs.async.max.queue.size</name>
<value>1048576</value>
</property>

<property>
<name>xasecure.audit.hdfs.async.max.flush.interval.ms</name>
<value>30000</value>
</property>

<property>
<name>xasecure.audit.hdfs.config.encoding</name>
<value></value>
</property>

<!-- hdfs audit provider config-->
<property>
<name>xasecure.audit.hdfs.config.destination.directory</name>
<value>hdfs://NAMENODE_HOST:8020/ranger/audit/</value>
</property>

<property>
<name>xasecure.audit.hdfs.config.destination.file</name>
<value>%hostname%-audit.log</value>
</property>

<proeprty>
<name>xasecure.audit.hdfs.config.destination.flush.interval.seconds</name>
<value>900</value>
</proeprty>

<property>
<name>xasecure.audit.hdfs.config.destination.rollover.interval.seconds</name>
<value>86400</value>
</property>

<property>
<name>xasecure.audit.hdfs.config.destination.open.retry.interval.seconds</name>
<value>60</value>
</property>

<property>
<name>xasecure.audit.hdfs.config.local.buffer.directory</name>
<value>/var/log/hadoop/%app-type%/audit</value>
</property>

<property>
<name>xasecure.audit.hdfs.config.local.buffer.file</name>
<value>%time:yyyyMMdd-HHmm.ss%.log</value>
</property>

<property>
<name>xasecure.audit.hdfs.config.local.buffer.file.buffer.size.bytes</name>
<value>8192</value>
</property>

<property>
<name>xasecure.audit.hdfs.config.local.buffer.flush.interval.seconds</name>
<value>60</value>
</property>

<property>
<name>xasecure.audit.hdfs.config.local.buffer.rollover.interval.seconds</name>
<value>600</value>
</property>

<property>
<name>xasecure.audit.hdfs.config.local.archive.directory</name>
<value>/var/log/hadoop/%app-type%/audit/archive</value>
</property>

<property>
<name>xasecure.audit.hdfs.config.local.archive.max.file.count</name>
<value>10</value>
</property>

<!-- log4j audit provider config -->
<property>
<name>xasecure.audit.log4j.is.enabled</name>
<value>false</value>
</property>

<property>
<name>xasecure.audit.log4j.is.async</name>
<value>false</value>
</property>

<property>
<name>xasecure.audit.log4j.async.max.queue.size</name>
<value>10240</value>
</property>

<property>
<name>xasecure.audit.log4j.async.max.flush.interval.ms</name>
<value>30000</value>
</property>

<!-- kafka audit provider config -->
<property>
<name>xasecure.audit.kafka.is.enabled</name>
<value>false</value>
</property>

<property>
<name>xasecure.audit.kafka.async.max.queue.size</name>
<value>1</value>
</property>

<property>
<name>xasecure.audit.kafka.async.max.flush.interval.ms</name>
<value>1000</value>
</property>

<property>
<name>xasecure.audit.kafka.broker_list</name>
<value>localhost:9092</value>
</property>

<property>
<name>xasecure.audit.kafka.topic_name</name>
<value>ranger_audits</value>
</property>

<!-- ranger audit solr config -->
<property>
<name>xasecure.audit.solr.is.enabled</name>
<value>false</value>
</property>

<property>
<name>xasecure.audit.solr.async.max.queue.size</name>
<value>1</value>
</property>

<property>
<name>xasecure.audit.solr.async.max.flush.interval.ms</name>
<value>1000</value>
</property>

<property>
<name>xasecure.audit.solr.solr_url</name>
<value>http://localhost:6083/solr/ranger_audits</value>
</property>
</configuration>
ranger-policymgr-ssl.xml
<configuration>
<property>
<name>xasecure.policymgr.clientssl.keystore</name>
<value>hadoopdev-clientcert.jks</value>
</property>

<property>
<name>xasecure.policymgr.clientssl.truststore</name>
<value>cacerts-xasecure.jks</value>
</property>

<property>
<name>xasecure.policymgr.clientssl.keystore.credential.file</name>
<value>jceks://file/tmp/keystore-hadoopdev-ssl.jceks</value>
</property>

<property>
<name>xasecure.policymgr.clientssl.truststore.credential.file</name>
<value>jceks://file/tmp/truststore-hadoopdev-ssl.jceks</value>
</property>
</configuration>
3. Add the following configurations to goosefs-site.properties:
...
goosefs.security.authorization.permission.type=CUSTOM
goosefs.security.authorization.custom.provider.class=org.apache.ranger.authorization.goosefs.RangerGooseFSAuthorizer
...
4. In \\${GOOSEFS_HOME}/libexec/goosefs-config.sh, add goosefs-ranger-plugin-${version}.jar to the GooseFS class paths:
...
GOOSEFS_RANGER_CLASSPATH="${GOOSEFS_HOME}/lib/ranger-goosefs-plugin-${version}.jar"
GOOSEFS_SERVER_CLASSPATH=${GOOSEFS_SERVER_CLASSPATH}:${GOOSEFS_RANGER_CLASSPATH}
...
After these, the configuration is complete.

Verification

You can add a policy that allows Hadoop users to read and execute but not write to the GooseFS root directory as follows:
1. Add a policy.
Delivering the Policy in the Console

2. Verify the policy to see if the policy takes effect.
Verification


Ajuda e Suporte

Esta página foi útil?

comentários