Given that super nodes lack the concept of actual nodes, resource objects running on regular nodes, such as DaemonSets, cannot operate as expected. Consequently, certain system-level application capabilities supported by DaemonSet, like log collection and resource monitoring services, cannot be uniformly supported on super nodes. The common industry solution is to implement DaemonSet related capabilities through sidecar injection. However, this leads to an inconsistent user experience compared to regular nodes and is functionally compromised. For example, updates to the sidecar can affect the lifecycle of business Pods. In response, Tencent Cloud has launched a new DaemonSet Pod injection scheme for running DaemonSet on super nodes. As the only scheme in the industry that supports the operation of DaemonSet Pods under a Nodeless architecture, this solution has the following advantages:
Full Compatibility: Fully compatible with the native use of DaemonSet Pods.
Zero Intrusion: DaemonSet Pods and business Pods have individual lifecycles. Any changes to the DaemonSet will not affect business Pods.
Observability: The console supports the monitoring of Daemonset Pod, and the querying of Daemonset Pod logs, events, etc.
Application scenario
TKE Managed Cluster: In the TKE Managed Cluster, if you have added a super node and the Pod running on the super node expects to support the same Daemonset capability as conventional nodes.
TKE Serverless Cluster: In the TKE Serverless Cluster, if you want to run the Daemonset resources, you can refer to this document.
IDC Cluster: in the IDC Cluster, if you have added a super node and the Pod executing on the super node expects to support the same Daemonset capability with IDC nodes.
Preparation
Check if the control plane master components have been upgraded to the following specific versions or higher:
Kubernetes Version
Version Requirements for Control Plane Master Component
v1.26
v1.26.1-tke.1 or higher version
v1.24
v1.24.4-tke.4 or higher version
v1.22
v1.22.5-tke.8 or higher version
v1.20
v1.20.6-tke.30 or a later version
v1.18
v1.18.4-tke.34 or a later version
v1.16
v1.16.3-tke.33 or higher version
Verify that the super node's version has been upgraded to v2.11.20 or higher.
1. Creating Daemonsets and label the Daemonsets that need to run on the super nodes
The purpose of this step is to declare which Daemonsets should run on the super nodes.
If you desire to run the same DaemonSet on both normal nodes and supernodes in TKE, we recommend creating a duplicate DaemonSet and tagging it accordingly. This will not affect the original DaemonSet running on the normal nodes and facilitates management.
As shown in the file below, tag the DaemonSet to be injected in eks.tke.cloud.tencent.com/ds-injection: "true". For pay-as-you-go supernodes, since they come with default taints (key=eks.tke.cloud.tencent.com/eklet,effect=NoSchedule), they will need to tolerate taints to support creating DaemonSet Pods.
Note:
During the scheduling process, the resources defined in the DaemonSet will not be effective, nor will they generate any additional charges.
spec:
template:
metadata:
annotations:
eks.tke.cloud.tencent.com/ds-injection:"true"
spec:
tolerations:
-key: eks.tke.cloud.tencent.com/eklet
operator: Exists
effect: NoSchedule
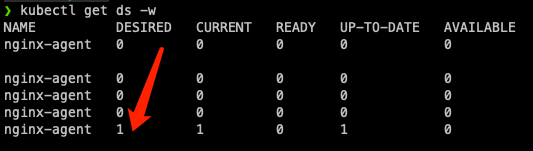
Through the steps above, if there are super nodes in the cluster, you can run the kubectl get ds command to view the new replica expansion situation. The cluster will display as many replicas as there are super nodes, as shown in the figure below:
2. Activating DaemonSet Pods
Upon the declaration of DaemonSet running on the supernodes is completed, it implies that every business Pod on the current supernode will be automatically injected with a DaemonSet Pod. Subsequently, any business Pod that is launched will also be automatically injected (excluding Pods under the kube-system namespace).
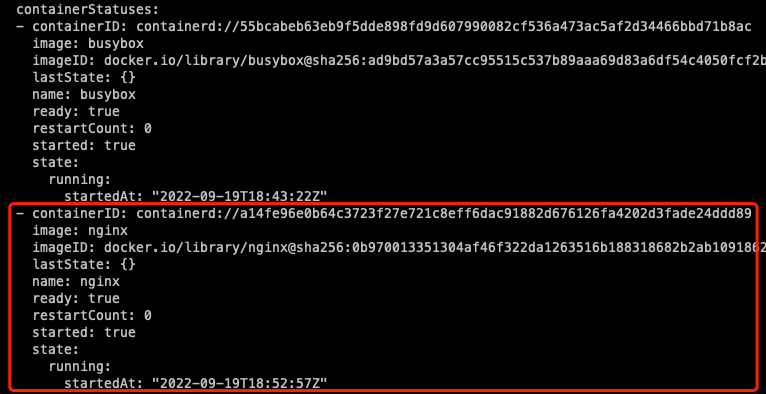
The YAML configuration of the injected Pods themselves will remain unchanged. However, the status of the injected DaemonSet Pod containers will be added to the Container Status for more convenient observation of the status of the DaemonSet Pods, as shown in the figure below:
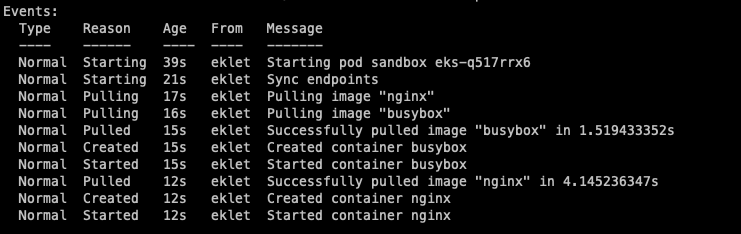
Events of the DaemonSet Pod containers, such as pulling images, launching, abnormal exit, and others, will be reported to the injected Pods.
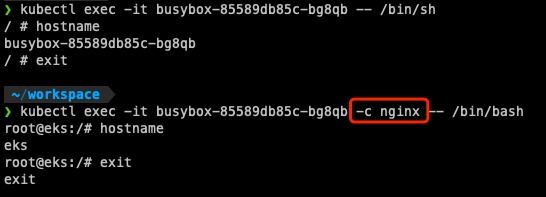
3. Logging in to Daemonset Pods
The kubectl exec command allows you to log in to the containers of the original Pods. To log in to the containers of the DaemonSet Pods, direct the exec towards the injected Pods, then use the -c parameter to specify the DaemonSet Pod containers you want to log in. The command is as follows:
If the container names of the DaemonSet Pods are the same with those of the original Pods, the exec command will give priority to the original Pods, hence it becomes impossible to log in to the containers of the DaemonSet Pods. However, the containers of the DaemonSet Pods continue to function normally. For the containers of the DaemonSet Pods to be observable, it's recommended to differentiate the container names of the DaemonSet Pods from those of the Pods.
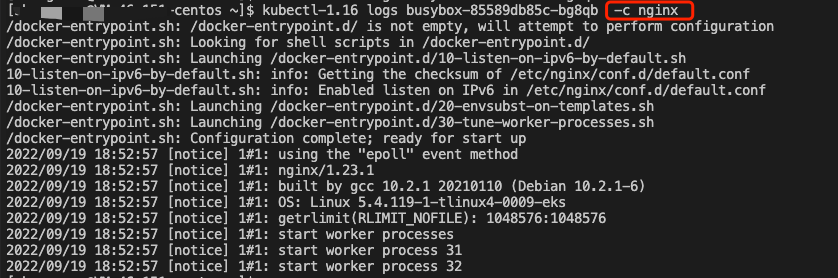
4. Viewing Daemonset Pod logs
Similar to using the kubectl exec command, you can utilize the kubectl logs command combined with the -c parameter to view the logs of the DaemonSet Pod containers. The command is as follows:
Please note that since clients of version 1.18 and above of kubectl will verify whether the Pod Spec contains the specified containers before initiating a logs request. If the specified container is absent, the following error is returned directly:
container xxx is not valid for pod xxx
In cases like these, you can switch your kubectl version to 1.16, or use the released version we will provide in the future.The download link for the kubectl 1.16 version is as follows:
If it is declared that the DaemonSet Pods have been enabled on the super nodes, in addition to the Pods under the kube-system namespace, the other Pods on the super nodes will be injected with the DaemonSet Pods. If you have special Pods that are not expected to be injected with the DaemonSet Pods, you can configure the following annotation:
eks.tke.cloud.tencent.com/ds-injection:"false"
If you hope that all Pods under a specific namespace are not injected with DaemonSet Pods, you can configure the following annotation for the namespace.
eks.tke.cloud.tencent.com/ds-injection:"false"
If you hope that Pods under the kube-system namespace are injected with DaemonSet Pods, it is necessary to explicitly declare the following annotation during the creation of these Pods.
eks.tke.cloud.tencent.com/ds-injection:"true"
6. Special capabilities
Adjusting the Startup Sequence of DaemonSet Pods
If the injected DaemonSet Pods need to start before the business Pods, you can configure the following annotation to the business Pods, allowing them to start after the DaemonSet Pods.
eks.tke.cloud.tencent.com/start-after-ds:"true"
Opening ports
If the injected DaemonSet Pod needs to expose ports externally, this must be declared additionally through annotations. The method of declaration is as follows.
By default, only port 9100 is exposed, providing monitoring data metrics. You can add other ports after 9100. The declaration of a port range is supported, and multiple ports are separated by commas. Note that port 9100 can be altered but not removed, because the first port is typically utilized for monitoring data metrics by default.
When accessing the port of the DaemonSet Pod from outside the container, the IP accessed is the business Pod IP and the port is the port of the DaemonSet.
curl"http://<pod-ip>:<ds-port>/"
Communication between business Pods and local DaemonSet Pods
If the business Pods need to actively access the injected DaemonSet Pods, it is necessary to obtain the virtual IPs used by the injected DaemonSet Pods. By adding the following annotation, the business Pods can obtain the virtual IPs used by the DaemonSet Pods through env from hostIP.