Creating a Registered Cluster
Download
Modo Foco
Tamanho da Fonte
The registered cluster is a new type of cluster in Tencent Kubernetes Engine (TKE), allowing users to register their Kubernetes clusters from local infrastructure or other cloud providers with TKE for unified management. This document will introduce how to register third-party Kubernetes clusters with TKE.
Prerequisites
The feature of registering clusters has been enabled. Currently, the capability of registering clusters is in a free beta phase. Please contact us to apply.
The supported version range of the registered Kubernetes clusters is from 1.18.x to 1.24.5. Versions outside this range have not been validated, and support for those versions is not guaranteed.
Directions
Creating a Hub Cluster
Note:
The registered cluster is an important part of the resource management capabilities of the Tencent Kubernetes Engine Distributed Cloud Center (TDCC), implemented based on the open-source Clusternet multi-cluster application governance project.
Before performing the cluster registration operation, it is necessary to first create a hub cluster, which can then be used to manage other registered child clusters.
1. In the Tencent Cloud console, choose Cloud Products > TDCC to enter the TDCC console, and follow the on-screen prompts to activate the TDCC service and authorize it. (If you have already authorized the service, skip this step.)
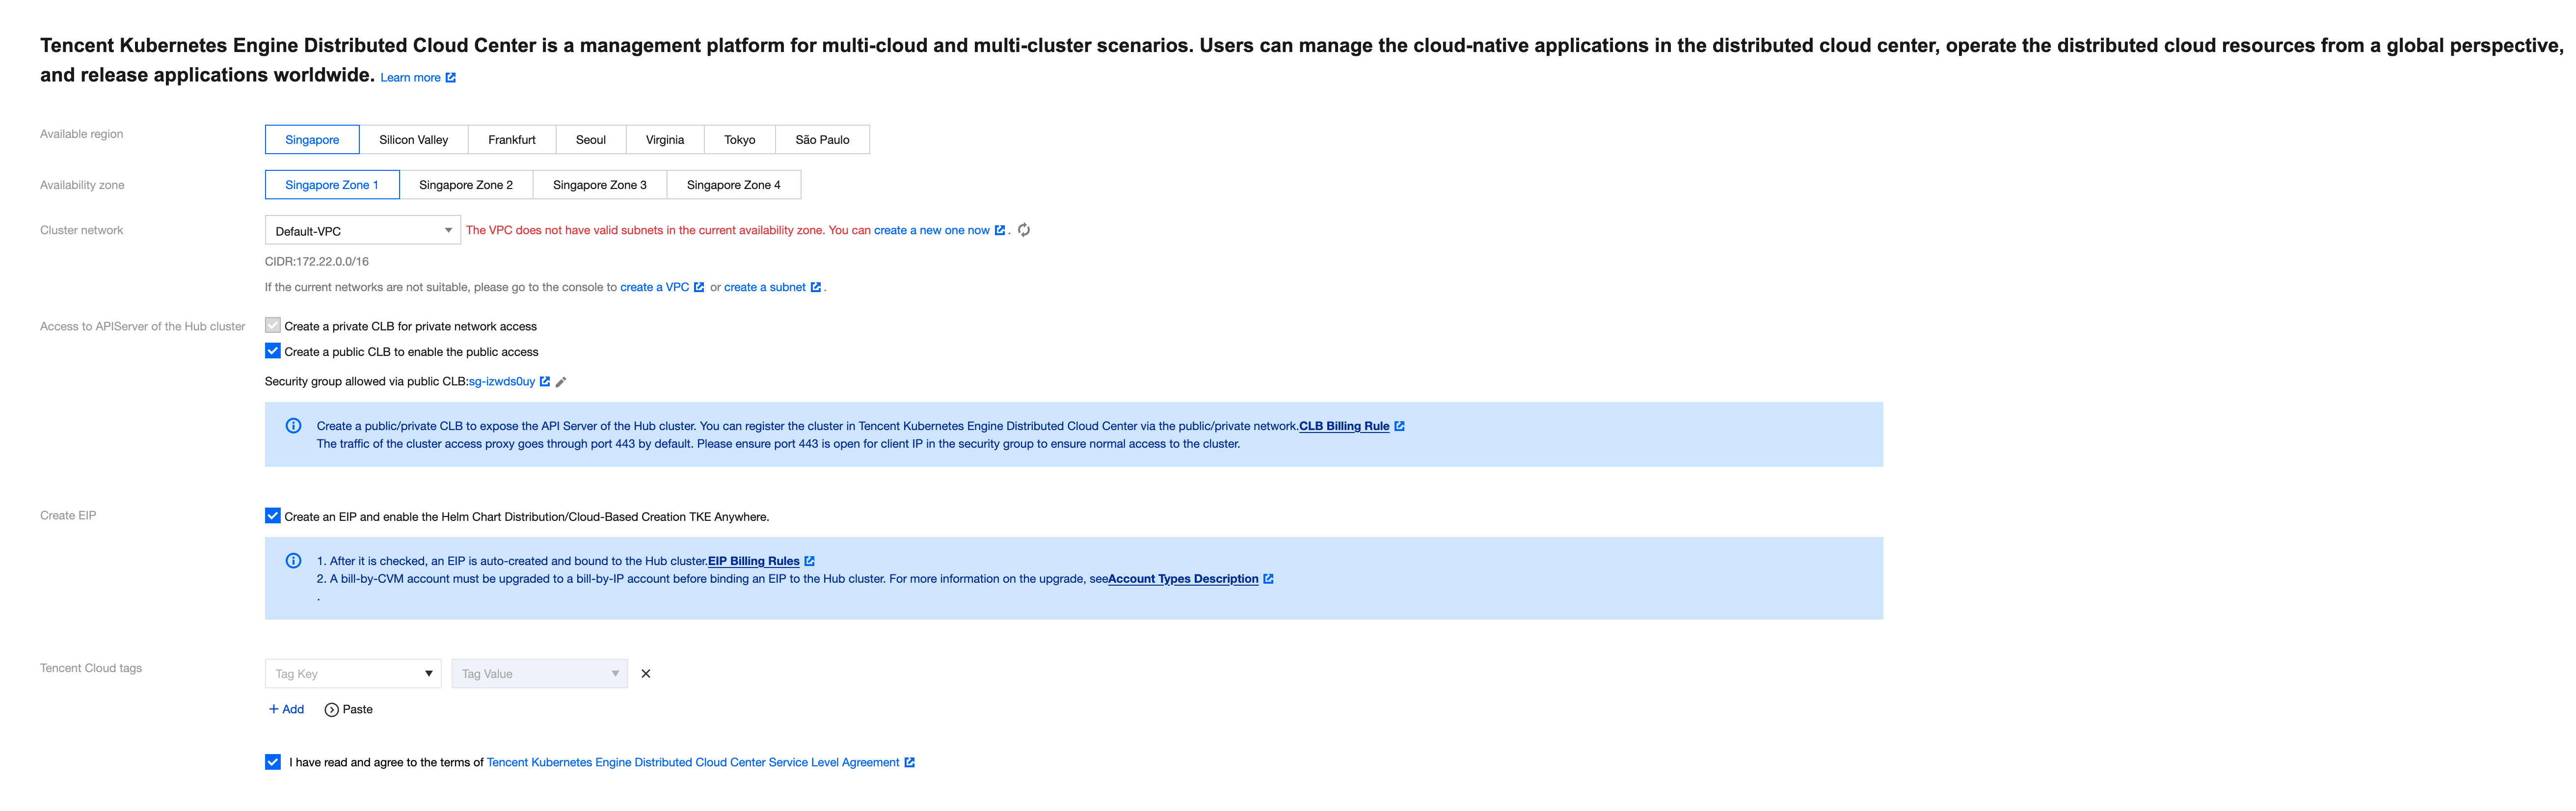
2. Follow the prompts on the page to set the basic information of the hub cluster:
Available region: Select a region for the hub cluster. Currently, only Guangzhou, Beijing, and Singapore are supported, but more regions will be supported in the future.
Availability zone: Select an availability zone for the hub cluster.
Cluster network: Select a subnet. Access to the hub cluster's kube-apiserver requires the use of an Elastic Network Interface (ENI), so you need to provide a VPC subnet. TKE will automatically create a proxy ENI within the selected subnet.
Note:
Once the hub cluster is created, the access region and availability zone cannot be changed.
Creating a Registered Cluster
1. Log in to the TKE console, and choose Register an existing cluster from the left navigation bar.
2. On the registered cluster management page, click Register an existing cluster above the cluster list.
3. Set the basic information of the registered cluster:
Cluster name: The name of the registered cluster, up to 60 characters.
Access region: Select an access region for the registered cluster. Currently, only Guangzhou, Beijing, and Singapore are supported, but more regions will be supported in the future.
Note:
The access region is unrelated to the actual operating region of the cluster to be registered. It refers to the region where the hub cluster that manages this registered cluster is located.
Tencent Cloud tags: Binding tags to a cluster enables classified management of resources. For details, see Querying Resources by Tag.
Cluster description: Fill in the relevant information of the cluster. This information will be displayed on the Cluster Info page.
4. Click Done to create a registered cluster. You can see the cluster you created in the registered cluster list, with the state Pending registration, as shown below:
Note:
You can View registration command or Unregister a cluster waiting for registration in the cluster list.

Executing the Registration Command
1. On the cluster management page, locate the created registered cluster and select View registration command on the right side of the registered cluster to see the corresponding registration command.
2. Users can choose to register the cluster via public network or private network, copy or download the registration command, and execute the kubectl command in a third-party cluster to complete the registration.
Note:
The validity period of the registration command is 24 hours. Please complete the registration within this period. If it exceeds the validity period, you will need to regenerate the registration command on the page.
3. Execute the following command to check the agent running status, as shown below:
# kubectl get pod -n clusternet-systemNAME READY STATUS RESTARTS AGEclusternet-agent-78444974d7-f6fsc 1/1 Running 0 7m32sclusternet-agent-78444974d7-qjp2q 1/1 Running 0 7m32sclusternet-agent-78444974d7-r575w 1/1 Running 0 7m32s
After successful registration, the status of the registered cluster changes to Running, indicating that the cluster has been successfully registered.
Ajuda e Suporte
Esta página foi útil?
Você também pode entrar em contato com a Equipe de vendas ou Enviar um tíquete em caso de ajuda.
comentários