Política de privacidade
Contrato de segurança e processamento de dados

Module | Description |
Core call view widget. Automatically listens to CallStore data and renders the call UI, with automatic layout switching for 1-on-1 and group calls. | |
Manages the call lifecycle, including dialing, answering, rejecting, and hanging up. Provides real-time participant audio/video status, call duration, call history, and other data. | |
Controls audio/video devices: microphone (toggle/volume), camera (toggle/switch/quality), screen sharing, and real-time device status monitoring. |
flutter pub add atomic_x_core
build.gradle.kts (or build.gradle) in the android/app/ directory to enable Proguard rules:android {buildTypes {release {isMinifyEnabled = trueproguardFiles(getDefaultProguardFile("proguard-android.txt"),"proguard-rules.pro")}}}
android {buildTypes {release {minifyEnabled trueproguardFiles getDefaultProguardFile('proguard-android.txt'), 'proguard-rules.pro'}}}
proguard-rules.pro file in your android/app directory and add:-keep class com.tencent.** { *; }
AndroidManifest.xml, set android:supportsPictureInPicture="true" for MainActivity:<manifest xmlns:android="http://schemas.android.com/apk/res/android"><application><activityandroid:name=".MainActivity"android:supportsPictureInPicture="true"</activity></application></manifest>
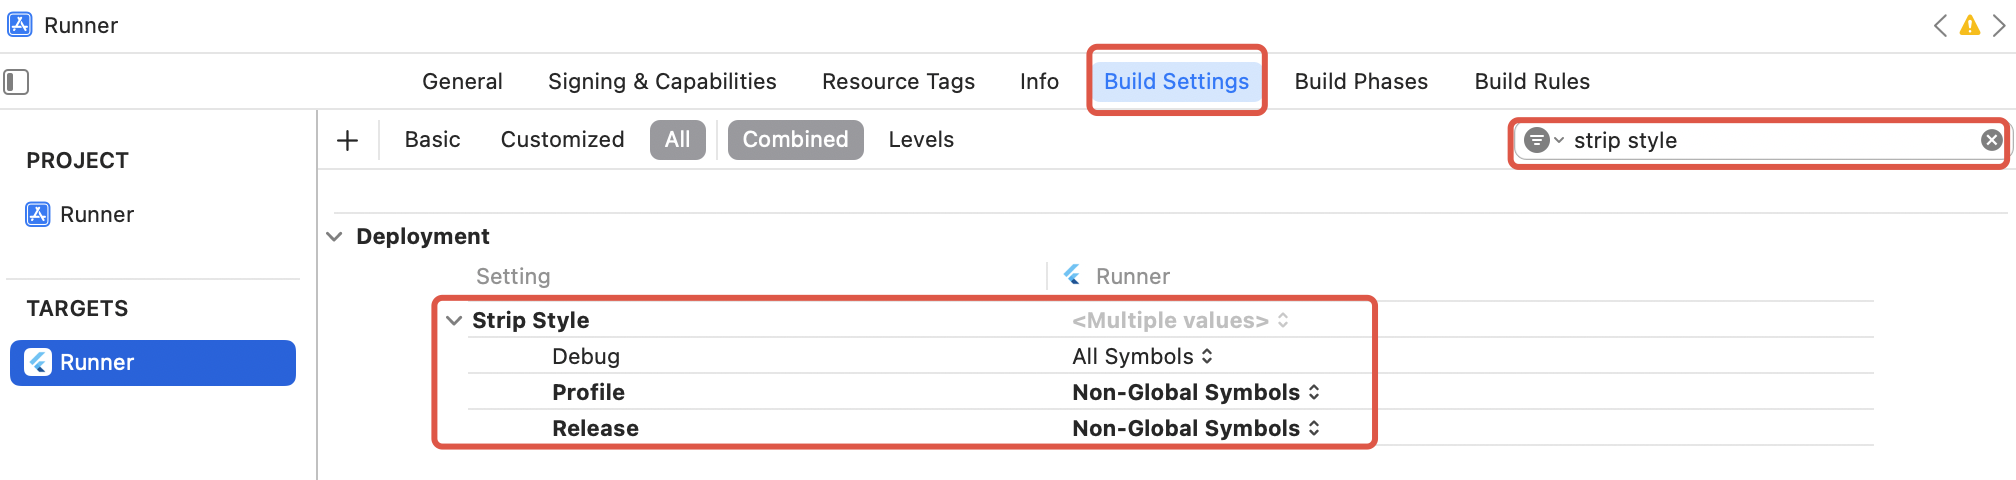
symbol not found errors. To fix: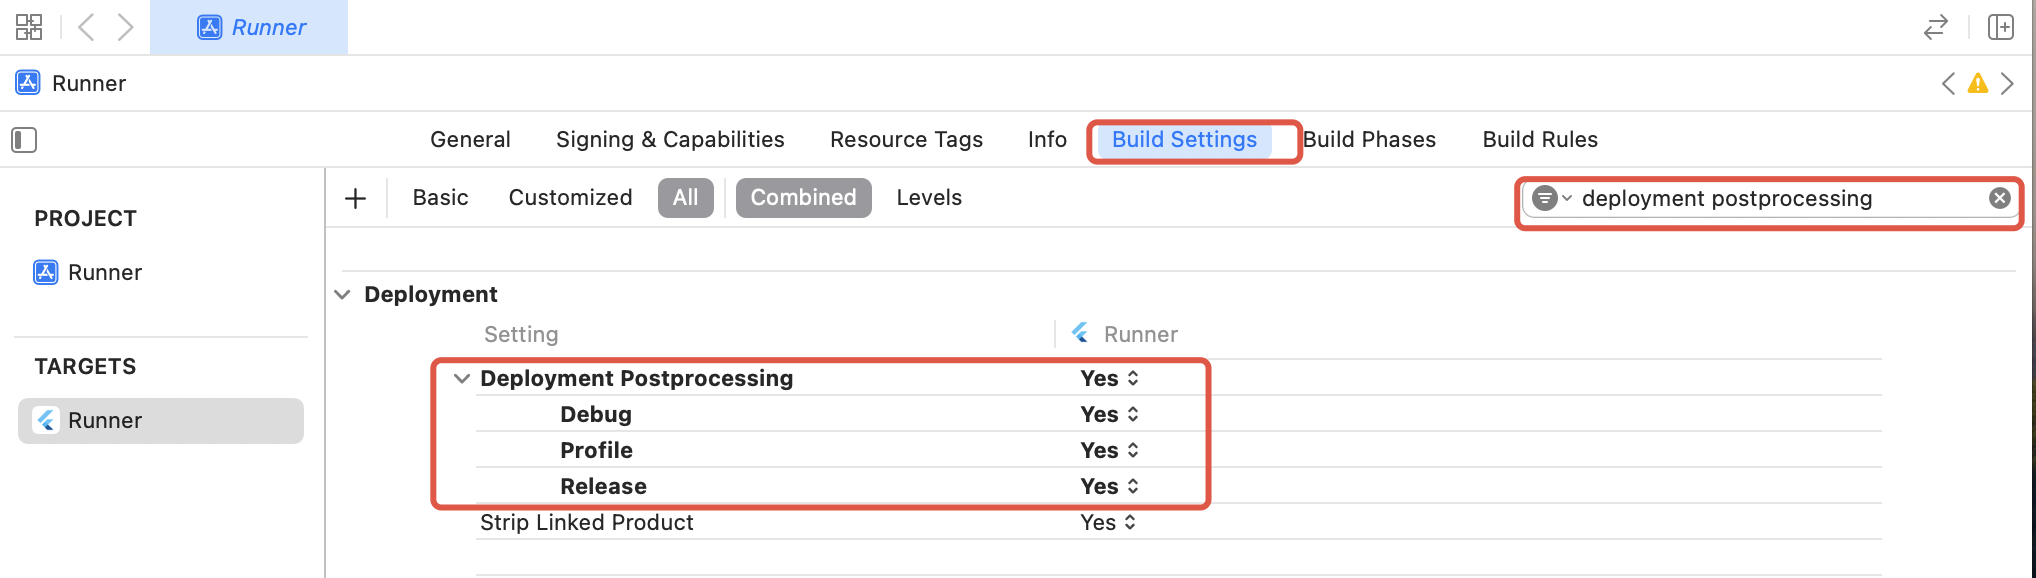
CallStore and log in the user. On successful login, CallStore will sync user info and enter the ready state. See the flowchart and sample code below: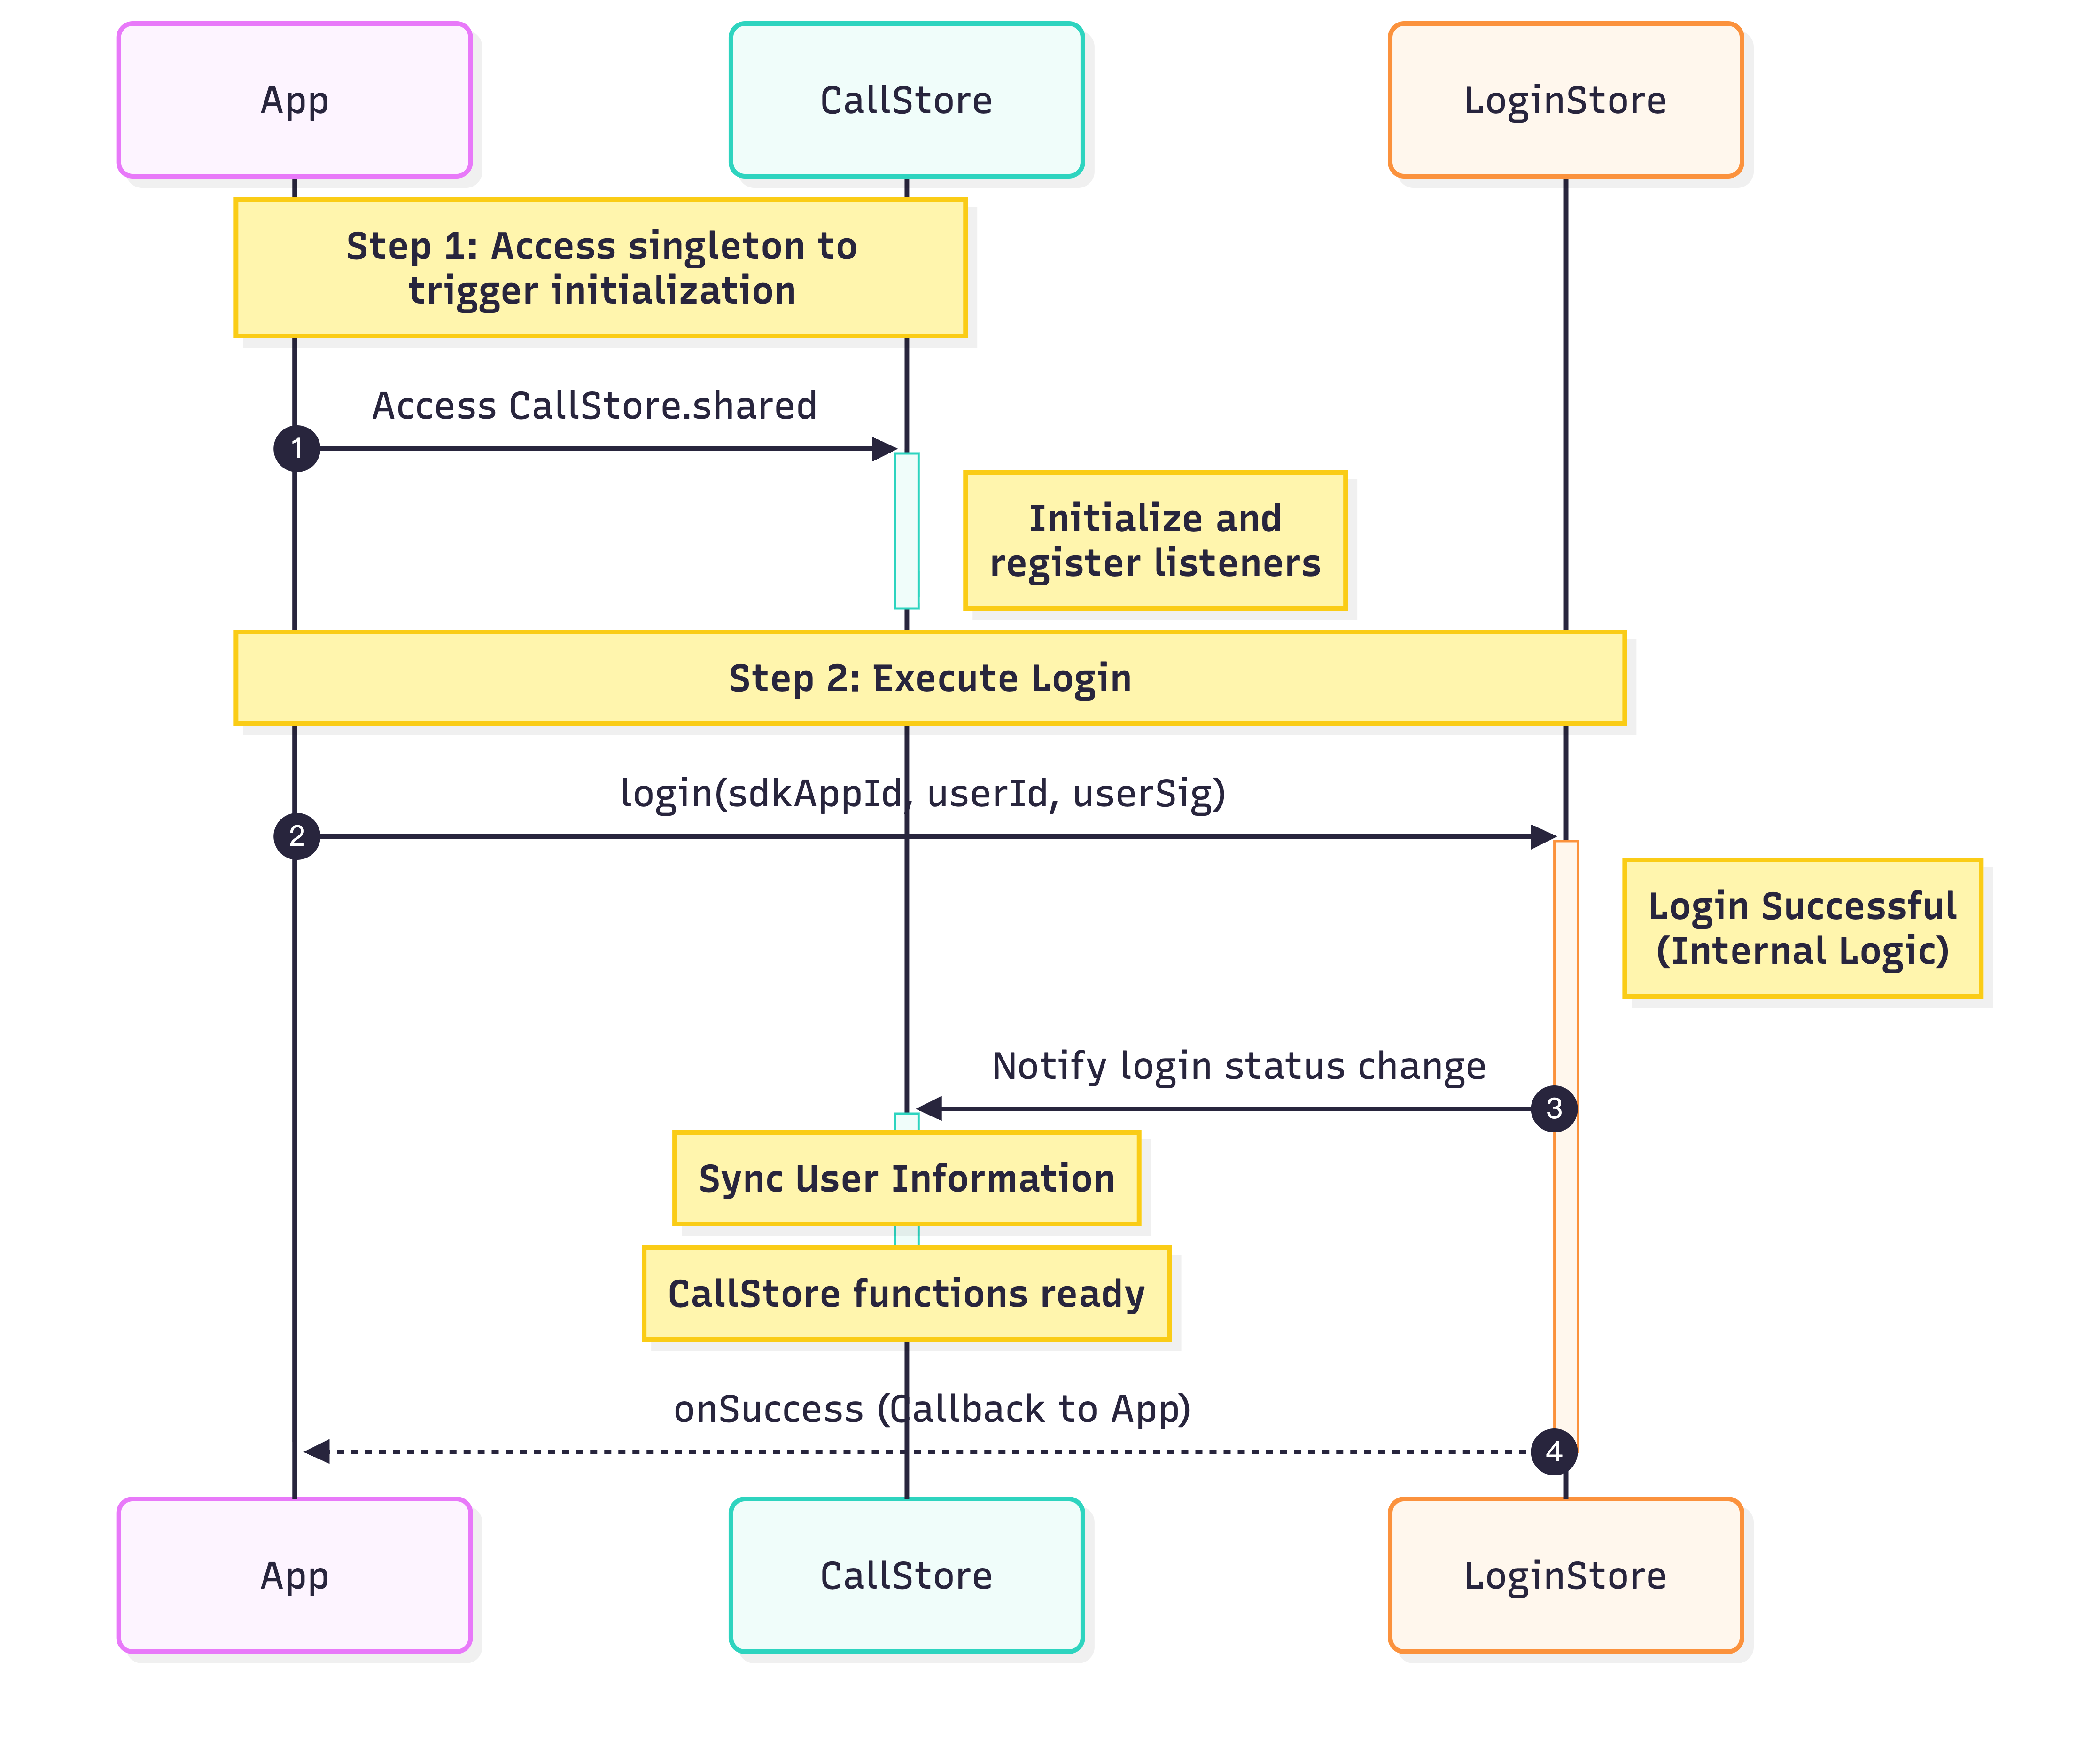
import 'package:atomic_x_core/atomicxcore.dart';import 'package:rtc_room_engine/api/call/tui_call_engine.dart';Future<void> _login() async {int sdkAppId = 1400000001; // Replace with your SDKAppIDString userId = 'test_001'; // Replace with your UserIDString userSig = 'xxxxxxxxxxx'; // Replace with your UserSigCallStore.shared;final result = await LoginStore.shared.login(sdkAppId, userId, userSig);TUICallEngine.instance.init(sdkAppId, userId, userSig);if (result.isSuccess) {// Login successfuldebugPrint('login success');} else {// Login faileddebugPrint('login failed, code: ${result.code}, message: ${result.message}');}}
Parameter | Type | Description |
userId | String | Unique ID for the current user. Only letters, numbers, hyphens, and underscores are allowed. To prevent conflicts with multi-device login, avoid using simple IDs like 1 or 123. |
sdkAppId | int | |
userSig | String | Authentication token for TRTC. Development: Generate userSig locally using GenerateTestUserSig.genTestUserSig or via the UserSig Tool for temporary userSig. Production: Always generate userSig server-side to prevent secret key leakage. See Server-side UserSig Generation. |
StatefulWidget to host the call page and manage navigation for incoming calls.import 'package:flutter/material.dart';import 'package:atomic_x_core/atomicxcore.dart';// 1. Create Call Page Widgetclass CallPage extends StatefulWidget {const CallPage({super.key});@overrideState<CallPage> createState() => _CallPageState();}class _CallPageState extends State<CallPage> {late CallCoreController controller;@overridevoid initState() {super.initState();controller = CallCoreController.create();}@overrideWidget build(BuildContext context) {// 2. Add CallCoreView widget to Call Pagereturn CallCoreView(controller: controller);}}
Feature | Description | Reference Doc |
Set Layout Mode | Supports flexible layout mode switching. If unset, layout automatically adapts based on participant count. | |
Set Avatar | Supports custom avatars for specific users via resource path. | |
Set Volume Indicator Icon | Supports custom volume indicator icons for different volume levels. | |
Set Network Indicator Icon | Supports real-time network quality indicator icons. | |
Set Waiting Animation for Pending Users | In group calls, supports GIF animation for users in waiting state. |
Icons: |  |  |  |  |  |  |  |  |
Download Links: |
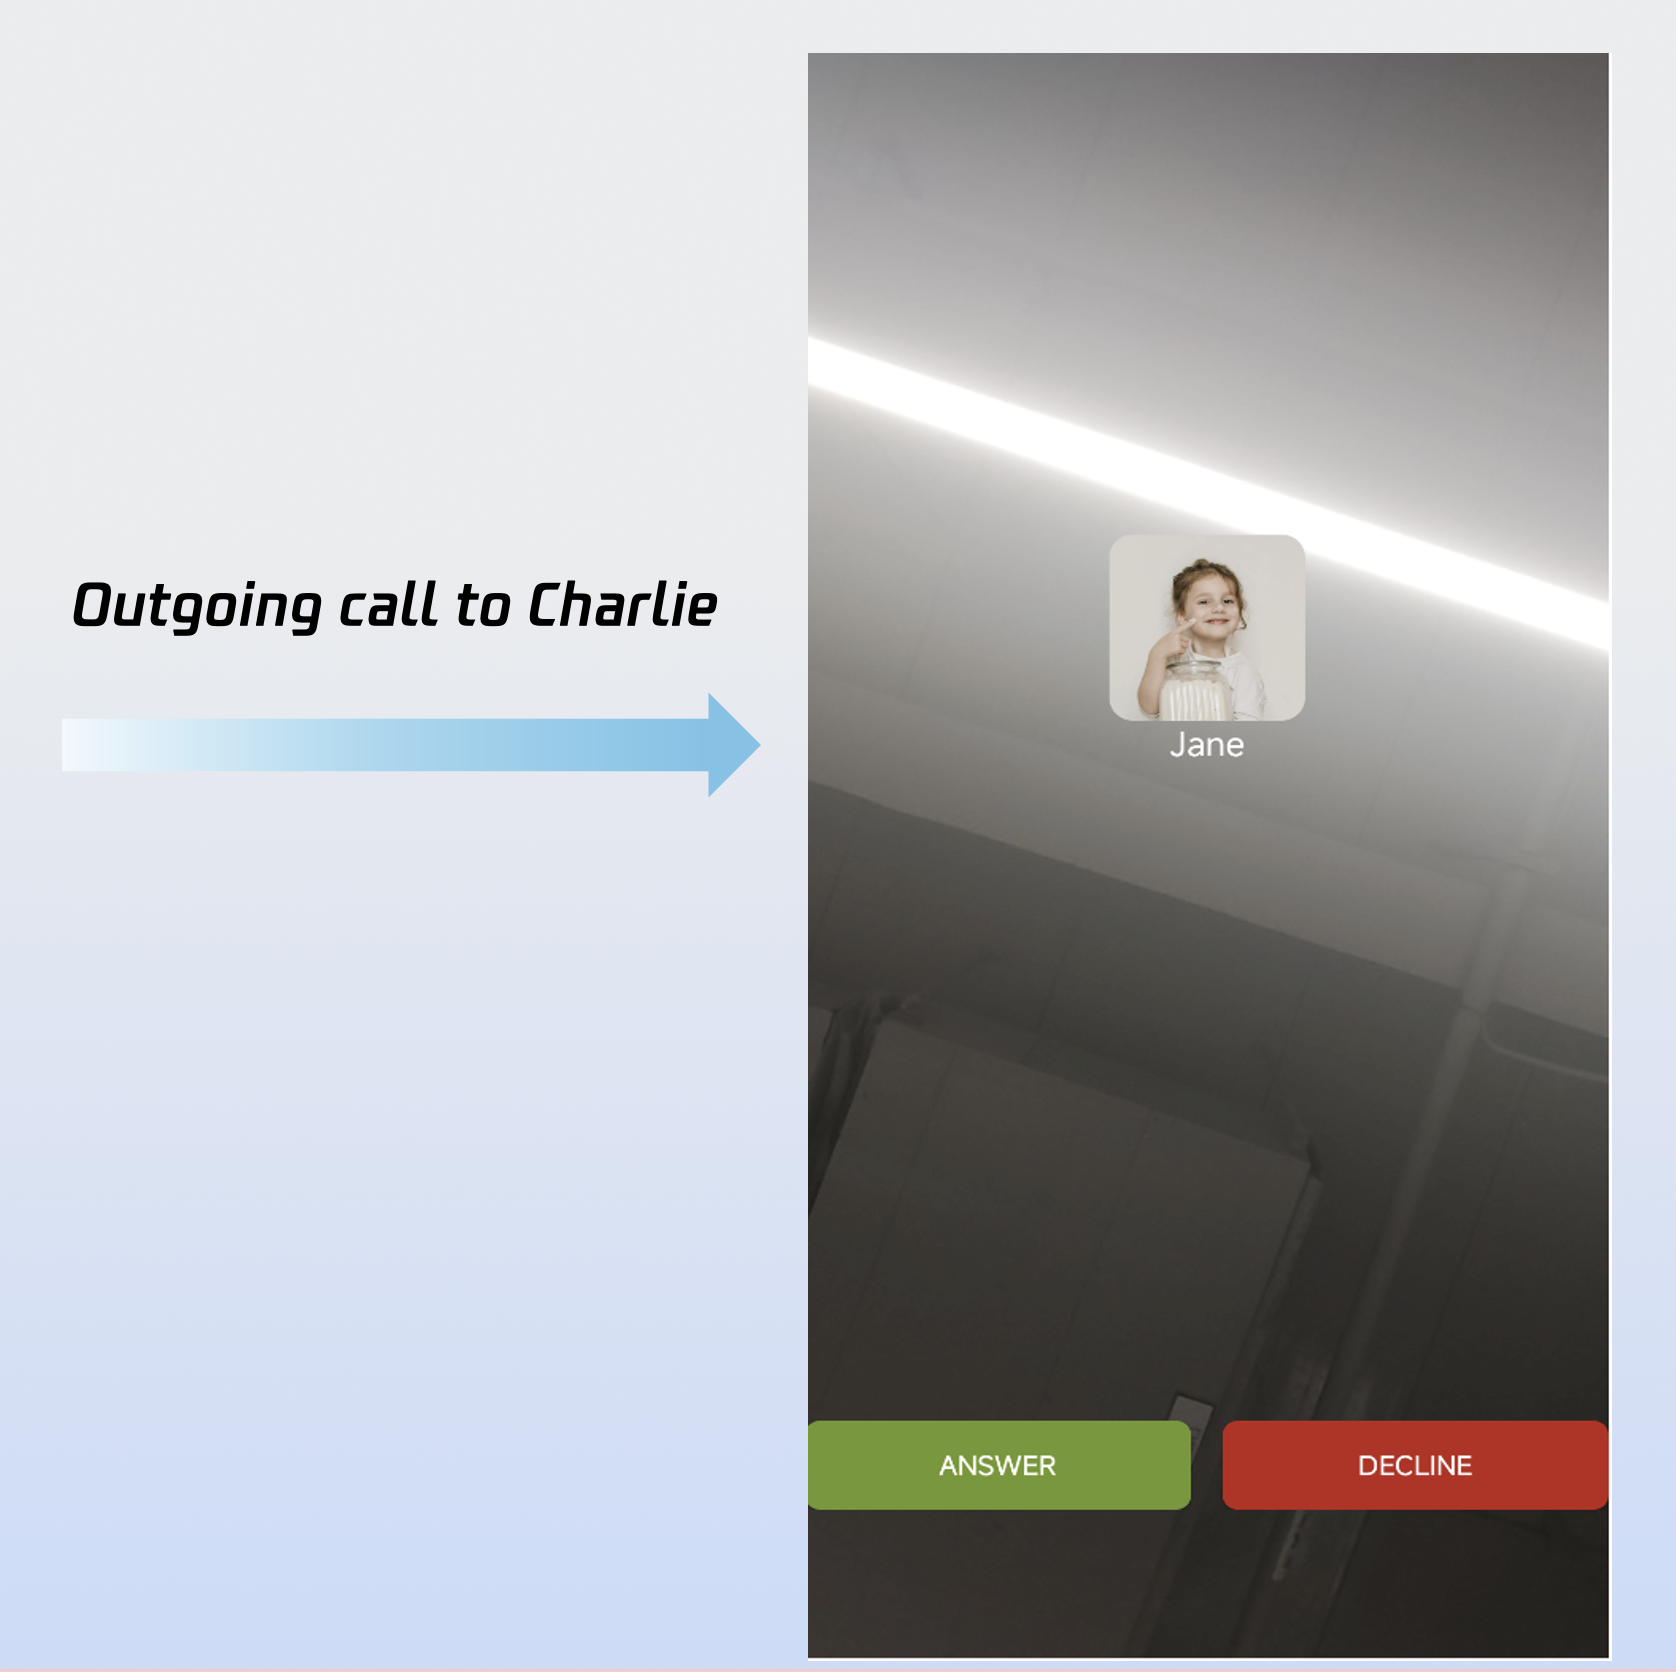
import 'package:flutter/material.dart';import 'package:atomic_x_core/atomicxcore.dart';// Answer and Reject Buttons Widgetclass AcceptRejectButtons extends StatelessWidget {const AcceptRejectButtons({super.key});@overrideWidget build(BuildContext context) {return Row(children: [// Answer Button_buildAcceptButton(),// Reject Button_buildRejectButton(),],);}// Answer ButtonWidget _buildAcceptButton() {return GestureDetector(onTap: () {// Call accept API to answer the callCallStore.shared.accept();},child: Container(width: 60,height: 60,decoration: const BoxDecoration(color: Colors.green,shape: BoxShape.circle,),child: const Icon(Icons.call,color: Colors.white,size: 30,),),);}// Reject ButtonWidget _buildRejectButton() {return GestureDetector(onTap: () {// Call reject API to reject the callCallStore.shared.reject();},child: Container(width: 60,height: 60,decoration: const BoxDecoration(color: Colors.red,shape: BoxShape.circle,),child: const Icon(Icons.call_end,color: Colors.white,size: 30,),),);}}
import 'package:atomic_x_core/atomicxcore.dart';import 'package:flutter/cupertino.dart';void addListener() {CallEventListener listener = CallEventListener(onCallEnded: (callId, mediaType, reason, userId) {Navigator.of(context).pop();});CallStore.shared.addListener(listener);}
Parameter | Type | Description |
callId | String | Unique identifier for this call. |
mediaType | Type of call, either audio or video. CallMediaType.video: Video call.CallMediaType.audio: Audio call. | |
reason | Reason for call ending. unknown: Unknown.hangup: User hung up.reject: Callee rejected.noResponse: Callee did not answer in time.offline: Callee offline.lineBusy: Callee busy.canceled: Caller canceled before callee answered.otherDeviceAccepted: Answered on another device.otherDeviceReject: Rejected on another device.endByServer: Ended by server. | |
userId | String | User ID responsible for ending the call. |
AndroidManifest.xml:<manifest xmlns:android="http://schemas.android.com/apk/res/android"><!-- Microphone permission --><uses-permission android:name="android.permission.RECORD_AUDIO" /><!-- Camera permission --><uses-permission android:name="android.permission.CAMERA" /></manifest>
Info.plist:<key>NSCameraUsageDescription</key><string>CallingApp needs access to your camera to record video with visuals</string><key>NSMicrophoneUsageDescription</key><string>CallingApp needs access to your microphone to record video with audio</string>
permission_handler plugin for runtime permission requests.flutter pub add permission_handler
import 'package:permission_handler/permission_handler.dart';// Request audio/video permissionsFuture<bool> requestCallPermissions() async {// Request microphone and camera permissionsMap<Permission, PermissionStatus> statuses = await [Permission.microphone,Permission.camera,].request();// Check permission statusbool micGranted = statuses[Permission.microphone]?.isGranted ?? false;bool cameraGranted = statuses[Permission.camera]?.isGranted ?? false;if (micGranted && cameraGranted) {// Permissions grantedreturn true;} else {// Some permissions denied, prompt user to enablereturn false;}}
CallStore.shared.state.selfInfo to reactively track the logged-in user's info.selfInfo.status is CallParticipantStatus.waiting, play ringtone/vibration; if CallParticipantStatus.accept, stop the notification.CallStore.shared.state.selfInfo.addListener(() {CallParticipantInfo info = CallStore.shared.state.selfInfo.value;if (info.status == CallParticipantStatus.accept || info.status == CallParticipantStatus.none) {// Stop ringtonereturn;}if (info.status == CallParticipantStatus.waiting) {// Play ringtone}});
onCallReceived event.import 'package:atomic_x_core/atomicxcore.dart';CallEventListener? callListener;void initCallListener() {// 1. Listen for incoming call eventcallListener = CallEventListener(onCallReceived: (callId, mediaType, userData) {// 2. Open devices based on media typeopenDeviceForMediaType(mediaType);},);if (callListener != null) {CallStore.shared.addListener(callListener!);}}void openDeviceForMediaType(CallMediaType? mediaType) {if (mediaType == null) return;DeviceStore.shared.openLocalMicrophone();if (mediaType == CallMediaType.video) {final isFrontCamera = DeviceStore.shared.state.isFrontCamera.value;DeviceStore.shared.openLocalCamera(isFrontCamera);}}
Parameter | Type | Description |
callId | String | Unique identifier for this call. |
mediaType | Call type: audio or video. CallMediaType.video: Video call.CallMediaType.audio: Audio call. |
Parameter Name | Type | Required | Description |
isFront | bool | Yes | Whether to open the front camera: true: Open front camera.false: Open rear camera. |
completion | No | Completion callback for camera open result. Returns error code and message if opening fails. |
Parameter Name | Type | Required | Description |
completion | No | Completion callback for microphone open result. Returns error code and message if opening fails. |
import 'package:atomic_x_core/atomicxcore.dart';import 'package:flutter/material.dart';CallEventListener? callListener;void addListener(BuildContext context) {callListener = CallEventListener(onCallReceived: (callId, mediaType, userData) {// Launch call page (using Navigator)Navigator.push(context,MaterialPageRoute(builder: (context) => const CallPage()),);},);if (callListener != null) {CallStore.shared.addListener(callListener!);}}
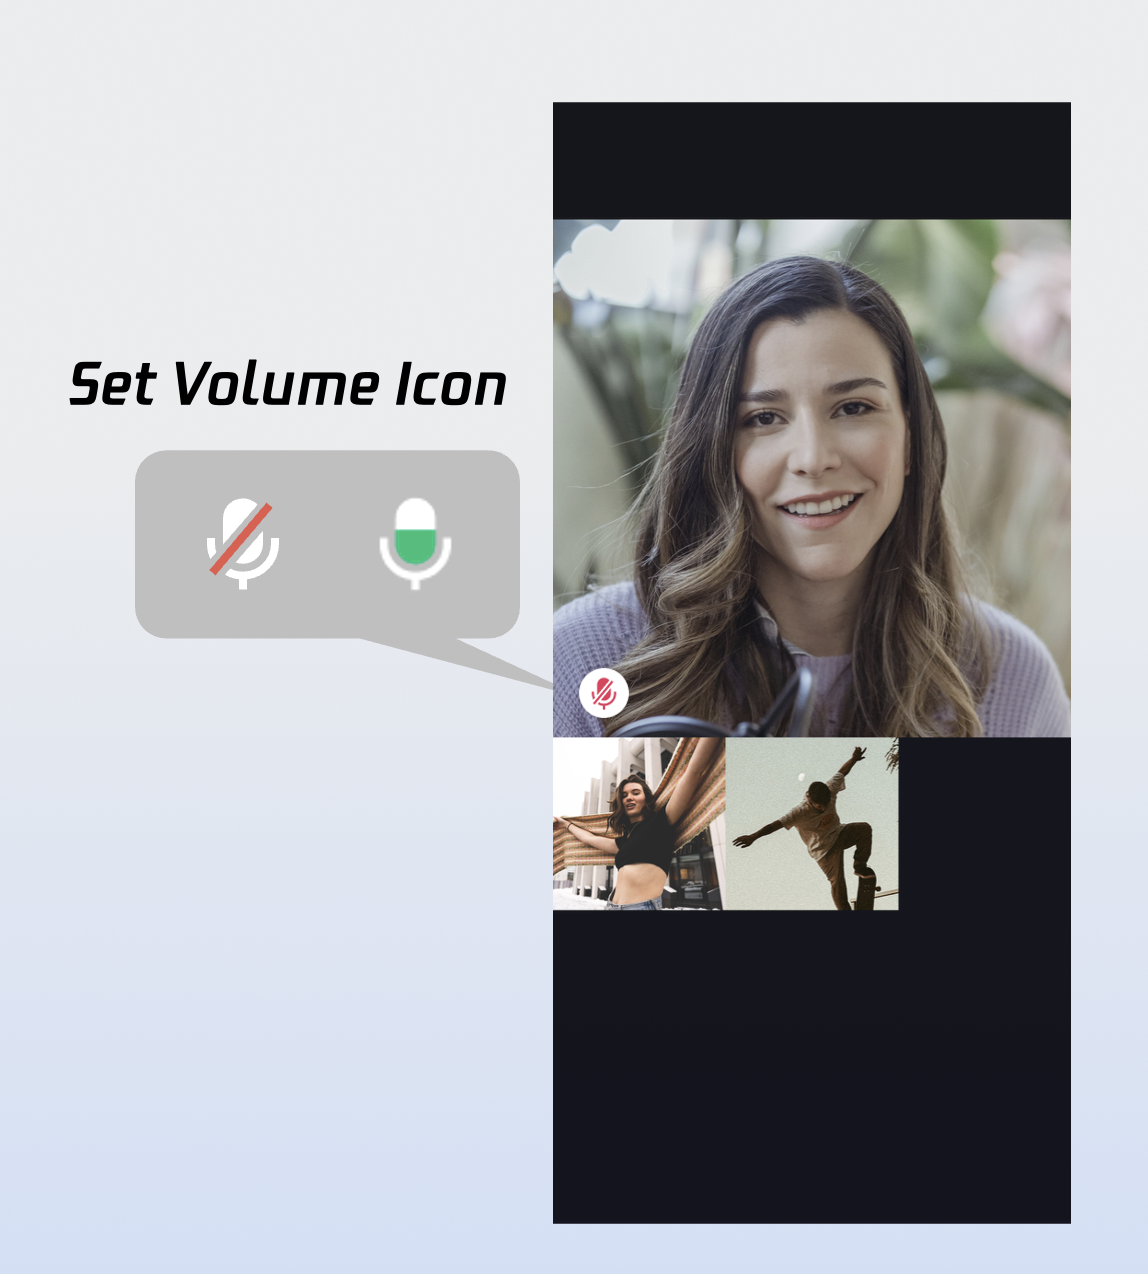
Widget _buildCallCoreView() {Map<VolumeLevel, Image> volumeIcons = {VolumeLevel.mute : Image.asset(''), // Icon for each volume level};return CallCoreView(controller: CallCoreController.create(),volumeIcons: volumeIcons,);}
Parameter | Type | Required | Description |
volumeIcons | Map | No | Maps volume levels to icon resources. VolumeLevel keys: VolumeLevel.mute: Microphone muted.VolumeLevel.low: Volume (0-25]VolumeLevel.medium: Volume (25-50]VolumeLevel.high: Volume (50-75]VolumeLevel.peak: Volume (75-100].Image values: Icon for each level. |
Icon | Description | Download Link |
 | Volume indicator icon.Recommended for VolumeLevel.low or VolumeLevel.medium. Display when user volume exceeds this level. | |
 | Mute icon.Recommended for VolumeLevel.mute. Display when user is muted. |
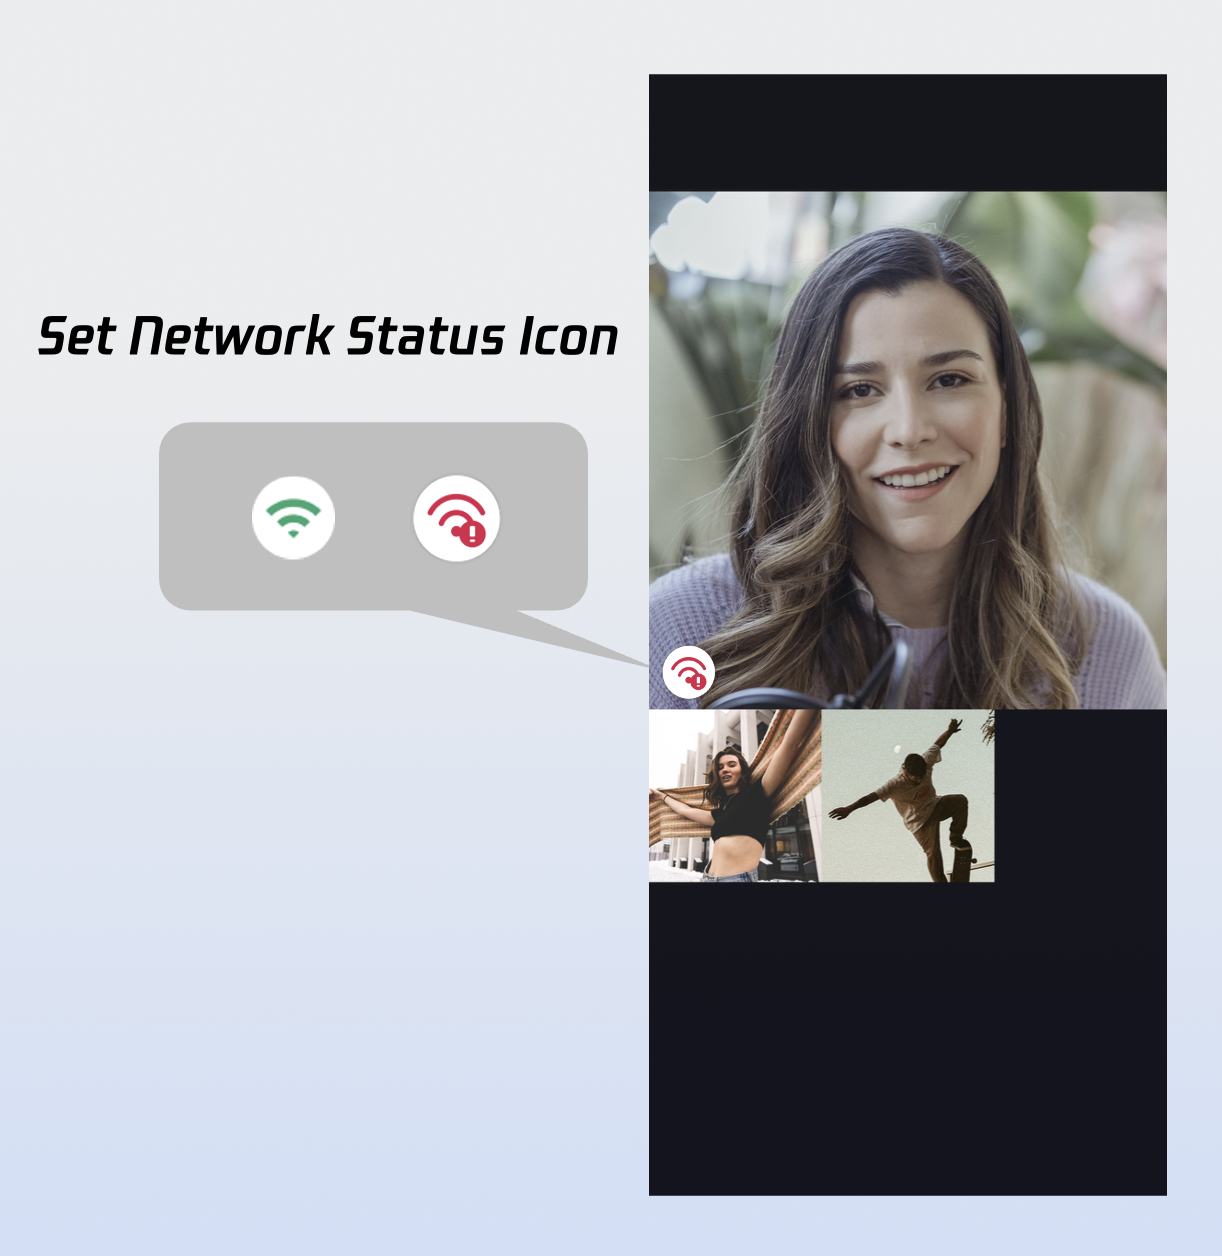
Widget _buildCallCoreView() {Map<NetworkQuality, Image> networkQualityIcons = {NetworkQuality.bad : Image.asset(''), // Icon for each network quality level};return CallCoreView(controller: CallCoreController.create(),networkQualityIcons: networkQualityIcons,);}
Parameter | Type | Required | Description |
networkQualityIcons | Map | No | Maps network quality levels to icon resources. NetworkQuality keys: NetworkQuality.unknown: Unknown.NetworkQuality.excellent: Excellent.NetworkQuality.good: Good.NetworkQuality.poor: Poor.NetworkQuality.bad: Bad.NetworkQuality.veryBad: Very bad.NetworkQuality.down: Disconnected.Image values: Icon for each state. | |
Icon | Description | Download Link |
 | Poor network indicator. Recommended for NetworkQuality.bad, NetworkQuality.veryBad, or NetworkQuality.down. Display when connection is poor. |
Widget _buildCallCoreView() {Image defaultAvatarImage = Image.asset(''); // Default user avatar imagereturn CallCoreView(controller: CallCoreController.create(),defaultAvatar: defaultAvatarImage,);}
Parameter | Type | Required | Description |
defaultAvatar | Image | No | Default user avatar. |
Icon | Description | Download Link |
 | Default avatar.Recommended when loading fails or no avatar is set. |
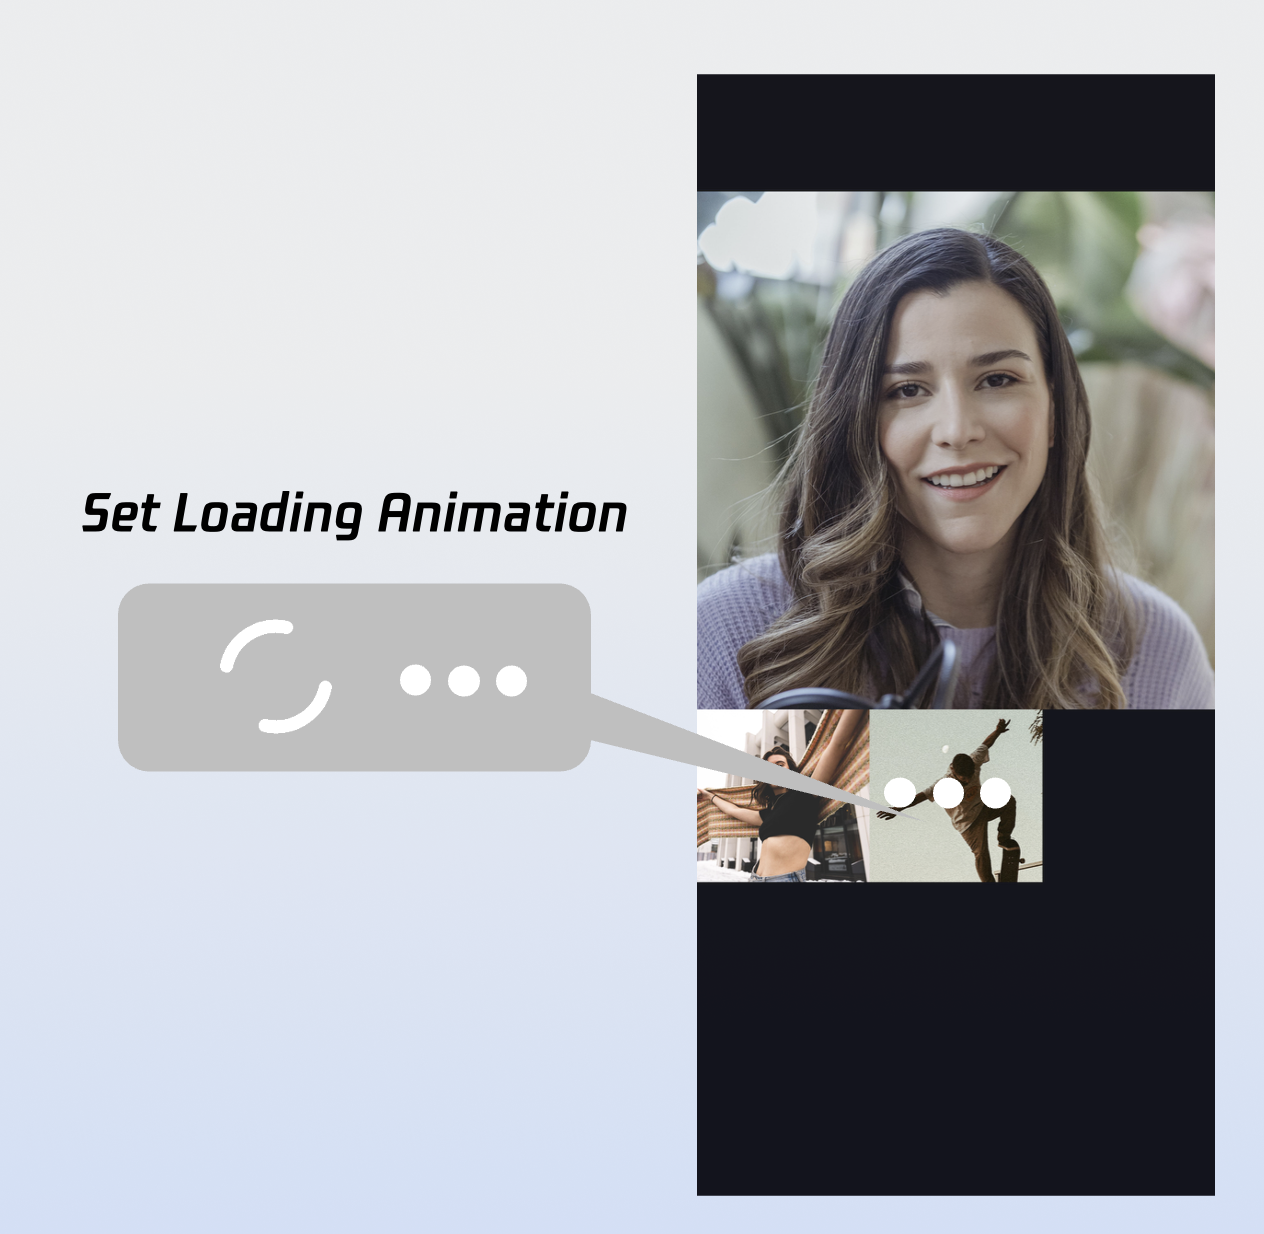
Widget _buildCallCoreView() {Image loading = Image.asset(''); // Default loading animation resourcereturn CallCoreView(controller: CallCoreController.create(),loadingAnimation: loading,);}
Parameter | Type | Required | Description |
loadingAnimation | Image | No | GIF image resource. |
Icon | Description | Download Link |
 | Waiting animation for users.Recommended for group calls; display when user status is waiting. |
CallStore.shared.state.activeCall for the current active call.activeCall.duration field to a UI widget. This is reactive and auto-updates the UI—no manual timer needed.import 'package:atomic_x_core/atomicxcore.dart';import 'package:flutter/material.dart';class TimerWidget extends StatelessWidget {final double? fontSize;final FontWeight? fontWeight;const TimerWidget({super.key,this.fontSize,this.fontWeight,});@overrideWidget build(BuildContext context) {return ValueListenableBuilder(valueListenable: CallStore.shared.state.selfInfo,builder: (context, info, child) {if (info.status == CallParticipantStatus.accept) {return ValueListenableBuilder(valueListenable: CallStore.shared.state.activeCall,builder: (context, activeCall, child) {return Text(formatDuration(activeCall.duration.toInt()),style: TextStyle(fontSize: fontSize,fontWeight: fontWeight,),);},);} else {return Container();}});}String formatDuration(int timeCount) {int hour = timeCount ~/ 3600;int minute = (timeCount % 3600) ~/ 60;String minuteShow = minute <= 9 ? "0$minute" : "$minute";int second = timeCount % 60;String secondShow = second <= 9 ? "0$second" : "$second";if (hour > 0) {String hourShow = hour <= 9 ? "0$hour" : "$hour";return '$hourShow:$minuteShow:$secondShow';} else {return '$minuteShow:$secondShow';}}}
UserProfile profile = UserProfile(userID: "", // Your UserIdavatarURL: "", // Avatar URLnickname: "", // Nickname to set);CompletionHandler result = await LoginStore.shared.setSelfInfo(userInfo: profile);if (result.errorCode == 0) {print("setSelfInfo success");} else {print("setSelfInfo failed");}
Parameter | Type | Required | Description |
userProfile | Yes | User info struct: userID (String): User ID.avatarURL (String): Avatar URL.nickname (String): Nickname. | |
completion | CompletionHandler | No | Completion callback for result. |
Float mode, group calls use Grid mode.Float Mode | Grid Mode | PIP Mode |
 |  | 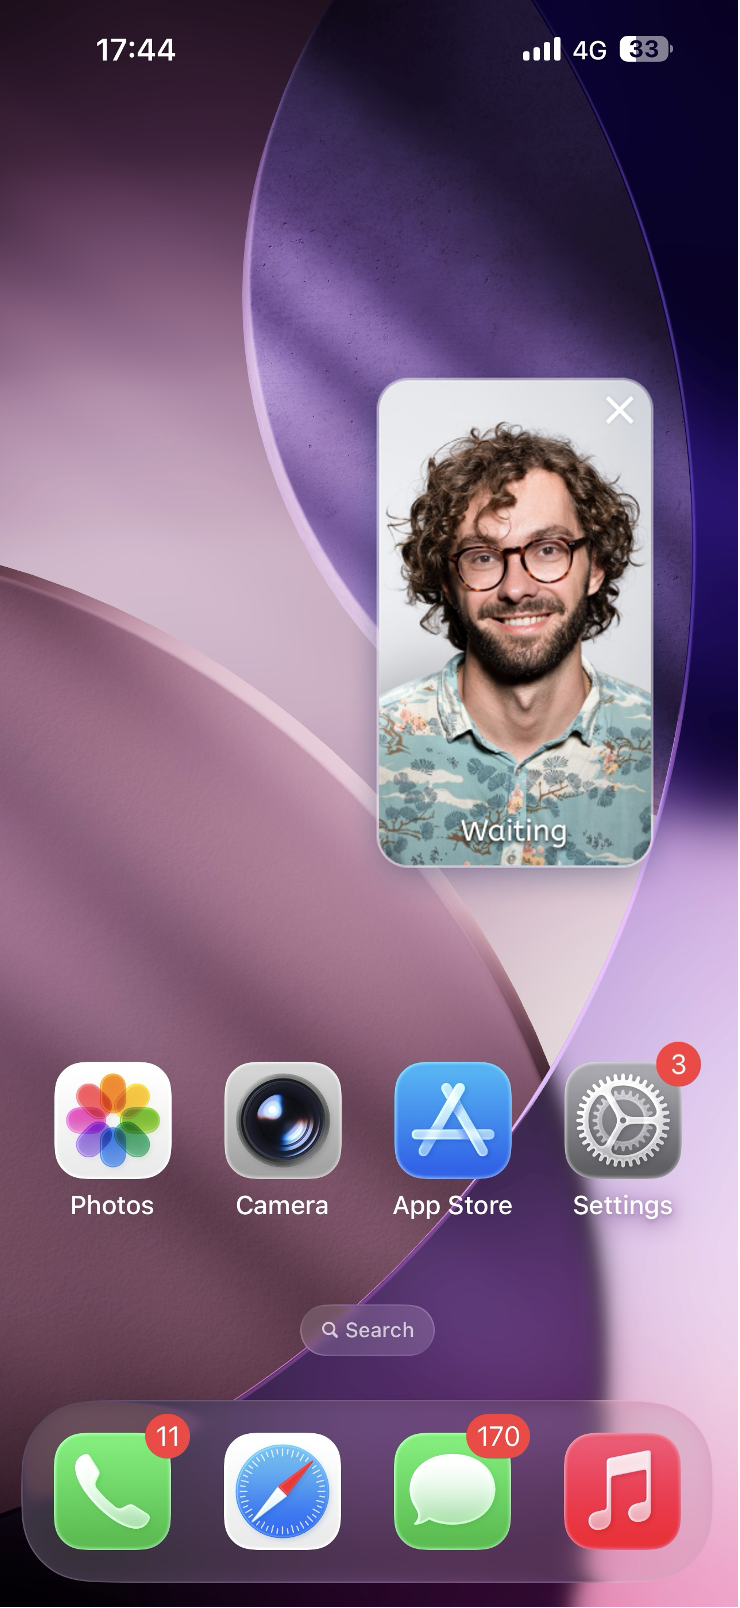 |
Layout: Full screen self-view while waiting; after connecting, full screen remote view with self-view as a floating window. Interaction: Floating window supports drag and click-to-swap with the main view. | Layout: Grid layout for all participants, suitable for 2+ users. Supports click-to-enlarge. Interaction: Click any participant's view to enlarge. | Layout: 1v1 shows fixed remote view; multi-party uses active speaker strategy with full screen for the current speaker. Interaction: Waiting state shows self-view; after connecting, call duration is displayed. |
CallCoreController controller = CallCoreController.create();CallLayoutTemplate template = CallLayoutTemplate.float;controller.setLayoutTemplate(template);
Parameter | Type | Required | Description |
template | Yes | Layout mode for CallCoreView: CallLayoutTemplate.float: Full-screen self-view while waiting, full-screen remote after answering, self-view floating window.CallLayoutTemplate.grid: Grid layout for all participants, tap to enlarge.CallLayoutTemplate.pip: 1-on-1 always shows remote; group calls auto-fullscreen active speaker. |
void startCall(List<String> userIdList, CallMediaType mediaType) {CallParams params = CallParams(timeout: 30, // Set call waiting timeout);CallStore.shared.calls(userIdList, mediaType, params);}
Parameter | Type | Required | Description |
userIdList | List | Yes | List of target user IDs. |
mediaType | Yes | Call type: audio or video. CallMediaType.video: Video call.CallMediaType.audio: Audio call. | |
params | No | Call extension parameters: roomId (String): Room ID (optional, auto-assigned if unset).timeout (int): Call timeout in seconds.userData (String): Custom data.chatGroupId (String): Chat group ID for group calls.isEphemeralCall (bool): Encrypted call (no call record). |
_buildPipWindowWidget() {final pipWidth = MediaQuery.of(context).size.width;final pipHeight = MediaQuery.of(context).size.height;final scale = pipWidth / originWidth;CallCoreController controller = CallCoreController.create();controller.setLayoutTemplate(CallLayoutTemplate.pip);return Scaffold(body: SizedBox(width: pipWidth,height: pipHeight,child: Container(width: pipWidth,height: pipHeight,decoration: const BoxDecoration(color: Colors.transparent),child: MediaQuery(data: MediaQuery.of(context).copyWith(size: Size(originWidth ?? pipWidth, originHeight ?? pipHeight)),child: ClipRect(child: Transform.scale(scale: scale,alignment: Alignment.center,child: OverflowBox(maxWidth: originWidth,maxHeight: originHeight,alignment: Alignment.center,child: CallCoreView(controller: controller,),),),),),),),);}
enablePictureInPicture is true, automatically enter PiP when the app goes to background.import android.app.PictureInPictureParamsimport android.content.pm.PackageManagerimport android.os.Buildimport android.util.Logimport android.util.Rationalimport io.flutter.embedding.android.FlutterActivityimport io.flutter.embedding.engine.FlutterEngineimport io.flutter.plugin.common.MethodChannelclass MainActivity : FlutterActivity() {companion object {private const val TAG = "MainActivity"private const val CHANNEL = "atomic_x/pip"}private var enablePictureInPicture = falseoverride fun configureFlutterEngine(flutterEngine: FlutterEngine) {super.configureFlutterEngine(flutterEngine)MethodChannel(flutterEngine.dartExecutor.binaryMessenger, CHANNEL).setMethodCallHandler { call, result ->when (call.method) {"enablePictureInPicture" -> {val enable = call.argument<Boolean>("enable") ?: falseval success = enablePIP(enable)result.success(success)}"enterPictureInPicture" -> {val success = enterPIP()result.success(success)}else -> result.notImplemented()}}}override fun onUserLeaveHint() {super.onUserLeaveHint()// Automatically enter PiP when user presses Homeif (enablePictureInPicture) {enterPIP()}}private fun enablePIP(enable: Boolean): Boolean {Log.i(TAG, "enablePictureInPicture: $enable")if (Build.VERSION.SDK_INT >= Build.VERSION_CODES.O &&packageManager.hasSystemFeature(PackageManager.FEATURE_PICTURE_IN_PICTURE)) {enablePictureInPicture = enablereturn true}return false}private fun enterPIP(): Boolean {if (!enablePictureInPicture) return falseif (Build.VERSION.SDK_INT >= Build.VERSION_CODES.O) {try {val aspectRatio = Rational(9, 16)val params = PictureInPictureParams.Builder().setAspectRatio(aspectRatio).build()return enterPictureInPictureMode(params)} catch (e: Exception) {Log.e(TAG, "enterPIP failed: ${e.message}")}}return false}}
<activityandroid:name=".MainActivity"android:exported="true"android:launchMode="singleTop"android:taskAffinity=""android:theme="@style/LaunchTheme"android:configChanges="orientation|keyboardHidden|keyboard|screenSize|smallestScreenSize|locale|layoutDirection|fontScale|screenLayout|density|uiMode"android:hardwareAccelerated="true"android:windowSoftInputMode="adjustResize"android:supportsPictureInPicture="true"><meta-dataandroid:name="io.flutter.embedding.android.NormalTheme"android:resource="@style/NormalTheme"/><intent-filter><action android:name="android.intent.action.MAIN"/><category android:name="android.intent.category.LAUNCHER"/></intent-filter></activity>
import 'package:flutter/services.dart';class PipManager {static const MethodChannel _channel = MethodChannel('atomic_x/pip');/// Enable/disable PiPstatic Future<bool> enablePictureInPicture(bool enable) async {try {final result = await _channel.invokeMethod<bool>('enablePictureInPicture', {'enable': enable});return result ?? false;} catch (e) {return false;}}/// Enter PiP mode immediatelystatic Future<bool> enterPictureInPicture() async {try {final result = await _channel.invokeMethod<bool>('enterPictureInPicture');return result ?? false;} catch (e) {return false;}}}
Background Modes in Xcode's Signing & Capabilities and check Audio, AirPlay, and Picture in Picture. import 'package:tencent_rtc_sdk/trtc_cloud.dart';TRTCCloud.sharedInstance().then((trtcCloud) {trtcCloud.callExperimentalAPI('''{"api": "configPictureInPicture","params": {"enable": true,"cameraBackgroundCapture": true,"canvas": {"width": 720,"height": 1280,"backgroundColor": "#111111"},"regions": [{"userId": "remoteUserId","userName": "","width": 1.0,"height": 1.0,"x": 0.0,"y": 0.0,"fillMode": 0,"streamType": "high","backgroundColor": "#111111","backgroundImage": "file:///path/to/avatar.png"},{"userId": "localUserId","userName": "","width": 0.333,"height": 0.333,"x": 0.65,"y": 0.05,"fillMode": 0,"streamType": "high","backgroundColor": "#111111"}]}}''');});
import 'package:tencent_rtc_sdk/trtc_cloud.dart';TRTCCloud.sharedInstance().then((trtcCloud) {trtcCloud.callExperimentalAPI('''{"api": "configPictureInPicture","params": {"enable": false}}''');});
AndroidManifest.xml): Android 9.0+ requires foreground service permissions; Android 14+ requires explicit service type for microphone/camera.<manifest xmlns:android="http://schemas.android.com/apk/res/android"><uses-permission android:name="android.permission.FOREGROUND_SERVICE" /><uses-permission android:name="android.permission.FOREGROUND_SERVICE_CAMERA" /><uses-permission android:name="android.permission.FOREGROUND_SERVICE_MICROPHONE" /><application><serviceandroid:name=".CallForegroundService"android:enabled="true"android:exported="false"android:foregroundServiceType="camera|microphone" /></application></manifest>
CallForegroundService):import android.app.Notificationimport android.app.NotificationChannelimport android.app.NotificationManagerimport android.app.Serviceimport android.content.Contextimport android.content.Intentimport android.os.Buildimport android.os.IBinderimport androidx.core.app.NotificationCompatclass CallForegroundService : Service() {companion object {private const val NOTIFICATION_ID = 1001private const val CHANNEL_ID = "call_foreground_channel"fun start(context: Context) {val intent = Intent(context, CallForegroundService::class.java)if (Build.VERSION.SDK_INT >= Build.VERSION_CODES.O) {context.startForegroundService(intent)} else {context.startService(intent)}}fun stop(context: Context) {val intent = Intent(context, CallForegroundService::class.java)context.stopService(intent)}}override fun onCreate() {super.onCreate()createNotificationChannel()// Start foreground notification to ensure background capture permissionstartForeground(NOTIFICATION_ID, createNotification())}override fun onBind(intent: Intent?): IBinder? = nullprivate fun createNotification(): Notification {return NotificationCompat.Builder(this, CHANNEL_ID).setContentTitle("In Call").setContentText("App is running in background to maintain call").setSmallIcon(android.R.drawable.ic_menu_call) // Replace with your app icon.setPriority(NotificationCompat.PRIORITY_HIGH).build()}private fun createNotificationChannel() {if (Build.VERSION.SDK_INT >= Build.VERSION_CODES.O) {val channel = NotificationChannel(CHANNEL_ID,"Call Keep-Alive Service",NotificationManager.IMPORTANCE_HIGH)val manager = getSystemService(NotificationManager::class.java)manager.createNotificationChannel(channel)}}}
Target → Signing & Capabilities.+ Capability.Background Modes.Audio, AirPlay, and Picture in Picture (for audio and PiP)Voice over IP (for VoIP)Remote notifications (optional, for offline push)Info.plist will automatically include:<key>UIBackgroundModes</key><array><string>audio</string><string>voip</string><string>remote-notification</string></array>
viewDidLoad, before dialing, or before answering.import AVFoundation/*** Configure audio session for background audio capture.** Recommended scenarios:* 1. In call UI's viewDidLoad* 2. Before making a call (calls)* 3. Before answering a call (accept)*/private func start() {let audioSession = AVAudioSession.sharedInstance()do {// Set audio session category to play and record// .allowBluetooth: Supports Bluetooth headset// .allowBluetoothA2DP: Supports high-quality Bluetooth audio (A2DP)try audioSession.setCategory(.playAndRecord, options: [.allowBluetooth, .allowBluetoothA2DP])// Activate audio sessiontry audioSession.setActive(true)} catch {// Audio session configuration failed}}
start() via MethodChannel at the appropriate time in your app to enable background keep-alive.symbol not found errors. To resolve:
Esta página foi útil?
Você também pode entrar em contato com a Equipe de vendas ou Enviar um tíquete em caso de ajuda.
comentários