iOS 自定义能力
Download
聚焦模式
字号
本文档主要介绍 iOS SDK 支持的自定义能力,包括自定义多语言和自定义 UI 两部分。
说明:
适用版本:v1.0.1.5 及以上。
v1.0.1.5 起,Bundle 配置字段由"Bundle 名称"改为"Bundle 绝对路径"。如果您从旧版本迁移,请参考本文末尾的迁移说明。
自定义多语言
SDK 内置语言
SDK 默认支持以下三种语言,通过
VerificationConfig.languageType 配置:枚举值 | 含义 |
HY_EKYC_DEFAULT | 跟随系统设置 |
HY_EKYC_ZH_HANS | 简体中文 |
HY_EKYC_ZH_HANT | 繁体中文 |
HY_EKYC_EN | 英文(默认) |
HY_EKYC_CUSTOMIZE_LANGUAGE | 自定义语言 |
使用内置语言无需额外配置,例如指定简体中文:
VerificationConfig *config = [[VerificationConfig alloc] init];config.languageType = HY_EKYC_ZH_HANS;
自定义语言配置
若内置语言不满足需求,可提供自定义语言 Bundle,该 Bundle 包含 SDK 内所有多语言字段,步骤如下。
步骤1:构建 UserLanguageBundle
1. 打开交付包
demo/ 目录下的工程文件,找到 UserLanguageBundle 目录下的 Localizable,该部分为翻译源文件。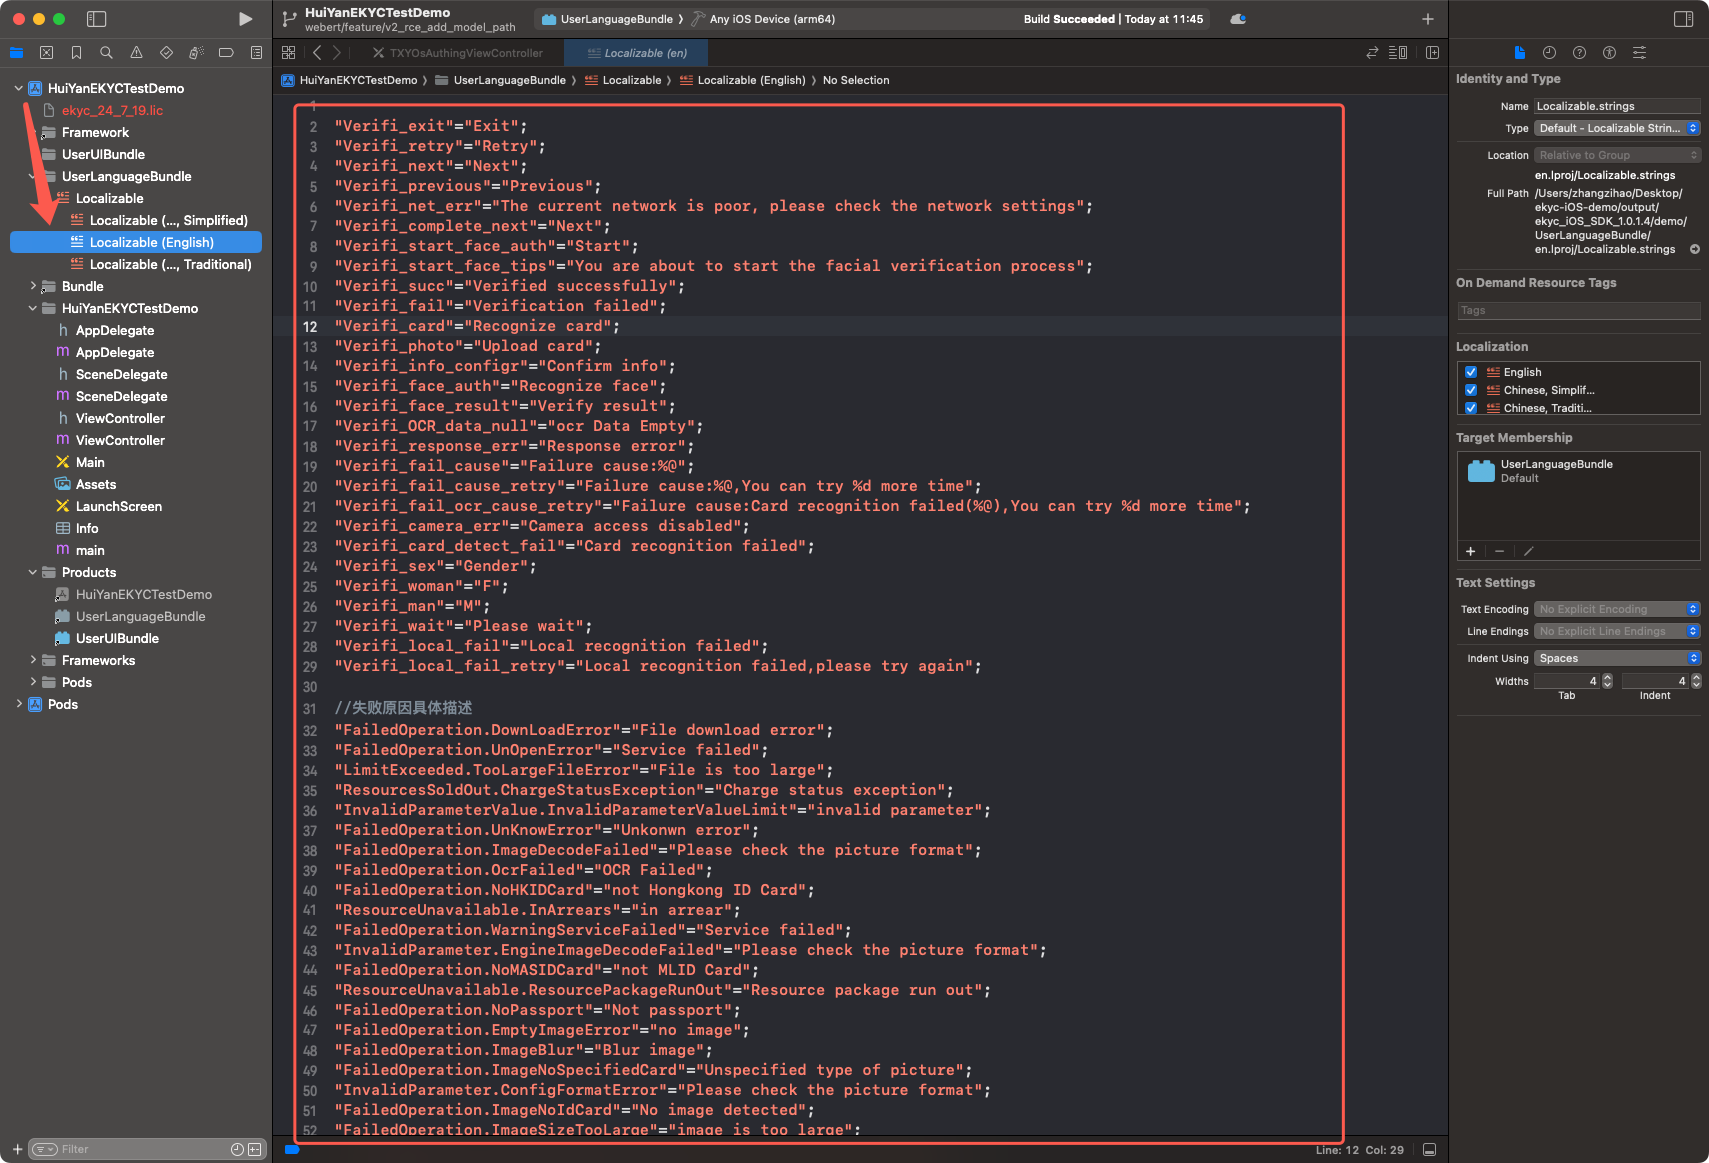
2. 在工程中找到
UserLanguageBundle 构建目标(Build Target)。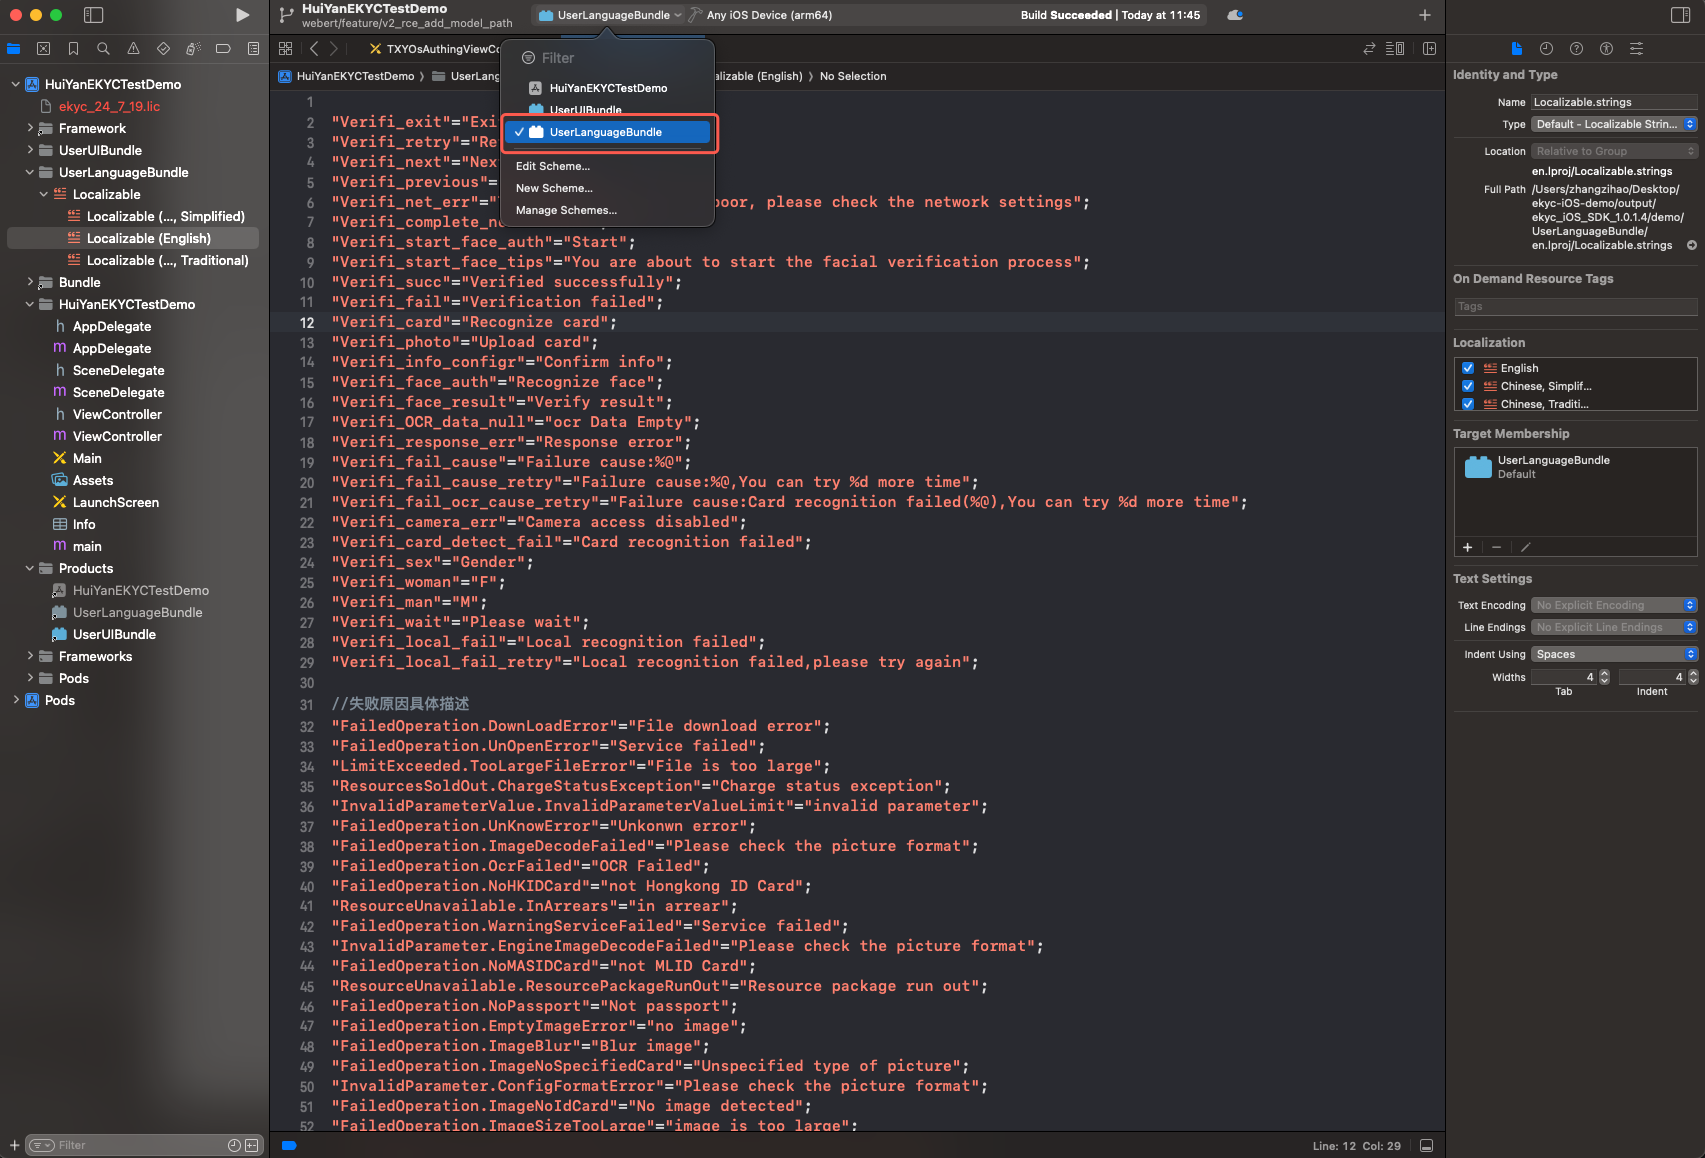
3. 按需新增语言文件(如
ja.lproj)。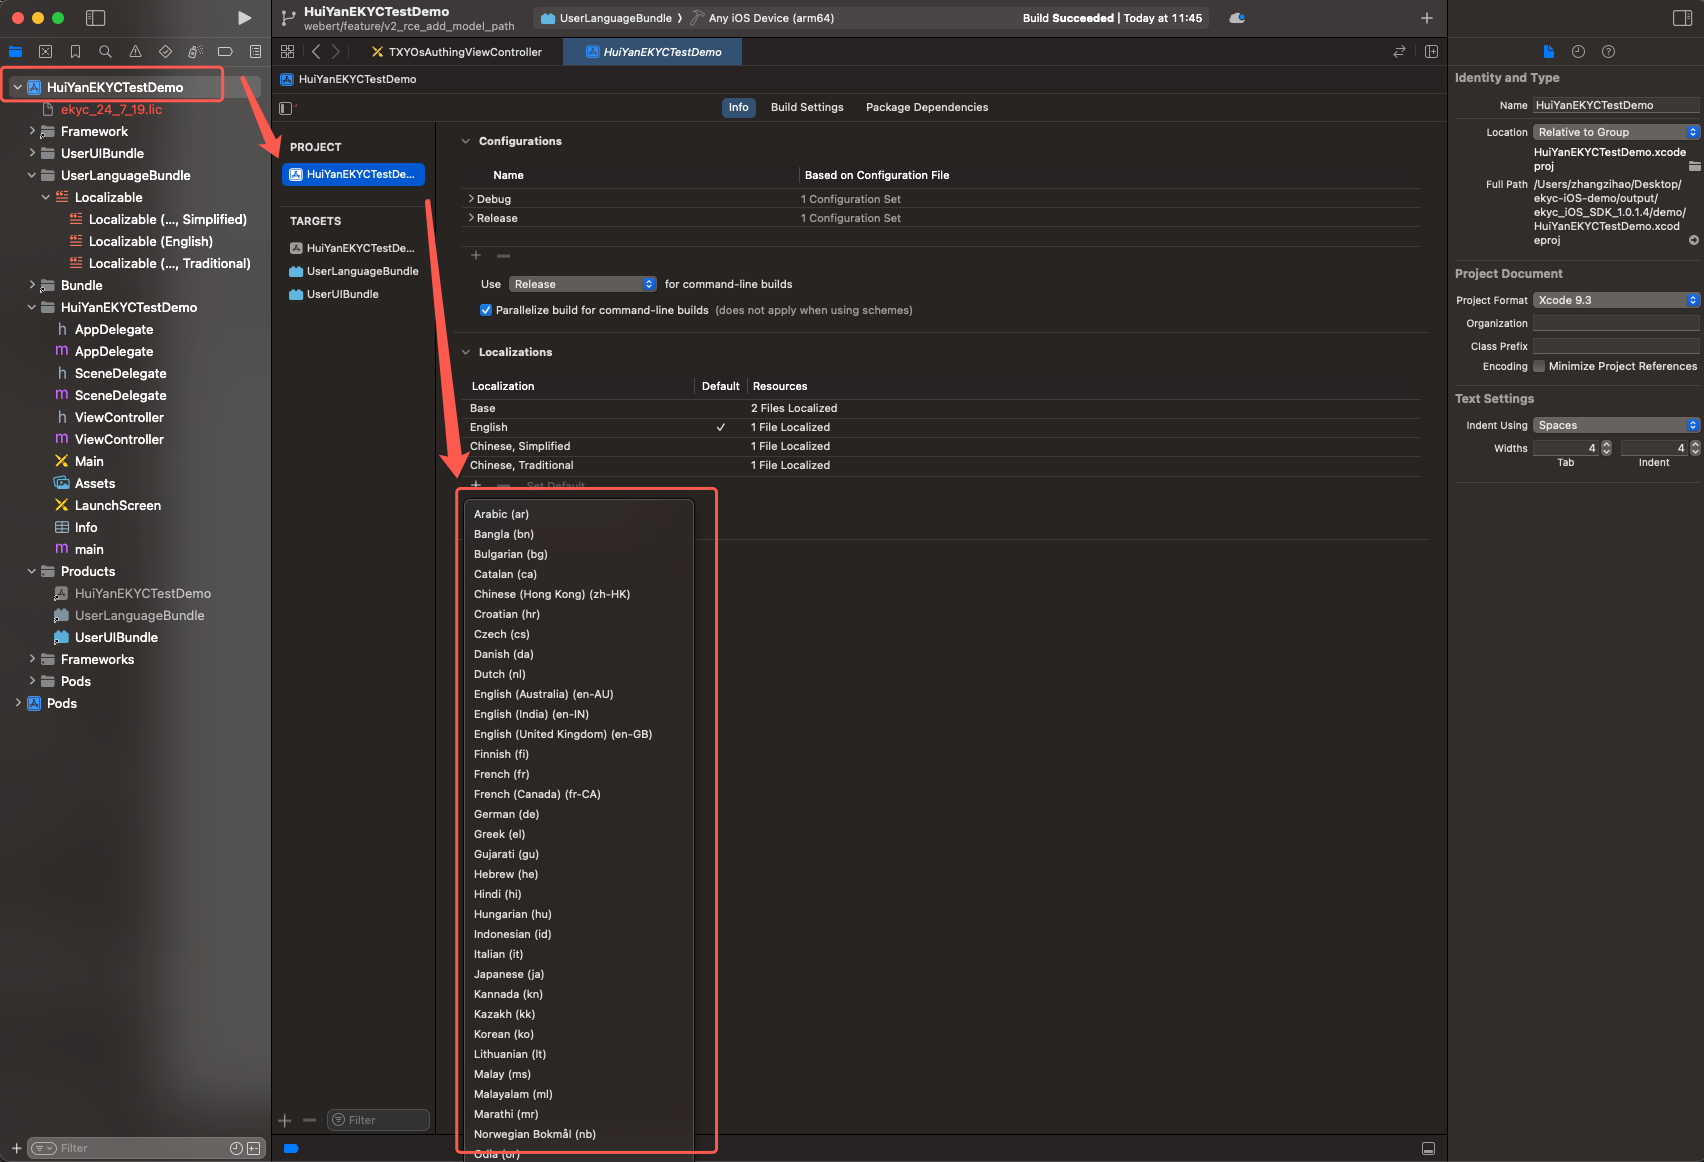
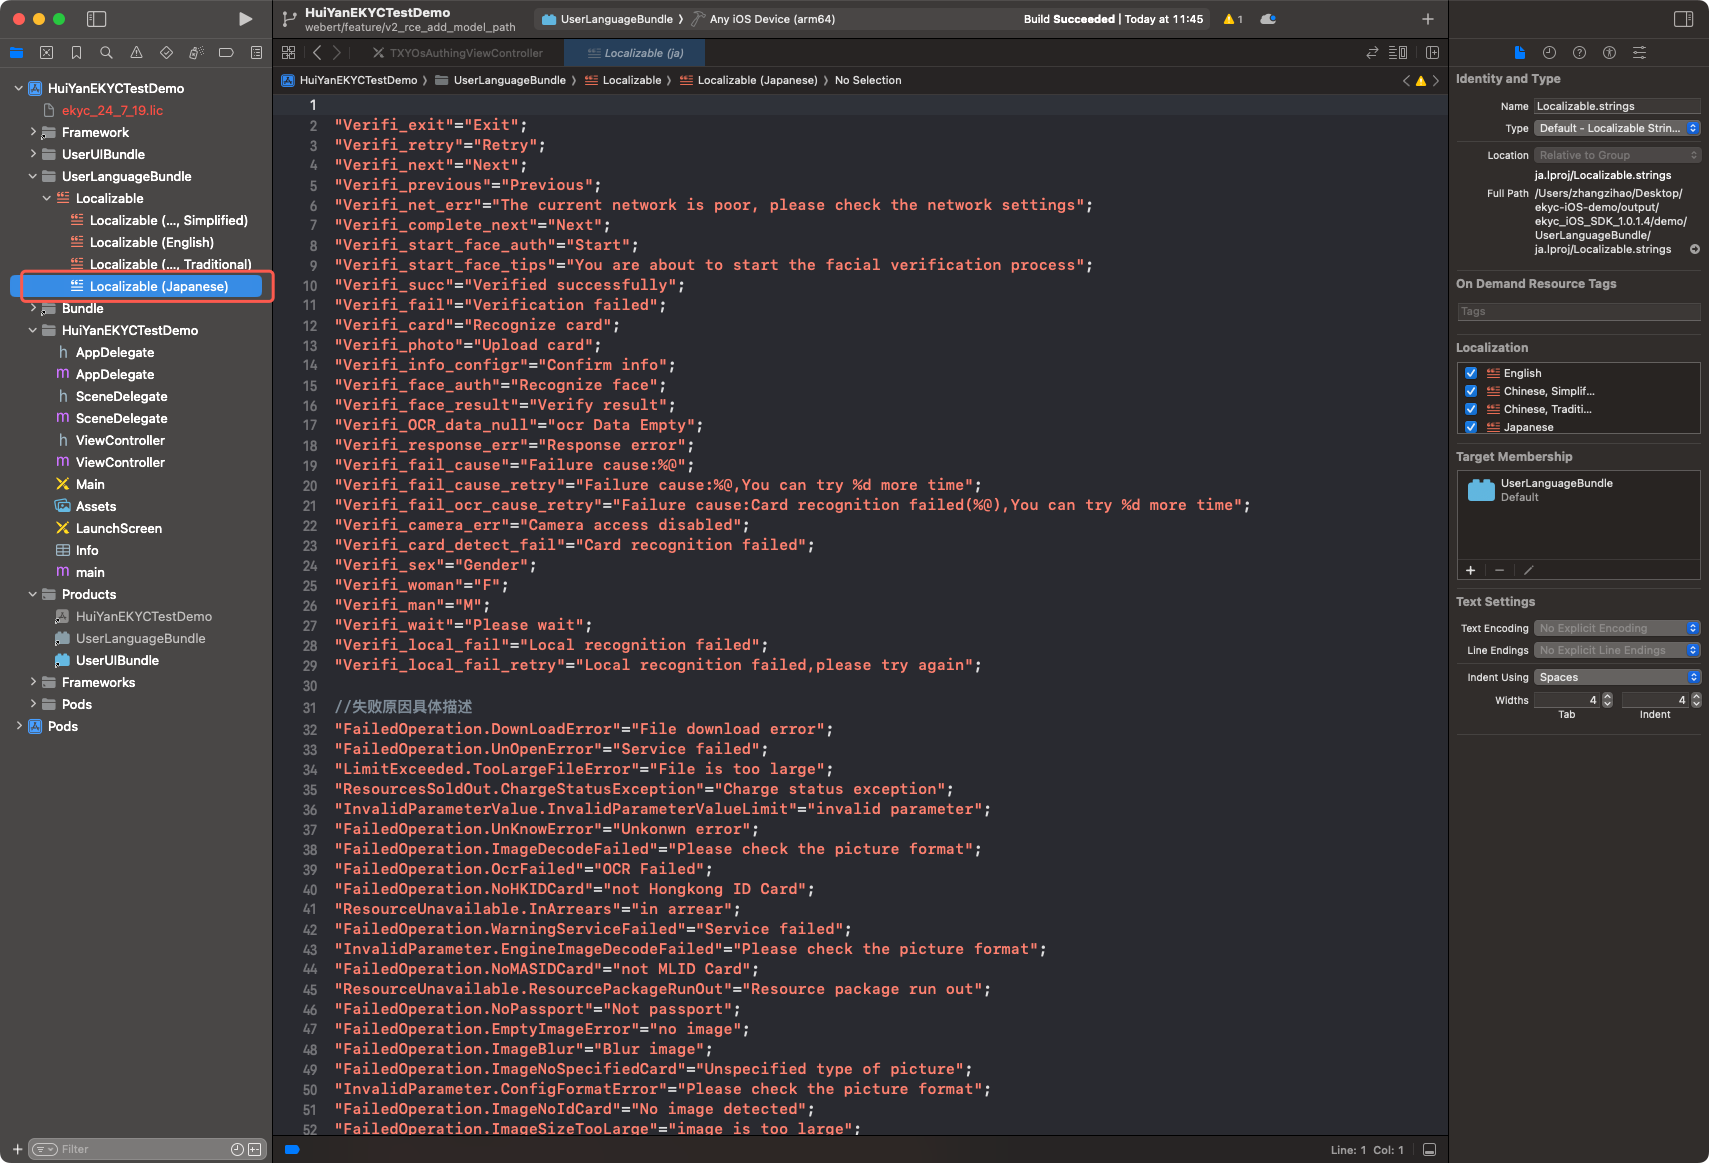
4. 将新增的多语言添加到 Localizable.strings。

5. 在 Localizable 中找到新增的多语言文件,并对内容进行翻译。
// 左侧为 SDK 使用的 Key,右侧为目标语言翻译内容"Verifi_OK"="OK";"Verifi_exit"="Exit";// ... 其余 Key 见下方 Key 参考表
6. 编译出
UserLanguageBundle.bundle。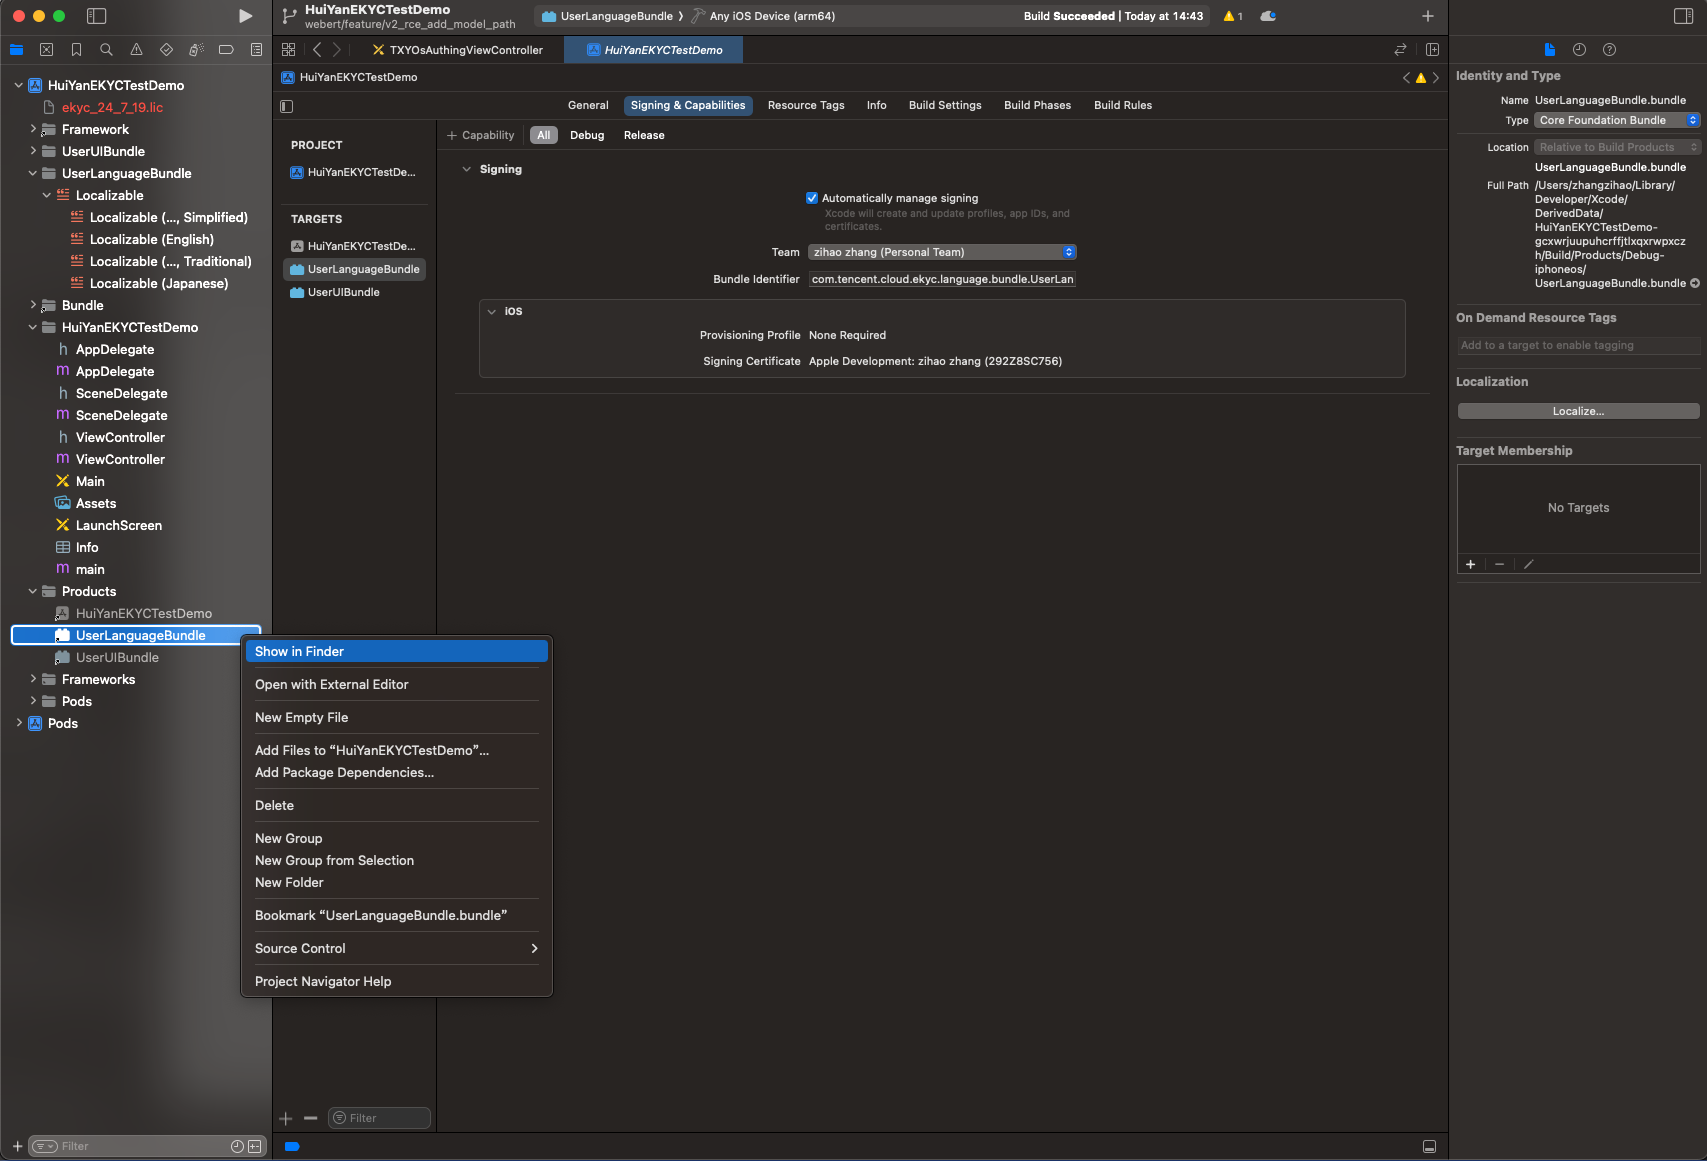
7. 若编译时出现签名报错,请配置签名后再编译。编译成功后需删除 Bundle 内的
Info.plist 和 _CodeSignature 文件夹。8. 将
UserLanguageBundle.bundle 导入宿主工程。步骤2:配置到 SDK
VerificationConfig *config = [[VerificationConfig alloc] init];// 1. 启用自定义语言模式config.languageType = HY_EKYC_CUSTOMIZE_LANGUAGE;// 2. 指定 Bundle 的绝对路径config.userLanguageBundlePath = [[NSBundle mainBundle] pathForResource:@"UserLanguageBundle" ofType:@"bundle"];// 3. 指定语言文件夹名称config.userLanguageFileName = @"ja.lproj";
属性 | 类型 | 必填条件 | 说明 |
languageType | 枚举 | 必填 | 设为 HY_EKYC_CUSTOMIZE_LANGUAGE 才启用自定义 |
userLanguageBundlePath | NSString * | 使用自定义语言时必填 | UserLanguageBundle 的绝对路径 |
userLanguageFileName | NSString * | 使用自定义语言时必填 | 目标 .lproj 文件夹名,如 ja.lproj |
注意:
若
userLanguageBundlePath 为 nil,SDK 将从 mainBundle 的 huiyan_verification.bundle 中查找多语言资源(默认行为)。
自定义 UI
代码级 UI 定制(无需 XIB)
如果仅需要调整颜色、字体等样式,SDK 提供了更轻量的配置类,无需重新编译 Bundle。
1. 卡证阶段(OcrCustomConfig)
OcrCustomConfig *ocrConfig = [[OcrCustomConfig alloc] init];ocrConfig.rectNormalColor = [UIColor whiteColor]; // 识别框正常颜色ocrConfig.rectErrorColor = [UIColor redColor]; // 识别框错误颜色ocrConfig.rectPassColor = [UIColor greenColor]; // 识别框通过颜色ocrConfig.tipsNormalColor = [UIColor whiteColor]; // 提示文字正常颜色ocrConfig.tipsErrorColor = [UIColor redColor]; // 提示文字错误颜色ocrConfig.tipsPassColor = [UIColor greenColor]; // 提示文字通过颜色ocrConfig.tipsFont = [UIFont systemFontOfSize:14]; // 提示文字字体ocrConfig.rectScaleX = 0.03; // 识别框横向边距比例(0.0~0.15)ocrConfig.rectTopMarginScale = 0.28; // 识别框顶部边距比例(仅竖屏有效)ocrConfig.isShowTips = YES; // 是否显示提示文字ocrConfig.tipsShowText = nil; // 自定义提示文字(nil 时显示 SDK 默认文案)VerificationConfig *config = [[VerificationConfig alloc] init];config.ocrCustomConfig = ocrConfig;
2. 活体人脸比对阶段(FaceCustomConfig)
FaceCustomConfig *faceConfig = [[FaceCustomConfig alloc] init];faceConfig.backgroundColor = [UIColor blackColor]; // 背景颜色faceConfig.tipsTextColor = [UIColor whiteColor]; // 提示文字颜色faceConfig.tipsTextErrorColor = UIColorFromRGB(0xFF3B30); // 提示文字错误态颜色faceConfig.tipsTextFont = [UIFont systemFontOfSize:16]; // 提示文字字体faceConfig.faceCircleErrorColor = UIColorFromRGB(0xFF3B30); // 圆框错误态颜色faceConfig.faceCircleCorrectColor = UIColorFromRGB(0x34C759); // 圆框正确态颜色faceConfig.countDownTextColor = [UIColor whiteColor]; // 倒计时文字颜色faceConfig.cancelButtonTextColor = [UIColor whiteColor]; // 取消按钮文字颜色VerificationConfig *config = [[VerificationConfig alloc] init];config.faceCustomConfig = faceConfig;
新增 UI 控件(无需 XIB)
通过
VerificationConfig.delegate 可监听 SDK 界面的创建与销毁事件,例如在 OCR 或活体人脸比对界面显示时插入自定义逻辑:VerificationConfig *config = [[VerificationConfig alloc] init];config.delegate = self; // 实现 VerificationDelegate 协议
// VerificationDelegate 协议方法@protocol VerificationDelegate <NSObject>@optional/// OCR 界面显示时回调,authView 为 SDK 展示的根视图- (void)ocrMainViewCreate:(UIView *)authView;/// OCR 界面被移除时回调- (void)ocrMainViewDestroy;/// 活体人脸比对界面显示时回调,authView 为 SDK 展示的根视图- (void)faceMainViewCreate:(UIView *)authView;/// 活体人脸比对界面被移除时回调- (void)faceMainViewDestroy;@end
例如:
@interface ViewController ()<VerificationDelegate>@end@implementation ViewController// OCR界面创建回调- (void)ocrMainViewCreate:(UIView *)authView {[self addCustomLabel:authView];}// OCR界面被回收的回调- (void)ocrMainViewDestroy {NSLog(@"ekyc ocr vc destroy");}// 活体人脸比对界面创建回调- (void)faceMainViewCreate:(UIView *)authView {[self addCustomLabel:authView];}// 活体人脸比对界面被回收的回调- (void)faceMainViewDestroy {NSLog(@"ekyc face vc destroy");}- (void)addCustomLabel:(UIView *)authView {UILabel *label = [[UILabel alloc]initWithFrame:CGRectMake(0, 100, 100, 30)];label.backgroundColor = [UIColor blackColor];label.textColor = [UIColor yellowColor];label.text = @"This is a newly added control";label.font = [UIFont systemFontOfSize:20];label.textAlignment = NSTextAlignmentCenter;[authView addSubview:label];}@end
修改 UI 控件(无需 XIB)
控件命名 | 控件描述 | tag 值 |
cancelButton | 活体人脸页面取消按钮 | 101 |
timeoutLabel | 活体人脸页面倒计时 | 102 |
tipsLabel | 活体人脸页面提示 | 103 |
navBarView | 活体人脸页面虚拟导航栏 | 200 |
通过
faceMainViewCreate: 回调可在活体页面创建后,直接通过 viewWithTag: 获取上表中的控件并进行修改。
示例:修改活体页面各控件样式
// 活体人脸比对界面创建回调- (void)faceMainViewCreate:(UIView *)authView {// 修改取消按钮文字颜色和字体UIButton *cancelButton = (UIButton *)[authView viewWithTag:101];[cancelButton setTitleColor:[UIColor whiteColor] forState:UIControlStateNormal];[cancelButton setTitle:@"" forState:UIControlStateNormal];cancelButton.titleLabel.font = [UIFont systemFontOfSize:16 weight:UIFontWeightMedium];// 修改取消按钮图片UIImage *originalImage = [UIImage systemImageNamed:@"chevron.left"];[cancelButton setImage:originalImage forState:UIControlStateNormal];// 修改取消按钮的 leading 左边距约束for (NSLayoutConstraint *constraint in cancelButton.superview.constraints) {if ((constraint.firstItem == cancelButton && constraint.firstAttribute == NSLayoutAttributeLeading) ||(constraint.secondItem == cancelButton && constraint.secondAttribute == NSLayoutAttributeLeading)) {constraint.constant = 0.0;break;}}// 修改倒计时标签颜色和字体UILabel *timeoutLabel = (UILabel *)[authView viewWithTag:102];timeoutLabel.textColor = [UIColor whiteColor];timeoutLabel.font = [UIFont systemFontOfSize:15];// 修改虚拟导航栏颜色(仅活体人脸比对模式、活体人脸检测模式)UIView *navBarView = [authView viewWithTag:200];navBarView.backgroundColor = [UIColor redColor];// 增加导航栏标题(仅活体人脸比对模式、活体人脸检测模式)CGFloat statusBarHeight = [UIApplication sharedApplication].statusBarFrame.size.height;CGRect frame = CGRectMake(0, statusBarHeight, navBarView.bounds.size.width, navBarView.bounds.size.height - statusBarHeight);UILabel *label = [[UILabel alloc]initWithFrame:frame];label.text = @"Custom Title";label.textColor = [UIColor blackColor];label.textAlignment = NSTextAlignmentCenter;[navBarView addSubview:label];}
说明:
修改前建议使用
if (view) { ... } 做非空判断,以防控件在某些模式下不存在时引发崩溃。若需要同时调整颜色参数(通过 FaceCustomConfig)和控件样式(通过回调),两者可以并存,FaceCustomConfig 控制基础样式,回调中的修改将覆盖对应控件的最终效果。
使用 XIB 自定义页面
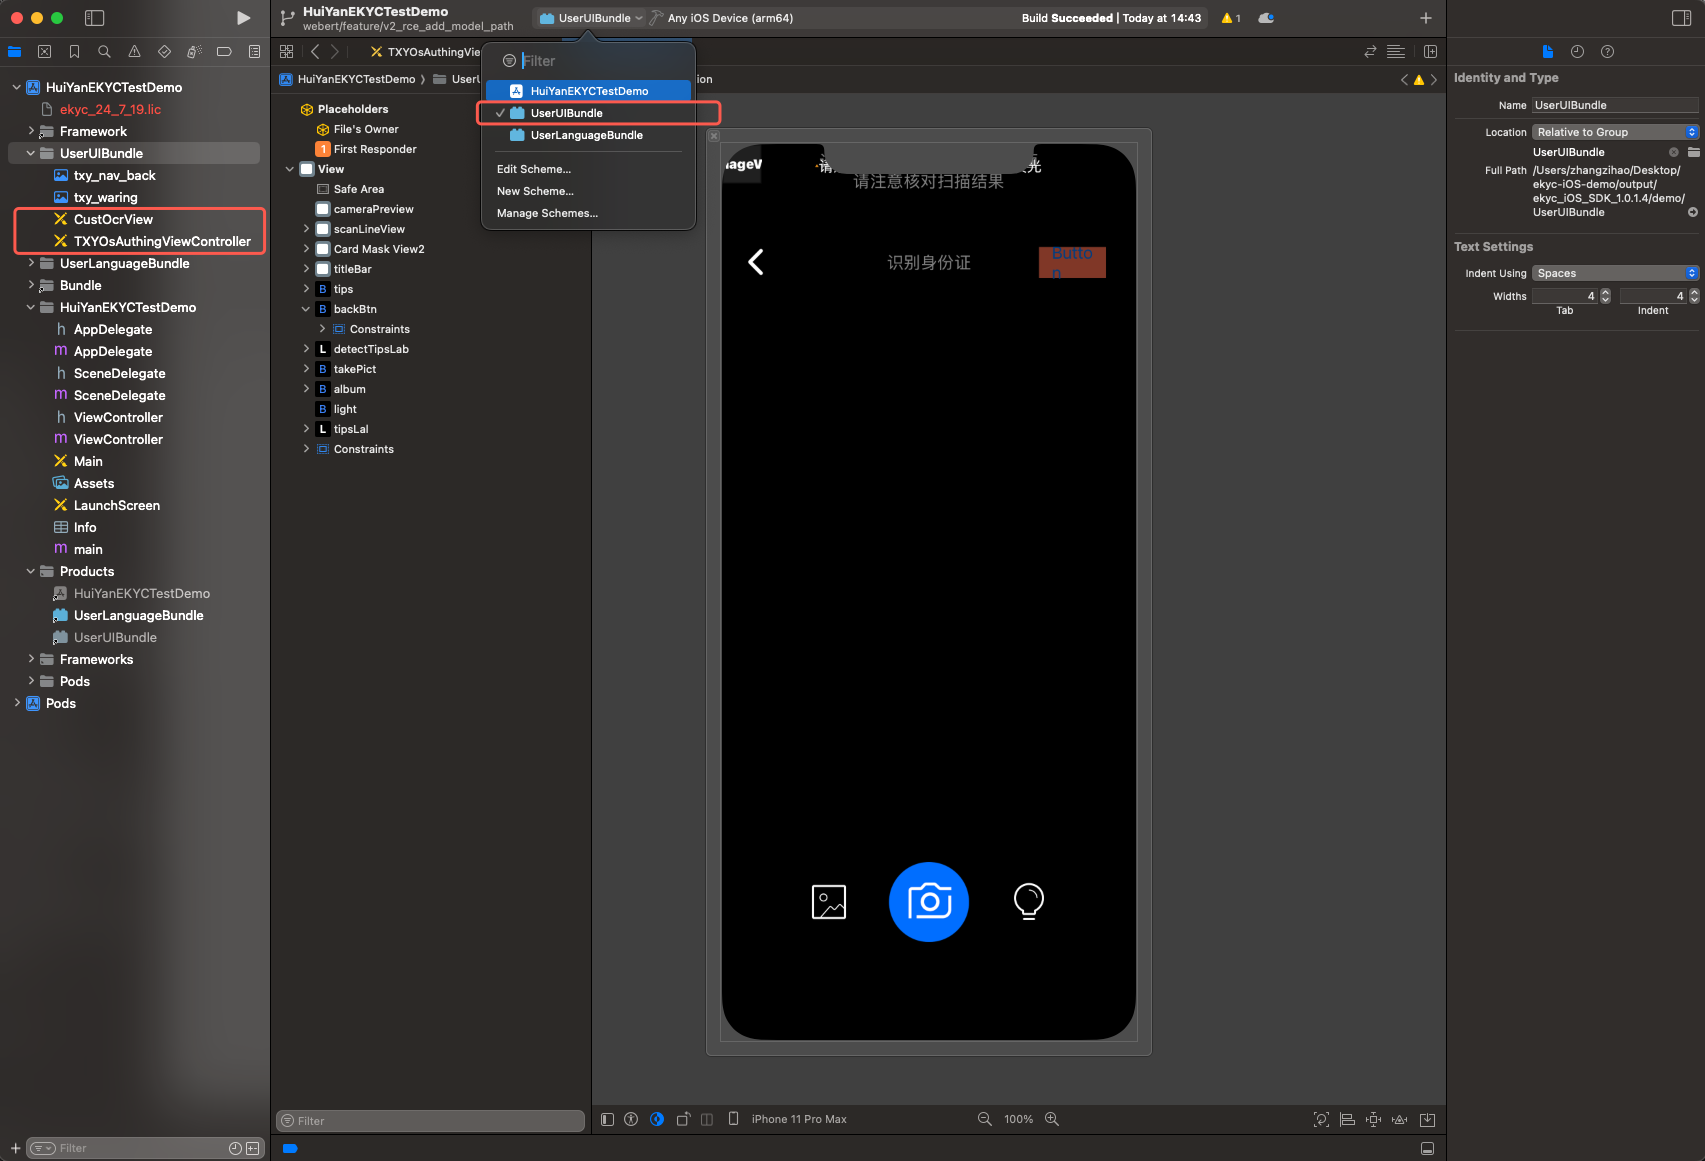
SDK 提供两个 XIB 文件供宿主 App 自定义 UI,均位于工程的
UserUIBundle 构建目标下:demo/└── UserUIBundle/├── TXYOsAuthingViewController.xib # 活体人脸比对页面└── CustOcrView.xib # 证件识别页面
XIB 文件名 | 对应页面 | 说明 |
TXYOsAuthingViewController | 人脸核身页面 | 活体检测与人脸比对的主界面 |
CustOcrView | 卡证识别页面 | OCR 拍摄与识别的主界面 |
警告:
可修改控件的布局约束、添加新控件,但不允许删除 XIB 中已有的控件及约束,否则运行时可能崩溃。
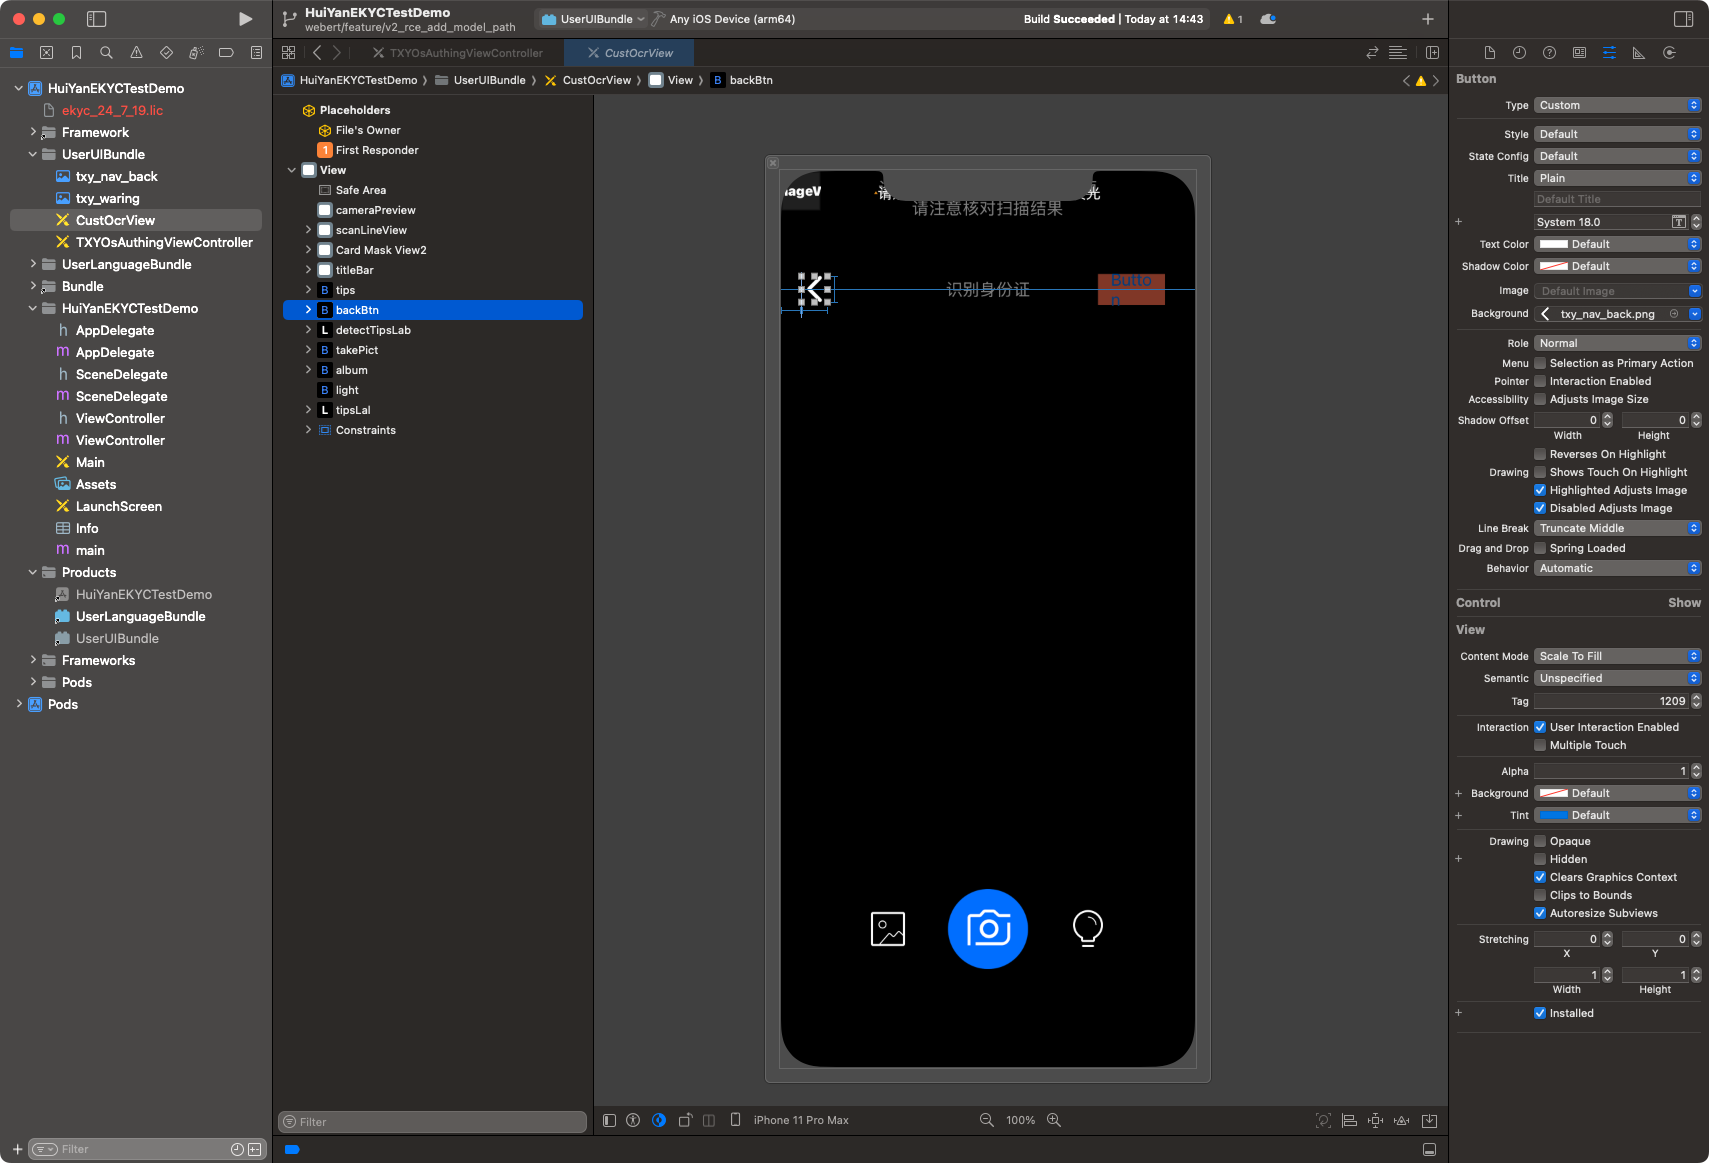
1. 证件识别阶段
该页面支持修改 XIB 文件中组件约束,如取消按钮、提示信息。支持替换返回按钮 icon(txy_nav_back)等。
注意:
不允许修改 XIB 中拍照、相册、手电筒控件的约束。
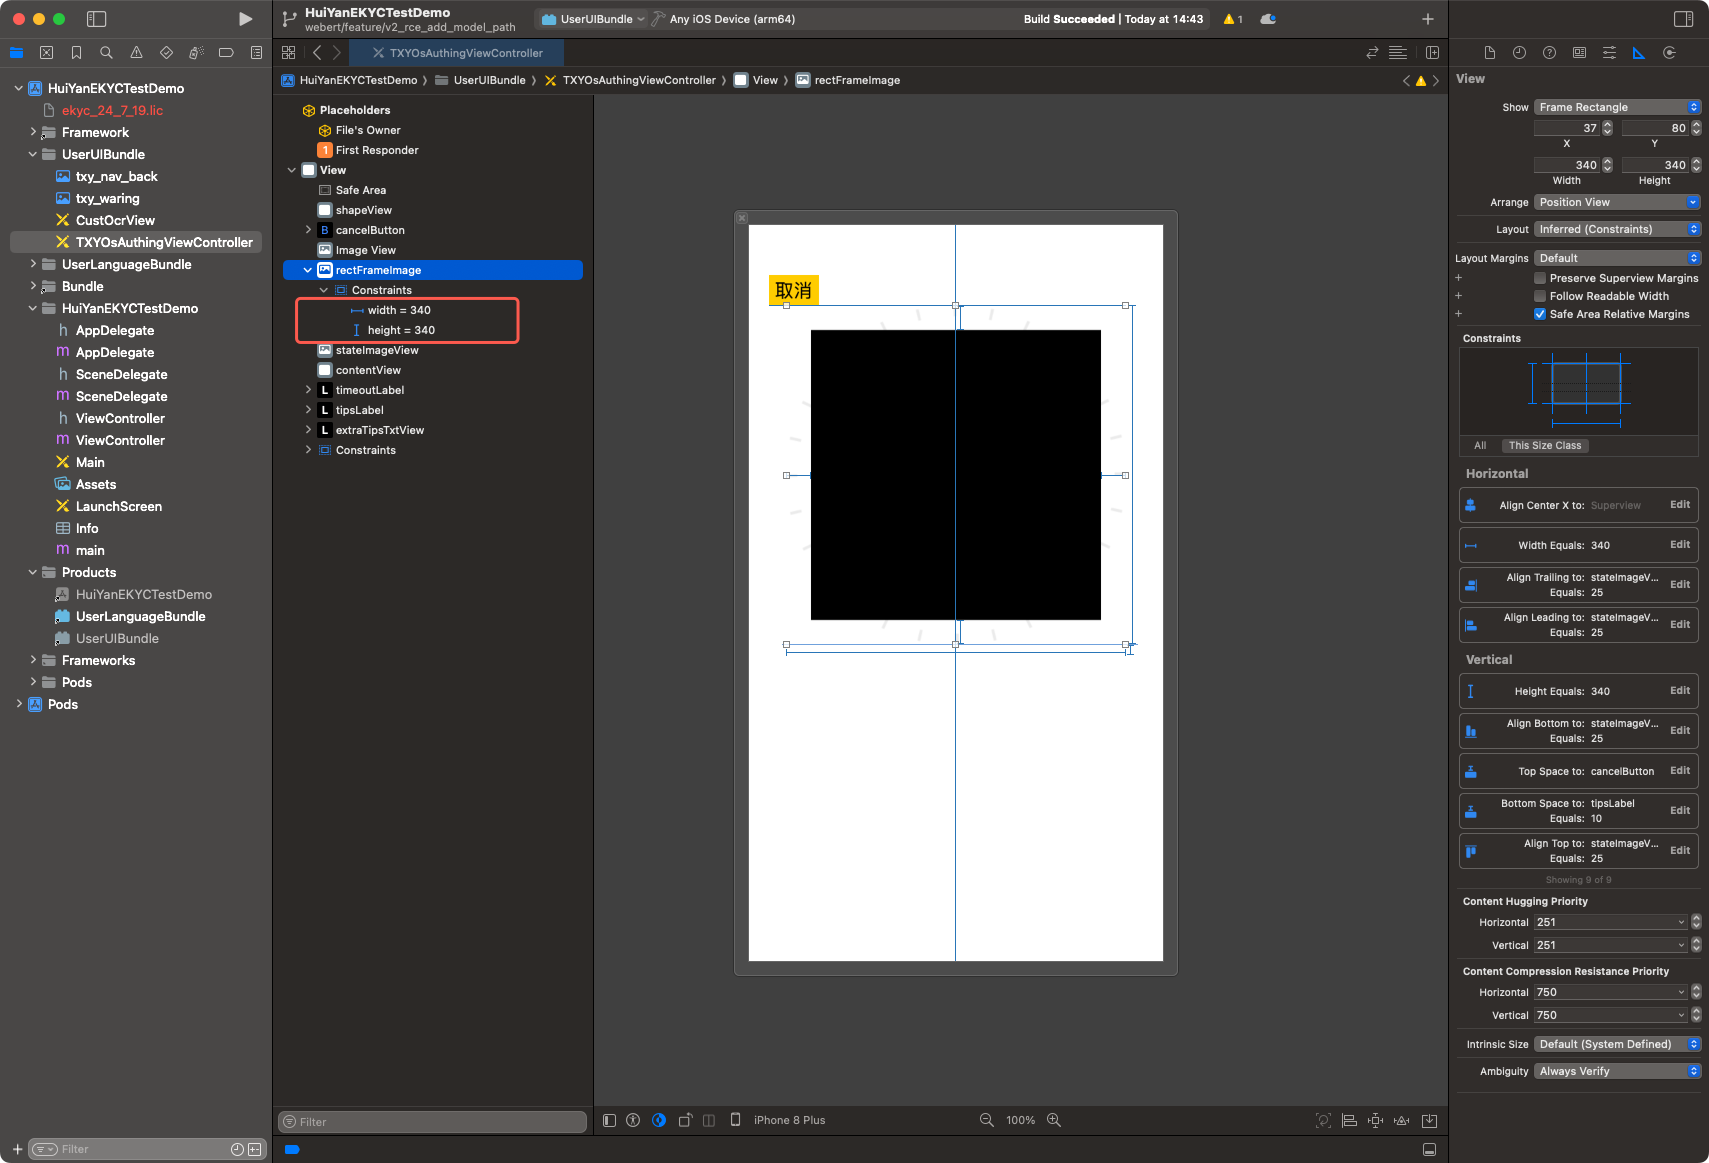
2. 活体人脸比对阶段
该页面支持修改 XIB 文件中取景框、提示信息、倒计时标签组件的大小和位置。
2.1 修改 rectFrameImage 的约束,可控制取景框大小和位置。
2.2 修改 tipsLabel 的约束,可控制提示框的位置。
2.3 修改 timeoutLabel 的约束,可控制倒计时的位置。也可配置字体及大小。
2.4 修改 cancelButton 的约束,可控制返回按钮的位置。也可配置字体及大小。
3. 构建 UserUIBundle
3.1 打开交付包
demo/ 目录下的工程文件。3.2 在工程中找到
UserUIBundle 构建目标(Build Target)。3.3 按需修改
TXYOsAuthingViewController.xib 或 CustOcrView.xib 的布局约束,或新增控件。3.4 编译出
UserUIBundle.bundle。3.5 若编译时出现签名报错,请配置签名后再编译;编译成功后需删除 Bundle 内的
Info.plist 和 _CodeSignature 文件夹。3.6 将
UserUIBundle.bundle 导入宿主工程。4. 配置到 SDK
VerificationConfig *config = [[VerificationConfig alloc] init];// 指定自定义 UI Bundle 的绝对路径config.userUIBundlePath = [[NSBundle mainBundle] pathForResource:@"UserUIBundle" ofType:@"bundle"];
5. 自定义 XIB 源码管理建议
若自定义修改后,建议将
demo/UserUIBundle/ 整个目录拷贝到宿主工程的代码仓库中,作为自定义 UI 的源码目录,后续所有修改均基于此目录进行。
完整配置示例
以下示例同时启用自定义 UI 和自定义多语言:
VerificationConfig *config = [[VerificationConfig alloc] init];config.licPath = @"/path/to/license.lic";config.ekycToken = @"your-ekyc-token";// --- 自定义 UI ---config.userUIBundlePath = [[NSBundle mainBundle] pathForResource:@"UserUIBundle" ofType:@"bundle"];config.delegate = self; // 可选:实现 VerificationDelegate 监听 UI 事件// 代码级样式微调(可选,不需要修改 XIB 时使用)config.ocrCustomConfig.rectNormalColor = [UIColor colorWithWhite:1.0 alpha:0.8];config.faceCustomConfig.backgroundColor = [UIColor colorWithRed:0.1 green:0.1 blue:0.1 alpha:1.0];// --- 自定义多语言 ---config.languageType = HY_EKYC_CUSTOMIZE_LANGUAGE;config.userLanguageBundlePath = [[NSBundle mainBundle] pathForResource:@"UserLanguageBundle" ofType:@"bundle"];config.userLanguageFileName = @"ja.lproj";// 启动验证VerificationKit *kit = [[VerificationKit alloc] init];[kit initWithViewController:self];[kit startVerifiWithConfig:config withSuccCallback:^(int errorCode, id resultInfo, id reserved) {// 验证成功} withFailCallback:^(int errorCode, NSString *errorMsg, id reserved) {// 验证失败,错误码 311 表示 Bundle 路径配置异常}];
错误处理
Bundle 路径校验失败时,SDK 通过
failCallback 返回以下错误码:错误码 | 枚举 | 触发条件 |
311 | HY_EKYC_BUNDLE_CONFIGURATION_EXCEPTION | 某个 Bundle 路径不存在或不是目录 |
错误信息(
errorMsg)格式为 "<字段名> not found",例如:"userUIBundle not found":userUIBundlePath 指向的路径不存在"userLanguageBundle not found":userLanguageBundlePath 指向的路径不存在
迁移说明
说明:
适用于从 v1.0.1.4 及以下版本升级的用户。
v1.0.1.5 对 Bundle 配置字段做了破坏性变更,旧字段已完全删除,请按以下对照表更新代码:
旧字段(已删除) | 新字段 | 变更说明 |
userUIBundleName | userUIBundlePath | 由 Bundle 名称改为绝对路径 |
userLanguageBundleName | userLanguageBundlePath | 由 Bundle 名称改为绝对路径 |
迁移示例:
// 旧写法(v1.0.1.4 及以下)config.userUIBundleName = @"UserUIBundle";config.userLanguageBundleName = @"UserLanguageBundle";// 新写法(v1.0.1.5 及以上)config.userUIBundlePath = [[NSBundle mainBundle] pathForResource:@"UserUIBundle" ofType:@"bundle"];config.userLanguageBundlePath = [[NSBundle mainBundle] pathForResource:@"UserLanguageBundle" ofType:@"bundle"];
若路径字段为
nil,SDK 保持与旧版本相同的默认行为(从 mainBundle 中查找对应 Bundle),不影响未使用自定义功能的接入方。
文档反馈