快速入门
Download
聚焦模式
字号
相关资源
SDK 源码地址请参考:XML iOS SDK。
SDK 快速下载地址:XML iOS SDK。
示例 Demo 可参考:XML iOS SDK Demo。
SDK 接口与参数文档请参见 SDK API 参考。
SDK 文档中的所有示例代码请参见 SDK 代码示例。
SDK 更新日志请参见:ChangeLog。
说明:
如果您在使用 XML 版本 SDK 时遇到函数或方法不存在等错误,请先将 XML 版本 SDK 升级到最新版再重试。
环境配置与准备
1. 您需要一个 iOS 应用,这个应用可以是您现有的工程,也可以是新建的工程。
2. SDK 支持 iOS 8.0 及以上的版本,在安装前请检查您项目支持的最低系统版本。
3. 您需要获取一个腾讯云 API 密钥,该密钥是您使用 COS SDK 各项功能的前提。
说明:
如果您一定要使用永久密钥,建议遵循 最小权限指引原则 对永久密钥的权限范围进行限制。
安装 SDK
方式一:使用 Cocoapods 集成(推荐)
COS SDK 有三个版本:标准版、精简版、无腾讯灯塔版。
标准版:包含了 COS API的所有功能,功能最为完善。
精简版:仅包含 COS 的文件上传/下载功能(如果您仅仅使用到上传和下载功能,并且对 SDK 体积要求较高,推荐使用精简版 SDK)。
无腾讯灯塔版:在标准版的基础上移除了腾讯的灯塔数据上报服务。
说明:
在您工程的 Podfile 文件中添加:
pod 'QCloudCOSXML'
pod 'QCloudCOSXML/Transfer'
pod 'QCloudCOSXML/Slim'
说明:
精简版 SDK 和无腾讯灯塔版 SDK 是通过 Cocoapods 的 Subspec 功能实现的,因此目前只支持通过自动集成的方式进行引入。
注意:
Swift 项目使用 Pod 集成时,需要在 podfile 文件中加上 use_frameworks!。
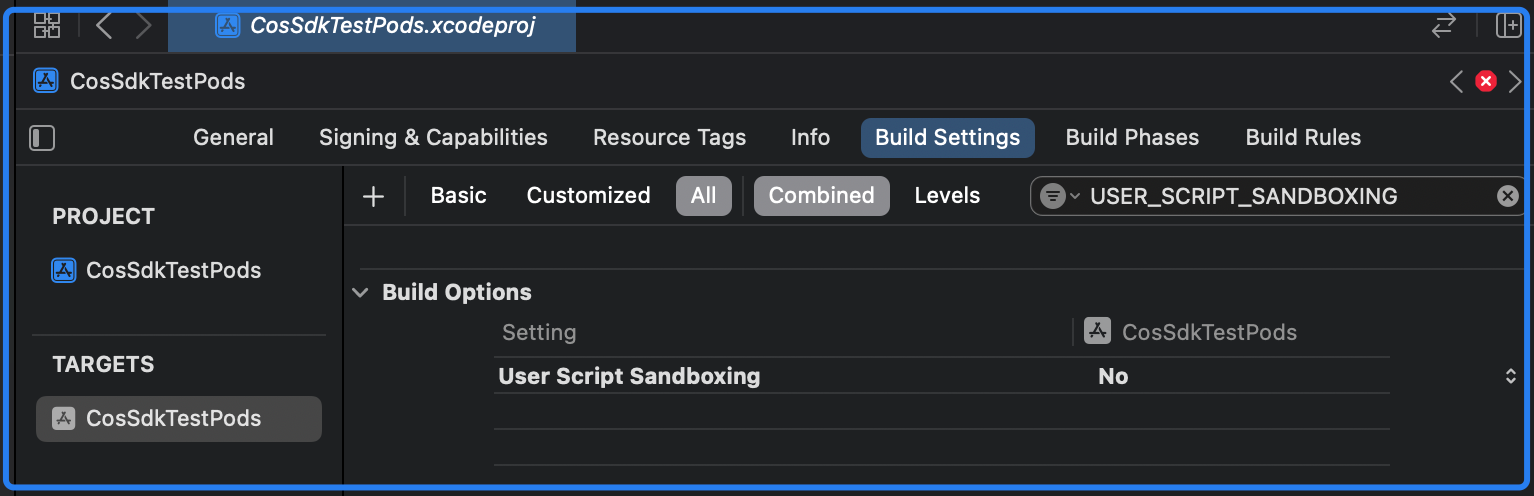
使用 Pod 集成 SDK 后,在编译时出现无权限写入问题,请在 Build Settings 中搜索 ENABLE_USER_SCRIPT_SANDBOXING 并设置为 NO ,如下图所示:
方式二:手动集成
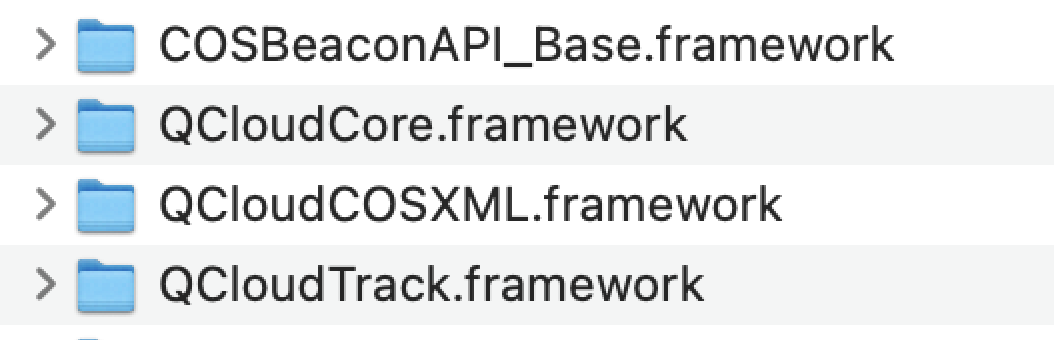
1. 将 QCloudCOSXML.framework、QCloudCore.framework 、QCloudTrack.framework和 COSBeaconAPI_Base.framework 拖入到工程中。
说明:
QCloudCore.framework、QCloudCOSXML.framework 为 SDK 核心组件,必选。
COSBeaconAPI_Base.framework、QCloudTrack.framework 为日志上报组件,可选依赖。
2. 添加以下系统依赖:
CoreTelephony
Foundation
SystemConfiguration
libc++.tbd
3. 在项目Build Setting中设置 Other Linker Flags,添加以下参数:
-ObjC

说明:
SDK 提供了打包脚本,支持根据业务需求自行打包(该打包脚本依赖于 Cocoapods,请先确保您的开发环境安装了 Cocoapods)。打包步骤如下:
1. 下载源码:git clone https://github.com/tencentyun/qcloud-sdk-ios。
2. 运行打包脚本:source package.sh。
3. 将打包产物拖到工程中,然后按照上面手动集成的方式操作即可。
iOS:将 ios 文件夹下的产物拖入项目。
macOS:将 osx 文件夹下的产物拖入项目。

初始化 COS 服务
导入头文件
#import <QCloudCOSXML/QCloudCOSXML.h>
#import <QCloudCOSXML/QCloudCOSXMLTransfer.h>
#import <QCloudCOSXML/QCloudCOSXML.h>
import QCloudCOSXML
import QCloudCOSXML
import QCloudCOSXML
初始化 COS
说明:
在应用启动后,初始化 COS SDK。
//AppDelegate.m@interface AppDelegate()@end@implementation AppDelegate- (BOOL)application:(UIApplication * )applicationdidFinishLaunchingWithOptions:(NSDictionary * )launchOptions {QCloudServiceConfiguration* configuration = [QCloudServiceConfiguration new];QCloudCOSXMLEndPoint* endpoint = [[QCloudCOSXMLEndPoint alloc] init];// 存储桶所在地域简称可以在控制台查看:https://console.tencentcloud.com/cos5/bucket// 例如广州地区是 ap-guangzhou,COS 支持的所有 region 列表参见 https://www.qcloud.com/document/product/436/6224endpoint.regionName = @"COS_REGION";// 使用 HTTPSendpoint.useHTTPS = true;configuration.endpoint = endpoint;// 初始化 COS 服务示例[QCloudCOSXMLService registerDefaultCOSXMLWithConfiguration:configuration];[QCloudCOSTransferMangerService registerDefaultCOSTransferMangerWithConfiguration:configuration];return YES;}@end
//AppDelegate.swiftclass AppDelegate: UIResponder, UIApplicationDelegate {func application(_ application: UIApplication,didFinishLaunchingWithOptions launchOptions:[UIApplication.LaunchOptionsKey: Any]?) -> Bool {let config = QCloudServiceConfiguration.init();let endpoint = QCloudCOSXMLEndPoint.init();// 存储桶所在地域简称可以在控制台查看:https://console.tencentcloud.com/cos5/bucket// 例如广州地区是 ap-guangzhou,COS 支持的所有 region 列表参见 https://www.qcloud.com/document/product/436/6224endpoint.regionName = "COS_REGION";// 使用 HTTPSendpoint.useHTTPS = true;config.endpoint = endpoint;// 初始化 COS 服务示例QCloudCOSXMLService.registerDefaultCOSXML(with: config);QCloudCOSTransferMangerService.registerDefaultCOSTransferManger(with: config);return true}}
import SwiftUIimport QCloudCOSXML@mainstruct SwiftUIDemoApp: App {init() {// 在应用初始化时调用 SDK 配置COSManager.shared.setupCOSSDK();}var body: some Scene {WindowGroup {ContentView()}}}class COSManager: NSObject {static let shared = COSManager()private override init() {}func setupCOSSDK() {let config = QCloudServiceConfiguration.init();let endpoint = QCloudCOSXMLEndPoint.init();// 存储桶所在地域简称可以在控制台查看:https://console.tencentcloud.com/cos5/bucket// 例如广州地区是 ap-guangzhou,COS 支持的所有 region 列表参见 https://www.qcloud.com/document/product/436/6224endpoint.regionName = "COS_REGION";// 使用 HTTPSendpoint.useHTTPS = true;config.endpoint = endpoint;// 初始化 COS 服务示例QCloudCOSXMLService.registerDefaultCOSXML(with: config);QCloudCOSTransferMangerService.registerDefaultCOSTransferManger(with: config);}}
设置 API 访问密钥
访问密钥是 COS SDK 访问所有服务的前提,密钥分为:永久密钥和临时密钥。SDK 内部提供了诸多方法来设置密钥,具体如下:
临时密钥:和每一个 COS 请求关联,业务方在发起请求时进行设置,优先级高于使用回调设置密钥的方式。
密钥回调:SDK 会在首次和缓存的密钥快过期时以回调的方式重新获取访问密钥。
说明:
临时密钥和每一个 COS 请求进行关联。
临时密钥的优先级高于密钥回调的方式,如果同时设置了临时密钥和密钥回调的方式则优先使用临时密钥。
SDK 中所有的请求(Request)都支持通过 credential 属性来设置临时密钥。
若项目中全部使用临时密钥,则无需使用密钥回调的方式。
临时密钥 ID、Key、Token 的获取指引,请参见 临时密钥生成及使用指引。
// 以文件上传请求为例QCloudCOSXMLUploadObjectRequest* put = [QCloudCOSXMLUploadObjectRequest new];QCloudCredential * credential = [QCloudCredential new];// 临时密钥 IDcredential.secretID = @"secretID";// 临时密钥 keycredential.secretKey = @"secretKey";// 临时密钥 tokencredential.token = @"token";// 设置临时密钥put.credential = credential;// 本地文件路径NSURL* url = [NSURL fileURLWithPath:@"文件的URL"];// 存储桶名称,由 BucketName-Appid 组成,可以在 COS 控制台查看 https://console.tencentcloud.com/cos5/bucketput.bucket = @"examplebucket-1250000000";// 对象键,是对象在 COS 上的完整路径,如果带目录的话,格式为 "video/xxx/movie.mp4"put.object = @"exampleobject";//需要上传的对象内容。可以传入 NSData* 或者 NSURL* 类型的变量put.body = url;//监听上传进度[put setSendProcessBlock:^(int64_t bytesSent,int64_t totalBytesSent,int64_t totalBytesExpectedToSend) {// bytesSent 本次要发送的字节数(一个大文件可能要分多次发送)// totalBytesSent 已发送的字节数// totalBytesExpectedToSend 本次上传要发送的总字节数(即一个文件大小)}];//监听上传结果[put setFinishBlock:^(id outputObject, NSError *error) {//可以从 outputObject 中获取 response 中 etag 或者自定义头部等信息NSDictionary * result = (NSDictionary *)outputObject;}];[[QCloudCOSTransferMangerService defaultCOSTransferManager] UploadObject:put];
// 以文件上传请求为例let put:QCloudCOSXMLUploadObjectRequest = QCloudCOSXMLUploadObjectRequest<AnyObject>();let credential = QCloudCredential()// 临时密钥 IDcredential.secretID = "secretID"// 临时密钥 Keycredential.secretKey = "secretKey"// 临时密钥 tokencredential.token = "token"// 设置临时密钥put.credential = credential// 存储桶名称,由 BucketName-Appid 组成,可以在 COS 控制台查看 https://console.tencentcloud.com/cos5/bucketput.bucket = "examplebucket-1250000000";// 对象键,是对象在 COS 上的完整路径,如果带目录的话,格式为 "video/xxx/movie.mp4"put.object = "exampleobject";//需要上传的对象内容。可以传入 NSData* 或者 NSURL* 类型的变量put.body = NSURL.fileURL(withPath: "Local File Path") as AnyObject;//监听上传结果put.setFinish { (result, error) in// 获取上传结果if error != nil{print(error!);}else{print(result!);}}//监听上传进度put.sendProcessBlock = { (bytesSent, totalBytesSent,totalBytesExpectedToSend) in// bytesSent 本次要发送的字节数(一个大文件可能要分多次发送)// totalBytesSent 已发送的字节数// totalBytesExpectedToSend 本次上传要发送的总字节数(即一个文件大小)};//设置上传参数put.initMultipleUploadFinishBlock = {(multipleUploadInitResult, resumeData) in//在初始化分块上传完成以后会回调该 block,在这里可以获取 resumeData//并且可以通过 resumeData 生成一个分块上传的请求let resumeUploadRequest = QCloudCOSXMLUploadObjectRequest<AnyObject>.init(request: resumeData as Data?);}QCloudCOSTransferMangerService.defaultCOSTransferManager().uploadObject(put);
说明:
密钥回调支持:临时密钥、永久密钥、服务端计算签名等多种密钥形式。
在某些业务场景中,客户端请求与访问密钥并非严格遵循一对一的关系,可能存在多个请求共享同一密钥的情况。为降低业务方的集成复杂度与密钥管理负担,我们提供了密钥代理机制。通过该机制,业务方只需实现指定的代理接口(QCloudSignatureProvider),SDK 即可在每次发起网络请求时动态获取有效的访问密钥,极大简化了密钥的调用与管理流程。
此外业务方可能为保障密钥安全,不会将密钥直接下发至客户端,而是采用签名等安全策略进行权限管控。为此 SDK 同样支持在回调中以签名方式发起请求,允许业务方通过安全计算生成临时访问凭证,确保密钥在传输与使用过程中的安全性,同时满足企业级安全合规要求。
//AppDelegate.m//AppDelegate 需遵循 QCloudSignatureProvider@interface AppDelegate()<QCloudSignatureProvider>@end@implementation AppDelegate- (BOOL)application:(UIApplication * )applicationdidFinishLaunchingWithOptions:(NSDictionary * )launchOptions {QCloudServiceConfiguration* configuration = [QCloudServiceConfiguration new];QCloudCOSXMLEndPoint* endpoint = [[QCloudCOSXMLEndPoint alloc] init];endpoint.regionName = @"COS_REGION";endpoint.useHTTPS = true;configuration.endpoint = endpoint;// 设置密钥回调代理configuration.signatureProvider = self;[QCloudCOSXMLService registerDefaultCOSXMLWithConfiguration:configuration];[QCloudCOSTransferMangerService registerDefaultCOSTransferMangerWithConfiguration:configuration];return YES;}// 密钥回调的代理方法- (void)signatureWithFields:(QCloudSignatureFields*)filedsrequest:(QCloudBizHTTPRequest*)requesturlRequest:(NSMutableURLRequest*)urlRequstcompelete:(QCloudHTTPAuthentationContinueBlock)continueBlock{/*** 此处获取密钥,如果使用永久密钥则忽略* ...*//*** 此处既可以是临时密钥也可以是永久密钥* 注意:永久密钥不可用于生产环境,仅可作为调试使用*/QCloudCredential* credential = [QCloudCredential new];// 密钥 SecretIdcredential.secretID = @"SECRETID";// 密钥 SecretKeycredential.secretKey = @"SECRETKEY";// 密钥 Token(如果使用永久密钥不需要填入 token,如果使用临时密钥需要填入)credential.token = @"TOKEN";// 强烈建议返回服务器时间作为签名的开始时间, 用来避免由于用户手机本地时间偏差过大导致的签名不正确(参数 startTime 和 expiredTime 单位为秒)credential.startDate = [NSDate dateWithTimeIntervalSince1970:startTime]; // 单位是秒credential.expirationDate = [NSDate dateWithTimeIntervalSince1970:expiredTime]];// 单位是秒QCloudAuthentationV5Creator* creator = [[QCloudAuthentationV5Creator alloc]initWithCredential:credential];// SDK 中默认下面所有 Header 都参与签名,无需设置。// 若需制定某个 Header 不参与签名,则将相应的 Header 从下面数组中删除,然后赋值给 shouldSignedList 即可。// creator.shouldSignedList = @[@"Cache-Control", @"Content-Disposition", @"Content-Encoding", @"Content-Length", @"Content-MD5", @"Content-Type", @"Expect", @"Expires", @"If-Match" , @"If-Modified-Since" , @"If-None-Match" , @"If-Unmodified-Since" , @"Origin" , @"Range" , @"transfer-encoding" ,@"Host",@"Pic-Operations",@"ci-process"];// 注意 这里不要对 urlRequst 进行 copy 以及 mutableCopy 操作QCloudSignature *signature = [creator signatureForData:urlRequst];continueBlock(signature, nil);}@end
//AppDelegate.swift//AppDelegate 需遵循 QCloudSignatureProviderclass AppDelegate: UIResponder, UIApplicationDelegate,QCloudSignatureProvider {func application(_ application: UIApplication,didFinishLaunchingWithOptions launchOptions:[UIApplication.LaunchOptionsKey: Any]?) -> Bool {let config = QCloudServiceConfiguration.init();let endpoint = QCloudCOSXMLEndPoint.init();endpoint.regionName = "COS_REGION";endpoint.useHTTPS = true;config.endpoint = endpoint;// 设置密钥回调代理config.signatureProvider = self;QCloudCOSXMLService.registerDefaultCOSXML(with: config);QCloudCOSTransferMangerService.registerDefaultCOSTransferManger(with: config);return true}// 密钥回调的代理方法func signature(with fileds: QCloudSignatureFields!,request: QCloudBizHTTPRequest!,urlRequest urlRequst: NSMutableURLRequest!,compelete continueBlock: QCloudHTTPAuthentationContinueBlock!) {/*** 此处获取密钥,如果使用永久密钥则忽略* ...*//*** 此处既可以是临时密钥也可以是永久密钥* 临时密钥获取见:https://www.tencentcloud.com/document/product/436/14048* 注意:永久密钥不可用于生产环境,仅可作为调试使用*/let credential = QCloudCredential.init();// 密钥 SecretIdcredential.secretID = "SECRETID";// 密钥 SecretKeycredential.secretKey = "SECRETKEY";// 密钥 Token(如果使用永久密钥不需要填入,如果使用临时密钥需要填入)credential.token = "TOKEN";// 强烈建议返回服务器时间作为签名的开始时间, 用来避免由于用户手机本地时间偏差过大导致的签名不正确(参数 startTime 和 expiredTime 单位为秒)credential.startDate = Date.init(timeIntervalSince1970: TimeInterval(startTime)!) DateFormatter().date(from: "startTime");credential.expirationDate = Date.init(timeIntervalSince1970: TimeInterval(expiredTime)!)let creator = QCloudAuthentationV5Creator.init(credential: credential);// 注意:这里不要对 urlRequst 进行 copy 以及 mutableCopy 操作let signature = creator?.signature(forData: urlRequst);continueBlock(signature,nil);}}
import SwiftUIimport QCloudCOSXML@mainstruct SwiftUIDemoApp: App {init() {// 在应用初始化时调用 SDK 配置COSManager.shared.setupCOSSDK();}var body: some Scene {WindowGroup {ContentView()}}}// COSManager需遵循QCloudSignatureProviderclass COSManager: NSObject, QCloudSignatureProvider {static let shared = COSManager()private override init() {}func setupCOSSDK() {let config = QCloudServiceConfiguration.init();let endpoint = QCloudCOSXMLEndPoint.init();endpoint.regionName = "COS_REGION";endpoint.useHTTPS = true;config.endpoint = endpoint;config.signatureProvider = self;QCloudCOSXMLService.registerDefaultCOSXML(with: config);QCloudCOSTransferMangerService.registerDefaultCOSTransferManger(with: config);}// 密钥回调的代理方法func signature(with fileds: QCloudSignatureFields!,request: QCloudBizHTTPRequest!,urlRequest urlRequst: NSMutableURLRequest!,compelete continueBlock: QCloudHTTPAuthentationContinueBlock!) {/*** 此处获取密钥,如果使用永久密钥则忽略* ...*//*** 此处既可以是临时密钥也可以是永久密钥* 临时密钥获取见:https://www.tencentcloud.com/document/product/436/14048* 注意:永久密钥不可用于生产环境,仅可作为调试使用*/let credential = QCloudCredential.init();// 密钥 SecretIdcredential.secretID = "SECRETID";// 密钥 SecretKeycredential.secretKey = "SECRETKEY";// 密钥 Token(如果使用永久密钥不需要填入,如果使用临时密钥需要填入)credential.token = "TOKEN";// 强烈建议返回服务器时间作为签名的开始时间, 用来避免由于用户手机本地时间偏差过大导致的签名不正确(参数 startTime 和 expiredTime 单位为秒)credential.startDate = Date.init(timeIntervalSince1970: TimeInterval(startTime)!) DateFormatter().date(from: "startTime");credential.expirationDate = Date.init(timeIntervalSince1970: TimeInterval(expiredTime)!)let creator = QCloudAuthentationV5Creator.init(credential: credential);// 注意:这里不要对 urlRequst 进行 copy 以及 mutableCopy 操作let signature = creator?.signature(forData: urlRequst);continueBlock(signature,nil);}}
说明:
此外SDK还提供了栅栏机制(QCloudCredentailFenceQueue),所有获取签名的请求会等待签名完成后在执行,免去了自己管理异步过程。注意:栅栏机制仅针对密钥回调这种方式有效并且仅适用客户端管理密钥的情况。
栅栏机制的使用如下:
// AppDelegate需遵循QCloudCredentailFenceQueueDelegate@interface AppDelegate () <QCloudSignatureProvider, QCloudCredentailFenceQueueDelegate>// 控制栅栏机制的对象@property (nonatomic, strong) QCloudCredentailFenceQueue *credentialFenceQueue;@end@implementation AppDelegate- (BOOL)application:(UIApplication * )applicationdidFinishLaunchingWithOptions:(NSDictionary * )launchOptions {// ... SDK 初始化相关的流程此处省略self.credentialFenceQueue = [QCloudCredentailFenceQueue new];// 设置栅栏机制的代理对象self.credentialFenceQueue.delegate = self;return YES;}// 密钥回调代理中需要使用栅栏对象获取签名- (void)signatureWithFields:(QCloudSignatureFields *)filedsrequest:(QCloudBizHTTPRequest *)requesturlRequest:(NSMutableURLRequest *)urlRequstcompelete:(QCloudHTTPAuthentationContinueBlock)continueBlock {[self.credentialFenceQueue performAction:^(QCloudAuthentationCreator *creator, NSError *error) {if (error) {continueBlock(nil, error);} else {QCloudSignature *signature = [creator signatureForData:urlRequst];continueBlock(signature, nil);}}];}// 栅栏机制的回调代理中获取密钥- (void)fenceQueue:(QCloudCredentailFenceQueue *)queue requestCreatorWithContinue:(QCloudCredentailFenceQueueContinue)continueBlock {[[[NSURLSession sharedSession]dataTaskWithURL:[NSURL URLWithString:@"http://******"] completionHandler:^(NSData * _Nullable data, NSURLResponse * _Nullable response, NSError * _Nullable error) {// 从业务服务接口请求临时密钥。NSDictionary * dic = [NSJSONSerialization JSONObjectWithData:data options:NSJSONReadingTopLevelDictionaryAssumed error:nil];NSDictionary * credentials = dic[@"credentials"];QCloudCredential *credential = [QCloudCredential new];credential.secretID = credentials[@"tmpSecretId"];credential.secretKey = credentials[@"tmpSecretKey"];;credential.token = credentials[@"sessionToken"];;//签名过期时间credential.expirationDate = nil;credential.startDate = nil;QCloudAuthentationV5Creator *creator = [[QCloudAuthentationV5Creator alloc] initWithCredential:credential];continueBlock(creator, nil);}] resume];}@end
import UIKitimport QCloudCOSXML@mainclass AppDelegate: UIResponder, UIApplicationDelegate, QCloudSignatureProvider, QCloudCredentailFenceQueueDelegate {var window: UIWindow?var credentialFenceQueue: QCloudCredentailFenceQueue!func application(_ application: UIApplication,didFinishLaunchingWithOptions launchOptions:[UIApplication.LaunchOptionsKey: Any]?) -> Bool {// ... SDK 初始化相关的流程此处省略credentialFenceQueue = QCloudCredentailFenceQueue()credentialFenceQueue.delegate = selfreturn true}// MARK: - QCloudSignatureProviderfunc signature(with fileds: QCloudSignatureFields!,request: QCloudBizHTTPRequest!,urlRequest urlRequst: NSMutableURLRequest!,compelete continueBlock: QCloudHTTPAuthentationContinueBlock!) {credentialFenceQueue.performAction { (creator: QCloudAuthentationCreator?, error: Error?) inif let error = error {continueBlock(nil, error)} else if let creator = creator {let signature = creator.signature(for: urlRequst)continueBlock(signature, nil)}}}// MARK: - QCloudCredentailFenceQueueDelegatefunc fenceQueue(_ queue: QCloudCredentailFenceQueue!, requestCreatorWithContinue continueBlock: QCloudCredentailFenceQueueContinue!) {// 构建请求临时密钥的 URL (请替换为您实际的服务器地址)guard let url = URL(string: "http://******") else {// 处理 URL 构造失败let error = NSError(domain: "AppDelegate", code: -1, userInfo: [NSLocalizedDescriptionKey: "Invalid URL for temporary key"])continueBlock(nil, error)return}let task = URLSession.shared.dataTask(with: url) { [weak self] (data, response, error) in// 处理网络错误if let error = error {continueBlock(nil, error)return}// 确保数据存在guard let data = data else {let error = NSError(domain: "AppDelegate", code: -2, userInfo: [NSLocalizedDescriptionKey: "No data received from server"])continueBlock(nil, error)return}do {// 解析 JSON 数据if let json = try JSONSerialization.jsonObject(with: data, options: []) as? [String: Any],let credentials = json["credentials"] as? [String: Any],let tmpSecretId = credentials["tmpSecretId"] as? String,let tmpSecretKey = credentials["tmpSecretKey"] as? String,let sessionToken = credentials["sessionToken"] as? String {// 创建 QCloudCredential 对象并设置临时密钥let credential = QCloudCredential()credential.secretID = tmpSecretIdcredential.secretKey = tmpSecretKeycredential.token = sessionToken// 如果服务器返回了 startTime 和 expiredTime,建议设置// credential.startDate = Date(timeIntervalSince1970: startTime)// credential.expirationDate = Date(timeIntervalSince1970: expiredTime)let creator = QCloudAuthentationV5Creator(credential: credential)continueBlock(creator, nil)} else {// JSON 解析失败或键值缺失let error = NSError(domain: "AppDelegate", code: -3, userInfo: [NSLocalizedDescriptionKey: "Failed to parse temporary key response"])continueBlock(nil, error)}} catch {// JSON 解析异常continueBlock(nil, error)}}task.resume() // 启动网络任务}}
import SwiftUIimport QCloudCOSXML@mainstruct SwiftUIDemoApp: App {init() {// 在应用初始化时调用 SDK 配置COSManager.shared.setupCOSSDK();}var body: some Scene {WindowGroup {ContentView()}}}class COSManager: NSObject, QCloudSignatureProvider, QCloudCredentailFenceQueueDelegate{static let shared = COSManager()private let credentialFenceQueue = QCloudCredentailFenceQueue()private override init() {}func setupCOSSDK() {// ... SDK 初始化相关的流程此处省略credentialFenceQueue.delegate = self}// MARK: - QCloudSignatureProviderfunc signature(with fileds: QCloudSignatureFields!,request: QCloudBizHTTPRequest!,urlRequest urlRequst: NSMutableURLRequest!,compelete continueBlock: QCloudHTTPAuthentationContinueBlock!) {credentialFenceQueue.performAction { (creator: QCloudAuthentationCreator?, error: Error?) inif let error = error {continueBlock(nil, error)} else if let creator = creator {let signature = creator.signature(for: urlRequst)continueBlock(signature, nil)}}}// MARK: - QCloudCredentailFenceQueueDelegatefunc fenceQueue(_ queue: QCloudCredentailFenceQueue!, requestCreatorWithContinue continueBlock: QCloudCredentailFenceQueueContinue!) {// 构建请求临时密钥的 URL (请替换为您实际的服务器地址)guard let url = URL(string: "http://******") else {// 处理 URL 构造失败let error = NSError(domain: "AppDelegate", code: -1, userInfo: [NSLocalizedDescriptionKey: "Invalid URL for temporary key"])continueBlock(nil, error)return}let task = URLSession.shared.dataTask(with: url) { [weak self] (data, response, error) in// 处理网络错误if let error = error {continueBlock(nil, error)return}// 确保数据存在guard let data = data else {let error = NSError(domain: "AppDelegate", code: -2, userInfo: [NSLocalizedDescriptionKey: "No data received from server"])continueBlock(nil, error)return}do {// 解析 JSON 数据if let json = try JSONSerialization.jsonObject(with: data, options: []) as? [String: Any],let credentials = json["credentials"] as? [String: Any],let tmpSecretId = credentials["tmpSecretId"] as? String,let tmpSecretKey = credentials["tmpSecretKey"] as? String,let sessionToken = credentials["sessionToken"] as? String {// 创建 QCloudCredential 对象并设置临时密钥let credential = QCloudCredential()credential.secretID = tmpSecretIdcredential.secretKey = tmpSecretKeycredential.token = sessionToken// 如果服务器返回了 startTime 和 expiredTime,建议设置// credential.startDate = Date(timeIntervalSince1970: startTime)// credential.expirationDate = Date(timeIntervalSince1970: expiredTime)let creator = QCloudAuthentationV5Creator(credential: credential)continueBlock(creator, nil)} else {// JSON 解析失败或键值缺失let error = NSError(domain: "AppDelegate", code: -3, userInfo: [NSLocalizedDescriptionKey: "Failed to parse temporary key response"])continueBlock(nil, error)}} catch {// JSON 解析异常continueBlock(nil, error)}}task.resume() // 启动网络任务}}
//AppDelegate.m//AppDelegate 需遵循 QCloudSignatureProvider@interface AppDelegate()<QCloudSignatureProvider>@end@implementation AppDelegate- (BOOL)application:(UIApplication * )applicationdidFinishLaunchingWithOptions:(NSDictionary * )launchOptions {QCloudServiceConfiguration* configuration = [QCloudServiceConfiguration new];QCloudCOSXMLEndPoint* endpoint = [[QCloudCOSXMLEndPoint alloc] init];// 替换为用户的 region,已创建桶归属的 region 可以在控制台查看,https://console.tencentcloud.com/cos5/bucket// COS 支持的所有 region 列表参见 https://www.qcloud.com/document/product/436/6224endpoint.regionName = @"COS_REGION";// 使用 HTTPSendpoint.useHTTPS = true;configuration.endpoint = endpoint;// 密钥提供者为自己configuration.signatureProvider = self;// 初始化 COS 服务示例[QCloudCOSXMLService registerDefaultCOSXMLWithConfiguration:configuration];[QCloudCOSTransferMangerService registerDefaultCOSTransferMangerWithConfiguration:configuration];return YES;}- (void)signatureWithFields:(QCloudSignatureFields*)filedsrequest:(QCloudBizHTTPRequest*)requesturlRequest:(NSMutableURLRequest*)urlRequstcompelete:(QCloudHTTPAuthentationContinueBlock)continueBlock{// 签名过期时间NSDate *expiration = [[[NSDateFormatter alloc] init]dateFromString:@"expiredTime"];QCloudSignature *signature = [[QCloudSignature alloc] initWithSignature:@"后台计算好的签名" expiration:expiration];signature.token = @"临时密钥Token";// 永久密钥不需要 TokencontinueBlock(signature, nil);}@end
//AppDelegate.swift//AppDelegate 需遵循 QCloudSignatureProviderclass AppDelegate: UIResponder, UIApplicationDelegate,QCloudSignatureProvider {func application(_ application: UIApplication,didFinishLaunchingWithOptions launchOptions:[UIApplication.LaunchOptionsKey: Any]?) -> Bool {let config = QCloudServiceConfiguration.init();let endpoint = QCloudCOSXMLEndPoint.init();// 替换为用户的 region,已创建桶归属的 region 可以在控制台查看,https://console.tencentcloud.com/cos5/bucket// COS 支持的所有 region 列表参见 https://www.qcloud.com/document/product/436/6224endpoint.regionName = "COS_REGION";// 使用 HTTPSendpoint.useHTTPS = true;config.endpoint = endpoint;// 密钥提供者为自己config.signatureProvider = self;// 初始化 COS 服务示例QCloudCOSXMLService.registerDefaultCOSXML(with: config);QCloudCOSTransferMangerService.registerDefaultCOSTransferManger(with: config);return true}func signature(with fileds: QCloudSignatureFields!,request: QCloudBizHTTPRequest!,urlRequest urlRequst: NSMutableURLRequest!,compelete continueBlock: QCloudHTTPAuthentationContinueBlock!) {// 签名过期时间let expiration = DateFormatter().date(from: "expiredTime");let signature = QCloudSignature.init(signature: "后台计算好的签名",expiration: expiration);signature.token = "临时密钥Token";// 永久密钥不需要 TokencontinueBlock(signature,nil);}}
import SwiftUIimport QCloudCOSXML@mainstruct SwiftUIDemoApp: App {init() {// 在应用初始化时调用 SDK 配置COSManager.shared.setupCOSSDK();}var body: some Scene {WindowGroup {ContentView()}}}class COSManager: NSObject, QCloudSignatureProvider {static let shared = COSManager()private override init() {}func setupCOSSDK() {let config = QCloudServiceConfiguration.init();let endpoint = QCloudCOSXMLEndPoint.init();// 替换为用户的 region,已创建桶归属的 region 可以在控制台查看,https://console.tencentcloud.com/cos5/bucket// COS 支持的所有 region 列表参见 https://www.qcloud.com/document/product/436/6224endpoint.regionName = "COS_REGION";// 使用 HTTPSendpoint.useHTTPS = true;config.endpoint = endpoint;config.signatureProvider = self;// 初始化 COS 服务示例QCloudCOSXMLService.registerDefaultCOSXML(with: config);QCloudCOSTransferMangerService.registerDefaultCOSTransferManger(with: config);}// 获取签名的方法入口,这里演示了获取临时密钥并计算签名的过程// 您也可以自定义计算签名的过程func signature(with fileds: QCloudSignatureFields!,request: QCloudBizHTTPRequest!,urlRequest urlRequst: NSMutableURLRequest!,compelete continueBlock: QCloudHTTPAuthentationContinueBlock!) {// 签名过期时间let expiration = DateFormatter().date(from: "expiredTime");let signature = QCloudSignature.init(signature: "后台计算好的签名",expiration: expiration);signature.token = "临时密钥Token";// 永久密钥不需要 TokencontinueBlock(signature,nil);}}
配置域名
SDK 支持自定义域名访问 COS 的相关服务。
使用方式:在“初始化 COS 服务”步骤中,实例化 QCloudCOSXMLEndPoint 时传入指定的域名。
说明:
若业务方中不需要指定自定义源站域名或全球加速域名,则跳过该步骤。
建议使用自定义源站域名或全球加速域名,不推荐使用自定义 CDN 加速域名。CDN 加速域名主要用于加速下载,不适用于加速上传场景。若使用 CDN 加速域名,则没有加速效果。
NSString *customDomain = @"exampledomain.com"; // 自定义源站域名或全球加速域名QCloudCOSXMLEndPoint *endpoint = [[QCloudCOSXMLEndPoint alloc] initWithLiteralURL:[NSURL URLWithString:customDomain]];QCloudServiceConfiguration* configuration = [QCloudServiceConfiguration new];// 替换为用户的 region,已创建桶归属的 region 可以在控制台查看,https://console.tencentcloud.com/cos5/bucket// COS 支持的所有 region 列表参见https://www.qcloud.com/document/product/436/6224// 使用 HTTPSendpoint.regionName = @"COS_REGION";endpoint.useHTTPS = true;configuration.endpoint = endpoint;// 初始化 COS 服务示例[QCloudCOSXMLService registerDefaultCOSXMLWithConfiguration:configuration];[QCloudCOSTransferMangerService registerDefaultCOSTransferMangerWithConfiguration:configuration];
let endpoint = QCloudCOSXMLEndPoint.init(literalURL: NSURL.init(string: "exampledomain.com") as URL?);let config = QCloudServiceConfiguration.init();// 替换为用户的 region,已创建桶归属的 region 可以在控制台查看,https://console.tencentcloud.com/cos5/bucket// COS 支持的所有 region 列表参见https://www.qcloud.com/document/product/436/6224// 使用 HTTPSendpoint.useHTTPS = true;endpoint.regionName = "COS_REGION";config.endpoint = endpoint;// 初始化 COS 服务示例QCloudCOSXMLService.registerDefaultCOSXML(with: config);QCloudCOSTransferMangerService.registerDefaultCOSTransferManger(with: config);
配置并发(可选)
SDK 支持自定义请求并发数。
使用方式:在“初始化 COS 服务”步骤中,自定义并发数以及并发数自增上限。
说明:
SDK 内部请求为多线程并发请求,并发数默认1,并且根据实时网速进行自动增减,最小1,最大4。
// 设置并发数4[QCloudHTTPSessionManager shareClient].customConcurrentCount = 4;// 设置自动上限8[QCloudHTTPSessionManager shareClient].maxConcurrencyTask = 8;
// 设置并发数4QCloudHTTPSessionManager.shareClient.customConcurrentCount = 4;// 设置自动上限8QCloudHTTPSessionManager.shareClient.maxConcurrencyTask = 8;
访问 COS 服务
以文件上传/下载为例介绍如何访问 SDK 的相关服务。
SDK 支持上传本地文件与二进制数据 NSData。下面以上传本地文件为例。
QCloudCOSXMLUploadObjectRequest* put = [QCloudCOSXMLUploadObjectRequest new];// 本地文件路径NSURL* url = [NSURL fileURLWithPath:@"文件的URL"];// 存储桶名称,由 BucketName-Appid 组成,可以在 COS 控制台查看 https://console.tencentcloud.com/cos5/bucketput.bucket = @"examplebucket-1250000000";// 对象键,是对象在 COS 上的完整路径,如果带目录的话,格式为 "video/xxx/movie.mp4"put.object = @"exampleobject";//需要上传的对象内容。可以传入 NSData* 或者 NSURL* 类型的变量put.body = url;//监听上传进度[put setSendProcessBlock:^(int64_t bytesSent,int64_t totalBytesSent,int64_t totalBytesExpectedToSend) {// bytesSent 本次要发送的字节数(一个大文件可能要分多次发送)// totalBytesSent 已发送的字节数// totalBytesExpectedToSend 本次上传要发送的总字节数(即一个文件大小)}];//监听上传结果[put setFinishBlock:^(id outputObject, NSError *error) {//可以从 outputObject 中获取 response 中 etag 或者自定义头部等信息NSDictionary * result = (NSDictionary *)outputObject;}];[[QCloudCOSTransferMangerService defaultCOSTransferManager] UploadObject:put];
let put:QCloudCOSXMLUploadObjectRequest = QCloudCOSXMLUploadObjectRequest<AnyObject>();// 存储桶名称,由 BucketName-Appid 组成,可以在 COS 控制台查看 https://console.tencentcloud.com/cos5/bucketput.bucket = "examplebucket-1250000000";// 对象键,是对象在 COS 上的完整路径,如果带目录的话,格式为 "video/xxx/movie.mp4"put.object = "exampleobject";//需要上传的对象内容。可以传入 NSData* 或者 NSURL* 类型的变量put.body = NSURL.fileURL(withPath: "Local File Path") as AnyObject;//监听上传结果put.setFinish { (result, error) in// 获取上传结果if error != nil{print(error!);}else{print(result!);}}//监听上传进度put.sendProcessBlock = { (bytesSent, totalBytesSent,totalBytesExpectedToSend) in// bytesSent 本次要发送的字节数(一个大文件可能要分多次发送)// totalBytesSent 已发送的字节数// totalBytesExpectedToSend 本次上传要发送的总字节数(即一个文件大小)};//设置上传参数put.initMultipleUploadFinishBlock = {(multipleUploadInitResult, resumeData) in//在初始化分块上传完成以后会回调该 block,在这里可以获取 resumeData//并且可以通过 resumeData 生成一个分块上传的请求let resumeUploadRequest = QCloudCOSXMLUploadObjectRequest<AnyObject>.init(request: resumeData as Data?);}QCloudCOSTransferMangerService.defaultCOSTransferManager().uploadObject(put);
QCloudCOSXMLDownloadObjectRequest * request = [QCloudCOSXMLDownloadObjectRequest new];// 存储桶名称,由 BucketName-Appid 组成,可以在 COS 控制台查看 https://console.tencentcloud.com/cos5/bucketrequest.bucket = @"examplebucket-1250000000";// 对象键,是对象在 COS 上的完整路径,如果带目录的话,格式为 "video/xxx/movie.mp4"request.object = @"exampleobject";//设置下载的路径 URL,如果设置了,文件将会被下载到指定路径中request.downloadingURL = [NSURL fileURLWithPath:@"Local File Path"];//监听下载结果[request setFinishBlock:^(id outputObject, NSError *error) {//outputObject 包含所有的响应 http 头部NSDictionary* info = (NSDictionary *) outputObject;}];//监听下载进度[request setDownProcessBlock:^(int64_t bytesDownload,int64_t totalBytesDownload,int64_t totalBytesExpectedToDownload) {// bytesDownload 本次要下载的字节数(一个大文件可能要分多次发送)// totalBytesDownload 已下载的字节数// totalBytesExpectedToDownload 本次要下载的总字节数(即一个文件大小)}];[[QCloudCOSTransferMangerService defaultCOSTransferManager] DownloadObject:request];
let request : QCloudCOSXMLDownloadObjectRequest = QCloudCOSXMLDownloadObjectRequest();// 存储桶名称,由 BucketName-Appid 组成,可以在 COS 控制台查看 https://console.tencentcloud.com/cos5/bucketrequest.bucket = "examplebucket-1250000000";// 对象键request.object = "exampleobject";//设置下载的路径 URL,如果设置了,文件将会被下载到指定路径中request.downloadingURL = NSURL.fileURL(withPath: "Local File Path") as URL?;//监听下载进度request.downProcessBlock = { (bytesDownload, totalBytesDownload,totalBytesExpectedToDownload) in// bytesDownload 本次要下载的字节数(一个大文件可能要分多次发送)// totalBytesDownload 已下载的字节数// totalBytesExpectedToDownload 本次要下载的总字节数(即一个文件大小)}//监听下载结果request.finishBlock = { (copyResult, error) inif error != nil{print(error!);}else{print(copyResult!);}}QCloudCOSTransferMangerService.defaultCOSTransferManager().downloadObject(request);
说明:
更多完整示例,请前往 GitHub 查看。
上传之后,您可以用同样的 Key 生成文件下载链接,具体使用方法请参见 生成预签名链接 文档。但注意如果您的文件是私有读权限,那么下载链接只有一定的有效期。
常见问题
文档反馈