Autonomy Center
Download
Focus Mode
Font Size
The autonomy center of TencentDB for DBbrain (DBbrain) provides the automatic scale-out capability for Tencent Cloud Distributed Cache instances. It allows automatic scale-out based on configured policies, such as average memory utilization and scale-out specifications, to cope with constantly changing business requirements.
Automatic scale-out helps the system dynamically adapt to changes in business load to improve availability and scalability. It effectively guarantees Tencent Cloud Distributed Cache system performance and stability, reduces manual intervention and Ops costs, and maximizes resource utilization.
Supported Region
Guangzhou, Shenzhen, Shenzhen Finance, Shanghai, Nanjing, Shanghai Finance, Beijing, Tianjin, Beijing Finance, Chengdu, Chongqing, Hong Kong (China), Taipei (China), Singapore, Seoul, Tokyo, Bangkok, Jakarta, Silicon Valley, Virginia, São Paulo, Frankfurt
Use Limits
If the current instance specification reaches the upper limit for scale-out, the scale-out still fails even if the average memory utilization is equal to or greater than the set value and the duration exceeds the set value of the observation window.
When a task is running on instances, the scale-out operation still cannot be performed even if the scale-out conditions are met, resulting in an automatic scale-out failure.
Precautions
During instance configuration adjustment, 1 or 2 momentary disconnections lasting less than 30 seconds will occur, and the instance will be in the read-only status for less than 1 minute. During vertical scale-out, cross-instance will be performed by migrating data to another instance if the local instance has insufficient resources. This may lead to performance jitter caused by psync and data migration. For details, see Changing Instance Specifications.
The instance specification will not be automatically downgraded to the original specification after scale-out. You can subscribe to downgrade suggestions and manually perform specification downgrade in a timely manner.
Prerequisite
The operating user configuring the database autonomous task must have the DBBRAIN_QCSLinkedRoleInRedisAutonomy role.
Configuring Database Autonomy Tasks
1. Log in to the DBbrain console.
2. In the left sidebar, select Performance Optimization.
3. Select a database and an Instance ID at the top of the page, and click the Autonomy Center tab.
4. Click Autonomy Configuration in the upper right corner of the page.
5. Click Notification Settings in the upper right corner of the autonomy configuration page.
Note:
After event notification configuration is completed, recipients can receive the corresponding notifications via the configured channels within the specified time period when an automatic scale-out task starts execution. The notification frequency is the same as the set autonomy event sending frequency.
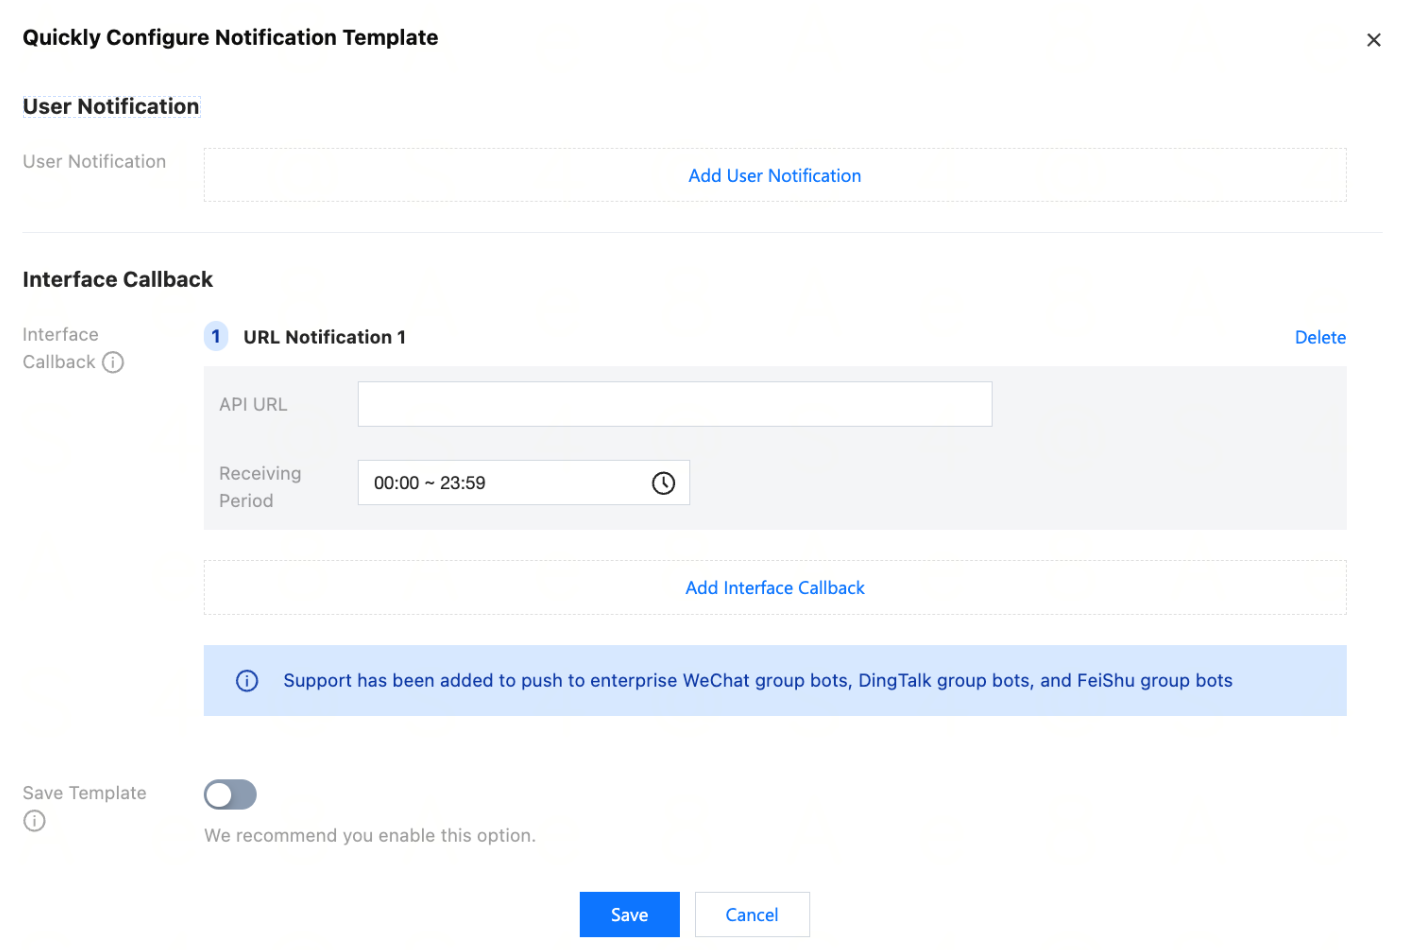
5.1 Modify the sending frequency of automatic scale-out autonomy events and the event notification template on the event notification page, and then click Save.
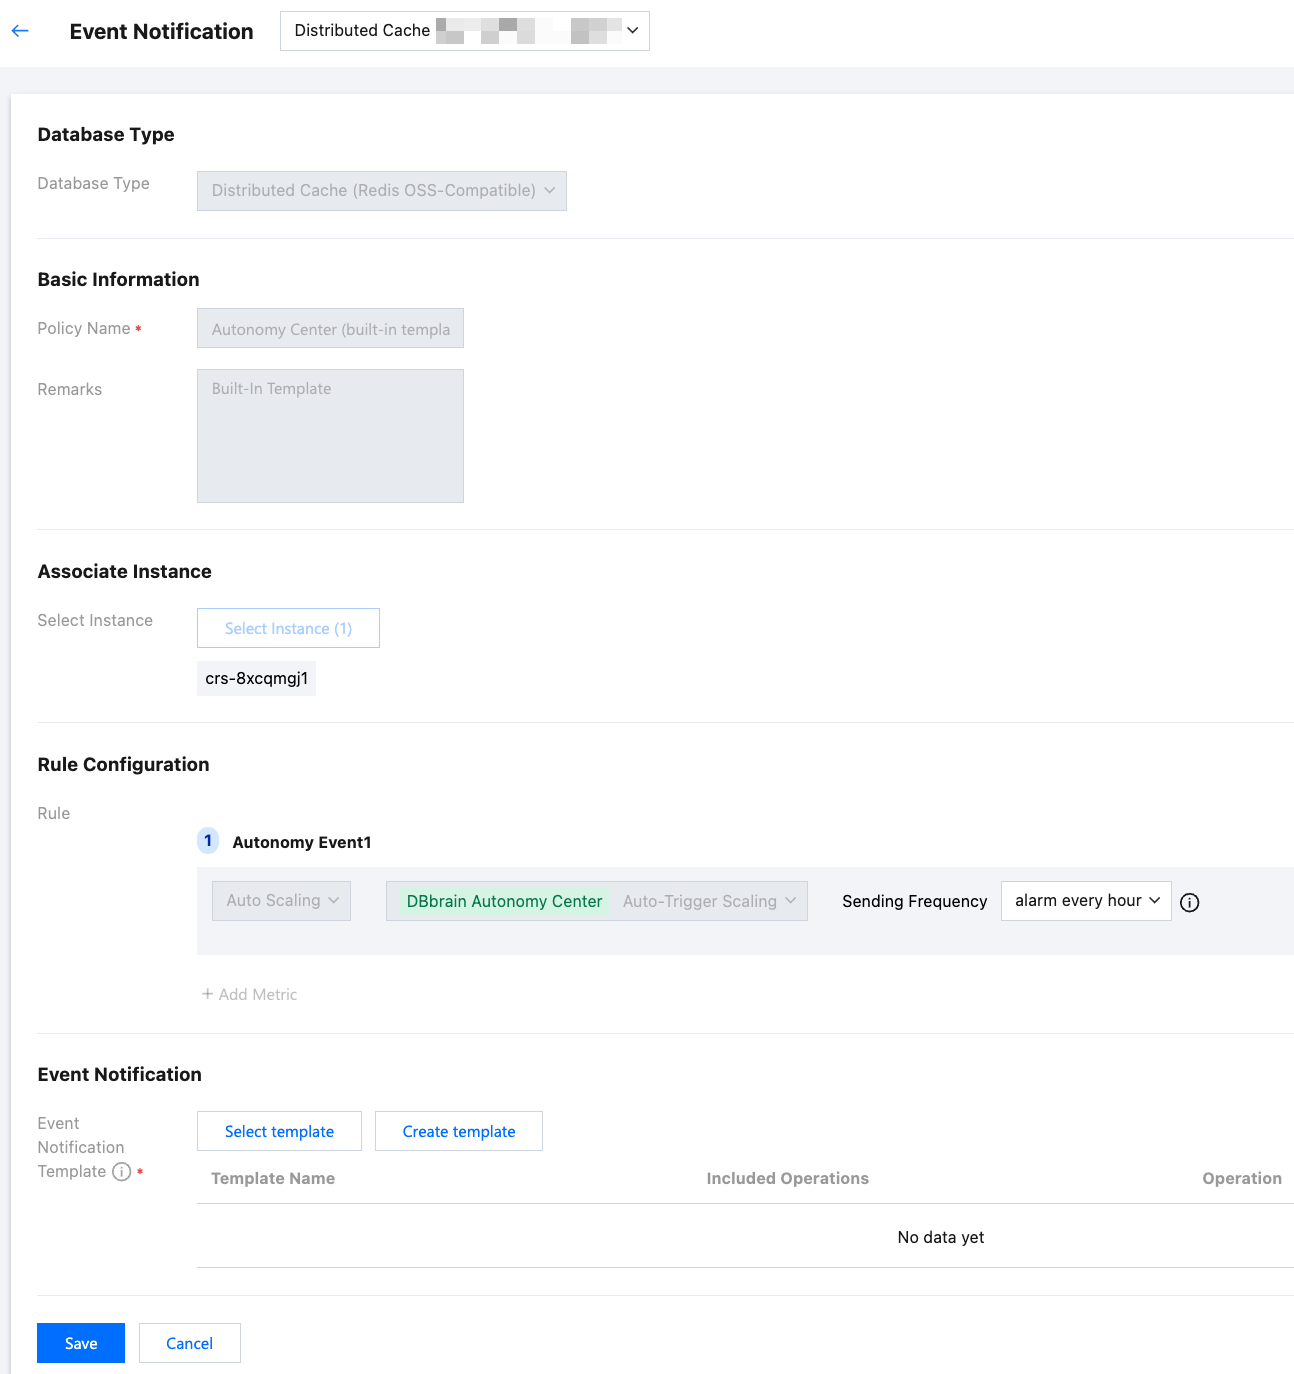
For instructions and operations of event notification policy configuration, see Creating an Event Notification Policy.
5.2 After the event notification configuration is saved successfully, the policy list will show the newly created autonomy policy and enable it by default.
6. Click the button of Automatic Scaling and set parameters.
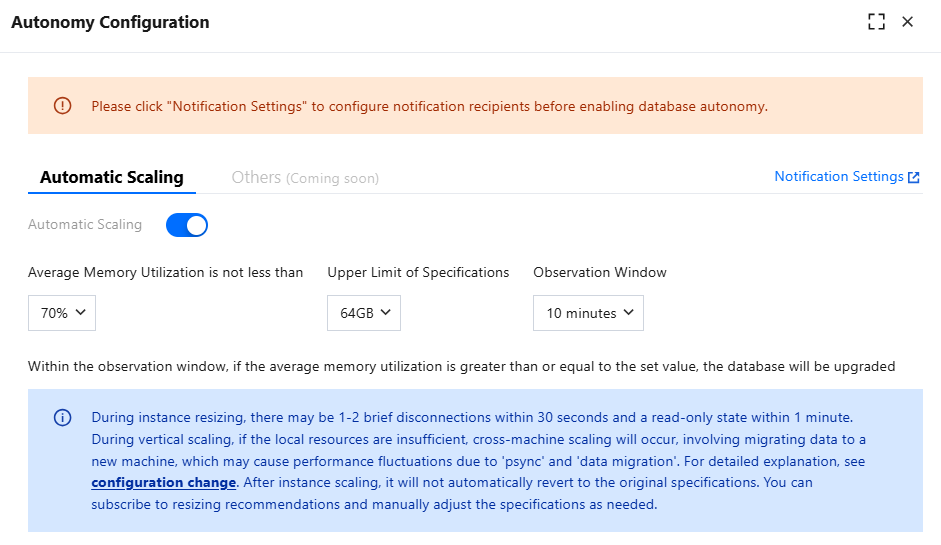
Average Memory Utilization is not less than: 50%, 60%, 70%, 80%, and 90% are supported.
Upper Limit of Specifications: 256 MB, 512 MB, 1 GB, 2 GB, 4 GB, 8 GB, 12 GB, 16 GB, 20 GB, 24 GB, 32 GB, 40 GB, 48 GB, and 64 GB are supported. It indicates the upper limit of the instance memory supported for scale-out.
Observation Window: 10 minutes, 15 minutes, 20 minutes, 25 minutes, and 30 minutes are supported.
7. Click Save.
If the average memory utilization is equal to or greater than the set value and the duration exceeds the set value of the observation window, the database configuration will be upgraded. The upper limit of the specification indicates that the instance can be scaled out to this limit.
Viewing Autonomy Tasks and Autonomy Events
1. Log in to the DBbrain console.
2. In the left sidebar, select Performance Optimization.
3. Select a database and an Instance ID at the top of the page, and click the Autonomy Center tab.
4. Select a time range. Last 24 hours, last 3 days, last 1 week, and custom time ranges are supported.
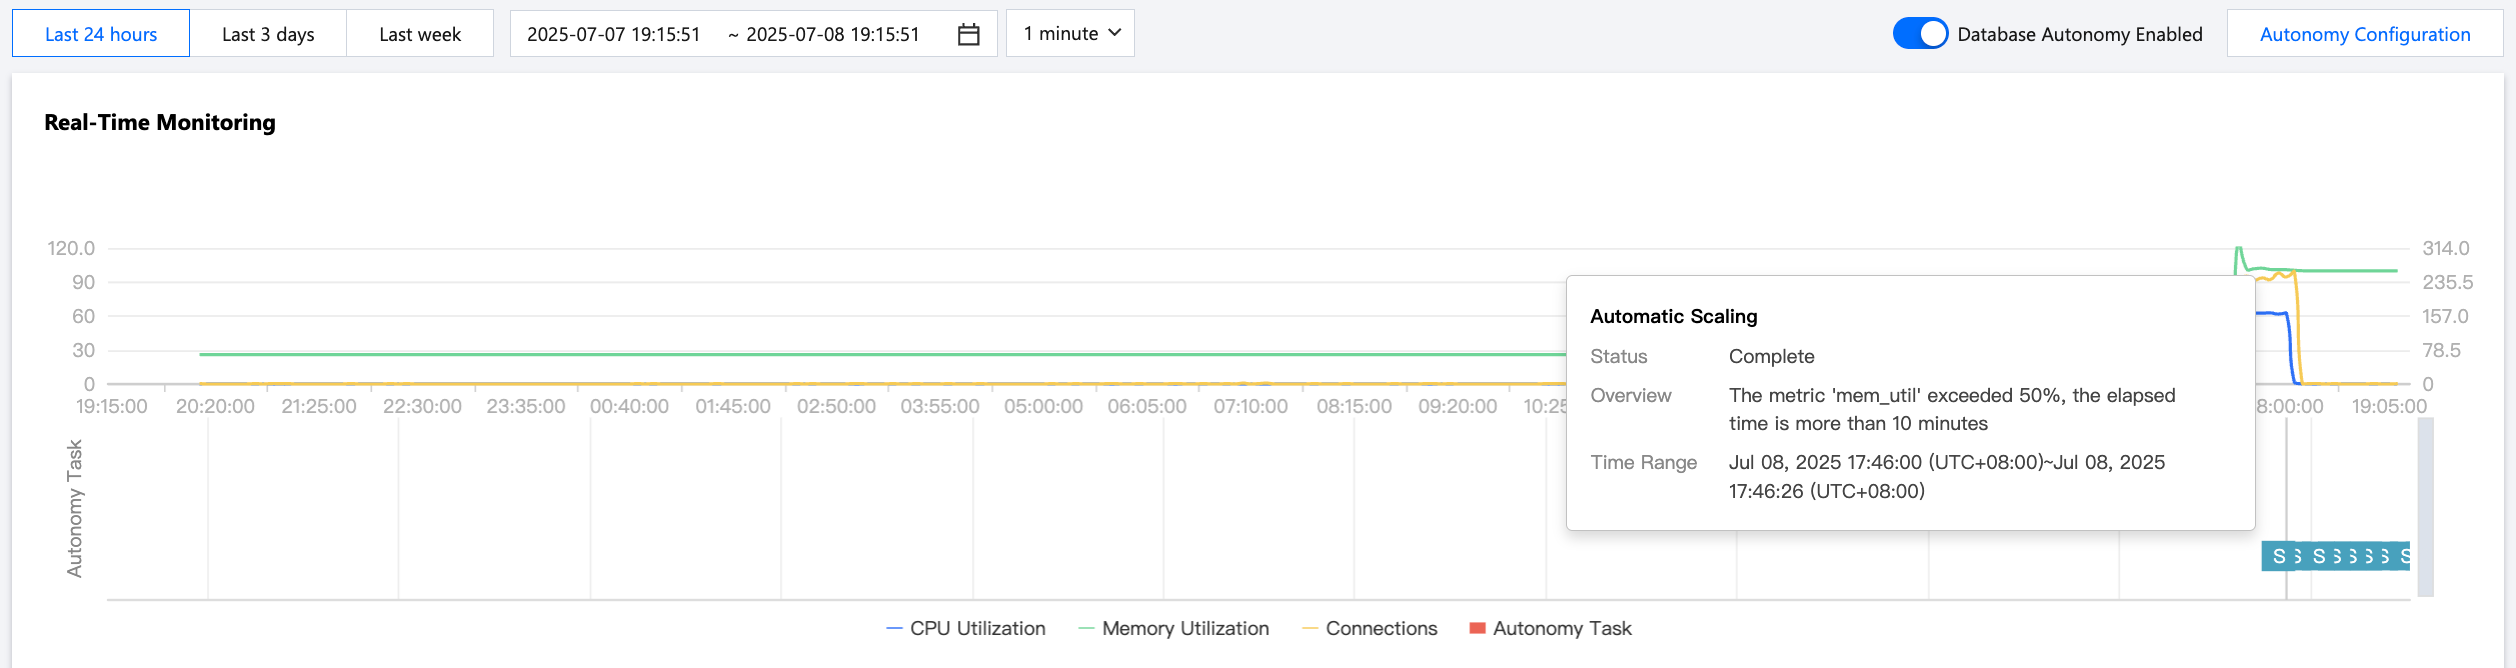
5. View the real-time monitoring trend chart, autonomy tasks, and the event list within the time range.
View the real-time monitoring trend chart
Click any time point in the trend chart to display the metric values of the CPU utilization, memory utilization, and number of connections at this time point.
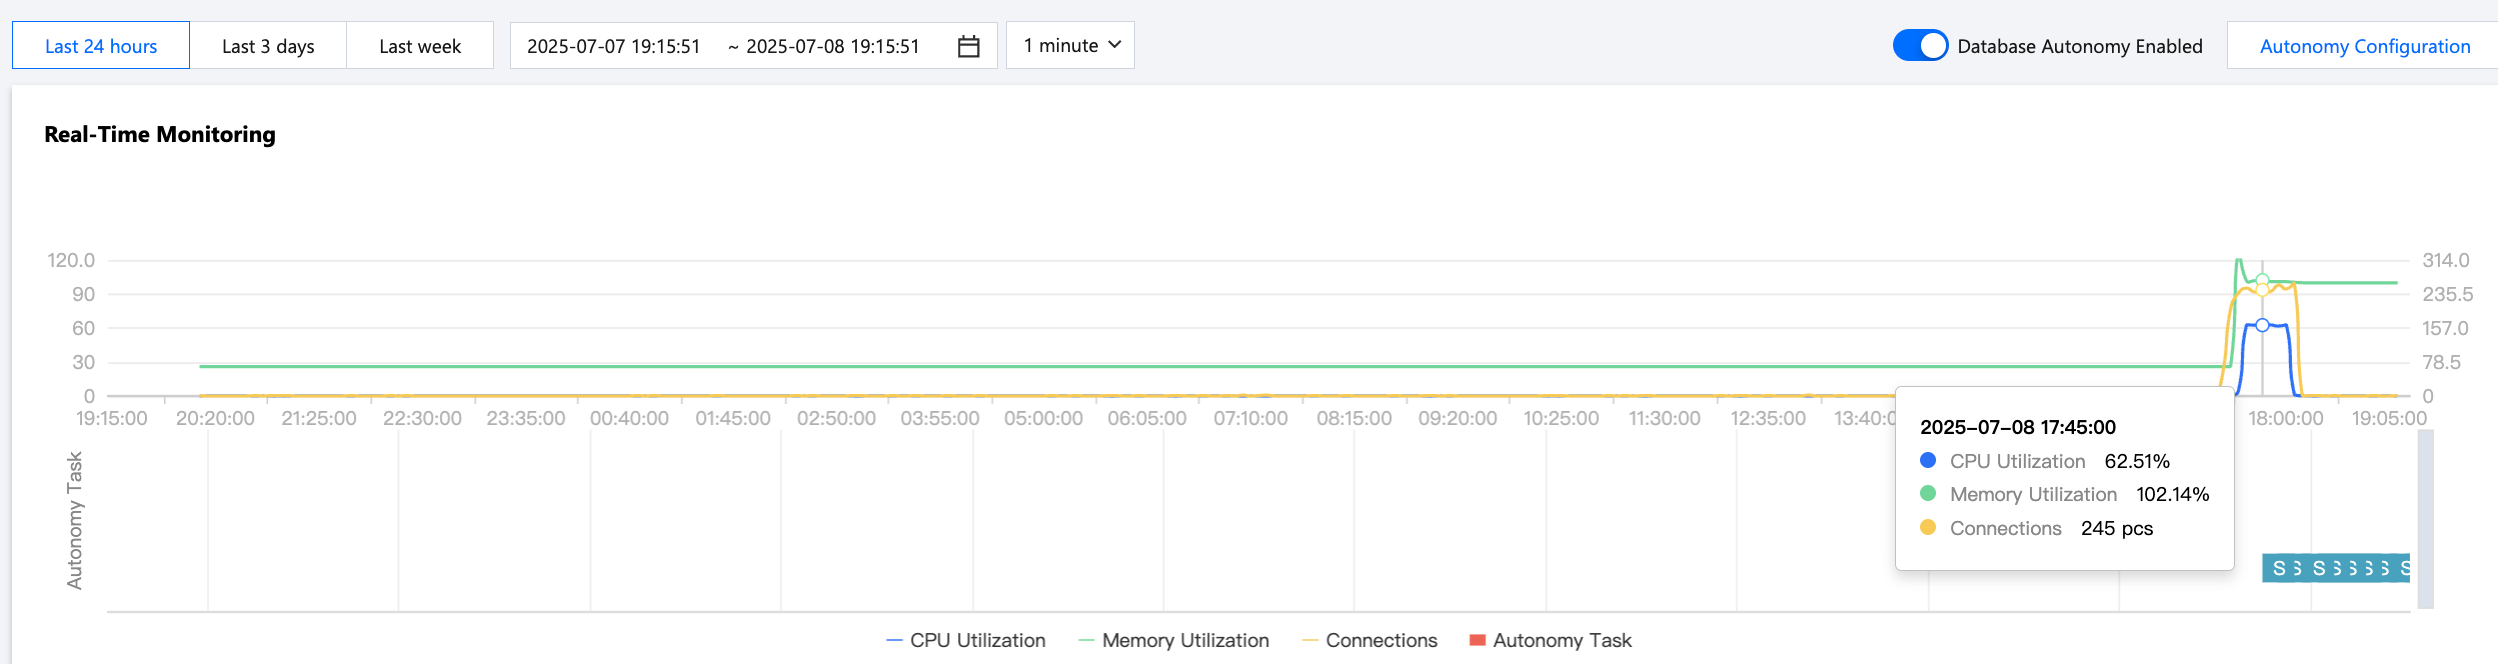
View the autonomy task bar chart
Hover over the autonomy task bar chart to display the status, summary, start/end time, and other information. You can click the bar chart to go to the autonomy task details page and view the task details, timeline, and task history backtracking information.
View autonomy events
View the list of triggered autonomy events, including the autonomy event policy status and the start time, task type, task status (running, completed, or terminated), and end time of corresponding events.

The autonomy event list also supports the following operations:
Terminate autonomy events in one click: Click Terminate, and then click OK in the pop-up dialog box to terminate the autonomy tasks.
View autonomy event details: Click Details in the operation column to view the task details, timeline, and task history backtracking information.
6. View the autonomy event details.
Click the autonomy task bar chart or click Details in the operation column of an autonomy event to access the autonomy event details page.
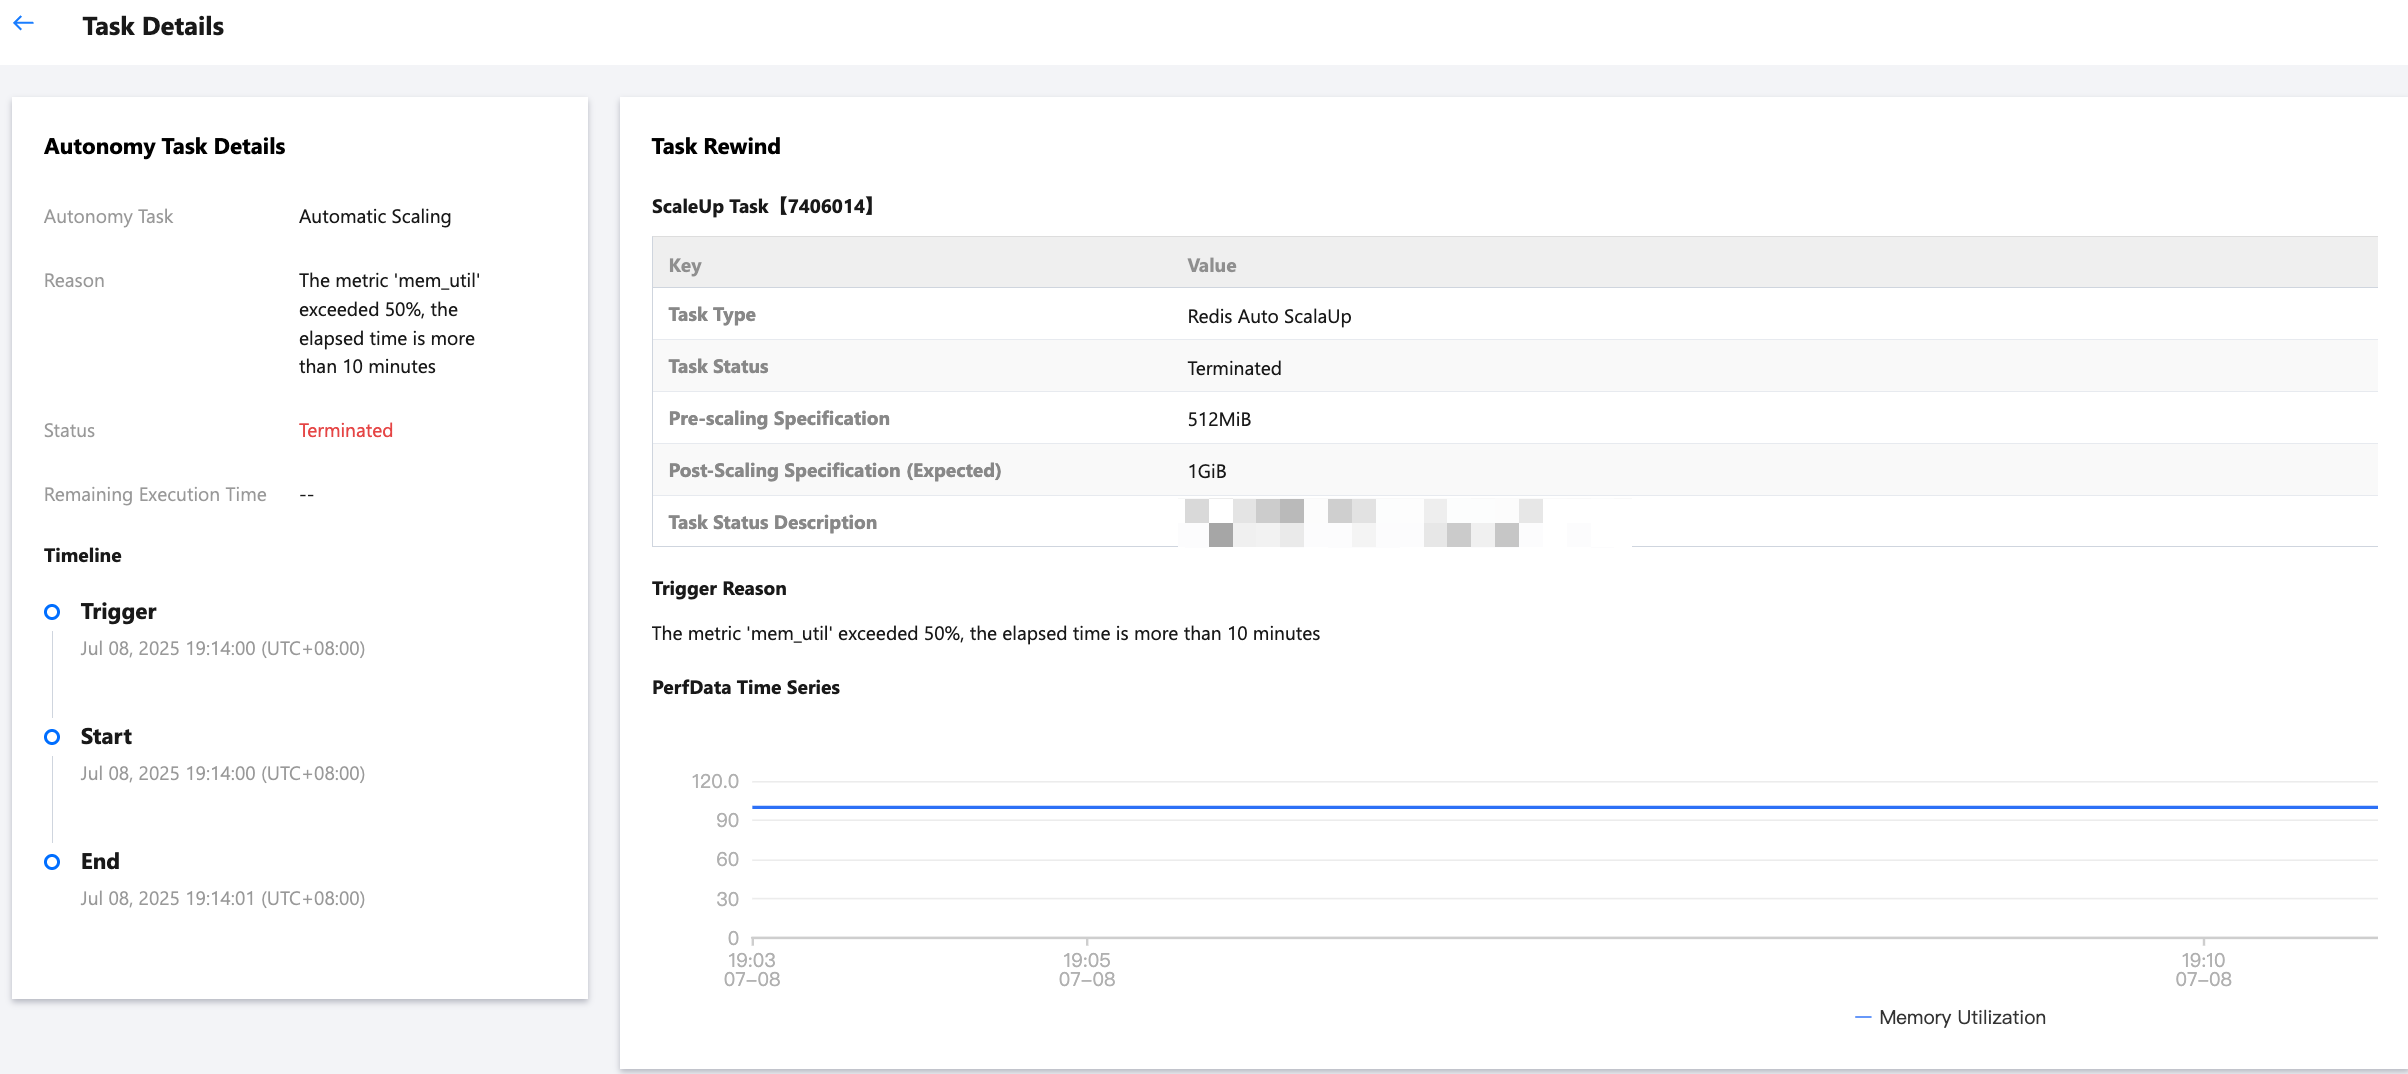
Autonomy Task Details: Name, event trigger cause, event status, and remaining execution time of an autonomy task (automatic scale-out only currently).
Timeline: Event trigger time, event execution start time, and event execution end time.
Task Rewind
Scaleup Task: Task type, task status, and specification before scale-out.
Trigger Reason: Cause for triggering automatic scale-out.
PerfData Time series: Displays the memory utilization trend chart.
Terminating or Disable Autonomy Tasks
1. Log in to the DBbrain console.
2. In the left sidebar, select Performance Optimization.
3. Select a database and an Instance ID at the top of the page, and click the Autonomy Center tab.
4. Terminate autonomy tasks in the following ways. The differences and operations are shown in the table below.
Note:
Disabling an autonomy task will disable the running autonomy event as well. Operate with caution.
Autonomy Task Disabling Type | Operation |
Disable all autonomy tasks of the current instance | 1. Click the button next to Under database autonomy in the upper right corner of the page.  2. In the pop-up dialog box, click OK. 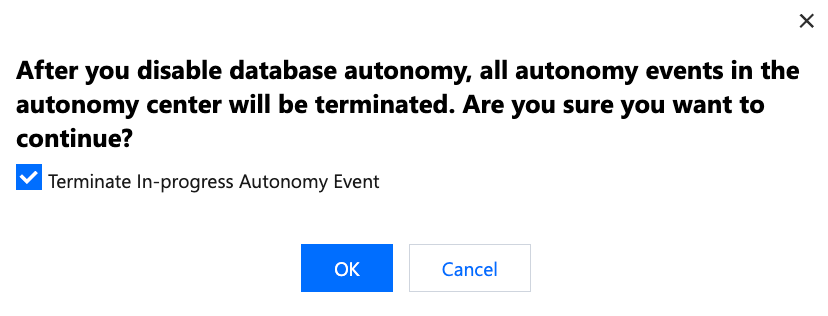 |
Disable automatic scale-out autonomy tasks of the current instance | Click Autonomy Configuration in the upper right corner of the page, click the automatic scale-out button in the pop-up dialog box on the right, and click Save.  |
Terminate a single autonomy event of the current instance | Click Terminate in the Event/Timeline area, and click OK in the pop-up dialog box. 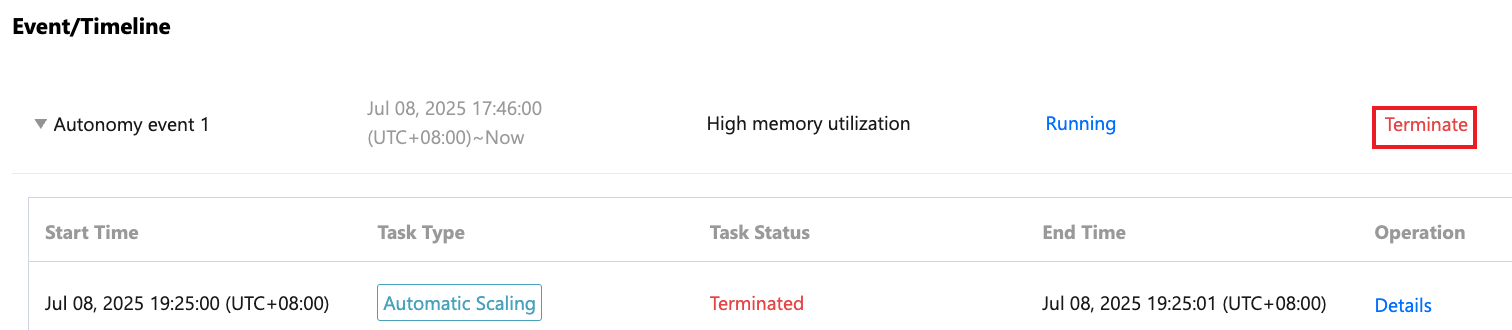 |
Help and Support
Was this page helpful?
You can also Contact sales or Submit a Ticket for help.
Help us improve! Rate your documentation experience in 5 mins.
Feedback