Two-way authentication refers to the mutual authentication between the client and the server.MQTT uses server certificates and client CA certificates to complete the authentication of the server and the client, ensuring a secure and reliable communication link between the client and the server.
Client authentication of the server is performed using the server certificate. MQTT provides a default server certificate, and you can also use your own certificate for authentication.
Server authentication of the client is performed using the CA certificate. When the client initiates a connection request, it passes the client certificate to the server. The server verifies the validity of the client certificate based on the CA certificate registered in advance by the client. If the verification passes, the client is allowed to connect to the server.
Restrictions and Limitations
The maximum number of server certificates in a single cluster is 3.
The maximum number of CA certificates that can be registered in a single cluster is 32.
Must-Knows
When initially using or replacing CA certificates or server certificates from SSL Certificates, you need to use the root account to authorize the service role MQTT_QCSLinkedRoleInSendSSLcertificate to obtain the feature of downloading and applying SSL Certificates.
If you replace the server certificate and CA certificate in the console, the corresponding clients need to update their certificates to avoid authentication errors caused by inconsistent updates between the server and client certificates. To ensure a smooth certificate transition, TDMQ for MQTT provides an approximately ten-minute grace period after certificate modification. During this period, both old and new certificates will pass authentication. Please replace the old certificates in the client code as soon as possible.
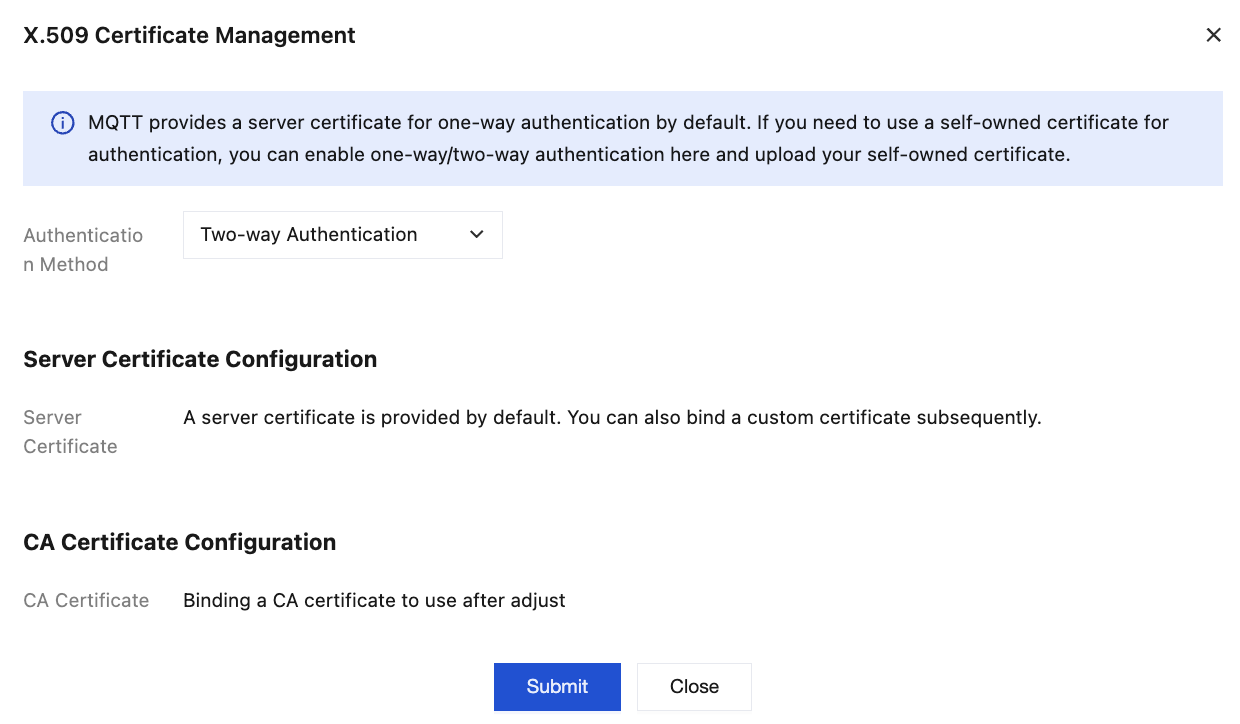
Enable Two-Way Authentication
2. In the left sidebar, click Resource > Cluster. Select a region, and click the ID of the cluster for which you want to configure a certificate, to go to the cluster basic information page.
3. On the basic information page, select Authentication, under the secondary tab, select X.509 Certificate Management, click the edit icon on the right , and complete the certificate configuration in the pop-up window. Authentication Method: Select the appropriate authentication method based on your business needs. By default, both one-way authentication and two-way authentication are supported. Pro Edition/Platinum Edition clusters additionally support the one-device-one-certificate mode (which is essentially a specialized form of two-way authentication. For specific usage, see One-Device-One-Certificate). Server Certificate Configuration: The default server certificate provided by MQTT will be used. Subsequently, you can also bind a custom certificate.
CA Certificate: If two-way authentication is selected, you need to configure a CA certificate for server authentication of the client.
4. Click Submit to complete the configuration of the authentication method. You will need to configure the relevant certificates subsequently.
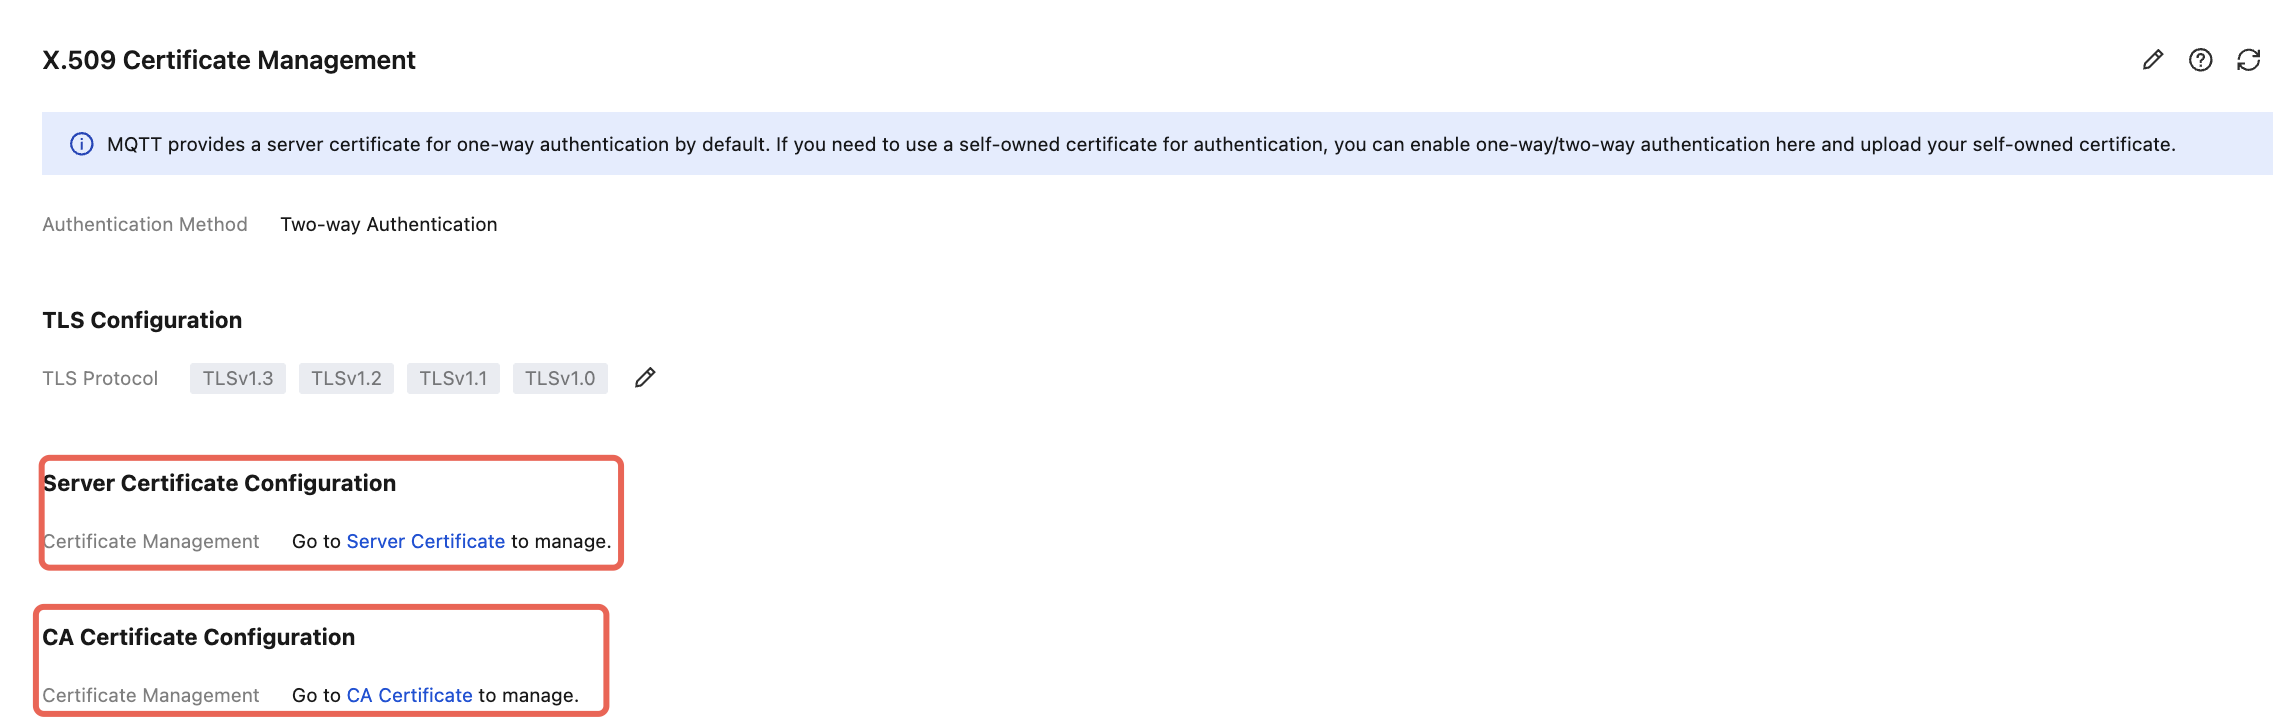
Server Certificate: Used for client authentication of the server. You can use the default server certificate provided by MQTT or bind a custom certificate.
CA Certificate: Used for server authentication of the client and needs to be manually configured.
Configuring a Server Certificate
Step 1: Hosting a Server Certificate
Step 2: Binding the Server Certificate
2. In the left sidebar, choose Resource > Cluster, select a region, and click the ID of the target cluster, to go to the cluster basic information page.
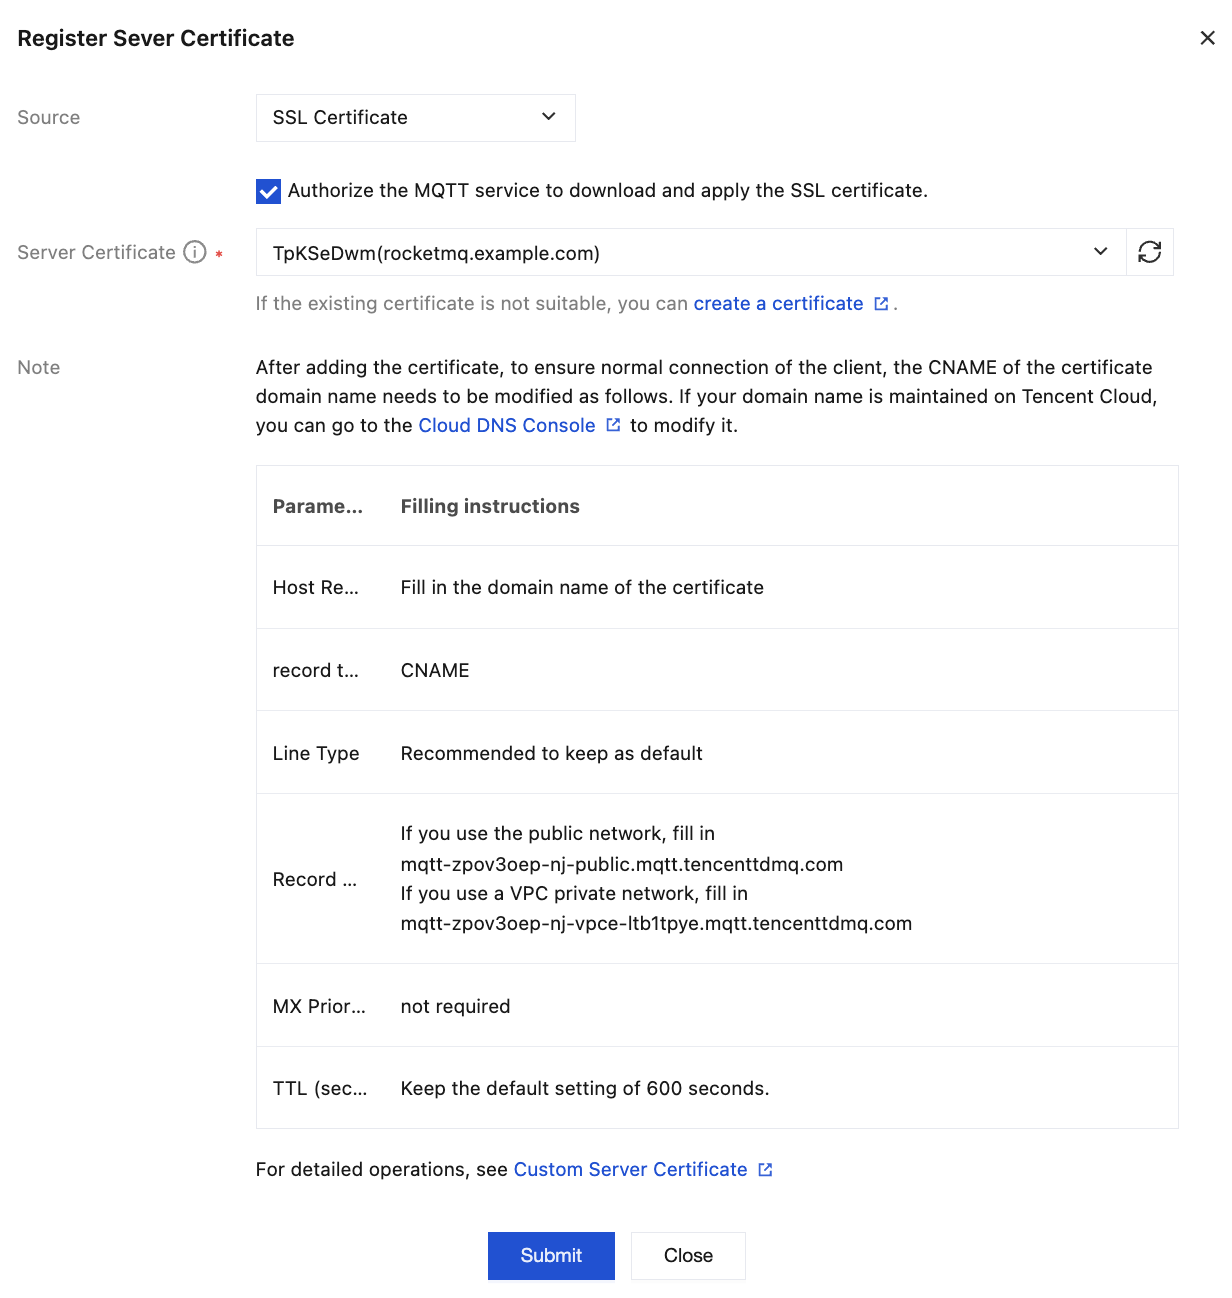
3. On the cluster details page, select the Server Certificate tab, and click Bind Custom Certificate in the top-left corner.
Source: Select SSL Certificates.
Server Certificate: In the drop-down box, select the SSL Certificates hosted in Tencent Cloud.
4. Click Submit to complete the binding.
Note:
Multiple custom certificates can be configured based on the default server certificate. The current maximum number of custom server certificates is 3.
Clusters support using multiple server certificates for authentication when one-way/two-way authentication is enabled.
Step 3: Configuring a Custom Domain Name
After the certificate is added, to ensure normal client connections, the CNAME configuration for the certificate domain name must be modified accordingly. If your domain name is managed on Tencent Cloud, you can go to the DNS Resolution console to modify it. |
Host record | Enter the domain name for the certificate in use. |
Record type | CNAME |
Record value | If using a public network, enter -. If using a VPC private network, enter mqtt-xxxx-nj-vpce-xxx.mqtt.tencenttdmq.com. |
MX priority | Not required |
TTL (seconds) | It is recommended to retain the default value of 600s. |
Assume the selected server certificate Subject Alternative Name contains the following domain name: mqtt-abc.compay.com.
Refer to Cloud DNS - CNAME Record to create a CNAME record that resolves mqtt-abc.compay.com to the domain name provided by the cluster's access point: mqtt-xxx-sh-public.mqtt.tencenttdmq.com. Subsequently, the cluster can be accessed via mqtt-abc.company.com. Disabling a Default Server Certificate
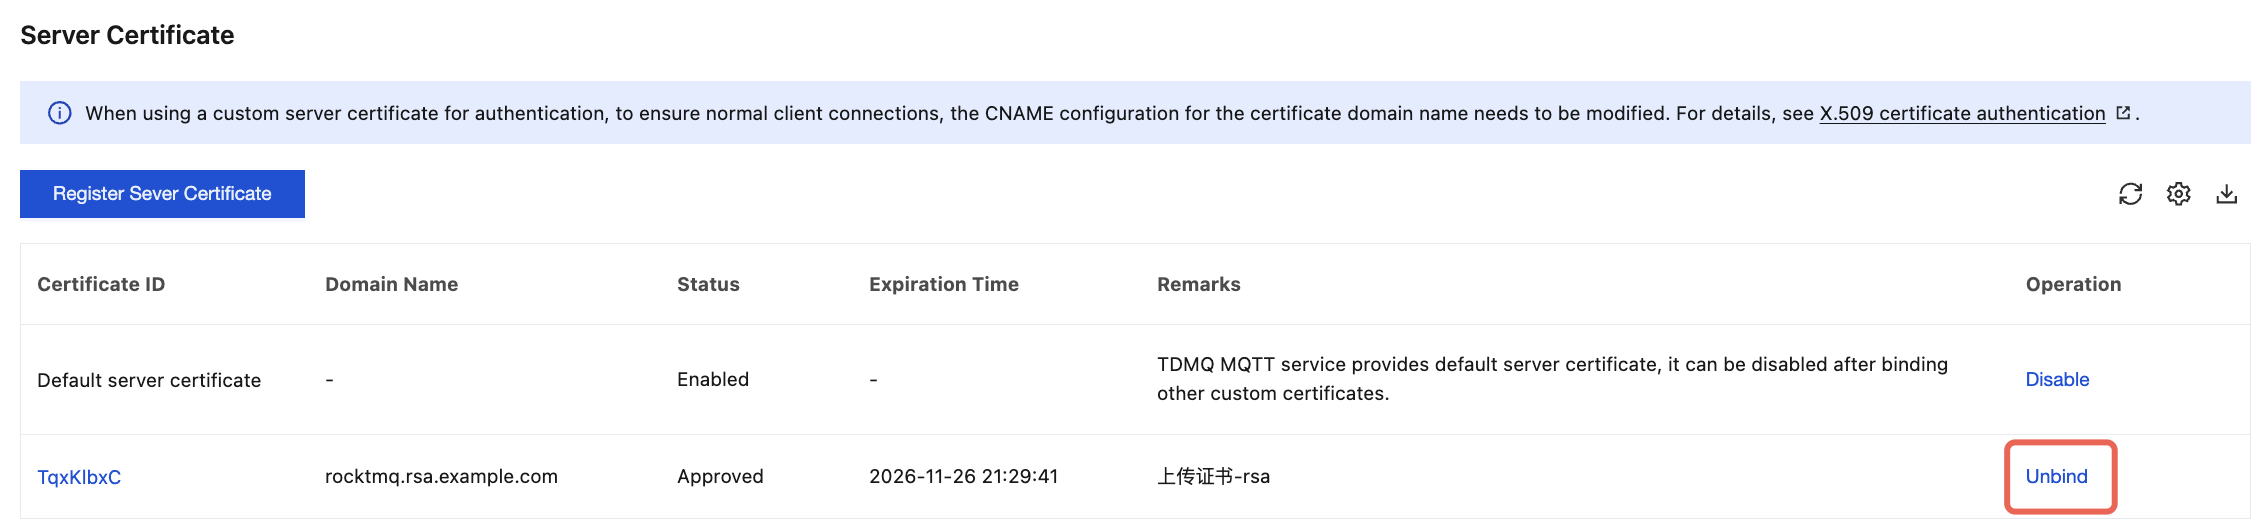
After a custom certificate is bound, you can disable the default server certificate provided by TDMQ for MQTT. The specific steps are as follows:
On the server certificate management page, click Disable in the operation column of the default server certificate. After confirmation in the pop-up window, the default certificate can be disabled.
Unbinding a Custom Certificate
If you no longer need the configured custom certificate, you can unbind it. After unbinding, you cannot connect via the domain name associated with the certificate.
Configuring a CA Certificate
Step 1: Hosting a CA Certificate
Step 2: Binding the CA Certificate
2. In the left sidebar, choose Resource > Cluster, select a region, and click the ID of the target cluster, to go to the cluster basic information page.
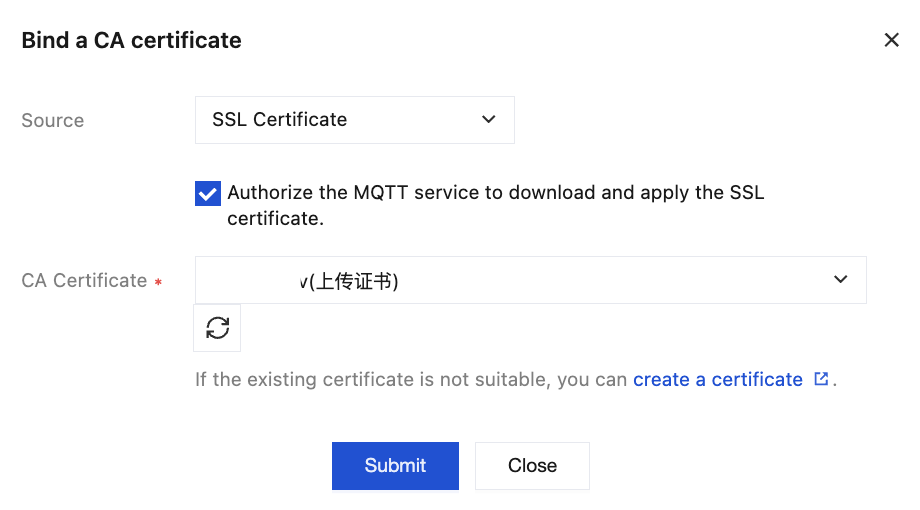
3. On the cluster details page, select the CA Certificate tab, and click Bind CA certificate in the top-left corner.
Source: Select SSL Certificates. You need to grant MQTT service access to download and apply SSL certificates.
CA Certificate: In the drop-down box, select the SSL Certificates hosted in Tencent Cloud.
4. Click Submit to complete the binding.
Unbinding a Certificate
If you no longer need the configured CA certificate, you can unbind it. After unbinding, you cannot connect via the certificate.
Configuring a TLS Version (Optional)
If certain devices or SDKs in your cluster only support specific versions of the TLS protocol, causing handshake failures and connection issues with the default server, you can adjust the supported TLS protocol version range on the server using the TLS Configuration feature. This enables both communication parties to negotiate a mutually recognized protocol version, resolving compatibility issues caused by version mismatches and ensuring all components successfully establish secure connections to maintain cluster communication stability.
Note:
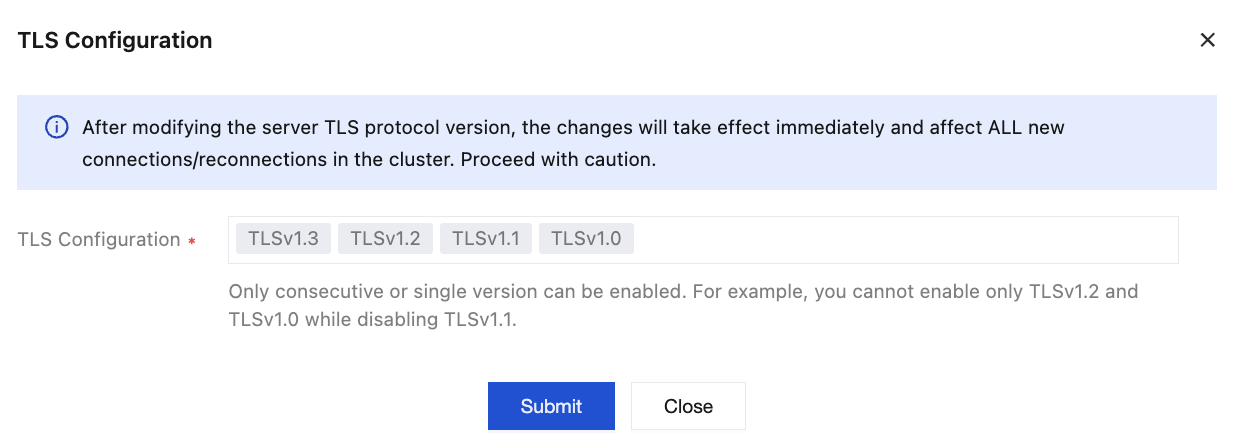
Upon modification, the TLS protocol version supported by the server takes effect immediately and affects all newly connected/reconnected clients under the cluster. Please exercise caution.
The server supports all versions from TLS 1.0 to TLS 1.3 by default. If modification is required, refer to the following configuration steps:
1. Go to Cluster > Authentication, choose the X.509 Certificate Management sub-tab, and click the edit icon on the right side of . 2. In the pop-up window, select the supported TLS version range. Since the TLS protocol only supports enabling consecutive versions or a single version, the configuration modification method is as follows:
To enable consecutive versions (such as TLS 1.1 and TLS 1.2): First select one version as the "Minimum Version", then select another version as the "Maximum Version", and click Submit to submit the configuration.
To enable only a single version (such as TLS 1.2 only): Double-click the version, then click Submit to submit the configuration.