従来型CLBクイックスタート
最終更新日:2024-01-04 17:48:23
従来型CLBクイックスタート
最終更新日: 2024-01-04 17:48:23
Tencent Cloudの従来型CLBを初めて使用する場合についての説明:
clb-testという名前で、従来型のパブリックネットワークCLBインスタンスを作成し、クライアントからのリクエストをバックエンドの2台のCVMに転送します。前提条件
1. CLBはトラフィックの転送のみをサポートしており、リクエストの処理機能はありません。そのため、ユーザーのリクエストを処理するためのCVMインスタンスが必要になります。
ここでの事例では、2台のCVMインスタンスを用意するだけです。また、自らCVMの数を計画することができます。この例では、すでに広州リージョンでCVMインスタンス
rs-1およびrs-2を作成しています。CVMインスタンスの作成方法については、CVMインスタンスの購入と起動をご参照ください。2. ここではHTTP転送を例としており、CVMで、Apache、Nginx、IISなどの対応するWebサーバーをデプロイする必要があります。
結果を検証するため、事例では
rs-1にApacheをデプロイし、「Hello Tomcat! This is rs-1!」と付いたHTMLを返し、また、rs-2にApacheをデプロイし、「Hello Tomcat! This is rs-2!」と付いたHTMLを返します。その他のCVMによるデプロイの内容については、Linux(CentOS)におけるJava WebのデプロイおよびWindowsにおけるPHPのインストールと設定をご参照ください。3. CVMのパブリックネットワーク IP+パスにアクセスし、表示された結果がデプロイ済みのページであった場合は、サービスのデプロイに成功したことを示しています。
ご注意:
従来型アカウントタイプのCVMでは、パブリックネットワーク帯域幅を購入する必要があります。現在の帯域幅の属性が、CLBではなく、CVMにあるためです。アカウントタイプがわからない場合は、アカウントタイプをご参照ください。
この例では、バックエンドサーバーにデプロイされたサービスによって戻り値が異なります。実際の状況では、ユーザー体験の一致性を維持するため、通常バックエンドサーバーには完全に同一のサービスをデプロイします。
従来型CLBインスタンスの購入
1. Tencent CloudのCLBサービス購入ページにログインします。
2. この例では、リージョンはCVMと同じく広州を選択し、インスタンスタイプは従来型を選択し、ネットワークの属性はパブリックネットワークを選択し、ネットワークはDefault-VPC(デフォルト)を選択して、インスタンス名に「clb-test」を入力します。
3. 今すぐ購入をクリックして、支払いを完了させます。関連するCLBインスタンスのその他の内容については、製品属性の選択をご参照ください。
4. 「CLBインスタンスリスト」ページで対応するリージョンを選択すると、新規作成したインスタンスを確認することができます。


CLBリスナーの作成
CLBリスナーはプロトコルとポートを指定して実際の転送を行います。ここでは、CLBがクライアントのHTTPリクエストを転送する設定の例を挙げます。
1. CLBコンソールにログインします。
2. 「CLBインスタンスリスト」で、作成済みの従来型CLBインスタンスの
clb-testを見つけ、インスタンスIDをクリックしてCLBの詳細ページに進みます。3. 「基本情報」の部分では、名前の後ろにある編集をクリックし、インスタンス名を変更することができます。
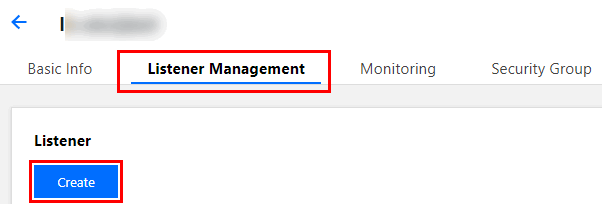
4. 「リスナー管理」のリスナーで、新規作成をクリックし、CLBリスナーを新規作成します。


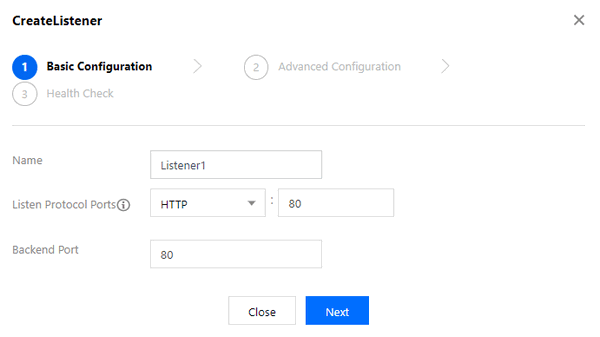
5. ポップアップボックスで以下の内容を設定します。
名前を「Listener1」にカスタマイズします。
リスニングプロトコルポートを
HTTP:80にします。バックエンドポートを
80にします。バランシング方式は、「重み付けラウンドロビン」を選択します。
セッション維持にはチェックを入れません。
ヘルスチェックをオンにします。


6. 完了をクリックすると、CLBリスナーの作成が完了します。
バックエンドCVMのバインド
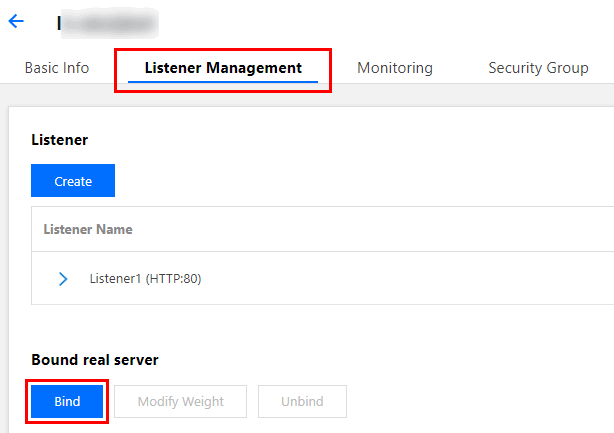
1. 「CLBインスタンスリスト」で、先ほど作成した
clb-testを見つけ、そのIDをクリックし、CLBの詳細ページに進みます。2. 「リスナー管理」の「バックエンドサービスのバインド」モジュールで、バインドをクリックします。

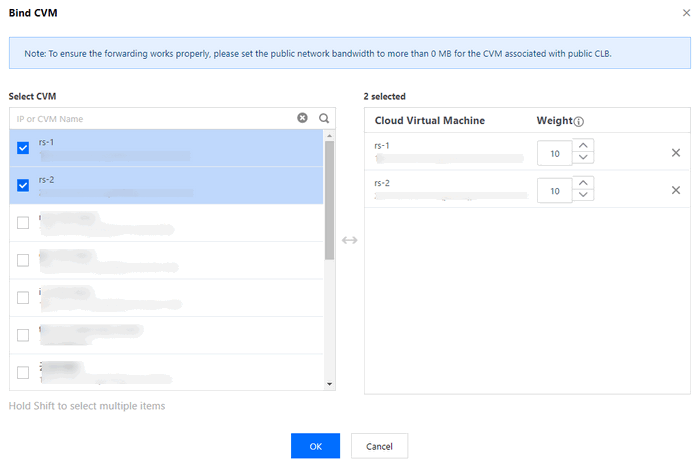
3. ポップアップボックスで、CLBと同じリージョンのCVMインスタンスの
rs-1とrs-2を選択します。重みは、すべてデフォルト値の「10」に設定します。4. 確定をクリックし、バインドを完了します。

5. リスナーのListener1を展開すると、バックエンドCVMのヘルスチェックステータスを確認することができます。ステータスが「健康」となっていれば、CLBが転送したリクエストを、CVMが正常に処理できることを表しています。
セキュリティグループの設定
CLBの作成完了後、CLBのセキュリティグループを設定して、パブリックネットワークトラフィックを分離することができます。詳細については、セキュリティグループの設定をご参照ください。
セキュリティグループの設定完了後、セキュリティグループのデフォルト許可を有効にするか無効にするかを選択できます。それぞれを選択する場合の設定は次のようになります。
方法1:セキュリティグループのデフォルト許可を有効にする
説明:
現在、この機能はベータ版テスト段階です。この機能を体験したい場合は、ベータ版テスト申請を送信してください。従来型プライベートネットワークCLBは、セキュリティグループのデフォルト許可機能をサポートしていません。
方法2:CVMセキュリティグループ上でクライアントIPを許可する
CLBサービスの検証
1. ブラウザにCLBのサービスアドレスとポート
http://vip:80を入力し、CLBサービスをテストすることができます。下図に示すとおり、今回のリクエストは、CLBによってrs-1のCVMに転送され、CVMがリクエストを正常に処理して返します。

2. このリスナーのラウンドロビンアルゴリズムは、「重み付けによるラウンドロビン」で、2台のCVMの重みは、すべて「10」です。ブラウザを更新して再度リクエストを送信すると、今回のリクエストが、CLBによってrs-2のCVMに転送されたことを確認することができます。


注意:
ユーザーがセッション維持機能を無効化し、ラウンドロビン方式を選択してスケジューリングを行うと、リクエストは順番に異なるバックエンドサーバーに分配されます。
ユーザーがセッション維持機能を有効化するか、またはセッション維持機能を無効化してもip_hashのスケジューリング方式を選択した場合は、リクエストは引き続き同一のバックエンドサーバーに分配されます。
フィードバック