tencent cloud

Feedback

Connecting to TencentDB for MongoDB Instance

Last updated: 2024-04-02 17:14:33
    After a TencentDB for MongoDB instance is created, you can read, write, and query it by using either MongoDB shell or drivers in various programming languages.

    Basic Process

    Using MongoDB shell

    MongoDB shell is an interactive JavaScript command line tool that comes with MongoDB and encapsulates many common commands. After installing MongoDB shell on a CVM instance, you can run shell commands to connect to the MongoDB instance and query, write/read, or update database data.
    Note:
    A CVM instance can be used to connect to the private network address that is automatically assigned to a TencentDB instance. This access method utilizes the high-speed private network of Tencent Cloud and features low delay. Both instances should be under the same account and reside in the same VPC in the same region or reside in the classic network. Public network access is not supported for the time being.

    Using URI

    A Uniform Resource Identifier (URI) uniquely identifies a resource on the Web. MongoDB recommends using URIs to connect to MongoDB databases, which is supported by most drivers.
    Typical samples of URI connection are as follows:
    mongodb://username:password@IP:27017/admin
    mongodb://username:password@IP:27017/somedb?authSource=admin
    mongodb://username:password@IP:27017/somedb?authSource=admin&readPreference=secondaryPreferred
    URI components are described as follows. For more information, see the Connection Strings section in the MongoDB official documentation.
    Component
    Description
    Required
    mongodb://
    A specific string indicating MongoDB protocol
    Yes
    username
    Username used to log in to MongoDB
    Yes. For more information, see Default user.
    password
    Password used to log in to MongoDB
    Yes
    hostX:portX
    MongoDB IP and port
    Yes
    /admin
    Database to be authenticated, which is always admin for TencentDB for MongoDB.
    Yes. For more information, see Authentication database.
    authMechanism=MONGODB-CR
    Authentication mechanism
    Yes. For more information, see Authentication mechanism.
    authSource=admin
    Database used for authentication, which is always admin for TencentDB for MongoDB.
    Yes. For more information, see Authentication database.
    readPreference=secondaryPreferred
    Read a secondary node first
    Yes. For more information, see Read preference.

    Connecting to Databases Using Shell

    The following describes how to connect to databases using MongoDB shell.

    Prerequisites

    You have signed up for a Tencent Cloud account and completed identity verification as instructed in Signing Up and Identity Verification Guide respectively.
    You have created a Linux CVM instance in the same VPC and the same region as the TencentDB for MongoDB instance.
    You have created a TencentDB for MongoDB instance, and it is in Running status.
    You have obtained the username and password information for database instance access on the Account Management tab on the Database Management page. For detailed directions, see Account Management.
    You have obtained the private IP and port for database instance access in the Instance List. For detailed directions, see Viewing Instance Details.

    Directions

    Step 1. Log in to the CVM instance

    1. Log in to the CVM console.
    2. On the left sidebar, select Instances.
    3. Select a region at the top of the instance management page.
    4. In the instance list, locate the CVM instance you created and click Log In in the Operation column.
    5. Enter the user password you set when creating the CVM instance and log in.

    Step 2. Download and decompress MongoDB shell

    1. Go to the MongoDB shell installation directory and run the mkdir command to create a folder for easy management.
    2. Go to the created folder and run the wget command to download MongoDB shell, as shown below:
    wget https://fastdl.mongodb.org/linux/mongodb-linux-x86_64-rhel70-XX.XX.XX.tgz
    Note:
    Select a MongoDB shell whose version matches both TencentDB for MongoDB and the CVM operating system. For more information, see the Download section in the MongoDB official website.
    3. Run the tar command to decompress the downloaded installer of MongoDB shell, as shown below:
    tar zxvf mongodb-linux-x86_64-rhel70-XX.XX.XX.tgz

    Step 3. Connect to MongoDB

    1. Run the cd command to enter the directory of the decompressed MongoDB shell, as shown below:
    cd mongodb-linux-x86_64-rhel70-XX.XX.XX
    2. Run the following command to connect to MongoDB.
    ./bin/mongo -umongouser -plxh***** 172.xx.xx.xx:27017/admin
    Here, -u is followed by the database connection username, -p is followed by the username password, and 172.xx.xx.xx and 27017 specify the IP address and port of the primary or secondary node of the TencentDB for MongoDB instance respectively. Replace them with your actual configuration information.
    If you forgot the username and password, view and change the account and password as instructed in Account Management.
    You can get the IP addressand port of the primary or secondary node of the instance on the Node Management tab.
    For multiple IP access, you can configure them by separating each IP address with a comma, such as --host 172.XX.XX.XX:27017,172.XX.XX.XX:27017,172.30.XX.XX:27017.
    After a successful connection, the following information will be displayed. For more information, see Shell Connection Sample.
    MongoDB shell version v4.2.16
    connecting to: mongodb://172.x.x.X:27017/admin?compressors=disabled&gssapiServiceName=mongodb
    Implicit session: session { "id" : UUID("aeb18f32-6413-49da-864a-5123b4d2****") }
    MongoDB server version: 4.2.11
    Welcome to the MongoDB shell.
    Note:
    For a replica set instance, you can connect to the address of the primary node, secondary node 1, or secondary node 2.
    Primary node: If you connect to the primary node, you can write to, and read data from the database.
    Secondary node: If you connect to a secondary node, you can only read from the database.
    For a sharded cluster instance, you can connect to any mongos node.

    ‌Connecting to Databases Using URI

    The following describes how to use URIs to connect to TencentDB for MongoDB from the SDK client which supports various programing languages.

    Prerequisites

    You have signed up for a Tencent Cloud account and completed identity verification as instructed in Signing Up and Identity Verification Guide respectively.
    You have prepared a running environment for the SDK client which supports various programing languages.
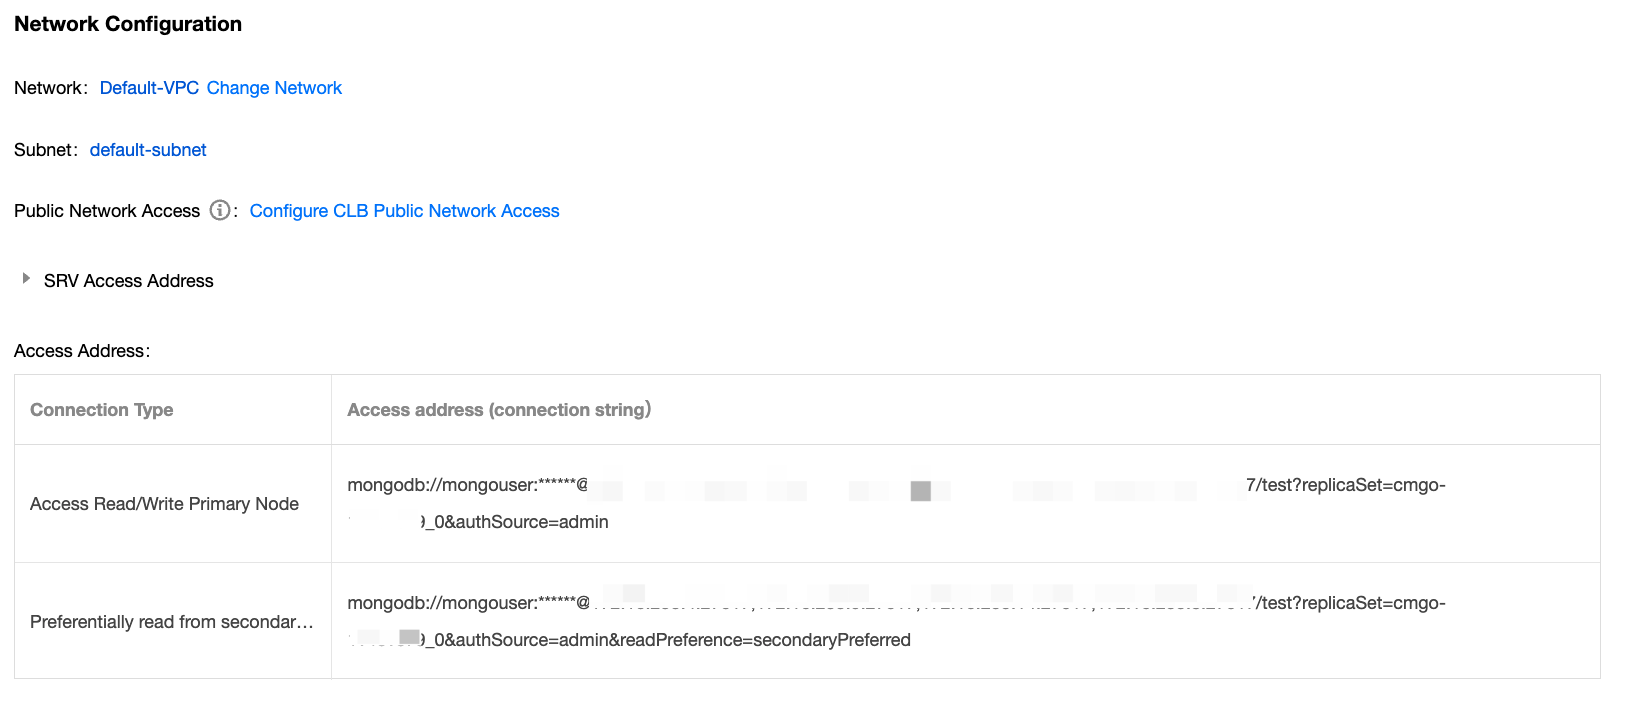
    You have obtained the URI encoded connection string: Log in to the TencentDB for MongoDB console, find the target instance in the instance list, enter its Instance Details page, and copy the string in Access Address in the Network Configuration section.
    

    Connection sample

    To connect to TencentDB for MongoDB, the driver version 3.2 or later is required. Use the latest version of the client driver to ensure the best compatibility with the shell kit, Java jar package, PHP expansion, Node.js module, etc. For more information, see MongoDB Drivers. SDK connection samples in various programing languages supported by TencentDB for MongoDB are listed below. Based on those samples, you can configure URIs to connect to, write to, or read from the database.

    References

    Default user

    TencentDB for MongoDB 3.2 uses both mongouser and rwuser as the default users, while other versions only use mongouser as the default user. On the Database Management page in the TencentDB for MongoDB console, you can view system accounts (i.e., default users) and manage permissions as needed.
    Only rwuser is authenticated with MONGODB-CR. Below is a sample URI:
    mongodb://rwuser:password@10.66.100.186:27017/admin?authMechanism=MONGODB-CR
    mongodb://rwuser:password@10.66.100.186:27017/somedb?authMechanism=MONGODB-CR&authSource=admin
    Both mongouser and users created in the TencentDB for MongoDB console are authenticated with SCRAM-SHA-1. Below is a sample URI:
    mongodb://mongouser:password@10.66.100.186:27017/admin
    mongodb://mongouser:password@10.66.100.186:27017/somedb?authSource=admin

    Authentication database

    TencentDB for MongoDB uses the admin database as the authentication database during login authentication, so the port in a URI must be followed by /admin to specify it. After authentication, you can switch to a specific business database for reads/writes. Below is a sample URI:
    mongodb://username:password@IP:27017/admin
    You can also directly access the target database by specifying the target database for reads/writes and an additional authentication database parameter (authSource=admin). Below is a sample URI:
    mongodb://username:password@IP:27017/somedb?authSource=admin
    Note:
    The authentication database for users created in the console is the admin database, so the users need to specify admin as the authentication database during login. The users created with the command line, such as those created under the test database, need to specify test as the authentication database.
    You must use one of the above methods to add admin as the authentication database into the URI.

    Authentication mechanism

    TencentDB for MongoDB supports the MONGODB-CR and SCRAM-SHA-1 authentication mechanisms as well as the rwuser and mongouser default users. You can create other users in the TencentDB for MongoDB console. Different users adopt different authentication mechanisms.
    Username
    Authentication mechanism
    URI Processing
    rwuser
    MONGODB-CR
    The parameter authMechanism=MONGODB-CR must be added.
    mongouser and users created in the console
    SCRAM-SHA-1 (recommended)
    No parameter needs to be added.

    Read preference

    TencentDB for MongoDB provides a load balancer IP to access the entire replica set. To read from a secondary node, you need to add the readPreference parameter in the URI. Parameter values are described below:
    Value
    Description
    Default
    primary
    Reads the primary node only.
    Yes
    primaryPreferred
    Reads the primary node first. If it is not available, a secondary node will be read.
    No
    secondary
    Reads a secondary node only. If it is not available, an error will be reported.
    No
    secondaryPreferred
    Reads a secondary node first. If it is not available, the primary node will be read.
    No
    To read a secondary node first, you can configure the URI as follows:
    mongodb://username:password@IP:27017/admin?readPreference=secondaryPreferred
    
    Contact Us

    Contact our sales team or business advisors to help your business.

    Technical Support

    Open a ticket if you're looking for further assistance. Our Ticket is 7x24 avaliable.

    7x24 Phone Support