Instructions
Download
Focus Mode
Font Size
This document describes how to activate and use the memory compression feature based on native nodes.
Environment preparations
The memory compression feature requires updating the kernel of the native node image to the latest version (5.4.241-19-0017), which can be achieved using the following methods:
Adding Native Nodes
1. Log in to the Tencent Kubernetes Engine Console, and choose Cluster from the left navigation bar.
2. In the cluster list, click on the desired cluster ID to access its details page.
3. Choose Node Management > Worker Nodes, select the Node Pool tab, and click Create.
4. Select native nodes, and click Create.
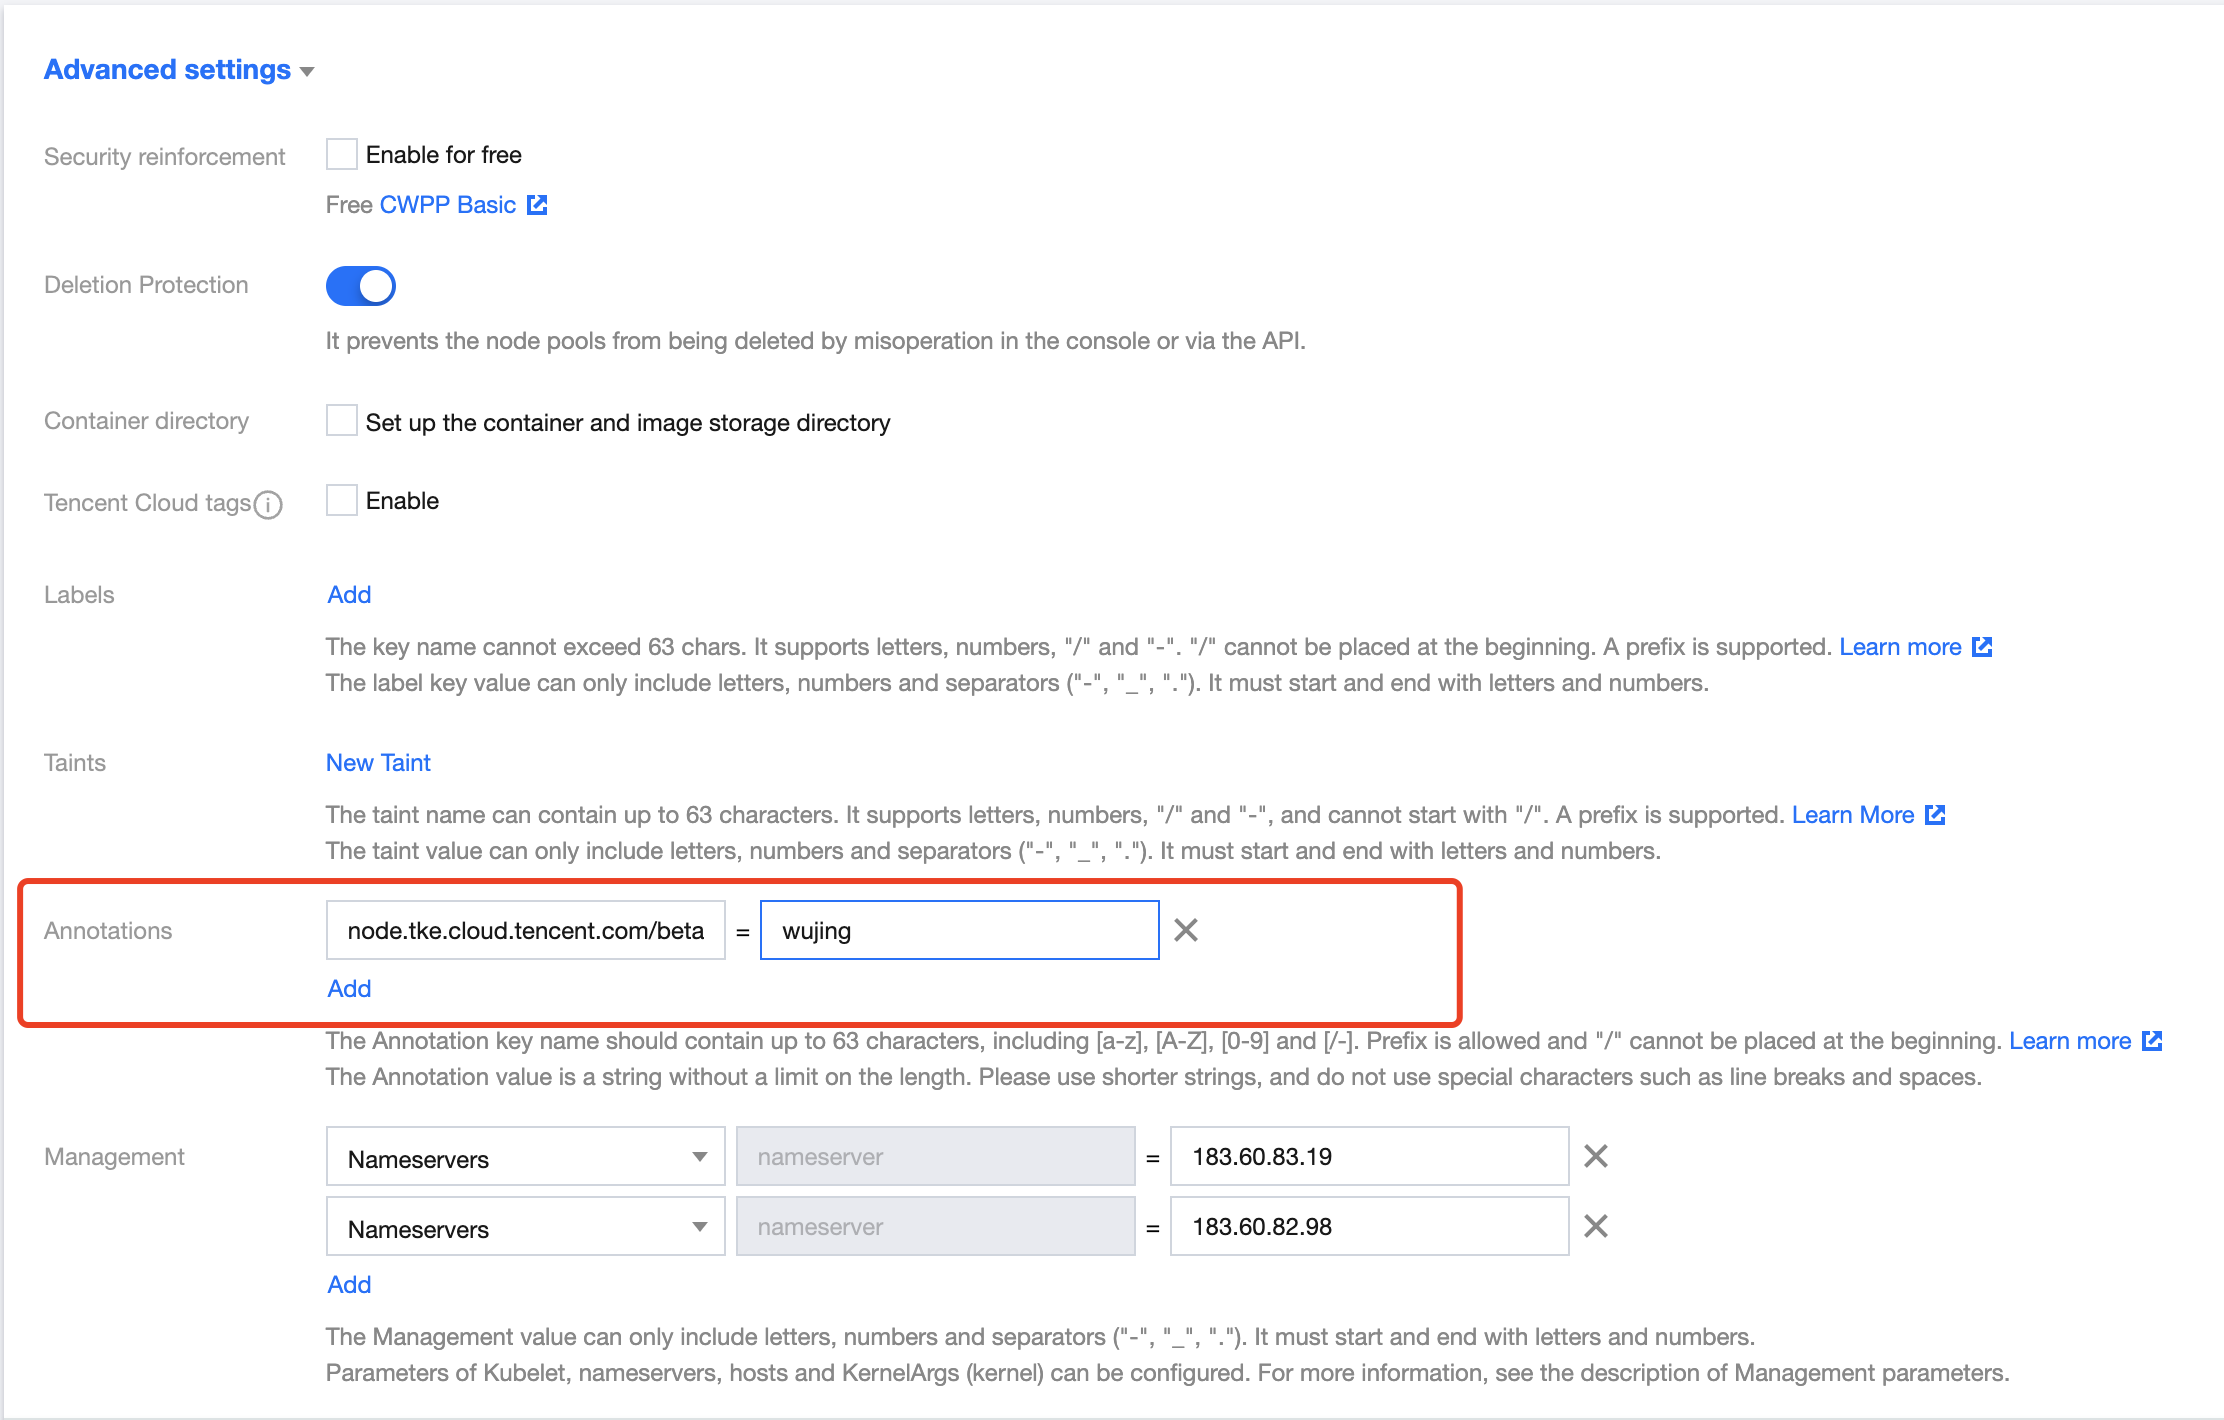
5. In Advanced Settings of the Create Node Pool page, find the Annotations field and set "node.tke.cloud.tencent.com/beta-image = wujing", as shown in the following figure:
6. Click Create node pool.
Note:
By default, the image with the latest kernel version (5.4.241-19-0017) will be installed on the native nodes added to this node pool.
Existing Native Nodes
The kernel versions of existing native nodes can be updated using RPM packages. You can contact us through Submit a Ticket.
Kernel Version Verification
You can run the
kubectl get nodes -o wide command to verify that the node's KERNEL-VERSION has been updated to the latest version 5.4.241-19-0017.1_plus.
Installing the QosAgent Component
1. Log in to the Tencent Kubernetes Engine Console, and choose Cluster from the left navigation bar.
2. In the cluster list, click on the desired cluster ID to access its details page.
3. Choose Component Management from the left-side menu, and click Create on the Component Management page.
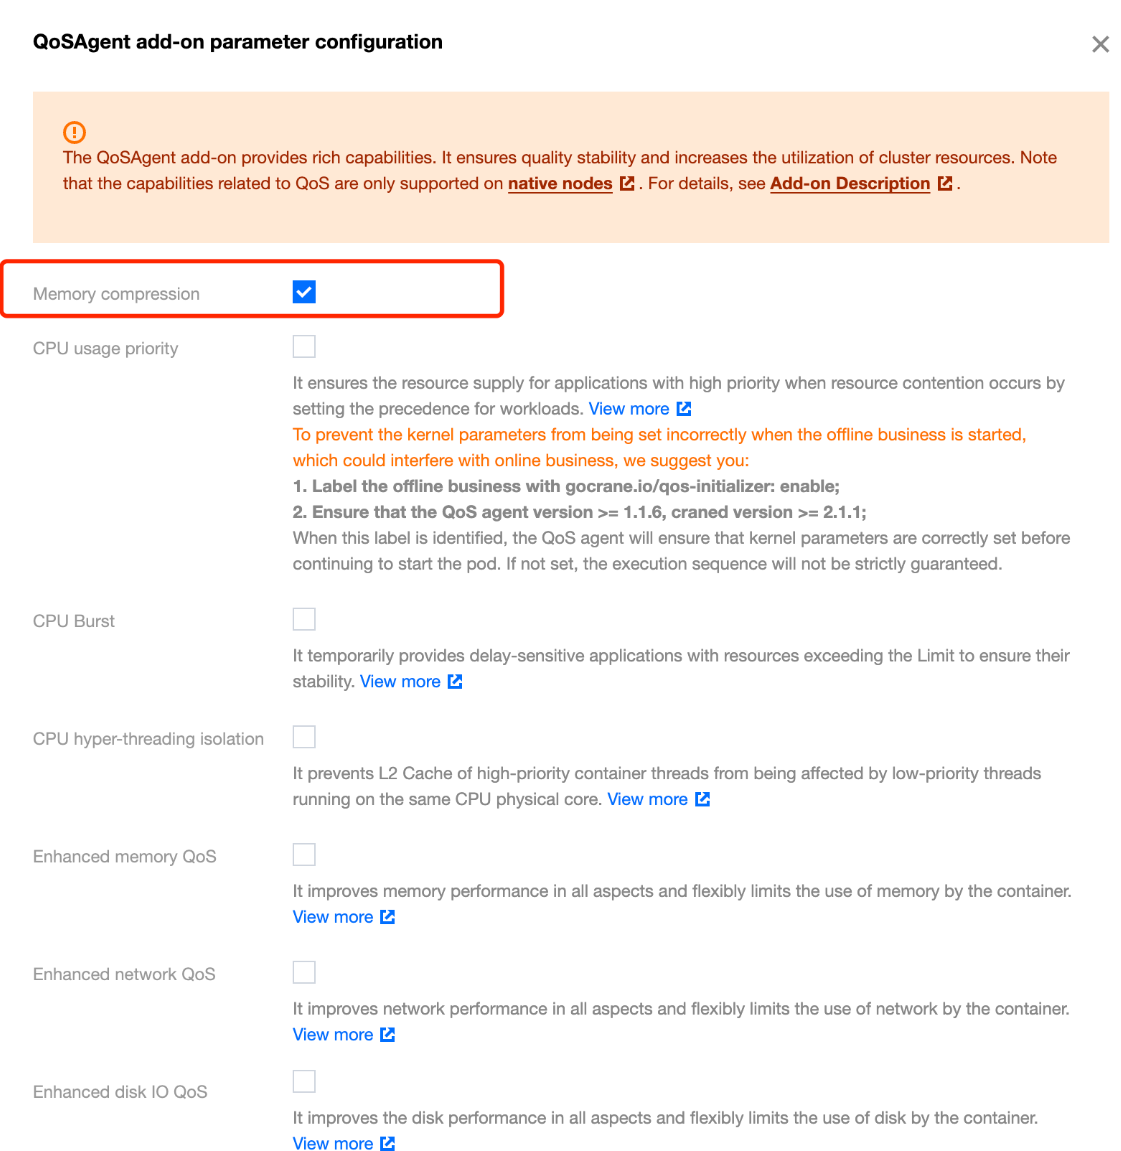
4. On the New Component Management page, select QoS Agent and check Memory Compression in the parameter configurations, as shown in the following figure:
5. Click OK.
6. On the New Component Management page, click Complete to install the component.
Note:
The QosAgent component of the version 1.1.5 or later supports memory compression. If the component has been installed in your cluster, perform the following steps:
1. On the cluster's Component Management page, find the successfully deployed QosAgent and click the right side Upgrade.
2. After the upgrade, click Update Configuration and select Memory Compression.
3. Click Complete.
Selecting Nodes to Enable Memory Compression
To facilitate Gray Box Testing, QosAgent does not enable kernel configurations required for memory compression on all native nodes by default. You need to use NodeQOS to specify which nodes can have Compression Capability enabled.
Deploying the NodeQOS Object
1. Deploy the NodeQOS object. Use
spec.selector.matchLabels to specify on which nodes to enable memory compression, as shown in the following example:apiVersion: ensurance.crane.io/v1alpha1kind: NodeQOSmetadata:name: compressionspec:selector:matchLabels:compression: enablememoryCompression:enable: true
2. Label the node to associate the node with NodeQOS. Perform the following steps:
2.1 Log in to the Tencent Kubernetes Engine Console, and choose Cluster from the left navigation bar.
2.2 In the cluster list, click on the desired cluster ID to access its details page.
2.3 Choose Node Management > Worker Nodes, select the Node Pool tab, and click Edit on the Node Pool tab page.
2.4 On the Adjust Node Pool Configuration page, modify the label and check Apply this update to existing nodes. In the example, the label is
compression: enable.2.5 Click OK.
Validation of Effectiveness
After enabling memory compression on the node, you can use the following command to obtain the node's YAML configuration and confirm whether memory compression is correctly enabled through the node's annotation. The following is an example:
kubectl get node <nodename> -o yaml | grep "gocrane.io/memory-compression"
After logging into the node, check zram, swap, and kernel parameters in turn to confirm that memory compression is correctly enabled. The following is an example:
# Confirm zram device initialization.# zramctlNAME ALGORITHM DISKSIZE DATA COMPR TOTAL STREAMS MOUNTPOINT/dev/zram0 lzo-rle 3.6G 4K 74B 12K 2 [SWAP]# Confirm settings for swap.# free -htotal used free shared buff/cache availableMem: 3.6Gi 441Mi 134Mi 5.0Mi 3.0Gi 2.9GiSwap: 3.6Gi 0.0Ki 3.6Gi# sysctl vm.force_swappinessvm.force_swappiness = 1
Selecting Services to Enable Memory Compression
Deploying the PodQOS Object
1. Deploy the PodQOS object. Enable memory compression on specific pods using
spec.labelSelector.matchLabels, as shown in the following example:apiVersion: ensurance.crane.io/v1alpha1kind: PodQOSmetadata:name: memorycompressionspec:labelSelector:matchLabels:compression: enableresourceQOS:memoryQOS:memoryCompression:compressionLevel: 1enable: true
Note:
compressionLevel represents the compression level. The value ranges from 1 to 4, corresponding to the algorithms lz4, lzo-rle, lz4hc, zstd, in order of decreasing compression ratio and increasing performance loss.
2. Create a workload matching the labelSelector in PodQOS, as shown in the following example:
apiVersion: apps/v1kind: Deploymentmetadata:name: memory-stressnamespace: defaultspec:replicas: 2selector:matchLabels:app: memory-stresstemplate:metadata:labels:app: memory-stresscompression: enablespec:containers:- command:- bash- -c- "apt update && apt install -yq stress && stress --vm-keep --vm 2 --vm-hang 0"image: ccr.ccs.tencentyun.com/ccs-dev/ubuntu-base:20.04name: memory-stressresources:limits:cpu: 500mmemory: 1Girequests:cpu: 100mmemory: 100MrestartPolicy: Always
Note:
All containers in a pod must have a memory limit.
Validation of Effectiveness
Verify the memory compression feature through pod annotation (gocrane.io/memory-compression), process memory usage, zram or swap usage, and cgroup memory usage, ensuring that memory compression has been correctly enabled for the pod.
# QosAgent will set an annotation for the pod with memory compression enabled.kubectl get pods -l app=memory-stress -o jsonpath="{.items[0].metadata.annotations.gocrane\\.io\\/memory-compression}"# zramctlNAME ALGORITHM DISKSIZE DATA COMPR TOTAL STREAMS MOUNTPOINT/dev/zram0 lzo-rle 3.6G 163M 913.9K 1.5M 2 [SWAP]# free -htotal used free shared buff/cache availableMem: 3.6Gi 1.4Gi 562Mi 5.0Mi 1.7Gi 1.9GiSwap: 3.6Gi 163Mi 3.4Gi#Check memory.zram.{raw_in_bytes,usage_in_bytes} in cgroup (usually in /sys/fs/cgroup/memory/) to see the amount of memory compressed in the pod, the size of memory after compression, and the difference, which indicates the memory saved.cat memory.zram.{raw_in_bytes,usage_in_bytes}170659840934001#Calculate the difference to obtain the size of memory saved. In the example, 170Mi of memory was saved.cat memory.zram.{raw_in_bytes,usage_in_bytes} | awk 'NR==1{raw=$1} NR==2{compressed=$2} END{ print raw - compress }'170659840
Help and Support
Was this page helpful?
You can also Contact sales or Submit a Ticket for help.
Help us improve! Rate your documentation experience in 5 mins.
Feedback