This guide walks you through integrating VoIP Push functionality using the TIMPush service, designed for headless (UI-less) scenarios with AtomicXCore. Note:
LiveCommunicationKit requires iOS 17.4 or later.
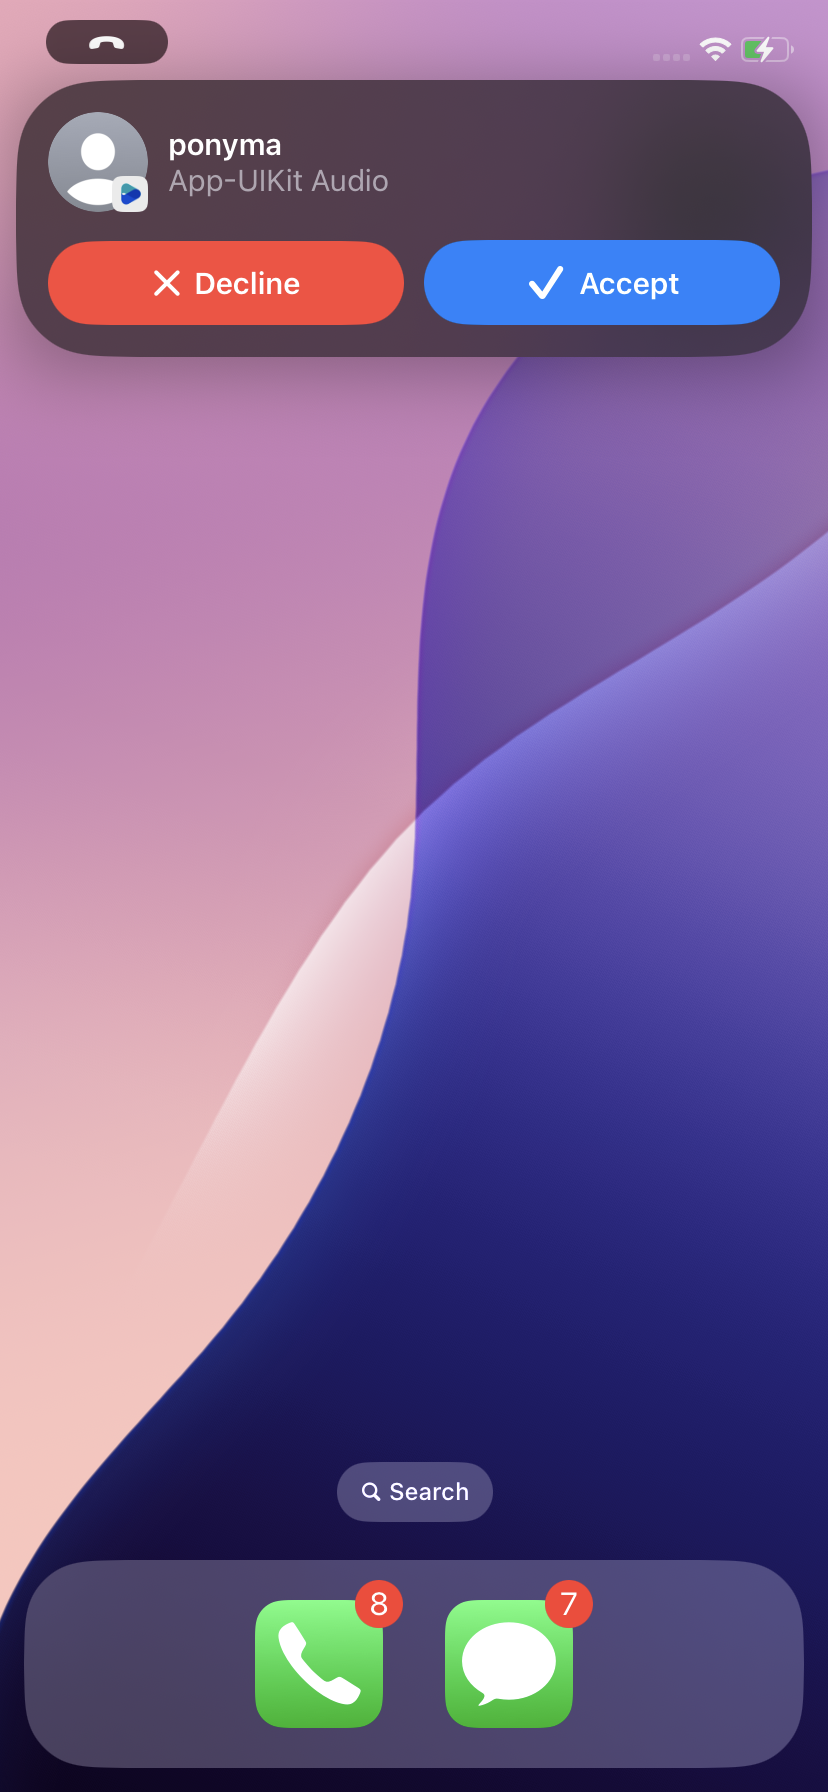
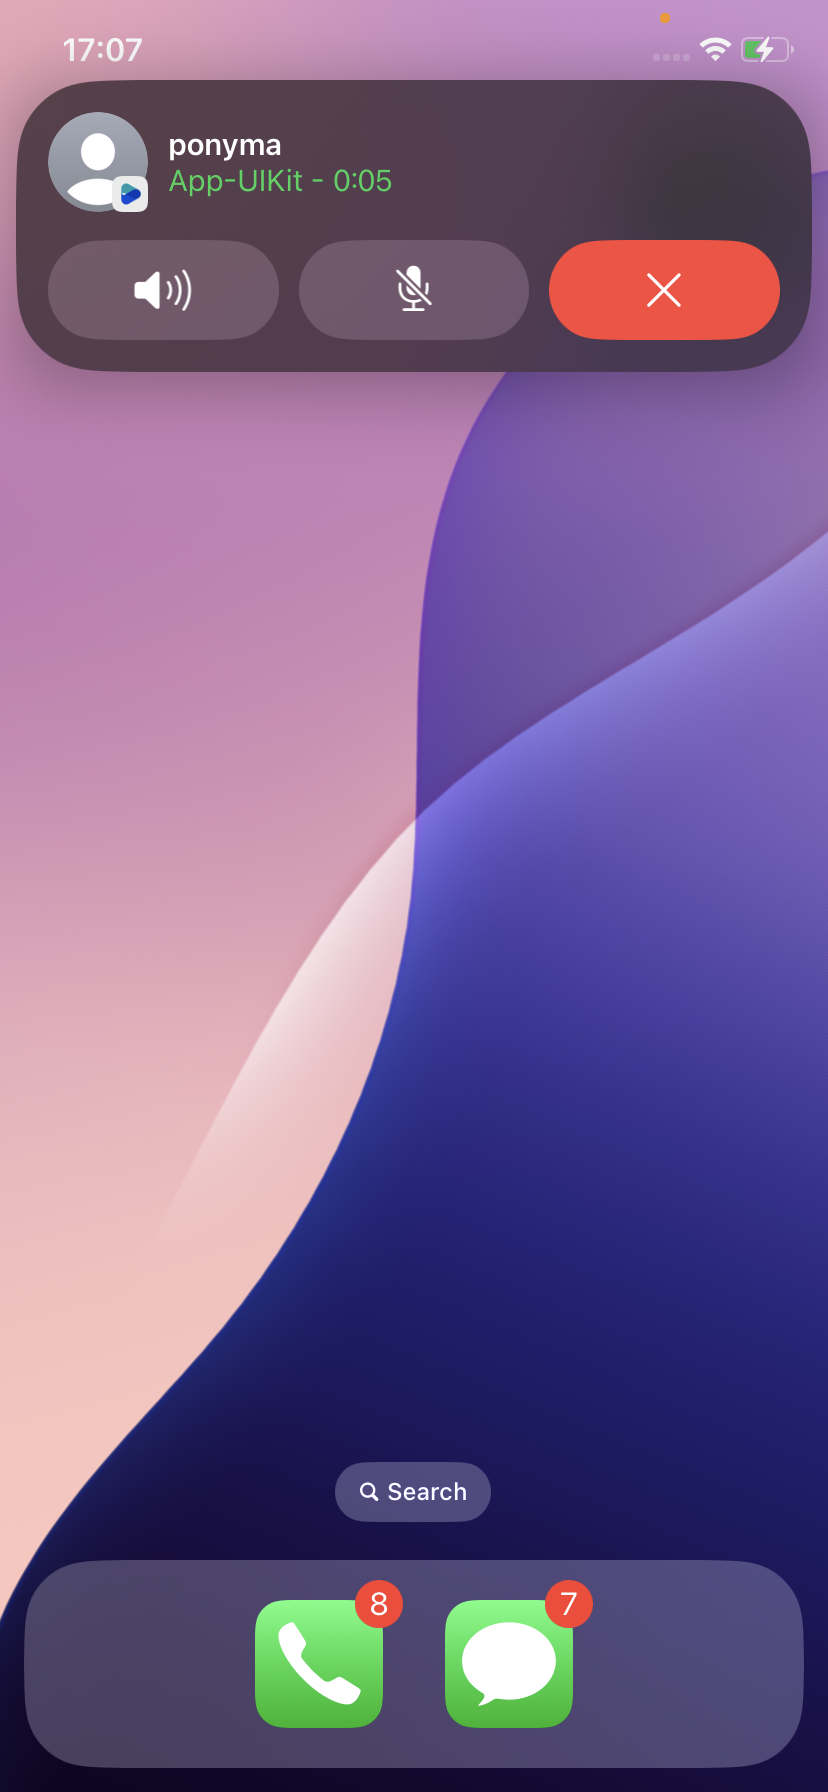
VoIP Push requires a dedicated certificate. Standard APNs push certificates cannot be reused. You must apply for a VoIP Push certificate separately through the Apple Developer portal. After following this guide to integrate Apple LiveCommunicationKit, your app will support native call experiences similar to WeChat. Even if your app is terminated or the device is locked, the system will present a full-screen incoming call interface automatically:
Prerequisites
Activate the Service
Note:
The push plugin will stop providing push services (including offline message push and broadcast/tag push) when your trial or subscription expires. To prevent service interruption, please purchase or renew your subscription in advance.
Configurate Vendors
Step 1: Apply for a VoIP Push Certificate
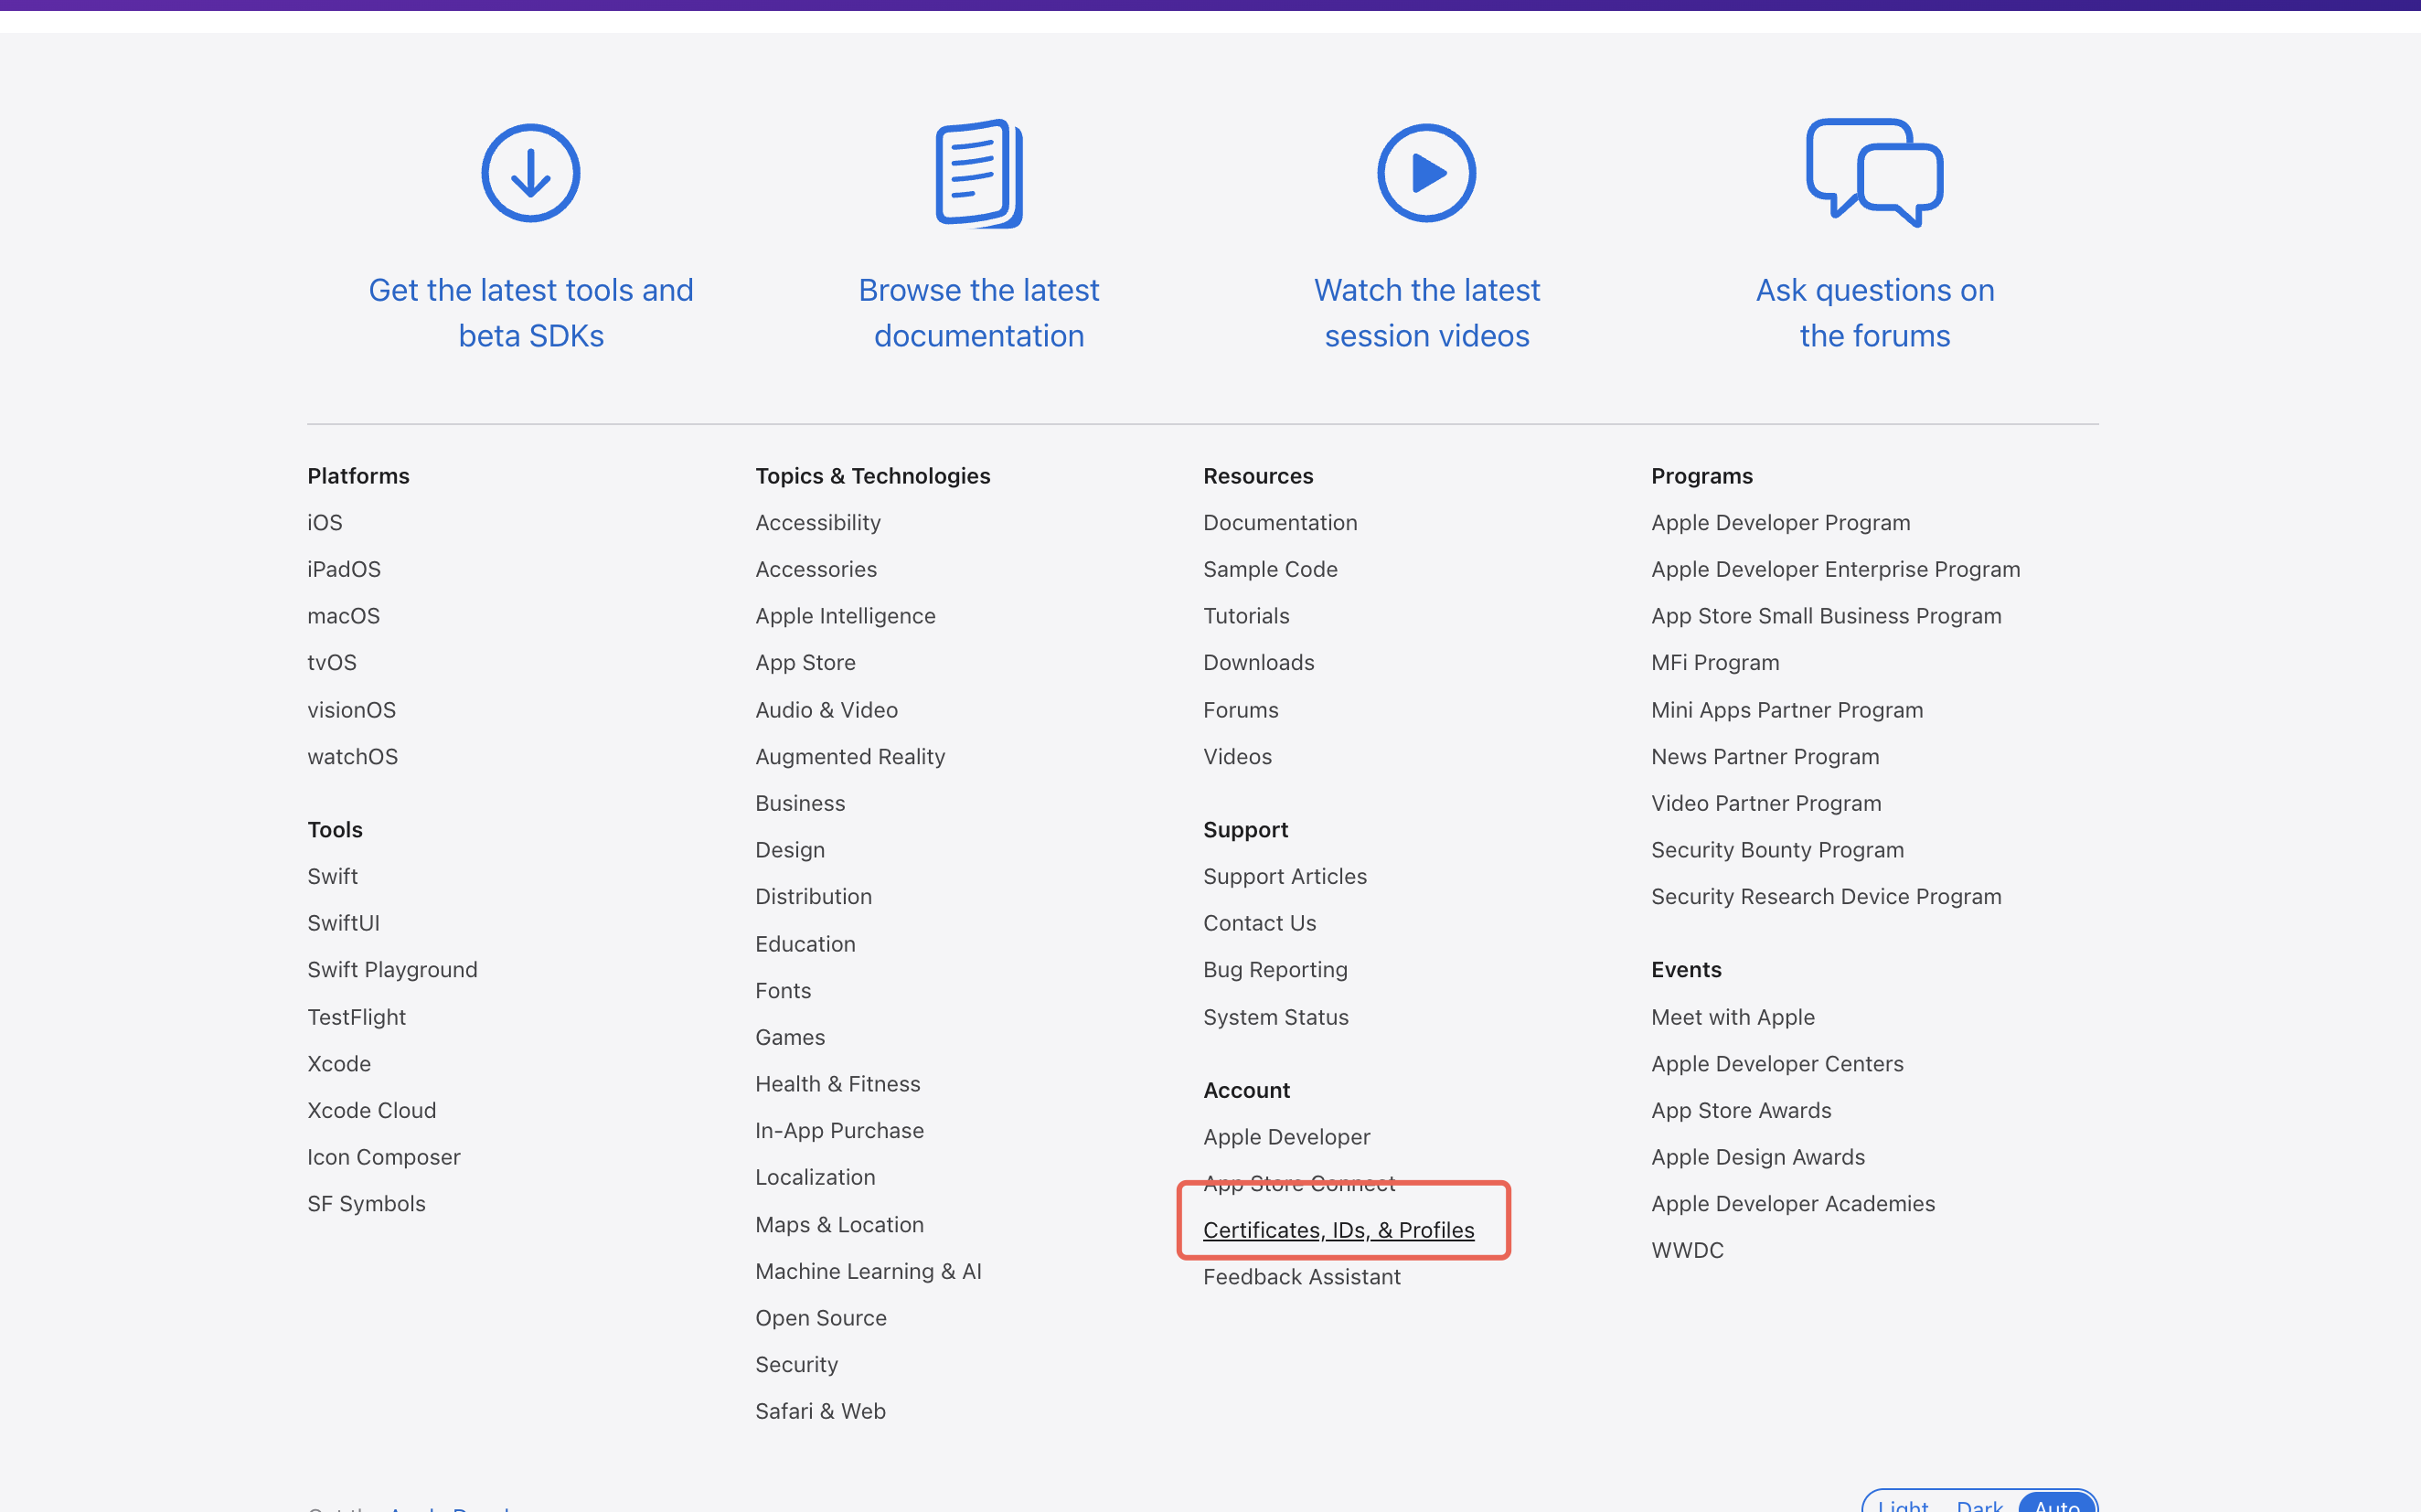
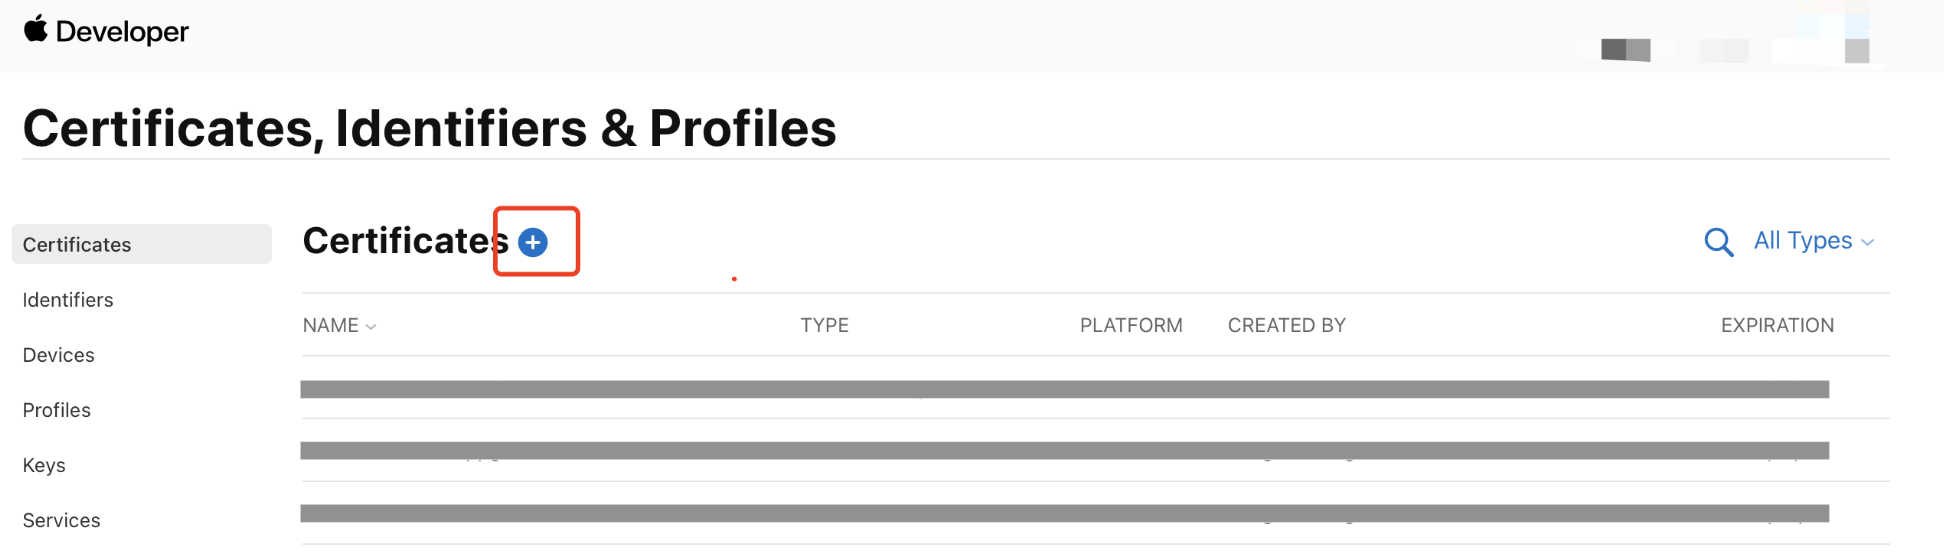
Before applying for a VoIP Push certificate, log in to the Apple Developer Center and enable remote push notifications for your app. Once your AppID has Push Notification capability, follow these steps to apply for and configure your VoIP Push certificate: 1. Log in to the Apple Developer Center, click Certificates, IDs & Profiles to enter the Certificates, Identifiers & Profiles page. 2. Click the + button next to Certificates.
3. On the Create a New Certificate page, select VoIP Services Certificate and click Continue.
4. Select your app's Bundle ID and click Continue.
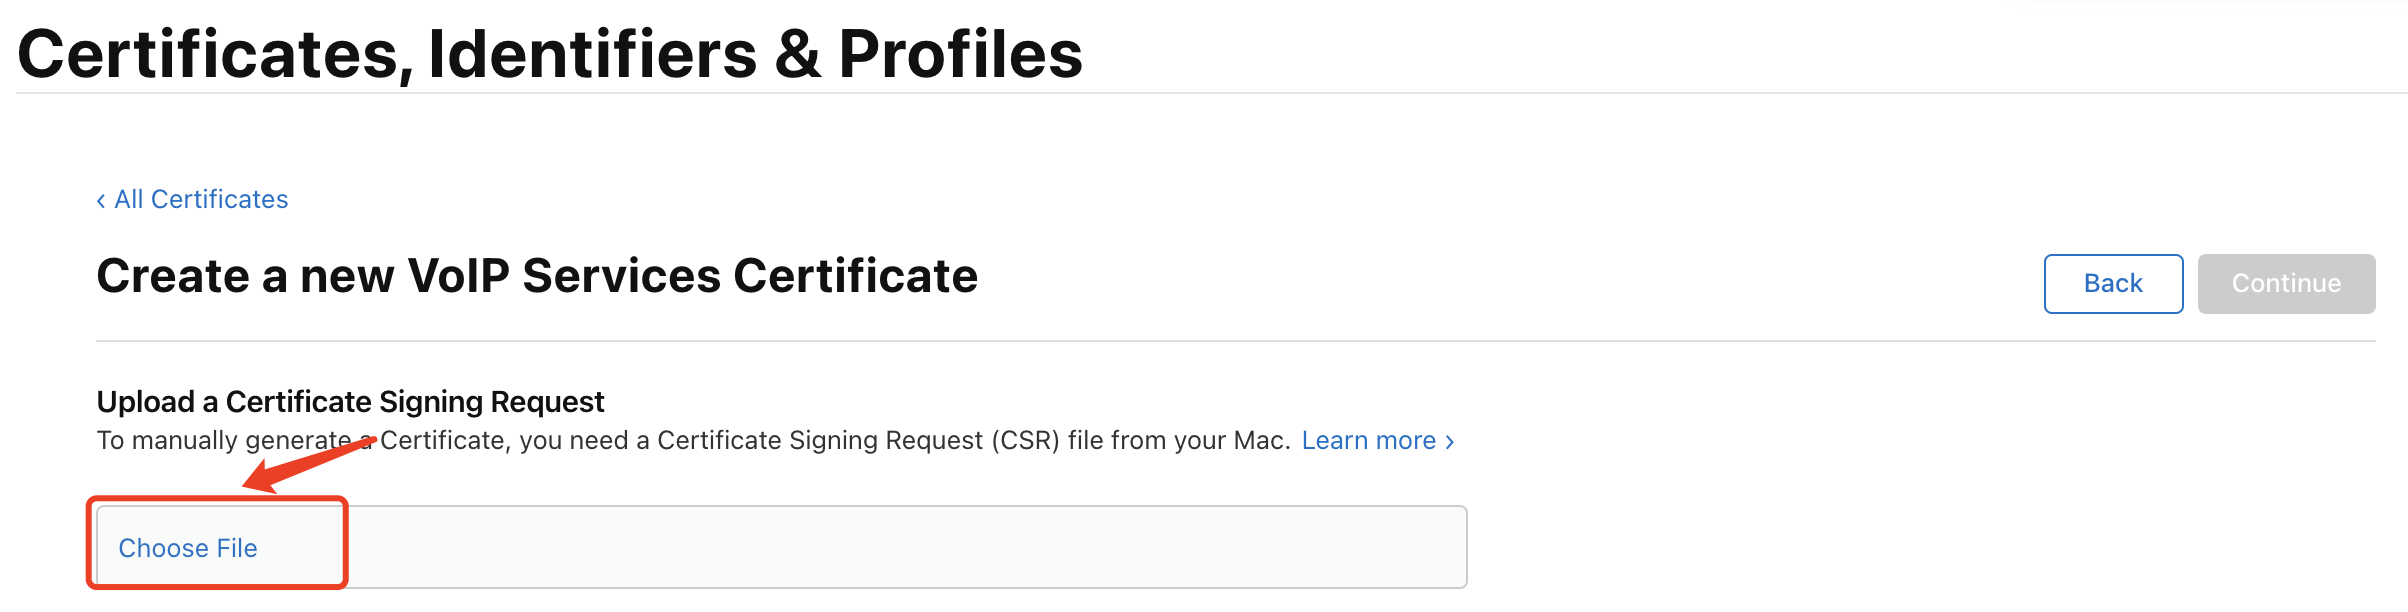
5. The system will prompt you to upload a Certificate Signing Request (CSR).
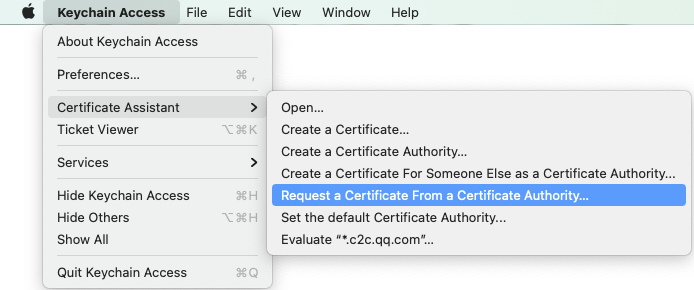
6. On your Mac, open Keychain Access and go to Keychain Access > Certificate Assistant > Request a Certificate From a Certificate Authority.
7. Enter your email address and common name (your name or company name), select Save to disk, then click Continue. This will generate a *.certSigningRequest file.
Return to the Apple Developer website (from Step 5), click Choose File, and upload the generated *.certSigningRequest.
8. Click Continue to generate the certificate, then click Download to save it locally.
9. Double-click the downloaded voip_services.cer to import it into Keychain.
10. In Keychain, under Login > My Certificates, right-click the new VoIP Services certificate and export it as a P12 file.
Note:
Be sure to set a password when saving the P12 file.
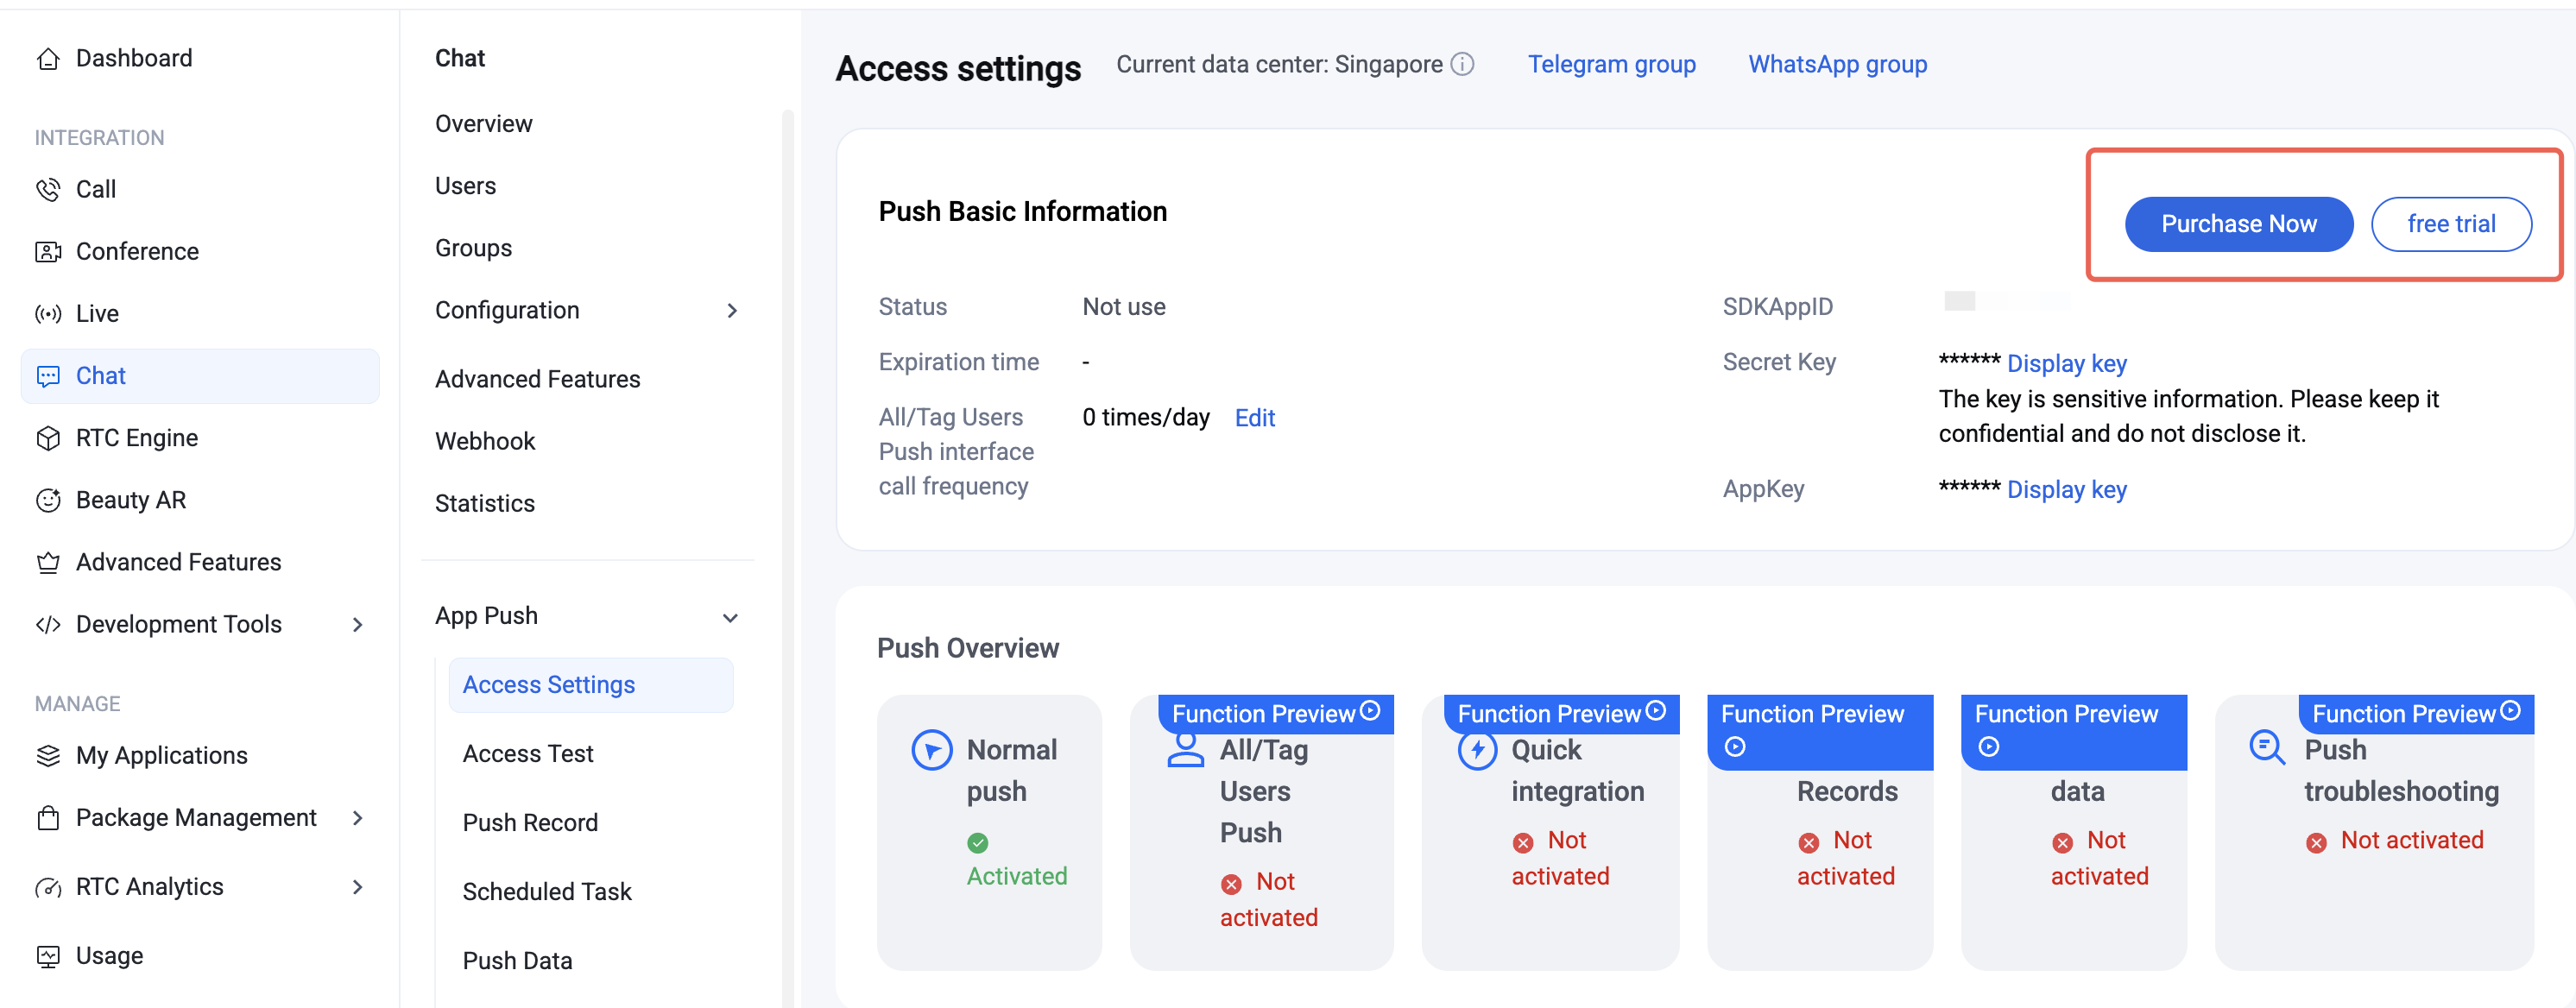
Step 2: Upload the Certificate to the Chat Console
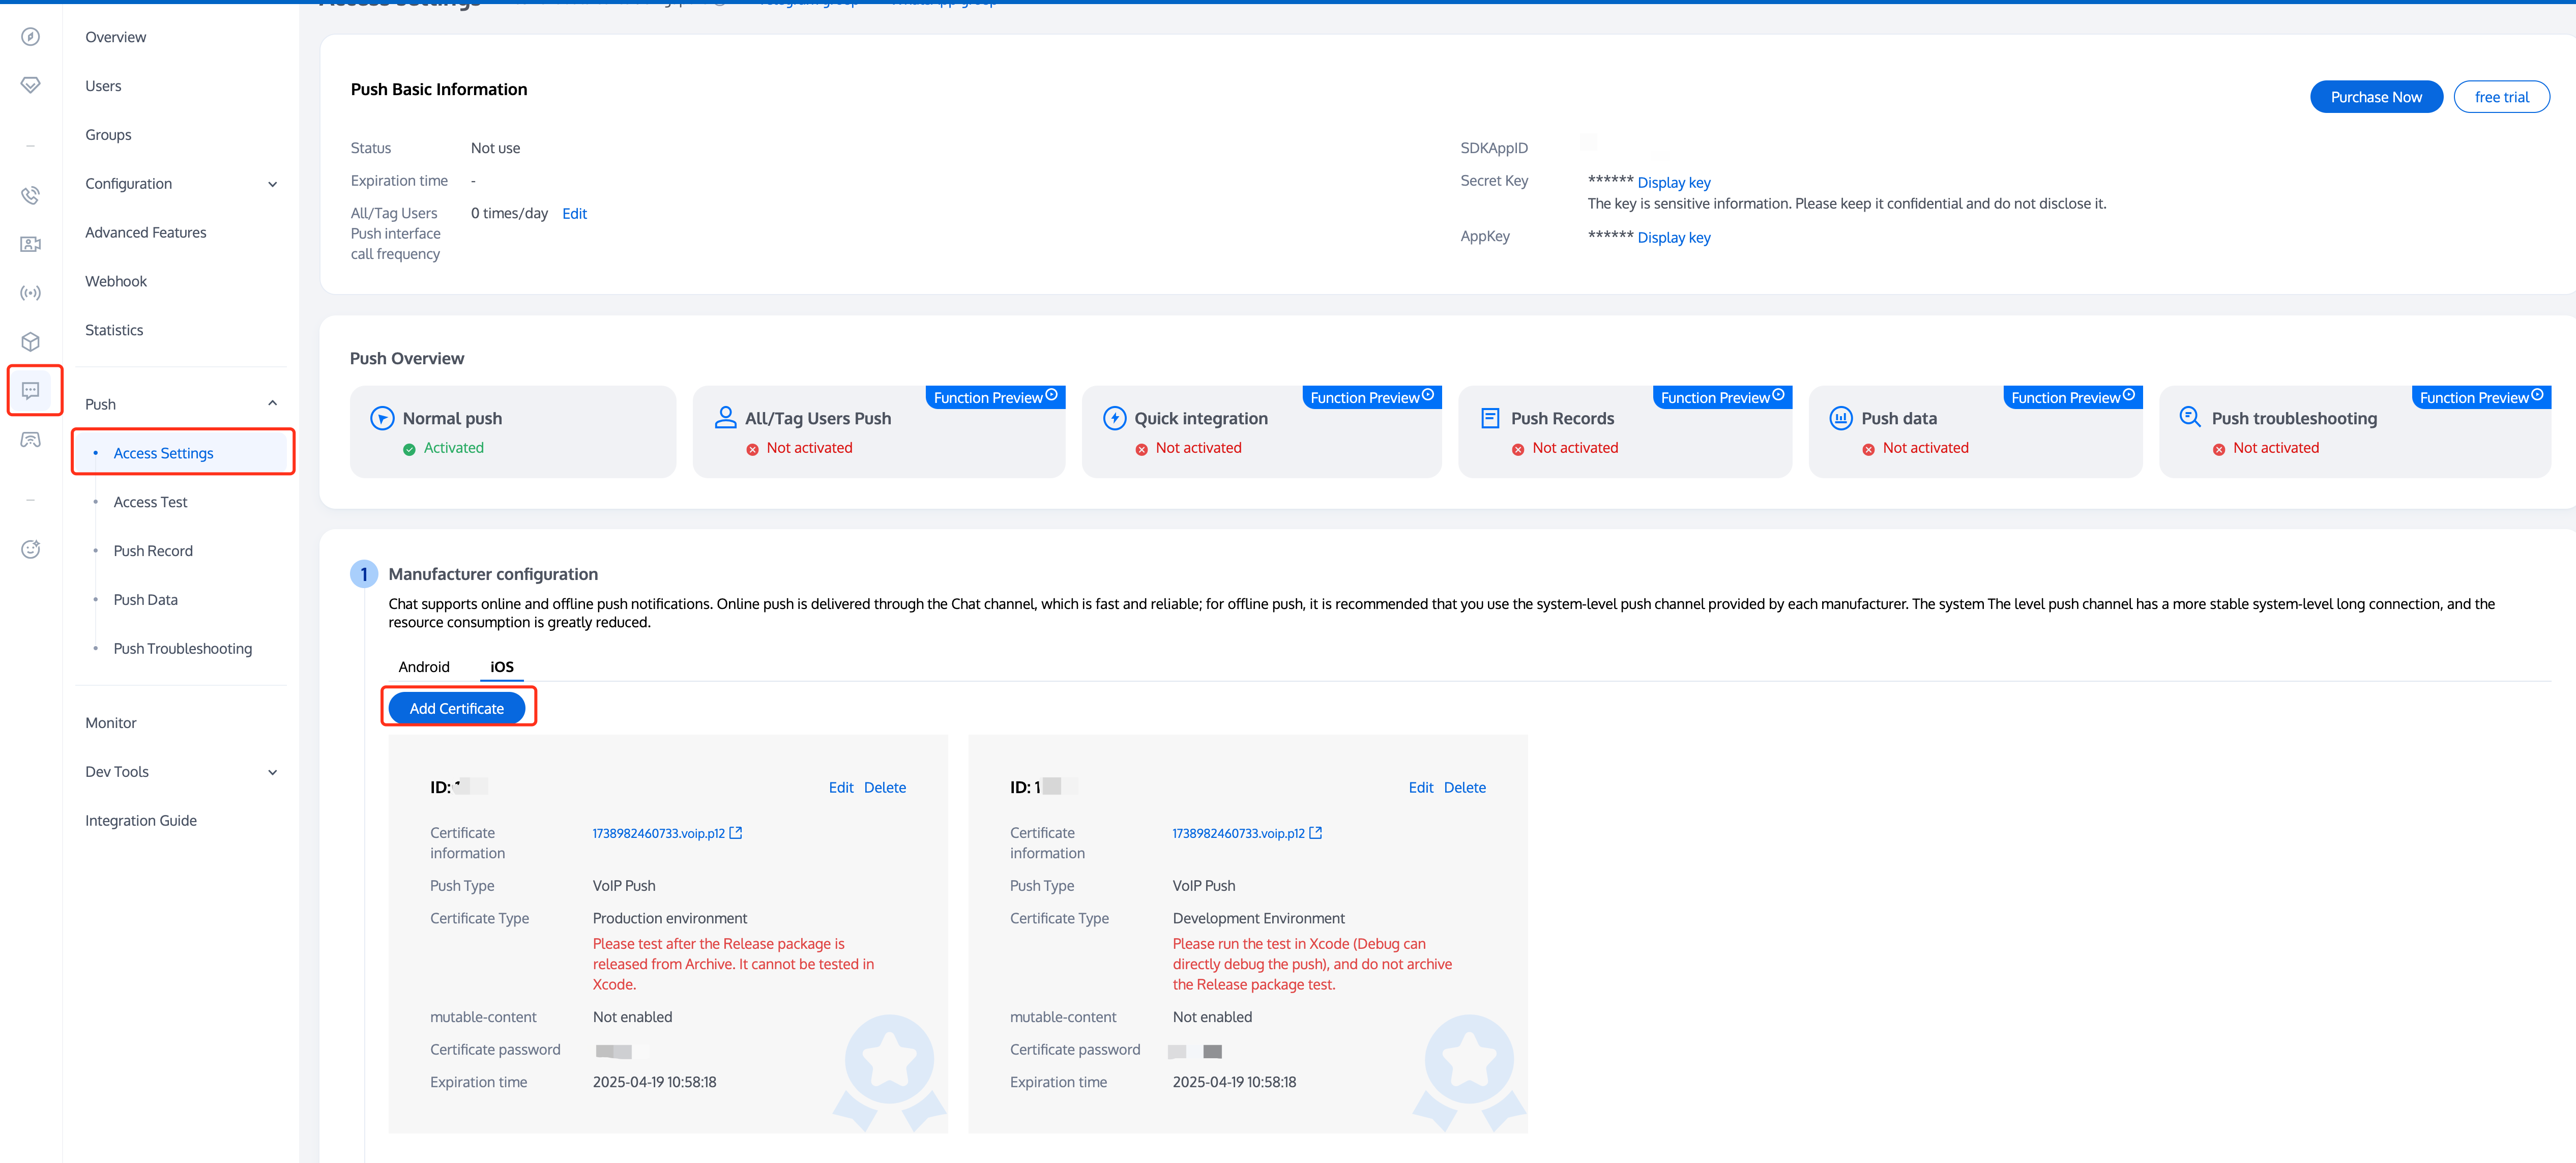
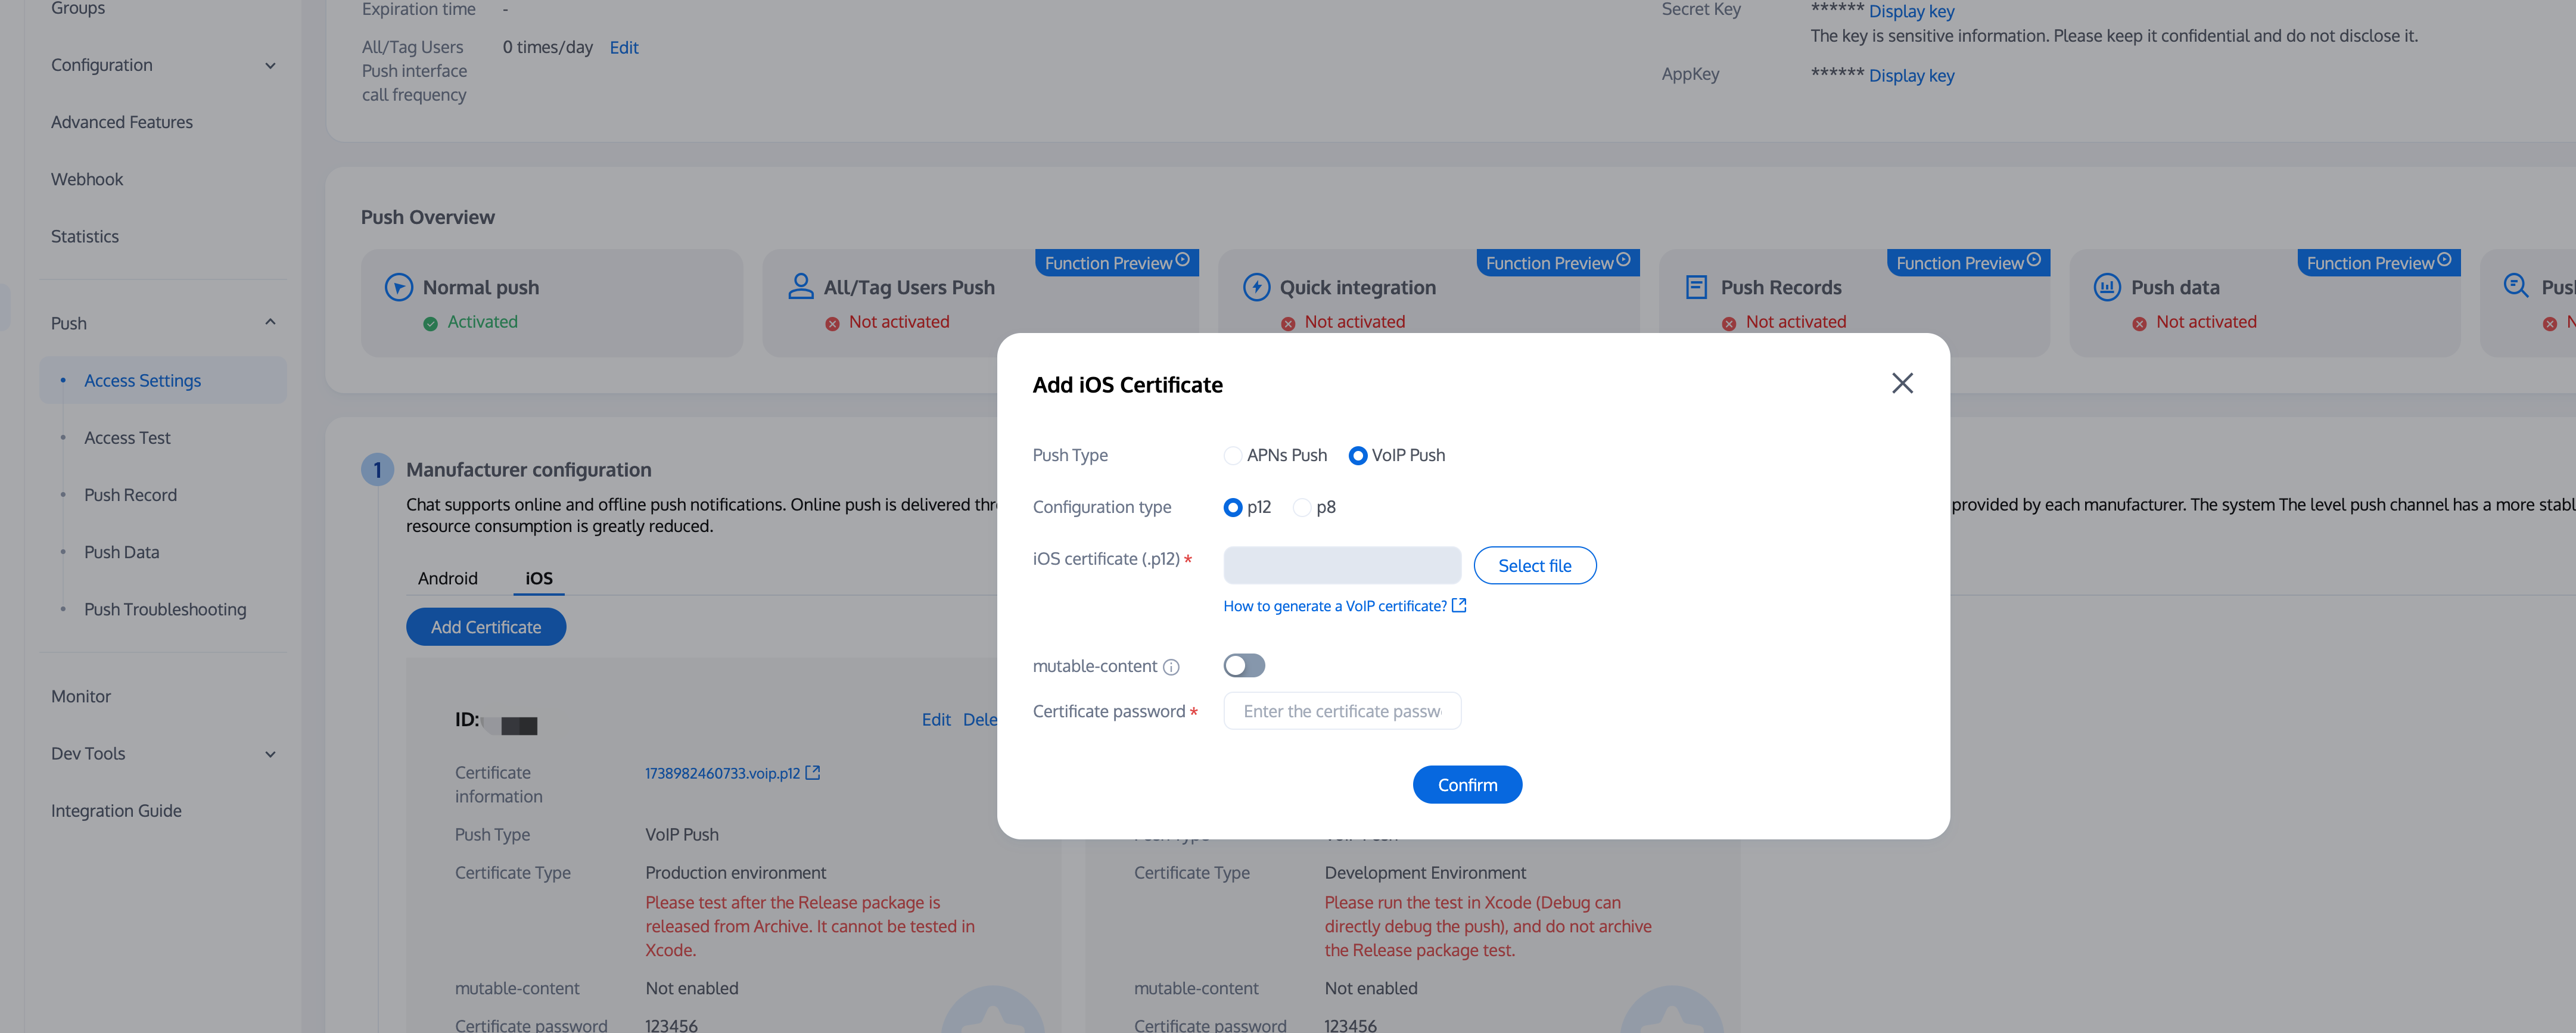
1. Select your Chat application, go to the Access Settings page of Push.
2. In Manufacturer configuration, switch to iOS, click the Add Certificate button, then select the certificate type in the floating page, upload the iOS certificate (p12), set the certificate password, and click Confirm.
Description:
When adding certificates, the push type defaults to APNs, which does not affect the upload and use of VoIP certificates.
VoIP Push certificates themselves do not distinguish between production and testing environments. Production and development environments use the same VoIP Push certificate, please upload separately.
Certificate names uploaded should preferably use all English (especially avoid special characters like parentheses).
Uploaded certificates need to set a password, otherwise push notifications cannot be received.
Certificates for App Store release need to be set to production environment, otherwise push notifications cannot be received.
The uploaded p12 certificate must be a real and valid certificate you applied for yourself.
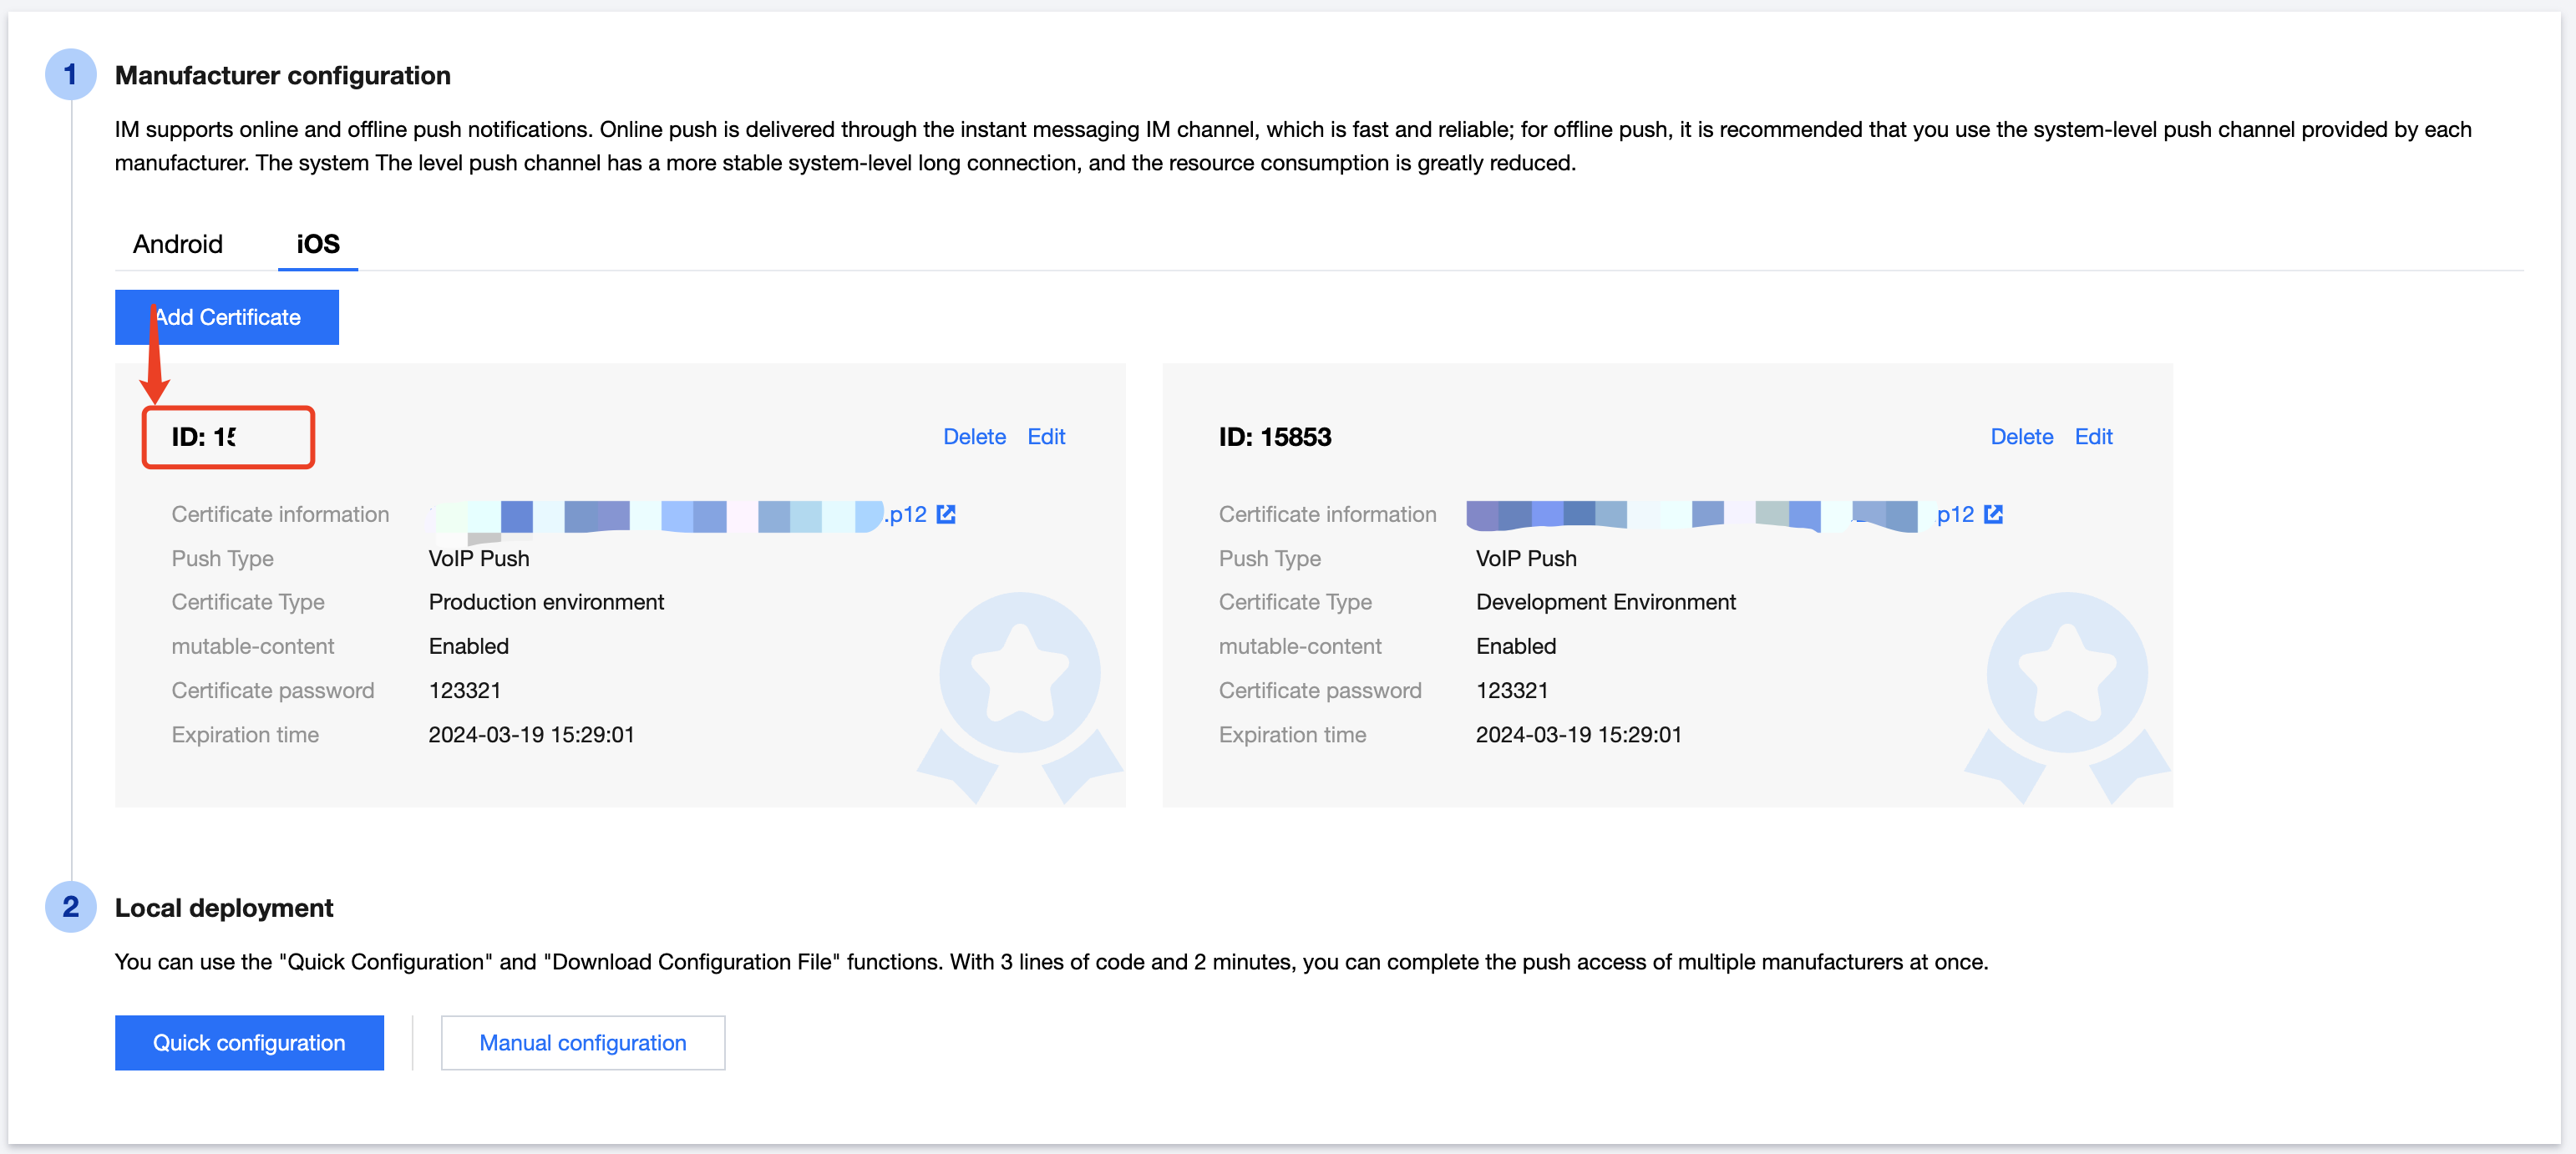
3. After upload is complete, record the certificate IDs for different environments.
Description:
Certificate IDs for development and production environments must be strictly distinguished, please fill in according to the actual environment.
Feature Integration
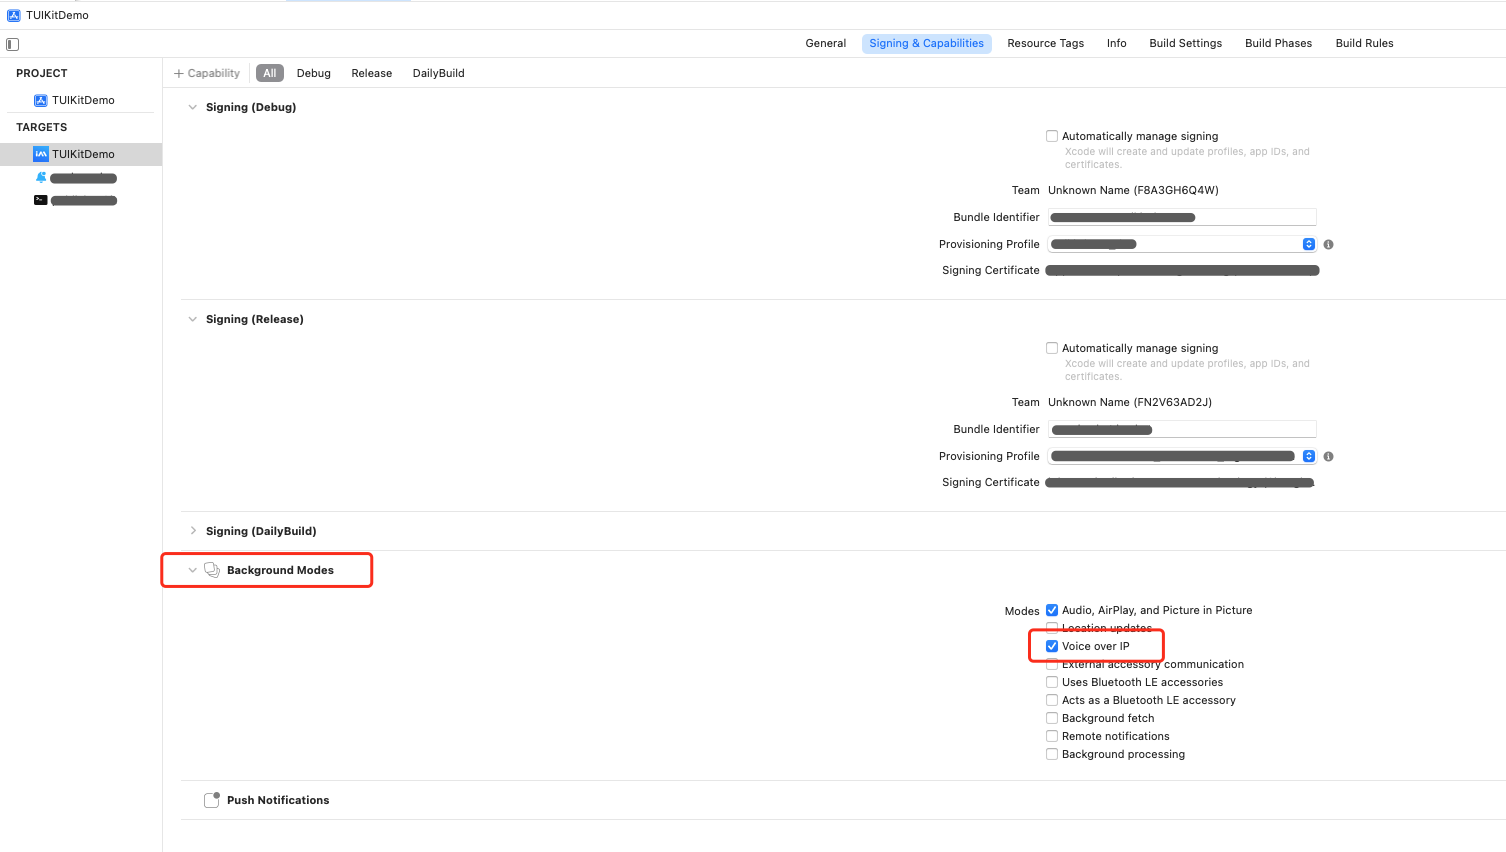
Step 1: Configure Project Capabilities
1. In your Xcode project, enable the Push Notifications capability under Capabilities.
2. Under Background Modes, enable the Voice over IP option.
Step 2: Add Dependencies
1. Add Pod Dependency: Add pod 'TUICore' to your Podfile.
2. Install Component: In your terminal, navigate to your project directory and run:
pod install --repo-update
Step 3: Initialize PushKit and Set Certificate ID
1. Create a class to manage VoIP Push, and initialize PushKit to receive VoIP push notifications.
import PushKit
import ImSDK_Plus
import LiveCommunicationKit
class VoIPPushManager: NSObject {
private let pushRegistry: PKPushRegistry
private var certificateID: Int = 0
private var voipToken: Data?
private var currentCallUUID: UUID?
private lazy var conversationManager: ConversationManager = {
let configuration = ConversationManager.Configuration(
ringtoneName: "phone_ringing.mp3",
iconTemplateImageData: nil,
supportsVideo: true
)
let manager = ConversationManager(configuration: configuration)
manager.delegate = self
return manager
}()
override init() {
pushRegistry = PKPushRegistry(queue: DispatchQueue.main)
super.init()
pushRegistry.delegate = self
pushRegistry.desiredPushTypes = [.voIP]
NotificationCenter.default.addObserver(
self,
selector: #selector(onTUILoginSuccess),
name: NSNotification.Name("TUILoginSuccess"),
object: nil
)
}
deinit {
NotificationCenter.default.removeObserver(self)
}
func setCertificateID(_ certificateID: Int) {
self.certificateID = certificateID
}
@objc private func onTUILoginSuccess() {
uploadVoIPToken()
}
private func uploadVoIPToken() {
guard let token = voipToken else {
return
}
guard certificateID != 0 else {
return
}
let config = V2TIMVOIPConfig()
config.certificateID = certificateID
config.token = token
V2TIMManager.sharedInstance().setVOIP(config: config, succ: {
}, fail: { code, desc in
})
}
}
2. Initialize and set the certificate ID in your AppDelegate:
class AppDelegate: UIResponder, UIApplicationDelegate {
private lazy var voipPushManager: VoIPPushManager = {
let manager = VoIPPushManager()
manager.setCertificateID(1234)
return manager
}()
func application(_ application: UIApplication,
didFinishLaunchingWithOptions launchOptions: [UIApplication.LaunchOptionsKey: Any]?) -> Bool {
_ = voipPushManager
return true
}
}
Note:
certificateID is the ID you received after uploading your certificate in the Chat Console.
Always use the correct certificate ID for your development or production environment.
Step 4: Obtain and Save VoIP Token
Implement the PKPushRegistryDelegate protocol. After obtaining the VoIP Token, save it first and report it only after TUILogin succeeds.
import PushKit
import ImSDK_Plus
extension VoIPPushManager: PKPushRegistryDelegate {
func pushRegistry(_ registry: PKPushRegistry,
didUpdate pushCredentials: PKPushCredentials,
for type: PKPushType) {
guard type == .voIP else { return }
voipToken = pushCredentials.token
let tokenString = pushCredentials.token.map { String(format: "%02.2hhx", $0) }.joined()
uploadVoIPToken()
}
func pushRegistry(_ registry: PKPushRegistry,
didInvalidatePushTokenFor type: PKPushType) {
}
}
Note:
Only report the VoIP Token after the Chat SDK login is successful. Do not report immediately when the token is obtained.
Step 5: Report Token
When a user logs in, first log in to the Chat SDK, then to TUICore. After TUICore login succeeds, a TUILoginSuccess notification is sent, and VoIPPushManager will automatically report the VoIP Token.
import TUICore
import AtomicXCore
LoginStore.shared.login(
sdkAppID: sdkAppID,
userID: userID,
userSig: userSig
) { result in
switch result {
case .success:
TUILogin.login(
sdkAppID,
userID: userID,
userSig: userSig
) {
NotificationCenter.default.post(
name: NSNotification.Name("TUILoginSuccess"),
object: nil
)
} fail: { code, message in
}
case .failure(let error):
}
}
Step 6: Receive VoIP Push Notifications
extension VoIPPushManager: PKPushRegistryDelegate {
func pushRegistry(_ registry: PKPushRegistry,
didReceiveIncomingPushWith payload: PKPushPayload,
for type: PKPushType) {
guard type == .voIP else { return }
showIncomingCall(with: payload)
}
}
Step 7: Display Incoming Call Notification
Use LiveCommunicationKit to report the incoming call to the system, which will automatically display the native incoming call UI.
import LiveCommunicationKit
extension VoIPPushManager {
private func showIncomingCall(with payload: PKPushPayload) {
let payloadDict = payload.dictionaryPayload
guard let callerName = payloadDict["voip_caller_name"] as? String else {
return
}
var isVideoCall = false
if let extString = payloadDict["ext"] as? String,
let extData = extString.data(using: .utf8),
let extDic = try? JSONSerialization.jsonObject(with: extData) as? [String: Any],
let voipExtDic = extDic["voip_ext"] as? [String: String],
let mediaType = voipExtDic["voip_media_type"] {
isVideoCall = (mediaType == "video")
}
let uuid = UUID()
currentCallUUID = uuid
var update = Conversation.Update(
members: [Handle(type: .generic, value: callerName, displayName: callerName)]
)
update.capabilities = isVideoCall ? .video : .playingTones
Task {
do {
try await conversationManager.reportNewIncomingConversation(uuid: uuid, update: update)
} catch {
}
}
}
}
extension VoIPPushManager: ConversationManagerDelegate {
func conversationManager(_ manager: ConversationManager, perform action: ConversationAction) {
if action is JoinConversationAction {
CallStore.shared.accept { result in
switch result {
case .success:
case .failure(let error):
}
}
} else if action is EndConversationAction {
CallStore.shared.hangup { result in
switch result {
case .success:
case .failure(let error):
}
}
}
action.fulfill()
}
}
You can customize the caller information and call type shown on the incoming call screen by configuring the following parameters in Conversation.Update:
|
members | [Handle] | Required | Array of caller information, supports multi-party call scenarios. Each Handle includes: type: usually .generic value: unique identifier of the caller (recommended to use user ID) displayName: name displayed on the incoming call interface |
capabilities | Conversation.Capabilities | Required | Call type: .video: video call (shows video icon) .playingTones: audio call (shows audio icon) |
Note:
After the user taps "Answer" or "Hang Up", the system will invoke the ConversationManagerDelegate callback. Implement your answer/hang up logic in this callback (e.g., navigate to your call page, call the CallStore API, etc.). Create a VoIP Call
Create call
CallStore uses VoIP Push by default, so you do not need to manually set the offlinePushInfo parameter. CallStore will automatically set the following push information.
Push Type: .voIP
Push Title: current user ID
Push Description: "You have a new call"
iOS Ringtone: phone_ringing.mp3
import AtomicXCore
var params = CallParams()
params.timeout = 30
params.userData = "custom data"
let userIdList = ["callee's userID"]
let mediaType = CallMediaType.video
CallStore.shared.calls(
participantIds: userIdList,
callMediaType: mediaType,
params: params
) { result in
switch result {
case .success:
case .failure(let error):
}
}
Note:
VoIP Push Downgrade Strategy
When using VoIP Push, the backend will intelligently select the certificate type to ensure users receive push notifications:
If a VoIP certificate is uploaded: VoIP Push will be sent.
If only an APNs certificate is uploaded: the system will automatically downgrade to APNs Push.
Answer a Call
When the callee is offline and receives a VoIP Push, tapping "Answer" will wake up your app. At this point, listen for call events and navigate to your call page.
import AtomicXCore
import Combine
class YourViewController: UIViewController {
private var cancellables = Set<AnyCancellable>()
override func viewDidLoad() {
super.viewDidLoad()
CallStore.shared.callEventPublisher
.receive(on: DispatchQueue.main)
.sink { [weak self] event in
guard let self = self else { return }
switch event {
case .onCallReceived(let callId, let mediaType, let userData):
self.showCallViewController(callId: callId, mediaType: mediaType, userData: userData)
case .onCallEnded(let callId, let mediaType, let reason, let userId):
self.dismissCallViewController()
case .onCallStarted(let callId, let mediaType):
break
}
}
.store(in: &cancellables)
}
private func showCallViewController(callId: String, mediaType: CallMediaType, userData: String) {
let callVC = YourCallViewController()
callVC.callId = callId
callVC.mediaType = mediaType
callVC.userData = userData
callVC.modalPresentationStyle = .fullScreen
present(callVC, animated: true)
}
private func dismissCallViewController() {
dismiss(animated: true)
}
}
FAQs
Why am I not receiving VoIP Push notifications?
1. Check the login sequence: You must log in to the Chat SDK first, then TUICore. Otherwise, the VoIP Token cannot be reported. See Step 5. 2. Ensure your app's runtime environment, certificate environment, and certificate ID all match. If not, push notifications will not be delivered.
3. Make sure the logged-in account is offline: either send the app to the background or kill the process after login. VoIP Push currently only supports push for offline users.
4. Verify that your project configuration is correct.
5. Restart the test device to clear system cache and memory (this is important).
6. Use the Chat Console's Push Troubleshooting tool for diagnostics. For details, see: Push Troubleshooting Tool. (highly recommended) Why does the app crash after receiving a VoIP Push?
This usually happens if you do not report the incoming call to the system within 5 seconds. Make sure to call reportNewIncomingConversation immediately in the didReceiveIncomingPushWith callback.
How can I customize the incoming call notification content?
You can customize the incoming call notification using Conversation.Update, including:
Caller information (displayName)
Call type (capabilities: .video or .playingTones)
Contact Us
If you have any questions or suggestions during integration or use, join the Telegram technical group or Contact Us for support.