Inventory Overview

Terakhir diperbarui:2025-12-08 16:19:03
What Is Inventory
The inventory feature helps users manage objects in a bucket. It operates periodically as an alternative to the COS synchronous List API. Cloud Object Storage (COS) can scan specified objects or objects with the same prefix in user buckets daily, weekly, or monthly based on user-configured inventory tasks, and generate an inventory report stored as a CSV file in the specified bucket. It also supports triggering a one-time inventory task to immediately produce a report. The file lists stored objects and their corresponding metadata, recording required object property information according to user configuration.
You can use the inventory feature for various purposes, including but not limited to:
Reviewing and reporting the replication and encryption status of objects.
Simplifying and accelerating business workflows and big data jobs.
Note:
You can configure multiple inventory jobs in one bucket. Such jobs do not directly read the object content during their execution; instead, they only scan the attribute information such as object metadata.
Currently not supported in financial cloud regions.
To set up an inventory through a sub-account, please ensure the sub-account has been granted
cos:PutBucketInventory and cos:PutObject operation permissions by the root account.Inventory Parameters
After you configure an inventory job for a bucket, COS regularly scans specified objects in the bucket based on your configuration, and exports an inventory report in .csv format. Currently, the inventory report can record the following information:
Inventory Information | Description |
AppID | Account ID. |
Bucket | Name of the bucket where the inventory job is performed. |
fileFormat | File format. |
listObjectCount | Number of objects to list, which will be used for billing. For more information, see the inventory feature fees in Management Fees. |
listStorageSize | Size of listed objects. |
filterObjectCount | Number of filtered objects. |
filterStorageSize | Size of filtered objects. |
Key | Name of an object file in a bucket. When the CSV file format is used, the key name is URL-encoded and must be decoded before you can use it. |
VersionId | Version ID of an object. After versioning is enabled for a bucket, COS specifies a version ID for the object added to the bucket. If the inventory is for the current version only, this field is not included. |
IsLatest | Set to True if the latest object version is used. This field is not included if the inventory is only for the current version of objects. |
IsDeleteMarker | Set to True if the object is a delete marker. This field is not included if the inventory is only for the current version of objects. |
Size | Object size (measured in bytes) |
LastModifiedDate | The last modified date of the object. |
ETag | Hash value of an object. It displays only modification to the content of an object, rather than to its metadata. The ETag may be or may not be the MD5 checksum of the data of the object, and this depends on how the object is created and encrypted. |
StorageClass | |
IsMultipartUploaded | Set to True if the object is uploaded in multiple parts. For more information, see Multipart Upload. |
Replicationstatus | Used for marking the status of source files and replica files in object replication. Source file marks: PENDING (awaiting replication), COMPLETED (replication completed), FAILED (replication failed); replica file marks: REPLICA (replication completed, replica file generated). For more information, please refer to Replication Behavior Description. |
Tag | Object tag. |
Crc64 | CRC64 checksum of the object. |
x-cos-meta-* | Custom metadata of the object, such as x-cos-meta-testheader. The inventory outputs the corresponding object metadata. If the object does not contain the metadata, it is empty. |
Periodic Inventory and One-Time List
The inventory supports two types: periodic inventory and one-time list.
Periodic inventory: Allows users to set inventory rules to generate inventory reports by month, week, or day. Among them, monthly requires specifying the output date (supports setting the 1st–28th), while weekly continues to generate reports on the configured day of the week.
One-time inventory: Initiate a one-time inventory task to generate a report. Currently, COS does not support record query for one-time inventory tasks, so save the task initiation Rule id, inventory storage path, etc. for future reference when searching the inventory report.
How to Configure Inventory
Before configuring an inventory, you need to understand two concepts:
Source bucket: The bucket for which you want to enable inventory, containing:
Objects listed in the inventory.
Configuration of the inventory.
Destination bucket: The bucket where to store the inventory report, containing:
An inventory list file.
Manifest files that describe the location of the inventory list file.
An inventory can be configured as follows:
Specify the information of the objects to be analyzed in the source bucket
To inform COS of object information to be analyzed, you need to configure the following information in the source bucket for the inventory:
Select object versions: List all the versions of the object or list only the current version. If you select to list all the versions of the object, COS adds information about the object in all historical versions to the inventory report. If you select to list only the current version, COS records only the object in the latest version.
Configure the attributes of the objects to be analyzed: You need to tell COS which information in the object attributes needs to be included in the inventory report. Currently, supported object attributes include account ID, source bucket name, object file name, object version ID, whether the object is of the latest version, whether the object is a deletion flag, object size, object's last modified date, ETag, object's storage class, cross-region replication tag, and whether the object is a part in multipart upload.
Configure the storage information for the inventory report
You need to tell COS how often to export the inventory report, which bucket to store the report in, and whether the report should be encrypted. The configuration information is as follows:
Select an export frequency: Daily or weekly. COS will execute the inventory feature at the specified frequency.
Select an encryption mode: No encryption or SSE-COS. If SSE-COS is selected, COS encrypts the generated inventory report.
Configure the output location of the inventory: You need to specify the bucket where to store the inventory report.
Note:
The destination bucket must be in the same region as the source bucket. They can be the same bucket.
How to Use
Configuring Inventory via the Console
Adding a Scheduled List
1. Log in to the COS Console.
2. In the left sidebar, click Bucket List.
3. Click to enter the bucket (source bucket) for which you want to enable the inventory feature.
4. In the left navigation bar, select basic configuration > inventory setting, then click Add list.
5. On the configuration page, you can configure the following:
5.1 Basic information
Rule Status: Select whether to enable the current inventory rule. You can select to enable/disable the inventory.
Inventory Name: Type the name of your inventory.
Target bucket: Refers to the bucket where the inventory is stored. The initial default destination bucket is the source bucket. The destination bucket must be in the same region as the source bucket.
Inventory report prefix (optional): Input a prefix of your choice for the target storage bucket, which can be used to group inventory files in a common location. The initial value is the default value.
Inventory report generation path: Refers to the path where the inventory report is generated.
5.2 Filtering Condition
File range: Select the scope of the inventory objects. You can select the entire bucket or some files with the same prefix. For example, to select all files in the doc path under the folder path in the bucket, specify the file prefix as
folder/doc.Object Version: Select whether the inventory will include all versions of the object or only the current version. If this is not selected, only the current version will be kept by default.
Object tag (optional): Filter objects with the same tag into the inventory. If left blank, no filtering is performed by default.
Filtering Time (optional): List objects whose modification time is after a certain time point or within a certain time to the inventory through filtering. If this is not set, no filtering will be performed by default.
Storage Type Filter (optional): List objects with the specified storage type (if any) into the inventory. For an introduction to storage types, please refer to Storage Type Overview. If not set, no filtering is performed by default.
Custom output header (optional): If you need to include custom headers of the object in the inventory report, you can fill in the custom headers to be output. Only x-cos-meta-* headers are supported. If not filled in, the custom header will not be output by default.
Inventory Information: Select the corresponding information of the object to be included in the inventory report. Options include: size, storage type, ETag, bucket replication status, multipart upload status, latest update date, Tag, CRC64. If not selected, all are selected by default.
Note:
ETag (Entity Tag) is a hash of an object. ETag reflects only changes to the content of an object but not changes to its metadata. The ETag is not necessarily an MD5 digest of the object's data, depending on how the object was created and encrypted.
The generated inventory content by default includes the field contents of AppID, Bucket, Key, and LastModifiedTime.
If versioning is enabled for the bucket, the generated inventory contents increase with VersionId, IsLatest, and IsDeleteMarker fields.
5.3 Output Format
Output format: The output inventory file format is a CSV file compressed using GZIP.
Generation Cycle: Select whether to generate the inventory daily/weekly/monthly. The default is to generate the inventory daily. The specific time to generate the inventory depends on the amount of data. The description of the configuration is shown below:
Daily: For example, if the list is added at 3 PM on the same day, the list file is typically generated and delivered to the target bucket by 6 AM the next day (estimated time). If the data volume is large, the generation time may be delayed. It is recommended to choose weekly or monthly list generation.
Weekly: The inventory is generated every 7 days by default. For example, if the inventory is enabled on September 1, the first inventory will be generated on September 2, then on September 9, 16, 23... at 7-day intervals.
Per month: You can specify any day from the 1st to the 28th to generate the inventory. The generation logic is as follows:
If the current day is the specified date when creating the inventory, it will be generated on the specified date of the current month.
For example, if you enable inventory on September 8 and designate the 25th of each month for generation, the first inventory will be generated on September 25, followed by October 25, November 25, December 25, and so on, with periodic inventory generation by month.
If the current day is on or after the specified date when creating the inventory, it will be generated on the specified date of the next month.
For example, if you enable inventory on September 8 and designate the 3rd of each month for generation, the first inventory will be generated on October 3, then on November 3, December 3, and so on, with periodic inventory generation by month.
Inventory Encryption: Select whether the inventory needs server-side encryption. The options are:
No encryption: The inventory will not be encrypted. This is the default option.
SSE-COS: Encrypt reports using server encryption with COS-managed keys. For more information, see SSE-COS Encryption in the COS Developer Guide.
Access authorization: Disabled by default. After enabling access authorization, you can proceed to the next step.
5.4 Information Confirmation
5.5 Confirm the inventory configuration information for the bucket. If modification is needed, click Back.
6. After confirming that the configuration information is correct, click Confirm. COS will then automatically generate inventory files based on the set period and deliver them to the target bucket you set.
Note:
For details on the format and content of the inventory report generated by the inventory feature, see Feature Overview of Inventory.
7. After successful creation, the inventory will be delivered to the specified path, which is the inventory report generation path in 5.1. For more information, see inventory report storage path.
Generating an Instant List
Note:
If you want to immediately execute created inventory rules, select instant inventory generation.
1. Log in to the COS Console.
2. In the left sidebar, click Bucket List, then click to enter the created bucket (source bucket) with inventory rules.
3. Click on the left basic configuration > inventory setting, find the corresponding inventory rule, then click on the right more > immediately execute to quickly generate a list.
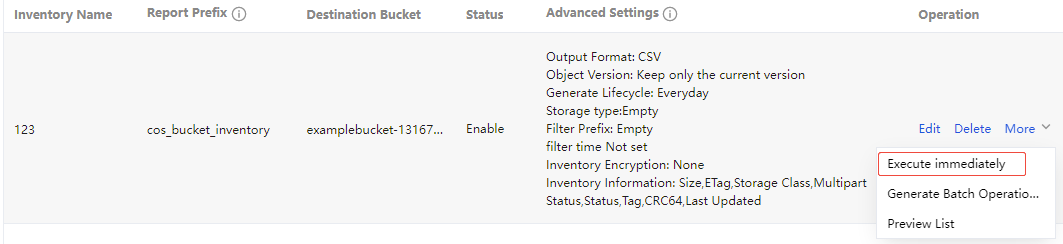
4. After successful creation, the instant inventory will be delivered to the specified path, which is the current scheduled inventory rule's configured inventory report generation path.
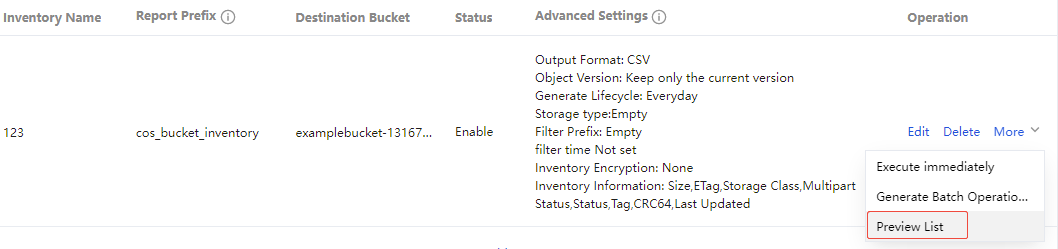
Previewing Inventory
1. Log in to the COS Console.
2. In the left sidebar, click Bucket List, then click to enter the created bucket (source bucket) with inventory rules.
3. Click on the left basic configuration > inventory setting, find the corresponding inventory rule, then click more > preview inventory to quickly view the inventory result.
4. The preview page shows all inventories generated under the current rule, including scheduled inventory and instant inventory. You can go to the directory and view inventory results with one-click, and support filtering by date and inventory type.
Note:
After triggering the manifest task, the inventory result will update gradually. The result will be fully generated only after the manifest.json file is generated under the directory.
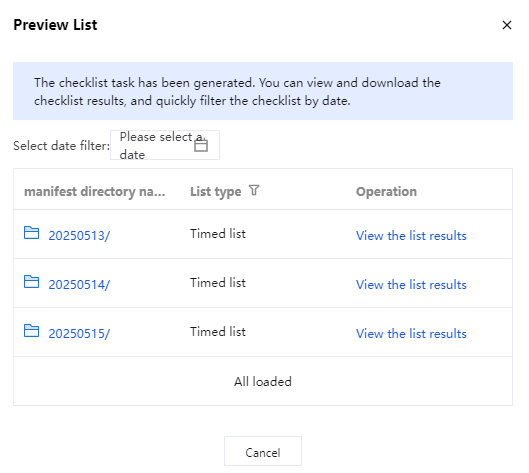
5. After selecting the date, in the directory name column, click a directory to quickly redirect to it. You can view the generated inventory contents. For more details, please refer to inventory report storage path.
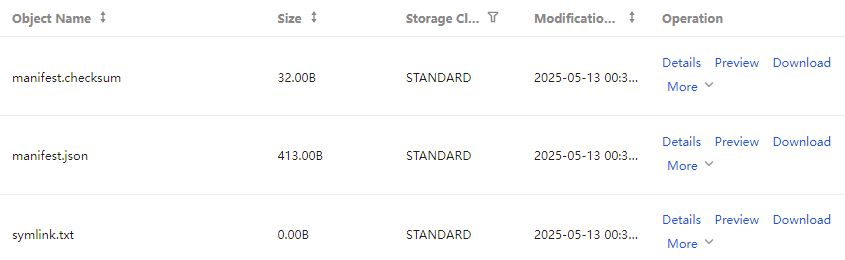
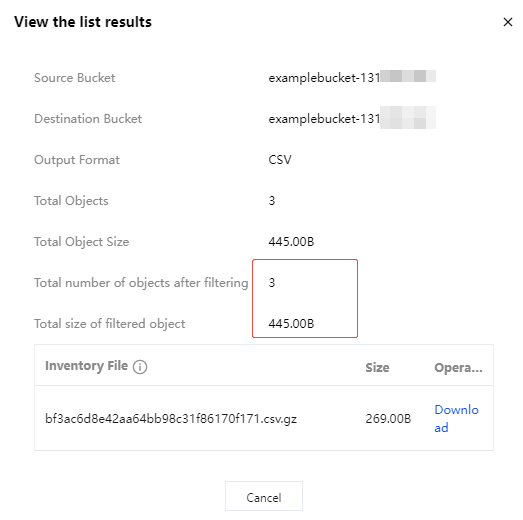
6. To directly view the inventory result, click View Inventory Result in the operation column, and you will see the total number of objects and sizes under your configuration criteria. For more detailed inventory information, click Download to decompress and view.
7. The field names corresponding to the downloaded CSV file can be viewed in the "fileSchema" of the manifest.json file. For more field meanings and descriptions, please refer to Inventory Parameters.
Configuring an Inventory Through APIs
To enable the inventory feature for a specified bucket using APIs, follow the steps below:
1. Create a COS role.
2. Bind permissions to the COS role.
3. Enable inventory.
1. Create a COS Role
Create a COS role, for detailed API information, refer to CreateRole.
The roleName must be: COS_QcsRole.
The policyDocument is:
{"version": "2.0","statement": [{"action": "name/sts:AssumeRole","effect": "allow","principal": {"service": "cos.cloud.tencent.com"}}]}
2. COS Role Binding Permissions
Bind role permissions, for more information on the specific interface, see AttachRolePolicy.
Here, policyName is: QcloudCOSFullAccess, and roleName is the COS_QcsRole from step 1, or you can use the roleID returned when creating the roleName.
3. Enable the Inventory Feature
The destination bucket for storing inventory files must be in the same region as the source bucket. Call the API to enable inventory. The API information is as follows:
Periodic Inventory
Configure periodic inventory: PUT Bucket inventory
View periodic inventory rules: GET Bucket Inventory
Delete periodic inventory rules: DELETE Bucket Inventory
List periodic inventory rules: LIST Bucket Inventory
Trigger a one-time inventory task: POST Bucket Inventory
Inventory Report Storage Path
The manifest reports and associated manifest files will be published in the destination bucket, with the manifest reports being published at the following path:
destination-prefix/appid/source-bucket/config-ID/The manifest files will be published under the following path in the destination bucket:
destination-prefix/appid/source-bucket/config-ID/YYYYMMDD/manifest.jsondestination-prefix/appid/source-bucket/config-ID/YYYYMMDD/manifest.checksumNote:
After initiating an inventory task, the results will be progressively updated. The inventory results will only be fully generated once the manifest.json file under the inventory directory is created.
The meanings of the paths are as follows:
destination-prefix: This is the "destination prefix" set by the user when configuring the inventory. It can be used to group all inventory reports in a common location within the target bucket.
source-bucket: This is the name of the source bucket corresponding to the inventory report. This folder is added to avoid conflicts that may occur when multiple source buckets send their inventory reports to the same destination bucket.
config-ID: This is the "inventory name" set when you configure the inventory. If multiple inventory reports are configured in the same source bucket and delivered to the same destination bucket, config-ID can be used to distinguish among different reports.
YYYYMMDD: Timestamp, including the time and date when the bucket scan is started when the inventory report is generated.
manifest.json: This is the manifest file.
manifest.checksum: This is the MD5 of the content of the manifest.json file.
There are two manifest files: manifest.json and manifest.checksum.
Note:
Below describes the Manifest files:
Both
manifest.json and manifest.checksum are Manifest files. The manifest.json file describes the location of the inventory report, while manifest.checksum serves as the MD5 of the manifest.json file content. Each time a new inventory report is delivered, a new set of Manifest files is included.Each manifest contained in manifest.json provides metadata and basic information about the inventory, including:
Source bucket name.
Destination bucket name.
Inventory version.
Timestamp, including the time and date when the bucket scan is started when the inventory report is generated.
Format and architecture of the inventory file.
Object key, size, and MD5 checksum of the inventory report in the destination bucket.
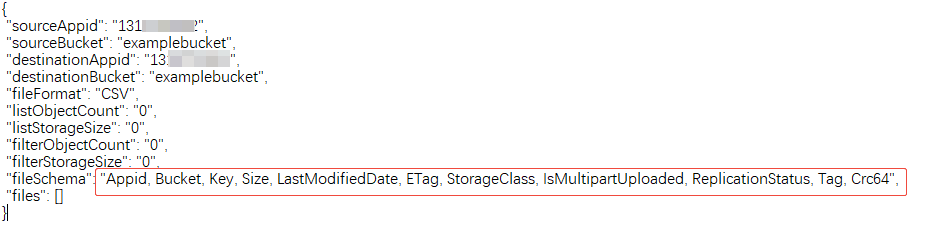
The following example shows a manifest in the manifest.json file for CSV-formatted inventory:
{"sourceAppid": "1250000000","sourceBucket": "example-source-bucket","destinationAppid": "1250000000","destinationBucket": "example-inventory-destination-bucket","fileFormat": "CSV","listObjectCount": "13","listStorageSize": "7212835","filterObjectCount": "13","filterStorageSize": "7212835","fileSchema": "Appid, Bucket, Key, Size, LastModifiedDate, ETag, StorageClass, IsMultipartUploaded, ReplicationStatus","files": [{"key": "cos_bucket_inventory/1250000000/examplebucket/inventory01/04d73d9debc73d9f0bf85af461abde6c.csv.gz","size": "502","md5Checksum": "7d40288a09c25b302ad6cb5fced54f35"}]}
Inventory Consistency
All of your objects might not appear in each inventory list. The inventory list provides eventual consistency for PUTs of both new objects and overwrites, and DELETEs. Therefore, the inventory report possibly does not include the latest added or deleted object. For example, if the user uploads or deletes an object when COS is executing an inventory job configured by the user, the results of the upload or deletion operations may not be reflected in the inventory report.
If you want to verify the object status before the execution, you are advised to call the HEAD Object API to extract the object metadata, or check the object attributes in the COS console.
Apakah halaman ini membantu?
Anda juga dapat Menghubungi Penjualan atau Mengirimkan Tiket untuk meminta bantuan.
Ya
Tidak
masukan