Introduction
The default system time of containers in TKE clusters is Universal Time Coordinated (UTC), which may be different with the local time zone of your nodes. During the use of containers, time zone inconsistency in containers will cause trouble when the system time is used for operations, such as log records and database storage. In this document, we will use "Asia/Shanghai" as the local time zone.
You cannot modify the default time of the cluster but the container. This document provides multiple solutions to time zone inconsistencies in containers. You can choose the solution that works for you.
Operation Environment
All operations described in this document are completed on TKE cluster nodes. The relevant operation environment is shown below. Please use this document to solve problems based on your actual situation.
|
| | CPU: 1 core, memory: 1 GB, bandwidth: 1 Mbps System disk: 50 GB (HDD cloud disk) | | |
Cause Locating
2. Run the following command to query the local time:
The following information appears:
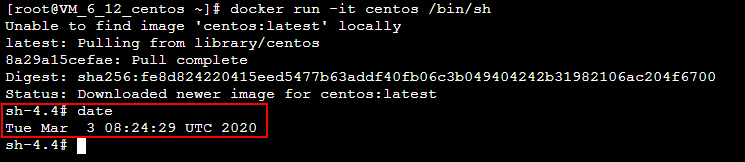
3. Run the following commands in sequence to query the default time zone of CentOS in the container:
docker run -it centos /bin/sh
The following information appears:
By comparison, it is clear that the local time zone and the time zone in the container are inconsistent. 4. Run the following command to exit the container:
Directions
Solution 1: create a time zone file in Dockerfile (recommended)
When creating a basic image or customizing an image based on a basic image, you can create a time zone file in Dockerfile to solve time zone inconsistency within a container. After this, you will no longer be troubled by time zone issues when using the image.
1. Run the following command to create the Dockerfile.txt file:
2. Press i to switch to the editing mode, and write the following information to configure the time zone file.
FROM centos
RUN rm -f /etc/localtime \\
&& ln -sv /usr/share/zoneinfo/Asia/Shanghai /etc/localtime \\
&& echo "Asia/Shanghai" > /etc/timezone
3. Press Esc, enter :wq, and save and close the file.
4. Run the following command to create a container image:
docker build -t centos7-test:v1 -f Dockerfile.txt .
The following information appears:
5. Run the following commands in sequence to launch the container image and query the time zone in the container:
docker run -it centos7-test:v1 /bin/sh
The time zone in the container is consistent with the local time. See the figure below:
6. Run the following command to exit the container:
Solution 2: mount the time zone configuration of the CVM to the container
You can also solve time zone inconsistency in a container by mounting the time configuration of the CVM to the container. This solution can be set when the container is started, or you can use the CVM path in the YAML file to mount volumes to the container.
Mounting CVM time configuration to the container when the container is started
When mounting the CVM time configuration to the container to overwrite the original configuration, there are two options:
Mount local /etc/localtime: you need to ensure that the CVM time zone configuration file exists and the time zone is correct.
Mount local /usr/share/zoneinfo/Asia/Shanghai: when the local /etc/localtime does not exist or the time zone is incorrect, you can directly mount the configuration file.
Choose one of the following methods based on your situation to mount the CVM time configuration to the container:
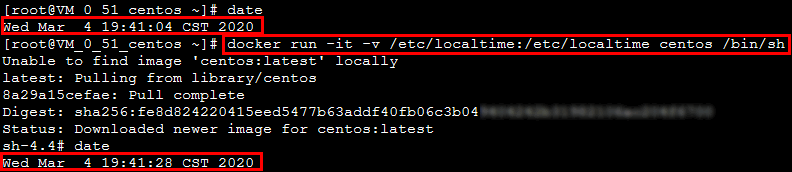
Method 1: mount local /etc/localtime;
1.1 Run the following commands in sequence to query the local time and mount the local /etc/localtime into the container:
docker run -it -v /etc/localtime:/etc/localtime centos /bin/sh
If the following information appears, the time zone in the container is consistent with the local time:
1.2 Run the following command to exit the container:
Method 2: mount local /usr/share/zoneinfo/Asia/Shanghai:
1.1 Run the following commands in sequence to query the local time and mount local /usr/share/zoneinfo/Asia/Shanghai into the container:
docker run -it -v /usr/share/zoneinfo/Asia/Shanghai:/etc/localtime centos /bin/sh
If the following information appears, the time zone in the container is consistent with the local time:
1.2 Run the following command to exit the container:
Using data volumes in the YAML file to mount the CVM time zone configuration to the container
This section uses mountPath:/etc/localtime as an example to illustrate how to mount the CVM time zone configuration to the container using volumes in the YAML file. This will solve time zone inconsistency in the container.
1. Run the following command on the node to create the pod.yaml file:
2. Press i to switch to the editing mode and enter the following.
apiVersion: v1
kind: Pod
metadata:
name: test
namespace: default
spec:
restartPolicy: OnFailure
containers:
- name: nginx
image: nginx-test
imagePullPolicy: IfNotPresent
volumeMounts:
- name: date-config
mountPath: /etc/localtime
command: ["sleep", "60000"]
volumes:
- name: date-config
hostPath:
path: /etc/localtime
3. Press Esc, enter :wq, and save and close the file.
4. Run the following command to create a pod:
kubectl create -f pod.yaml
The following information appears:
5. Run the following commands in sequence to query the time zone in the container:
kubectl exec -it test date
If the following information appears, the time zone is consistent with the local system time zone.