Creating an Account
Download
フォーカスモード
フォントサイズ
Scenarios
In TencentDB for MongoDB, creating an account is a fundamental operation for achieving data access isolation and fine-grained permission management. When you need to grant database access permissions to new applications, specific team members (such as developers, Ops personnel, or data analysts), or external partners, you should create separate dedicated accounts. By creating multiple accounts and assigning each precisely the required read-only or read-write permissions for specific databases, you can strictly adhere to the principle of least privilege, thereby preventing security risks such as misoperations or unauthorized data access caused by sharing a common account.
Usage Notes
Note:
After the successful creation of an account or modification of account permissions, the system requires 2 minutes for background configuration to take effect. Wait a moment before using the account to connect to or access the database.
To ensure database access security, it is recommended to change your account password regularly, with a recommended interval of no more than 3 months.
Prerequisites
The status of the replica set instance or sharded cluster instance of TencentDB for MongoDB is Running.
Operation Steps
1. Log in to the TencentDB for MongoDB console.
2. In the left sidebar, expand the MongoDB dropdown list, and select either Replica Set Instance or Shard Instance. The operations for replica set instances and sharded cluster instances are similar.
3. Select a region at the top of the instance list page on the right.
4. Find the target instance in the instance list.
5. Click the target instance ID to go to the Instance Details page.
6. Select the Database Management tab, go to the Account Management page, and click Create Account.
7. In the Create Account pop-up window, configure the account information as shown in the table below, and then click OK.
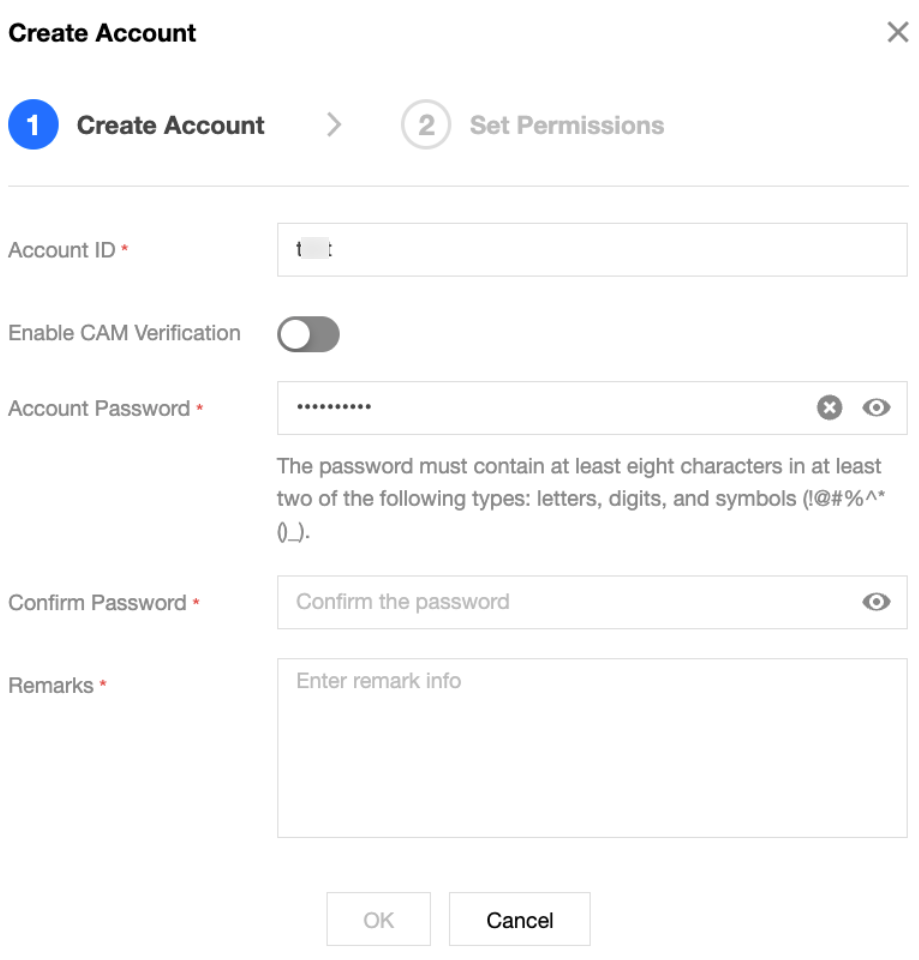
Parameter Name | Required or Not | Parameter Description | Parameter Value | Parameter Example |
Account ID | Yes | Sets a name for the new account. | The requirements for setting a new account name are as follows: The length should be between 1 and 32 characters. Allowed characters include uppercase letters, lowercase letters, digits (1–9), underscores (_), and hyphens (-). | test |
Enable CAM Verification | No | Associates CAM with database account verification and performs identity authentication with a dynamically generated security credential. | - | |
Account Password | Yes | Sets a password for the new account. | Password complexity requirements are as follows: The length should be between 8 and 32 characters. It should include at least two of the following: letters, digits, and special characters (the exclamation mark (!), at sign (@), number sign (#), percent sign (%), caret (^), asterisk (*), parentheses (), and underscore (_)). | test@123 |
Confirm Password | Yes | Confirms the password for the new account. | Password complexity requirements are as follows: The length should be between 8 and 32 characters. It should include at least two of the following: letters, digits, and special characters (the exclamation mark (!), at sign (@), number sign (#), percent sign (%), caret (^), asterisk (*), parentheses (), and underscore (_)). | test@123 |
Remarks | No | Remark information. | Any characters. | test |
8. On the Set Permissions page, set the database access permissions for the account.
Parameter Name | Parameter Description | Parameter Value |
Global Permission | Sets the global permissions of accessing all databases for the account. | No permission: The account has no permissions to read or write data. Read-Only: The account only has permissions to read data. Read/Write: The account has permissions to read or write data. |
Instance Details | Sets the access permissions of specific databases for the account. | Inherit global data: The account can use the global permissions. No permission: The account has no permissions to read or write data. Read-Only: The account only has permissions to read data. Read/Write: The account has permissions to read or write data. |
9. (Optional) Click Create Database to add a new entry to the database list. Enter the new database name in the input box, click OK to save it, and then set the access permissions for this database.
Note:
Creating a database does not actually create a physical database. It only presets the access permissions for that database.
10. Click OK to complete the settings. Wait for 2 minutes for the configuration to take effect. After that, you can use this account to access the database.
フィードバック