tencent cloud

TencentDB for MongoDB

Release Notes and Announcements
Release Notes
Announcements
User Guide
Product Introduction
Overview
Strengths
Use Cases
Cluster Architecture
Product Specifications
Features
Regions and AZs
Terms
Service Regions and Service Providers
Purchase Guide
Billing Overview
MongoDB Pricing
Billing Formula
Payment Overdue
Backup Space Billing
Configuration Adjustment Billing
Getting Started
Quickly Creating an Instance
Connecting to a TencentDB for MongoDB Instance
Reading/Writing Database
Operation Guide
Access Management
Instance Management
Node Management
Version Upgrade
Network Configuration
Monitoring
Backup and Rollback
Database Audit
Data Security
SSL Authentication
Log Management
Database Management
Multi-AZ Deployment
Disaster Recovery/Read-Only Instances
Parameter Configuration
Recycle Bin
Task Management
Performance Optimization
Data Migration Guide
Practical Tutorial
Optimizing Indexes to Break Through Read/Write Performance Bottlenecks
Troubleshooting Mongos Load Imbalance in Sharded Cluster
Considerations for Using Shard Clusters
Sample of Reading and Writing Data in MongoDB Instance
Methods for Importing and Exporting Data Based on CVM Connected with MongoDB
What to Do for Errors of Repeated Instance Creation and Deletion of Databases with the Same Names?
Troubleshooting MongoDB Connection Failures
Shard Removal Task: Guide for Confirming the Progress and Troubleshooting Issues
Performance Fine-Tuning
Ops and Development Guide
Development Specifications
Command Support in Sharded Cluster v3.2
Command Support in v3.6
Development Ops
Troubleshooting
Increased Slow Queries
Number of Connections Exceeding Limit
API Documentation
History
Introduction
API Category
Making API Requests
Instance APIs
Backup APIs
Account APIs
Other APIs
Task APIs
Introduction
Data Types
Error Codes
Instance Connection
Shell Connection Sample
PHP Connection Sample
Node.js Connection Sample
Java Connection Sample
Python Connection Sample
Python Read/Write Sample
Go Connection Sample
PHP Reconnection Sample
Product Performance
Test Environment
Test Method
Test Result
FAQs
Cost
Features
Sharded Cluster
Instance
Rollback and Backup
Connection
Data Migration
Others
Service Agreement
Service Level Agreement
Terms of Service
Glossary
Contact Us

Enabling CAM Authentication

PDF
フォーカスモード
フォントサイズ
最終更新日: 2025-11-18 16:30:27

Feature Description

TencentDB for MongoDB supports enabling the CAM authentication feature for database accounts, associating the accounts with CAM, and performing identity authentication with a dynamically generated security credential (temporary password) instead of the traditional static password. Once enabled, the system will automatically take over password management, performing an automatic rotation every 24 hours by default. This eliminates potential security risks caused by long-term static passwords or manual management oversights.

Scenarios

Enabling CAM authentication is a key step from "static password management" to "dynamic identity governance". It is particularly suitable for scenarios requiring user identity differentiation, fine-grained authorization, and compliance audit. It is recommended to enable CAM authentication in the following two scenarios.
Use CAM identity authentication as a mechanism for temporary personal access to the database.
Use CAM identity authentication only for workloads that can be retried easily.

Constraints and Limitations

Item
Description/Rule
Connection method
Persistent connections should be used to access the database if possible.
Enabling prerequisite
Before CAM authentication is enabled, it is required to configure the related permission policies in Tencent Cloud CAM in advance.
Number of accounts
For a single database instance, it is recommended to enable CAM authentication for no more than 10 accounts.
Password modification
After CAM authentication is enabled, the account password cannot be modified. You can only access the instances through using the token provided by CAM.
Instance type
It is not supported to enable CAM authentication for instances with "password-free authentication" enabled.
Disabling operation
To disable CAM authentication, a new static password should be set for the account; otherwise, databases cannot be connected.
Version description
MongoDB 4.4 and later versions are supported, and CAM authentication is compatible with both the physical disk and Cloud Disk Edition simultaneously.

Operation Steps

Step 1: Configuring CAM Permission Rules

Before using the CAM authentication feature for the account, users need to configure the related CAM permission rules. The policy content is as follows.
<User uin>: Replace it with the actual account ID.
<Instance ID>: Replace it with the actual ID of the instance that needs to be authorized.
<Account name>: Replace it with the actual name of the account that needs to be authorized.
{
"statement": [
{
"action": [
"cam:GetMongoDBPassword"
],
"effect": "allow",
"resource": [
"qcs::cam::uin/<User uin>:resourceUser/<Instance ID>/<Account name>",
]
}
],
"version": "2.0"
}
1. Log in to the CAM console with an administrator account.
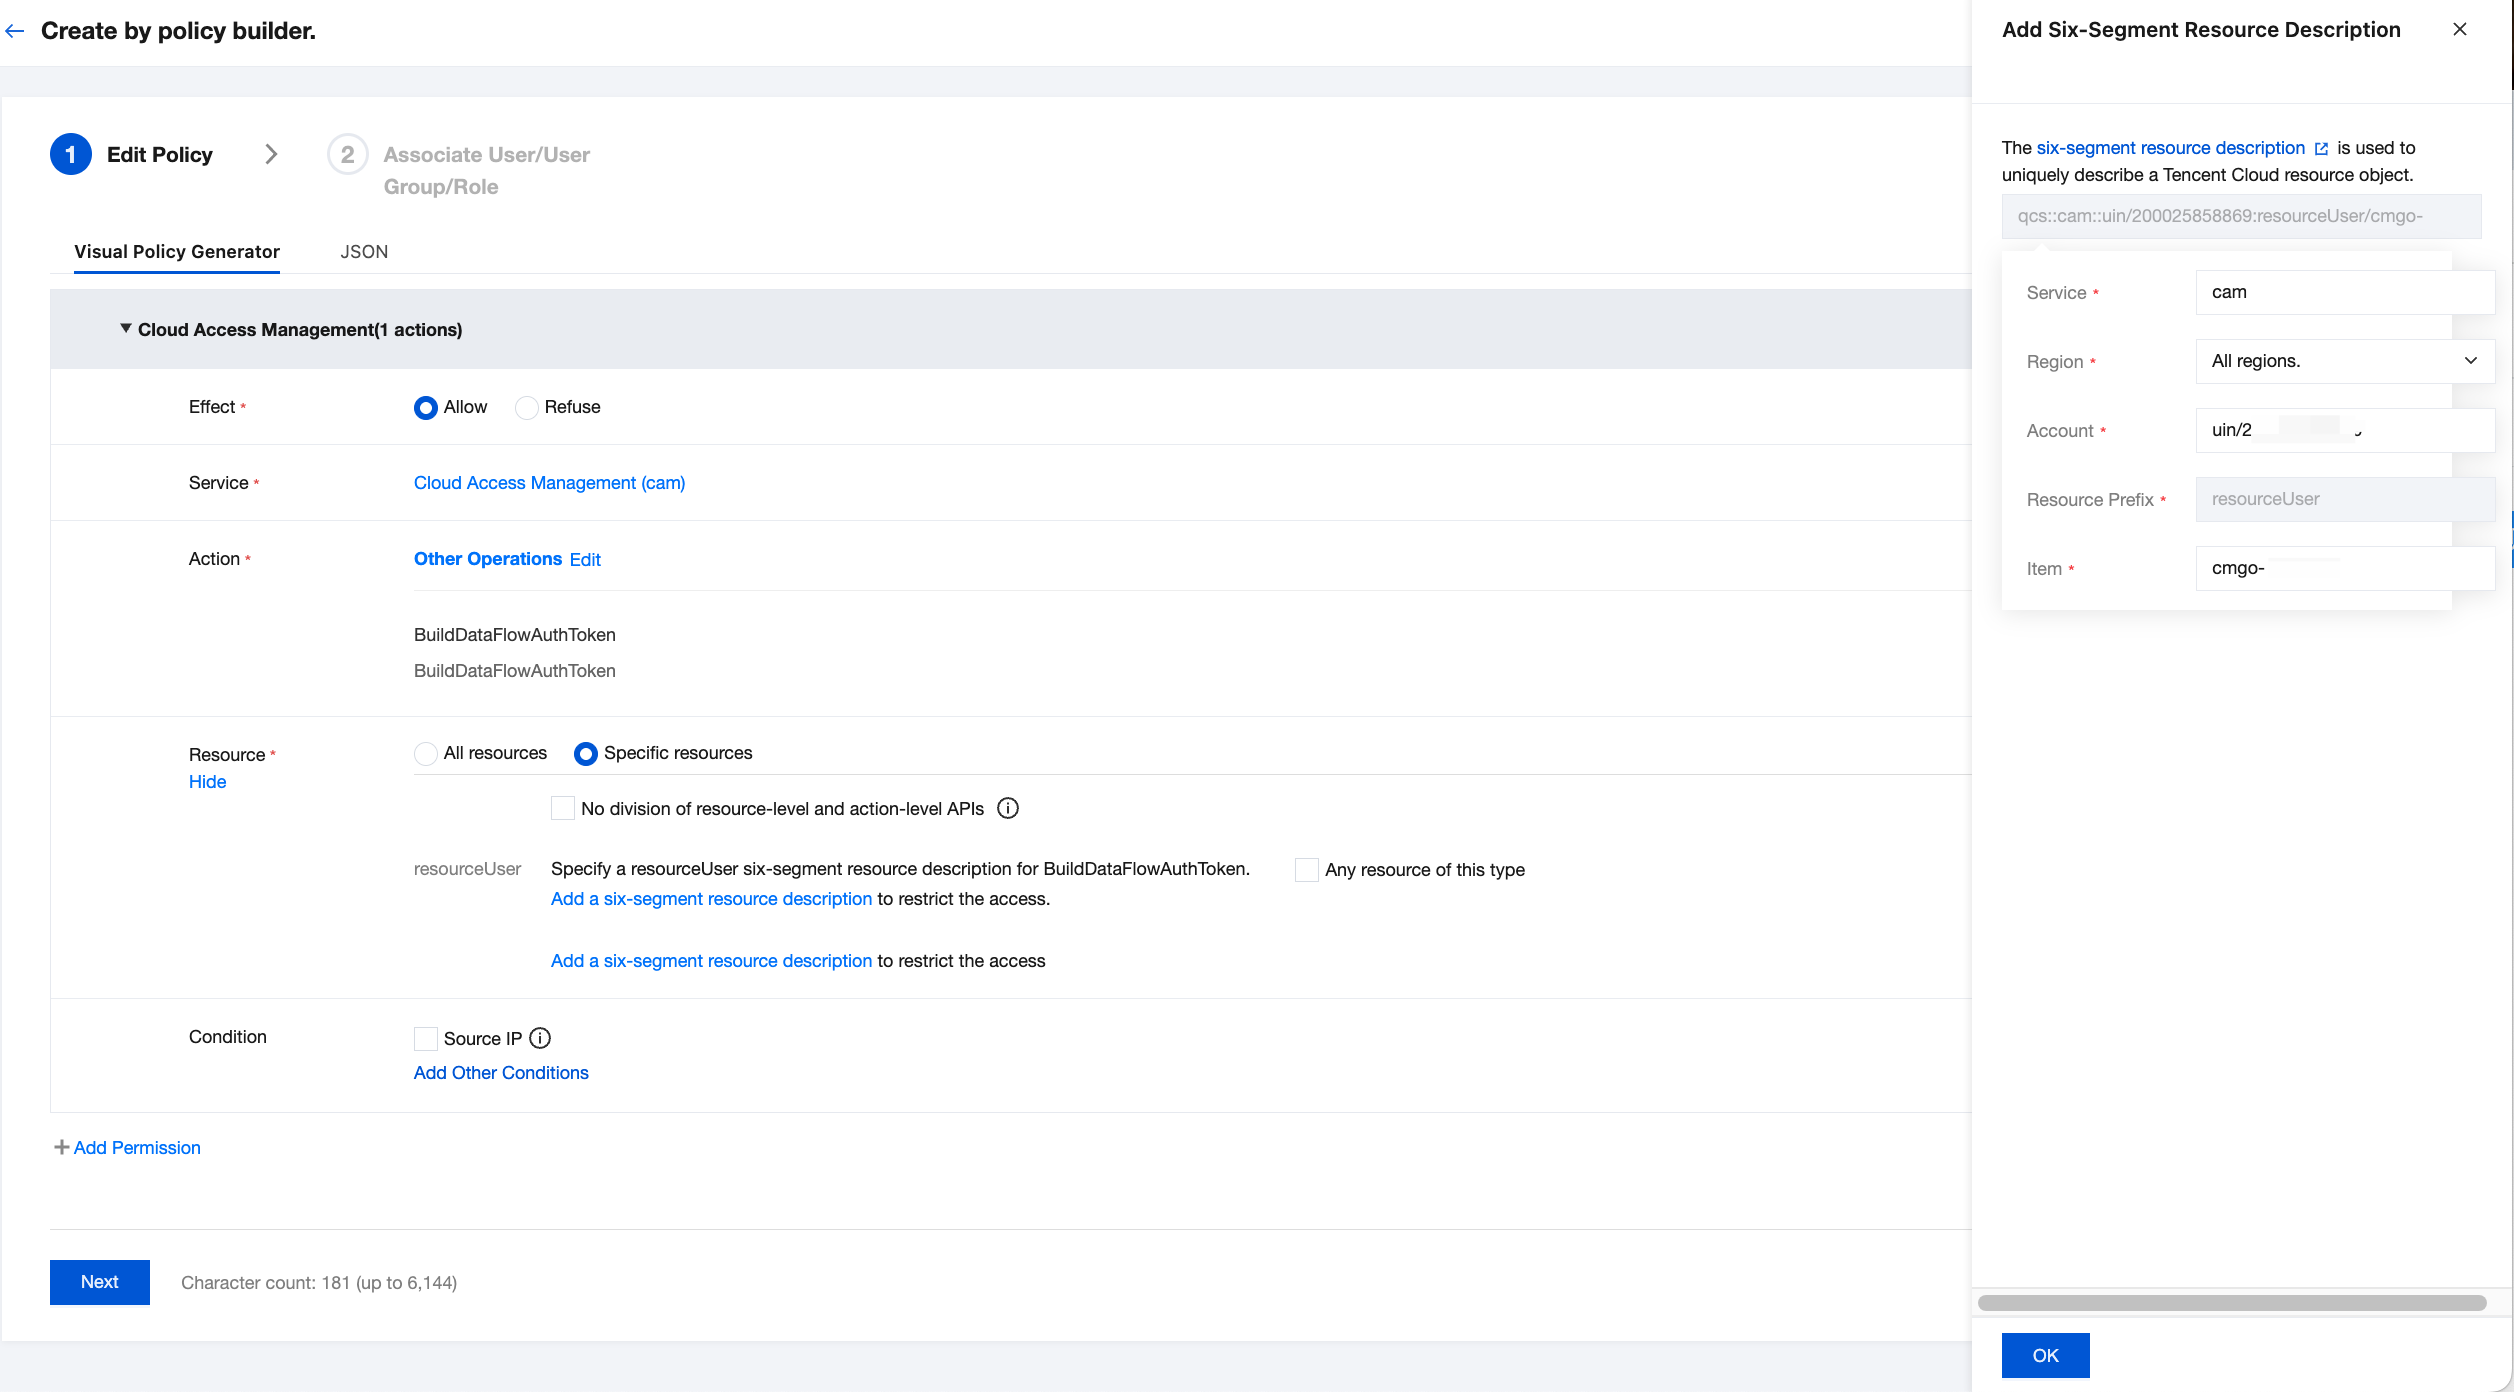
2. In the left sidebar, select Policies. On the right-side page, click Create a custom policy in the upper left corner. In the Select a policy creation method pop-up window, select Create by policy builder.
3. On the Create by Policy Generator configuration wizard page, generate the policy according to the following descriptions and requirements. For detailed operations, see Creating Custom Policies Using the Policy Generator.
Note:
1. Effect: configured as Allow.
2. Service: configured as Cloud Access Management (cam).
3. Action: configured as Other Operations > BuildDataFlowAuthToken.
4. Resource: Select Specific resources, click Add a six-segment resource description, configure resource information for resources in the Add Six-Segment Resource Description area on the right side as <Instance ID>/<Account name>, and then click OK.

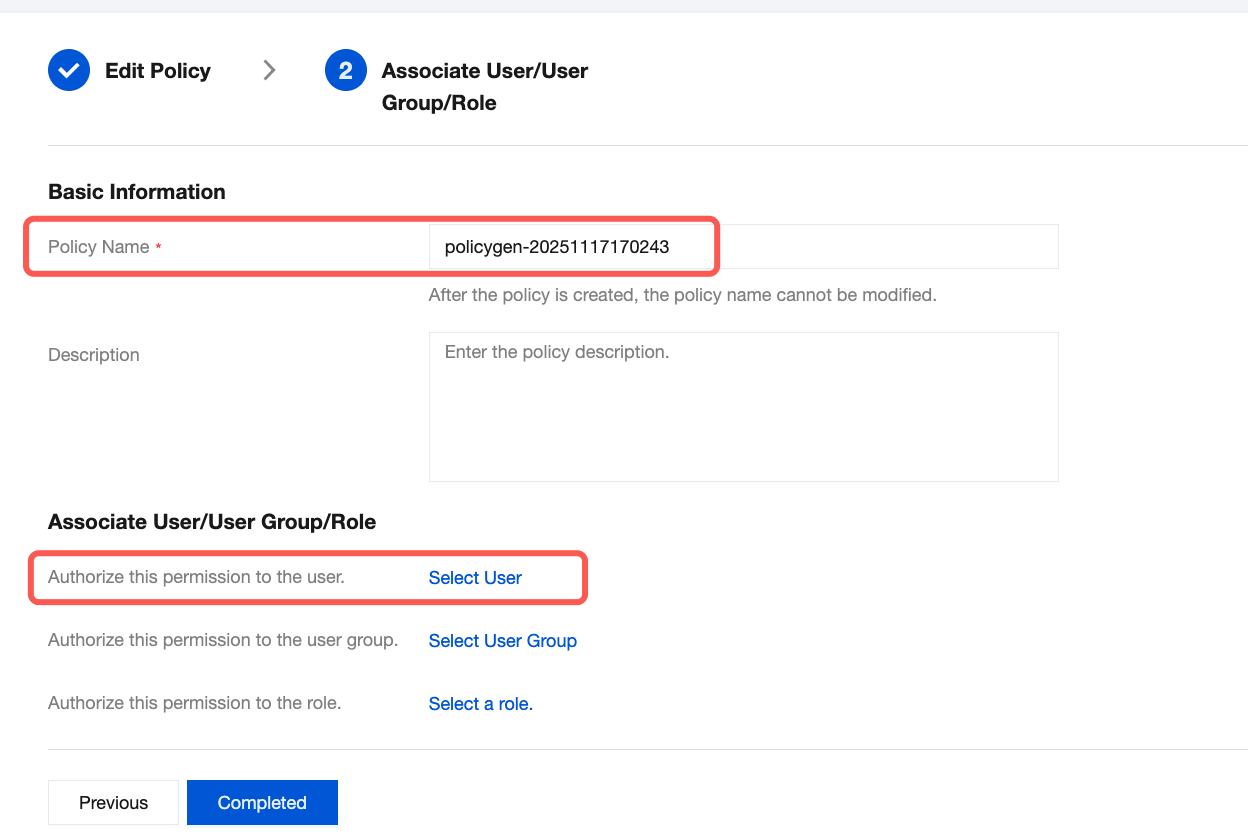
4. Click Next, customize the policy name according to the prompt, and grant policy permissions to the target sub-account.

5. Click Complete to complete authorization.

Step 2: Enabling CAM Authentication

Enabling CAM authentication involves two scenarios: enabling CAM authentication during account creation and enabling CAM authentication for an existing account. You can follow the steps below to perform operations respectively:
Note:
It is recommended to enable this feature for no more than 10 accounts of each instance.
Relevant CAM permission rules should be configured before this feature is enabled.
Scenario 1: Enabling CAM Authentication During Account Creation
Scenario 2: Enabling CAM Authentication After Account Creation
2. In the left sidebar, expand the MongoDB dropdown list, and select either Replica Set Instance or Shard Instance. The operations for replica set instances and sharded cluster instances are similar.
3. Select a region at the top of the instance list page on the right.
4. Find the target instance in the instance list.
5. Click the target instance ID to go to the Instance Details page.
6. Select the Database Management tab to go to the Account Management page.
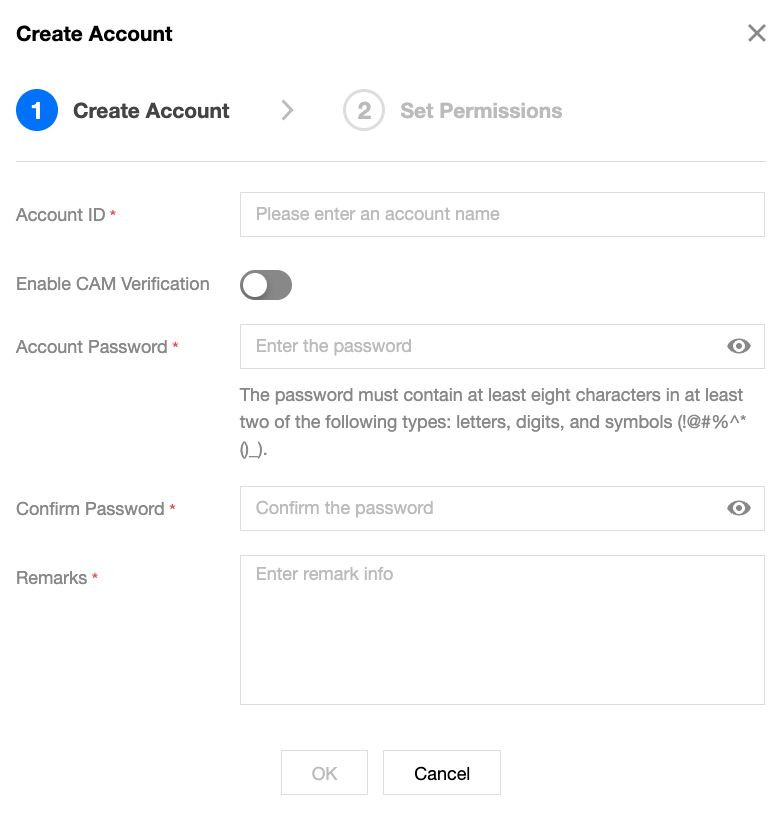
7. Click Create Account, click

next to Enable CAM Verification in the Create Account pop-up window, confirm the risk warning message in the Enable CAM Verification pop-up window, and click OK to enable CAM authentication.

2. In the left sidebar, expand the MongoDB dropdown list, and select either Replica Set Instance or Shard Instance. The operations for replica set instances and sharded cluster instances are similar.
3. Select a region at the top of the instance list page on the right.
4. Find the target instance in the instance list.
5. Click the target instance ID to go to the instance details page.
6. Select the Database Management tab to go to the Account Management page.
7. In the account list, find the account that needs to enable CAM authentication, and click Enable CAM Authentication in the Operation column.

8. In the Enable CAM Authentication pop-up window, confirm the risk warning message, and click OK to enable CAM authentication.

Step 3: Obtaining a Password Through Calling Code at the Application Side

After assigning the related CAM permission policies and enabling CAM authentication for an account, users can obtain a password through calling code, such as Java, at the application side to establish connections to the database instance.
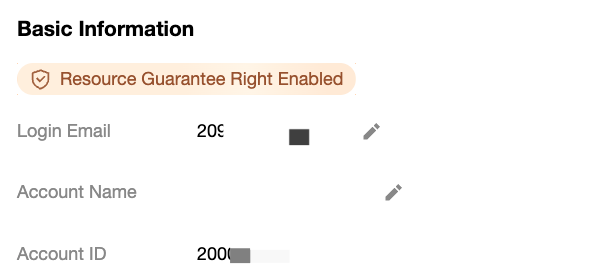
1. In the Tencent Cloud console, query the account AppID on the Account Information page.

2. Log in to the CAM console, and go to the API Key Management page to obtain the SecretID and SecretKey.
3. Use the following code at the application side.
<dependency>
<groupId>com.tencentcloudapi</groupId>
<artifactId>tencentcloud-dbauth-sdk-java</artifactId>
<version>1.0.4</version>
</dependency>
Indirect dependency item: tencentcloud-sdk-java 3.1.1039 or later versions.
<dependency>
<groupId>com.tencentcloudapi</groupId>
<artifactId>tencentcloud-sdk-java</artifactId>
<version>3.1.1039</version>
</dependency>
Example of obtaining a password through calling code
<Instance region>: Replace it with the region of the instance that needs to be accessed. For example, ap-guangzhou.
<Instance ID>: Replace it with the actual ID of the instance that needs to be accessed.
<Account name>: Replace it with the actual login account name.
<TENCENTCLOUD_SECRET_ID>: Replace it with the SecretID obtained from the CAM console.
<TENCENTCLOUD_SECRET_KEY>: Replace it with the SecretKey obtained from the CAM console.
package com.tencentcloud.dbauth;
import com.tencentcloudapi.common.Credential;
import com.tencentcloud.dbauth.model.GenerateAuthenticationTokenRequest;
import com.tencentcloudapi.common.exception.TencentCloudSDKException;
import com.tencentcloudapi.common.profile.ClientProfile;
import com.tencentcloudapi.common.profile.HttpProfile;

public class GenerateDBAuthentication {

public static void main(String[] args) {
// Define authentication token parameters.
String region = "<Instance region>";
String instanceId = "<Instance ID>";
String userName = "<Account name>";
// Obtain credentials from environment variables.
Credential credential = new Credential(System.getenv("<TENCENTCLOUD_SECRET_ID>"), System.getenv("<TENCENTCLOUD_SECRET_KEY>"));

System.out.println(getAuthToken(region, instanceId, userName, credential));
}

public static String getAuthToken(String region, String instanceId, String userName, Credential credential) {
try {
// Instantiate an http option (optional). Skip it if there are no special requirements.
HttpProfile httpProfile = new HttpProfile();
httpProfile.setEndpoint("cam.tencentcloudapi.com");
// Instantiate a client option (optional). Skip it if there are no special requirements.
ClientProfile clientProfile = new ClientProfile();
clientProfile.setHttpProfile(httpProfile);

// Build GenerateAuthenticationTokenRequest.
GenerateAuthenticationTokenRequest tokenRequest = GenerateAuthenticationTokenRequest.builder()
.region(region)
.credential(credential)
.userName(userName)
.instanceId(instanceId)
.clientProfile(clientProfile) // clientProfile is optional.
.build();

return DBAuthentication.generateAuthenticationToken(tokenRequest);

} catch (TencentCloudSDKException e) {
e.printStackTrace();
}
return "";
}
}

Step 4: Connecting to TencentDB for MongoDB Using Identity Token

Note:
Using the JDBC driver for connection is the standard method for Java applications to connect to relational databases. For detailed JDBC driver installation and connection methods, see Using the JDBC Driver.
Add MongoDB Java Driver dependency.
<dependency>
<groupId>org.mongodb</groupId>
<artifactId>mongodb-driver-sync</artifactId>
<version>4.11.0</version>
</dependency>
After obtaining the identity token AuthToken in Step 3, you can use it to connect to TencentDB for MongoDB. The following connection command is an example for the scenario of using JDBC for database connections.
<Database name>: Replace it with the actual name of the database that needs to be accessed.
<Account name>: Replace it with the actual login account name.
<Password>: Replace it with the AuthToken obtained in Step 3.
import com.mongodb.client.MongoClient;
import com.mongodb.client.MongoClients;
import com.mongodb.client.MongoDatabase;

public class MongoDBConnectExample {
public static void main(String[] args) {
// Connection string format.
String connectionString = "mongodb://<Account name>:<Password>@localhost:27017/<Database name>?authSource=admin";

try (MongoClient mongoClient = MongoClients.create(connectionString)) {
MongoDatabase database = mongoClient.getDatabase("<Database name>");
System.out.println("Connected to MongoDB successfully!");
// You can use the database to perform subsequent operations.
} catch (Exception e) {
e.printStackTrace();
}
}
}

Appendix 1: Disabling CAM Authentication

2. In the left sidebar, expand the MongoDB dropdown list and select either Replica Set Instance or Sharded Cluster Instance. The operations for replica set instances and sharded cluster instances are similar.
3. Select a region at the top of the instance list page on the right.
4. Find the target instance in the instance list.
5. Click the target instance ID to go to the instance details page.
6. Select the Database Management tab to go to the account management page.
7. In the account list, find the account that needs to disable CAM authentication, and click Disable CAM Authentication in the Operation column.
8. In the Disable CAM Authentication pop-up window, enter the account password, enter it again in the password confirmation area, and then click OK to disable CAM authentication.

Appendix 2: Using Python to Connect to a Database

import logging
import os
import time
from pymongo import MongoClient
from dbauth.db_authentication import DBAuthentication
from dbauth.model.generate_authentication_token_request import GenerateAuthenticationTokenRequest
from tencentcloud.common import credential
from tencentcloud.common.exception.tencent_cloud_sdk_exception import TencentCloudSDKException
from tencentcloud.common.profile.client_profile import ClientProfile
from tencentcloud.common.profile.http_profile import HttpProfile
# Configure root logger.
logging.basicConfig(
level=logging.INFO,
format='[%(asctime)s] - [%(threadName)s] - {%(module)s:%(funcName)s:%(lineno)d} %(levelname)s - %(message)s',
datefmt='%Y-%m-%d %H:%M:%S'
)
log = logging.getLogger(__name__)
def main():
region = "ap-guangzhou"
instance_id = "cmgo-xxxx" # MongoDB instance ID.
user_name = "camtest"
host = "10.0.0.1"
port = 27017
db_name = "test"
secret_id = os.environ['AK']
secret_key = os.environ['SK']
client = None
try:
# Obtain a MongoDB connection.
client = get_mongo_connection_using_cam(secret_id, secret_key, region,
instance_id, user_name, host, port, db_name)
# Verify whether the connection is successful.
db = client[db_name]
# Query test.
dummy_collections = db.list_collection_names()
log.info(f"Collections: {dummy_collections}")
log.info("Success!")
except Exception as e:
log.error(f"An error occurred: {e}")
finally:
if client:
client.close()
def get_mongo_connection_using_cam(secret_id, secret_key, region, instance_id, user_name, host, port, db_name):
cred = credential.Credential(secret_id, secret_key)
max_attempts = 3
last_exception = None
for attempt in range(1, max_attempts + 1):
try:
auth_token = get_auth_token(region, instance_id, user_name, cred)
# Connection string format for MongoDB.
mongo_uri = (
f"mongodb://{user_name}:{auth_token}@{host}:{port}/{db_name}?authSource={db_name}"
)
client = MongoClient(mongo_uri, serverSelectionTimeoutMS=5000)
# Test the connection.
client.admin.command("ping")
return client
except Exception as e:
last_exception = e
log.info(f"Attempt {attempt} failed: {e}")
time.sleep(5)
log.error(f"All attempts failed: {last_exception}")
raise last_exception
def get_auth_token(region, instance_id, user_name, cred):
try:
http_profile = HttpProfile()
http_profile.endpoint = "cam.tencentcloudapi.com"
client_profile = ClientProfile()
client_profile.httpProfile = http_profile
request = GenerateAuthenticationTokenRequest(
region=region,
instance_id=instance_id,
user_name=user_name,
credential=cred,
client_profile=client_profile
)
return DBAuthentication.generate_authentication_token(request)
except TencentCloudSDKException as err:
log.error(err)
raise
if __name__ == "__main__":
main()


ヘルプとサポート

この記事はお役に立ちましたか?

フィードバック