製品アップデート情報
Tencent Cloudオーディオビデオ端末SDKの再生アップグレードおよび承認チェック追加に関するお知らせ
TRTCアプリケーションのサブスクリプションパッケージサービスのリリースに関する説明について
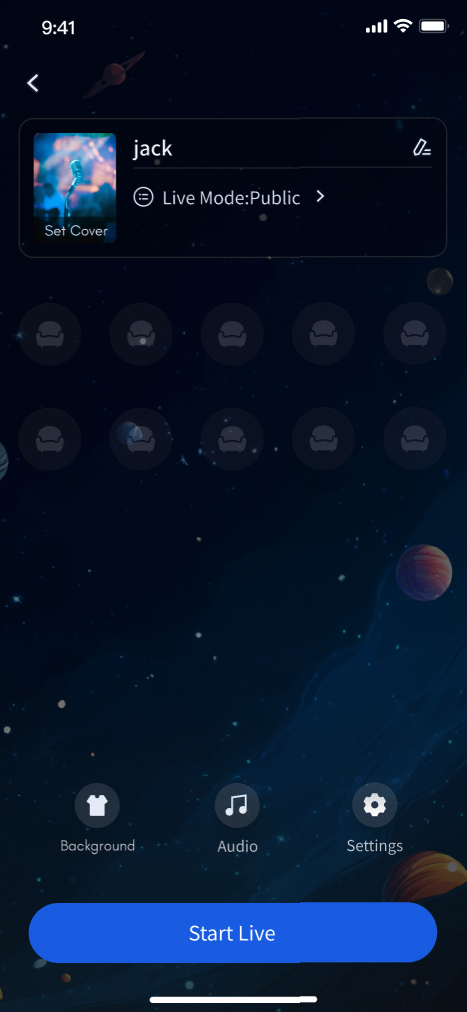
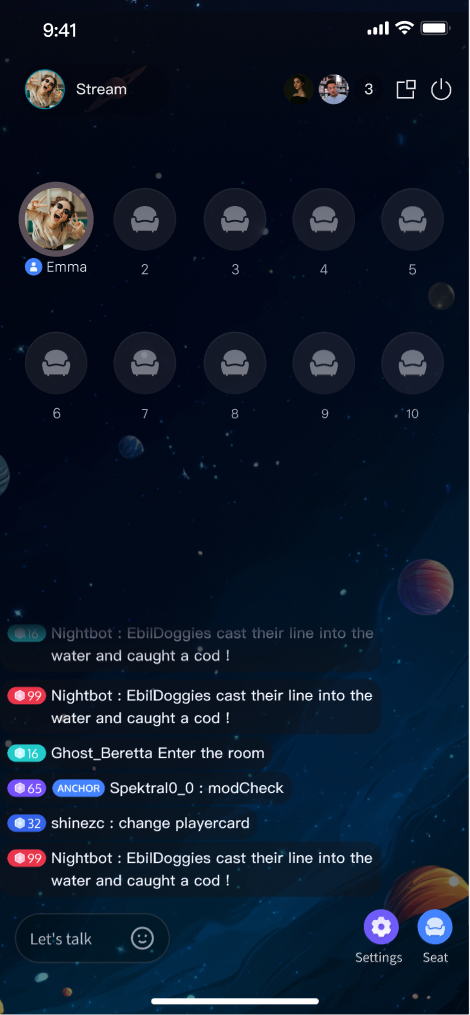
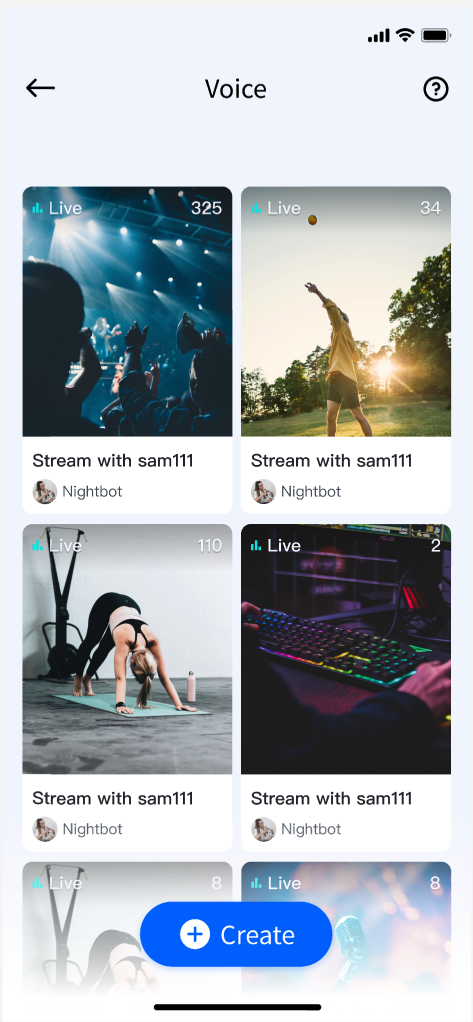
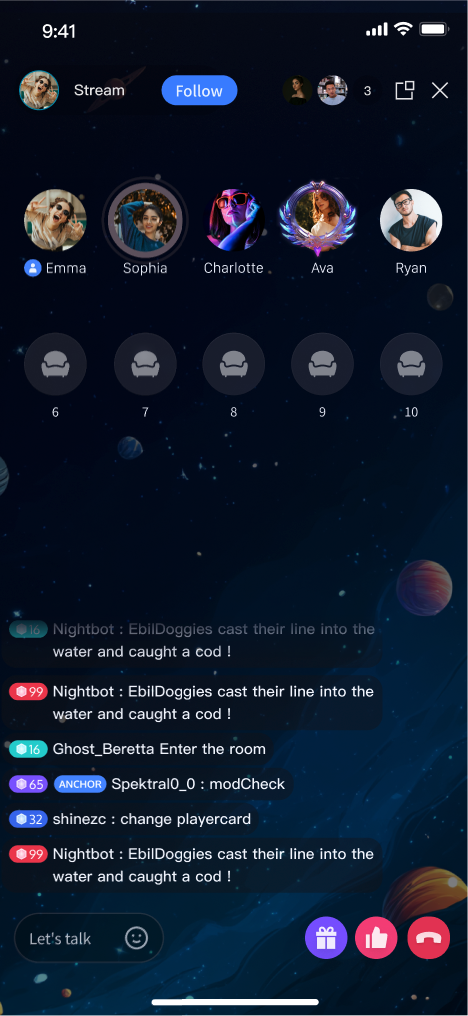
TUILiveKit is a comprehensive voice chat room component. After integration, you can quickly implement the following key modules:Host Preparation Page | Host Live Page | Live Stream List | Audience Viewing Page |
 |  |  |  |
flutter pubaddtencent_live_uikit
Resolving dependencies...Downloading packages.........+ tencent_live_uikit x.x.x......Changed xx dependencies!xx packages have newer versions incompatible with dependency constraints.Try `flutter pub outdated` for more information.
android/app/build.gradle file:android {......buildTypes {release {......// Configure and activate obfuscation rulesminifyEnabled trueproguardFiles getDefaultProguardFile('proguard-android.txt'), 'proguard-rules.pro'}}}
android/app/proguard-rules.pro file. If the file does not exist, create a new one:-keep class com.tencent.** { *; }
android/app/build.gradle:android {......defaultConfig {......// Enable Multidex supportmultiDexEnabled true}}
Non-Global Symbols to retain required global symbol information. This is mandatory—otherwise, runtime exceptions may prevent you from entering the room.ios/Podfile:target 'xxxx' do......end......post_install do |installer|installer.pods_project.targets.each do |target|flutter_additional_ios_build_settings(target)target.build_configurations.each do |config|config.build_settings['VALID_ARCHS'] = 'arm64 arm64e x86_64'config.build_settings['VALID_ARCHS[sdk=iphonesimulator*]'] = 'x86_64'endendend
<dict> in your iOS project's Info.plist. This message is displayed to users when requesting permission:<key>NSMicrophoneUsageDescription</key><string>CallingApp needs to access your microphone permission. Recorded video will have sound when enabled</string>
ios/Podfile to enable microphone permissions:post_install do |installer|installer.pods_project.targets.each do |target|flutter_additional_ios_build_settings(target)target.build_configurations.each do |config|config.build_settings['GCC_PREPROCESSOR_DEFINITIONS'] ||= ['$(inherited)','PERMISSION_MICROPHONE=1',]endendend
TUILiveKitNavigatorObserver.instance to navigatorObservers to track route changes and manage component lifecycle.localizationsDelegates to display UI text in the correct system language.MaterialApp:import 'package:tencent_live_uikit/tencent_live_uikit.dart';// Your own APP main classclass XXX extends StatelessWidget {const XXX({super.key});@overrideWidget build(BuildContext context) {return MaterialApp(// Add TUILiveKit navigator observer to listen for page routing changes and lifecycle managementnavigatorObservers: [TUILiveKitNavigatorObserver.instance],// Add localized agent to support multilingual copywriting displaylocalizationsDelegates: [...LiveKitLocalizations.localizationsDelegates,...BarrageLocalizations.localizationsDelegates,...GiftLocalizations.localizationsDelegates],// Other app configurations......);}}
TUILogin.login to authenticate. This step is required before you can use any TUILiveKit features. Make sure all parameters are set correctly.login after your own user authentication and login operations. This prevents business logic confusion or data inconsistency, and better aligns with your existing user management and permission controls.import 'package:tencent_cloud_uikit_core/tencent_cloud_uikit_core.dart';......login() async {await TUILogin.instance.login(1400000001, // replace with the SDKAppID from the open service console"denny", // replace with your UserID"xxxxxxxxxxx", // you can calculate a UserSig in the console and fill it in this locationTUICallback(onError: (code, message) {print("TUILogin login fail, {code:$code, message:$message}");},onSuccess: () async {print("TUILogin login success");},),);}
Parameter | Type | Description |
SDKAppID | int | |
UserID | String | Unique identifier for the current user. Only letters, numbers, hyphens, and underscores are allowed. To avoid multi-device login conflicts, do not use simple IDs like 1, 123, etc. |
userSig | String | Authentication credential for TRTC. Please note: In Development Environment: You can adopt the genTestSig function of the local GenerateTestUserSig class (example/lib/debug/generate_test_user_sig.dart) to generate userSig or, generate a temporary UserSig via the UserSig Generation Tool.In Production Environment: To prevent key leakage, always generate UserSig on your server. For details, see Generating UserSig on the Server. |
MaterialApp home page is attached to the rootNavigator.secondaryNavigator above the rootNavigatorrootNavigator to secondaryNavigatorOverlay on secondaryNavigatorsecondaryNavigator remains resident in the app throughout its lifecycle, enabling the floating window to persist even when navigating between different pages.import 'package:tencent_live_uikit/tencent_live_uikit.dart';import 'package:tencent_live_uikit/common/widget/global.dart';// Your own App main classclass XXX extends StatelessWidget {const XXX({super.key});@overrideWidget build(BuildContext context) {return MaterialApp(// Homepage configurationhome: Navigator(// Global.secondaryNavigatorKey is the global navigation key provided by TUILiveKit used to manage floating windows.key: Global.secondaryNavigatorKey,onGenerateRoute: (settings) => MaterialPageRoute(settings: const RouteSettings(name: 'home_widget'),builder: (BuildContext context) {// HomeWidget is your own application homepage widget, replace with your actual homepagreturn const HomeWidget();},),),// Other configuration of your App......);}}
Feature | Description | Integration Guide |
Host Live Streaming | The complete process for hosts to create a voice chat room, including preparation and all live interactions. | |
Audience viewing | Audience members can listen, request to join the mic, view bullet comments, and more after entering a voice chat room. | |
Live Stream List | Displays the list of available voice chat rooms and their details. |
TUILogin.login is sufficient. We recommend aligning TUILogin.login and TUILogin.logout with your own authentication logic.Non-Global Symbols to preserve the necessary global symbol information. Otherwise, runtime exceptions may prevent you from entering the room.フィードバック