The member self-pay mode involves the following finance permissions:
|
View member account information | The admin account can view the balance information of member accounts. |
View member account bills | The admin account can view the bill details of member accounts. |
Issue invoices to member accounts | The admin account can issue invoices to member accounts. |
Consolidate bills | The admin account consolidates the costs of multiple member accounts for download and viewing, and confirms the bills in batch. |
Inherit offers | Member accounts can inherit the admin account’s offers specified in the contract. |
Cost Explorer | The admin account can filter, view, classify, aggregate, and analyze member account costs. |
Budget Management | The admin account supports configuring budgets for member accounts. |
Credit Limit Setting | The admin account can set credit limit for member accounts. |
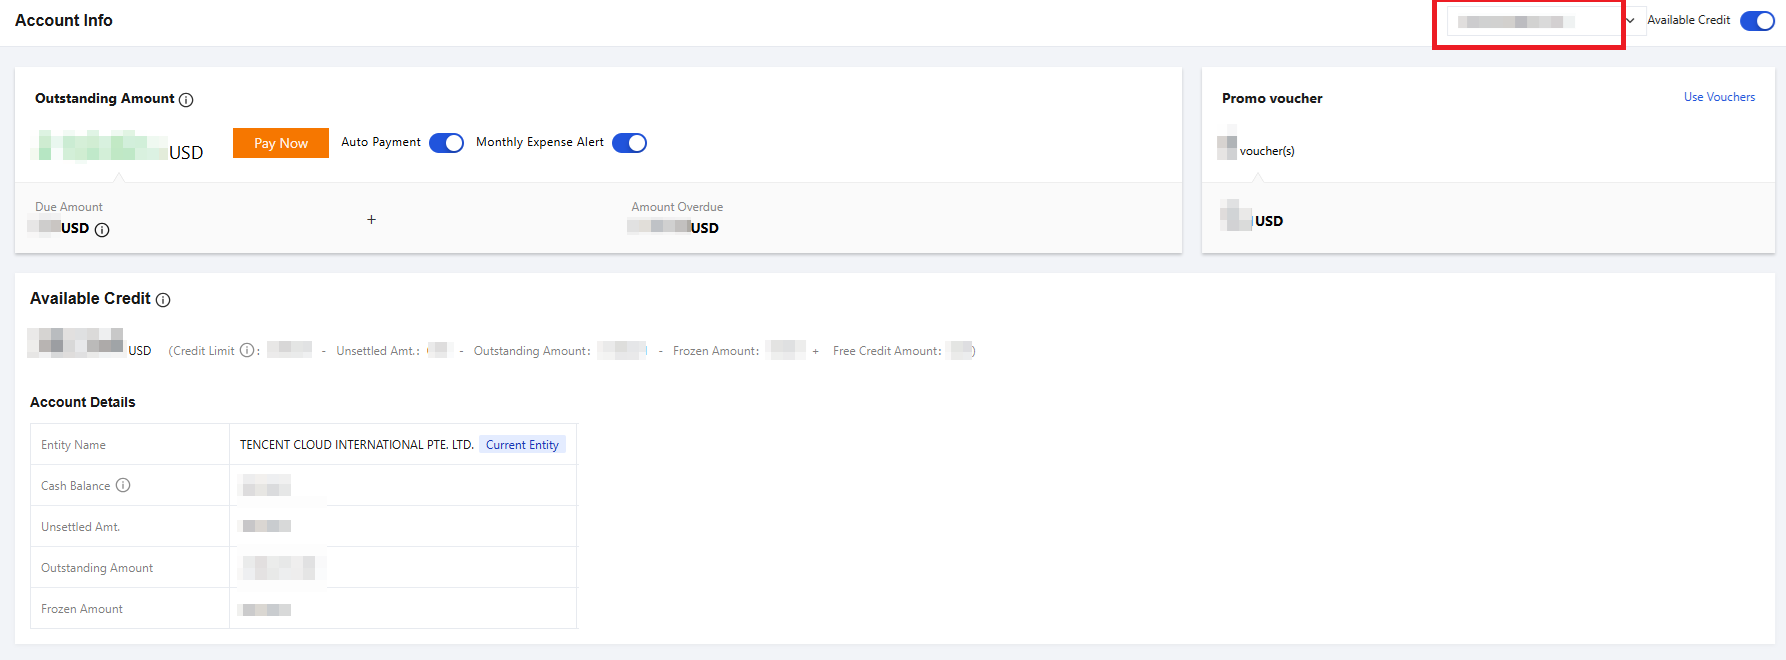
Viewing Member Account Balance
This section describes how the admin account views the balance information of its member accounts.
Directions
1. Log in to the Billing Center console with the admin account and select Account Info on the left sidebar. 2. In the drop-down list in the top-right corner, select a member account to view its balance information.
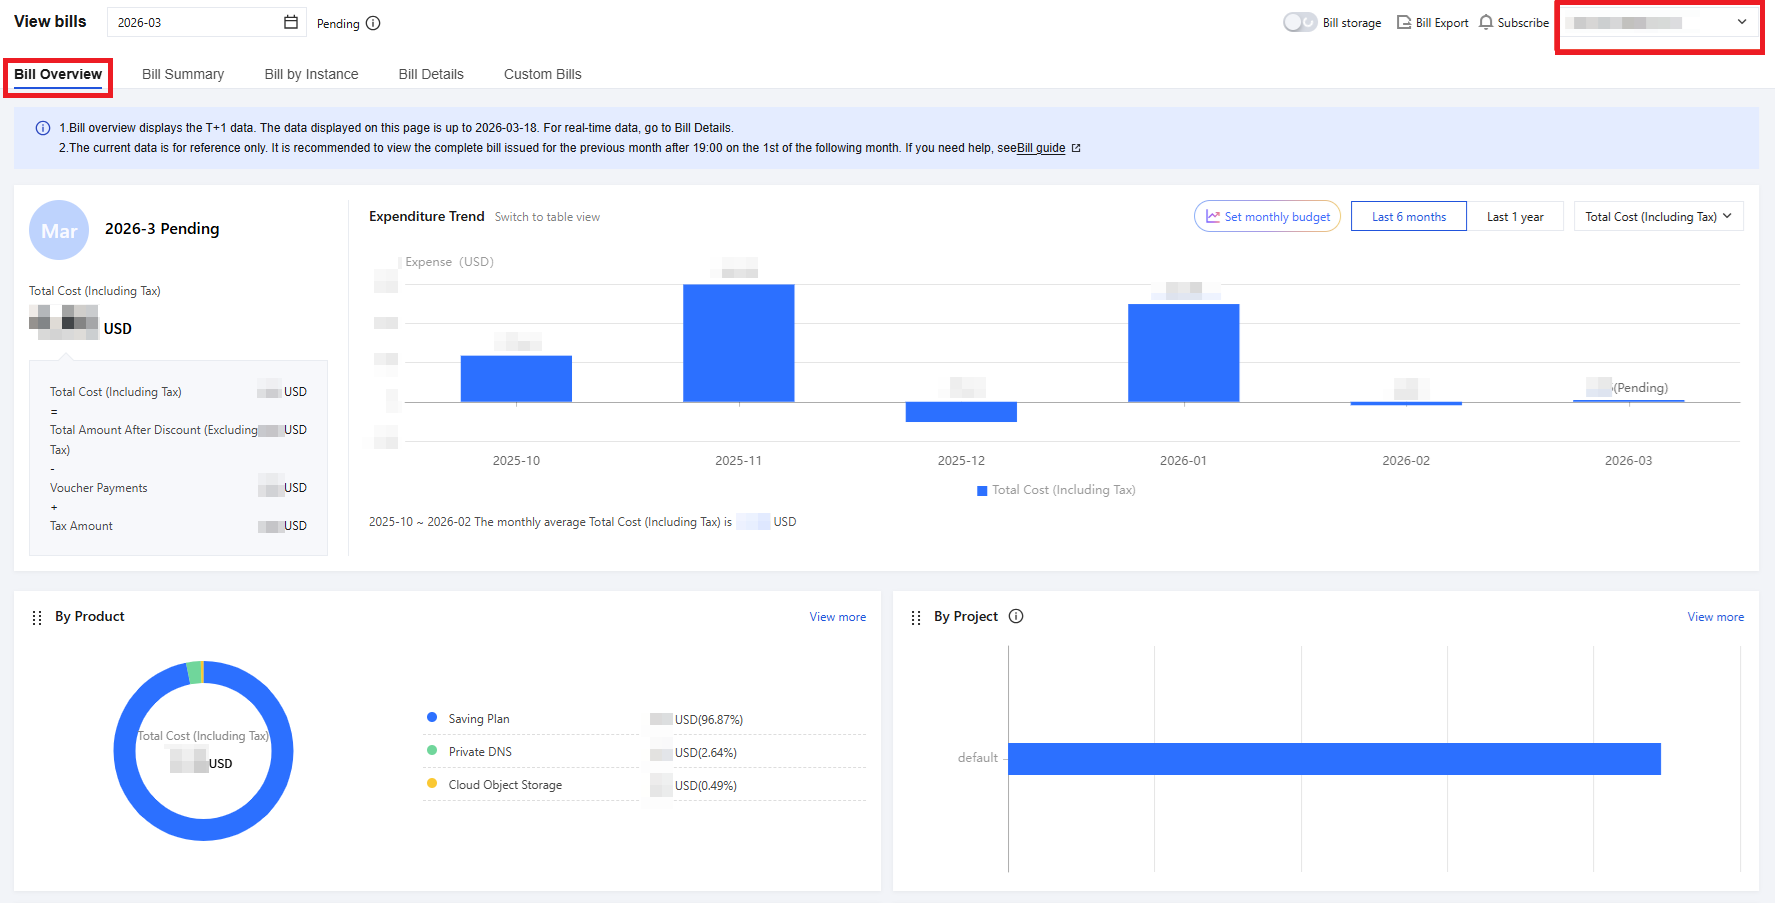
Viewing Member Account Bills
This section describes how the admin account views the bill details of member accounts.
Directions
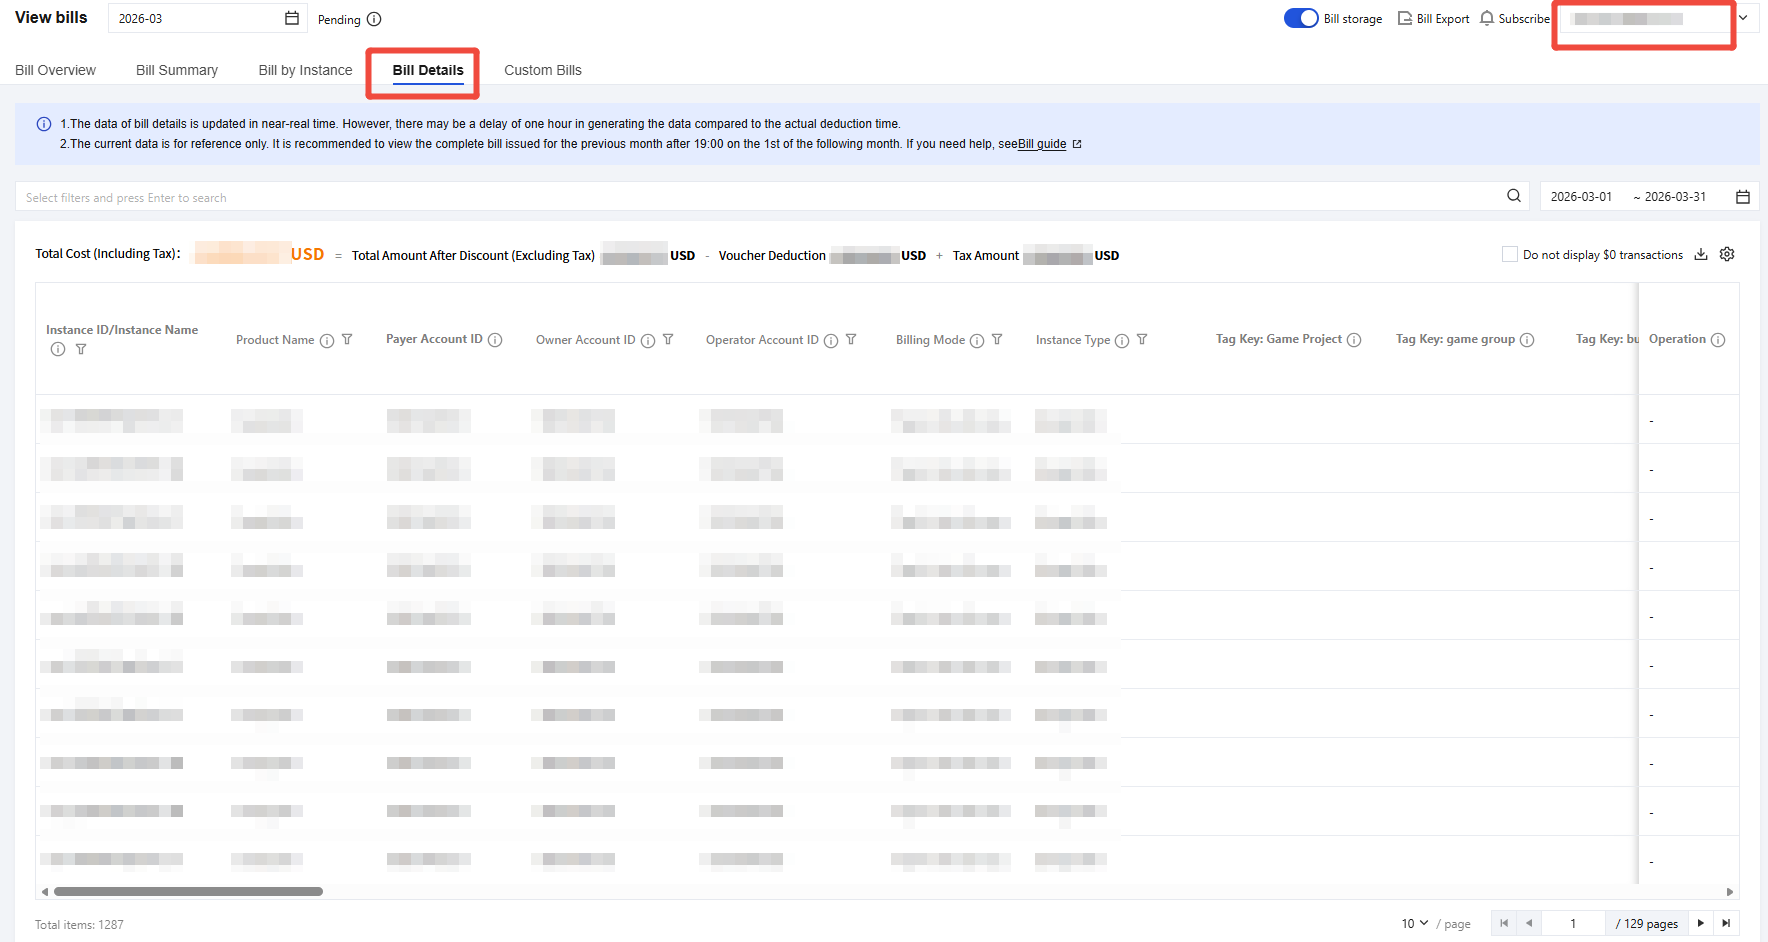
1. The admin account logs in to the Cost Center console and selects Billing > View Bills in the left sidebar. 2. On the Bill Overview page, select the corresponding member account from the drop-down list in the upper-right corner to view its bill overview.
3. On the Detailed Bill tab, select the corresponding member account from the drop-down list in the upper-right corner to view its billing details.
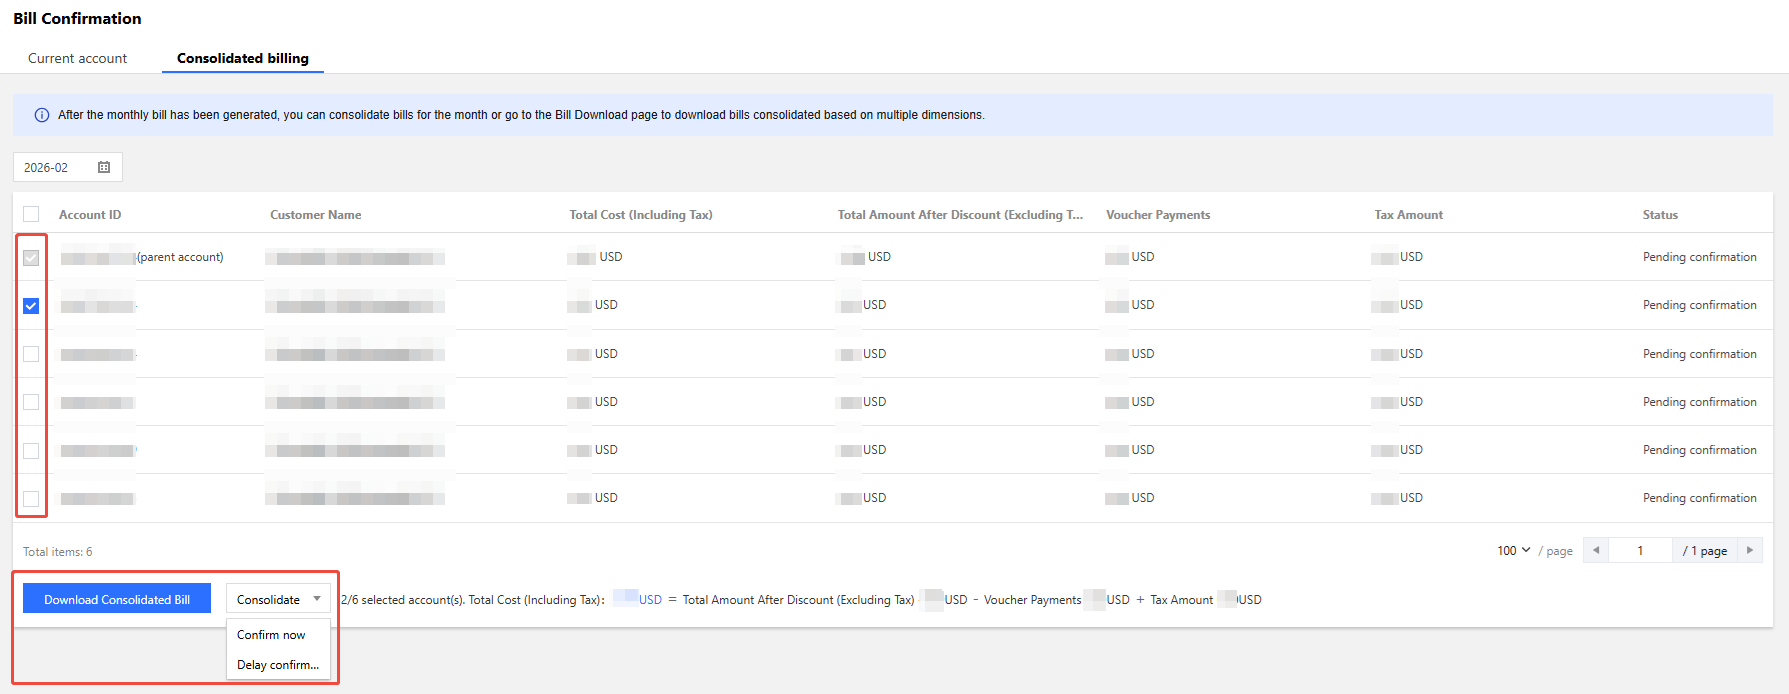
Select Member Accounts to Consolidate and Confirm Bills
This section describes how the admin account consolidates and confirms the bills of multiple member accounts.
Directions
1. The admin account logs in to the Cost Center console and selects Bill Confirmation in the left sidebar. 2. Select the Consolidated Bill tab, select the member accounts for which you want to consolidate bills, and click Download Consolidated Bill or Confirm Consolidated Billing, as shown in the figure below.
Note:
You can also go to the Download Records page and click Download to download the consolidated bills. Issuing Invoices to Member Accounts
This section describes how the admin account issues invoices to member accounts.
Directions
1. Log in to the Billing Center console with the admin account and select Invoicing on the left sidebar. 2. In the drop-down list in the top-right corner, select a member account to issue the invoice. The issued invoice belongs to the member account.
Inheriting Offers
This section describes how a member account inherits the admin account’s offers specified in the contract.
Inheritable offers
Member accounts can inherit the contract offers applied for by the sales rep, but not the official discount or promotional discount.
Contract offers include billing-level offers, account-level offers, and rebates, as detailed in the table below:
|
| It is applied to a single prepaid or pay-as-you-go order and takes effect in real time. | It is applied to consolidated bills on a monthly basis and takes effect on the first day of the next month. | It is a rebate (in the form of voucher or free credit) calculated based on a certain proportion of the bill amount in the current month. It takes effect on the third day of the next month. |
| | | |
Contract price (linear, tiered, or fixed pricing) | | | |
Minimum spend (fixed or fluctuated monthly) | | | |
Note:
“✔” means the offer is inheritable, and “×” means uninheritable.
Note:
Make sure all offers of member accounts are covered by the ones the admin account has applied for, so that they can still enjoy those offers after inheriting from the admin. Member accounts can choose to use their own applied offers without inheriting the admin account's offers, but once they inherit, only the inherited offers will apply.
Inherited offers cannot be applied to products in the blocklist which don’t support offer inheritance.
Only when the member accounts and the admin account use the same settlement cycle (such as daily or monthly) can the former inherit the latter’s offers. You can adjust the settlement cycle of products such as Cloud Streaming Services, Video on Demand, and Short Message Service for member accounts through CPQ.
Rebates and finance-level offers cannot be inherited.
You can go to the TCO console to allow member accounts under the same verified entity as yours to inherit your offers. To implement offer inheritance for member accounts under a different verified entity, contact your sales rep. Once the inheritance relationship is established, you can view the inheritance details of your member accounts.
In the organization fund allocation or member self-pay mode, the inherited offers will remain effective when the admin deletes the organization or removes organization members, or when members actively quit the organization. To cancel these offers, contact your sales rep.
Directions
Setting offer inheritance
1. When adding a member, you can set offer inheritance for the member account as follows:
3. On the "Member Account Management" page, click Add Member.
4. On the "Add Member" page, set offer inheritance in different ways based on different member adding methods:
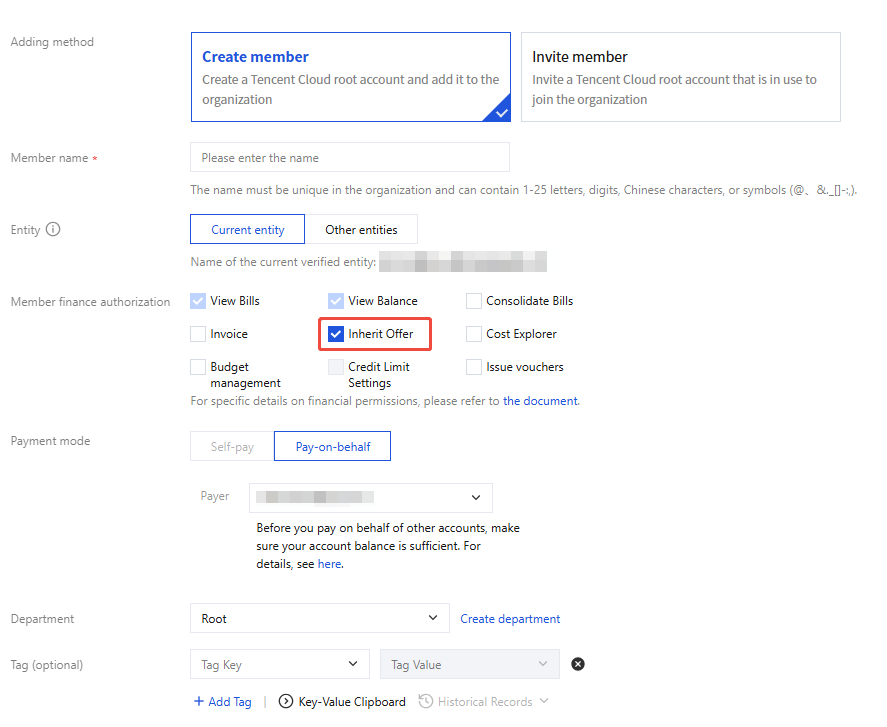
Create member: The created member account and the admin account are under the same verified entity by default. Select "Self-pay" for the "Payment mode" option, select "Inherit offer", and fill in other required information to create the member.
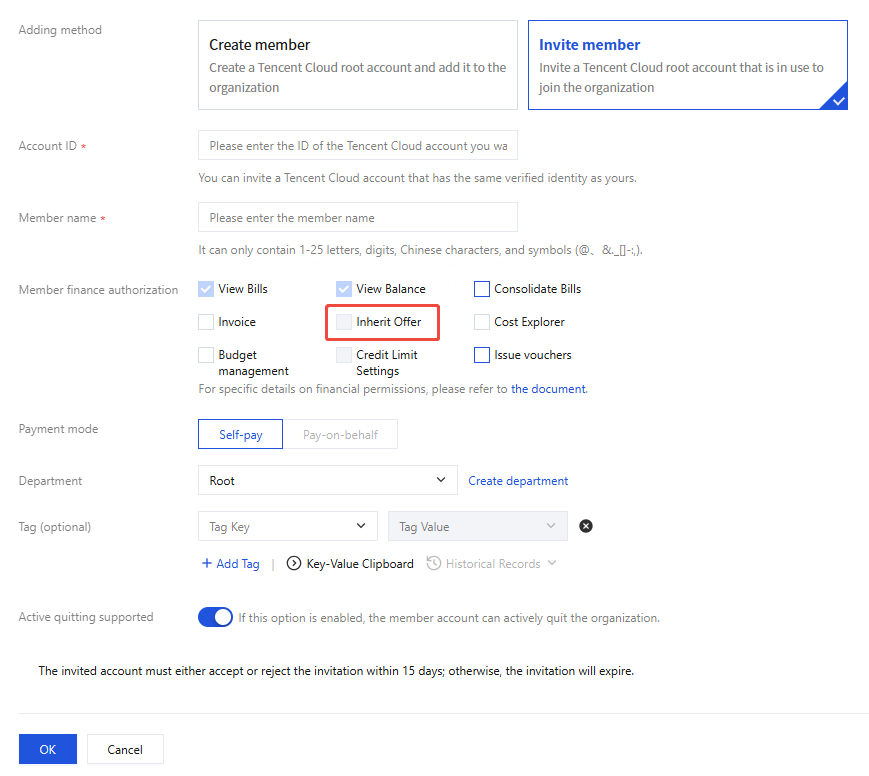
Invite Members:
If the member account and the admin account are under the same verified entity, select "Self-pay" for the "Payment mode" option, select "Inherit offer", and fill in other required information to invite the member.
If the member account and the admin account are under different verified entities, contact your sales rep if you want to set offer inheritance after selecting "Self-pay" for the "Payment mode" option.
Canceling inherited offers
To cancel the inherited offers of member accounts, contact your sales rep.
Cost Explorer
Assign Cost Explorer Permissions
When adding members, you can set cost explorer permissions. The specific steps are as follows:
2. In the Member Account Management page, click Add Member.
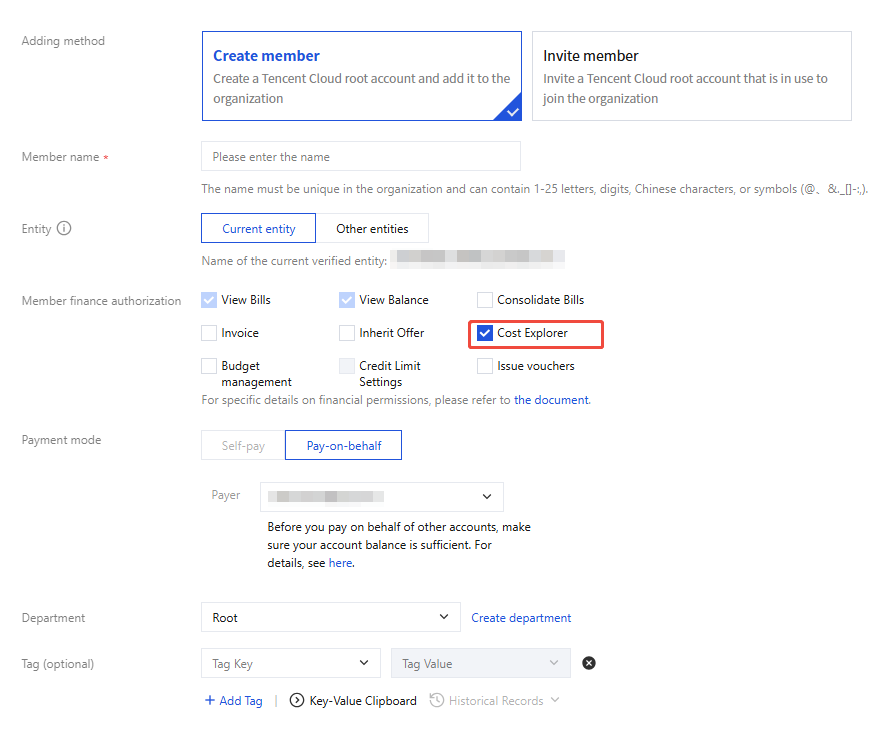
3. In the Add Member page, select Create member, select Cost Explorer, and click OK, as shown below:
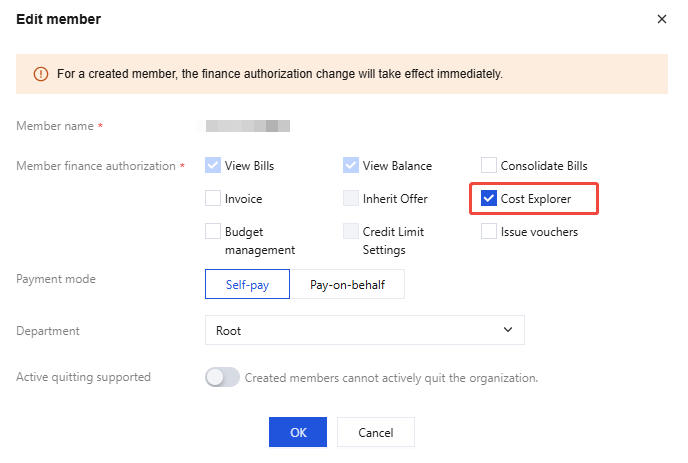
4. For added members, go to the Member Account Management page, find the member account, and click Edit in the Operation column. 5. On the edit member page, check Cost Explorer, and then click Confirm. For more details, see Cost Explorer. View Cost Explorer
2. On the organization structure page, click the department name to view the member list and their permissions.
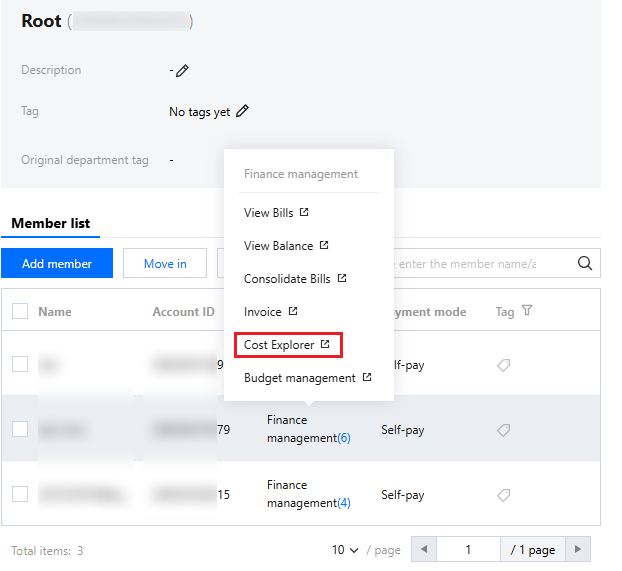
3. Click Financial Management > Cost Explorer in the target member.
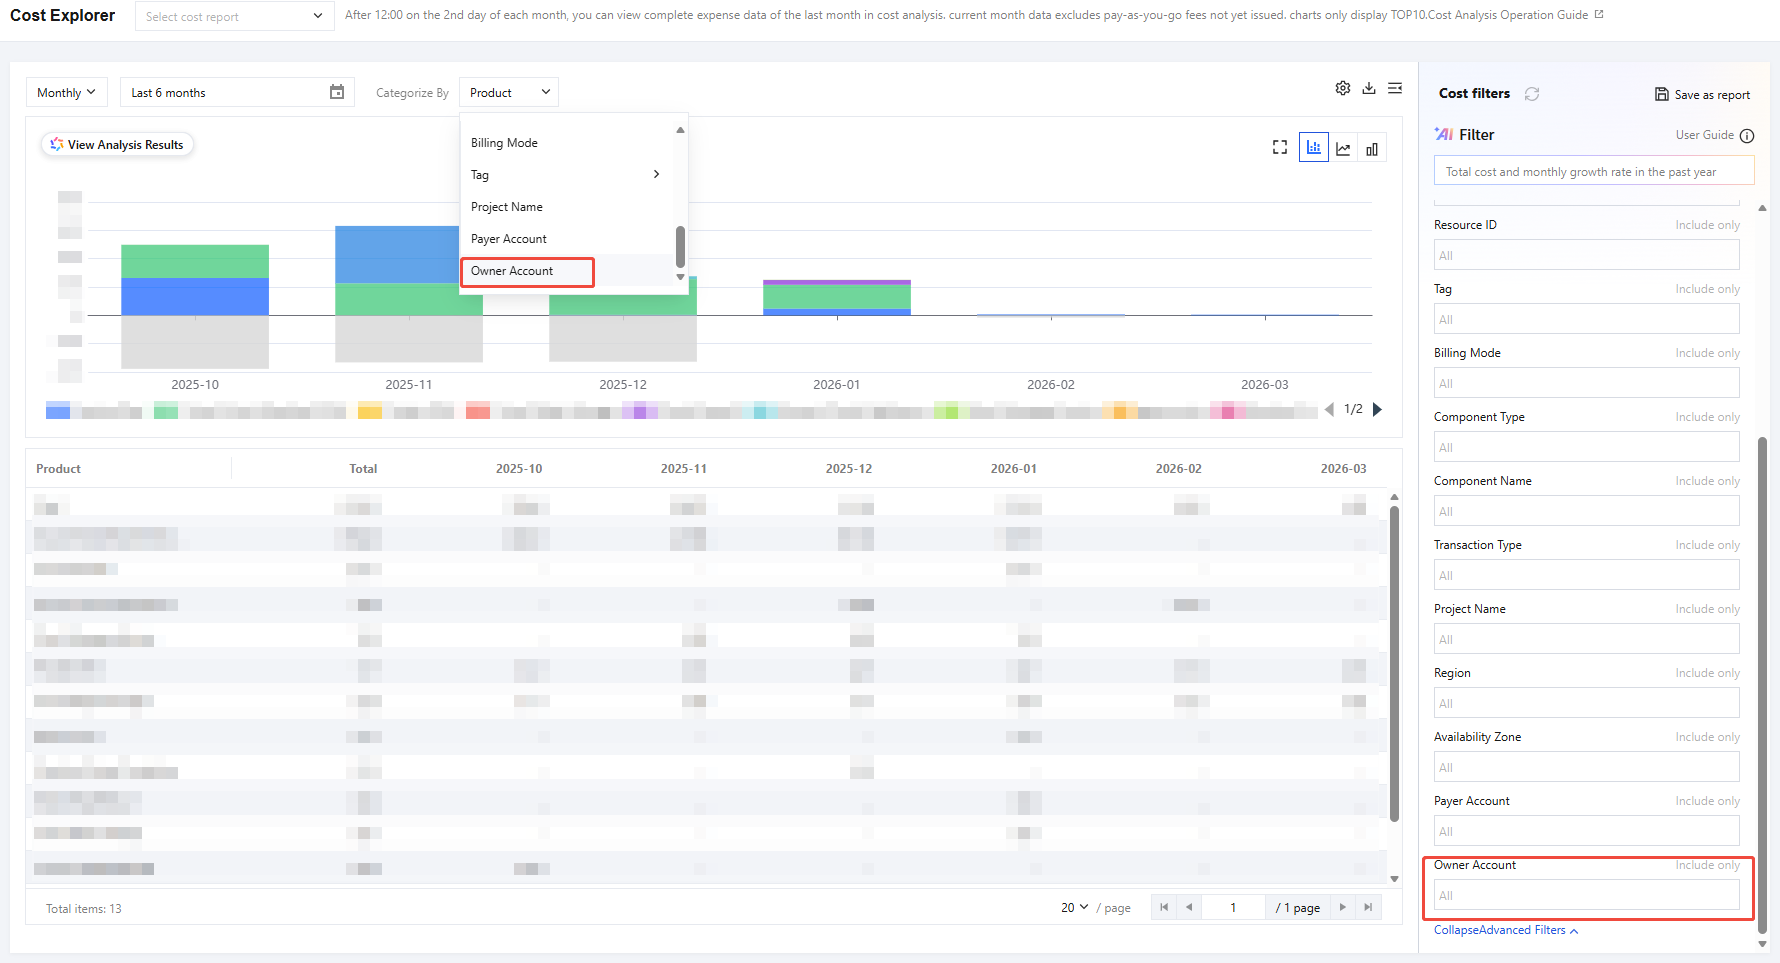
4. On the cost explorer page:
You can filter by classification dimension Owner Account and then view the member's cost analysis data;
You can also use the filtering box on the right Owner Account to filter member accounts and view the cost analysis data of the member account, as shown in the figure below:
Budget Management
Assign Budget Management Permissions
When adding members, you can set Budget Management permissions. The specific steps are as follows:
2. On the Member account management page, click Add member.
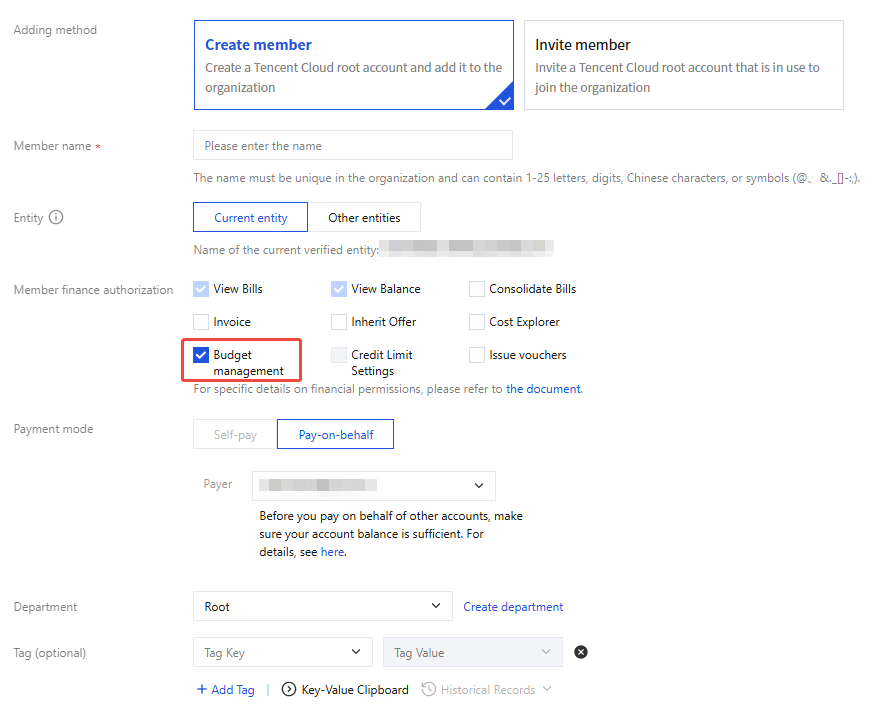
3. On the Add member page, select Create member, check Budget management, and click OK. As shown in the following figure:
4. For added members, go to the Member Account Management page, find the member account, and click Edit in the Operations column.
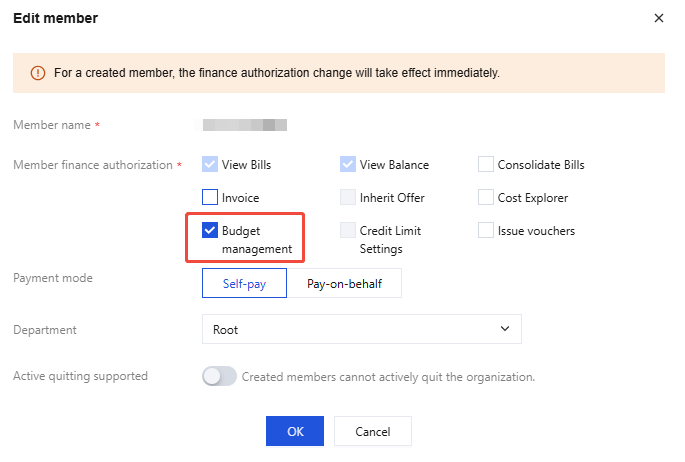
5. On the Edit member page, check Budget Management and click Confirm. For more details, see Budget Management. View Budget Management
2. On the organization structure page, click the department name to view the member list and their permissions.
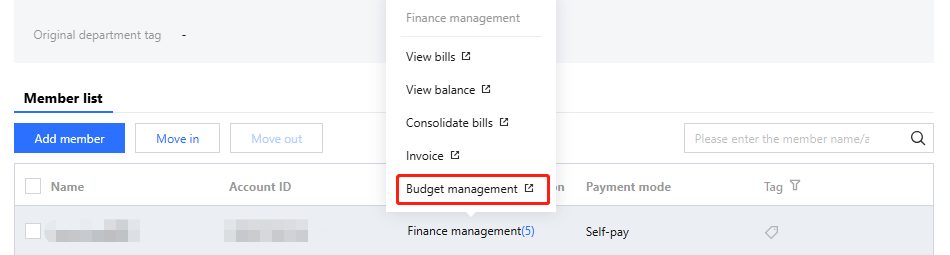
3. Click Financial Management > Budget Management of the target member.
4. On the Budget management page, click New and fill in the required information as prompted. Budget scope > Custom > Owner account, filter member accounts, and configure budgets for member accounts.
Credit Limit Setting
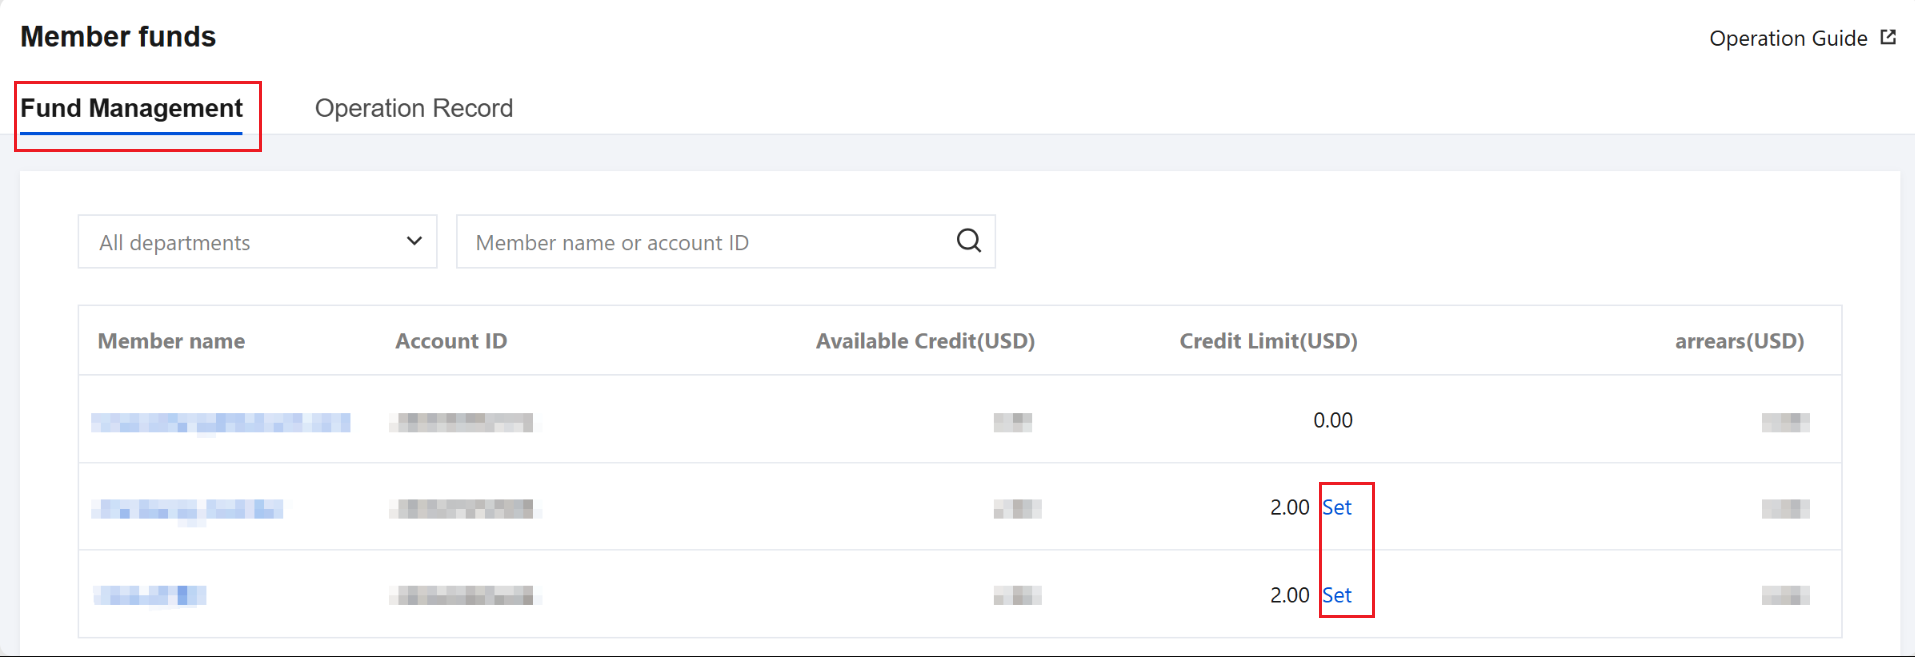
Under the premise of customer-level credit authorization, the admin account can set credit limits for member accounts. It can also revoke the credit limits already set for member accounts. The procedure is as follows:
Note:
The permission to set credit limits is a special privilege. The admin account needs to apply to the account manager, and the permission will be granted only after the requirements are met.
Set the credit limits
2. On the Member Funds management page, you can view the credit limits of member accounts and click Set.
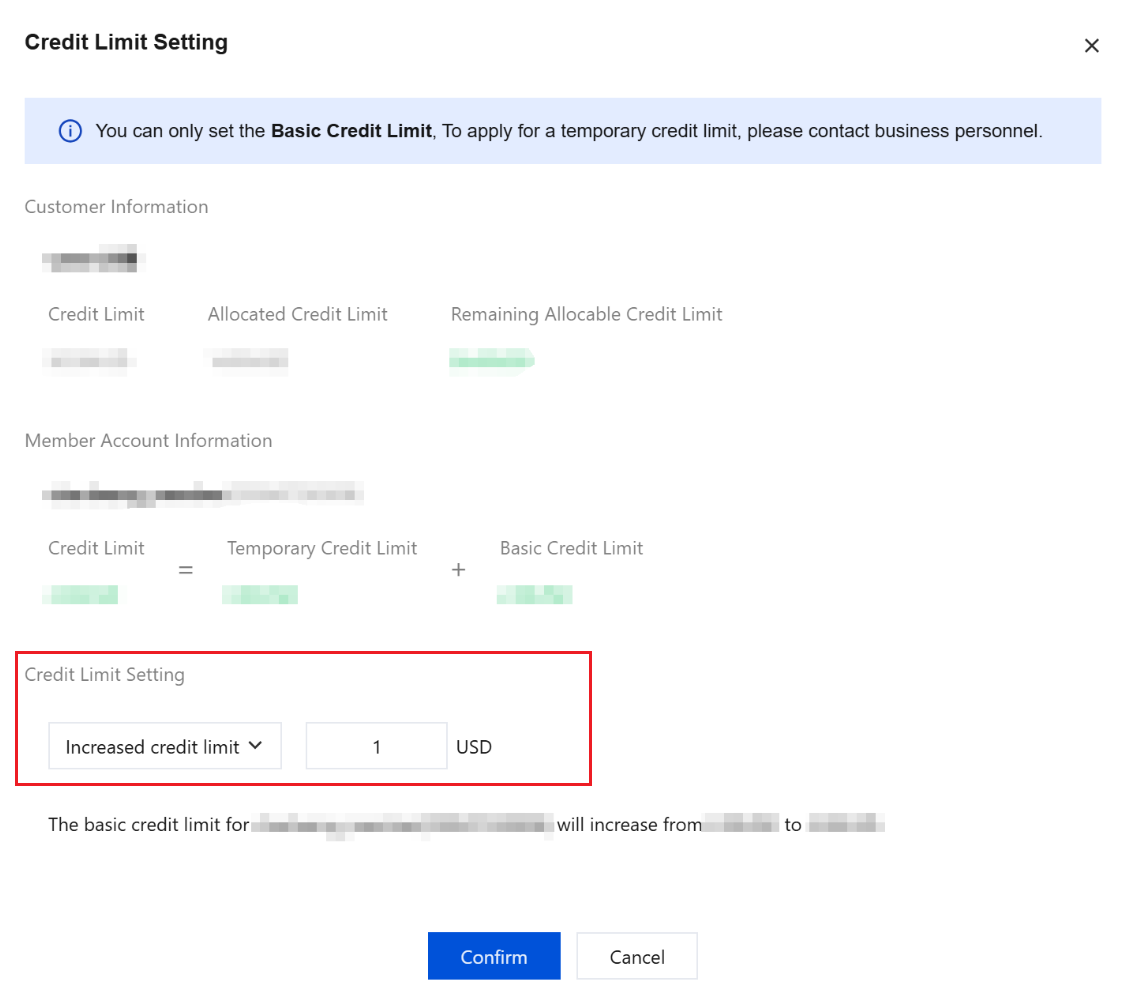
3. In the Credit Limit Setting dialog box, enter the credit limit amount to be increased or decreased, and click OK, as shown below:
Note:
The allocatable limit for each member account depends on the customer-level credit limit of the corresponding entity.
Only the basic credit limit can be allocated, while temporary credit limit cannot.
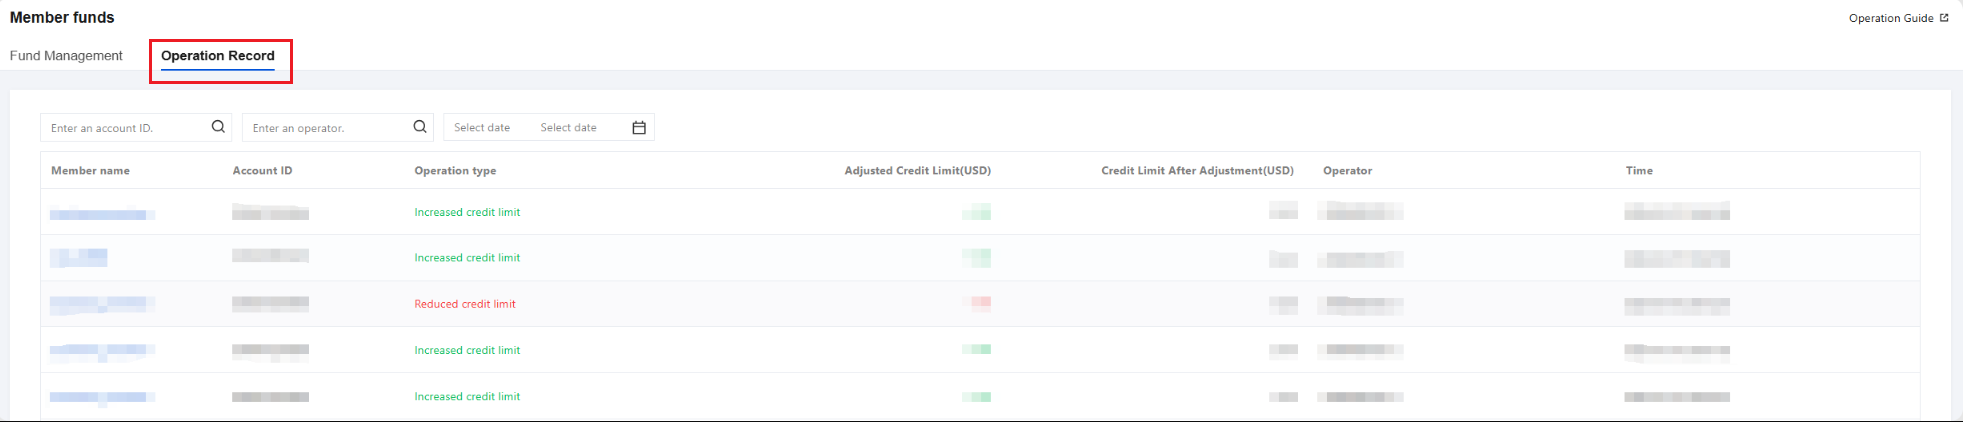
View credit limit setting record
On the Member Funds Management page, click the Operation Record tab to view the historical operation records of the admin account for the credit limits of member accounts.