Data Replenishment
Download
포커스 모드
폰트 크기
Enable Data Replenishment Configuration Page
1. Log in to Tencent Cloud WeData Console.
2. Click in the left directory project list.
3. Select the corresponding project and click to enter the Ops center module in the right operation column.
4. Click task operations in the left sidebar and select supplement data in the workflow list or task list.
Note:
One-time tasks cannot replenish data.
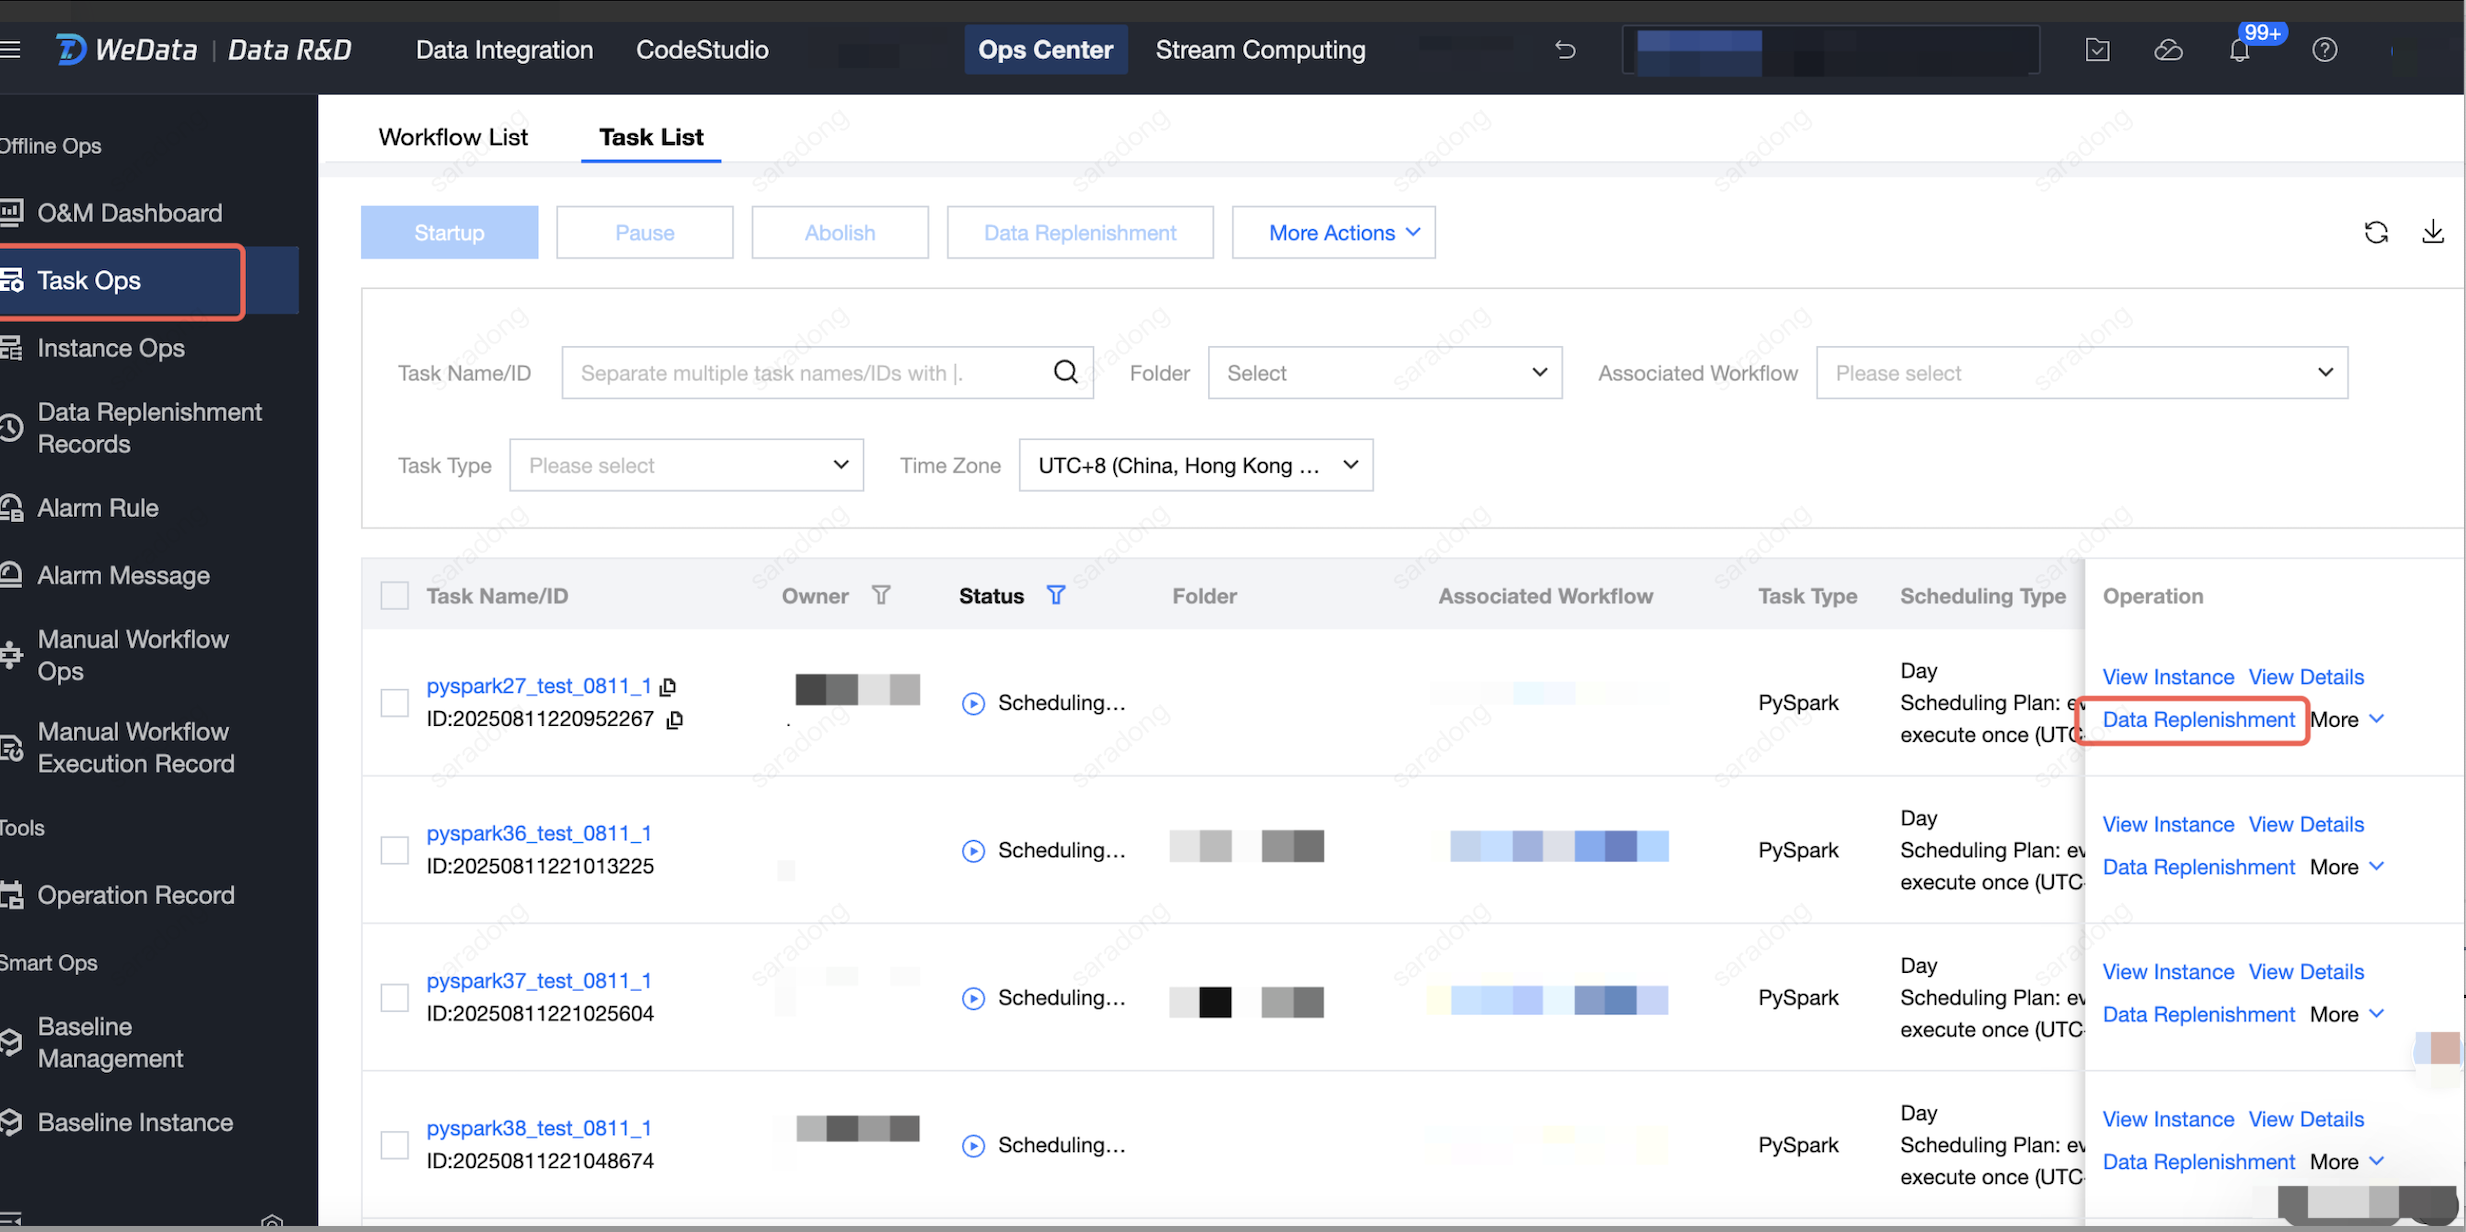
Note:
The task list supports multiple selections for batch data supplement. Select the task list above on the webpage, check the task name and click supplement data to batch supplement data.
Steps to Create a Replenishmental Task
Step 1. Task Selection
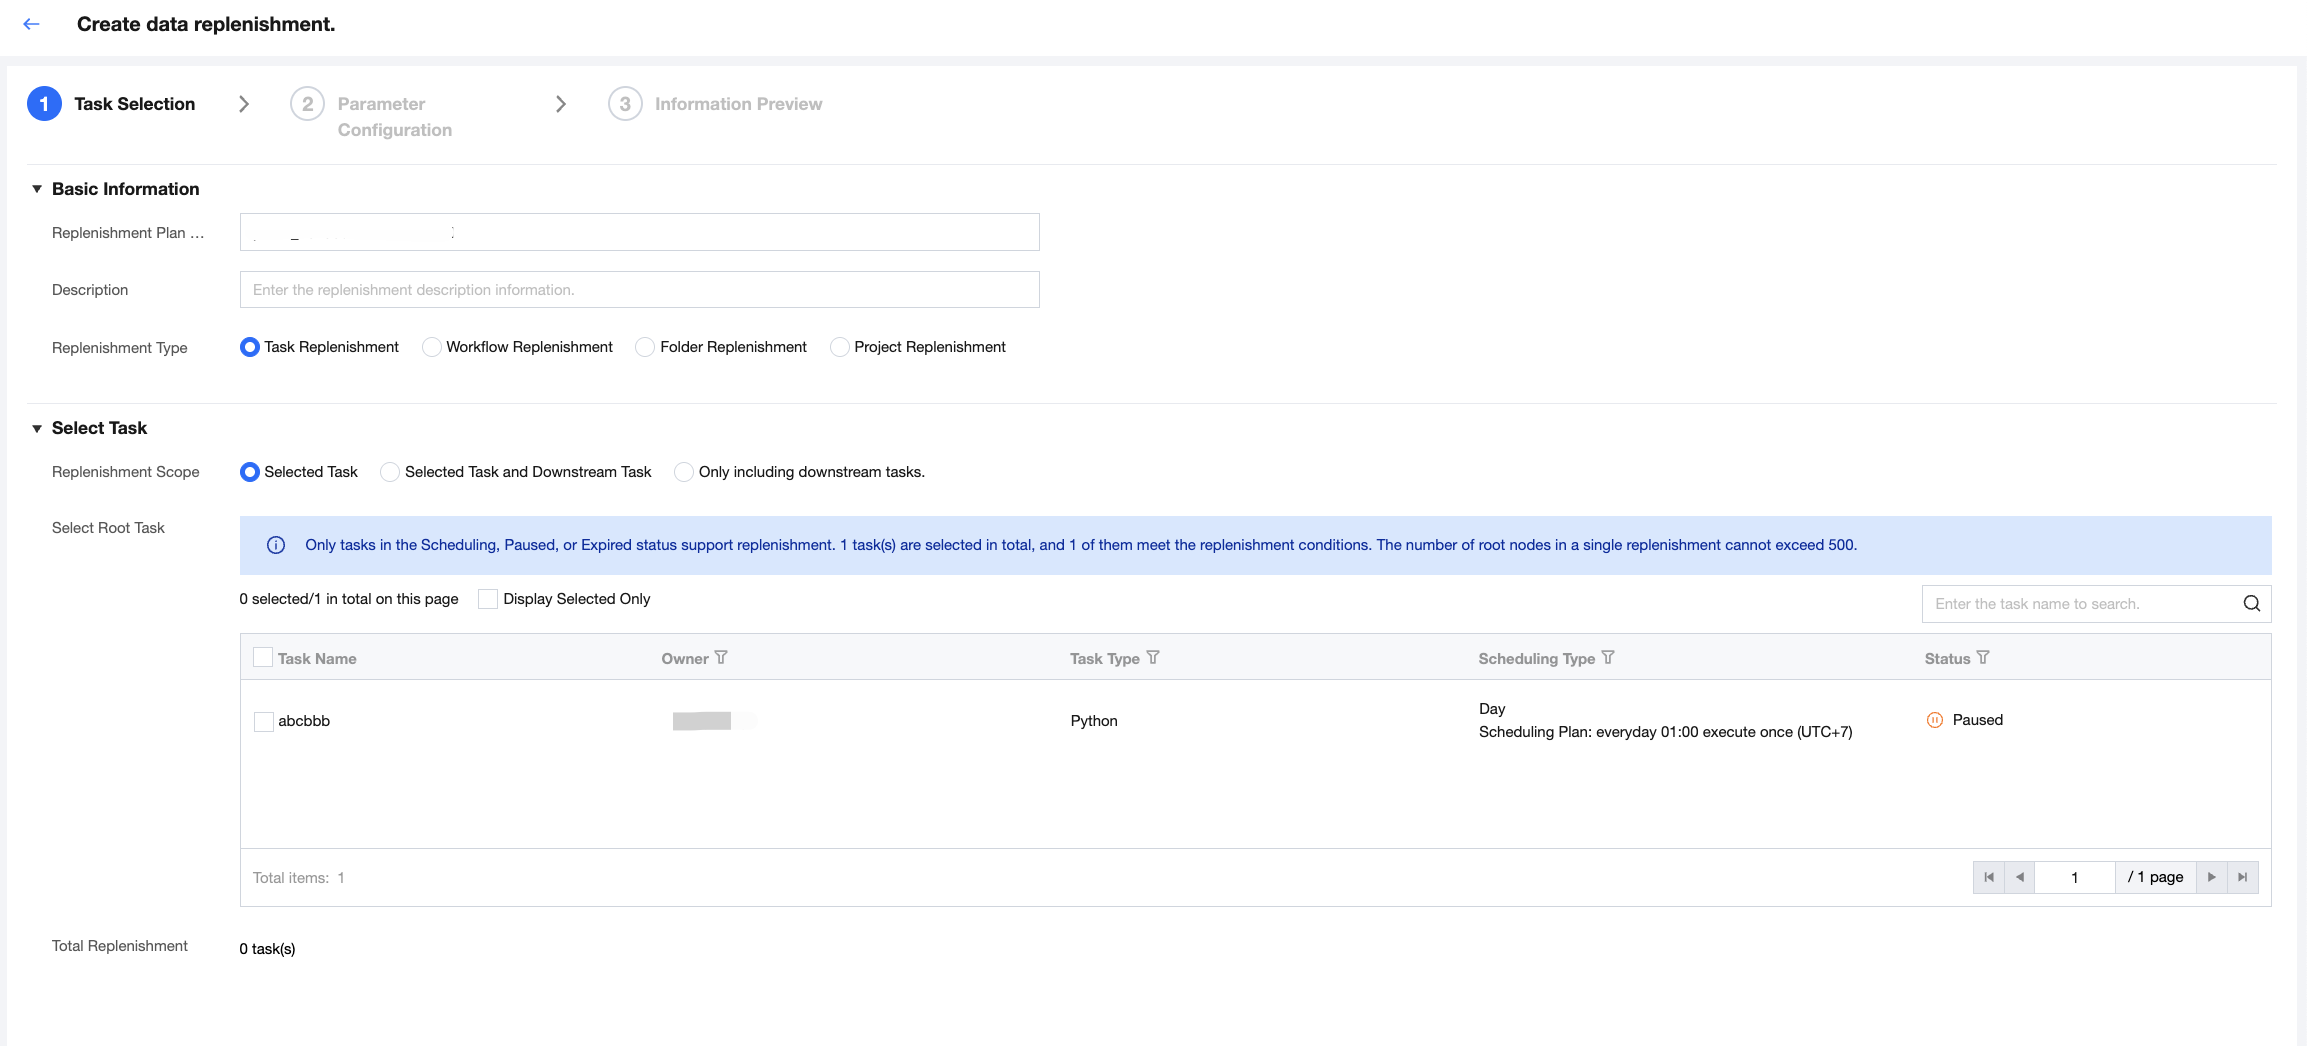
Description
Parameter | Description |
Replenishment Plan Name | By default, it generates as patch_year, month, day, hour, minute, and second_unique number, unique within the project. Example: patch_20230624195944_548. Support user customization. |
Description | Users can customize the supplementary plan description, up to 256 characters (optional). |
Replenishment type | Task replenishment: selected tasks are chosen by default after executing data replenishment in the Task List and serve as candidates. Workflow Replenishment: selected workflows are chosen by default after executing data replenishment in the workflow list and serve as candidates for tasks within them. Folder replenishment: tasks within ALL workflows in the folder of the orchestration space serve as candidates. Project replenishment: Use all tasks in the current project as candidates. |
Replenishment Scope | Selected tasks: only can be selected from workflow or selected tasks. Selected task and downstream task: can be selected from workflow or selected task and its downstream task. Contain only downstream tasks: only can be selected from workflow or downstream tasks of selected tasks. Note: Only tasks with status "scheduling in progress", "paused", or "invalid" support replenishment. The number of root nodes for a single replenishment cannot exceed 500. If the limit is exceeded, the user should narrow down the selection range. |
Root Task | In the workflow, select the root node for replenishment from tasks or selected tasks. |
Select downstream task | The configuration to select downstream tasks is shown only when the replenish task scope is "selected task and downstream task" or "contain only downstream tasks". |
Backfill task blocklist | After selecting the supplementary entry type as project replenishment, you can configure the task. Under the project, other tasks that meet the supplementary conditions participate in the replenishment this time, except for the blocklist task. |
After selecting the task, click Next.
Step 2: Parameter Configuration
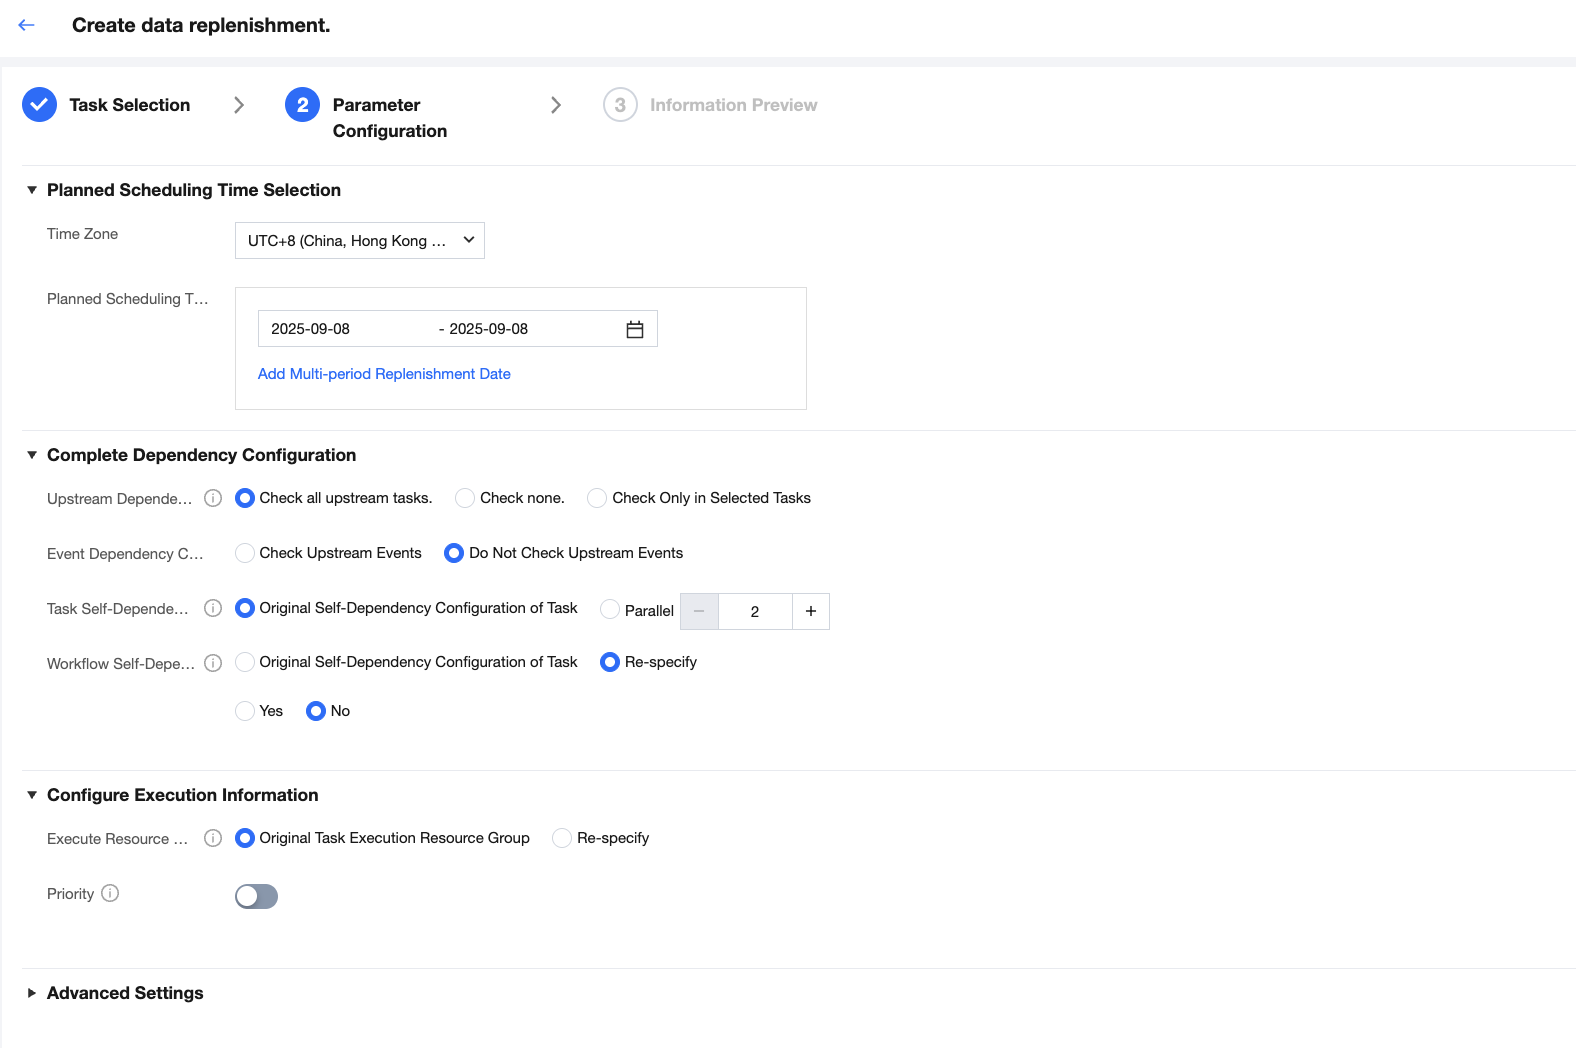
Description
Parameter | Description |
Planned Scheduling Time | Customize the planned scheduling time. Choose any time (support selecting future time), with yesterday chosen by default (up to 10 time periods with multiple selections). |
hour range | Default 00:00 - 23:59, effective for tasks with a period of hours or less. Generate replenish instances based on the data date. For example, if 01:00 - 02:00 is selected, scheduled task instances at 01:00 will be replenished, while instances at 03:00 will not. |
Upstream Dependency Configuration | Check all upstream tasks: the selected replenishment task runs as configured dependencies. Do not check all: the selected replenishment task does not run by task dependency and runs in parallel. Check within selected tasks only: the selected replenishment task checks dependencies only from selected tasks, not from unselected tasks. |
Event Dependency Configuration | Check whether to verify upstream events have occurred before running in user configuration. |
Self-dependency Configuration | Task Original Self-Dependency Configuration (original task self-dependency configuration) is customizable. Available degree of parallelism (minimum 2, default value 2, maximum value 10). After setting parallel, the original task dependency relationship will not be used. Task self-dependency only takes effect in the current supplementary instance. |
Workflow Self-dependency Configuration | Workflow self-dependency only takes effect in the current supplementary instance. If you select Yes, it means that all instances in the current cycle depend on all instances in the previous cycle of this workflow. Conditions as follows: 1.All tasks of the workflow are in the same cycle. 2.Only effective for this replenishment plan. |
Execution Resource Group | The default task's original resource group can be reassigned for the instance run's scheduling resource group and integration resource group, which does not affect the execution resource configuration of periodic tasks. |
execution order | Execute based on dependencies. Without dependency impact, execute based on configured execution order. The optional execution order can be as instance data time order or reverse instance data time order. |
replenishment instance generation period | Re-specify generation cycle for replenishment task instances. Currently, it will only convert day instances into instance of generation on the 1st per month. |
Custom Parameter | Re-specify the task's parameters to facilitate the execution of new logic by replenished instances. Scheduling Parameters(Optional) Default task parameters. Users can re-specify the task's parameters to facilitate the execution of new logic by replenished instances. The new parameters will overwrite the previous task parameter values. Parameter name supports drop-down selection of config. After selecting the parameter name, the parameter value will be automatically filled and can be modified as required. application parameter For Spark SQL and PySpark tasks, support reassigning application parameter values. |
Offline Sync Rate Limit | If a backfill task includes an offline synchronization task, you can specify the sync rate. Limit the synchronization rate based on the traffic or the number of records to reduce the read and write load at the data source or destination end. The default value -1 indicates no restriction on the rate. |
After configuring the time and parameters, click Next.
Step 3: Information Preview

Preview backfill includes configuration preview, Advanced Configuration Preview, and Instance Preview. Instance Preview shows the expected number of supplemented tasks and instances, as well as specific supplementary entry instances.
1. After the preview is correct, click Supplement Confirmation. If the project enables supplement approval, the replenishment plan will be generated and executed after approval.
2. After the replenishment plan is created, users can click Data Replenishment Records on the left to enter the list and view details and progress.
Data Replenishment Records
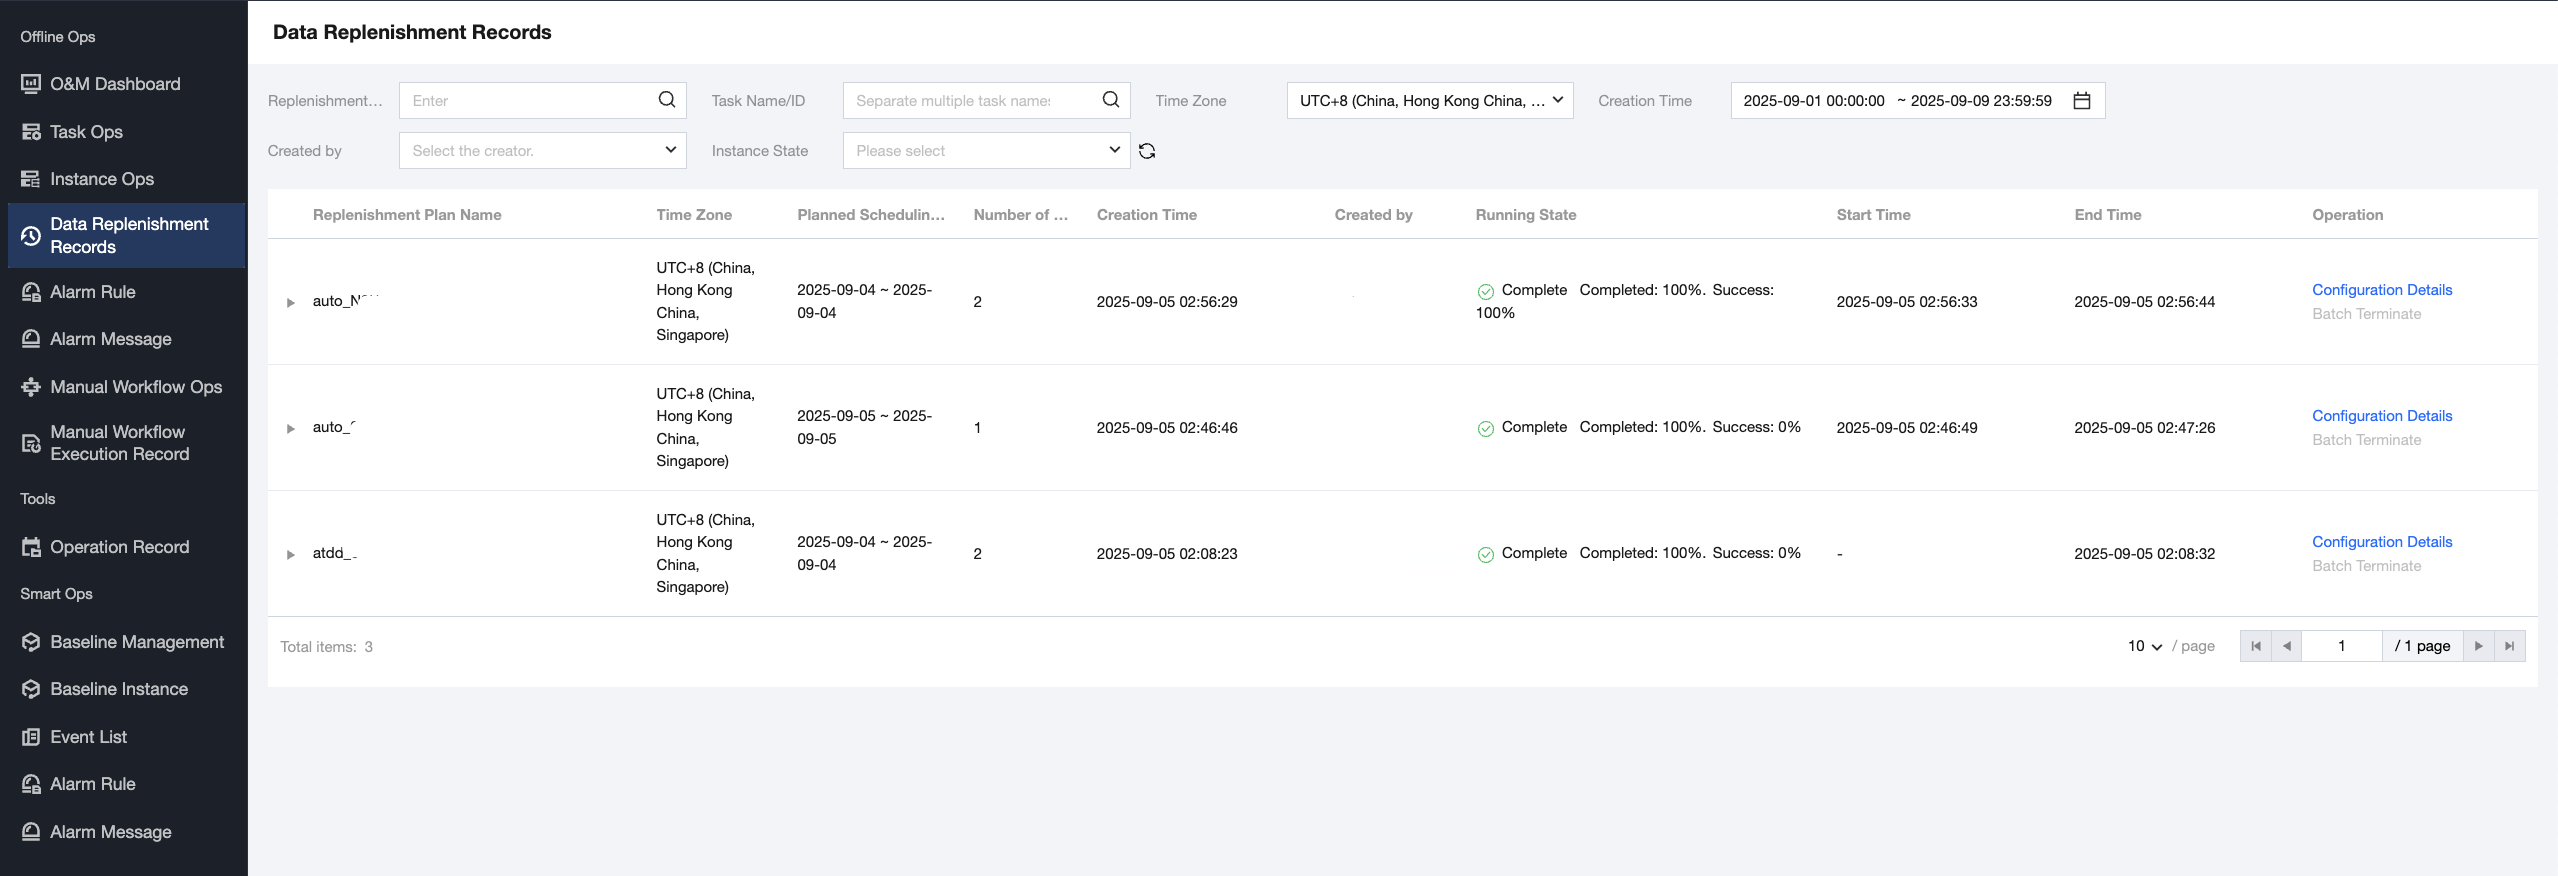
Filtering Replay Records
Data replenishment records support status filtering by replenishment plan name, task name/ID, creation time, creator, and instance status.
Note:
The time zone feature is temporarily not available.
Viewing Replenishment Information
Data replenishment is provided in a three-level list to view and perform backfill tasks.
Primary List
List view: by default, display supplementary task name, planned scheduling time, task count, creation time, creator, running state, start time, end time, and perform.
Running Status
Running: The current backfill task has instances in running and not running states.
Completed: All instances in the current backfill task are in completed, terminated, or failed states.
Completion rate: (successful, terminated, failed) instances / total number of instances.
Success rate: (successful) instances / total number of instances.
Start/End time: the start time of the first instance and the time when the last instance ended in the backfill task.
Operation
Configuration detail: click to view the current backfill task configuration.
Terminate in batches: forcibly terminate instances in "pending execution" or "running" status. Instances in other statuses are ignored by default. Batch operation is an asynchronous operation, and instance status updates may be delayed.
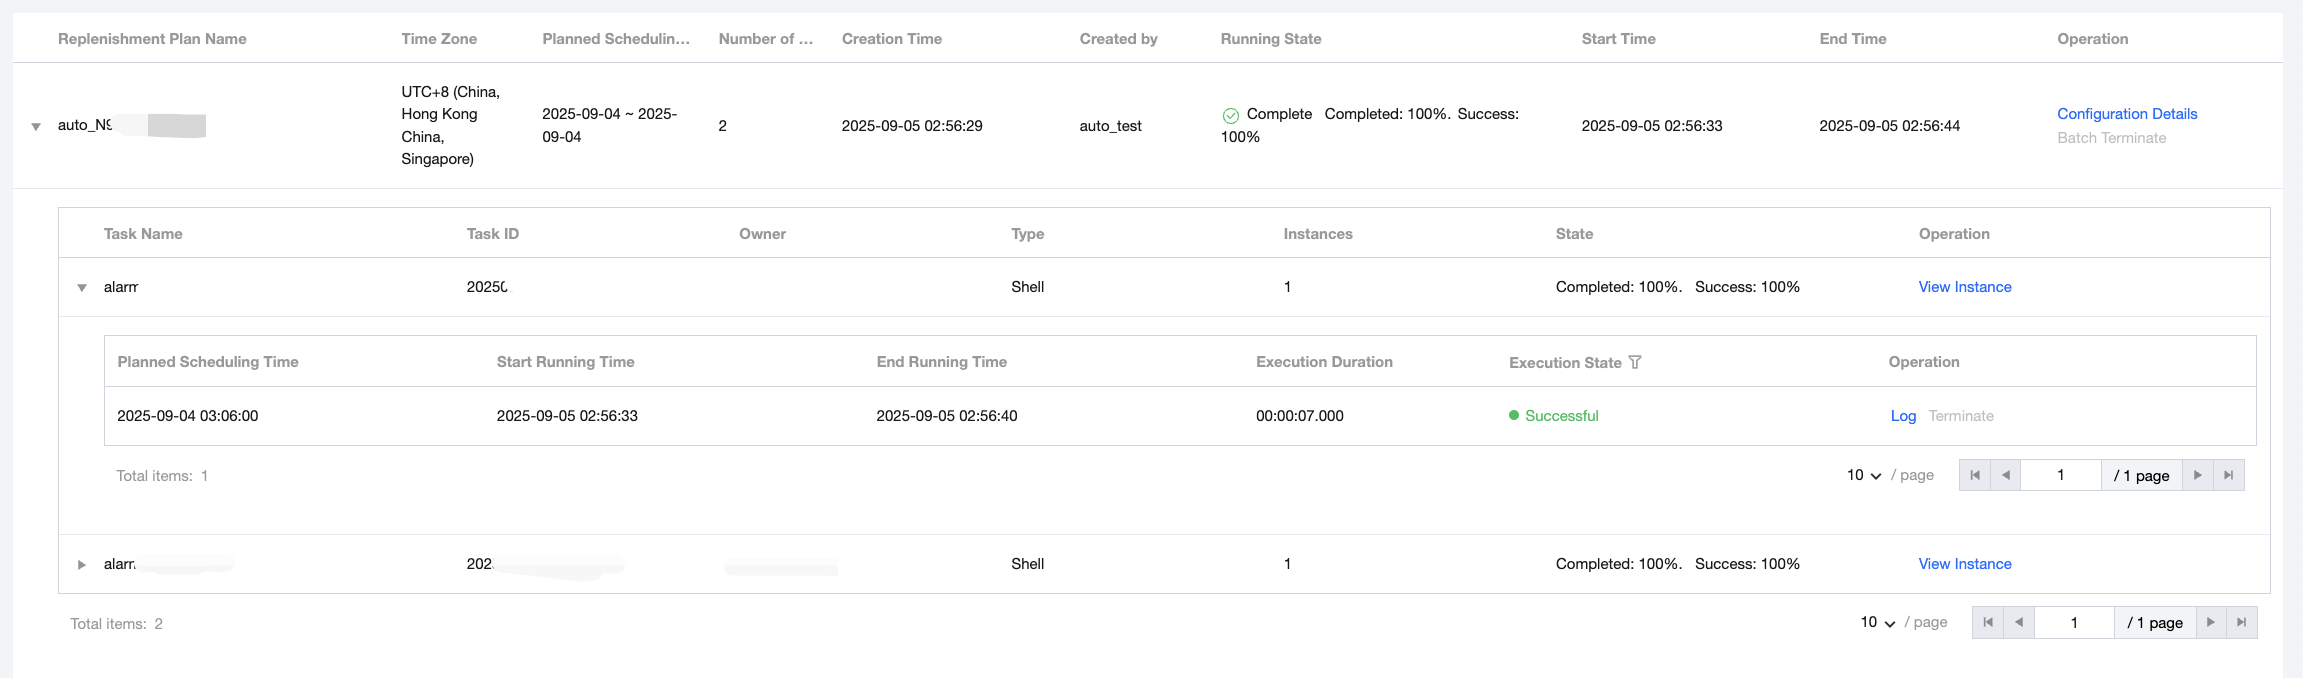
Secondary List
Display current task name, task ID, owner, data type, number of instances, status, and perform.
Operation - View instance: If only one time period is selected for backfill, you can click to jump to the instance list page and select the instance for this backfill task.
Three-Level List
Display current scheduled dispatch time, start time, running end time, execution duration, status, and operation.
Diagnosis: After task failure, judge the reason for failure through diagnostics and support redirection to the corresponding task for viewing details.
Operation: Support viewing logs and terminating instance operations.
피드백