Scenarios
Since ISO images typically cannot be used directly, when you need to use ISO images on Cloud Virtual Machine (CVM) instances, you can create custom CVM images based on the ISO images to achieve the purpose of importing ISO images to CVM instances. This document introduces the specific operations for importing Linux ISO images to CVM instances.
Basic Concepts
ISO Images
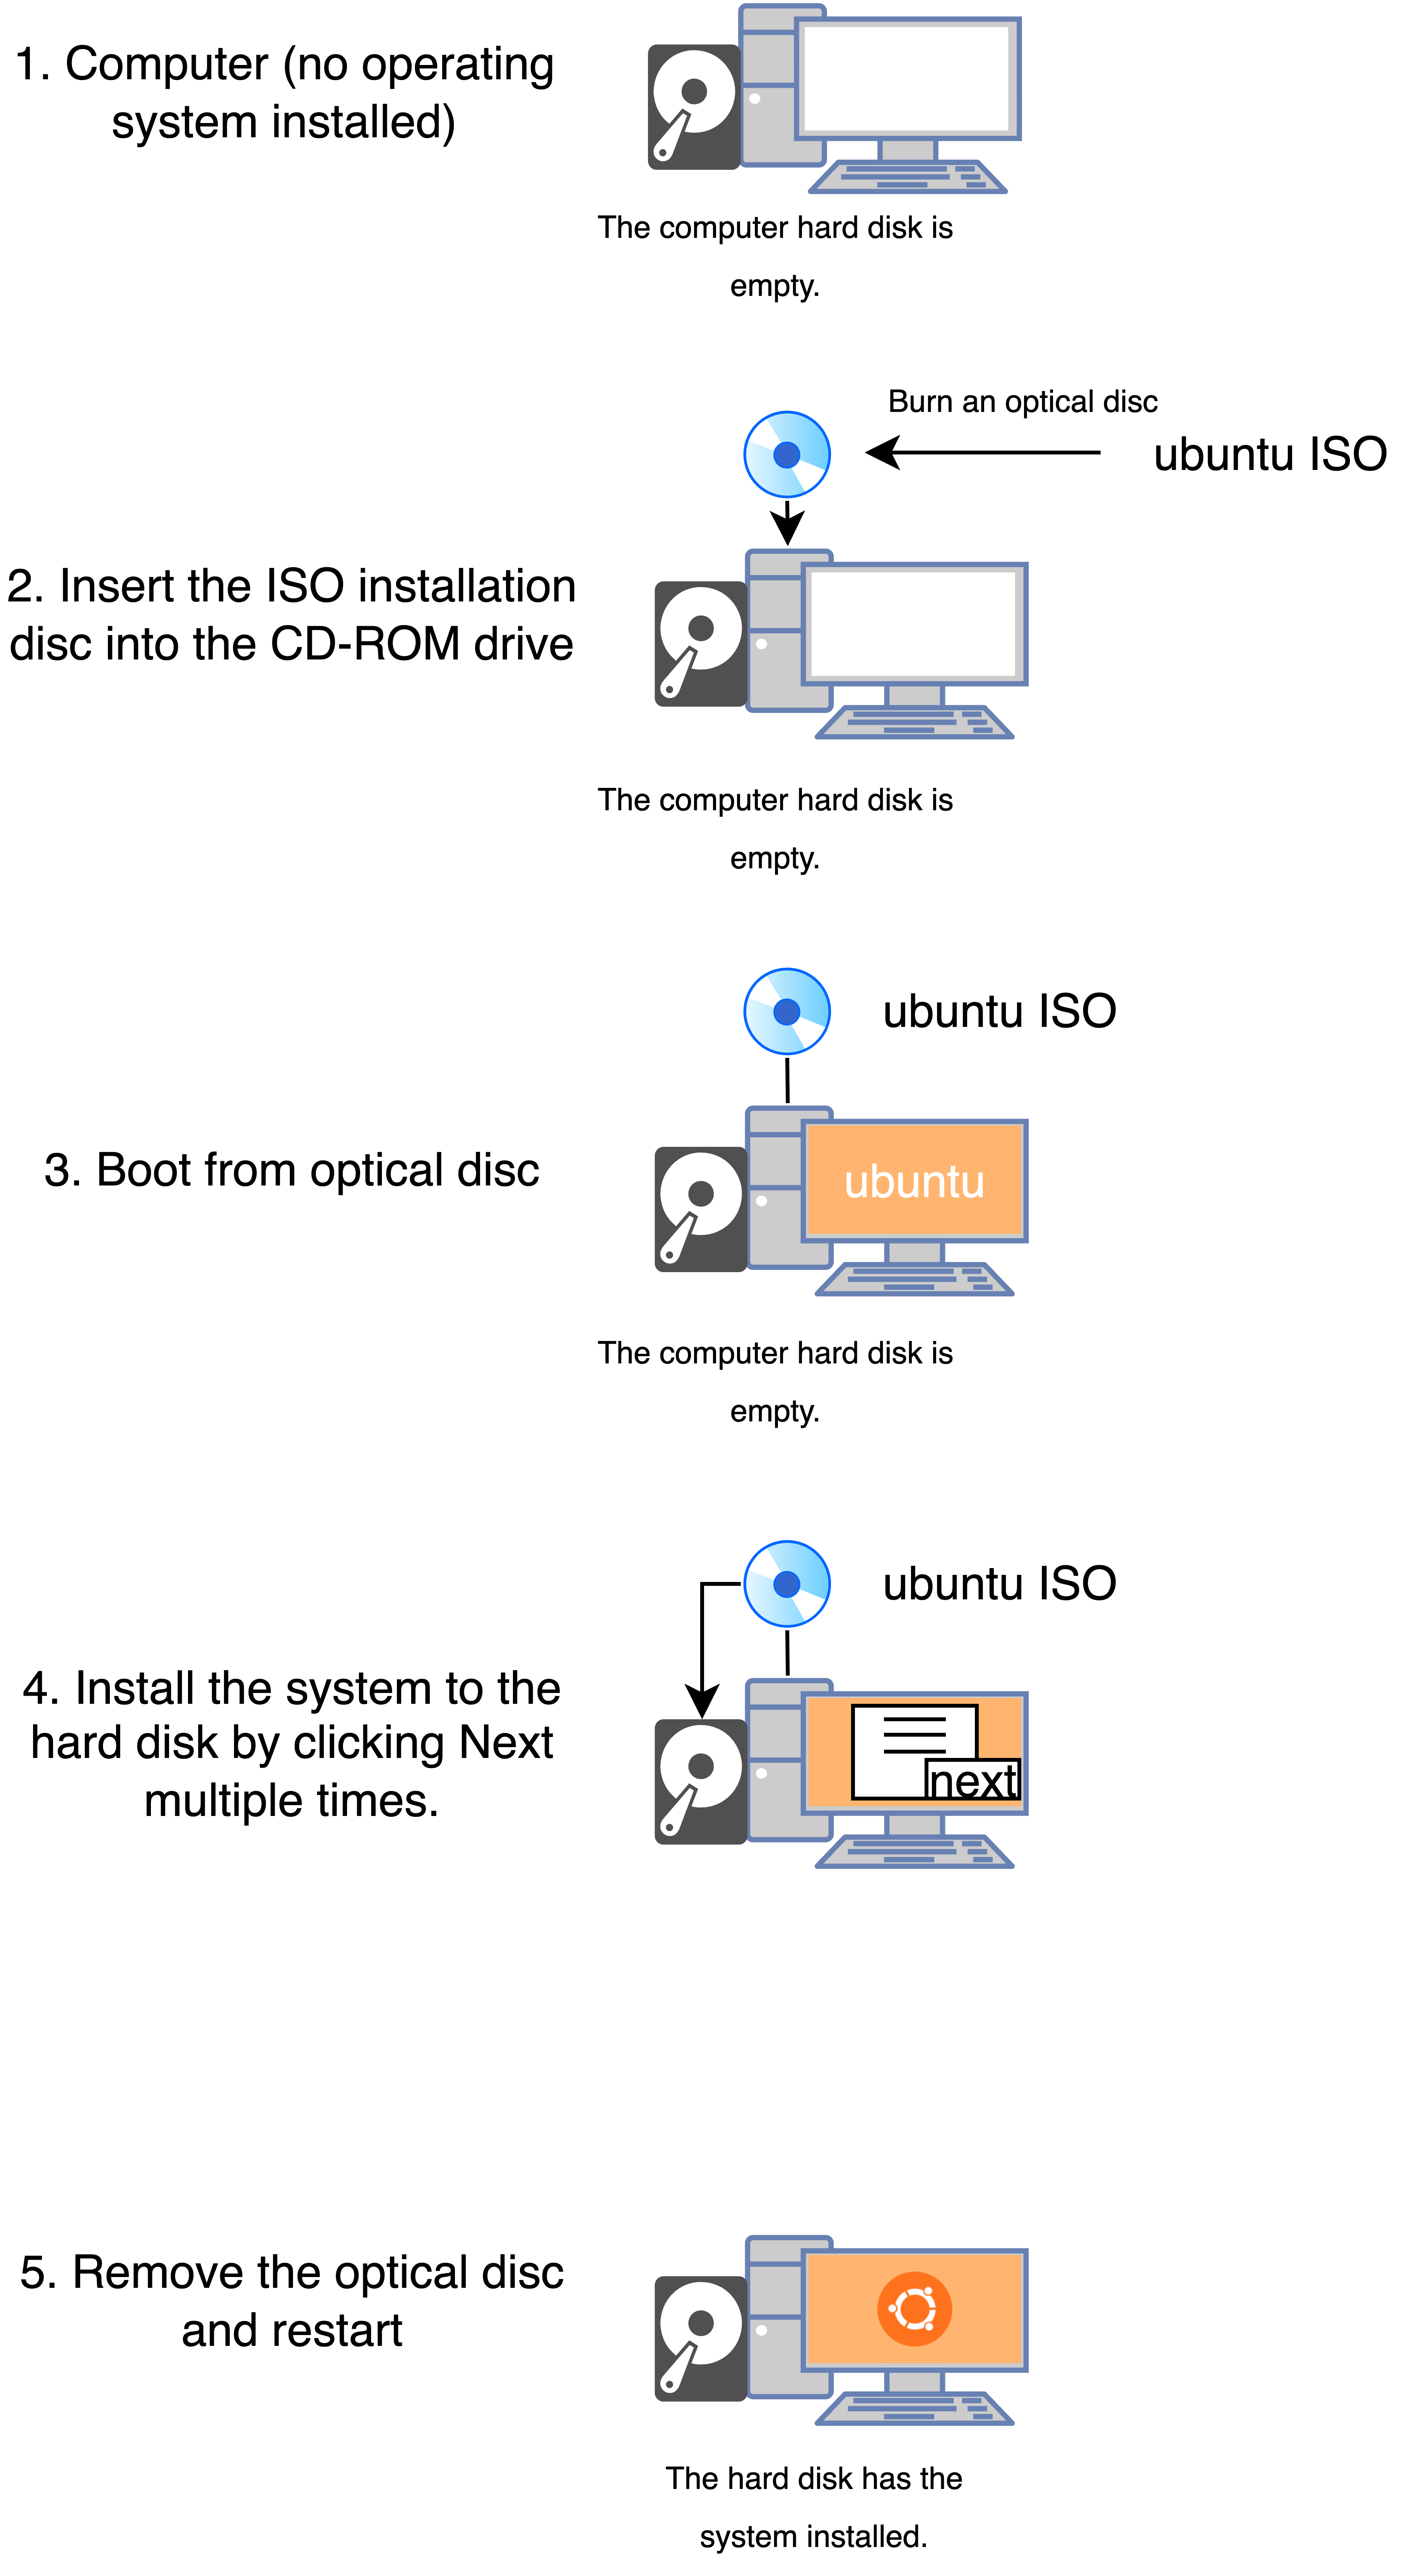
ISO images are optical disc images generally used for burning optical discs. ISO images of different distributions mainly provide the feature of installing the operating system, and the images themselves typically cannot be used directly.
Features of ISO images:
ISO images generally provide the feature of installing the system to a hard disk.
ISO images are read-only. Files within an ISO image cannot be modified. When booted from an ISO image, an overlayFS may be attached at the root directory to provide the modification feature. The upper layer of the attached overlayFS is tmpfs. Changes are stored in memory and are lost upon restart.
Typical steps for using an ISO image are shown in the figure below:
Server Images
Server images provide all the information required to start a CVM instance.
Comparison between server images and ISO images:
A server image allows a CVM instance to be started and immediately used for business deployment, while an ISO image has many limitations when being used to start a CVM instance, and it generally cannot be used directly.
CVM instances created through server images support read-write operations, and system configurations or files are saved after a system restart. However, the modifications are lost upon the ISO image restart.
Import Solutions
ISO images cannot be imported and used directly; server images are disk images that can be started directly. You can create custom CVM images based on ISO images. The following text provides two solutions for reference:
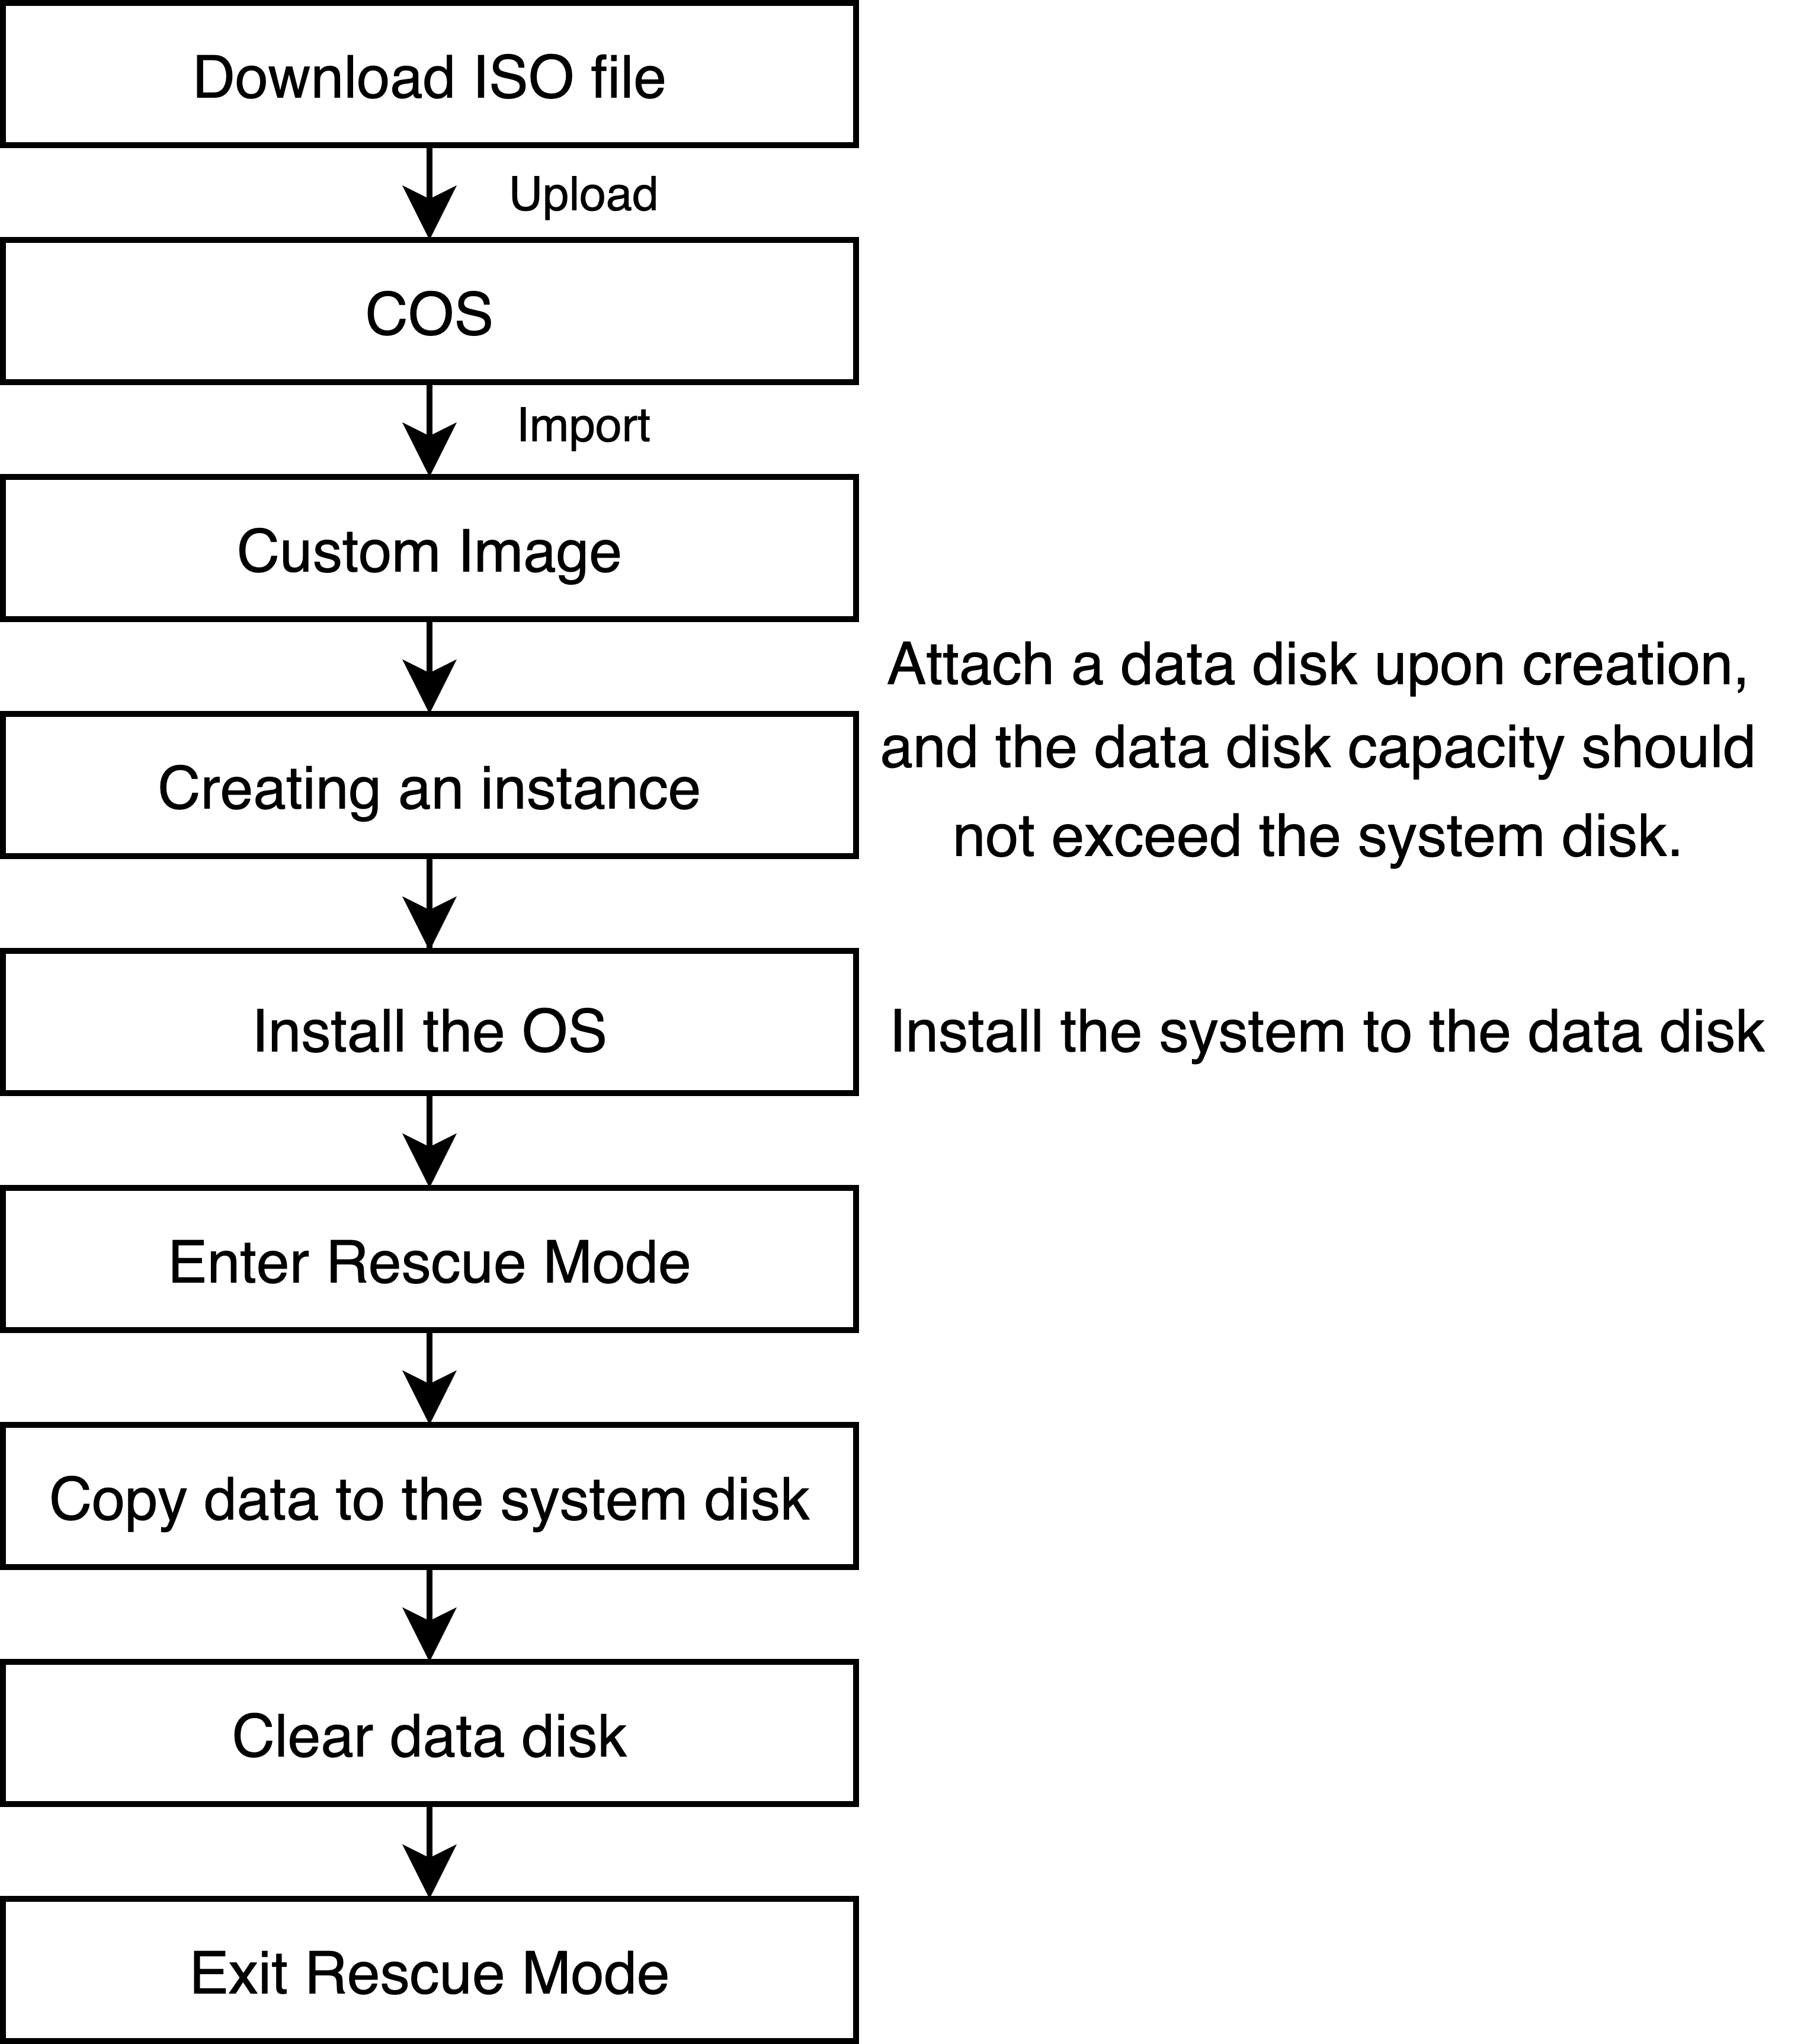
Solution 1: Importing Through the Rescue Mode (Recommended)
Import Process
Advantages, Disadvantages, and Limitations
Advantages:
This solution has good compatibility, supporting both Legacy BIOS and UEFI boot modes.
This solution does not need to modify grub.
This solution can be used when the instance has no public network access capability.
Disadvantages:
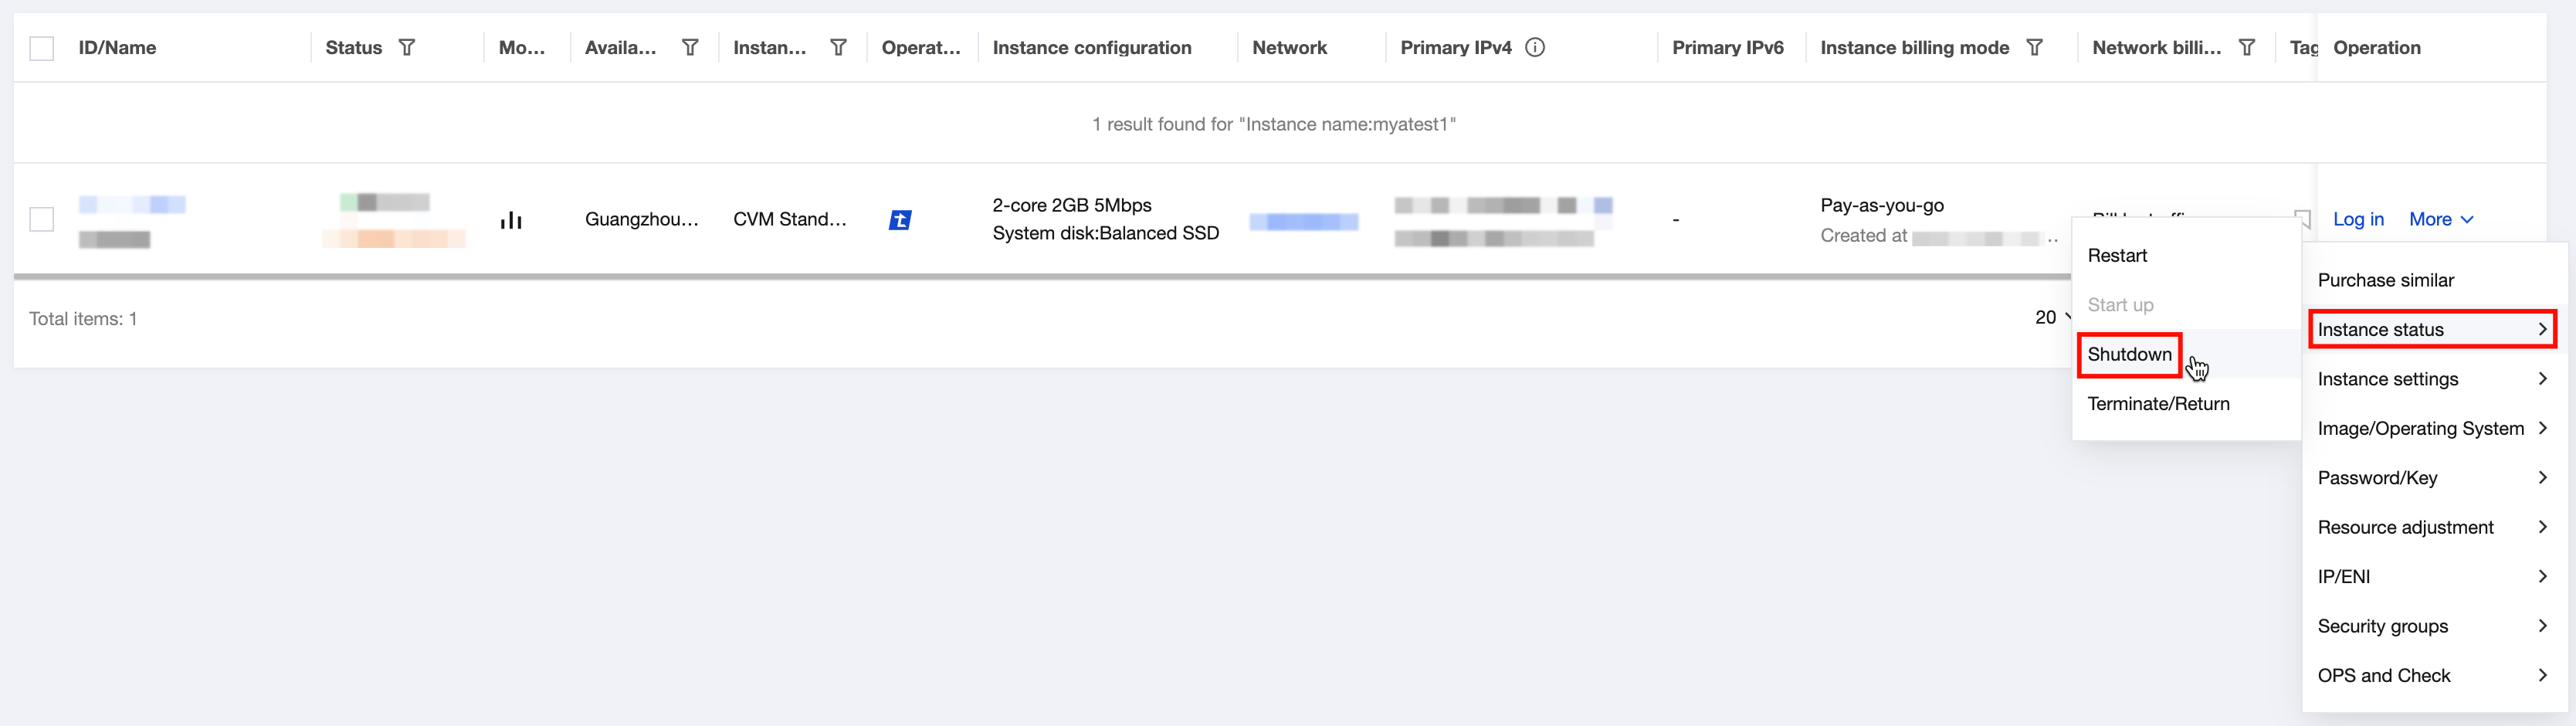
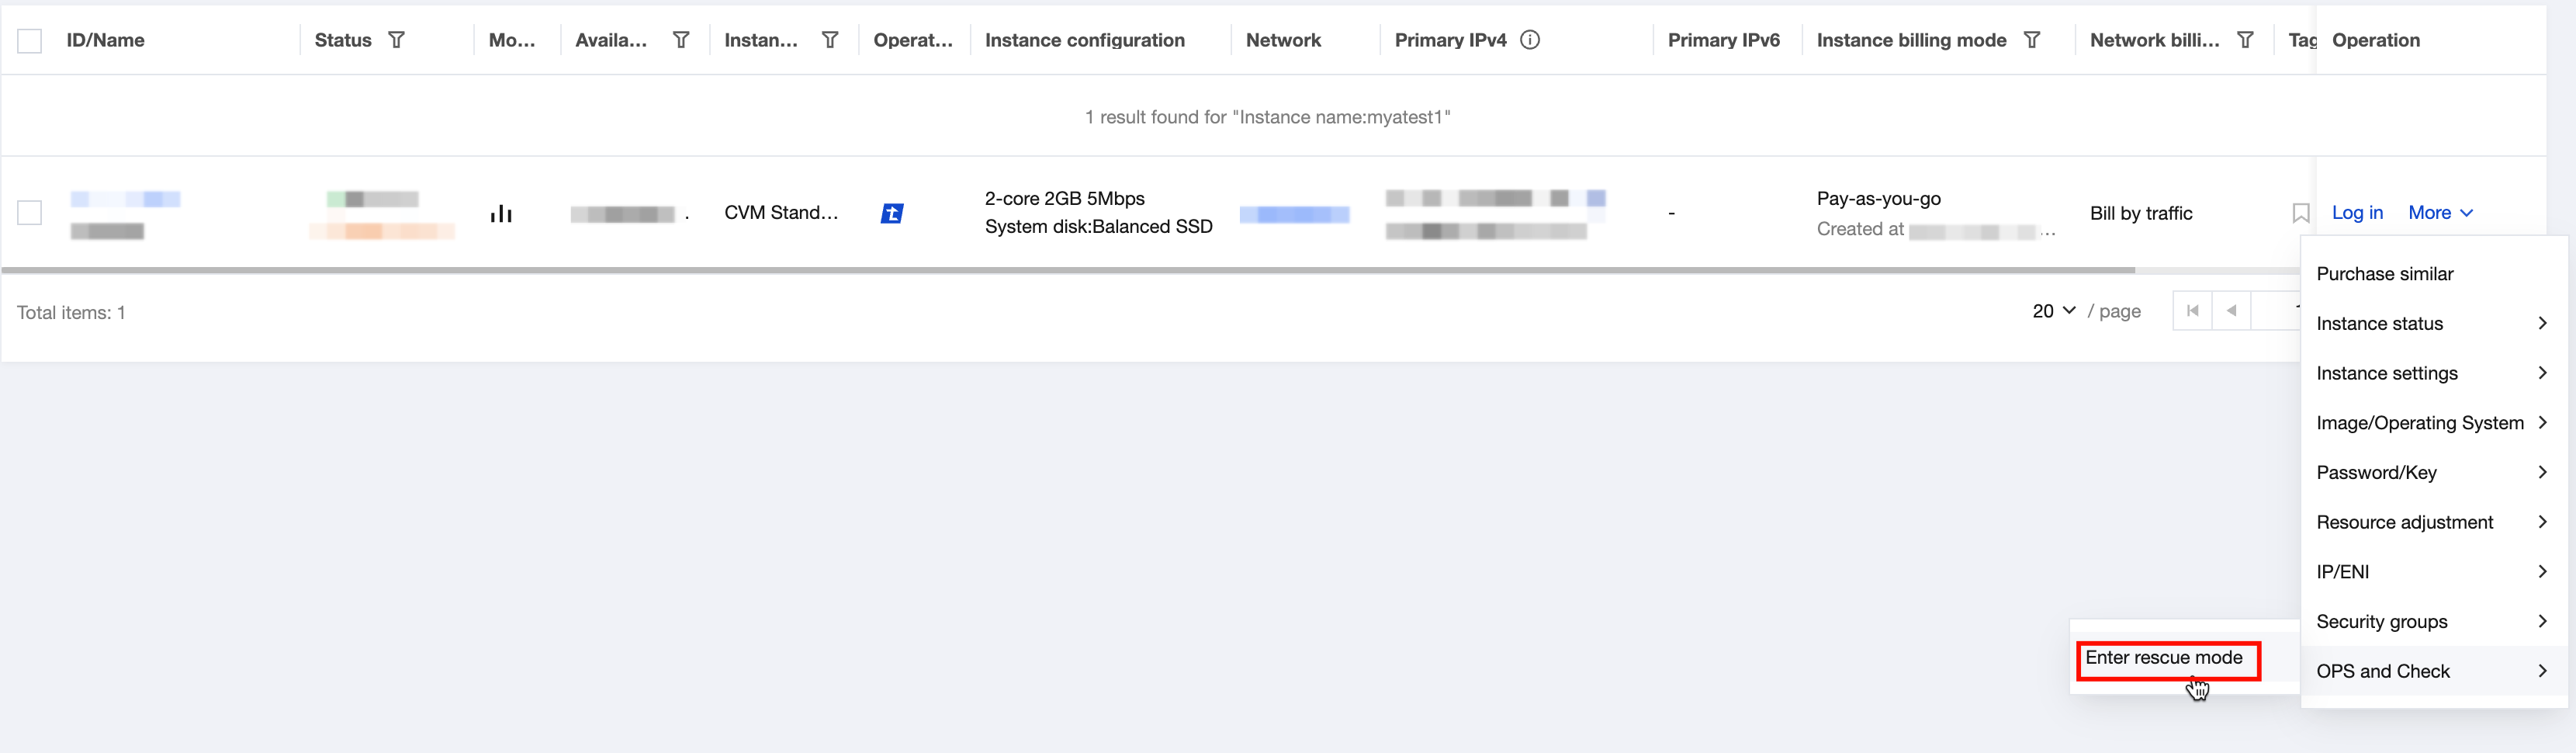
It is required to enter the rescue mode manually.
Since redundant data replication is performed multiple times, the process is relatively long.
Limitations:
This solution is suitable for Linux ISO images. Earlier Linux distributions may have compatibility issues.
Operation Steps
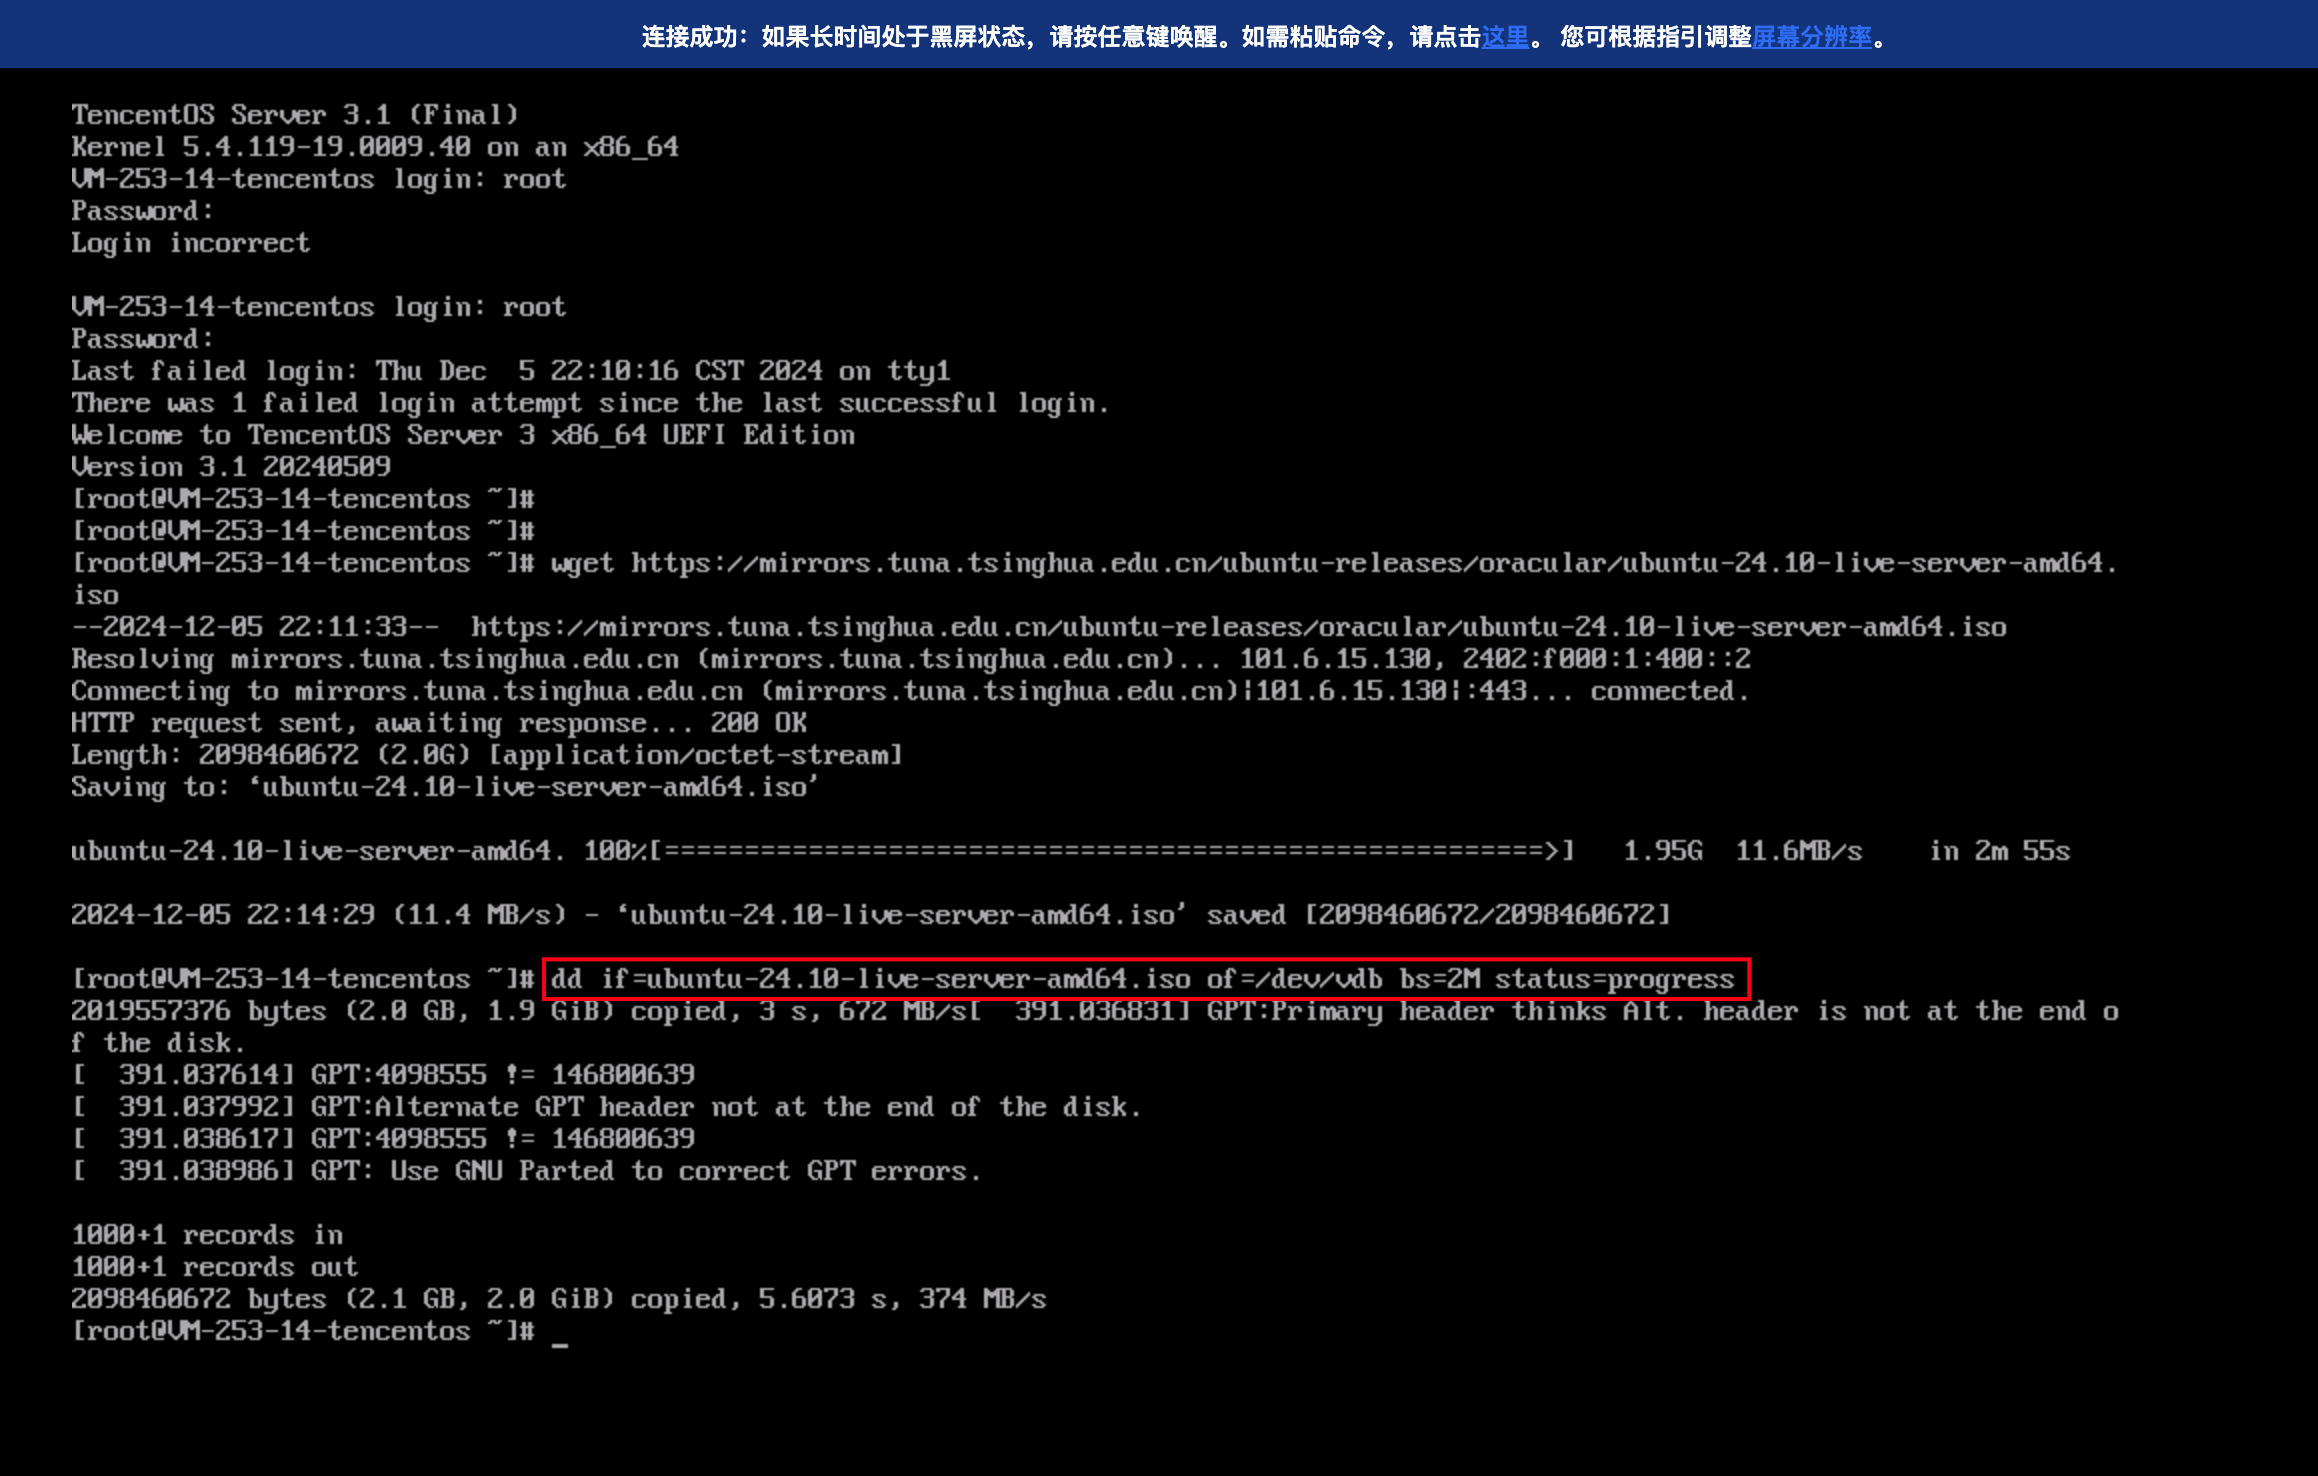
1. Download the ISO images from the official website of the corresponding distribution, and import them to CVM instances. 1.1 Download the ISO images.
1.2 Upload the ISO images to a Cloud Object Storage (COS) bucket.
1.3 Import the ISO images of the COS bucket to CVM instances.
Note:
When images are imported, select Enable Forced Import.
Ensure that the operating system architecture is selected correctly. (Generally 64-bit, namely, x86_64. For arm images, select arm_64.)
Ensure that the currently selected boot mode is consistent with that of the image file. Otherwise, using this image may affect the boot of your instance.
Note:
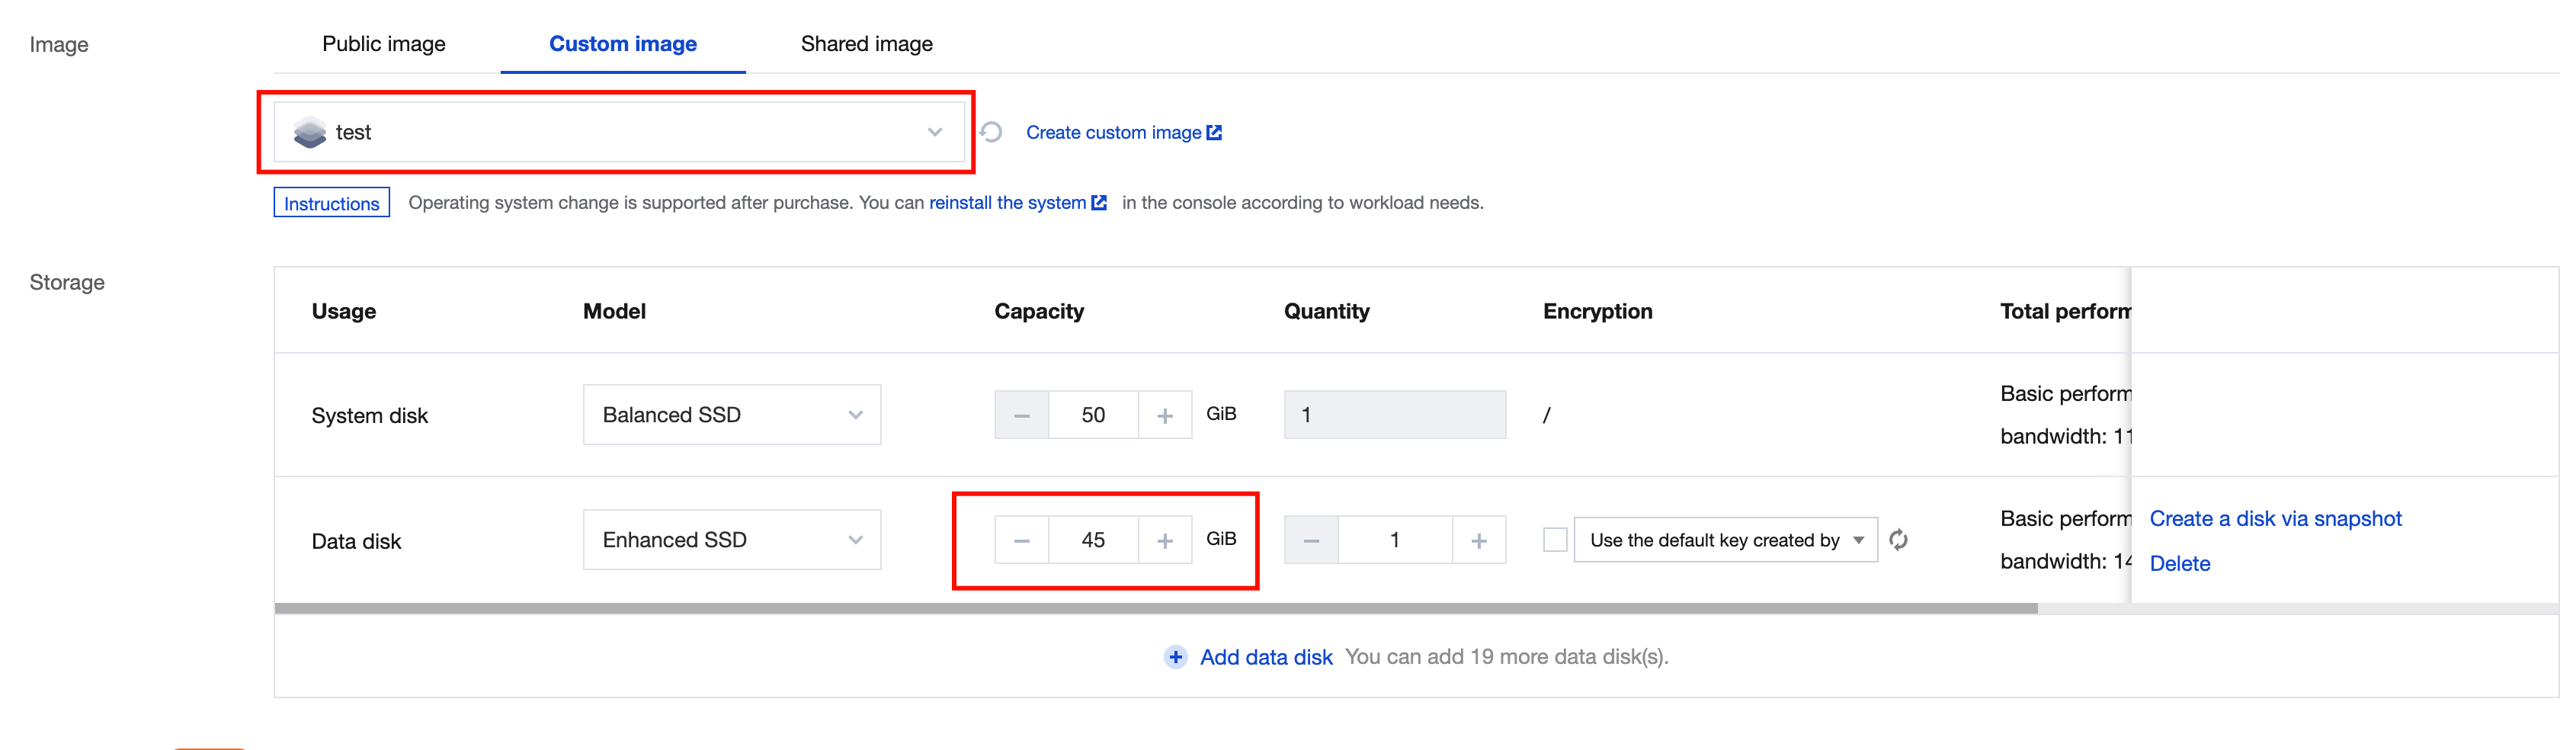
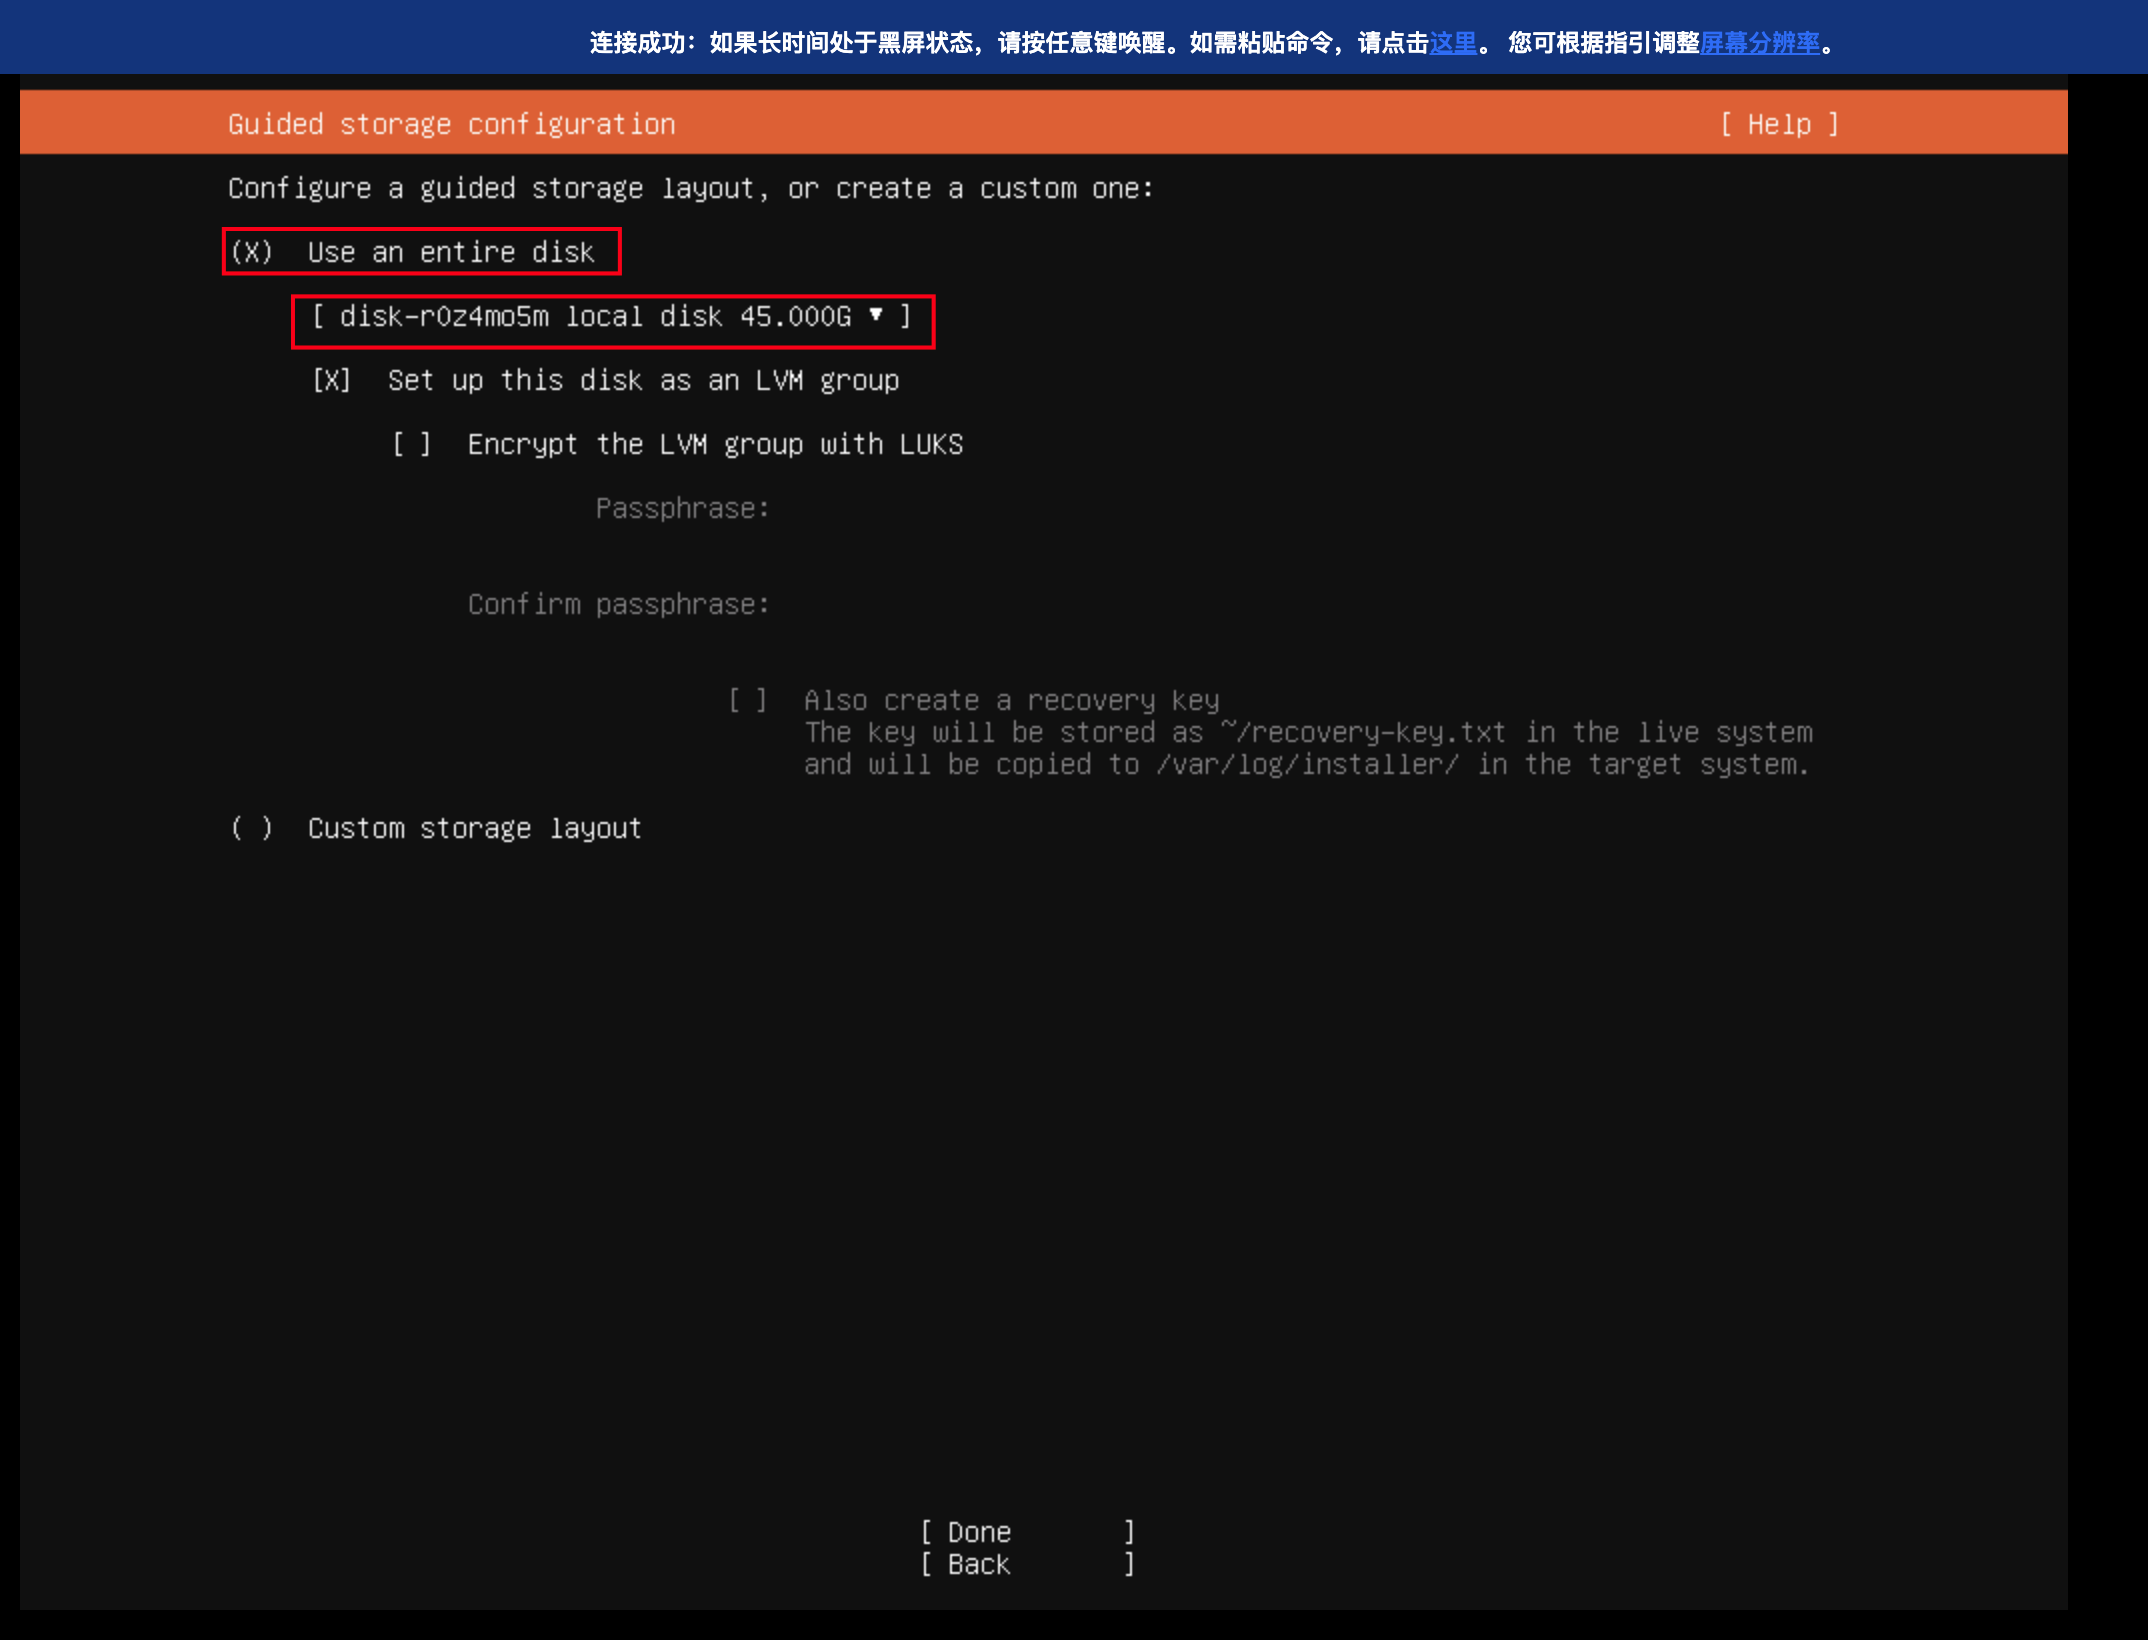
When instances are created, at least one data disk needs to be attached, and the disk capacity should not exceed the system disk capacity. After the images are imported, the default available space is equal to the data disk size.
The sizes of both the data disk and system disk should be greater than the recommended disk size for the distribution.
If your instance does not require a data disk, it is recommended to select the pay-as-you-go billing mode first. After the successful import of the ISO images, you can return the data disk and then change to a suitable billing mode as needed. For detailed operations, see Converting Pay-as-You-Go to Yearly/Monthly Subscription. The configuration of the created instance should meet the recommended configuration requirements of the distribution. In this example, Ubuntu 24.10 is used, with the instance configured as SA5.MEDIUM4. The illustration is shown below:
Note:
Depending on the requirements of different distributions, you may need to clear the disk before installation.
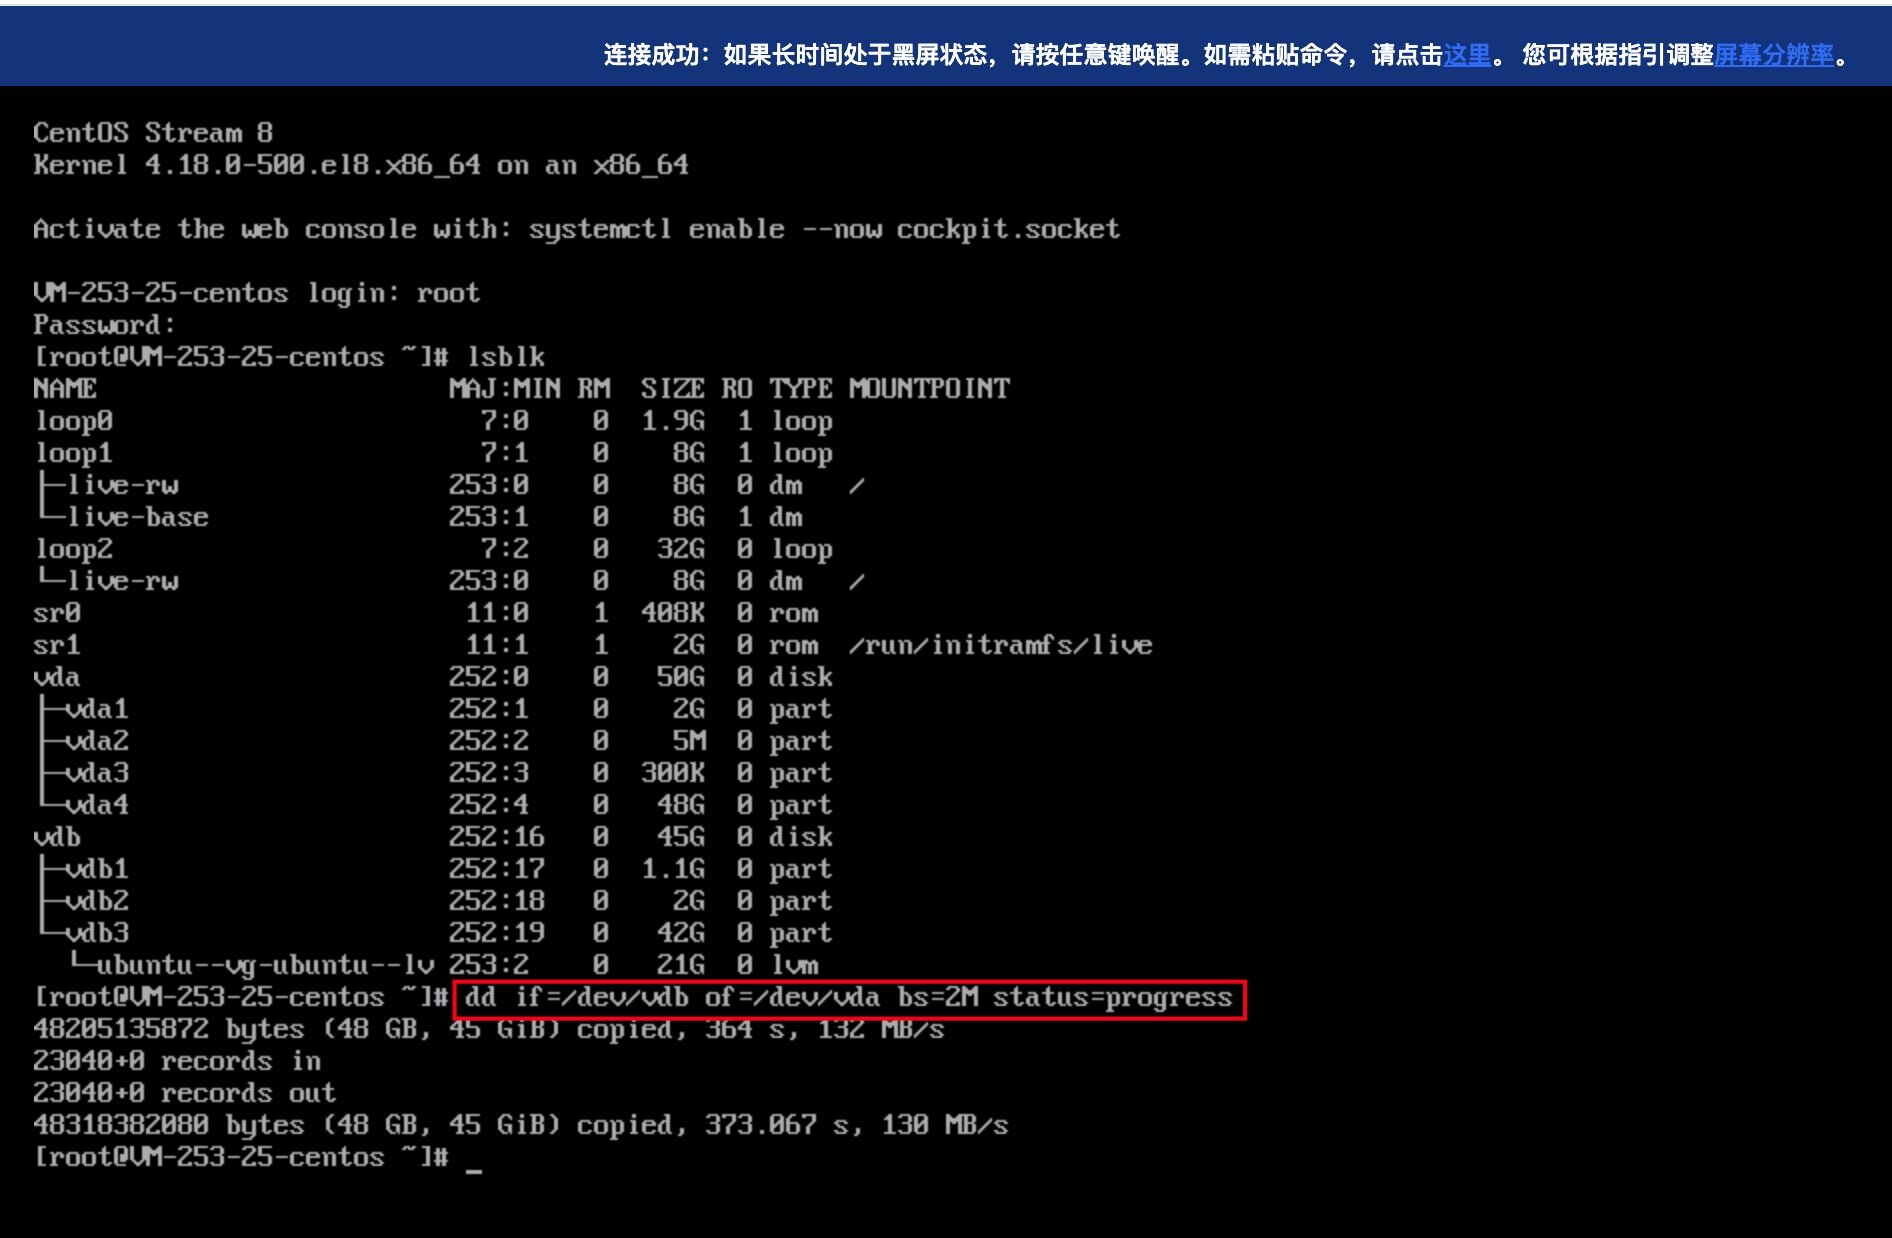
Forcibly importing ISO images and creating instances are equivalent to writing the ISO images directly into the system disk vda using the dd command. Since the currently running program is the installation program on the system disk vda, it is not possible to install the system on the system disk vda.
5. In the rescue mode, write the content of the data disk into the system disk using the dd command.
dd if=/dev/vdb of=/dev/vda bs=2M status=progress
6. In the rescue mode, clear the first 64 MB of the data disk using the dd command. This prevents issues caused by duplicate UUIDs between the data disk and the system disk.
dd if=/dev/zero of=/dev/vdb bs=2M count=32
Running Environment
Operating System: Ubuntu 24.04.3 LTS / x86_64
Runtime Version: GNU bash, version 5.2.21(1)-release (x86_64-pc-linux-gnu)
Solution 2: Importing Through Data Disks
Import Process
Advantages, Disadvantages, and Limitations
Advantages:
There is less redundant data replication, and the process is relatively short.
Disadvantages:
Operations are different between Legacy BIOS and UEFI boot modes.
For images in the Legacy BIOS boot mode, the operation of grub is required.
Limitations:
This solution is suitable for Linux ISO images. Earlier Linux distributions may have compatibility issues.
ISO files installed on the Windows operating system cannot be written to disks using the dd command, and installation of additional tools is required.
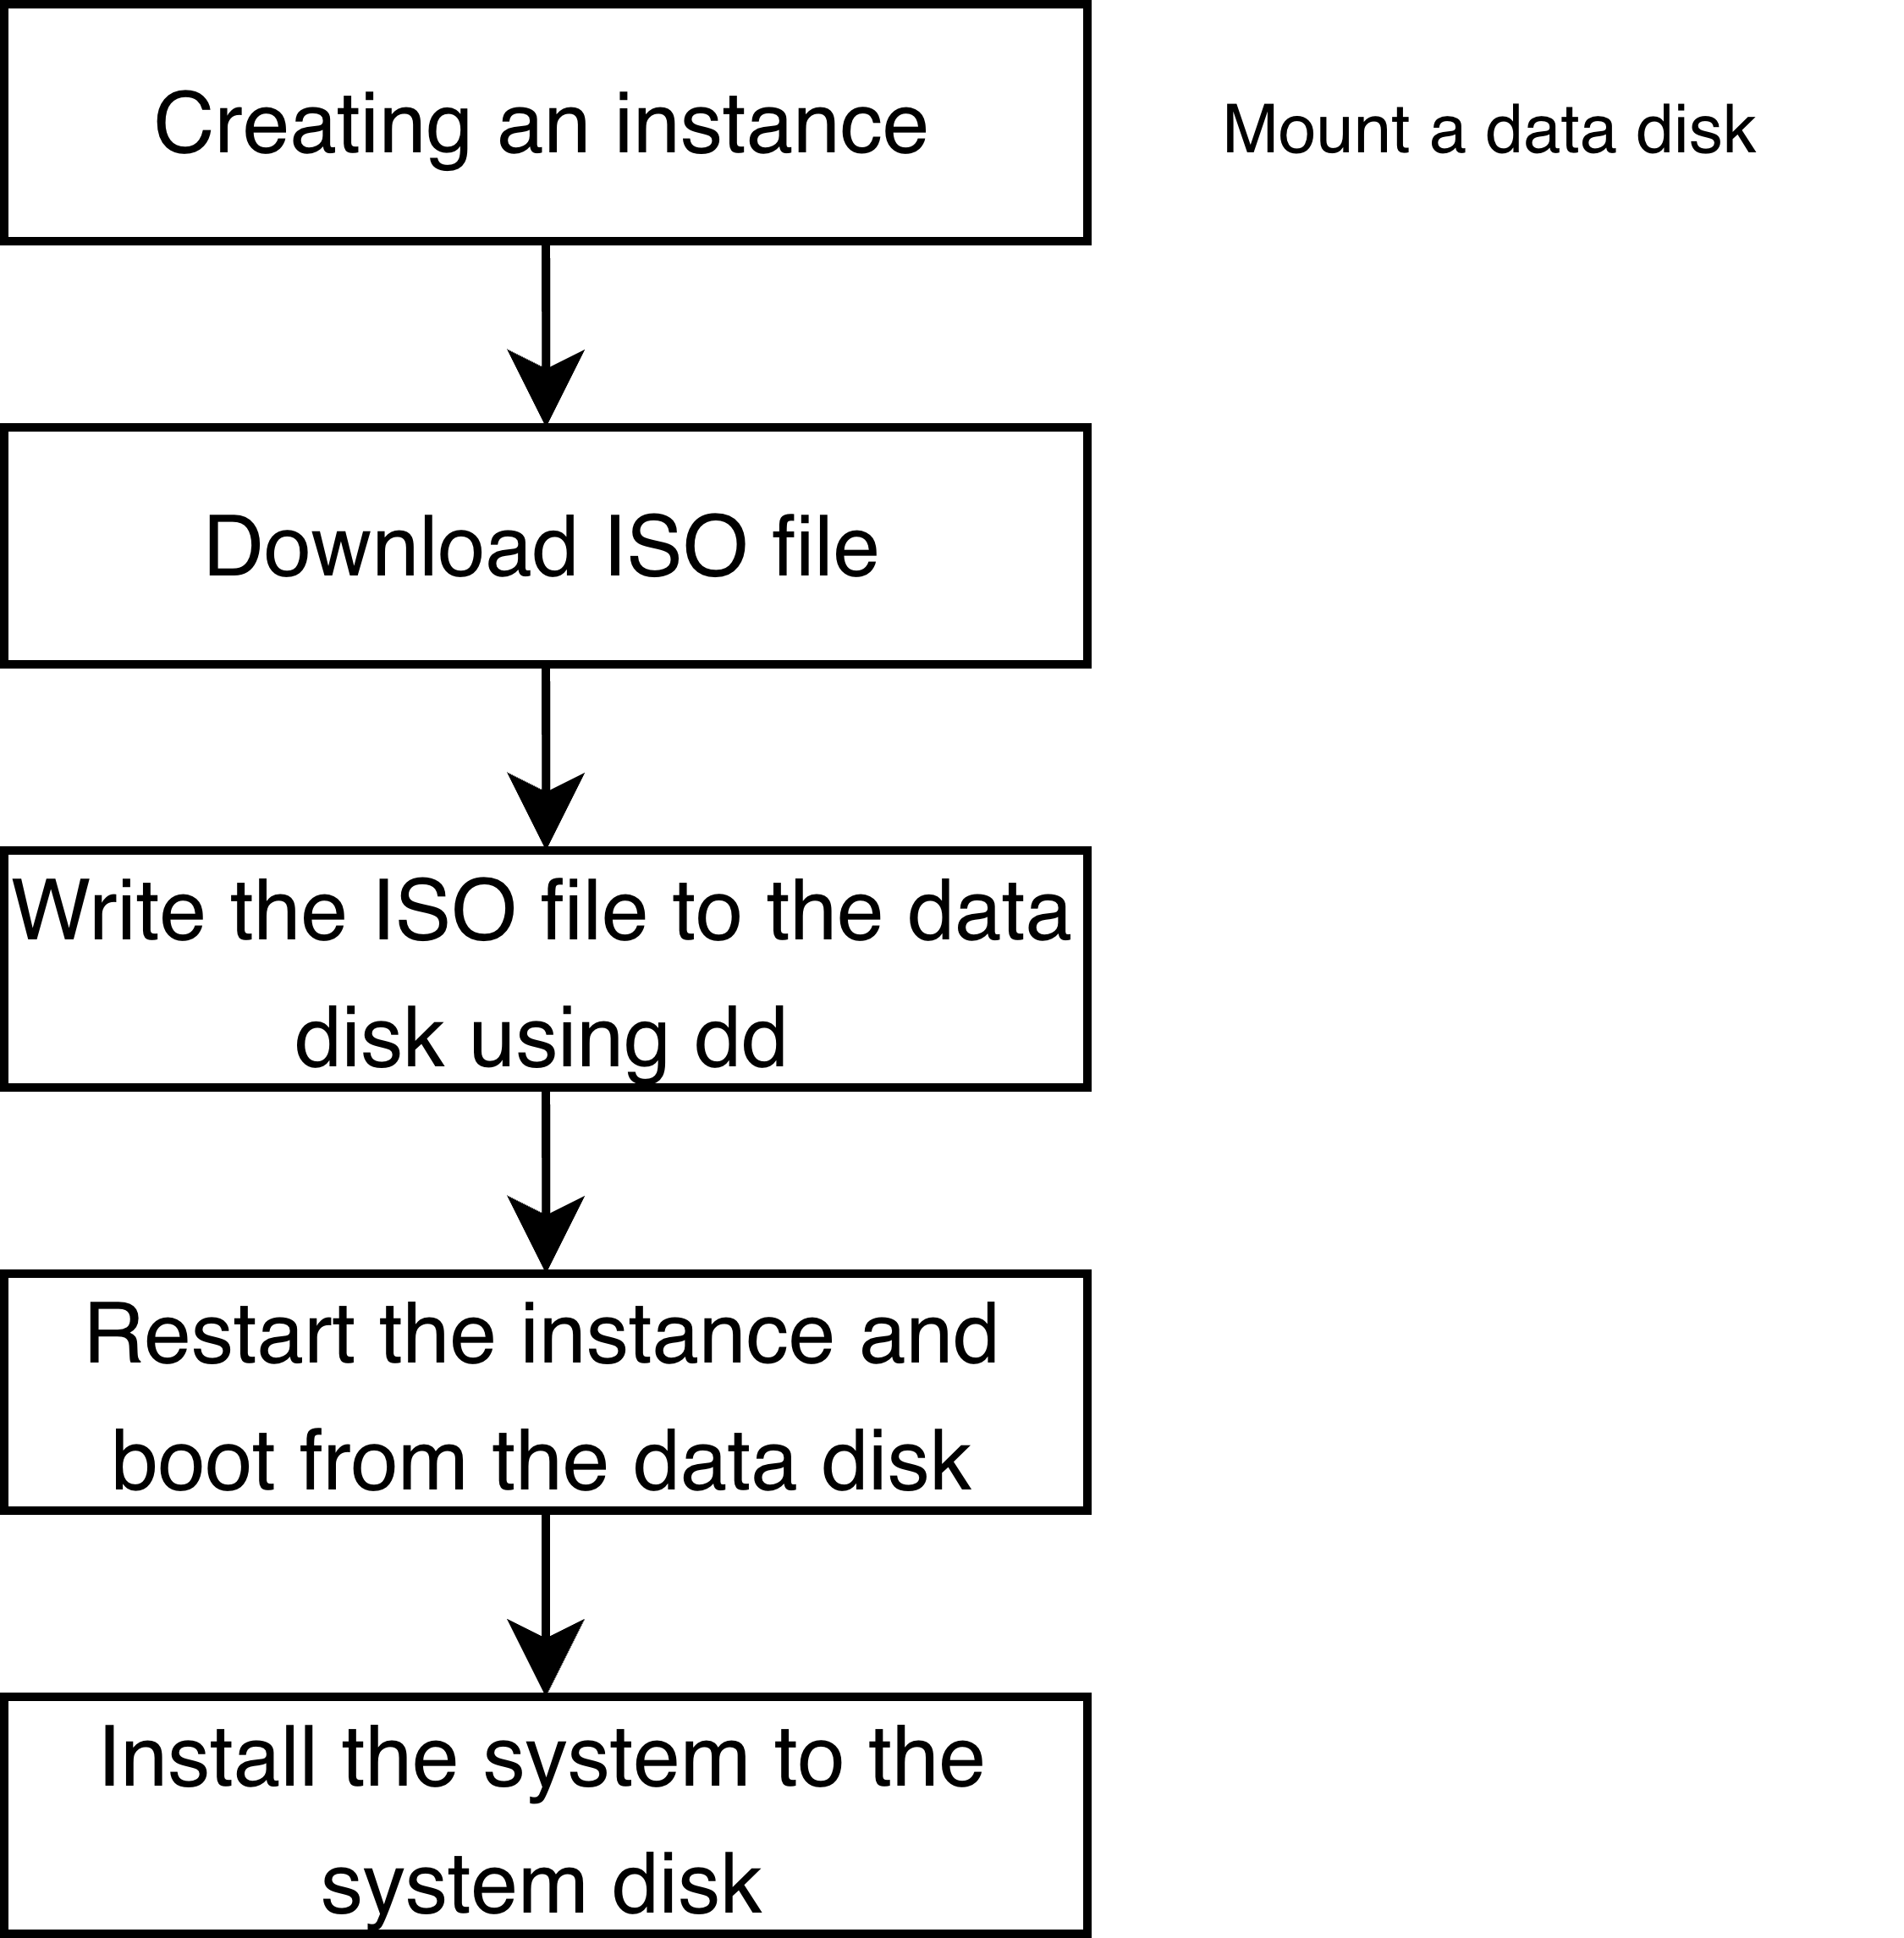
Operation Steps
1. Create CVM instances.
The configuration of the created instance should meet the recommended configuration requirements of the distribution. In this example, Ubuntu 24.10 is used, with the instance configured as SA5.MEDIUM4.
Note:
When instances are created, attach at least one data disk, and ensure that the data disk size exceeds the distribution ISO size.
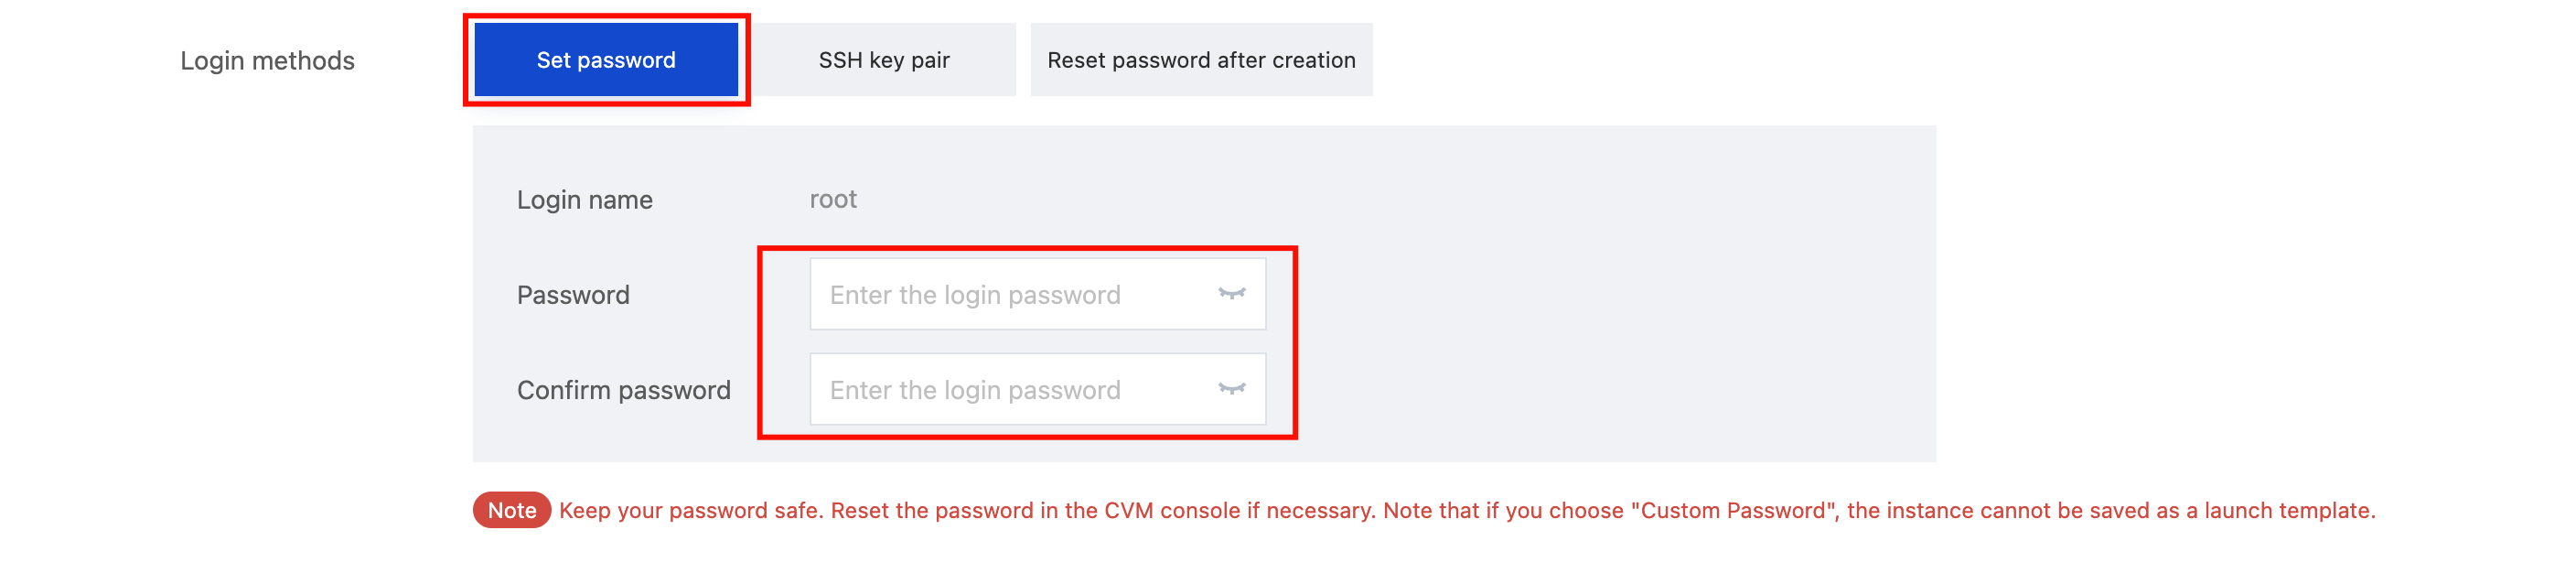
It is required to manually set the login password for the instance to facilitate subsequent VNC login.
The system disk should be greater than the recommended disk size for the distribution, and have sufficient space to download and store ISO images in subsequent steps.
The instance should have the public network access capability. You need to select Assign a Public IP Address when creating the instance to facilitate the download of ISO images through the public network.
The operating system information on the instance displayed in the CVM console may not match the operating system of the ISO file. This cannot be unified, but does not affect instance operation.
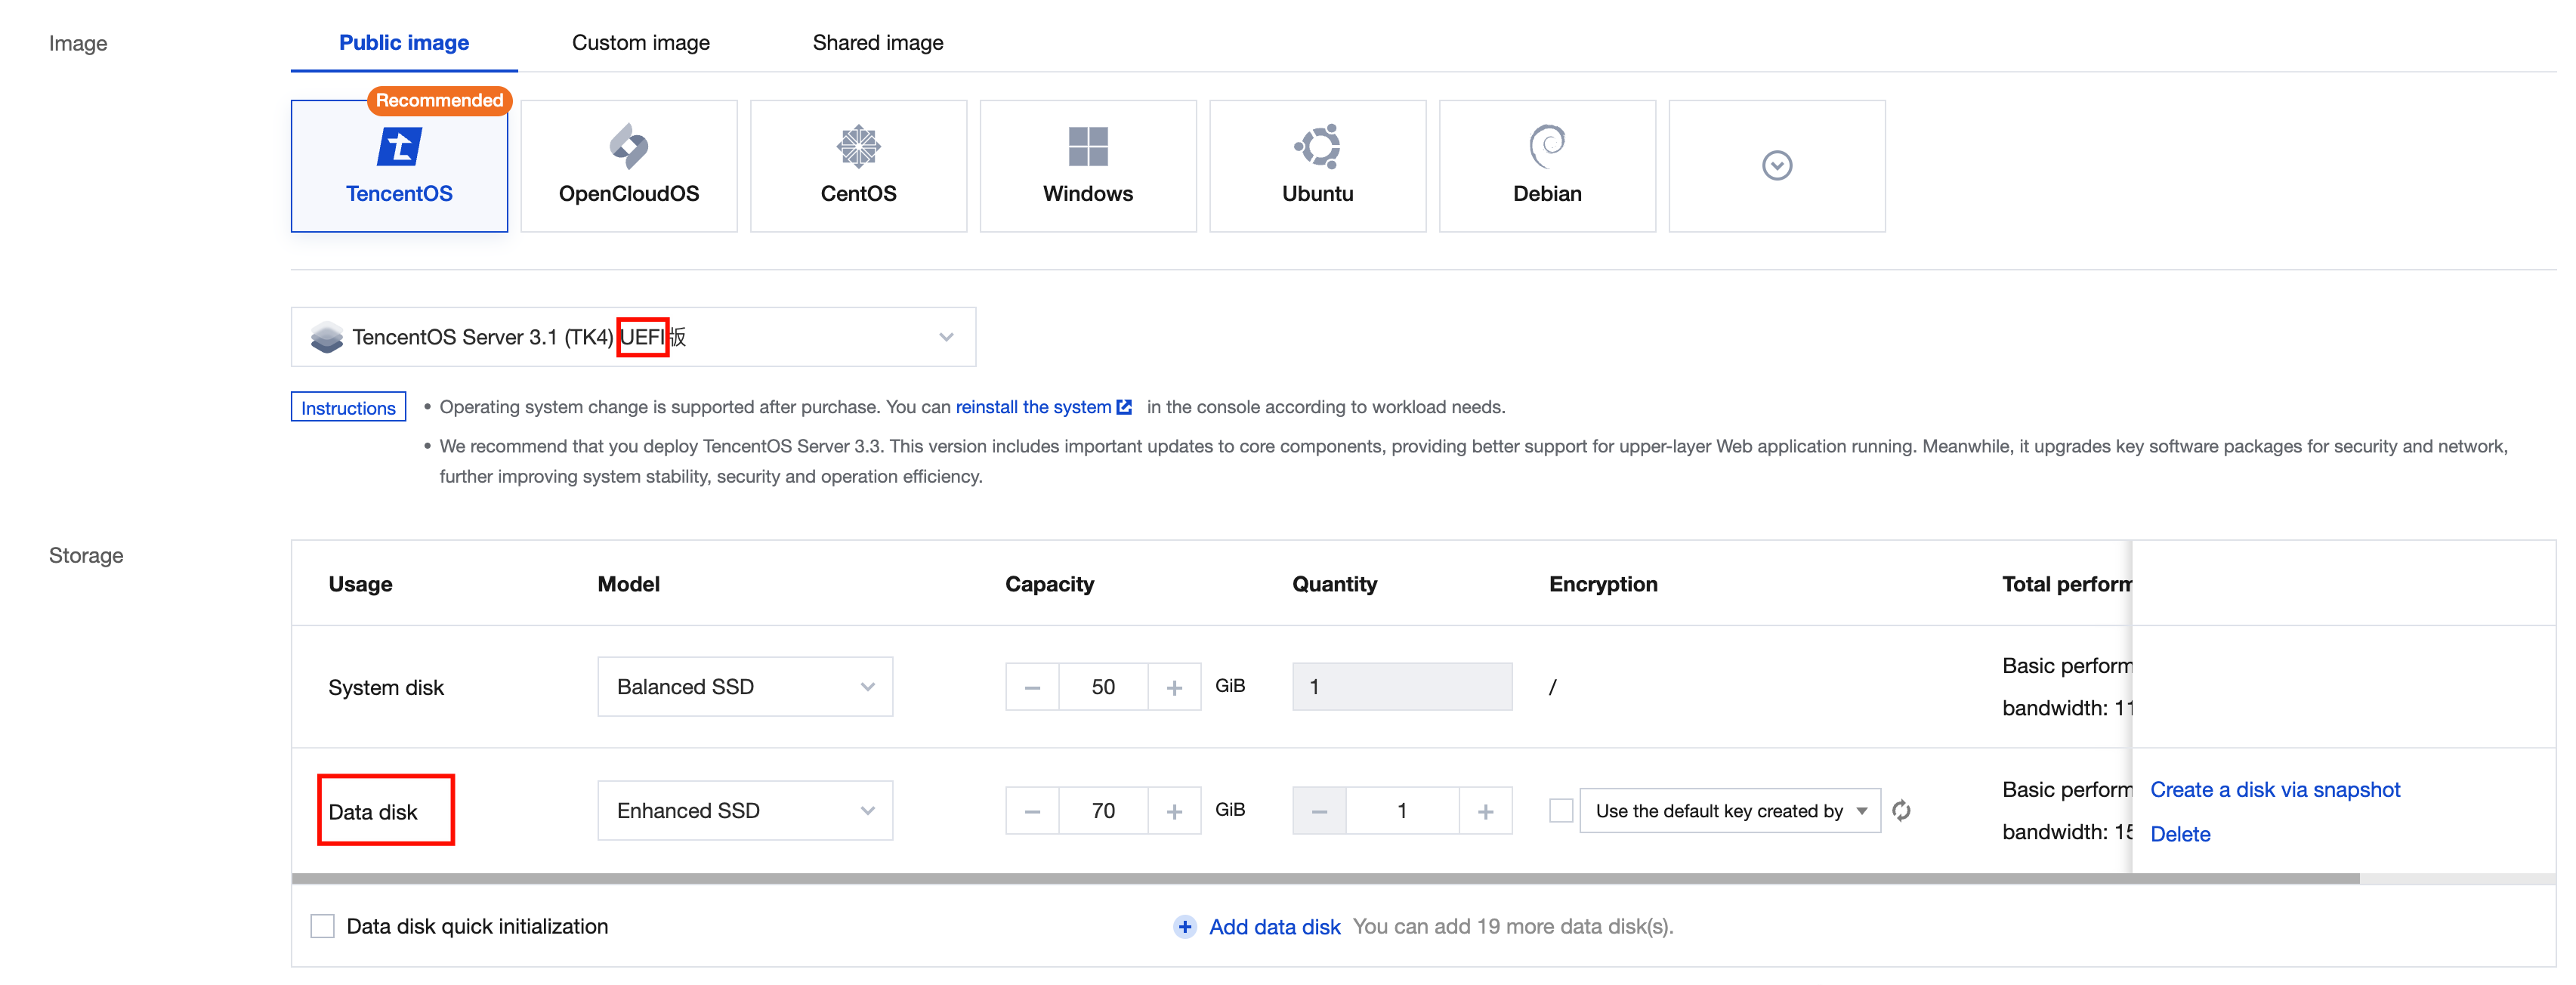
If your instance does not require a data disk, it is recommended to select the pay-as-you-go billing mode first. After the successful import of the ISO images, you can return the data disk and then change to a suitable billing mode as needed. For detailed operations, see Converting Pay-as-You-Go to Yearly/Monthly Subscription. The downloaded ISO images should support the UEFI boot mode (generally supported). When creating an instance, you need to select the TencentOS Server 3.1 (TK4) UEFI Edition image.
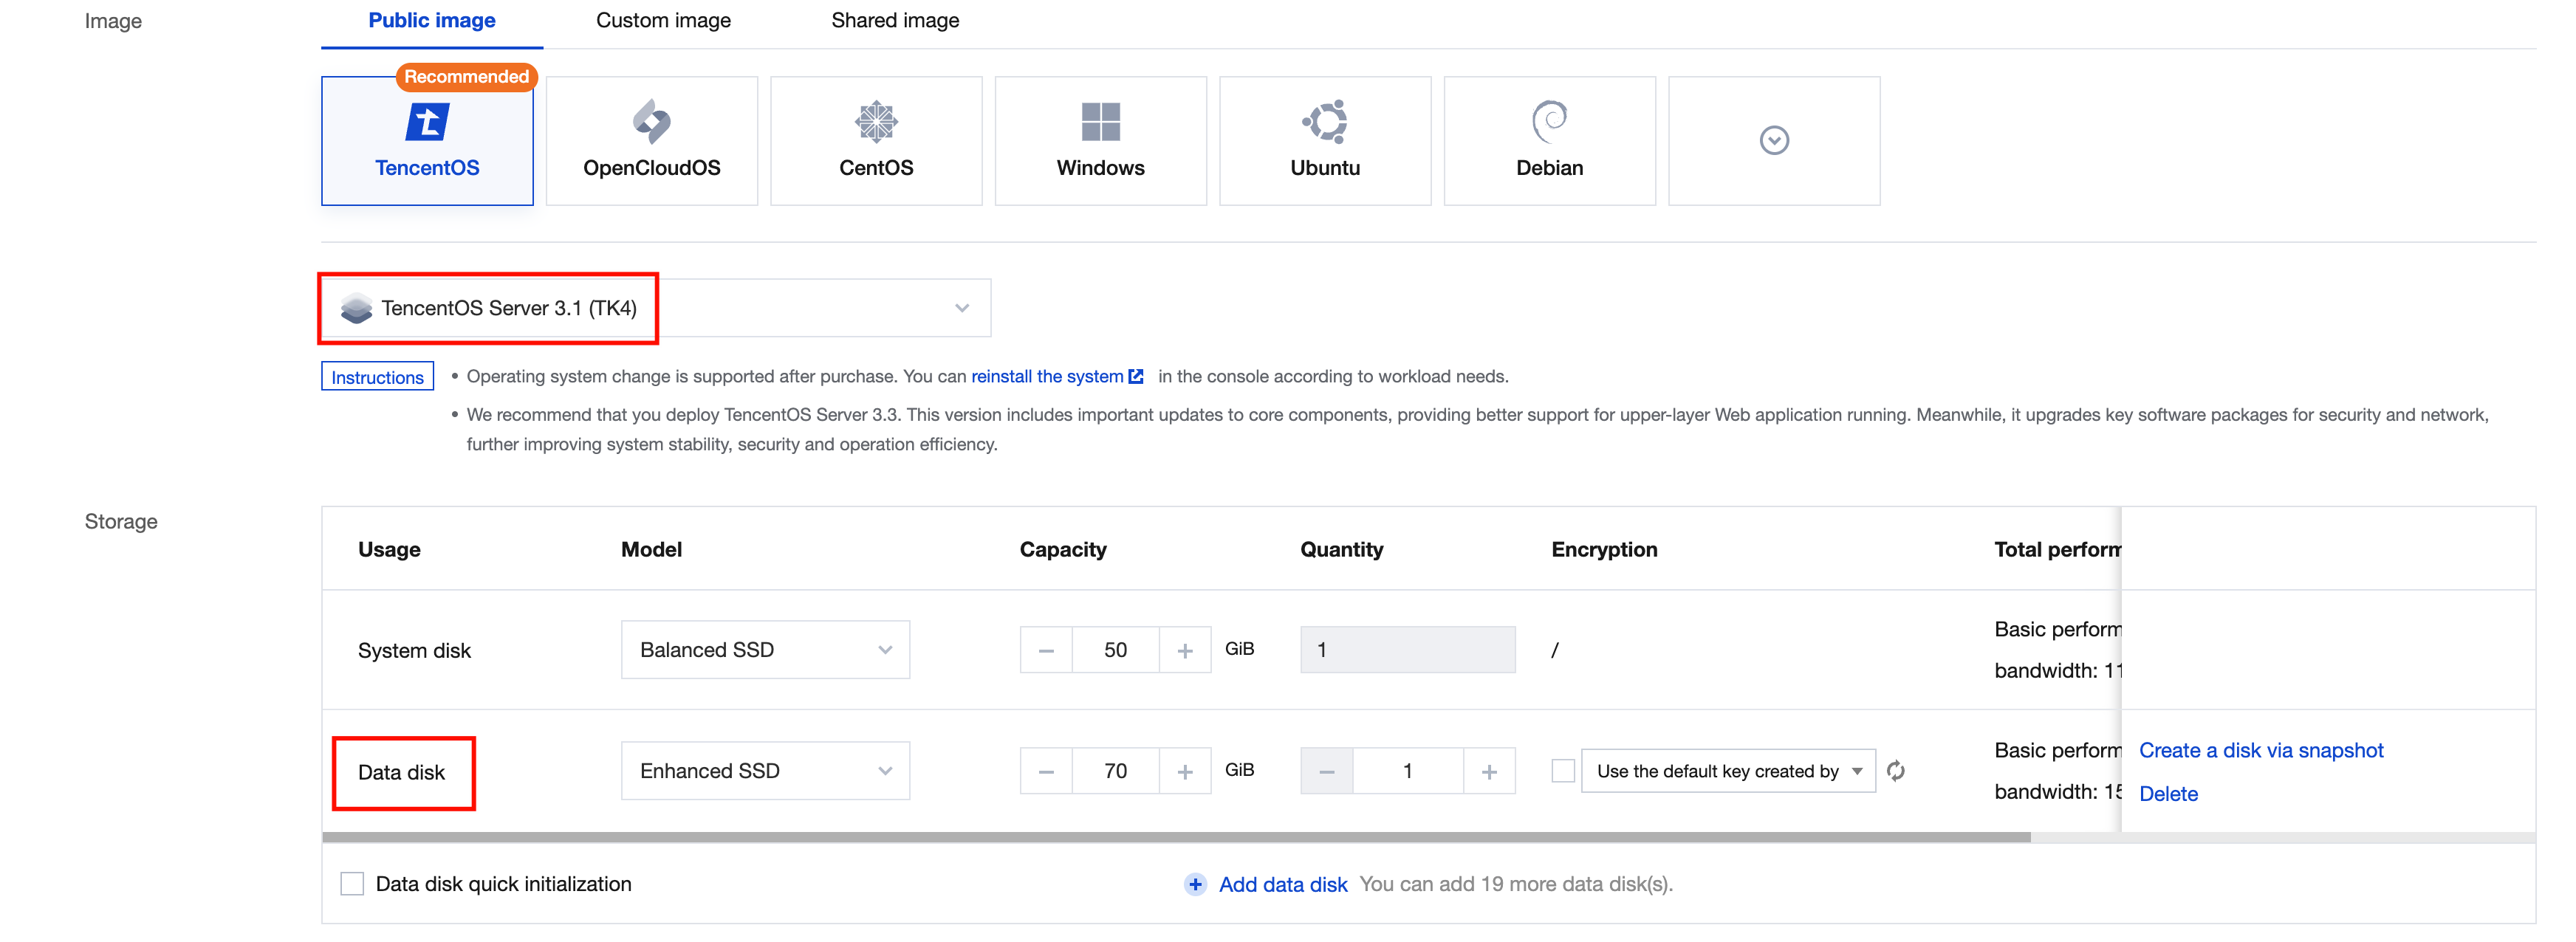
The downloaded ISO images should support the BIOS boot mode. When creating an instance, you need to select the TencentOS Server 3.1 (TK4) image (whose name does not contain the UEFI suffix).
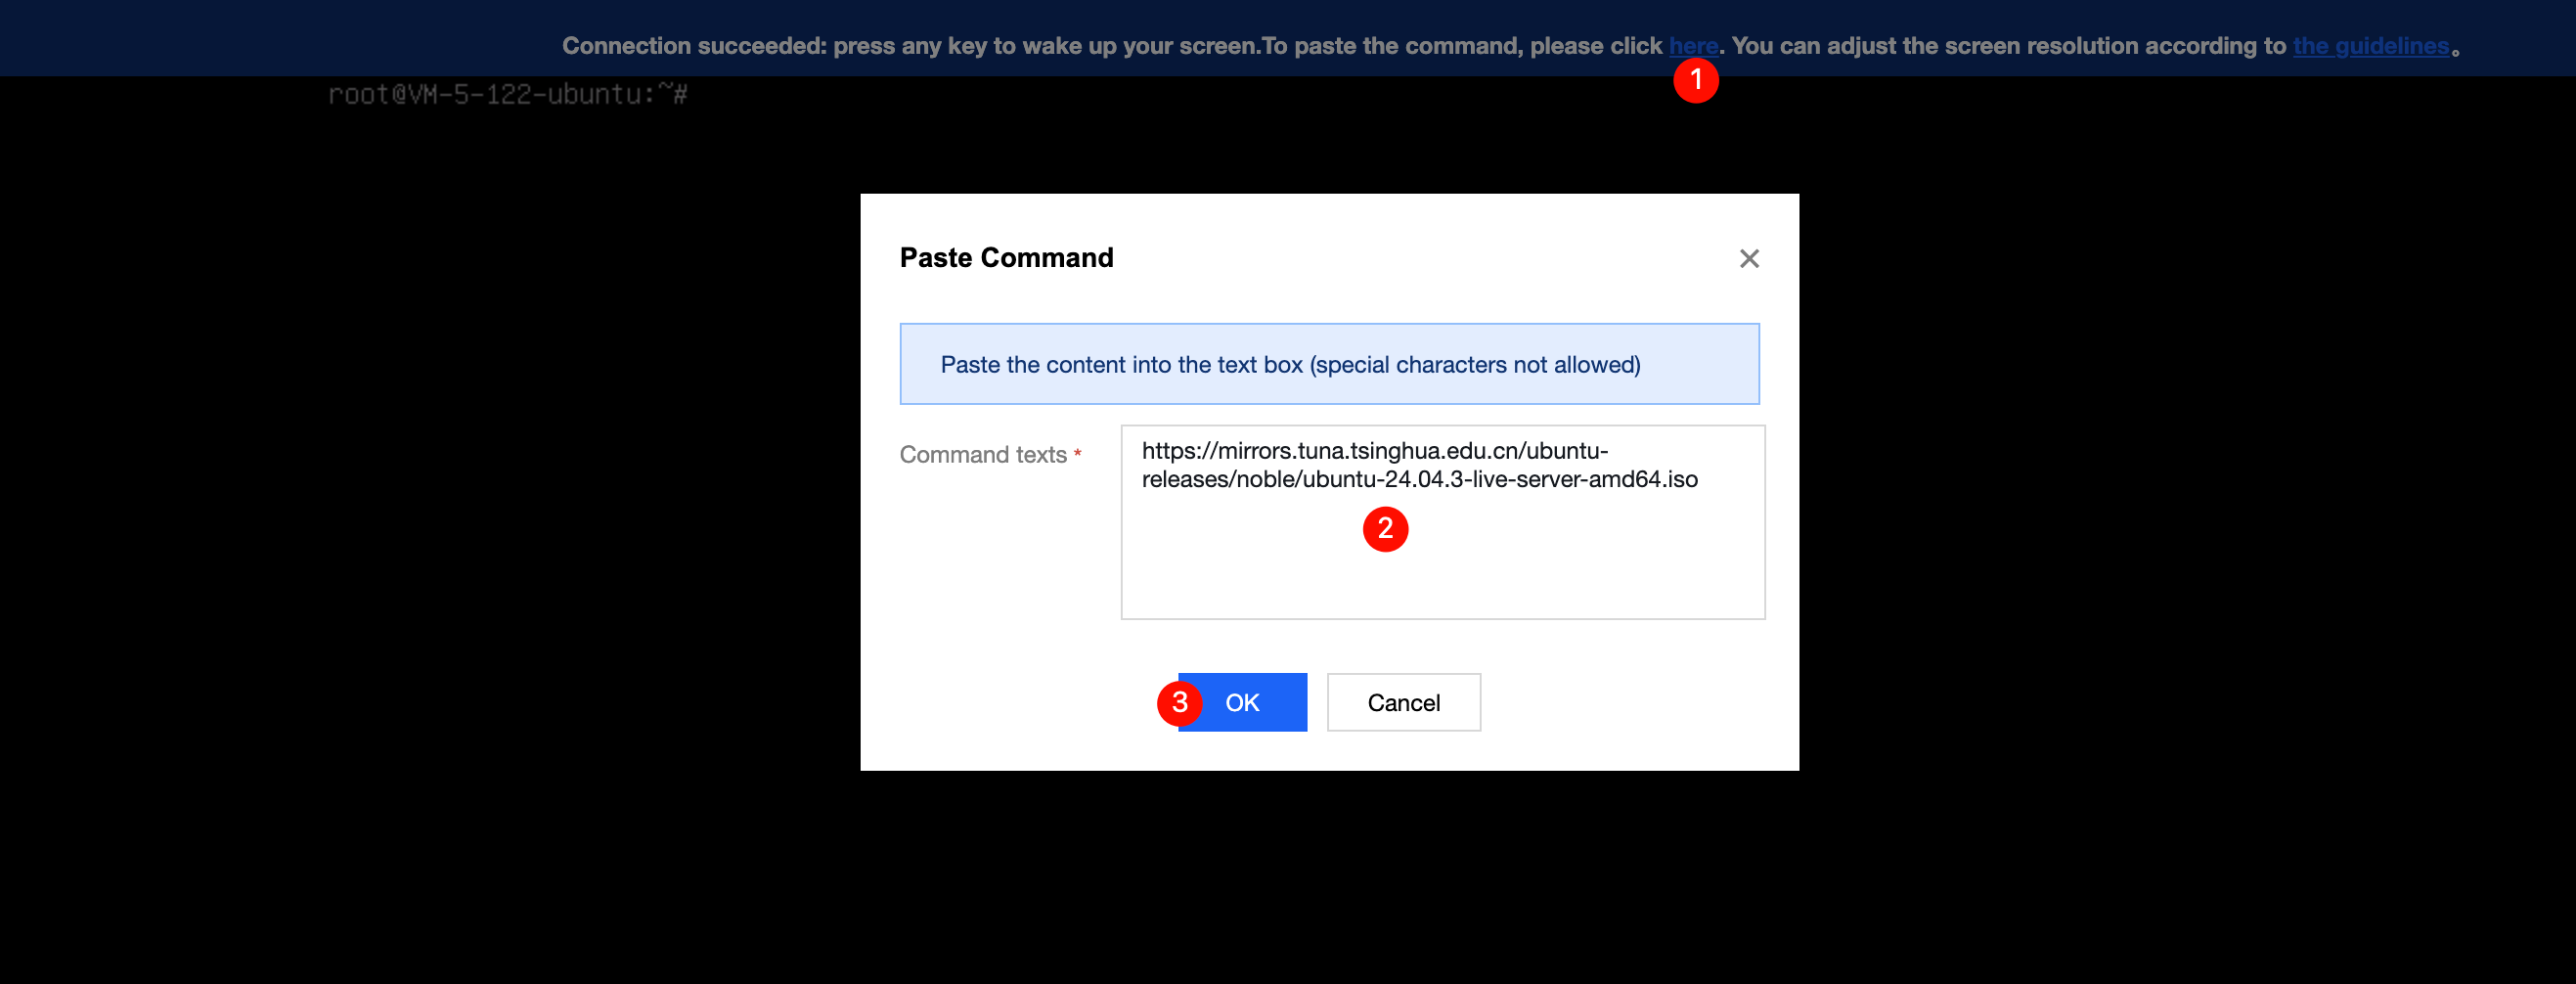
3. Write the ISO images into the data disk using the dd command.
dd if=<ISO file name> of=/dev/vdb bs=2M status=progress
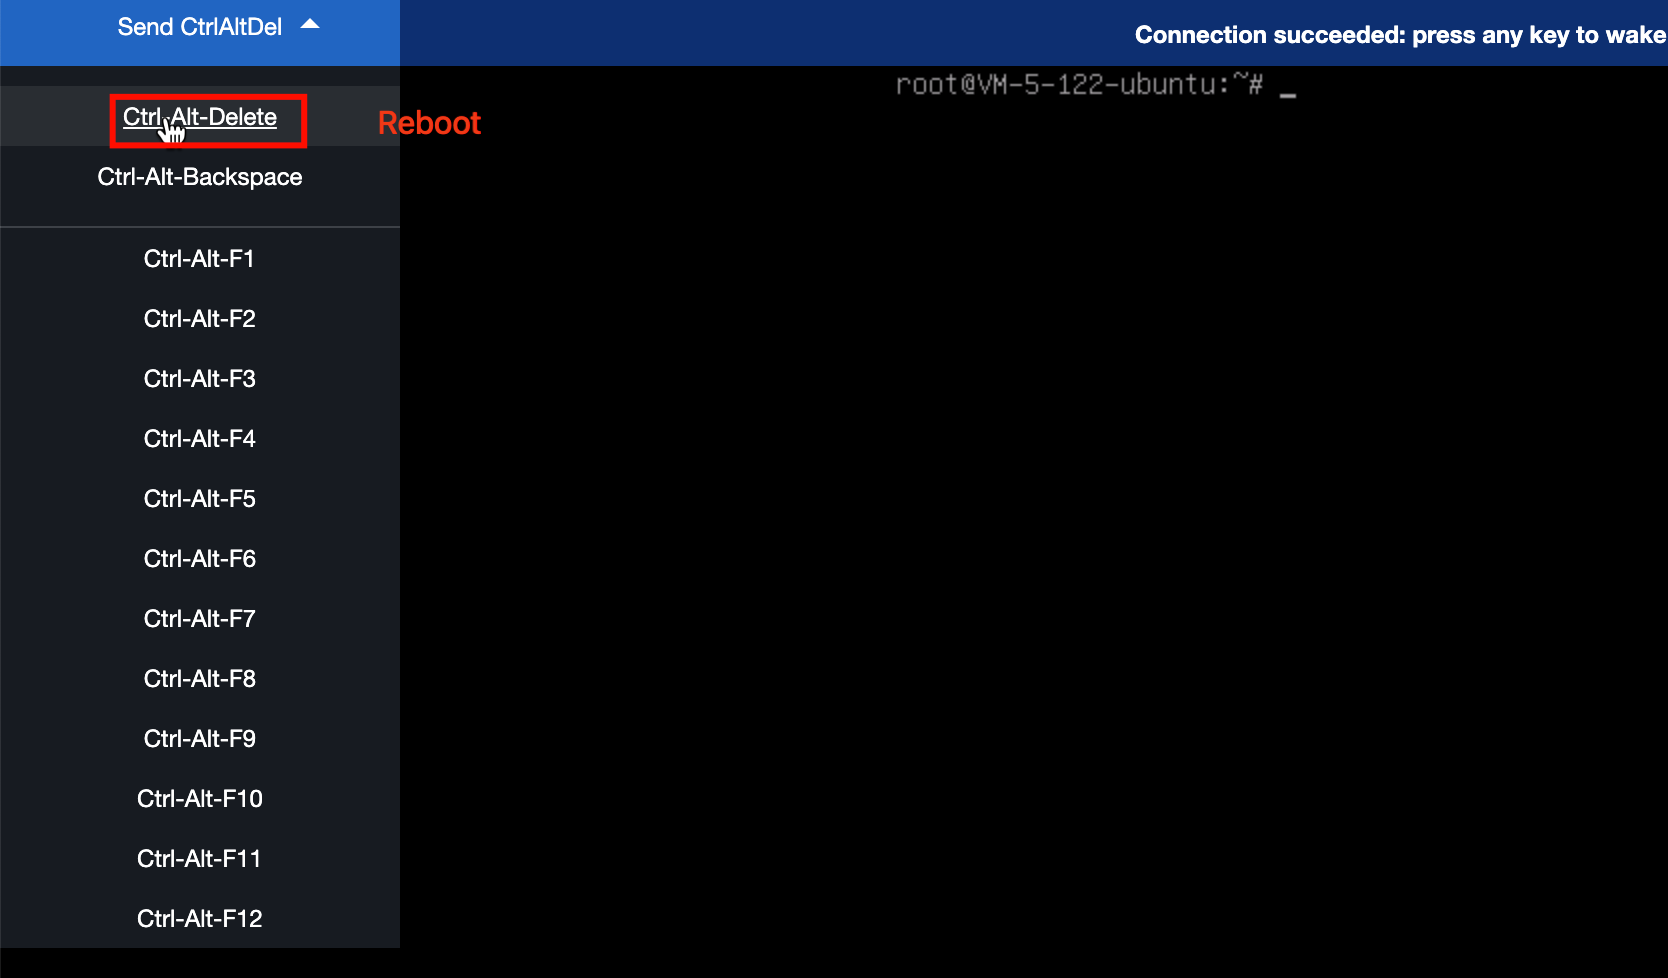
4. Restart the instance through VNC.
1. For the UEFI boot type of instances using the TencentOS Server 3.1 (TK4) UEFI Edition image, immediately press F2 multiple times after the restart until you access the firmware interface.
Note:
After the restart, you should press F2 multiple times to access the firmware interface; if you miss the opportunity to press F2, the grub interface is accessed instead. On the grub interface, press the c key to access the grub cmdline interface. You can also enter the fwsetup command on the grub interface to access the firmware interface.
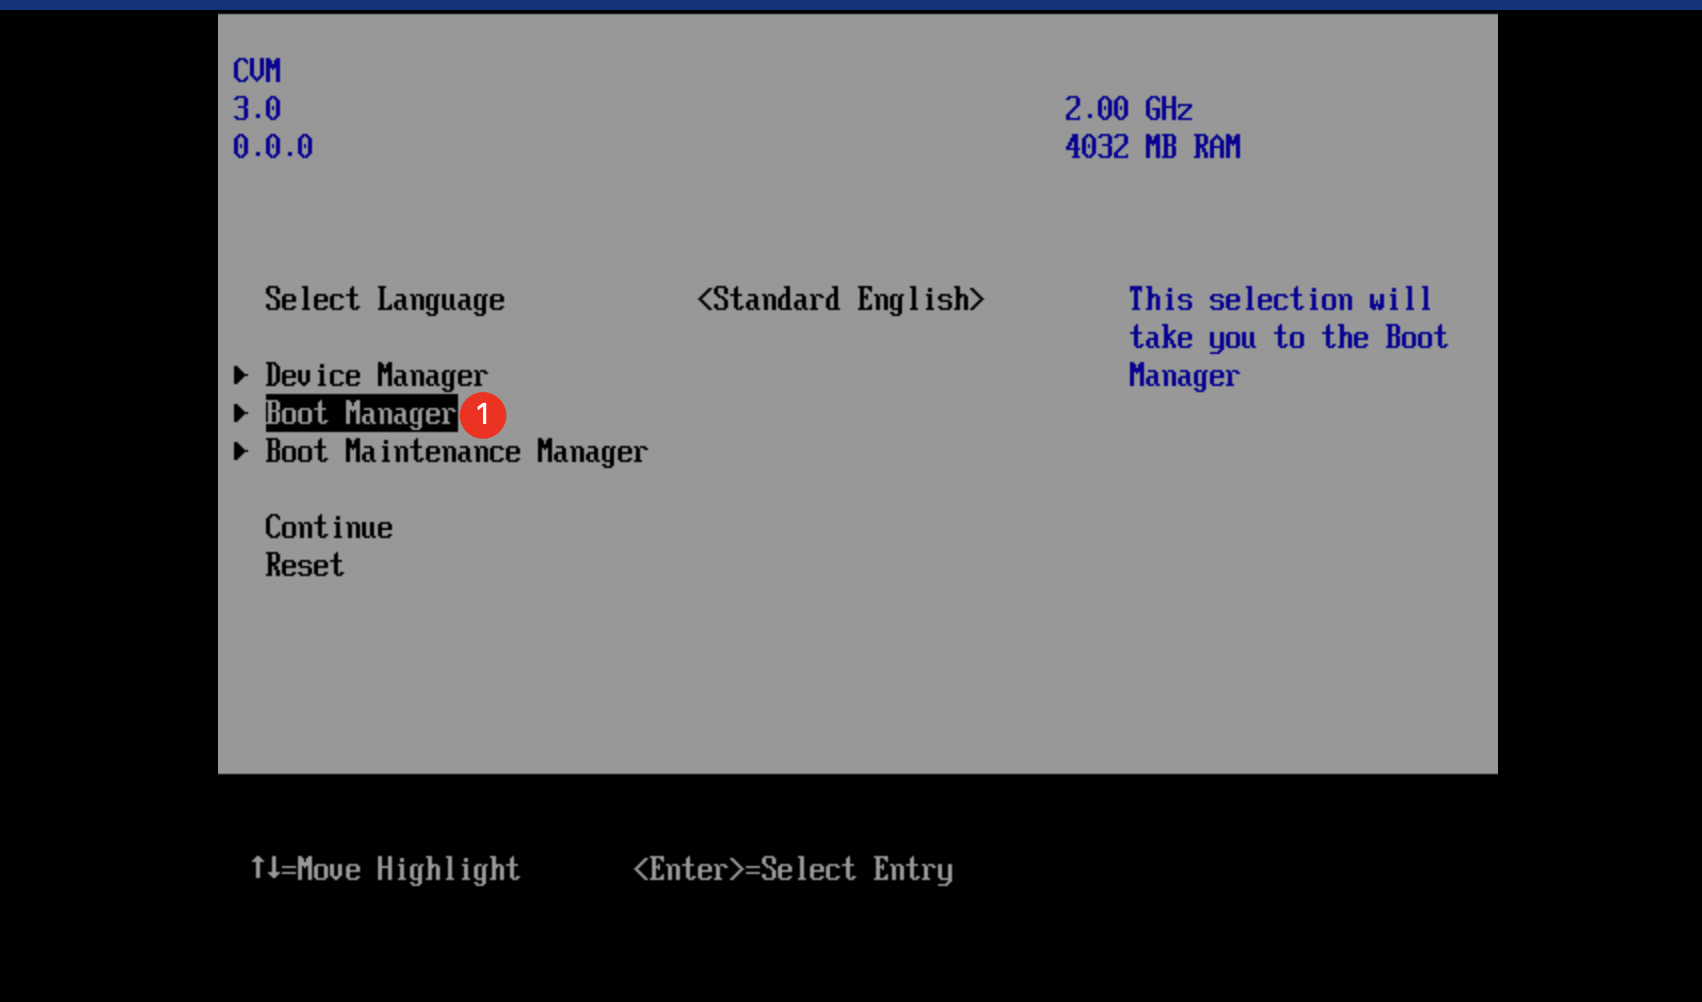
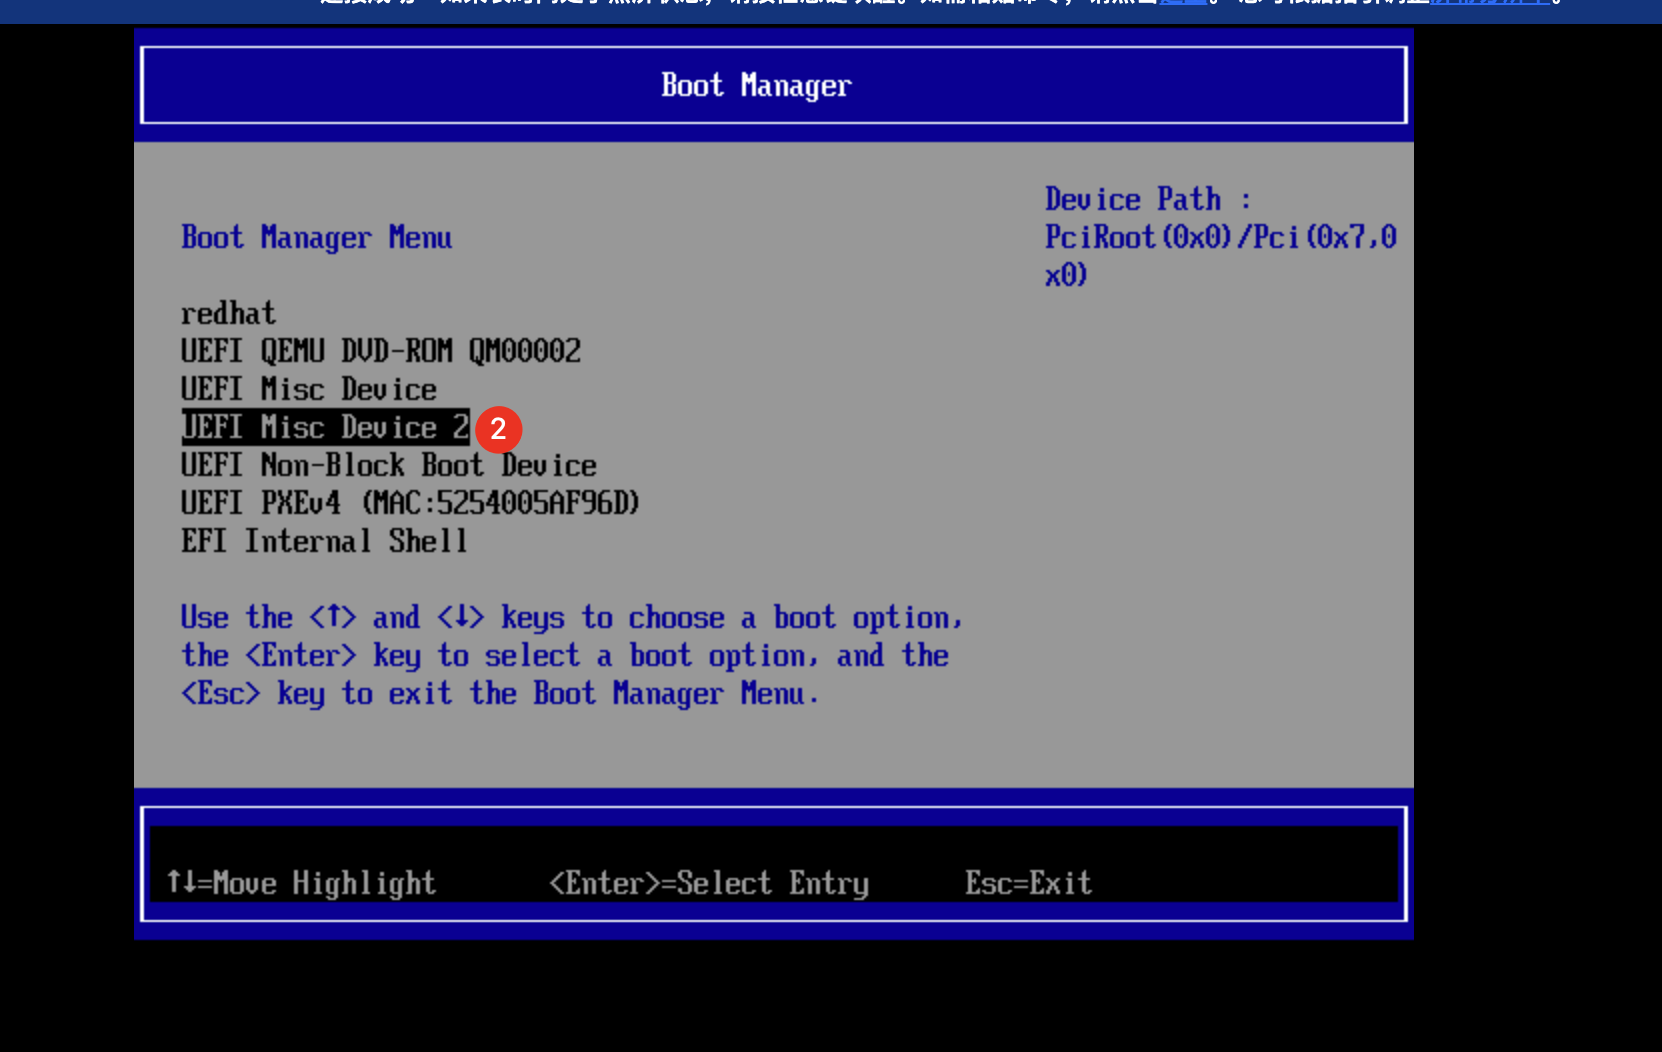
2. On the firmware interface, select the Boot Manager option.
3. Select to boot from UEFI Misc Device 2 (Device 2 indicates the second disk, which is the data disk).
1. For the BIOS boot type of instances using the TencentOS Server 3.1 (TK4) image, the grub interface is accessed after the restart.
2. Press the up arrow key or down arrow key on the grub interface to interrupt the countdown.
3. Press the c key on the grub interface to access the grub cmdline, and then run the command below to boot from the data disk.
grub> set root=(hd1) # Set the root variable to (hd1), which is Disk 1. Disks are indexed from 0, so Disk 1 is the second disk.
grub> chainloader +1 # This is a fixed writing method. +1 indicates loading the MBR from the location specified by the root variable.
grub> boot # Boot.
Note:
grub may not recognize the NVMe disks during BIOS boot, which specifically refer to the NVMe local disks on Cloud Bare Metal (CBM) instances.
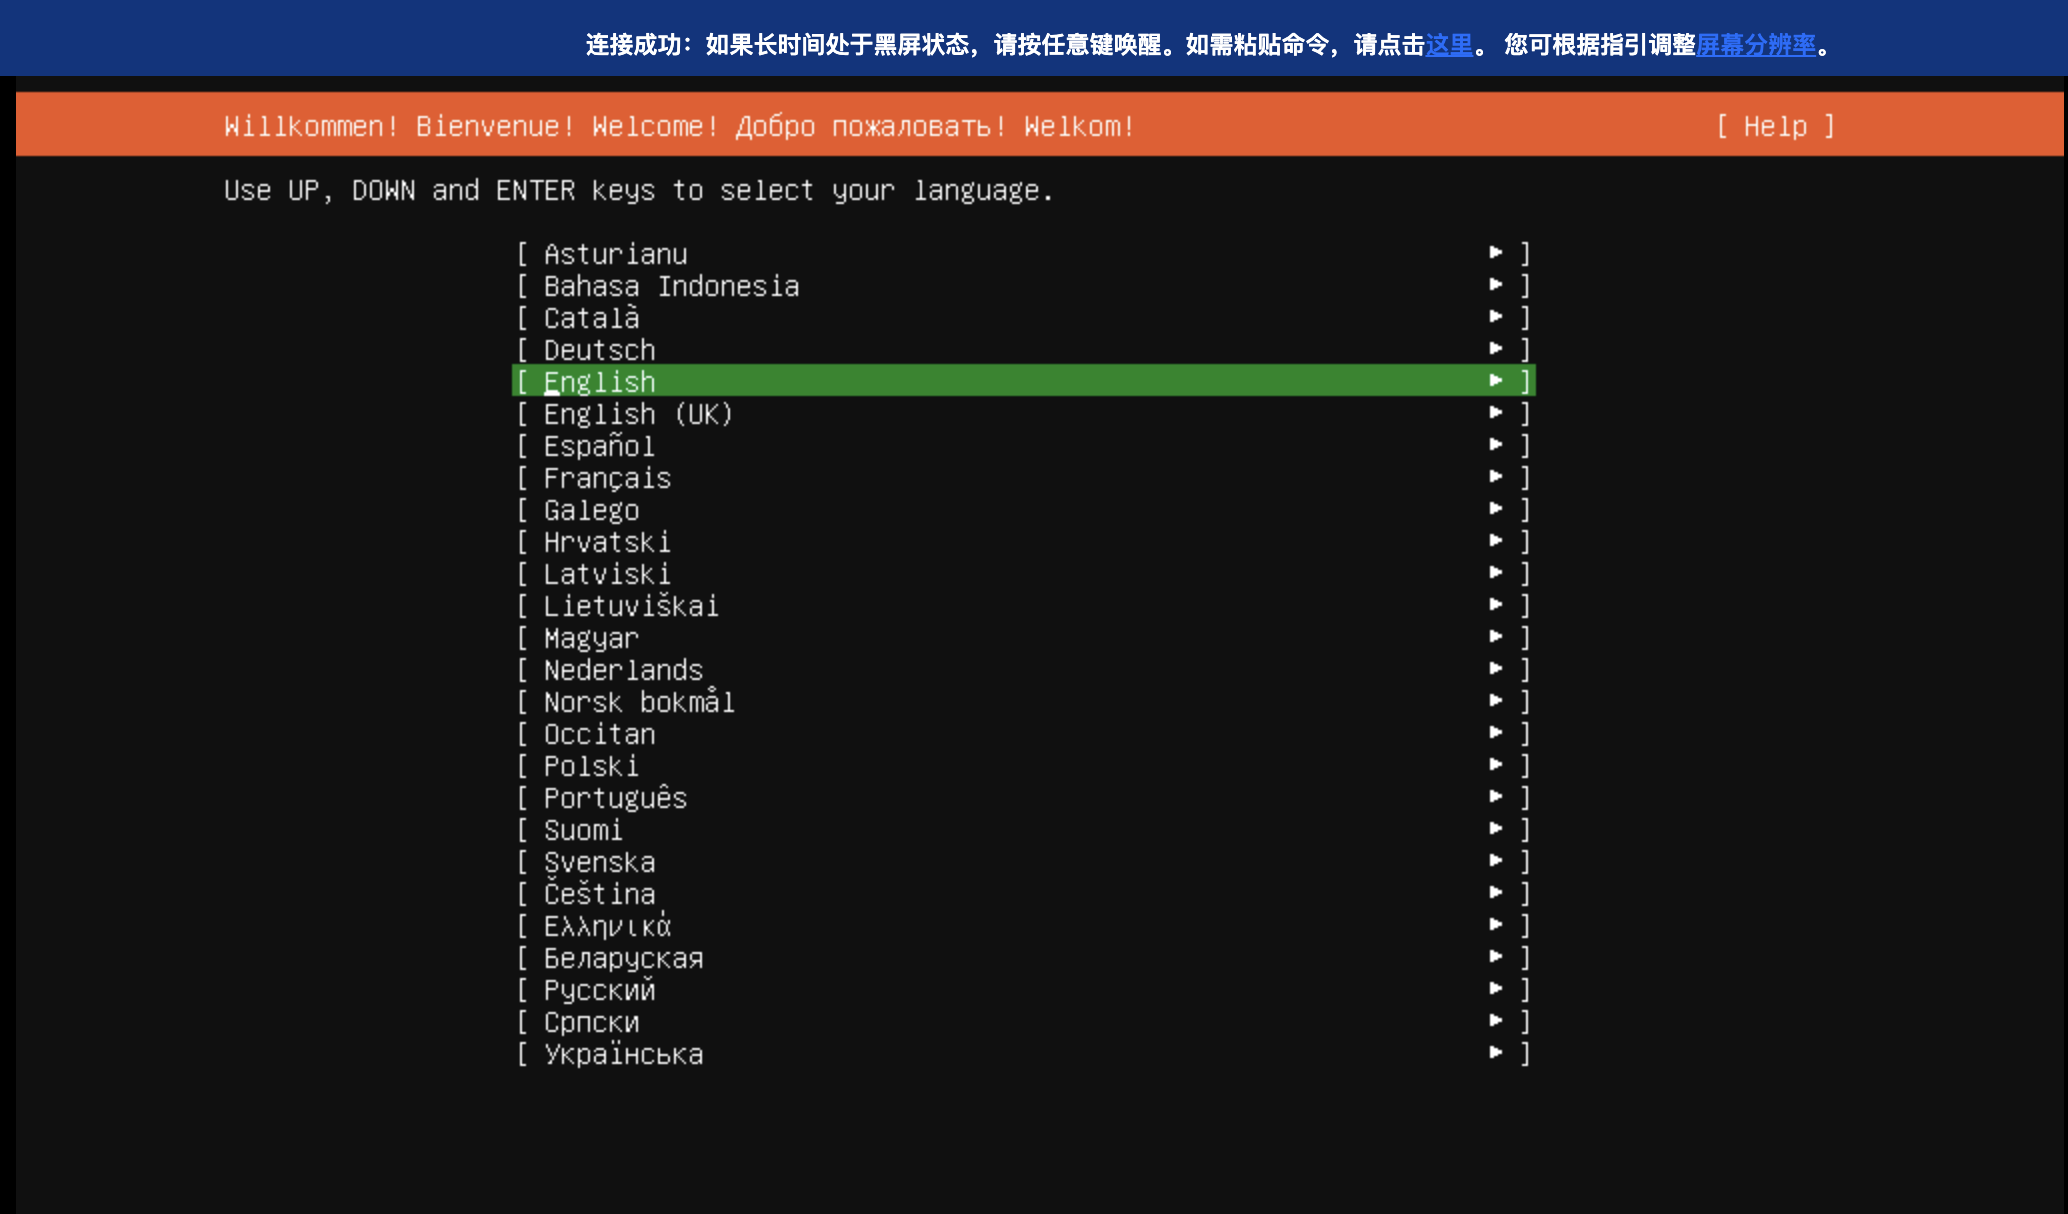
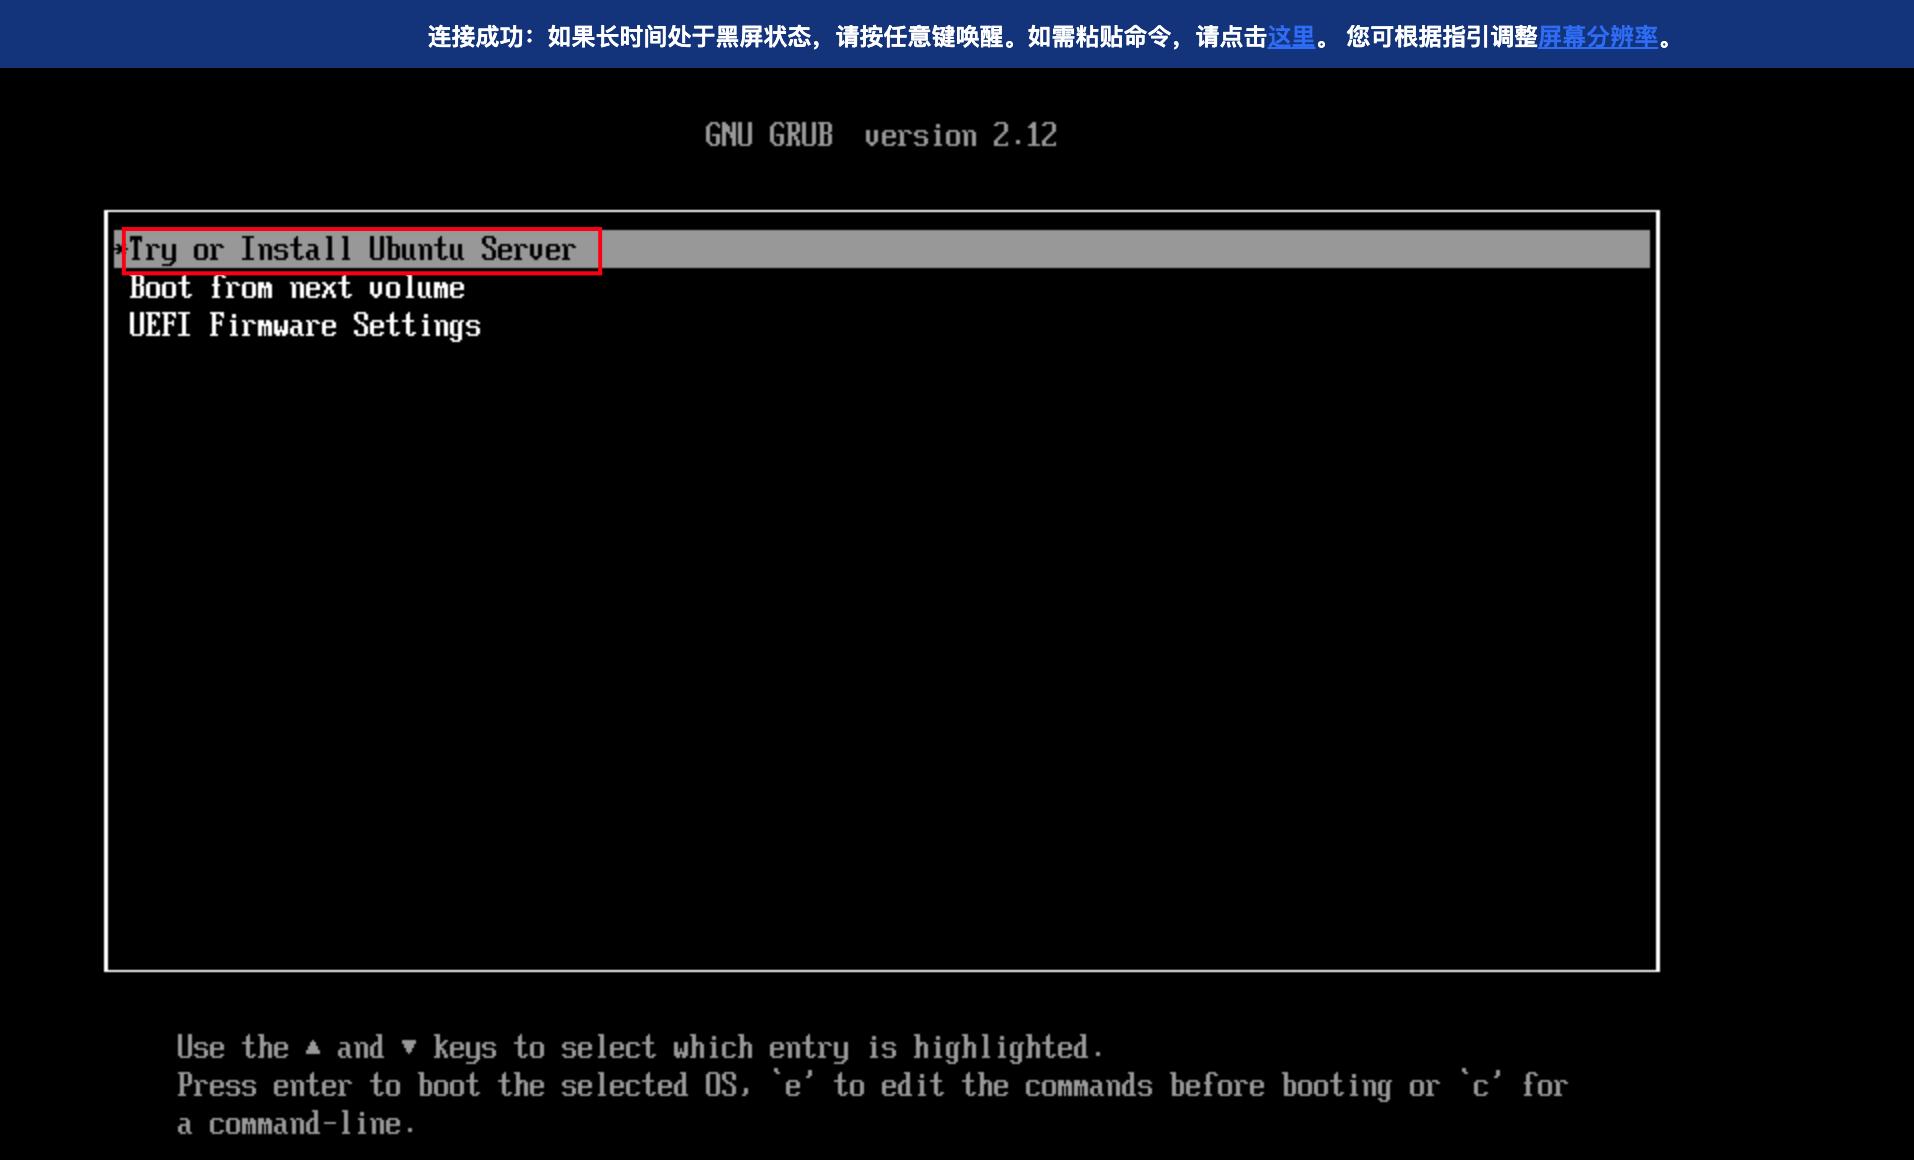
When the above steps are performed successfully, the GRUB interface of the ISO image (Ubuntu 24.10) is accessed, and select Try or Install Ubuntu Server.
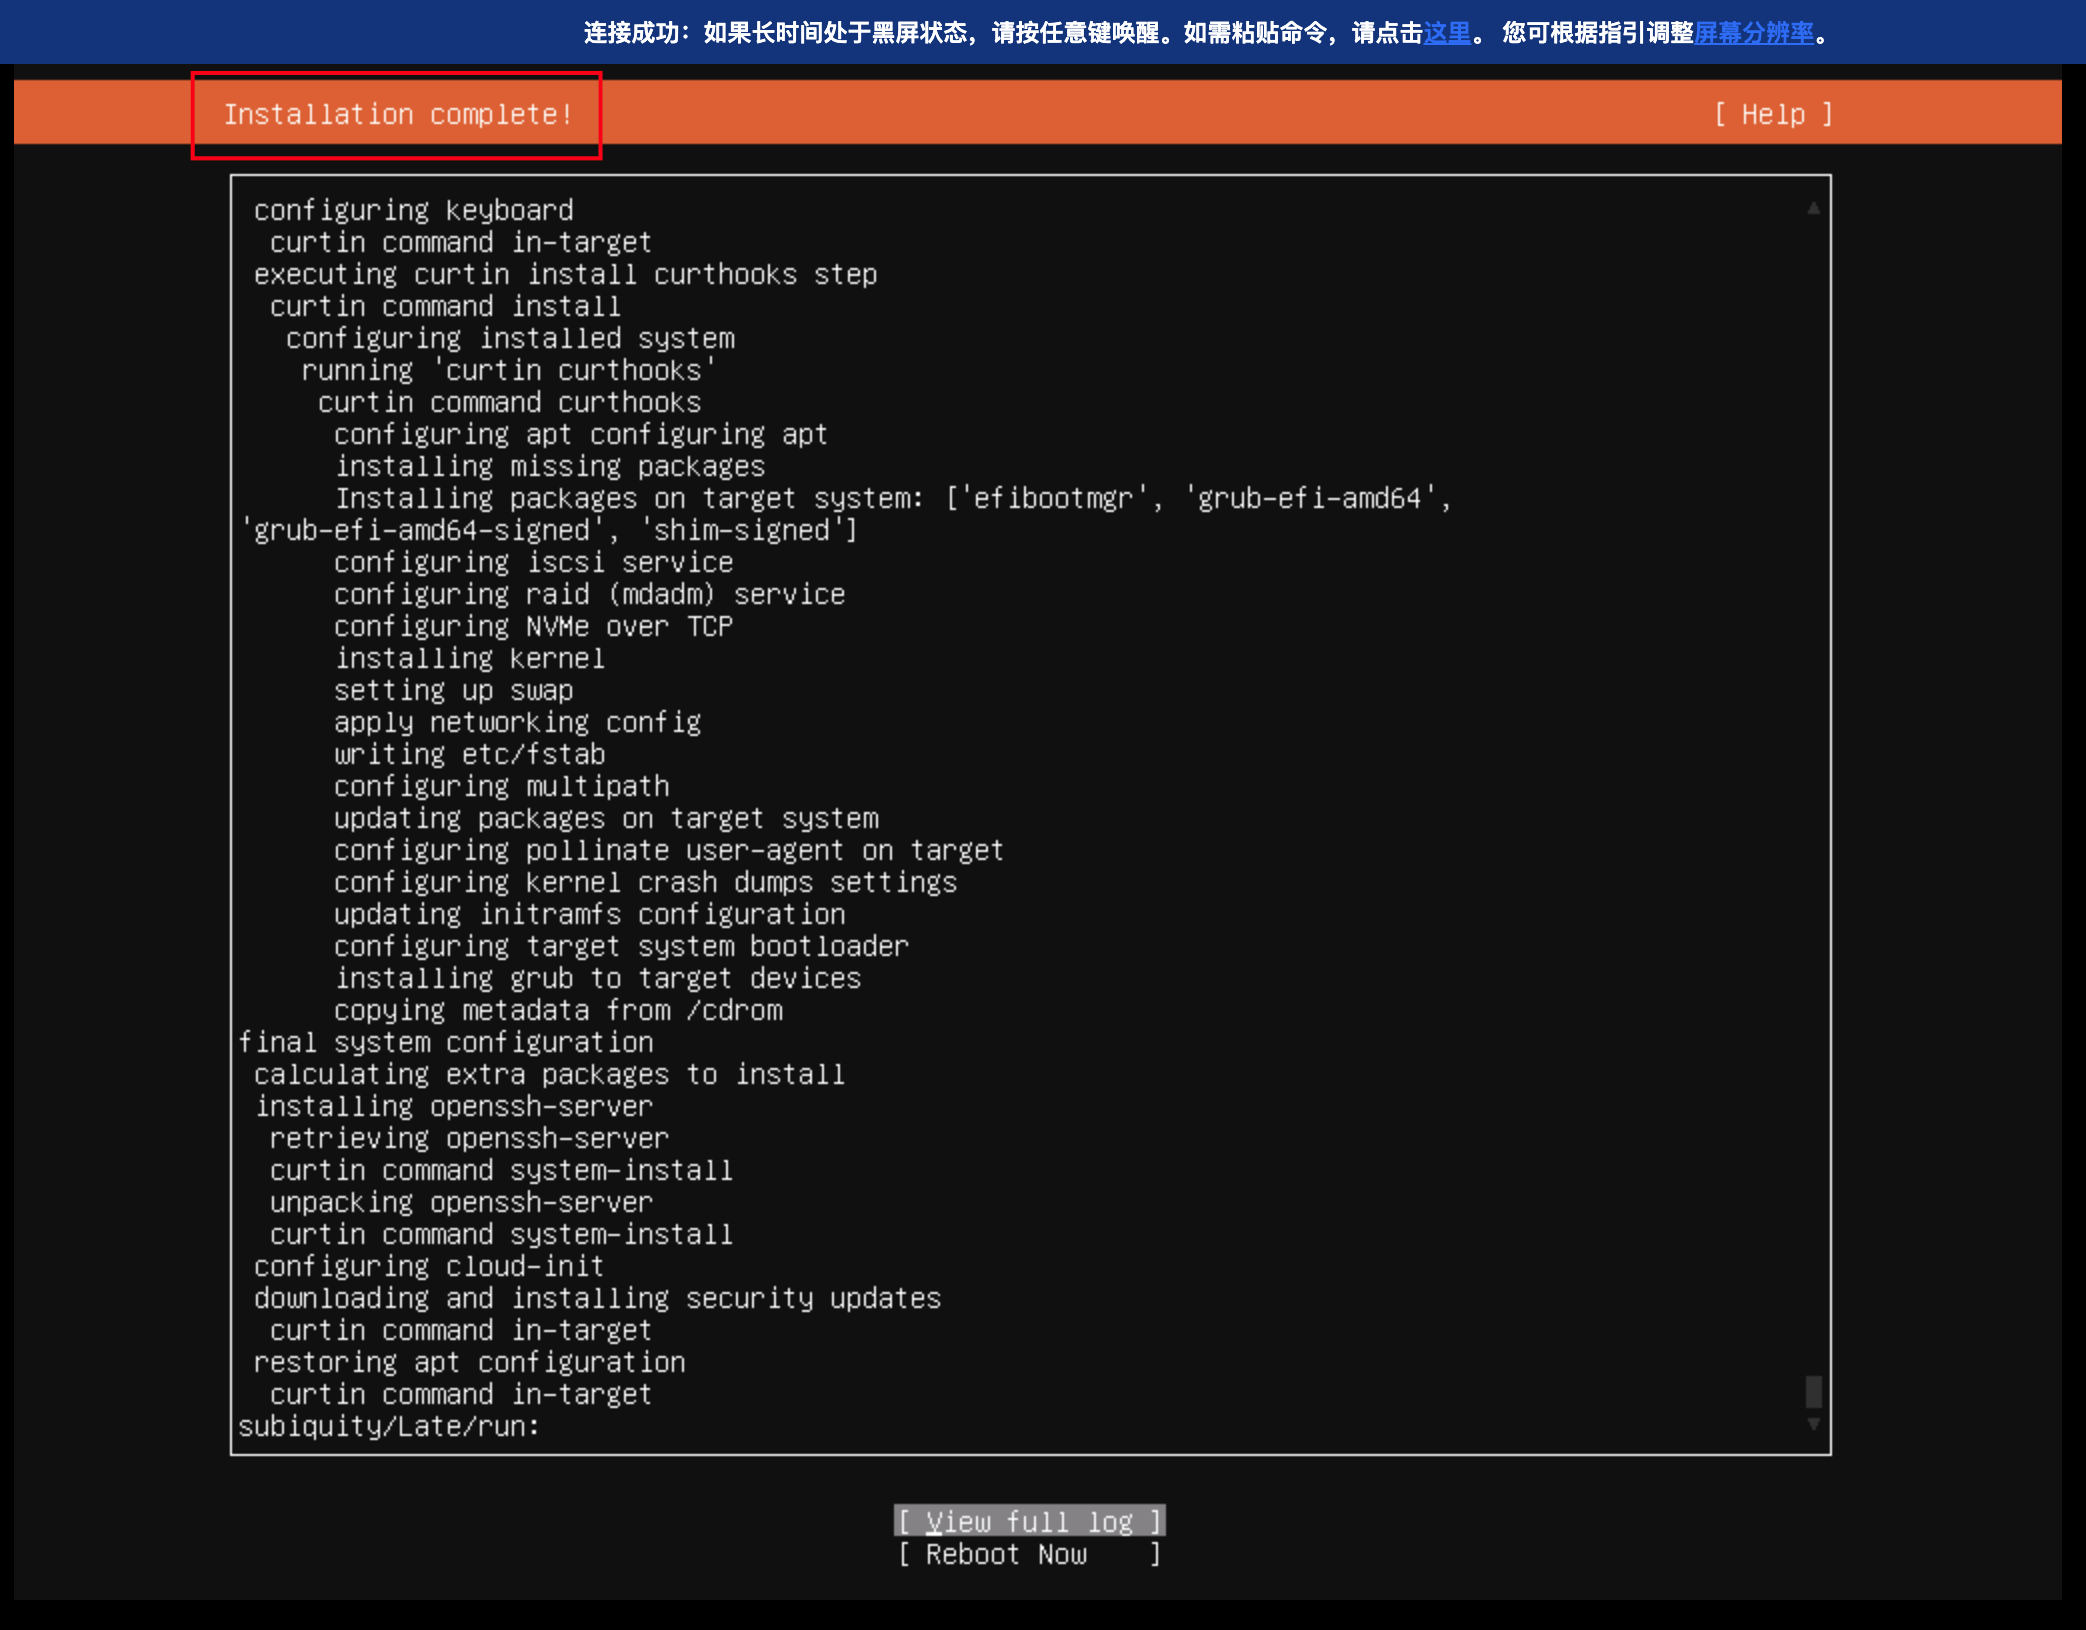
5. Install the system to the system disk.
Note:
Depending on the requirements of different distributions, you may need to clear the disk before installation.
6. After the system installation is completed, restart the instance.
FAQs
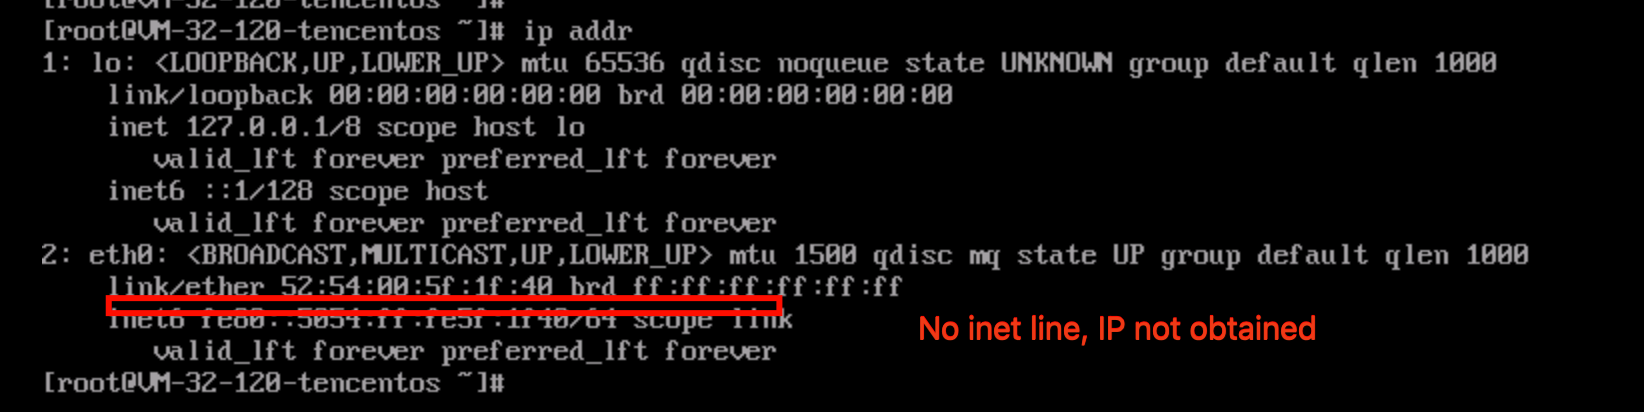
After the System Installation Is Completed and the Instance Is Restarted, the Instance Fails to Obtain an IP Address Through DHCP
Issue Symptoms
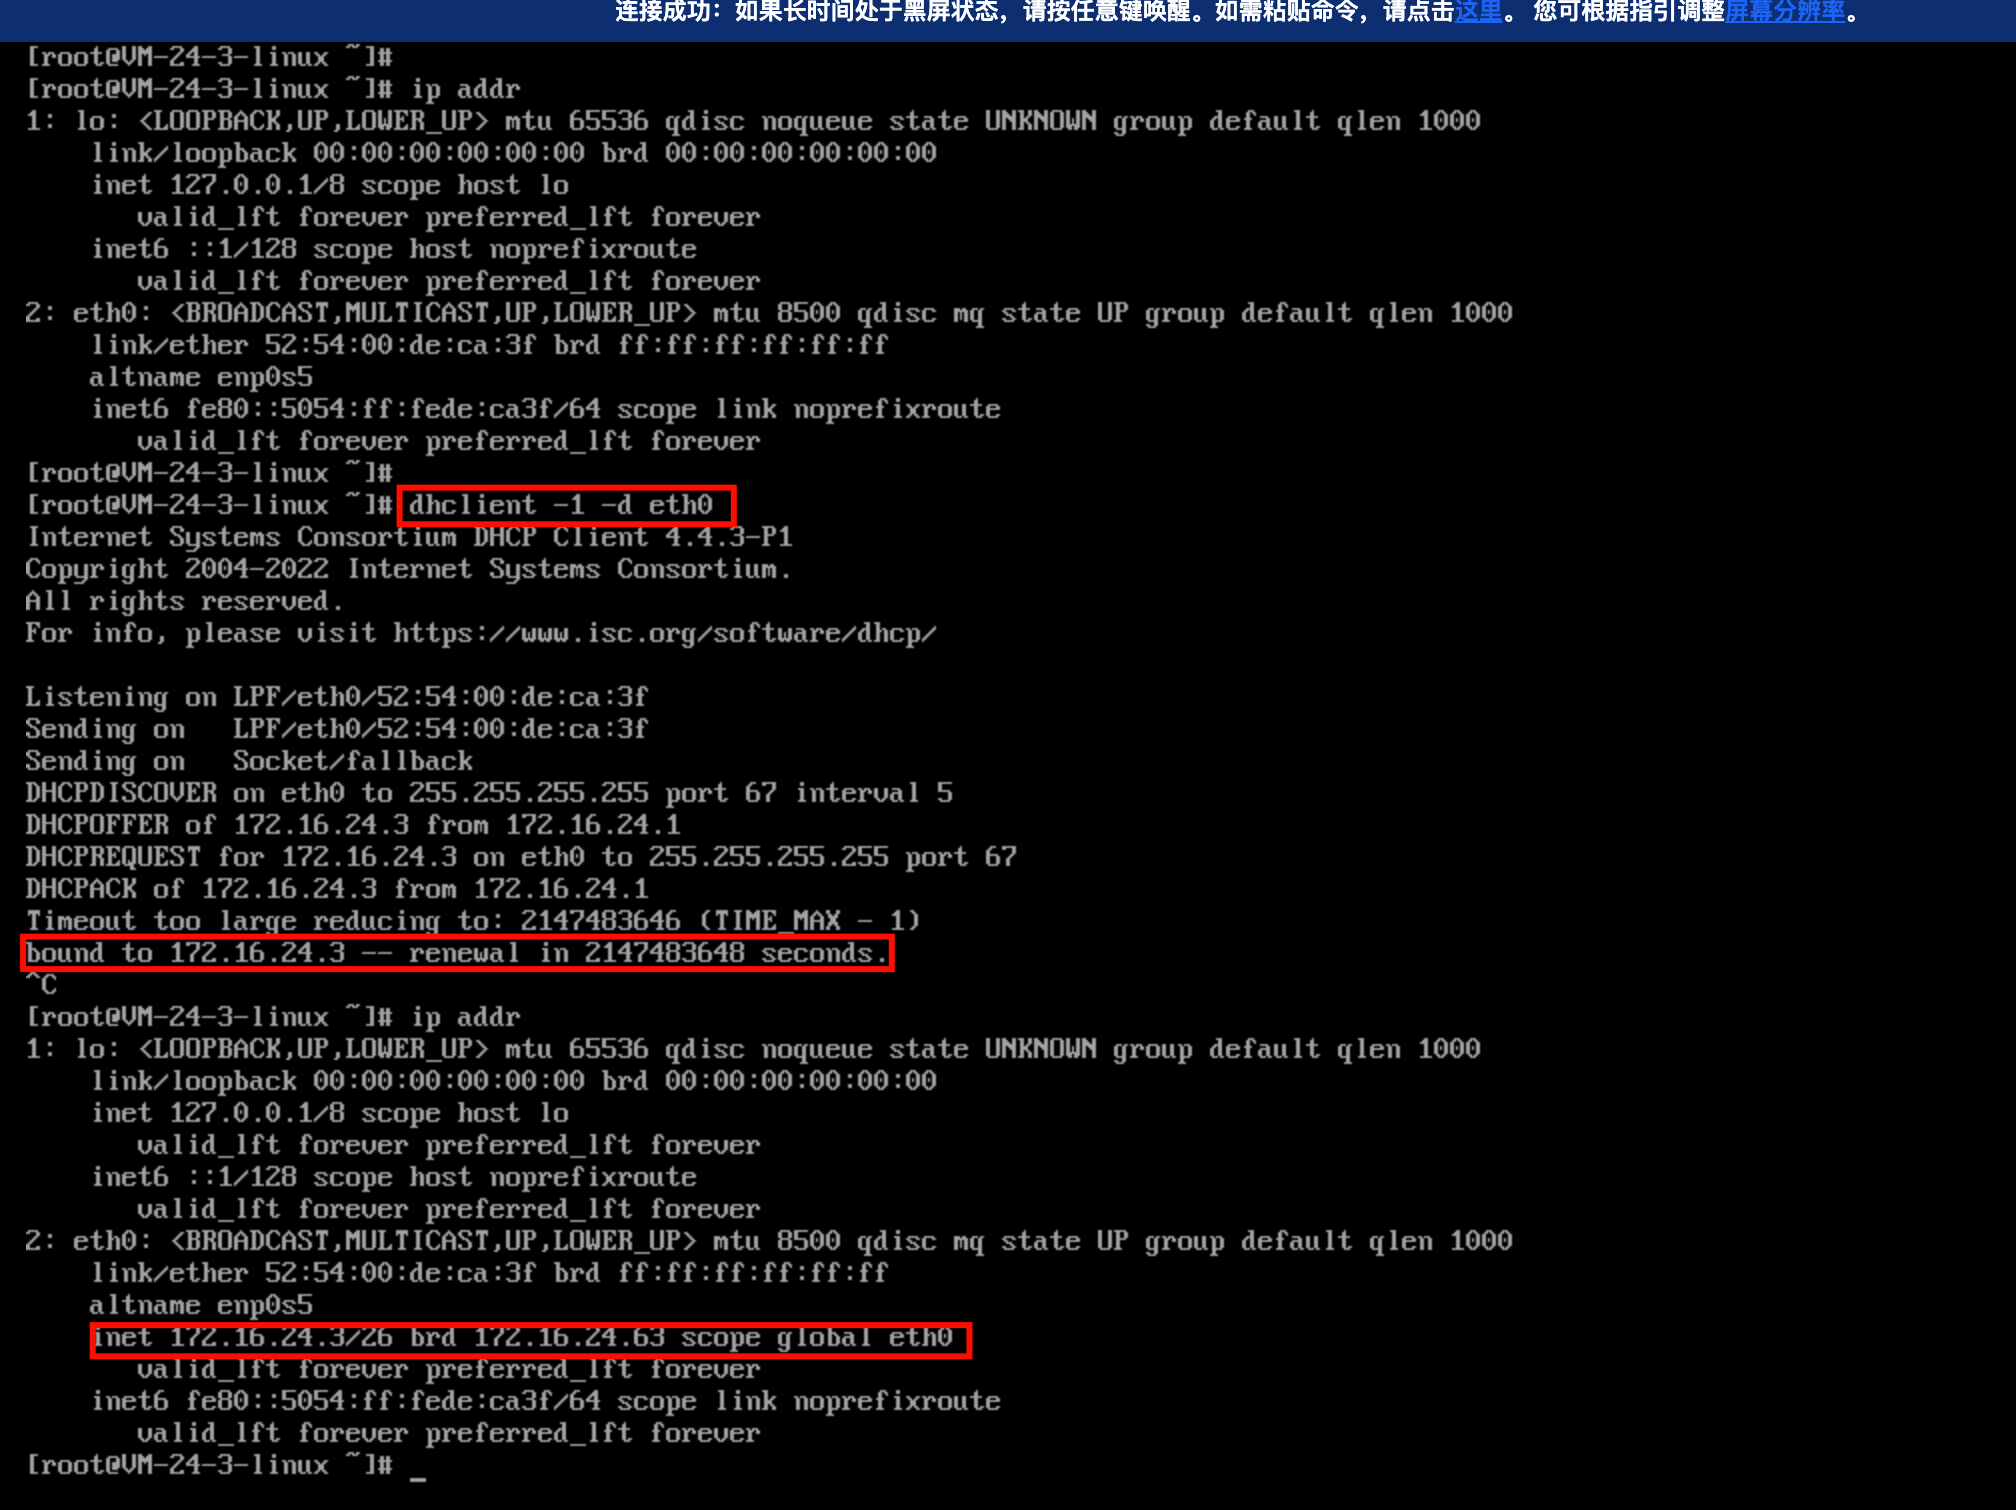
In the output result of ip addr, the eth NIC does not have an IP address.
Solutions
It is recommended to use one of the methods below to obtain the IP address:
Note:
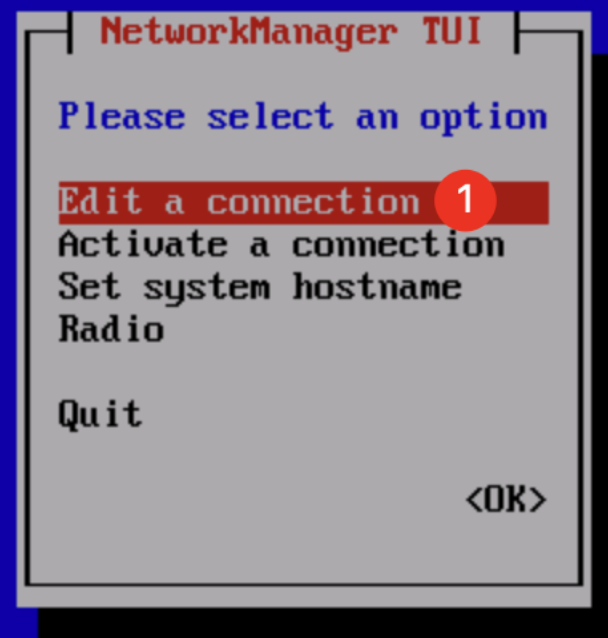
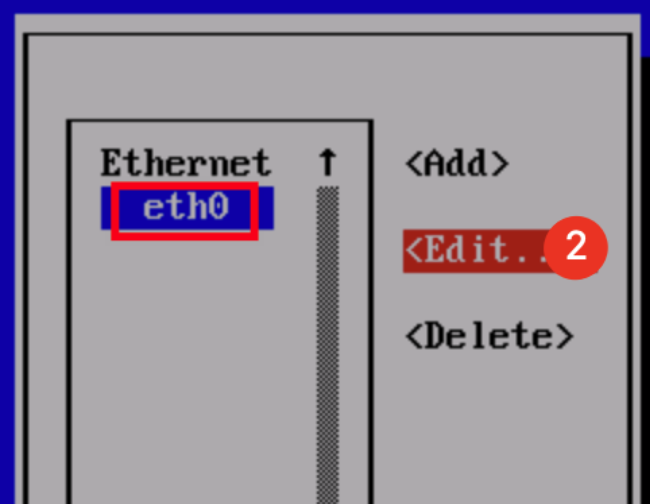
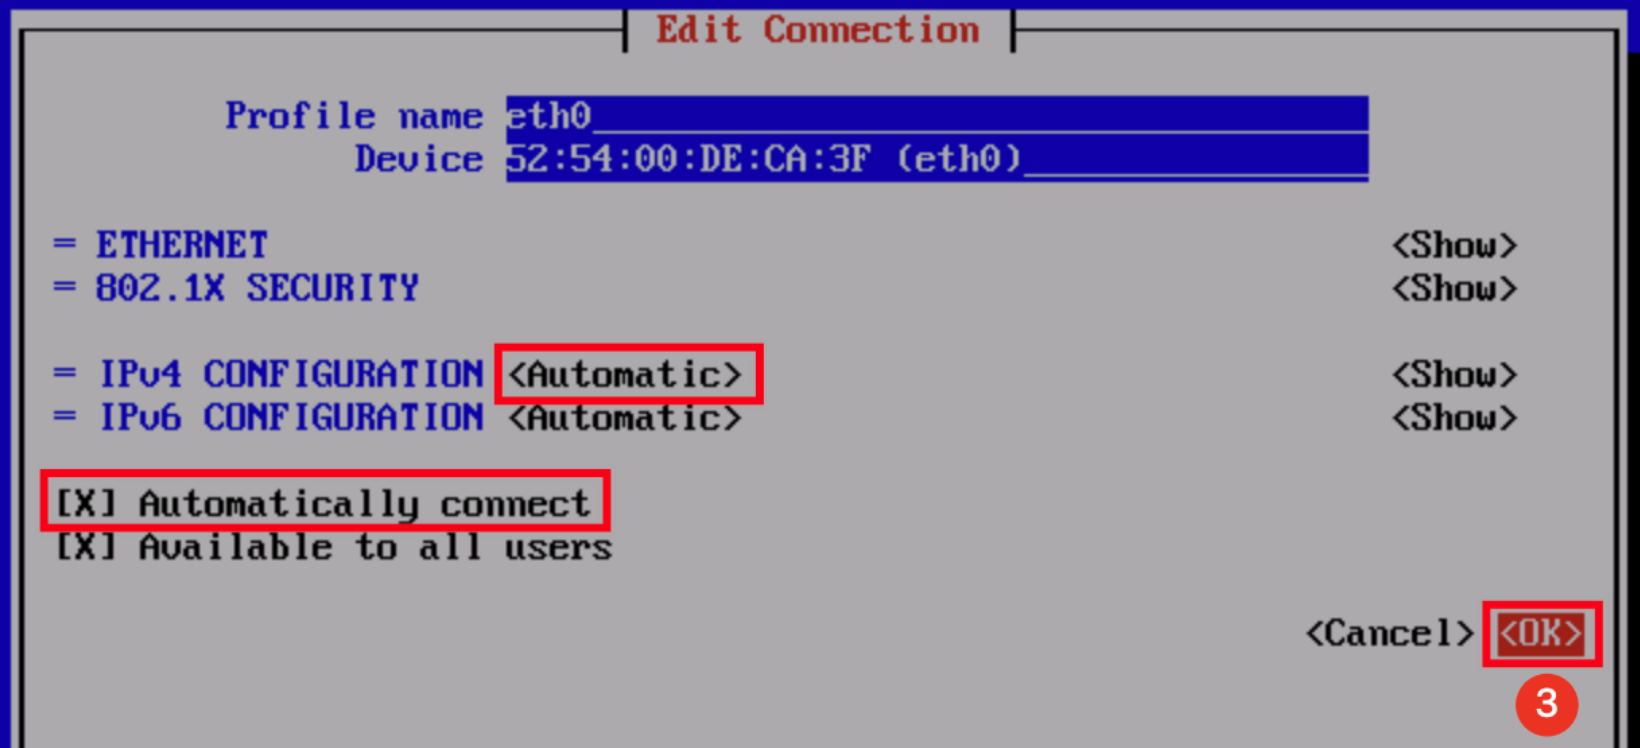
After the IP address is obtained using one of the following methods, it is recommended to install cloud-init to provide the capability for customizing configurations during instance initialization. For details, see Installing Cloud-Init on a Linux Instance. Method 1: If NetworkManager is installed on the instance, you can use the nmtui command to adjust the network configuration of the machine. After configuration adjustment, the machine automatically obtains an IP address through DHCP.
Method 2: If NetworkManager is not installed on the instance, but there is the dhclient command, you can obtain an IP address by running dhclient -1 -d <NIC name>. After the IP address is obtained, you can exit the dhclient process using Ctrl + C.
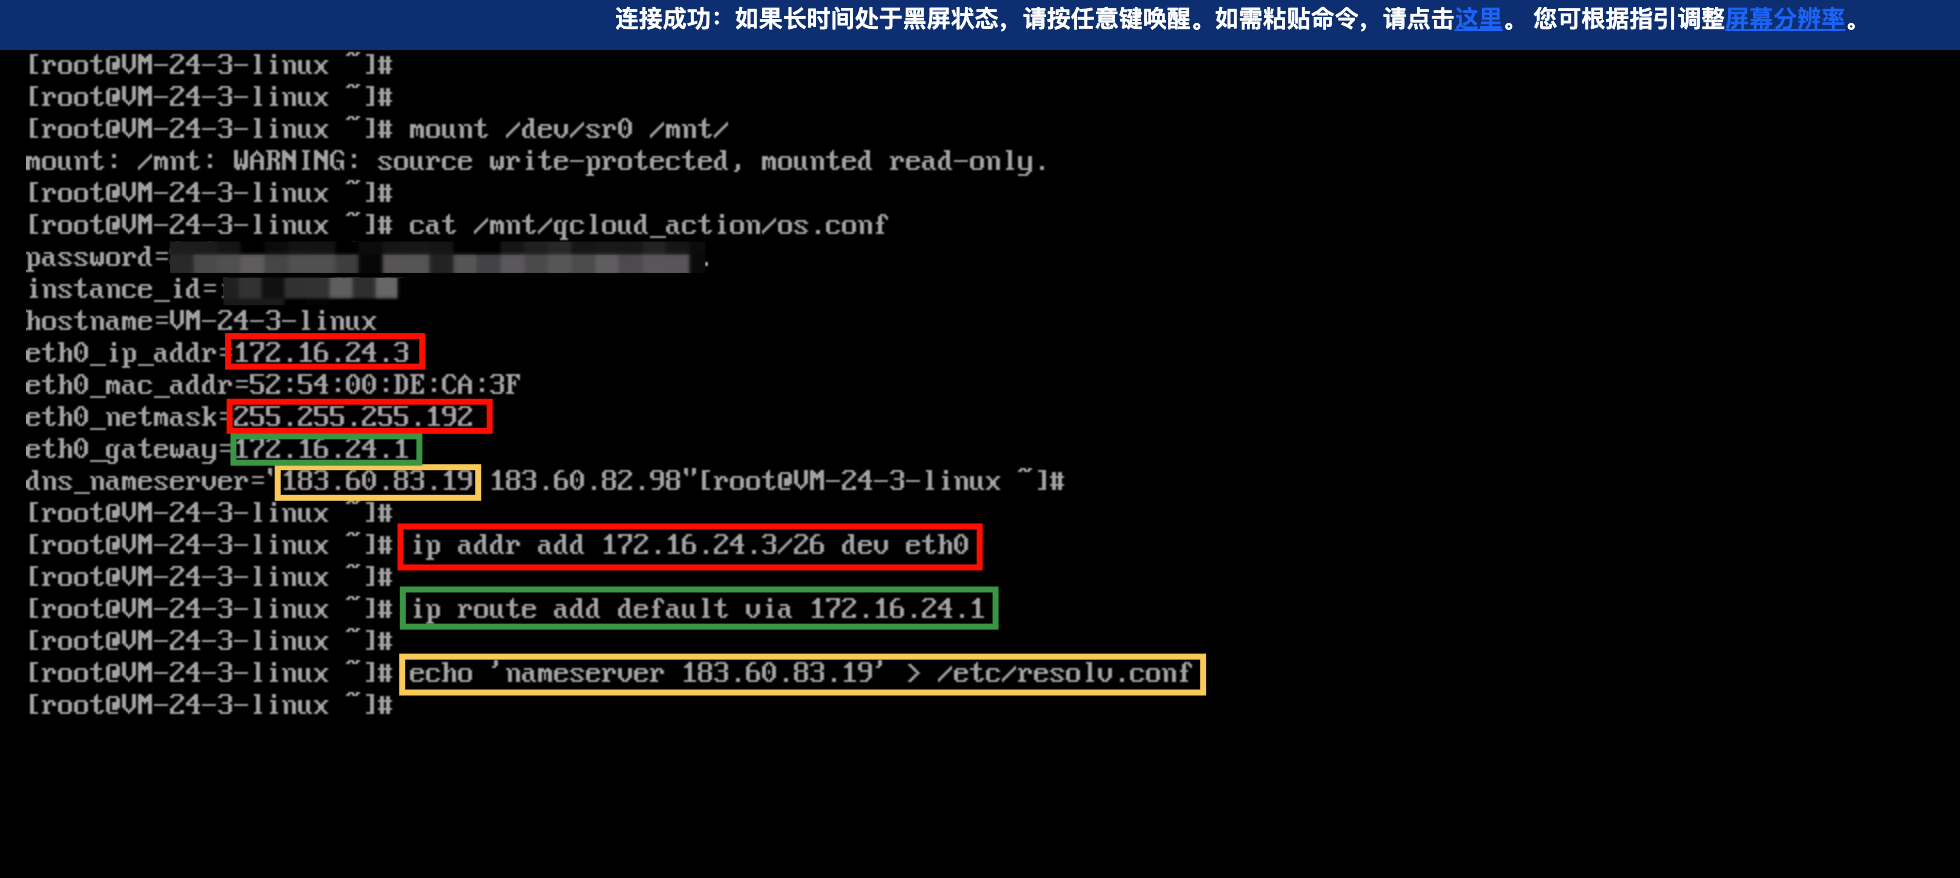
Method 3: If there is no NetworkManager or the dhclient command, you can consider obtaining IP address information directly from /dev/sr0 and performing manual configuration.
How to Determine the Current System Boot Mode? How to Determine the Boot Mode Supported by the ISO Images?
Method of determining the current system boot mode: You can determine the current system boot mode according to the contents of the /sys/firmware directory. If the /sys/firmware directory contains an efi directory, UEFI boot is used; otherwise, BIOS boot is used.
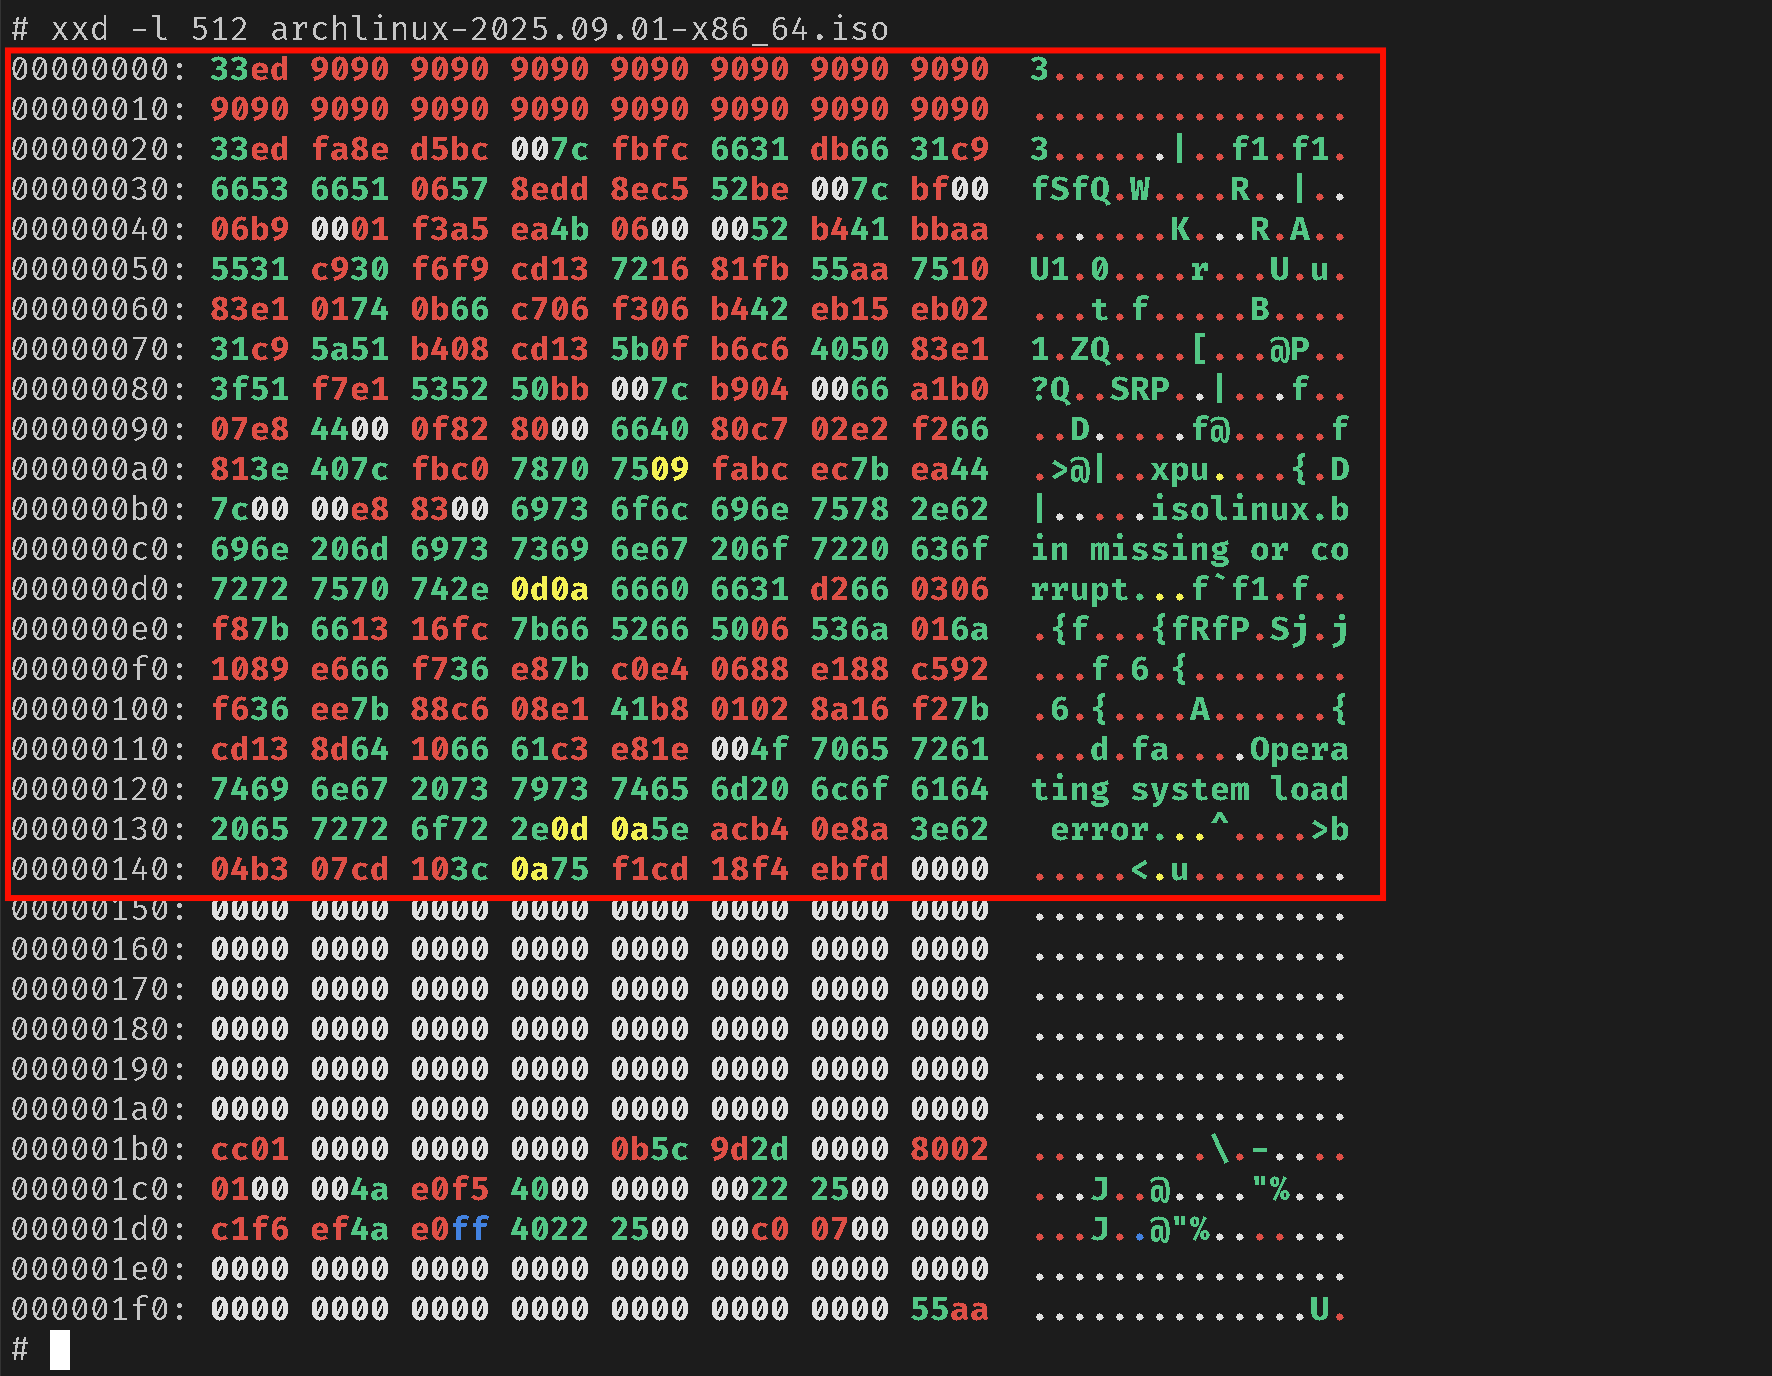
Method of determining whether an ISO file supports BIOS boot: If the first 0 to 446 bytes of the ISO file are not empty, it generally supports BIOS boot; otherwise, it does not support BIOS boot.
Method of determining whether an ISO file supports UEFI boot: Based on experience, most ISO images created after 2010 support UEFI boot, while earlier images may or may not support it.
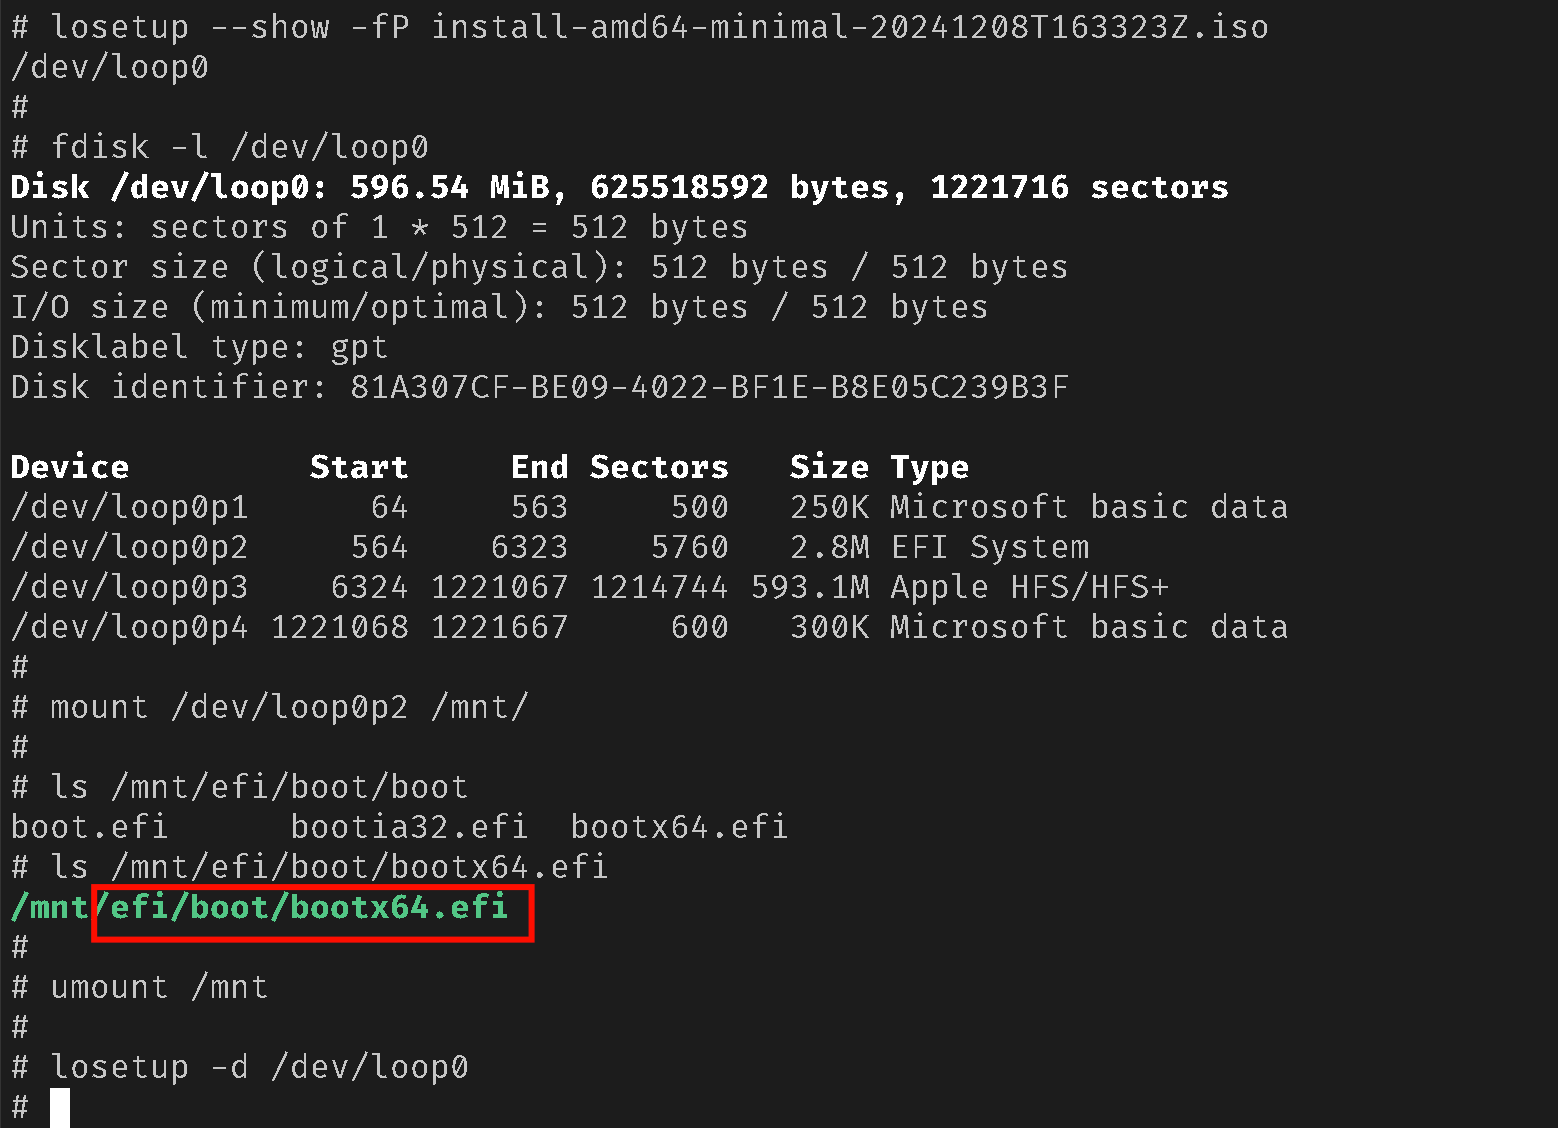
A more formal method is to check whether the ISO file contains the efi/boot/bootx64.efi file. The bootx64.efi file is required to be stored in a UEFI boot partition in the FAT format or in the ISO file system. Below is a check method for reference: