This method is applicable to CentOS versions 8.0, 7.8, 7.6, 7.5, 7.4, and 7.2.
The nic-hotplug.tgz tool is triggered when an ENI is bound or the CVM is restarted. It automatically creates an ENI configuration file and delivers the ENI route.
If the CVM already has ENIs, ensure that the routes of the existing ENIs are correctly configured before using the tool to configure a new ENI. If restarting the CVM is acceptable to your business, you can also restart the CVM after configuration by following Step 5 to apply the tool configurations to all ENIs.
Operation Steps
1. Log in to the CVM and directly run the following command on the CVM to download the nic-hotplug.tgz tool.
If the CVM requiring ENI configuration is located in the Chinese mainland, you can use the following command to download the nic-hotplug.tgz tool.
If the CVM requiring ENI configuration is located in Hong Kong (China), Macao (China), Taiwan (China), or other countries or regions, you can use the following command to download the nic-hotplug.tgz tool.
2. Run the following command to decompress the file.
tar -zxvf nic-hotplug.tgz
3. Run the following commands to grant execute permissions and install the tool.
cd nic-hotplug
chmod +x ./install.sh
./install.sh
4. Refer to Binding an ENI to bind an ENI. After an ENI is bound, perform the following operations to verify whether the route of the new ENI eth1 has been delivered.
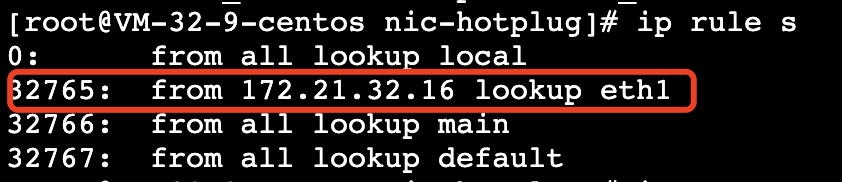
4.1 Run the ip rule show command. You can see that the policy-based route of eth1 has been added.
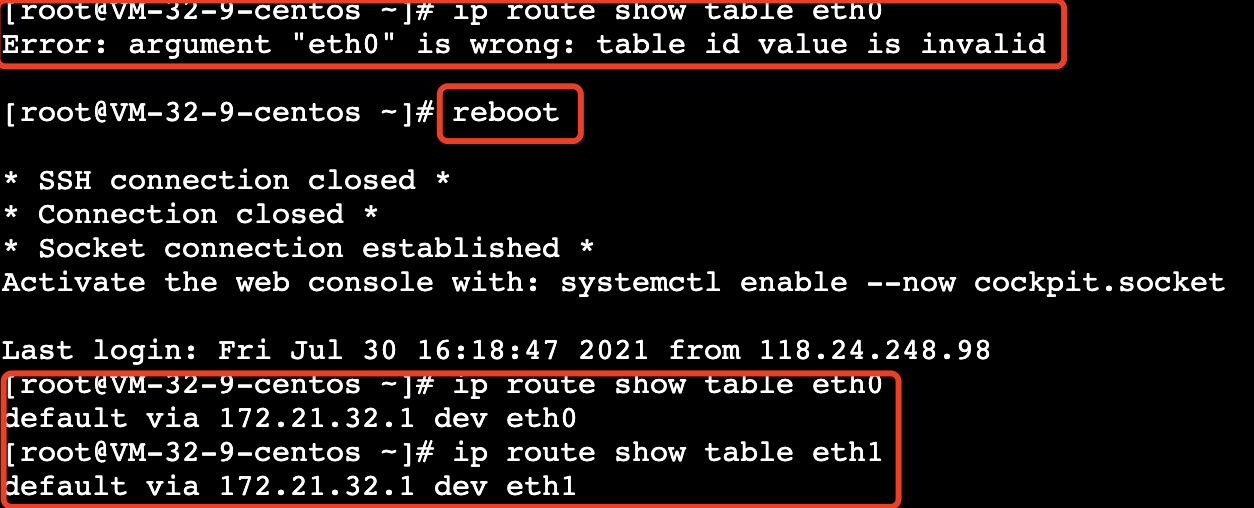
4.2 Run the ip route show table eth1 command to view the route table information of eth1.
5.
(Optional)
If there are existing ENIs, you can restart the CVM via the CVM console or by running the reboot command. After the restart, the routes of all ENIs will be automatically delivered.
Note:
Restarting the CVM causes service interruption. Evaluate the business impact before performing the restart operation.
Console-based restart:
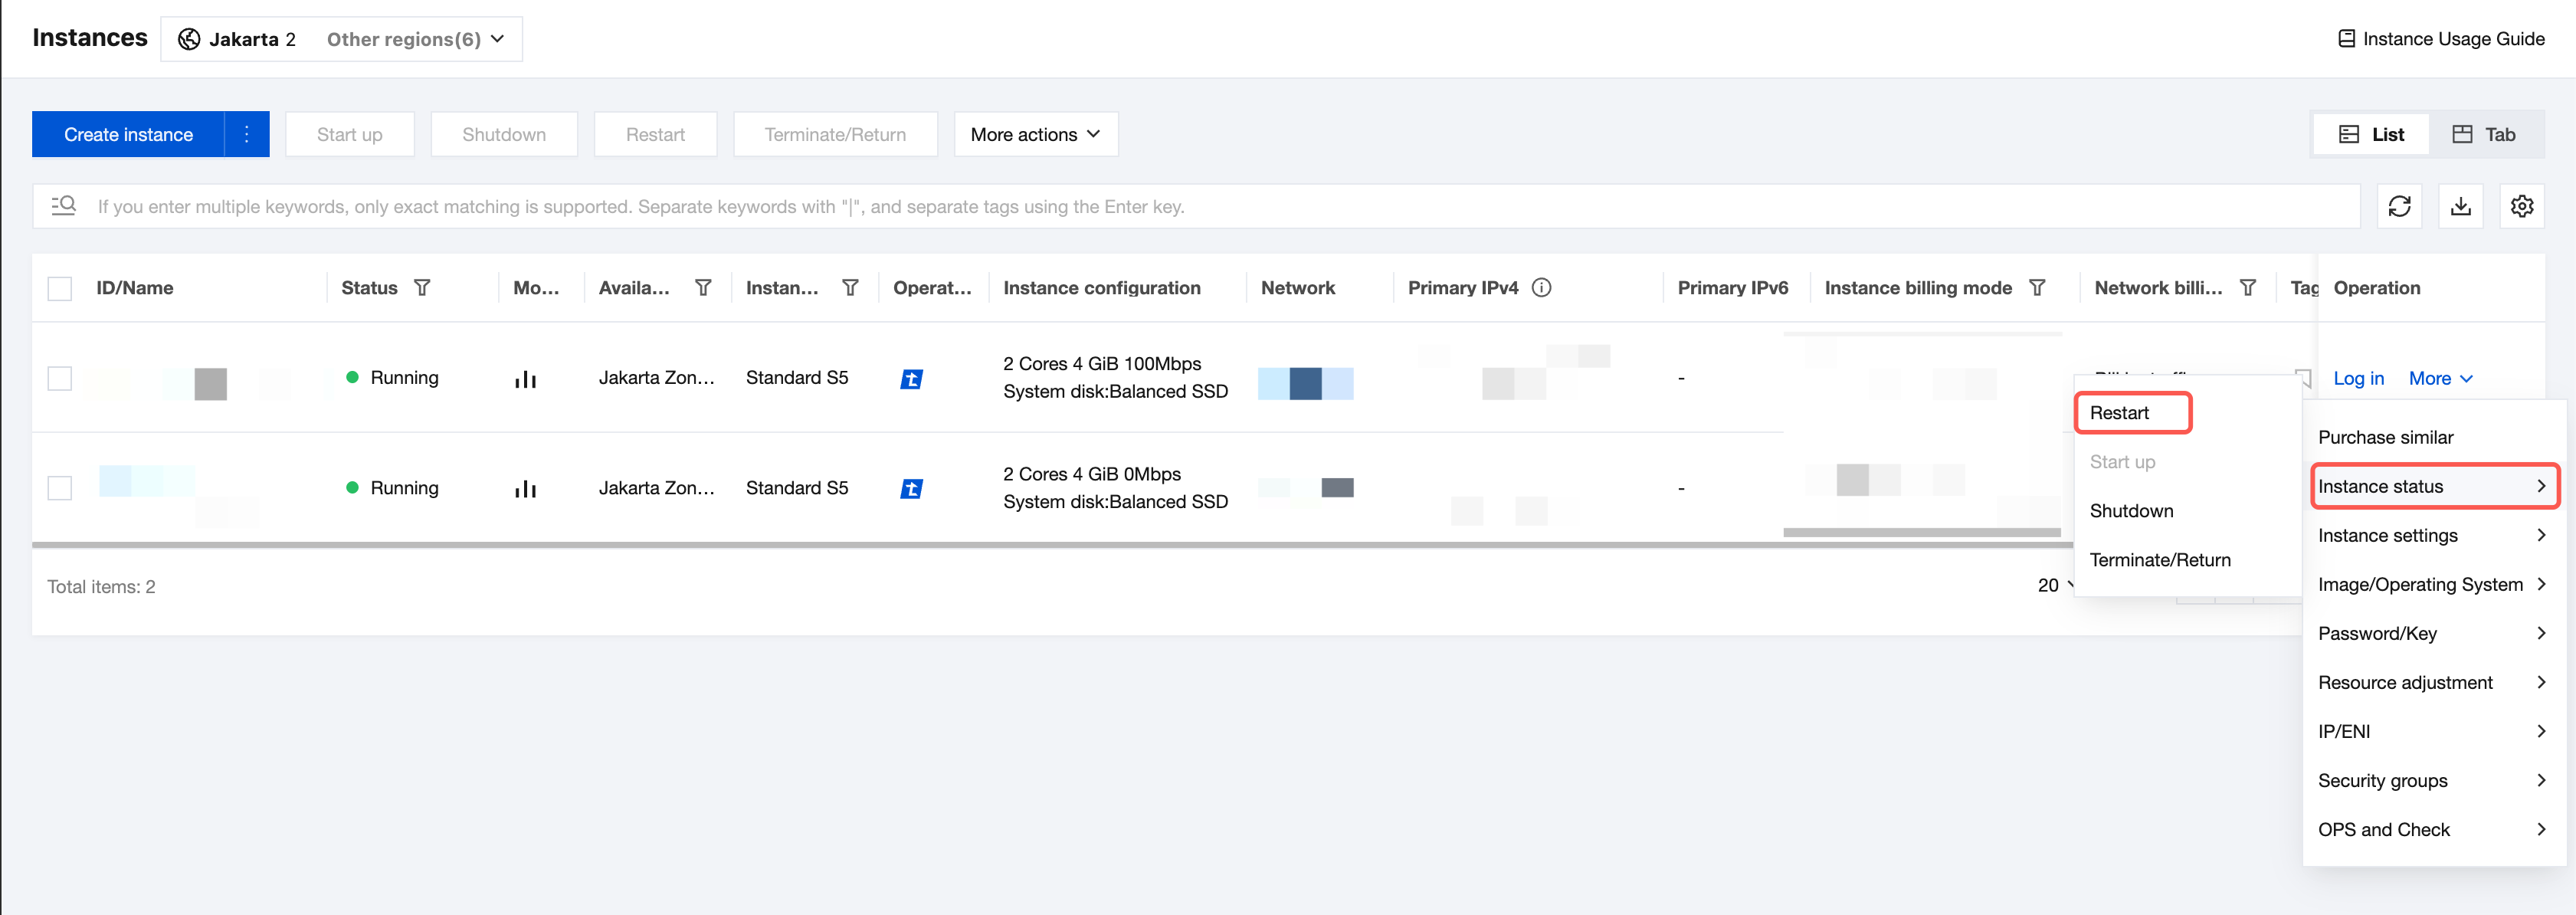
In the CVM console, select the target CVM, and choose More > Instance Status > Restart in the Operation column.
Command-based restart:
Method 2: Manual Configuration
Note:
This method supports CentOS versions 8.0, 7.8, 7.6, 7.5, 7.4, and 7.2, as well as Rocky Linux 9.x versions.
The configuration steps for CentOS and Rocky Linux are similar, with differences only in the commands for restarting the network service. For details, see Operation Steps.
Prerequisites
An ENI has been bound to the CVM. For details, see Binding an ENI.
Operation Steps
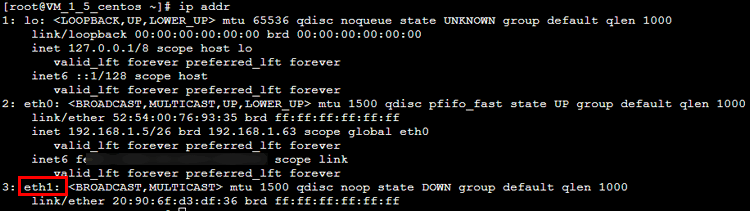
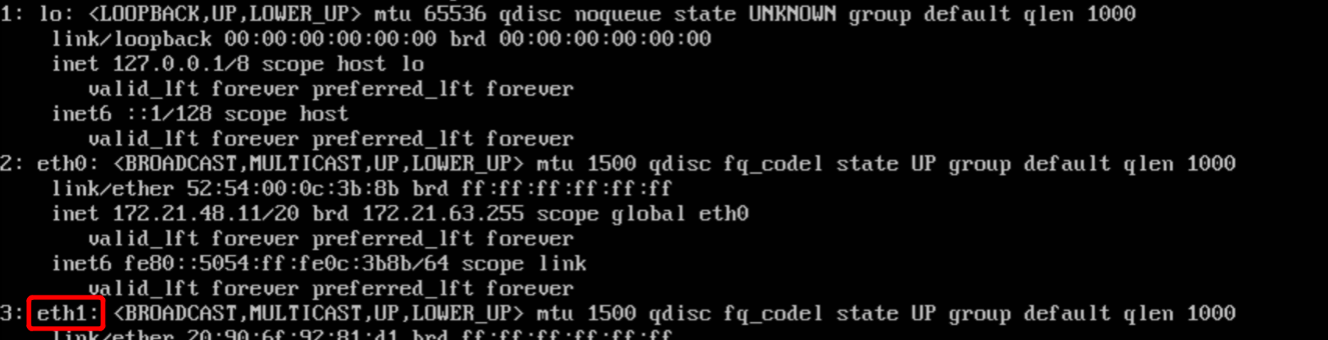
1. Log in to the CVM as an administrator, and run the following command to view the information of the ENI to be configured (IP address not displayed). As shown in the figure, the ENI to be configured is named eth1.
ip addr
2. Run the following command to go to the /etc/sysconfig/network-scripts/ directory.
cd /etc/sysconfig/network-scripts/
3. Create a configuration file for the new ENI as needed. For example, create a configuration file named ifcfg-eth1.
3.1 Enter the following command:
cp ifcfg-eth0 ifcfg-eth1
3.2 Enter the following command to modify the configuration file.
vim ifcfg-eth1
3.3 Press the i key to switch to the edit mode and modify the configuration file.
Note:
For the methods to view the IP address and subnet mask of the ENI, see Appendix.
Method 1: Manually configure a static IP address.
BOOTPROTO=static
DEVICE=eth1 # Enter the actual name of the ENI to be configured, as identified in Step 1.
ONBOOT=yes
PERSISTENT_DHCLIENT=yes
TYPE=Ethernet
USERCTL=no
IPADDR='192.168.1.62'# Enter the actual IP address of the ENI.
NETMASK='255.255.255.192'# Enter the actual subnet mask.
#GATEWAY='192.168.1.1' # Enter the actual IP address of the gateway of the subnet where the ENI is located. In this example, since eth1 and eth0 are in the same subnet and the gateway is already defined, it is not entered again here to avoid gateway conflicts.
Method 2: Dynamically obtain the IP address.
BOOTPROTO=dhcp # Use this configuration to automatically obtain the IP address.
DEVICE=eth1 # Enter the name of the ENI to be configured.
HWADDR=20:90:6F:63:98:CC # Replace the value here with the actual MAC address of the ENI. Refer to the MAC address in the output of ip addr eth1 from Step 1.
ONBOOT=yes
PERSISTENT_DHCLIENT=yes
TYPE=Ethernet
USERCTL=no
PEERDNS=no
DEFROUTE=no # Specify whether to set the ENI as the default route. In this example, eth1 is not set as the default route to prevent routing conflicts.
3.4 Save the modified configuration file and exit. (Press Esc when you get to the last line of vim, enter :wq!, and then press Enter.)
4. Enter the following command to restart the network service for the configuration to take effect.
Note:
If you have configured DNS, restarting the network may cause the resolv.conf file to be reset, affecting DNS resolution. Evaluate the impact and proceed with caution.
Restarting the network service causes service interruption. Evaluate the business impact and proceed with caution.
CentOS
Rocky Linux
systemctl restart network
systemctl restart NetworkManager
5. Check and confirm whether the IP address configuration is correct.
5.1 Enter the following command to view the IP address.
ip addr
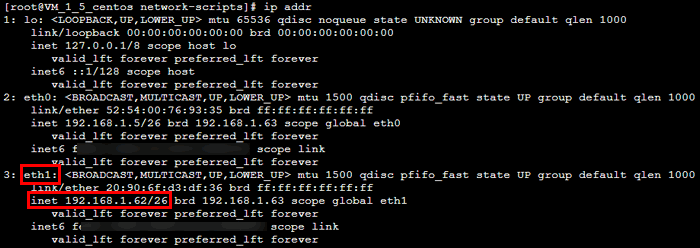
5.2 Confirm that the secondary ENI and its IP address are visible, as shown in the figure below.
5.3 If the IP address configuration is incorrect, perform the following checks:
5.3.1 Check whether the configuration file is correct. If not, reconfigure it.
5.3.2 Check whether the network has been restarted. If not, run the following command to restart the network for the configuration to take effect.
Note:
Restarting the network service causes service interruption. Evaluate the business impact and proceed with caution.
CentOS
Rocky Linux
systemctl restart network
systemctl restart NetworkManager
6. Configure a routing policy based on the actual business scenario.
7. After the above configuration is completed, the Linux image still sends packets from the primary ENI by default. You can use a policy-based route to specify the ENI through which packets are sent and returned.
7.1
Create
two route tables.
echo"10 t1">> /etc/iproute2/rt_tables # Replace 10 with the actual route ID and t1 with the actual route table name.
echo"20 t2">> /etc/iproute2/rt_tables # Replace 20 with the actual route ID and t2 with the actual route table name.
7.2 Add default routes for the above route tables in the following two ways.
To configure a temporary policy-based route (which disappears after a network restart and needs to be reconfigured), run the following commands.
ip route add default dev eth0 via 192.168.1.1 table 10# Replace 192.168.1.1 with the subnet gateway of the primary ENI.
ip route add default dev eth1 via 192.168.1.1 table 20# Replace 192.168.1.1 with the subnet gateway of the secondary ENI.
, which can be saved in the configuration file. The following operations use CentOS 7.8 as an example.
7.2.1 Edit the configuration file in the route-ENI_name format under the /etc/sysconfig/network-scripts/ directory, such as route-eth0.
vim /etc/sysconfig/network-scripts/route-eth0 # Edit the route-eth0 file.
7.2.2 Add a line of command: `default dev [ENI name, such as eth0] via [ENI gateway, such as 192.168.1.1] table [policy-based route table ID, such as 10]`. Example:
default dev eth0 via 192.168.1.1 table 10# Add a default gateway for route table 10 in the route-eth0 file.
7.2.3 Press Esc, and enter :wq! to save the file and exit. Then, follow the same steps to configure the route-eth1 file.
vim /etc/sysconfig/network-scripts/route-eth1 # Edit the route-eth1 file.
default dev eth1 via 192.168.1.1 table 20# Add a default gateway for route table 20 in the route-eth1 file.
7.2.4 Restart the network for the configuration to take effect.
Note:
Restarting the network service causes service interruption. Evaluate the business impact and proceed with caution.
systemctl restart network
7.3 Configure policy-based routing rules.
Temporary configuration.
ip rule add from 192.168.1.5 table 10# Replace the IP address here with the actual IP address of the primary ENI.
ip rule add from 192.168.1.62 table 20# Replace the IP address here with the actual IP address of the secondary ENI.
Persistent storage.
echo"from 192.168.1.5 table 10">> /etc/sysconfig/network-scripts/rule-eth0 # Replace the IP address here with the actual IP address of the primary ENI.
echo"from 192.168.1.62 table 20">> /etc/sysconfig/network-scripts/rule-eth1 # Replace the IP address here with the actual IP address of the secondary ENI.
8. After completing the configuration, you can use a CVM in the same subnet to ping the private IP address. If the ping is successful, the configuration is correct. If no other CVM is available, you can bind the private IP address of the secondary ENI to an Elastic IP (EIP) and then ping the EIP.
Configuring an ENI for a Ubuntu CVM
Ubuntu 16.04
Ubuntu 24.04
1. Log in to the CVM as an administrator, and run the following command to view the information of the ENI to be configured (IP address not displayed). As shown in the figure, the ENI to be configured is named eth1.
ip addr
2. Run the following command to go to the /etc/network/ directory.
cd /etc/network/
3. Modify the configuration file interfaces.
3.1 Run the following commands to switch to the root user and modify the configuration file.
sudosu
vim interfaces
3.2 Press the i key to switch to the edit mode and add the following configuration content.
Note:
For the methods to view the IP address and subnet mask of the ENI, see Appendix.
auto eth1
# Enter the actual name of the ENI to be configured, as identified in Step 1.
iface eth1 inet static
# Enter the actual name of the ENI to be configured, as identified in Step 1.
address 172.21.48.3
# Enter the actual IP address of the ENI.
netmask 255.255.240.0
# Enter the actual subnet mask.
3.3 Save the modified configuration file and exit. (Press Esc when you get to the last line of vim, enter :wq!, and then press Enter.)
4. Restart the ENI eth1.
4.1 Run the following commands to switch to the root user and install ifupdown.
sudosu
aptinstall ifupdown
4.2 Disable the ENI eth1.
ifdown eth1
4.3 Start the ENI eth1.
ifup eth1
5. Check and confirm whether the IP address configuration is correct.
5.1 Run the following command to view the IP address.
ip addr
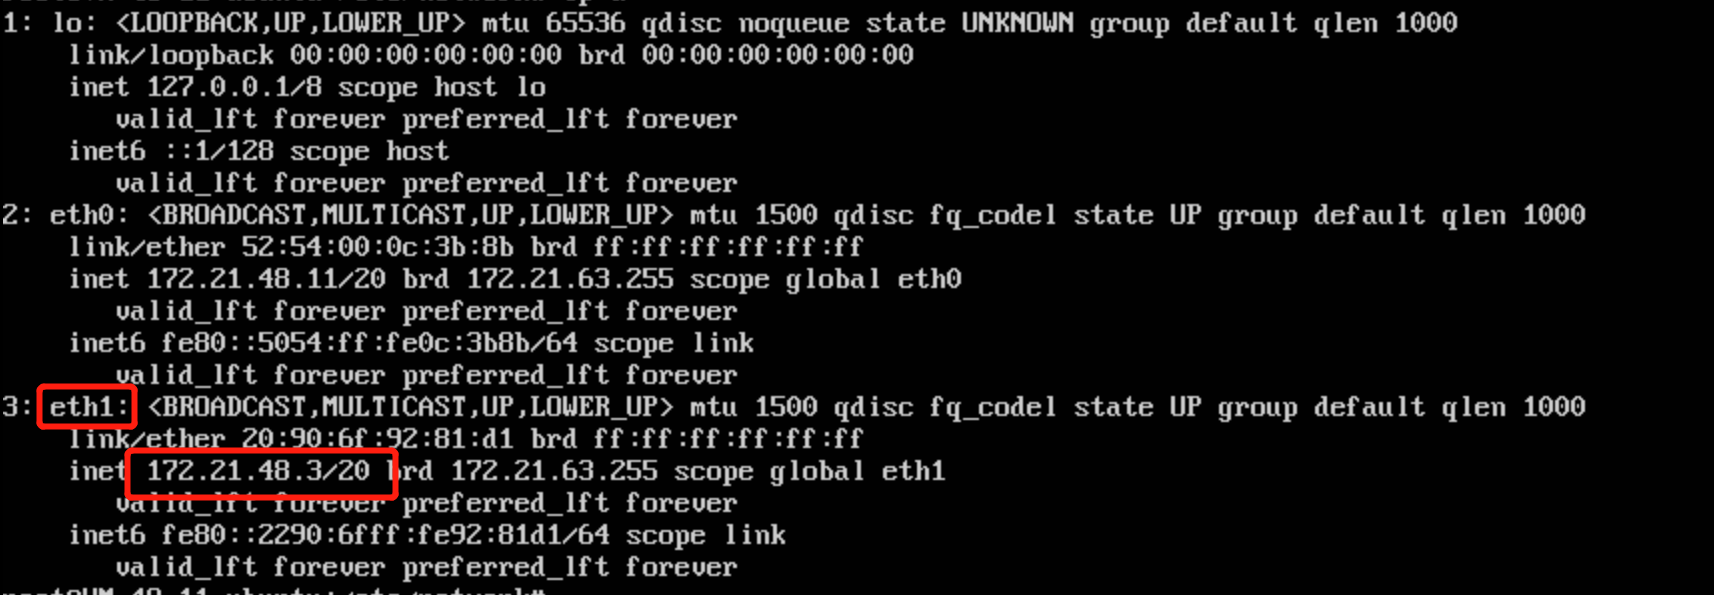
5.2 Confirm that the secondary ENI and its IP address are visible, as shown in the figure below.
If the IP address configuration is incorrect, perform the following checks:
5.3. Check whether the configuration file is correct. If not, reconfigure it.
5.4. Check whether the ENI has been restarted. If not, run the following command to restart the ENI for the configuration to take effect.
ifdown eth1
ifup eth1
6. Configure a routing policy based on the actual business scenario.
Note:
After the above configuration is completed, the Linux image still sends packets from the primary ENI by default. You can use a policy-based route to specify the ENI through which packets are sent and returned.
6.1
Run the following command
to create two route tables.
echo"10 t1">> /etc/iproute2/rt_tables # Replace 10 with the actual route ID and t1 with the actual route table name.
echo"20 t2">> /etc/iproute2/rt_tables # Replace 20 with the actual route ID and t2 with the actual route table name.
6.2 Add default routes for both route tables in the following two ways.
To configure a temporary policy-based route (which disappears after a network restart and needs to be reconfigured), perform the following steps.
1.1 Run the following commands to configure routes in the route tables.
ip route add default dev eth0 via 172.21.48.1 table 10# Replace 172.21.48.1 with the subnet gateway of the primary ENI.
ip route add default dev eth1 via 172.21.48.1 table 20# Replace 172.21.48.1 with the subnet gateway of the secondary ENI.
1.2 Run the following commands to configure policy-based routes.
ip rule add from 172.21.48.11 table 10# Replace the IP address here with the actual IP address of the primary ENI.
ip rule add from 172.21.48.3 table 20# Replace the IP address here with the actual IP address of the secondary ENI.
Configure a permanent policy-based route, which can be saved in the configuration file. The following operations use Ubuntu 16.04 as an example.
1.1 Edit the network interface configuration in the /etc/network/interfaces file.
vim /etc/network/interfaces # Edit the interfaces file.
1.2 There may be configurations for multiple interfaces in the interfaces file. You need to add policy-based route configurations under the corresponding interfaces. Example:
up ip route add default dev eth1 via 172.21.48.1 table 20# Replace 172.21.48.1 with the subnet gateway of the secondary ENI.
up ip rule add from 172.21.48.3 table 20# Replace 172.21.48.3 with the actual IP address of the secondary ENI.
1.3 Press Esc, and enter :wq! to save the file and exit.
1.4 Edit the network interface configuration in the /etc/network/interfaces.d/50-cloud-init.cfg file.
vim /etc/network/interfaces.d/50-cloud-init.cfg # Edit the eth0 ENI configuration.
1.5 Add policy-based route configurations under the network configuration for the eth0 interface. Example:
up ip route add default dev eth0 via 172.21.48.1 table 10# Replace 172.21.48.1 with the subnet gateway of the primary ENI.
up ip rule add from 172.21.48.11 table 10# Replace 172.21.48.11 with the actual IP address of the primary ENI.
1.6 Press Esc, and enter :wq! to save the file and exit.
1.7 Restart the network for the configuration to take effect.
Note:
Restarting the network service causes service interruption. Evaluate the business impact and proceed with caution.
service networking restart
7. After completing the configuration, you can use a CVM in the same subnet to ping the private IP address. If the ping is successful, the configuration is correct. If no other CVM is available, you can bind the private IP address of the secondary ENI to an EIP and then ping the EIP.
1. Log in to the server and identify the new ENI.
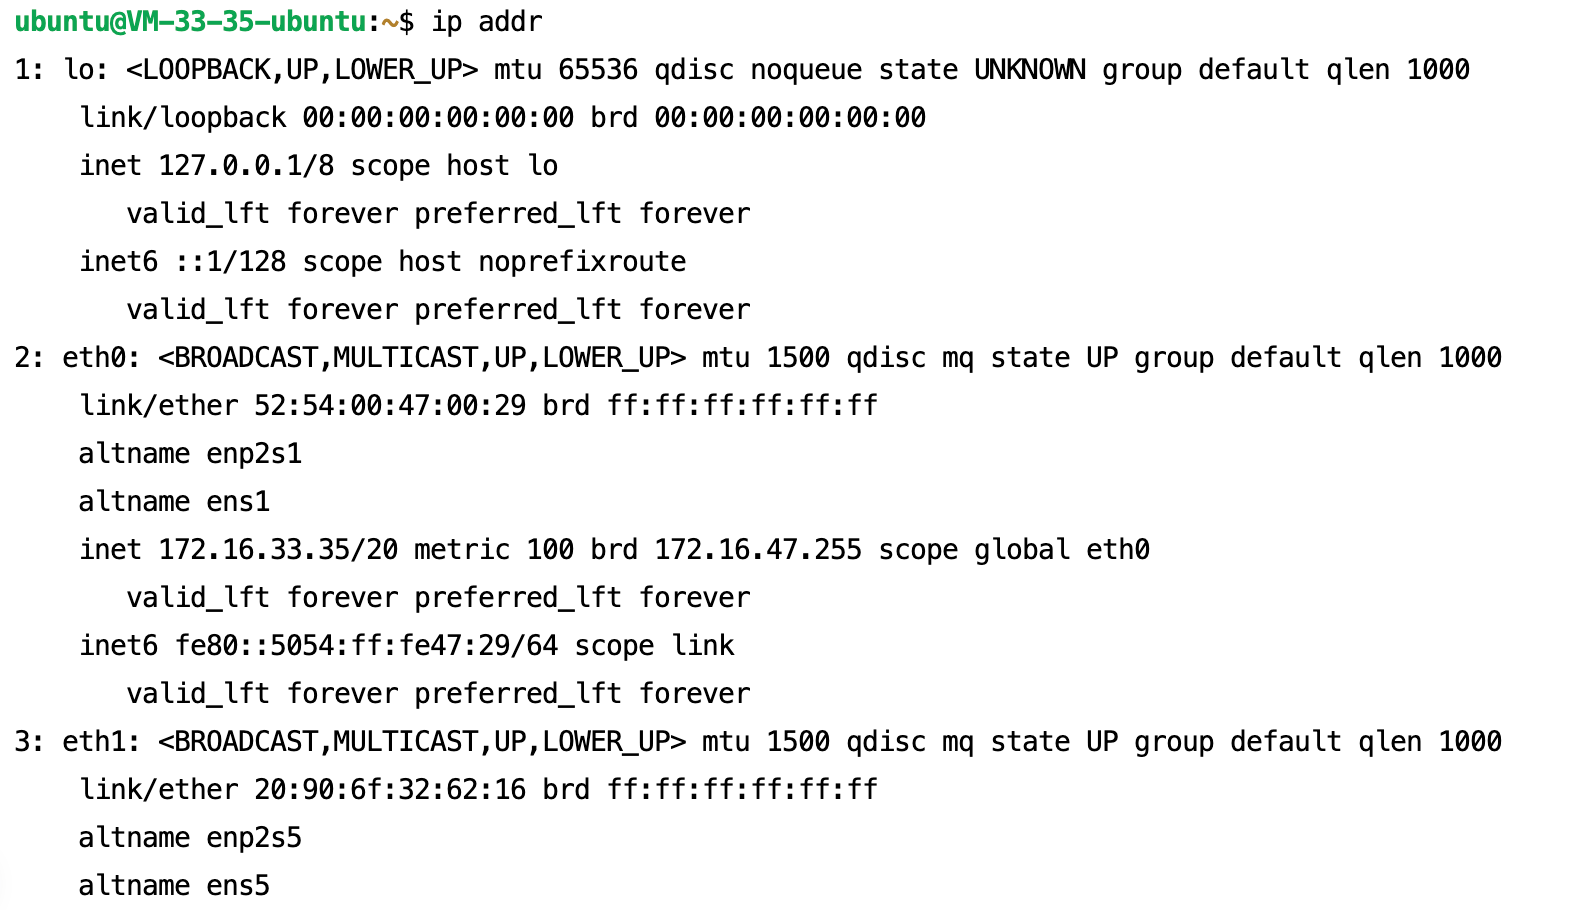
Log in to the CVM as an administrator, and run the following command to view the information of the ENI to be configured (IP address not displayed). You will see a list of devices such as eth0 and eth1. Typically, eth0 is your primary ENI, which already has an IP address configured. The newly bound ENI (such as eth1) will appear in the list without an assigned IP address.
ip addr
2. Create a Netplan configuration file.
The Netplan configuration file is located in the /etc/netplan/ directory. A default configuration file (such as 50-cloud-init.yaml) generated by cloud-init may already exist in this directory.
Use nano to create a new YAML file.
sudonano /etc/netplan/60-eni-config.yaml
3. Edit the Netplan configuration file.
Copy and paste the following content into the file. Be sure to modify the file content according to your own ENI information.
# /etc/netplan/60-eni-config.yaml
# Configure a static IP address for the secondary ENI.
network:
version: 2
renderer: networkd
ethernets:
# Replace eth1 with the ENI name identified in Step 1.
eth1:
# Disable Dynamic Host Configuration Protocol (DHCP) for manual configuration of a static IP address.
dhcp4: no
dhcp6: no
# Replace the value here with the CIDR notation of your ENI in the private_IP_address/subnet_mask_bits format.
# Example: 192.168.2.10/24.
addresses:
- 192.168.2.10/24
# Key step: Configure a policy-based route for the ENI to ensure that traffic exits through the correct interface.
# This can avoid routing conflicts between the primary and secondary ENIs.
routes:
# Add a route pointing to the subnet where this interface resides.
# Replace 192.168.2.0/24 with the subnet of your ENI.
- to: 192.168.2.0/24
via: 0.0.0.0
scope: link
table: 101# Use a custom route table, such as 101.
# Add the default gateway route of this interface to the custom route table.
# Replace 192.168.2.1 with the gateway address of your ENI.
- to: default
via: 192.168.2.1
table: 101
routing-policy:
# Add a policy rule: All traffic originating from the IP address of this ENI will use the 101 route table defined above.
# Replace 192.168.2.10 with the IP address of your ENI.
- from: 192.168.2.10
table: 101
priority: 101
Configuration description:
eth1: name of your secondary ENI.
addresses: static IP address and subnet mask bits (in CIDR notation) of the ENI.
routes and routing-policy: This is the most critical part when multiple ENIs are configured. It creates a separate route table (numbered 101) and sets a rule to force all packets originating from the IP address of this ENI (192.168.2.10) to be routed through this separate route table. This addresses multi-gateway conflicts and ensures a stable server network.
After completing the configuration, save the file and exit the editor. (In nano, press Ctrl+X, then Y, and finally Enter.)
4. Apply network configurations.
Run the following command to have Netplan read the new configuration file and apply the changes:
sudo netplan apply
5. Verify configuration results.
If no error is reported, the new network configuration should have taken effect. You can verify this using a few commands:
(1) Check whether an IP address has been assigned.
# Replace eth1 with the name of your ENI.
ip addr show eth1
(2) Check whether the policy-based routing rules take effect.
2. In the left sidebar, choose IP and ENI > ENI to go to the ENI list page.
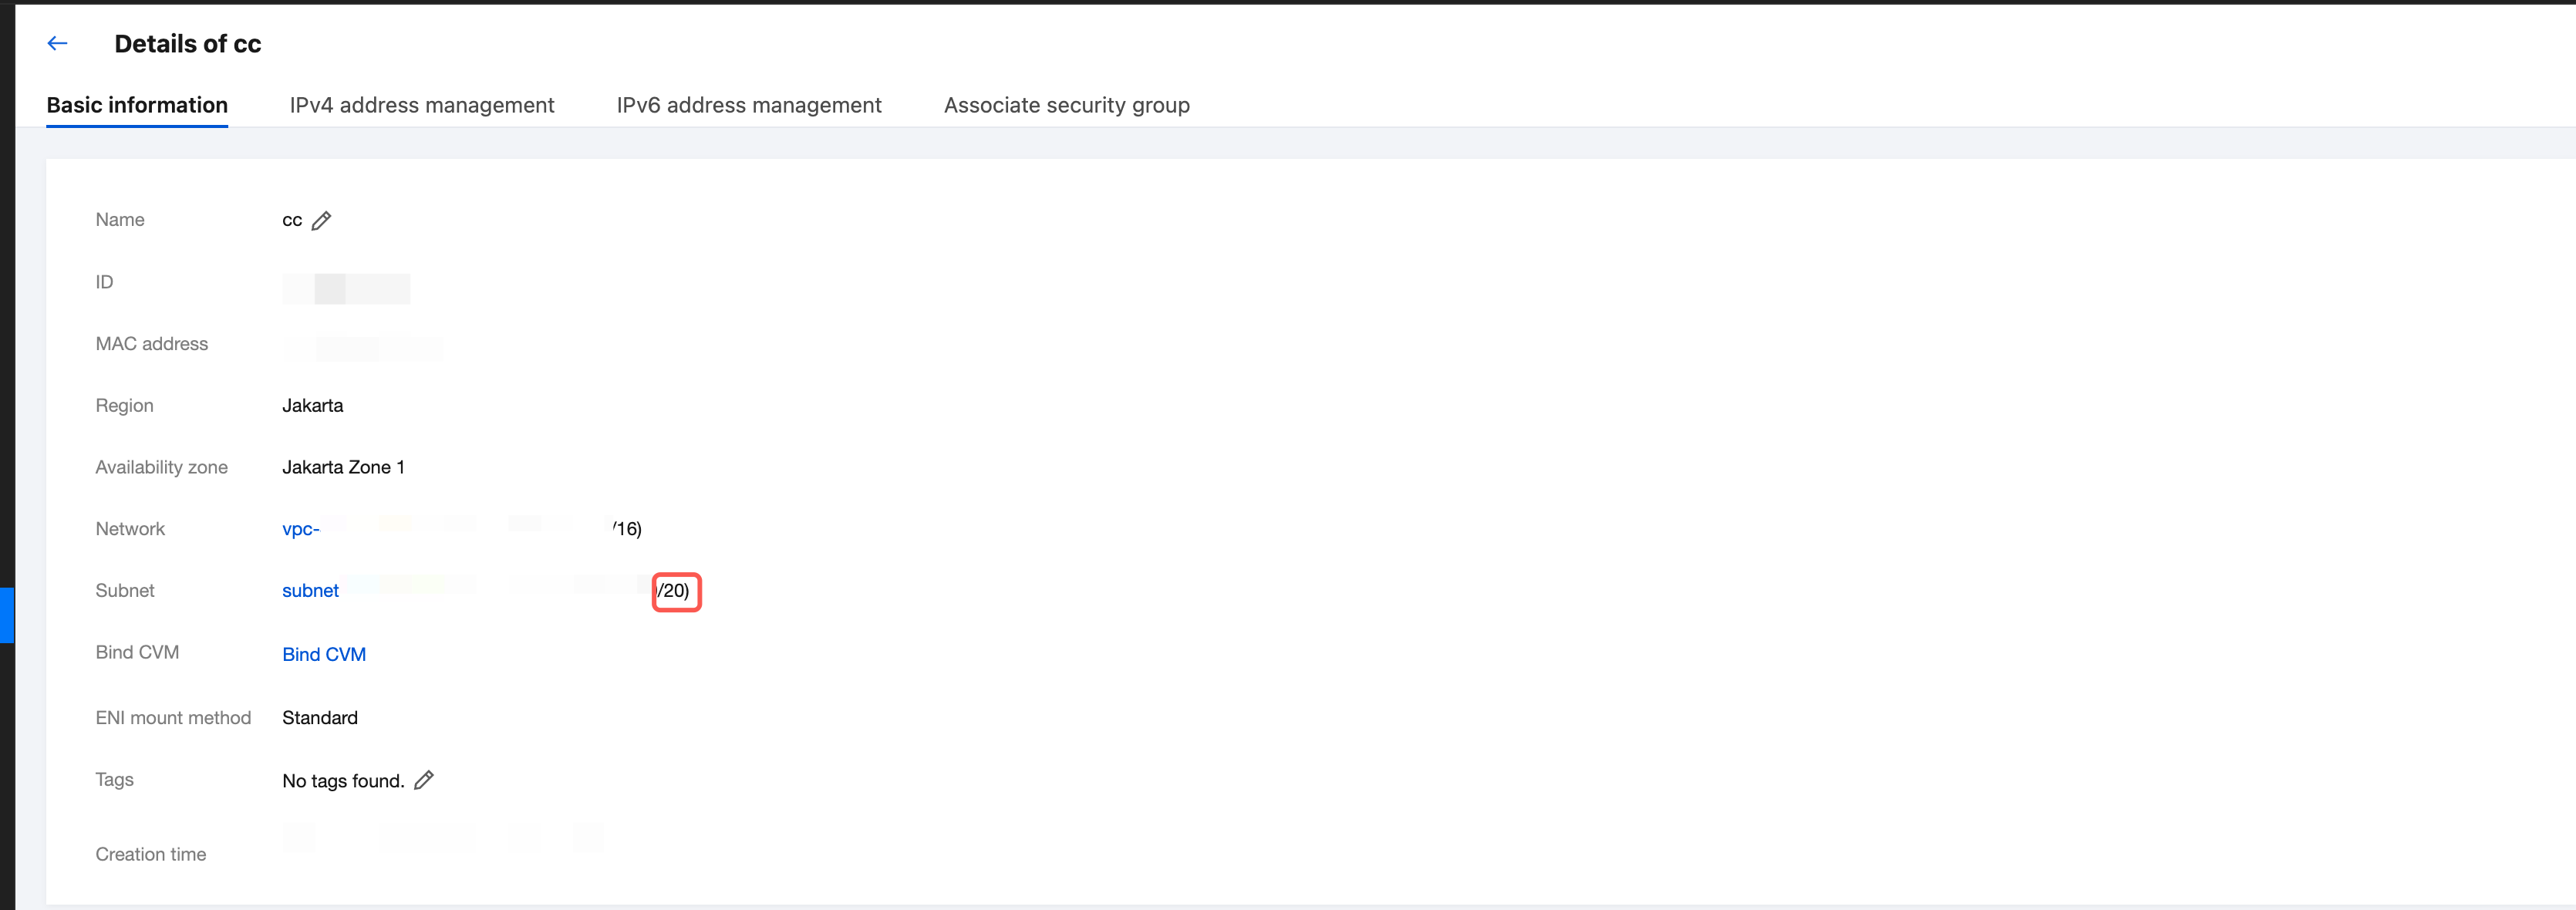
3. Click the ID of the target ENI to go to its details page, where you can view the subnet mask of the ENI.
As shown in the figure below, the CIDR prefix length of the subnet is /20, which means that the subnet mask of the ENI is 255.255.240.0.
The relationship between the CIDR prefix length and the subnet mask is described in the following table:
CIDR Prefix Length
Subnet Mask
/29
255.255.255.248
/28
255.255.255.240
/27
255.255.255.224
/26
255.255.255.192
/25
255.255.255.128
/24
255.255.255.0
/23
255.255.254.0
/22
255.255.252.0
/21
255.255.248.0
/20
255.255.240.0
/19
255.255.224.0
/18
255.255.192.0
/17
255.255.128.0
/16
255.255.0.0
Viewing the Gateway
If you have not changed other settings, the gateway is the first IP address in the CIDR block of the subnet. For example, if the CIDR block of the subnet is 192.168.0.0/24, the gateway is 192.168.0.1.
If you are not sure about the CIDR block of the subnet to which the ENI belongs, you can perform the following steps:
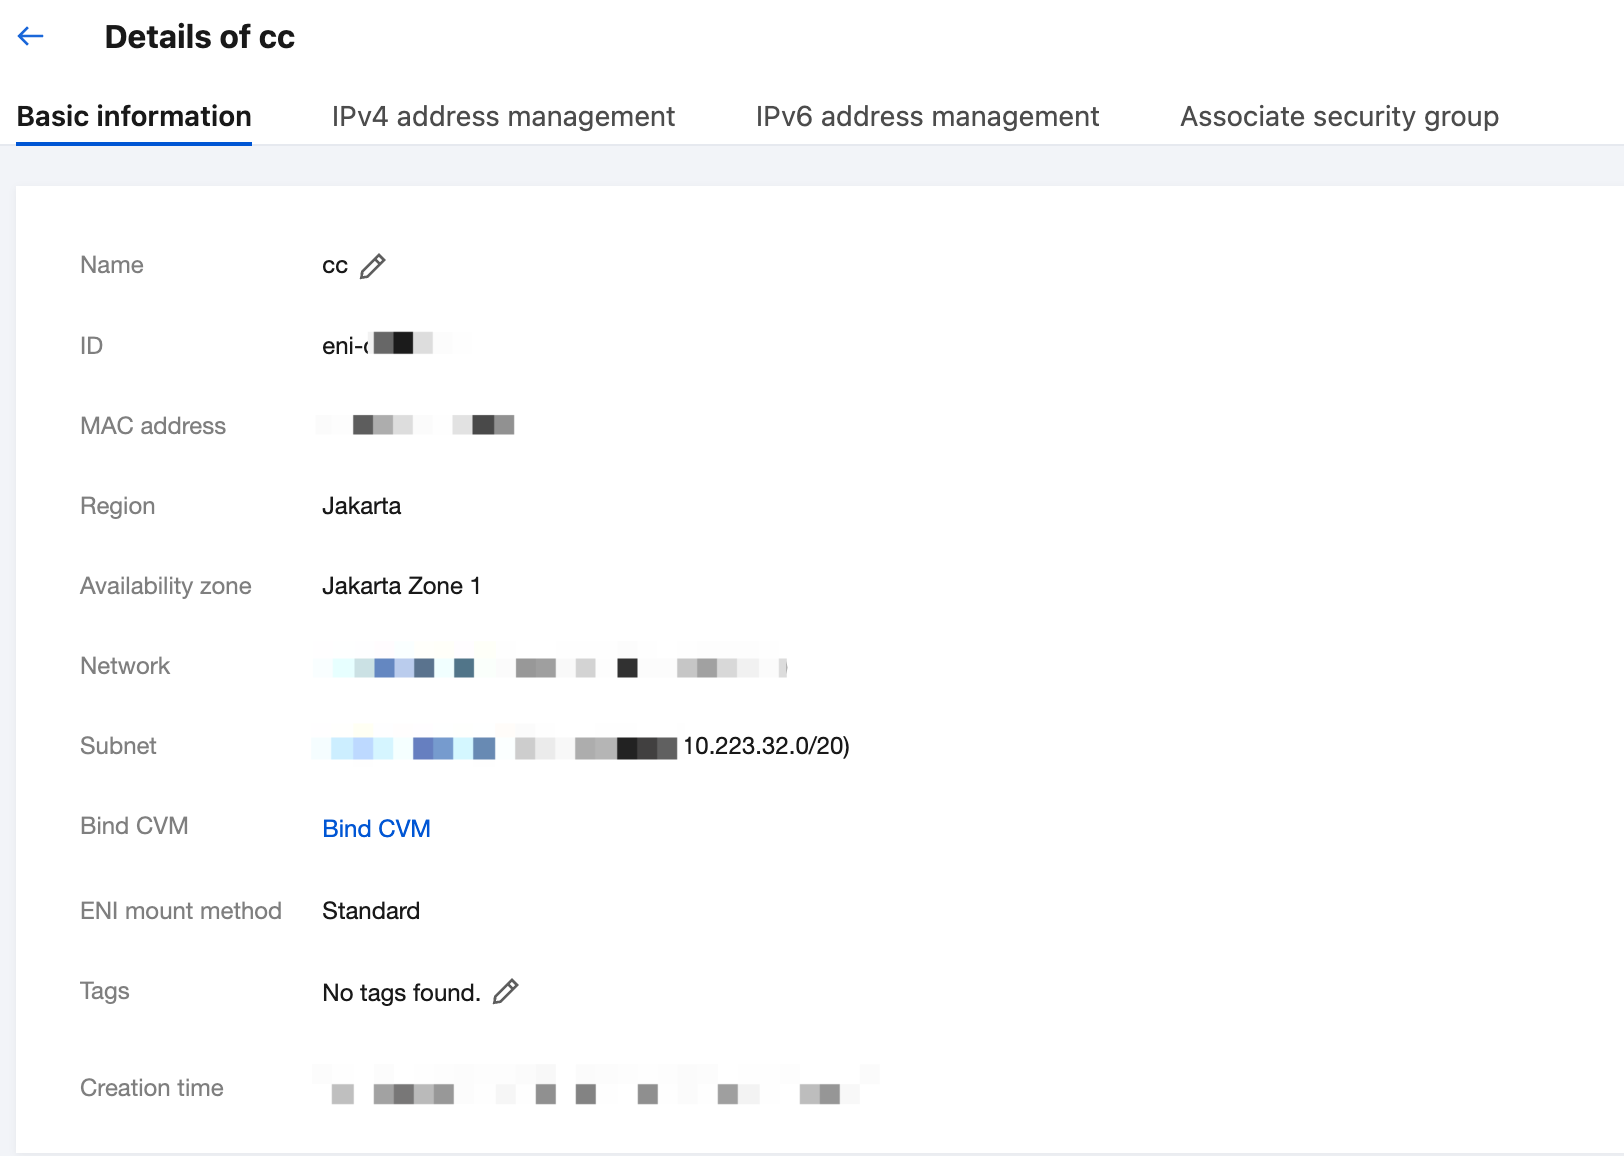
2. In the left sidebar, choose IP and ENI > ENI to go to the ENI list page.
3. Click the ID of the target ENI to go to its details page, where you can view the subnet of the ENI. As shown in the figure below, the first IP address in the CIDR block of the subnet is 10.223.32.1.