This document describes how to create a role via the CAM console or APIs. The created role can manage resources under the root account within the scope of permissions.
Prerequisites
Log in to the CAM console and go to the Roles page.
Directions
Creating in the console
Creating a role for a Tencent Cloud root account
1. On the Roles page, click Create Role.
2. In the Select role entity pop-up window, select Tencent Cloud Account as the role entity.
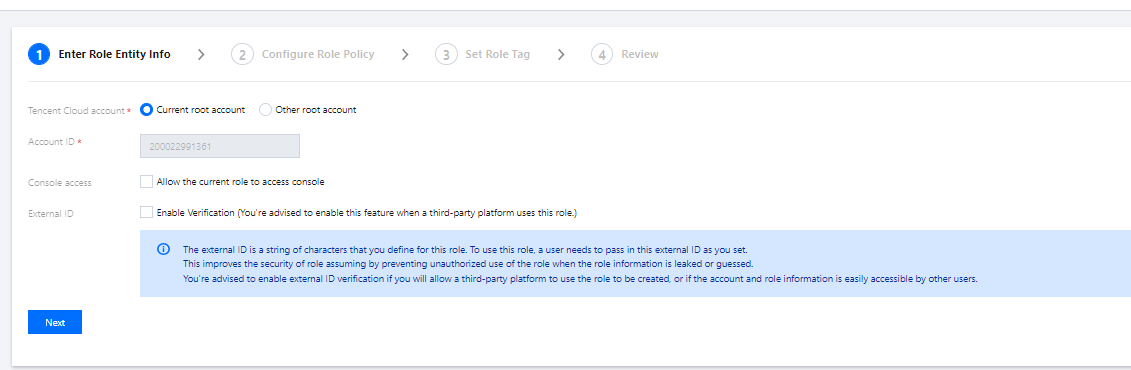
3. On the Enter Role Entity Info page, enter the following information and click Next.
Tencent Cloud account: Select Current root account or Other root account.
Account ID: Enter the ID of the root account to which you want to grant access to your Tencent Cloud account resources. Your root account ID is entered by default.
Console access: You can select it to allow the current role to access the console.
External ID: We recommend you enable external ID verification if you will allow a third-party platform to use the role to be created, or if the account and role information is easily accessible by other users. After it is enabled, you need to enter an external ID.
4. In the policy list, select the policies to be granted to the current role and click Next.
5. Set the role tag keys and values and click Next.
6. Enter a role name. After confirming that the role entity and policy information are correct, click Next.
2. In the Select role entity pop-up window, select Tencent Cloud Product Service as the role entity.
To check whether a Tencent Cloud service supports using roles, see CAM-Enabled Products.
3. Select the service you need as the role entity from the list of services that support roles and click Next.
4. In the policy list, select the policies you want to grant the role for permission configuration and click Next.
5. Set the role tag keys and values and click Next.
6. Enter a role name. After confirming that everything is correct, click Complete.
Creating a role for an IdP
1. On the Roles page, click Create Role.
2. In the Select role entity pop-up window, select IdPs as the role entity to enter the role information configuration page.
IdPs refer to the identity providers you created. You can select one from them as the role entity.
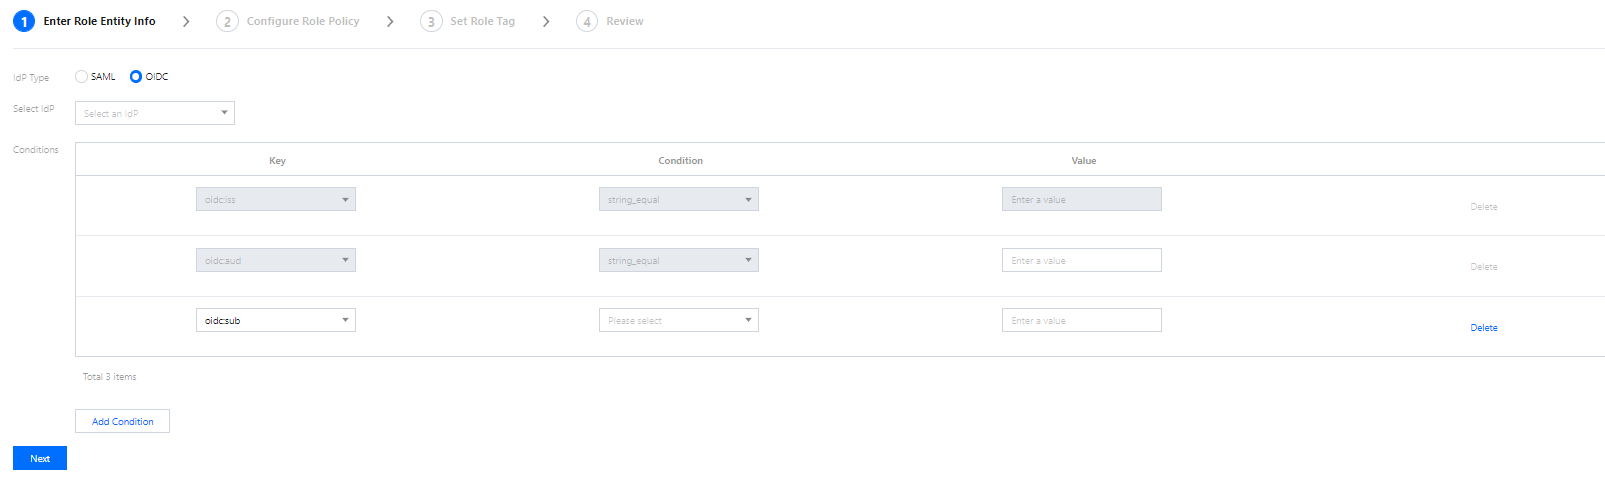
3. Select the IdP type and the specific IdP, configure conditions as needed, and click Next.
IdP Type: You can select SAML or OIDC.
Select IdP: You can select an IdP as the role entity.
Console access (optional): You can configure whether to allow the role to log in to the Tencent Cloud console. A role has programming access to Tencent Cloud by default.
Conditions (optional): You can configure conditions for IdPs to use the role. For more information, see Conditions.
4. In the policy list, select the policies you want to grant the role for permission configuration and click Next.
5. Set the role tag keys and values and click Next.
6. Enter a custom role name. After confirming that everything is correct, click Complete.
Creating through APIs
Creating a role for a Tencent Cloud account
You can create a role by using CAM APIs in Tencent Cloud. Here we explain the process with a typical use case.
For example, Company A wants to outsource its Ops Engineer position to Company B. The person taking the position needs the access to all Company A's CVM resources located in the Guangzhou region.
Company A's enterprise account CompanyExampleA (ownerUin:12345) creates a role and sets the role entity to Company B's enterprise account CompanyExampleB (ownerUin: 67890).
1. CompanyExampleA (ownerUin: 12345) calls the CreateRole API to create a role with DevOpsRole as the roleName. The parameter policyDocument (role trust policy) is configured as follows:
{
"version":"2.0",
"statement":[
{
"action":"name/sts:AssumeRole",
"effect":"allow",
"principal":{
"qcs":["qcs::cam::uin/67890:root"]
}
}
]
}
2. CompanyExampleA (ownerUin: 12345) needs to add permissions to the new role.
3. CompanyExampleA (ownerUin: 12345) creates a new policy DevOpsPolicy. The policy syntax is as follows:
{
"version":"2.0",
"statement":[
{
"effect":"allow",
"action":"cvm:*",
"resource":"qcs::cvm:ap-guangzhou::*"
}
]
}
4. CompanyExampleA (ownerUin: 12345) calls AttachRolePolicy to associate the new policy with the role DevOpsRole. Input parameters: policyName=DevOpsPolicy, roleName=DevOpsRole.
At this point, Company A's enterprise account CompanyExampleA (ownerUin: 12345) has created a new role and granted permissions to the role.
Creating a role for an IdP
Before creating a role for an IdP, you need to create a SAML IdP in CAM first. For detailed directions, see Creating Role.
1. Prepare a trust policy for the role to be created.
Note:
The fields in a trust policy are as specified below:
action: Defines the API for which SAML Federation is allowed to use the role. Use sts:AssumeRoleWithSAML.
principal: Defines the IdP that is allowed to use the role. Use {"federated": [ IdPArn ]} string, such as "qcs::cam::uin/10001:saml-provider/idp_name".
condition: Defines the conditions to be met before an IdP can use the role. {"StringEquals": {"SAML:aud": "https://cloud.tencent.com/login/saml"}} is used by default, specifying that only the IdPs with Tencent Cloud as the SAML Federation endpoint are allowed to use this role.
Sample trust policy:
{
"version":"2.0",
"statement":[
{
"action":"name/sts:AssumeRoleWithSAML",
"effect":"allow",
"principal":{
"federated":[
"qcs::cam::uin/10001:saml-provider/idp_name"
]
},
"condition":{
"string_equal":{
"saml:aud":"https://cloud.tencent.com/login/saml"
}
}
}
]
}
2. Prepare permission policies for the role to be created. For more information on permission policies, see Policy.
3. Call the cam:CreateRole API to create a role for the IdP.
Conditions
SAML currently supports the following conditions:
Condition Key
Meaning
Required
Description
saml:aud
Recipient
No
The URL of the endpoint to which SAML assertion is submitted. The value of this key comes from the `SAML Recipient` rather than `Audience` field in the assertion.
saml:iss
Sender
No
This key is represented as a URN. The value of this key comes from the `SAML Issuer` field in the assertion.
saml:sub
External account ID
No
This is the statement topic. It contains a value uniquely identifying a user in the organization. The value of this key comes from the `SAML NameID` field in the assertion.
saml:sub_type
External user type
No
The value of this key comes from the `Format` attribute in the ` SMAL NameID` field in the assertion.
OIDC currently supports the following conditions:
Condition Key
Meaning
Required
Description
oidc:iss
OIDC issuer
Yes
This condition must use `string_equal`, and the condition value can only be the IdP URL that you entered in the OIDC IdP configuration. The `iss` field of the token of the OIDC IdP account to assume the role must meet this condition.
oidc:aud
OIDC audience
Yes
This condition must use `string_equal`, and the condition value can only be the one or multiple client IDs in the OIDC IdP configuration. The `aud` field of the token of the OIDC IdP account to assume the role must meet this condition.
oidc:sub
OIDC subject
No
This condition can be any condition operation in string type, and you can configure up to ten OIDC subjects in the condition value. The `sub` field of the token of the OIDC IdP account to assume the role must meet this condition.