Step 4: Configure Security Group
Download
포커스 모드
폰트 크기
In SaaS-WAF, you need to configure rules for the security group bound to the origin server instance (such as CVM, CLB, and so on) to allow the WAF origin-pull IPs. This prevents normal traffic forwarded by WAF to the origin server from being mistakenly identified as an attack and blocked. This document will guide you through setting up security group rules.
Prerequisites
Only supports allowing WAF origin-pull IPs in security groups for instances located on Tencent Cloud (such as: CVM, CLB, and so on).
Obtain the WAF origin-pull IP addresses
1. Log in to the WAF console, and at the top of the left sidebar, switch the console to the region where the instance is located (Chinese mainland/non-Chinese mainland).
2. In the left sidebar, choose Connection Management > Domain Onbroading, and in the Intermediate address column of the domain name list, you can view the intermediate IP .

Configuring a Security Group
After obtaining the WAF origin-pull IP address ranges, you need to whitelist these WAF origin-pull IP address ranges in the security group bound to the origin server. This prevents legitimate business requests forwarded by WAF to the origin server from being mistakenly blocked.
Create a security group (Optional)
Note:
You can create a new security group by referring to this step. If your origin server instance is already bound to a security group, you can skip this step.
1. Log in to the CVM console, and click Security Group in the left navigation.
2. Go to the Security Group page, select Region, click New, fill in the information as required, and after filling, click OK. For detailed instructions on creating a security group, see Creating a Security Group.
Adding Security Group Rules
1. Log in to the VPC console, choose Security > Security Group in the left sidebar.
2. On the Security Group page, locate the security group to which you need to add rules, and click its ID to go to the details page.
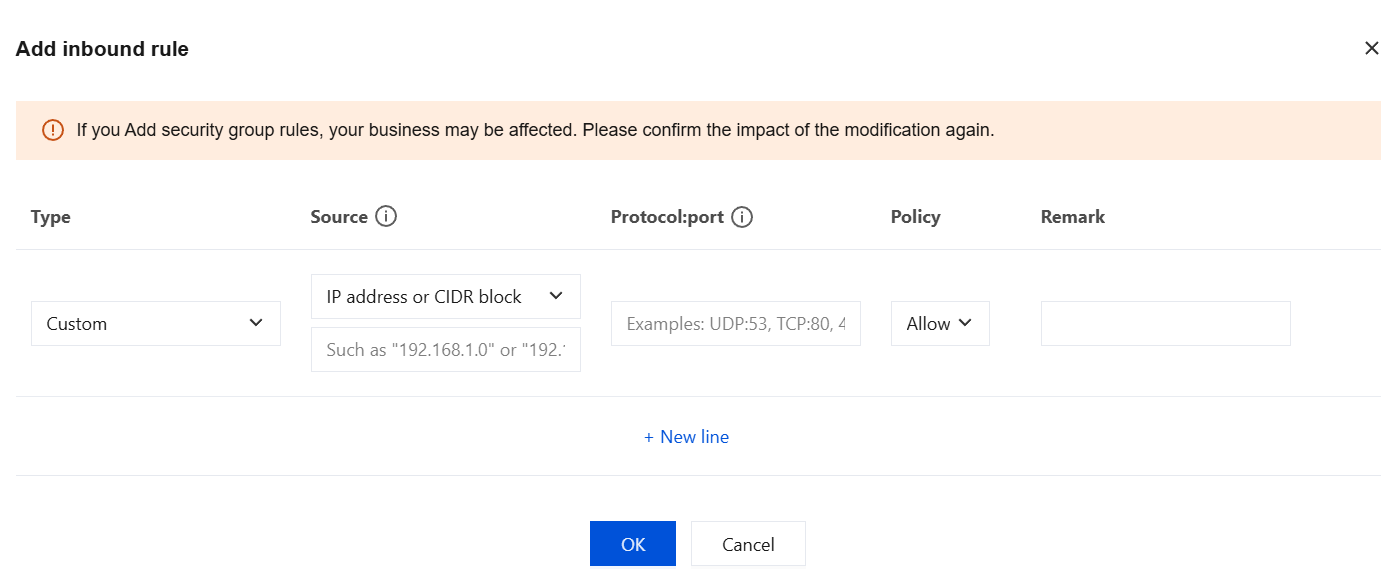
3. On the Inbound Rules page, click Add Rule.
4. In the pop-up window, fill in the relevant information. Select Custom for Type, enter the WAF origin-pull IPs to be allowed in Source, fill in Protocol & Port as TCP:443,80 or specify the protocol and ports based on the custom protocol and origin-pull ports configured in the domain access settings. Select Allow for Policy. After the information is filled in, click OK. For details on adding security group rules, see Adding Security Group Rules.
Associating Instance with Security Group
After adding rules to allow WAF origin-pull IPs in the security group, you need to bind this security group to your origin server instance.
1. Log in to the VPC console, choose Security > Security Group in the left sidebar.
2. On the Security Group page, select the region where your instance is located, and locate the security group for which you need to set rules.
3. In the row of the security group for which you need to set rules, click Manage Instances in the Operation column.
4. On the Associate Instances page, click Add Association.
5. In the Associate New Instances window, select the instances to be bound to the security group, and click OK. Security groups can be associated with instances such as CVM and CLB.
Note:
For more information on how to configure security groups for CLB instances, see Configuring Security Groups for CLB.
피드백