Native Node Scaling
Download
Modo Foco
Tamanho da Fonte
Note
The auto-scaling of a native node is implemented by Tencent Kubernetes Engine (TKE). The auto-scaling of a normal node relies on Auto Scaling (AS).
If auto-scaling is not enabled for a native node pool:
The number of initialized nodes is specified by the Nodes parameter in the console, or the
replicas parameter in the YAML configuration file.You can manually adjust the number of nodes as needed. However, the number of nodes is limited by the maximum number, which is 500 by default, and the number of IP addresses in the container subnet.
If auto-scaling is enabled for a native node pool:
The number of initialized nodes is specified by the Nodes parameter in the console, or the
replicas parameter in the YAML configuration file.You must specify the Number of Nodes parameter in the console, or the
minReplicas and maxReplicas parameters in the YAML configuration file to set the range for the number of nodes. Cluster Autoscaler (CA) adjusts the number of nodes in the current node pool within the specified range.You cannot manually adjust the number of nodes as needed.
Note:
At a same moment, the auto-scaling of the node pool can be controlled only by 1 role in the console. If auto-scaling is enabled, the instance quantity cannot be adjusted manually. If you wish to manually adjust the instance quantity, first disable auto-scaling.
Enabling the Auto-scaling Feature for Nodes
Parameter description
Function | Parameter and Values | Description |
Auto Scaling | Parameter: spec.scaling | The auto-scaling feature is enabled by default. If the auto-scaling feature is enabled for a node pool, CA automatically scales in or out the node pool. |
Number of Nodes | Parameter: spec.scaling.maxReplicas and spec.scaling.minReplicas Valid values: The value is customizable. | The number of nodes in the node pool cannot exceed the specified range. If auto-scaling is enabled for a node pool, the number of native nodes in the node pool can be automatically adjusted within the specified range. |
Scaling policy | Parameter: spec.scaling.createPolicy Example values: Zone priority in the console, or ZonePriority in the YAML configuration file.Zone equality in the console, or ZoneEquality in the YAML configuration file. | If you specify Zone priority, the auto-scaling feature performs scaling in the preferred zone first. If the preferred zone cannot be scaled, other zones are used. If you specify Zone equality, the auto-scaling feature distributes node instances evenly among the zones, or subnets, specified in the scaling group. This policy takes effect only if you have configured multiple subnets. |
Enabling the feature in the TKE console
Method 1: Enabling auto-scaling on the node pool creation page
1. Log in to the TKE console and create a node pool in the cluster. For more information, see Creating Native Nodes.
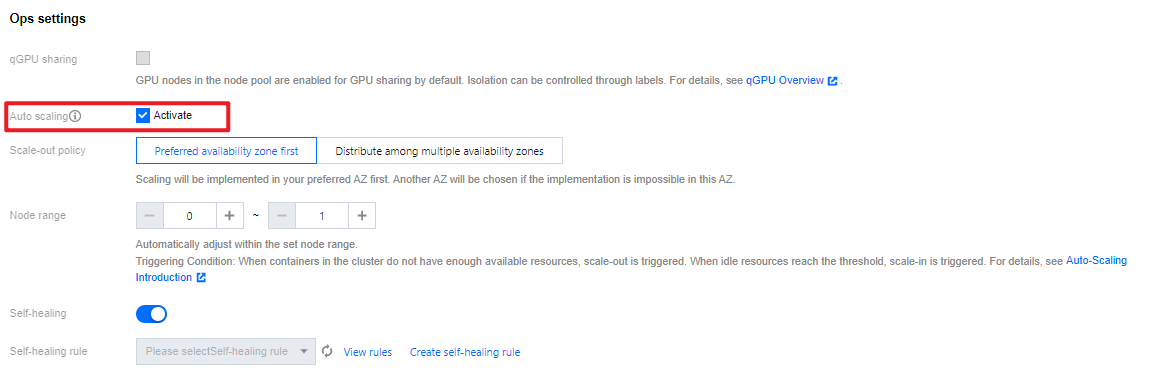
2. On the Create node pool page, select Enable for Auto-scaling. See the following figure:
Method 2: Enabling auto-scaling on the details page of a node pool
1. Log in to the TKE console and select Cluster in the left sidebar.
2. On the cluster list page, click the ID of the target cluster to go to the details page.
3. Select Node Management > Worker Node in the left sidebar, and click the node pool ID in the node pool to enter the node pool details page.
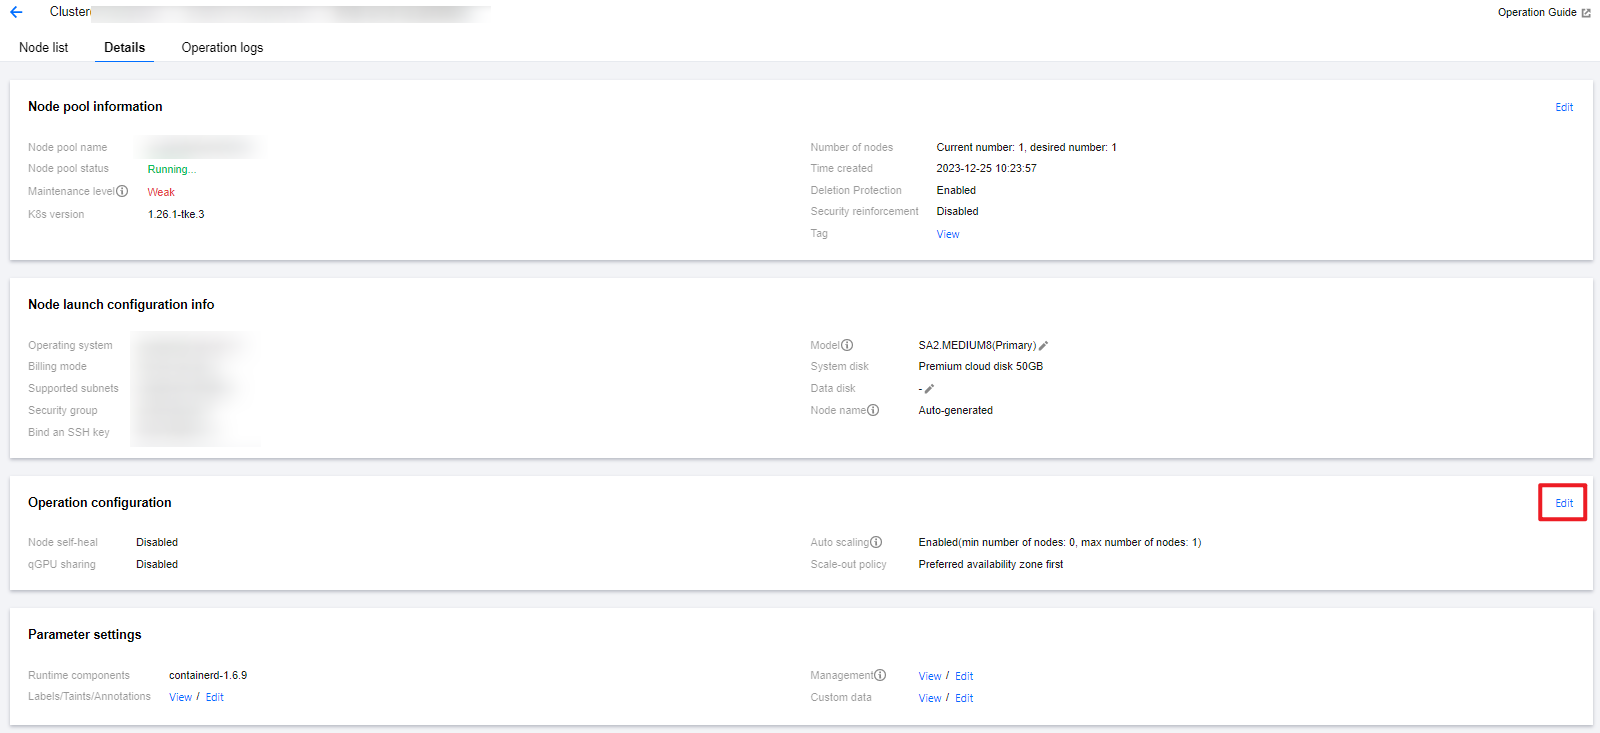
4. On the node pool details page, click Edit on the right side of Operation configuration, as shown in the following figure:
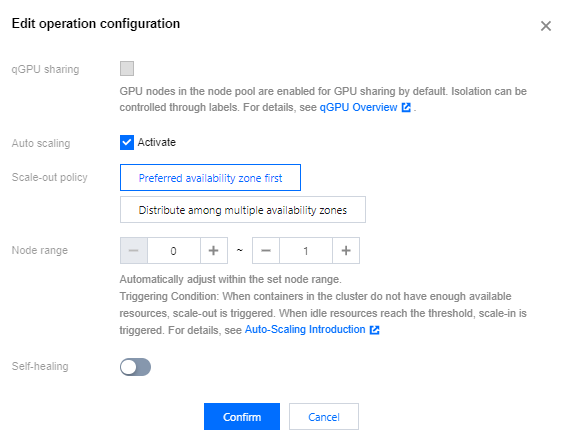
5. Check Activate Auto-scaling , and click Confirm to enable auto-scaling.
Enabling the feature by using YAML
Specify the
scaling parameter in the YAML configuration file for a node pool.apiVersion: node.tke.cloud.tencent.com/v1beta1kind: MachineSetspec:type: NativedisplayName: mstestreplicas: 2autoRepair: truedeletePolicy: RandomhealthCheckPolicyName: test-allinstanceTypes:- C3.LARGE8subnetIDs:- subnet-xxxxxxxx- subnet-yyyyyyyyscaling:createPolicy: ZonePriorityminReplicas: 10maxReplicas: 100template:spec:displayName: mtestruntimeRootDir: /var/lib/containerdunschedulable: false......
Viewing the scaling records
1. Log in to the TKE console and select Cluster in the left sidebar.
2. On the cluster list page, click the ID of the target cluster to go to the details page.
3. Choose Node management > Node pool in the left sidebar to go to the Node pool list page.
4. Click the ID of the target node pool to go to the details page of the node pool.
5. View the scaling records on the Ops records page.
Introduction to Scale-out Principles
This document will explain the scale-out principles of native nodes with examples under conditions of multiple models and multiple subnets.
Scenario 1: The scale-out policy is Preferred availability zone first when auto-scaling is enabled
Algorithm :
1. Determine the preferred availability zone based on the subnet arrangement sequence.
2. Select a model with the highest current inventory from multiple models for scale-out, and check the inventory in real time after scale-out of each machine, to ensure that the machine is scaled out successfully in the preferred availability zone as much as possible.
Example :
Assume that the node pool is configured with Models A/B (A has an inventory of 5 units, and B has an inventory of 3 units) and Subnets 1/2/3 (3 subnets are in different availability zones, with Subnet 1 being preferred). The arrangement sequences of models and subnets are valid during algorithm judgment. At this moment, CA triggers the scale-out of 10 machines in the node pool. The background judgment process is as follows:
2.1 Based on the subnet arrangement sequence, identify the subnet of the preferred availability zone as Subnet 1.
2.2 Check the real-time inventory status of all models, and scale out 1 node. Then repeat this process.
2.3 After the scale-out of 8 nodes, if no resources are available to continue scaling out in Subnet 1, proceed to Step 2.1 and switch the subnet of preferred availability zone to Subnet 2.
Scenario 2: The scale-out policy is Distribute among multiple availability zones when auto-scaling is enabled
Algorithm :
1. Based on the distribution status of the existing nodes within the node pool in the availability zones, determine the expected scale-out quantity for each availability zone, to ensure that the number of nodes distributed in each zone is as uniform as possible after scaling out.
2. After the availability zone is determined, select a model with the highest current inventory from multiple models for scale-out, and check the inventory in real time after scale-out of each machine, to ensure that the machine is successfully scaled out in the current availability zone as much as possible.
Example :
Assume that the node pool is configured with Models A/B (A has an inventory of 5 units, and B has 3 units) and Subnets 1/2/3 (3 subnets are in different availability zones, with Subnet 1 as preferred). The arrangement sequences of the models and subnets are valid during algorithm evaluation, and the node pool has 5 nodes which are deployed in Availability Zone 1. At this moment, CA triggers the scale-out of 10 machines in the node pool. The background judgment process is as follows:
2.1 Based on the deployment status of the existing nodes, it is expected to scale out 5 machines respectively in Availability Zones 2 and 3.
2.2 Based on the subnet sequence, identify the subnet of currently operated availability zone, namely Subnet 2.
2.2.1 Check the real-time inventory status of all models, and scale out 1 node. Then repeat this process.
2.2.2 After the scale-out in Availability Zone 2 is completed, proceed to Step 2.2 and switch the subnet of the availability zone to be scaled out currently to Subnet 3.
Scenario 3: Manually increase the number of node pools when auto-scaling is disabled
At this time, the default scale-out policy is Distribute among multiple availability zones, and the principle is as same as that of Scenario 2.
Ajuda e Suporte
Esta página foi útil?
Você também pode entrar em contato com a Equipe de vendas ou Enviar um tíquete em caso de ajuda.
comentários